TOYOTA TACOMA 2017 Owners Manual (in English)
TACOMA 2017
TOYOTA
TOYOTA
https://www.carmanualsonline.info/img/14/43001/w960_43001-0.png
TOYOTA TACOMA 2017 Owners Manual (in English)
Trending: climate control, wheel size, differential, trunk, compression ratio, sport mode, CD changer
Page 491 of 640
4917-3. Do-it-yourself maintenance
7
Maintenance and care
Light bulbs
Check the wattage of the light bulb to be replaced. (→P. 580)
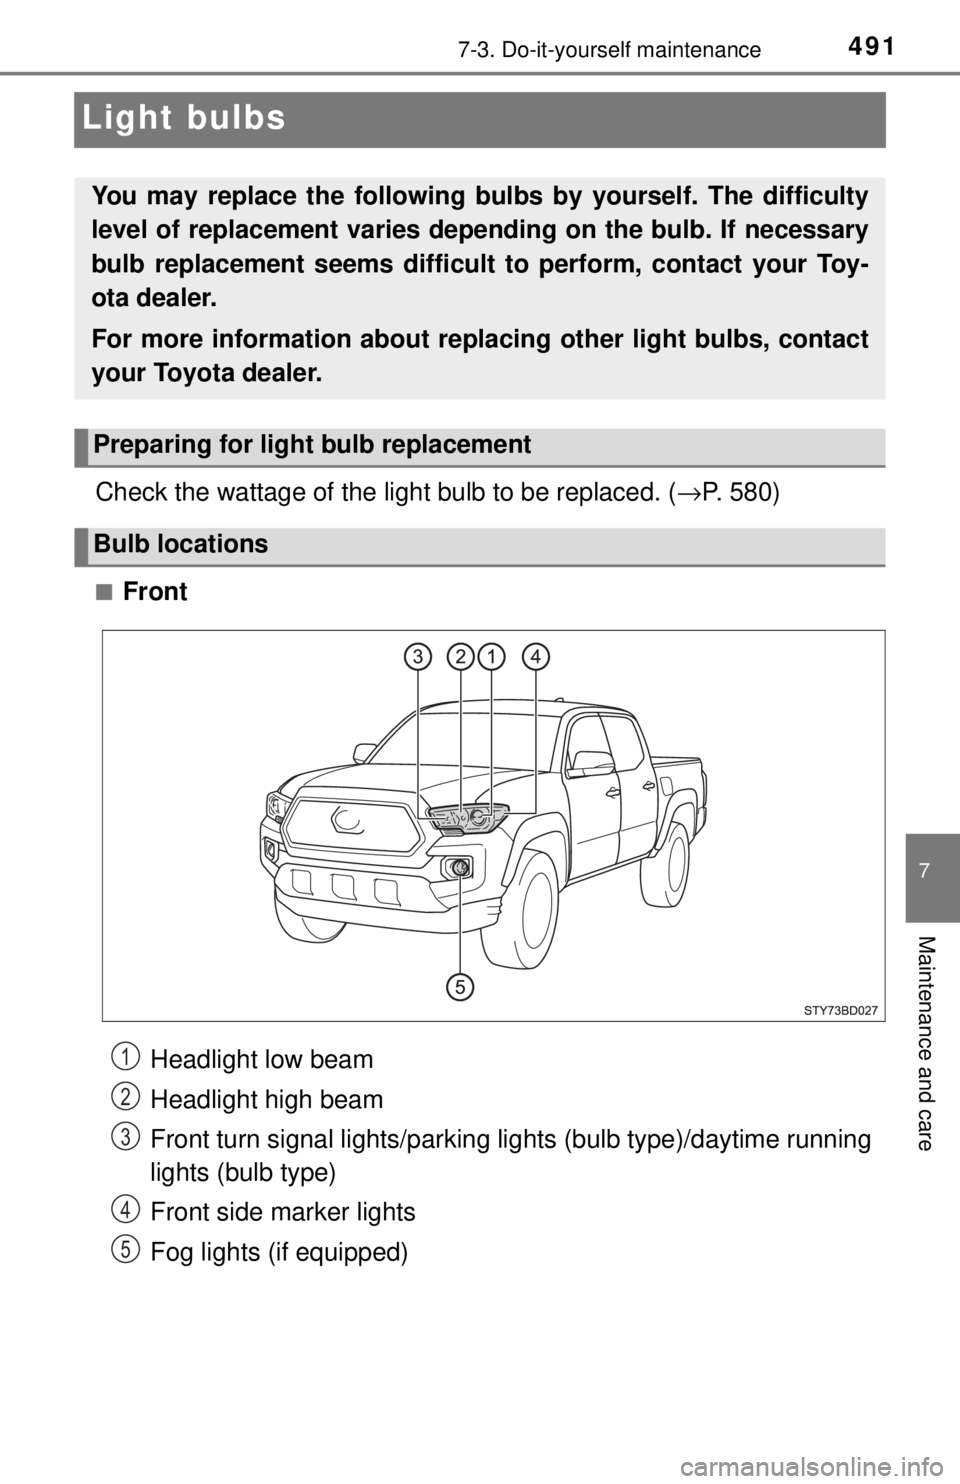
■Front
You may replace the following bulbs by yourself. The difficulty
level of replacement varies de pending on the bulb. If necessary
bulb replacement seems difficult to perform, contact your Toy-
ota dealer.
For more information about replacing other light bulbs, contact
your Toyota dealer.
Preparing for light bulb replacement
Bulb locations
Headlight low beam
Headlight high beam
Front turn signal lights/parking li ghts (bulb type)/daytime running
lights (bulb type)
Front side marker lights
Fog lights (if equipped)1
2
3
4
5
Page 492 of 640
4927-3. Do-it-yourself maintenance
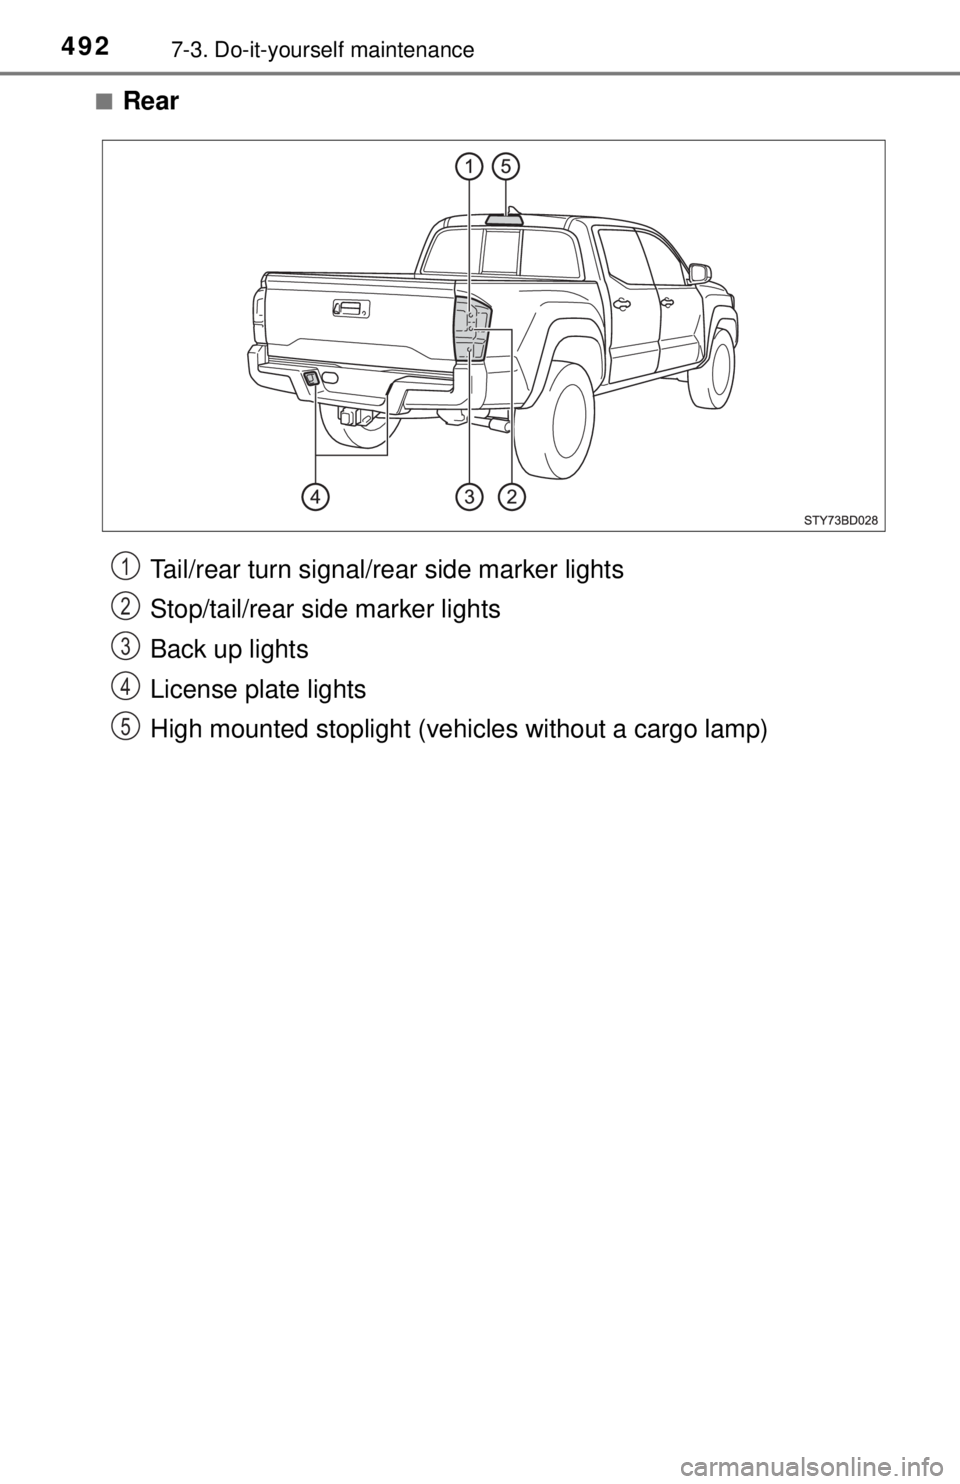
■Rear
Tail/rear turn signal/rear side marker lights
Stop/tail/rear side marker lights
Back up lights
License plate lights
High mounted stoplight (vehicles without a cargo lamp)1
2
3
4
5
Page 493 of 640
4937-3. Do-it-yourself maintenance
7
Maintenance and care
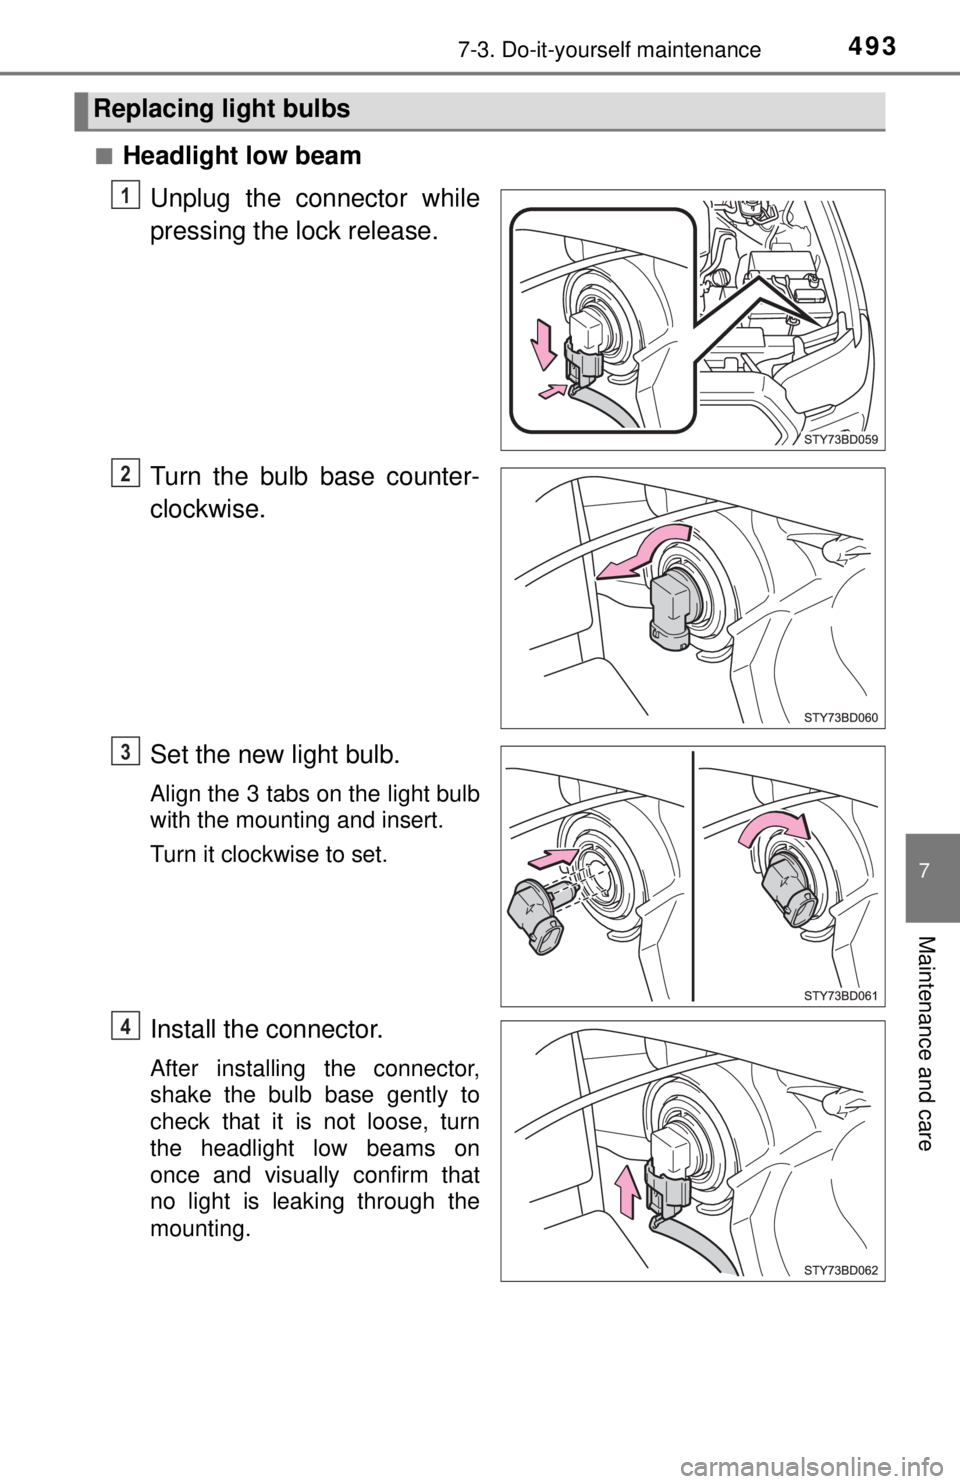
■Headlight low beamUnplug the connector while
pressing the lock release.
Turn the bulb base counter-
clockwise.
Set the new light bulb.
Align the 3 tabs on the light bulb
with the mounting and insert.
Turn it clockwise to set.
Install the connector.
After installing the connector,
shake the bulb base gently to
check that it is not loose, turn
the headlight low beams on
once and visually confirm that
no light is leaking through the
mounting.
Replacing light bulbs
1
2
3
4
Page 494 of 640
4947-3. Do-it-yourself maintenance
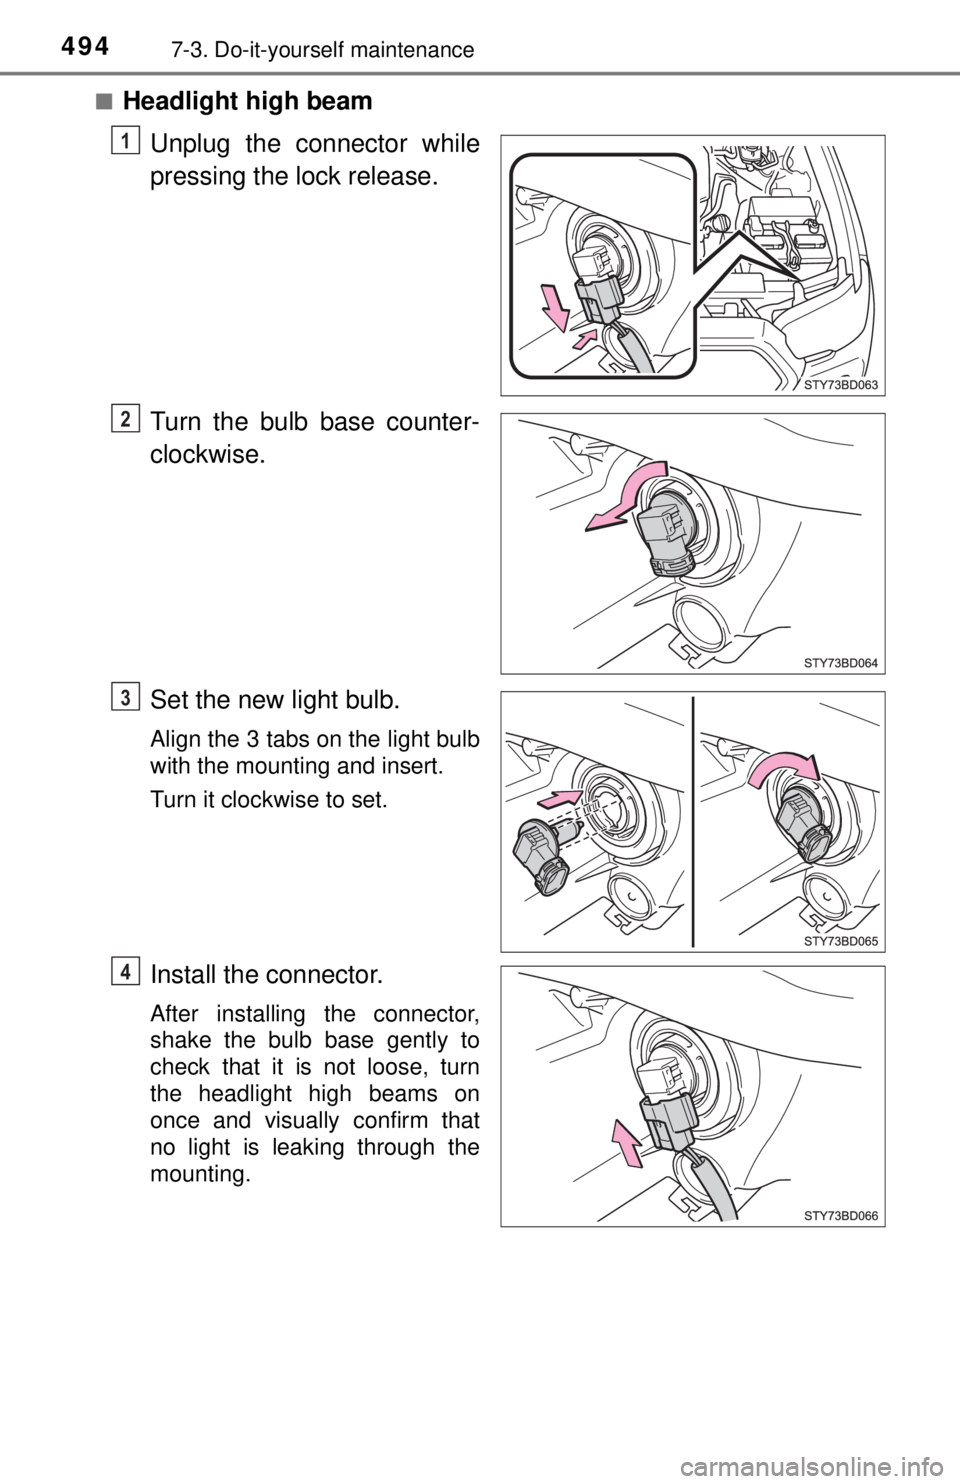
■Headlight high beamUnplug the connector while
pressing the lock release.
Turn the bulb base counter-
clockwise.
Set the new light bulb.
Align the 3 tabs on the light bulb
with the mounting and insert.
Turn it clockwise to set.
Install the connector.
After installing the connector,
shake the bulb base gently to
check that it is not loose, turn
the headlight high beams on
once and visually confirm that
no light is leaking through the
mounting.
1
2
3
4
Page 495 of 640
4957-3. Do-it-yourself maintenance
7
Maintenance and care
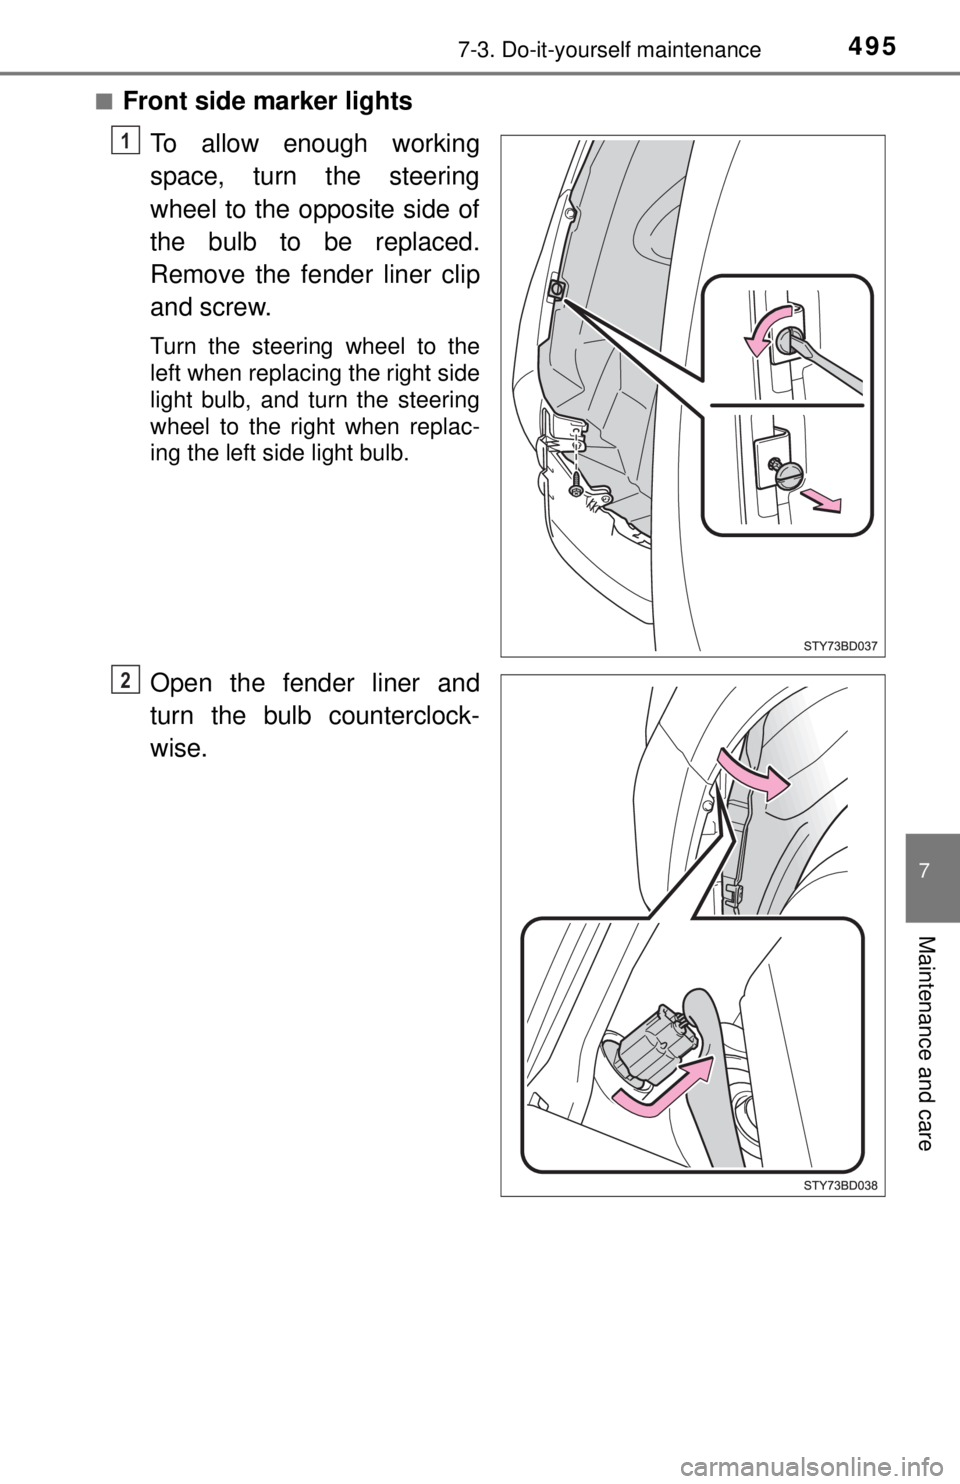
■Front side marker lightsTo allow enough working
space, turn the steering
wheel to the opposite side of
the bulb to be replaced.
Remove the fender liner clip
and screw.
Turn the steering wheel to the
left when replacing the right side
light bulb, and turn the steering
wheel to the right when replac-
ing the left side light bulb.
Open the fender liner and
turn the bulb counterclock-
wise.
1
2
Page 496 of 640
4967-3. Do-it-yourself maintenance
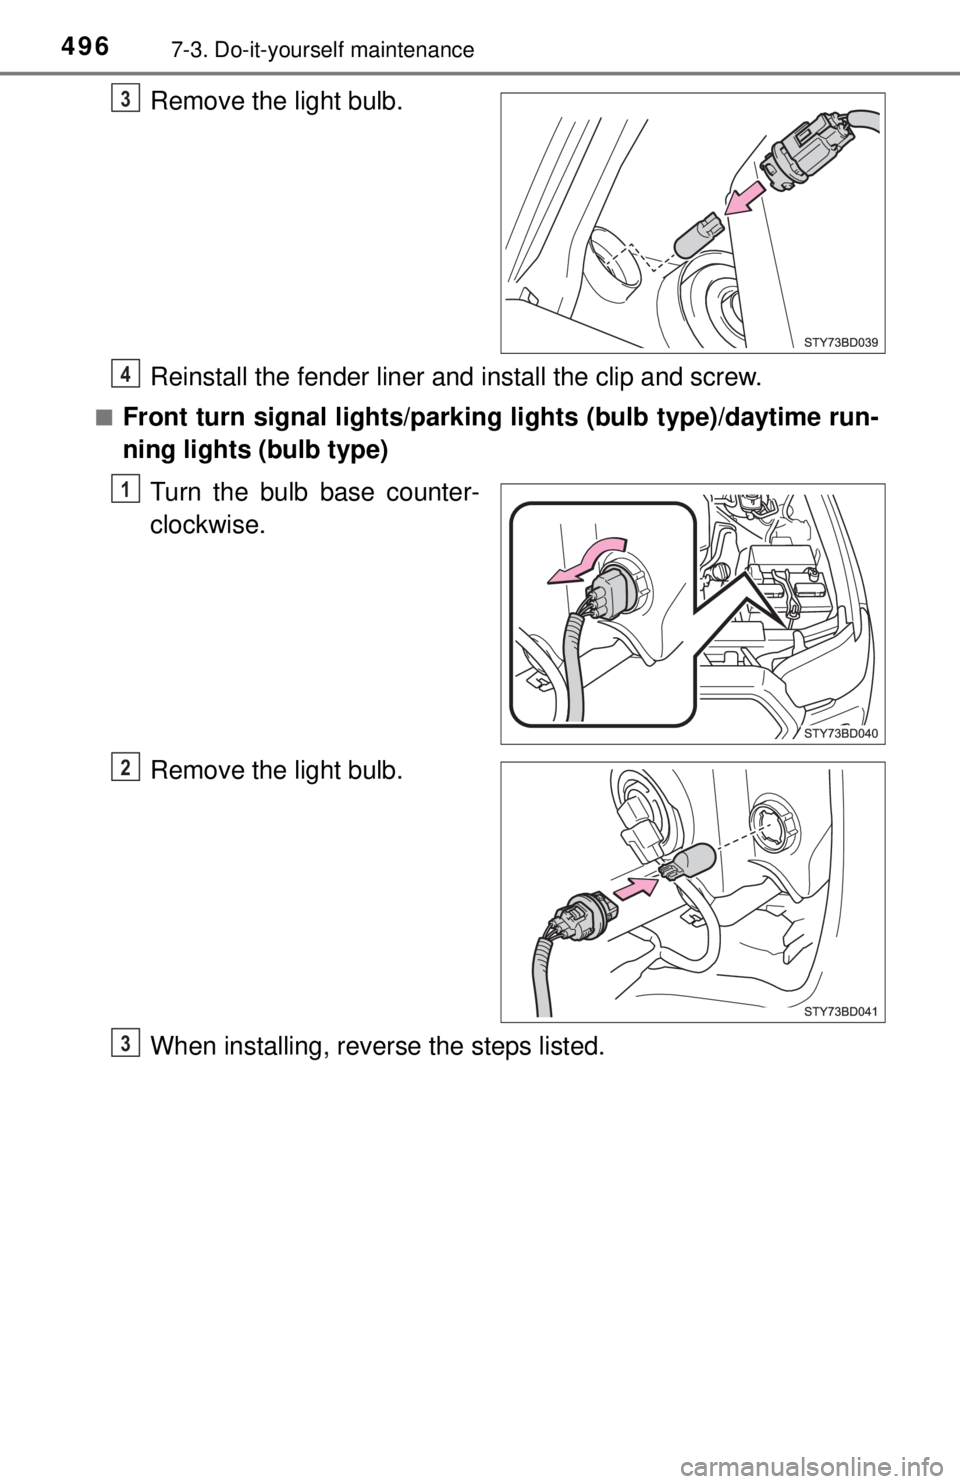
Remove the light bulb.
Reinstall the fender liner and install the clip and screw.
■Front turn signal lights/parking lights (bulb type)/daytime run-
ning lights (bulb type)
Turn the bulb base counter-
clockwise.
Remove the light bulb.
When installing, reve rse the steps listed.
3
4
1
2
3
Page 497 of 640
4977-3. Do-it-yourself maintenance
7
Maintenance and care
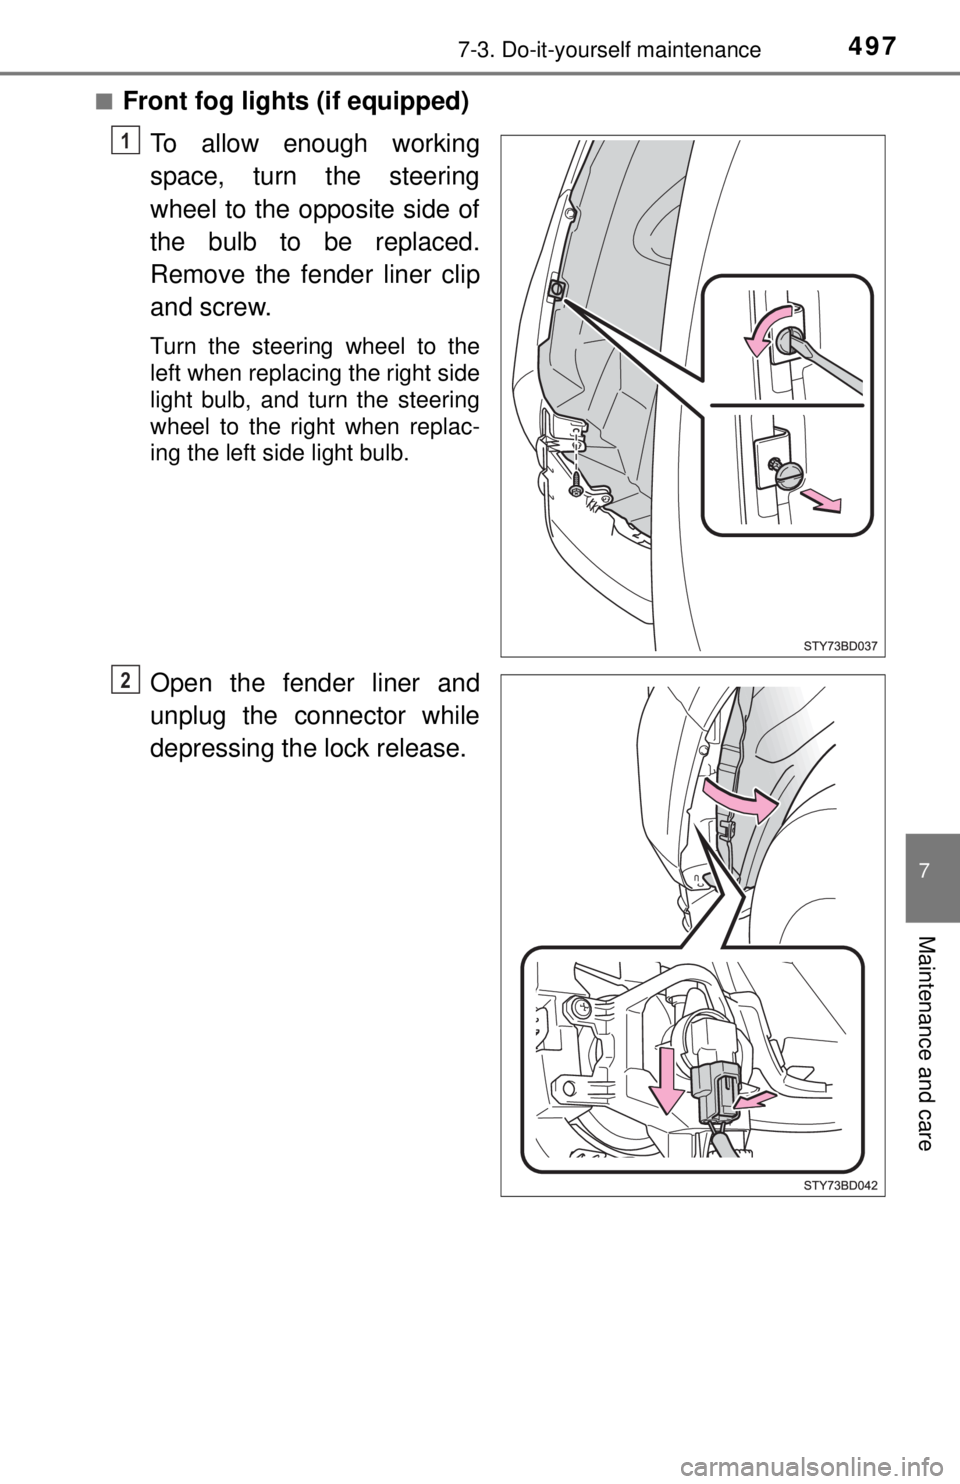
■Front fog lights (if equipped)To allow enough working
space, turn the steering
wheel to the opposite side of
the bulb to be replaced.
Remove the fender liner clip
and screw.
Turn the steering wheel to the
left when replacing the right side
light bulb, and turn the steering
wheel to the right when replac-
ing the left side light bulb.
Open the fender liner and
unplug the connector while
depressing the lock release.
1
2
Page 498 of 640
4987-3. Do-it-yourself maintenance
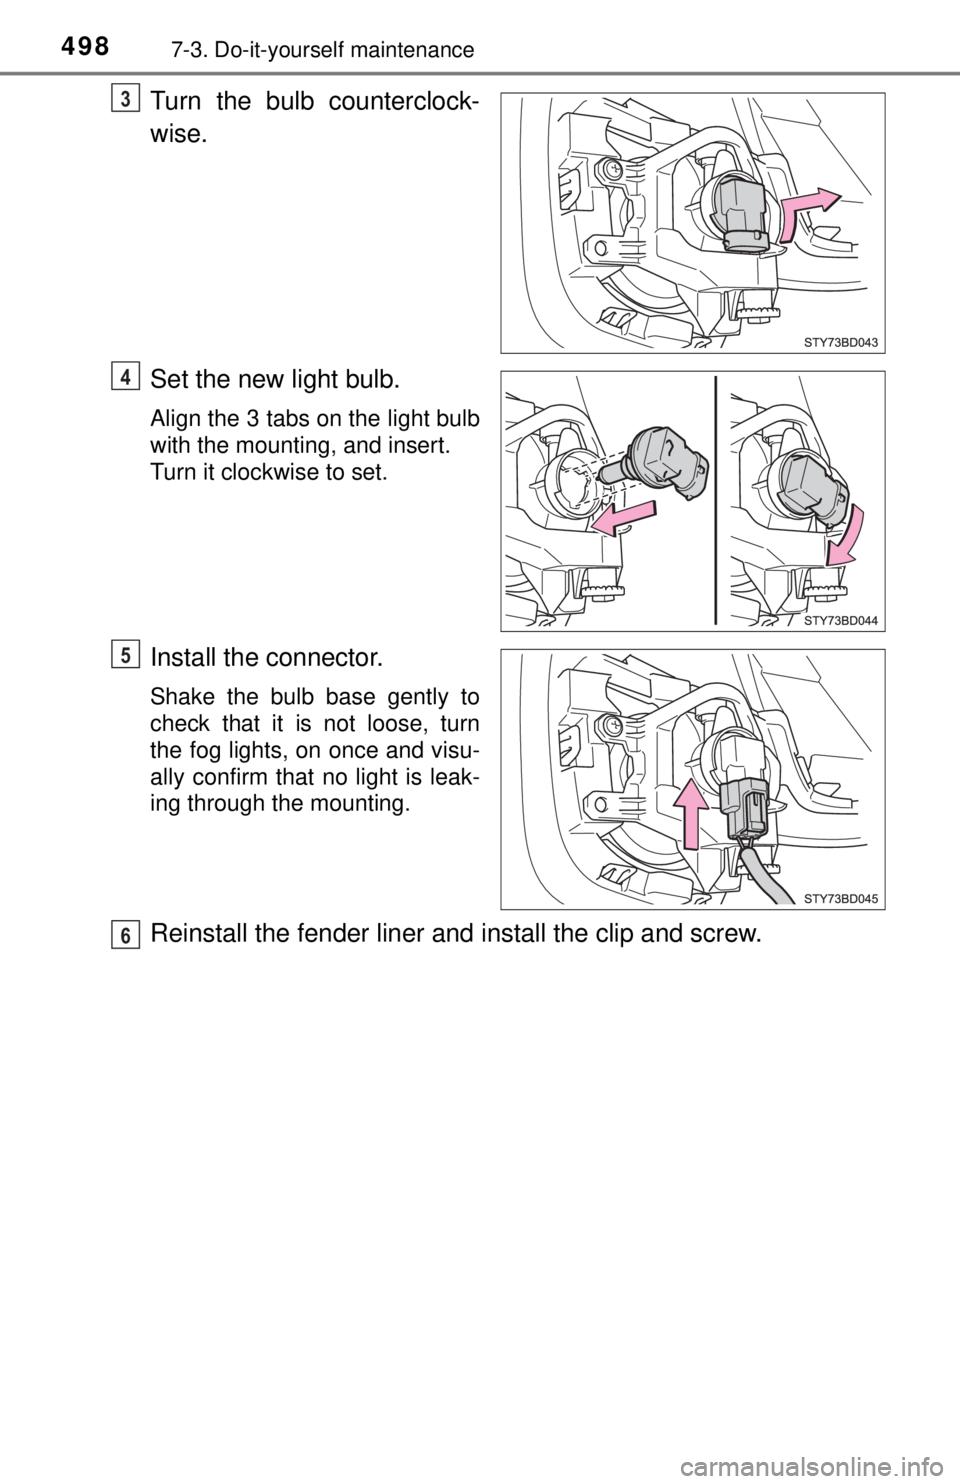
Turn the bulb counterclock-
wise.
Set the new light bulb.
Align the 3 tabs on the light bulb
with the mounting, and insert.
Turn it clockwise to set.
Install the connector.
Shake the bulb base gently to
check that it is not loose, turn
the fog lights, on once and visu-
ally confirm that no light is leak-
ing through the mounting.
Reinstall the fender liner and install the clip and screw.
3
4
5
6
Page 499 of 640
4997-3. Do-it-yourself maintenance
7
Maintenance and care
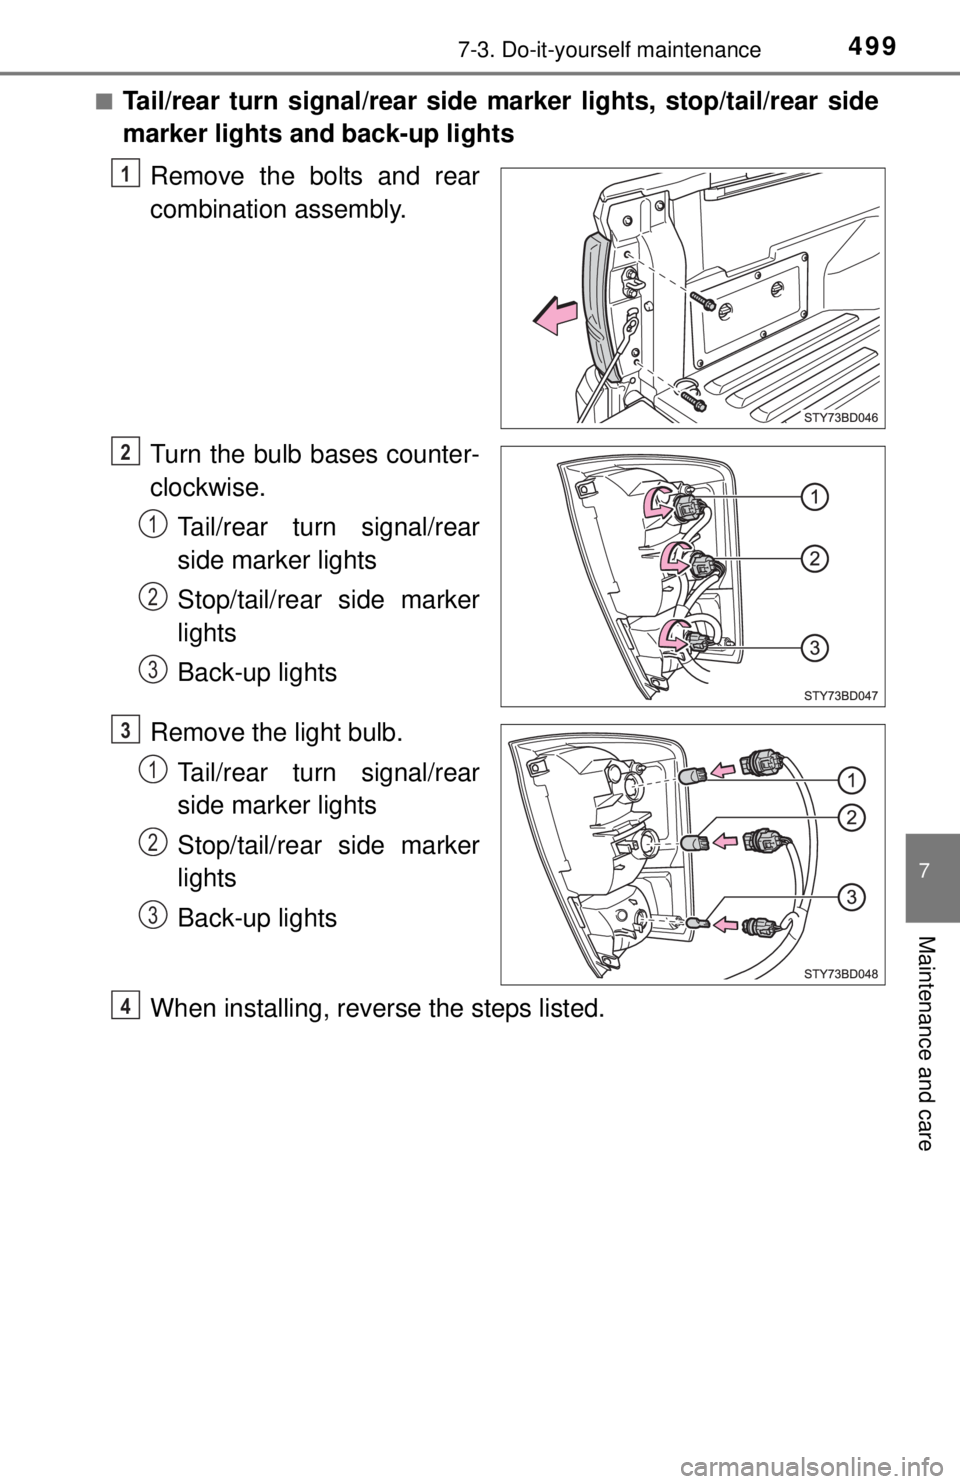
■Tail/rear turn signal/rear side marker lights, stop/tail/rear side
marker lights and back-up lights
Remove the bolts and rear
combination assembly.
Turn the bulb bases counter-
clockwise.Tail/rear turn signal/rear
side marker lights
Stop/tail/rear side marker
lights
Back-up lights
Remove the light bulb. Tail/rear turn signal/rear
side marker lights
Stop/tail/rear side marker
lights
Back-up lights
When installing, reve rse the steps listed.
1
2
1
2
3
3
1
2
3
4
Page 500 of 640
5007-3. Do-it-yourself maintenance
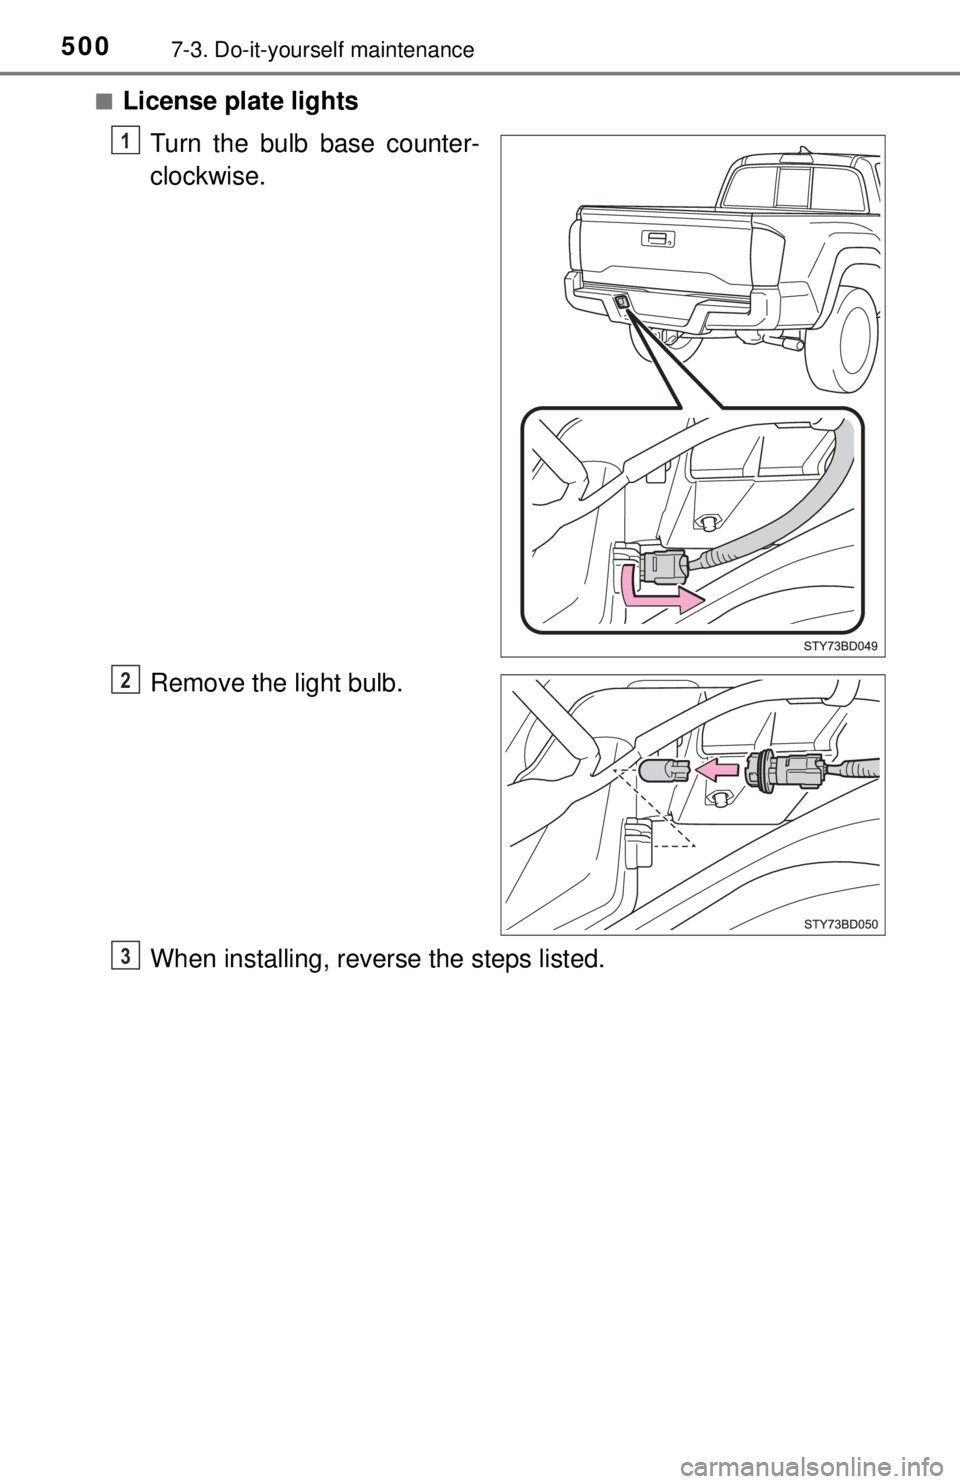
■License plate lightsTurn the bulb base counter-
clockwise.
Remove the light bulb.
When installing, reve rse the steps listed.
1
2
3
Trending: fuel cap, height, cruise control, start stop button, oil temperature, roof rack, coolant capacity
