headlights TOYOTA tC 2013 Owners Manual (in English)
[x] Cancel search | Manufacturer: TOYOTA, Model Year: 2013, Model line: tC, Model: TOYOTA tC 2013Pages: 484, PDF Size: 9.1 MB
Page 6 of 484
6
tC_OM_OM21042U_(U)
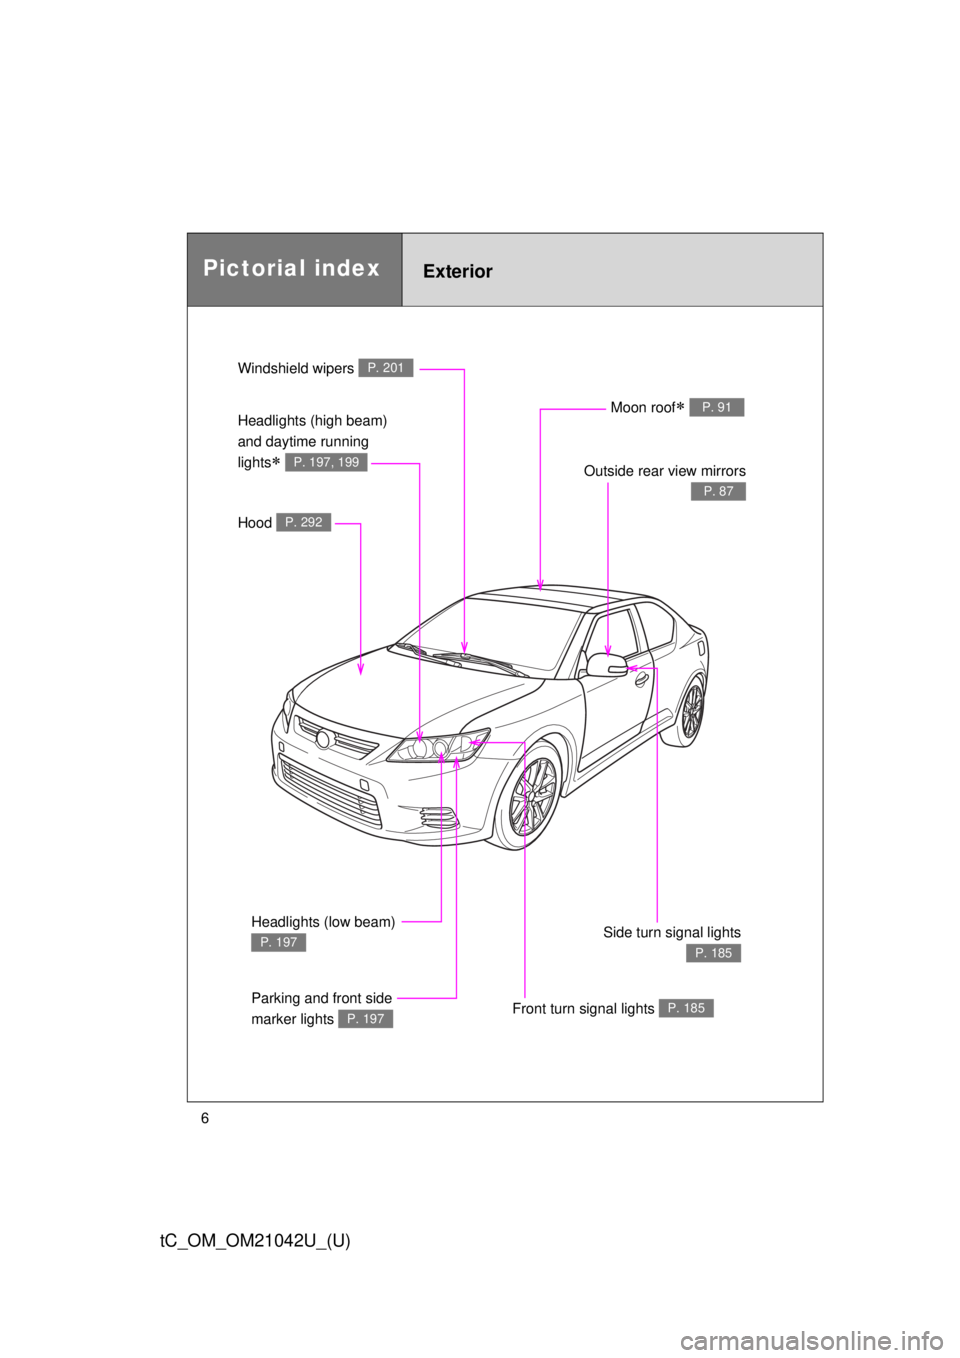
Front turn signal lights P. 185
Hood P. 292
Windshield wipers P. 201
Outside rear view mirrors
P. 87
Side turn signal lights
P. 185
Moon roof P. 91Headlights (high beam)
and daytime running
lights
P. 197, 199
Headlights (low beam)
P. 197
Parking and front side
marker lights
P. 197
Pictorial indexExterior
Page 86 of 484
86
1-3. Adjustable components (seats, mirrors, steering wheel)
tC_OM_OM21042U_(U)
Anti-glare inside rear view mirror
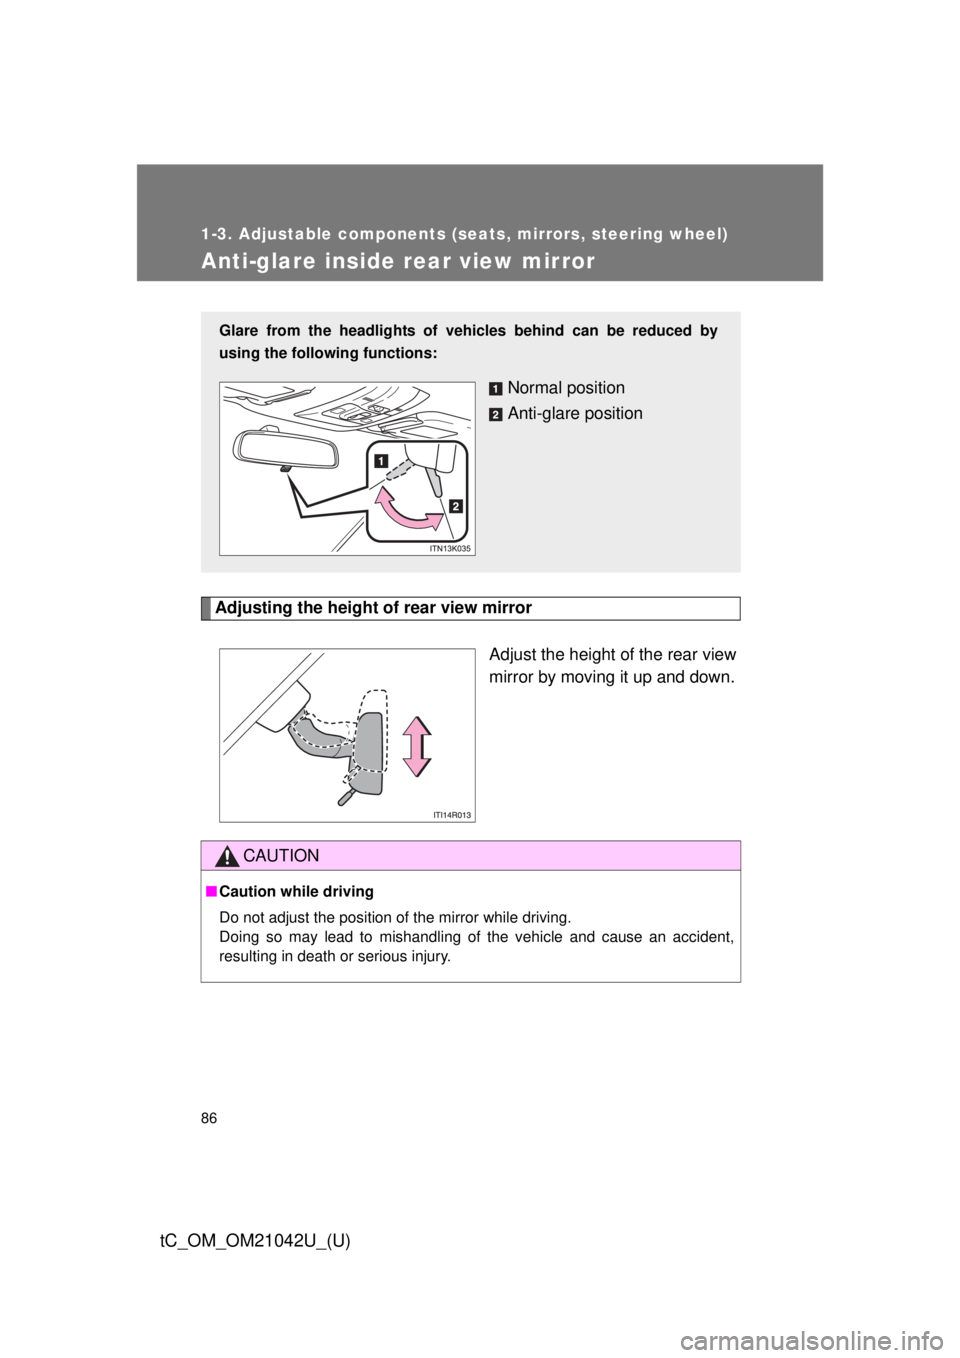
Adjusting the height of rear view mirrorAdjust the height of the rear view
mirror by moving it up and down.
Glare from the headlights of vehic les behind can be reduced by
using the following functions:
Normal position
Anti-glare position
CAUTION
■ Caution while driving
Do not adjust the position of the mirror while driving.
Doing so may lead to mishandling of the vehicle and cause an accident,
resulting in death or serious injury.
Page 197 of 484
197
2
When driving
tC_OM_OM21042U_(U)
2-3. Operating the lights and Windshield wipers
Headlight switch
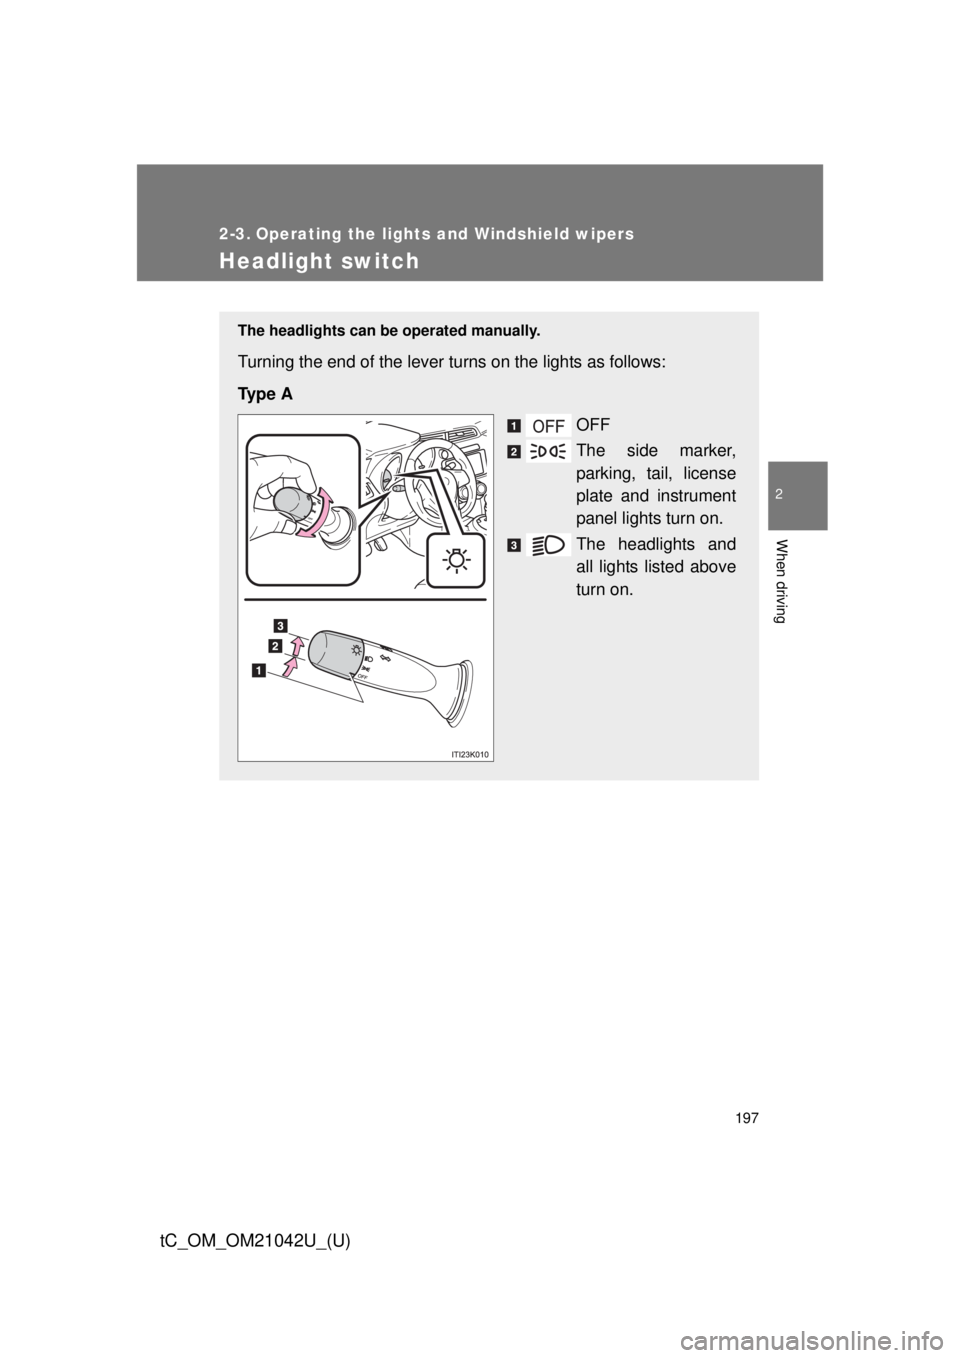
The headlights can be operated manually.
Turning the end of the lever turns on the lights as follows:
Ty p e AOFF
The side marker,
parking, tail, license
plate and instrument
panel lights turn on.
The headlights and
all lights listed above
turn on.
Page 198 of 484
198 2-3. Operating the lights and Windshield wipers
tC_OM_OM21042U_(U)
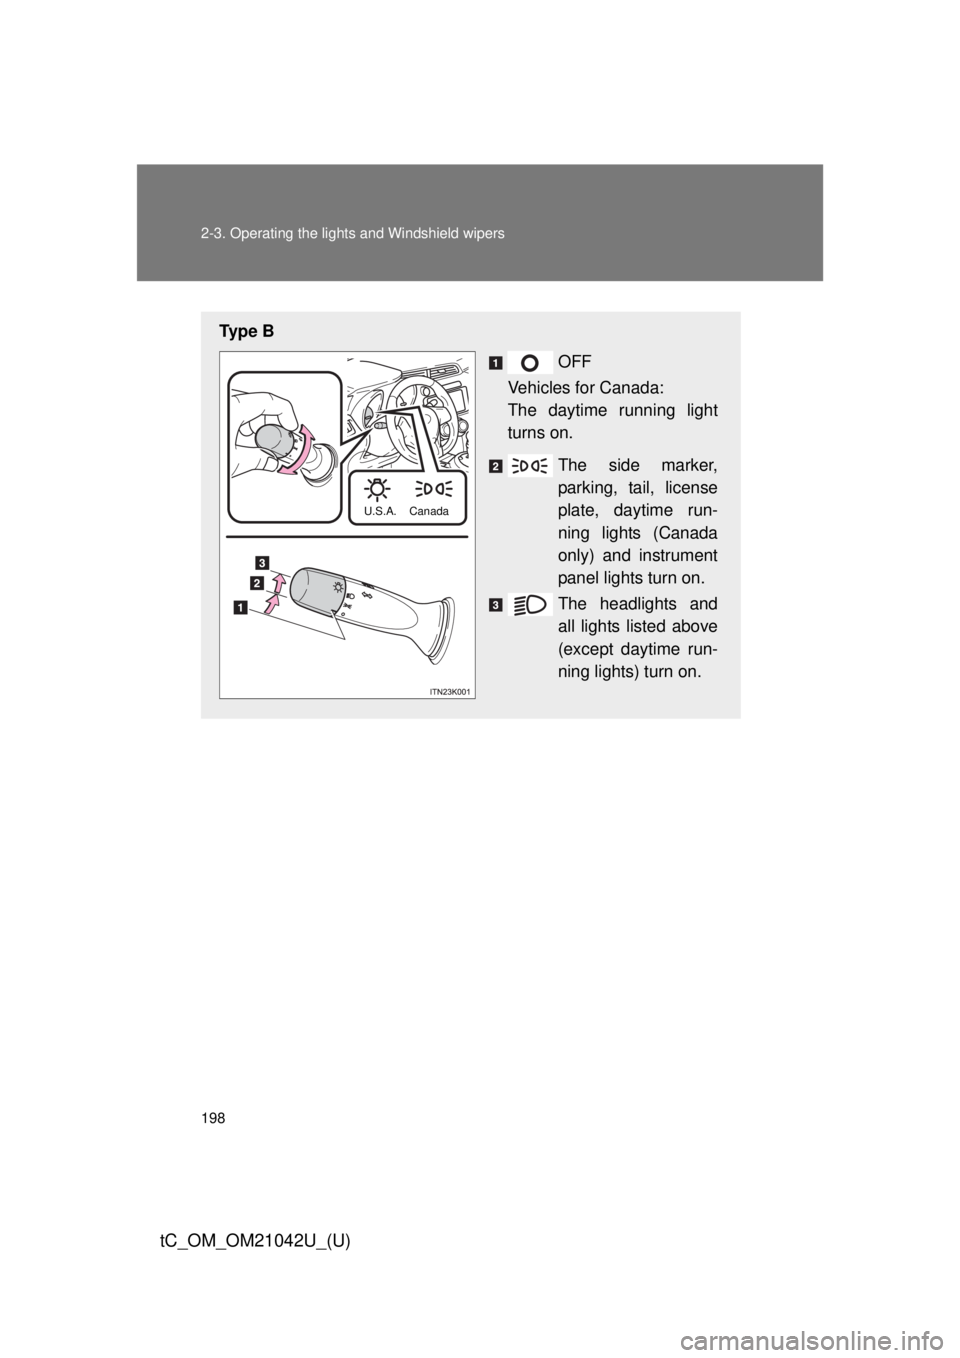
Ty p e BOFF
Vehicles for Canada:
The daytime running light
turns on.
The side marker,
parking, tail, license
plate, daytime run-
ning lights (Canada
only) and instrument
panel lights turn on.
The headlights and
all lights listed above
(except daytime run-
ning lights) turn on.
U.S.A. Canada
Page 199 of 484
199
2-3. Operating the lights and Windshield wipers
2
When driving
tC_OM_OM21042U_(U)
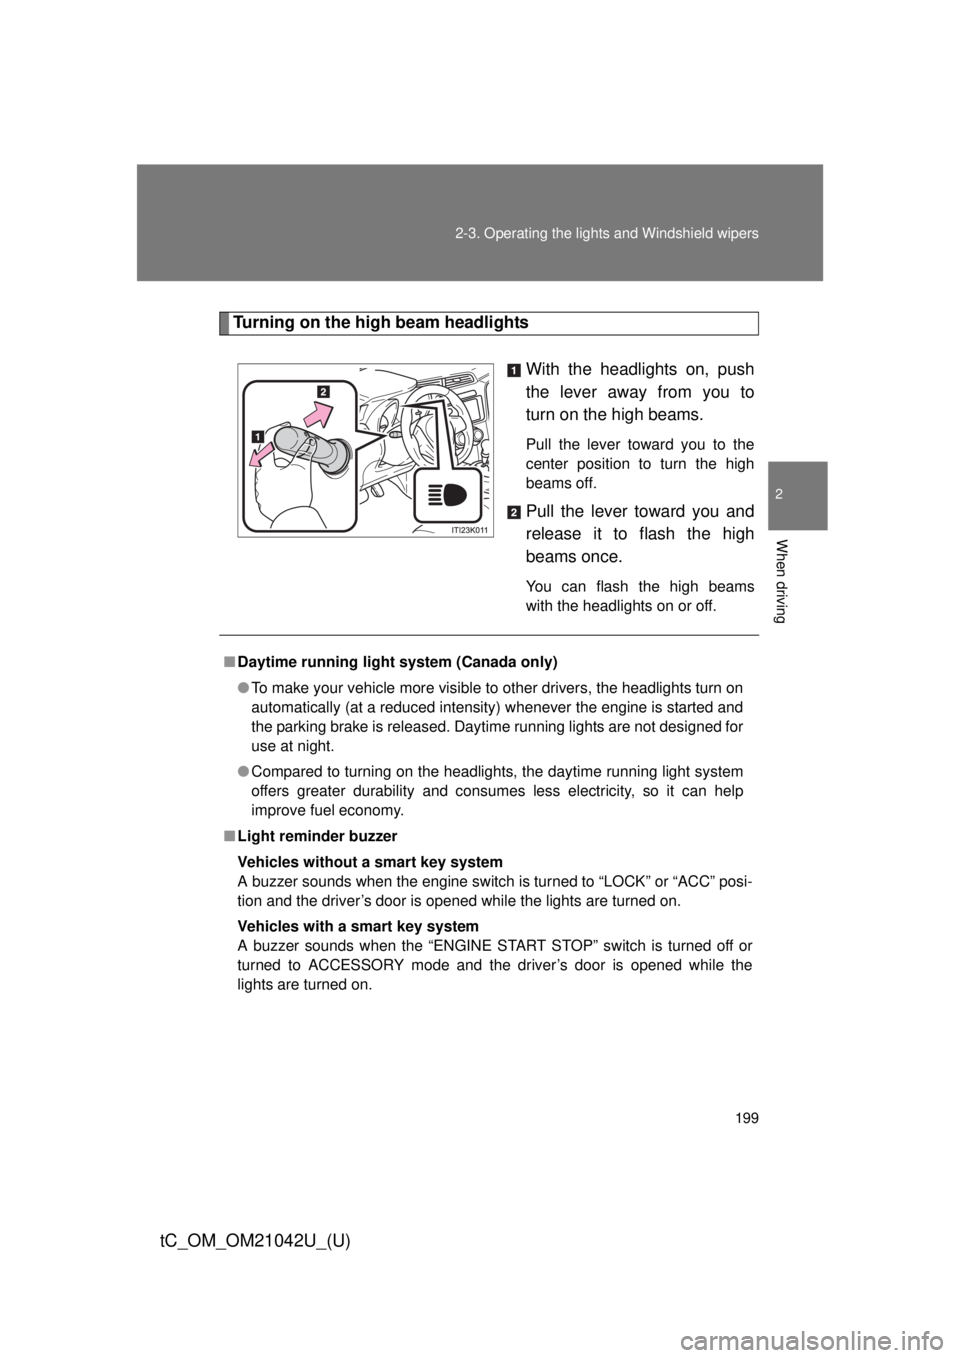
Turning on the high beam headlights
With the headlights on, push
the lever away from you to
turn on the high beams.
Pull the lever toward you to the
center position to turn the high
beams off.
Pull the lever toward you and
release it to flash the high
beams once.
You can flash the high beams
with the headlights on or off.
■Daytime running light system (Canada only)
● To make your vehicle more visible to other drivers, the headlights turn on
automatically (at a reduced intensity) whenever the engine is started and
the parking brake is released. Daytime running lights are not designed for
use at night.
● Compared to turning on the headlights, the daytime running light system
offers greater durability and consumes less electricity, so it can help
improve fuel economy.
■ Light reminder buzzer
Vehicles without a smart key system
A buzzer sounds when the engine switch is turned to “LOCK” or “ACC” posi-
tion and the driver’s door is opened while the lights are turned on.
Vehicles with a smart key system
A buzzer sounds when the “ENGINE START STOP” switch is turned off or
turned to ACCESSORY mode and the driver’s door is opened while the
lights are turned on.
Page 338 of 484
338 4-3. Do-it-yourself maintenance
tC_OM_OM21042U_(U)
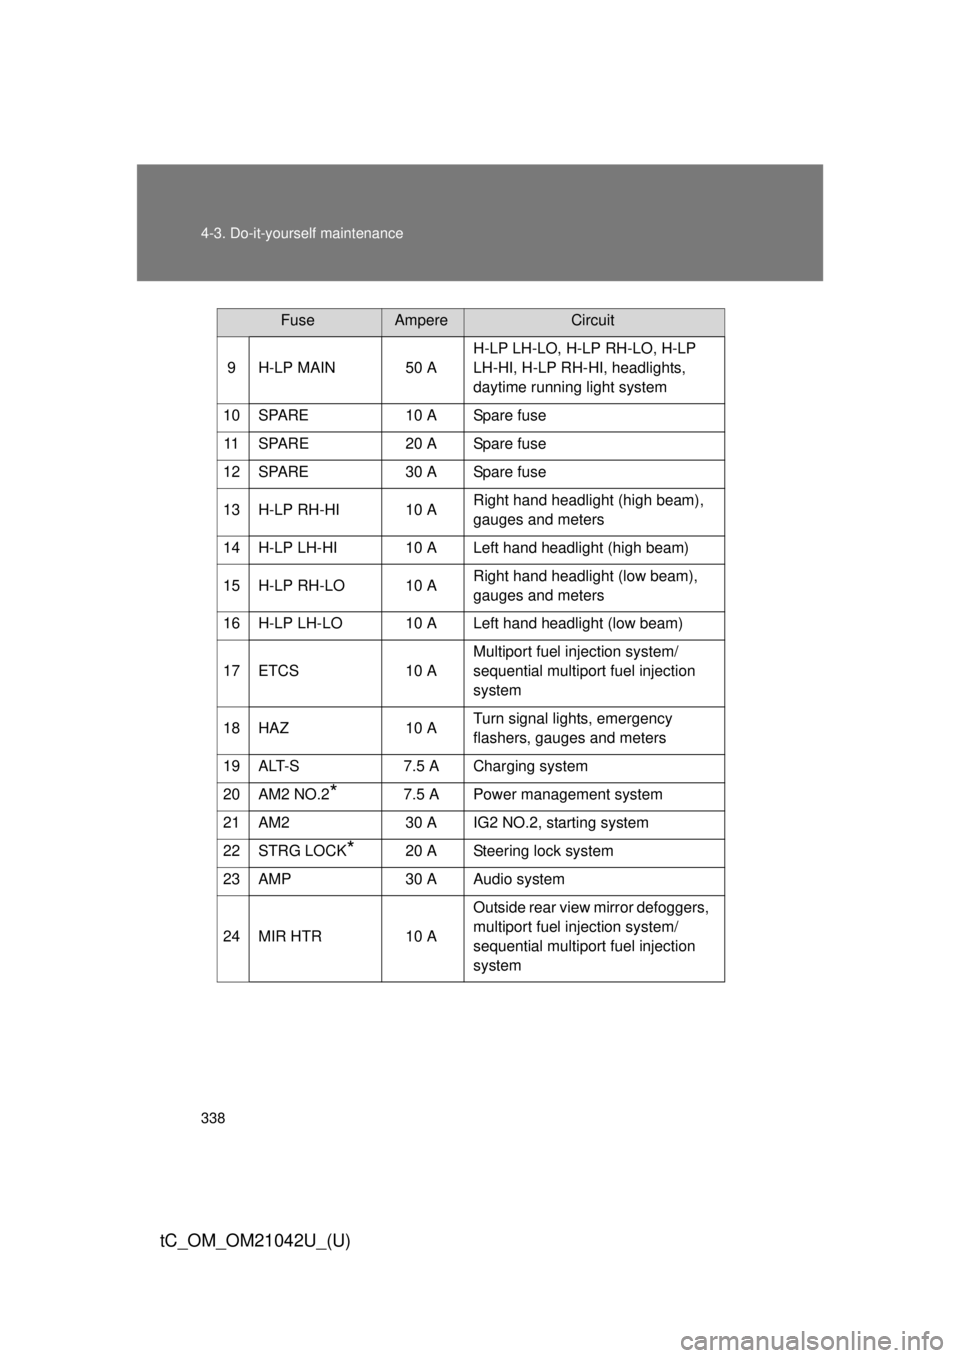
9 H-LP MAIN 50 AH-LP LH-LO, H-LP RH-LO, H-LP
LH-HI, H-LP RH-HI, headlights,
daytime running light system
10 SPARE 10 A Spare fuse
11 SPARE 20 A Spare fuse
12 SPARE 30 A Spare fuse
13 H-LP RH-HI 10 A Right hand headlight (high beam),
gauges and meters
14 H-LP LH-HI 10 A Left hand headlight (high beam)
15 H-LP RH-LO 10 A Right hand headlight (low beam),
gauges and meters
16 H-LP LH-LO 10 A Left hand headlight (low beam)
17 ETCS 10 A Multiport fuel injection system/
sequential multiport fuel injection
system
18 HAZ 10 A Turn signal lights, emergency
flashers, gauges and meters
19 ALT-S 7.5 A Charging system
20 AM2 NO.2
*7.5 A Power management system
21 AM2 30 A IG2 NO.2, starting system
22 STRG LOCK
*20 A Steering lock system
23 AMP 30 A Audio system
24 MIR HTR 10 A Outside rear view mirror defoggers,
multiport fuel injection system/
sequential multiport fuel injection
system
FuseAmpereCircuit
Page 354 of 484
354 4-3. Do-it-yourself maintenance
tC_OM_OM21042U_(U)
■LED lights
The side turn signal lights and high mounted stoplight consist of a number of
LEDs. If any of the LEDs burn out, take your vehicle to your Scion dealer to
have the light replaced.
■ Condensation build-up on the inside of the lens
Contact your Scion dealer for more information in the following situations.
Temporary condensation build-up on the inside of the headlight lens does
not indicate a malfunction.
● Large drops of water have built up on the inside of the lens.
● Water has built up inside the headlight.
CAUTION
■Replacing light bulbs
● Turn off the lights. Do not attempt to replace the bulb immediately after
turning off the lights.
The bulbs become very hot and may cause burns.
● Do not touch the glass portion of the light bulb with bare hands. Hold the
bulb by the plastic or metal portion.
If the bulb is scratched or dropped, it may blow out or crack.
● Fully install light bulbs and any parts used to secure them. Failing to do so
may result in heat damage, fire, or water entering the headlight unit. This
may damage the headlights or cause condensation to build up on the lens.
■ To prevent damage or fire
Make sure bulbs are fully seated and locked.
Page 400 of 484
400
5-2. Steps to take in an emergency
tC_OM_OM21042U_(U)
If the engine will not star t
If the engine will not start even though correct starting procedures
are being followed ( P. 163, 167), consider each of the following
points:
■ The engine will not start even though the starter motor
operates normally.
One of the following may be the cause of the problem:
●There may not be sufficient fuel in the vehicle’s tank.
Refuel the vehicle.
● The engine may be flooded.
Try to restart the engine again following correct starting proce-
dures. ( P. 163, 167)
● Vehicles with an engine immobilizer system: There may be a
malfunction in the engine immobilizer system. (P. 100)
■ The starter motor turns over slowly, the interior lights and
headlights are dim, or the horn does not sound or sounds at
a low volume.
One of the following may be the cause of the problem:
●The battery may be discharged. ( P. 409)
● The battery terminal connec tions may be loose or corroded.
■ The starter motor does not turn over (vehicles with a smart
key system)
The engine starting system may be malfunctioning due to an
electrical problem such as an open circuit or a blown fuse. How-
ever, an interim measure is available to start the engine.
( P. 402)
Page 401 of 484
5
When trouble arises
401
5-2. Steps to take in an emergency
tC_OM_OM21042U_(U)
■
The starter motor does not turn over, the interior lights and
headlights do not turn on, or the horn does not sound.
One of the following may be the cause of the problem:
● One or both of the battery terminals may be disconnected.
● The battery may be discharged. ( P. 409)
● There may be a malfunction in the steering lock system (vehi-
cles with a smart key system).
Contact your Scion dealer if the problem cannot be repaired, or if
repair procedures are unknown.
Page 410 of 484
410 5-2. Steps to take in an emergency
tC_OM_OM21042U_(U)
■Starting the engine when the battery is discharged (vehicles with an
automatic transmission)
The engine cannot be started by push-starting.
■ To prevent battery discharge
● Turn off the headlights and the audio system while the engine is turned
off.
● Turn off any unnecessary electrical components when the vehicle is run-
ning at a low speed for an extended period, such as in heavy traffic.
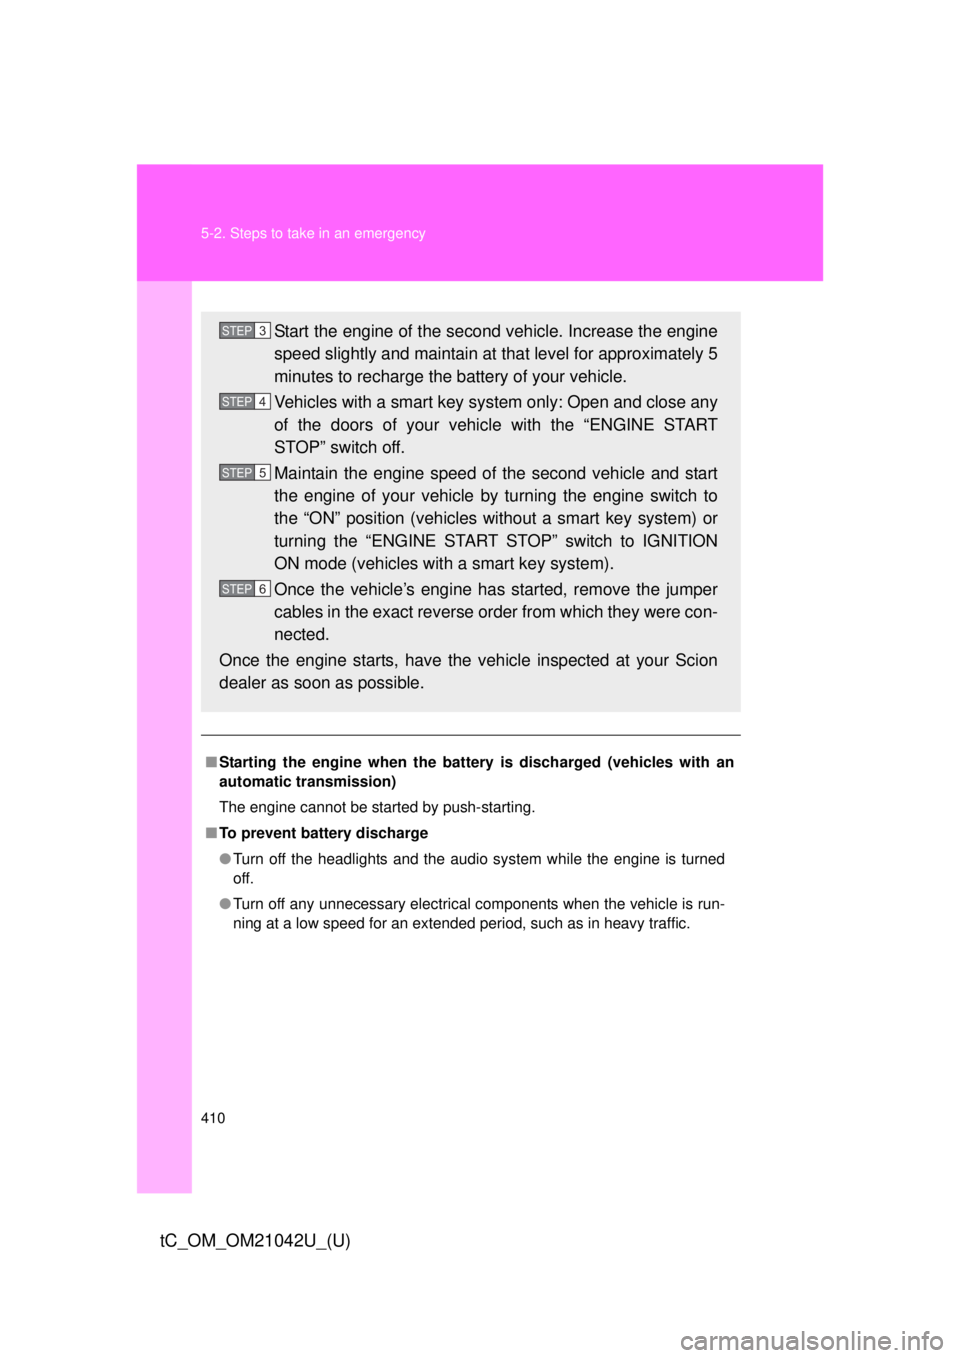
Start the engine of the second vehicle. Increase the engine
speed slightly and maintain at that level for approximately 5
minutes to recharge the battery of your vehicle.
Vehicles with a smart key system only: Open and close any
of the doors of your vehicle with the “ENGINE START
STOP” switch off.
Maintain the engine speed of the second vehicle and start
the engine of your vehicle by turning the engine switch to
the “ON” position (vehicles without a smart key system) or
turning the “ENGINE START STOP” switch to IGNITION
ON mode (vehicles with a smart key system).
Once the vehicle’s engine has started, remove the jumper
cables in the exact reverse order from which they were con-
nected.
Once the engine starts, have the vehicle inspected at your Scion
dealer as soon as possible.STEP 3
STEP 4
STEP 5
STEP 6