audio TOYOTA tC 2016 Accessories, Audio & Navigation (in English)
[x] Cancel search | Manufacturer: TOYOTA, Model Year: 2016, Model line: tC, Model: TOYOTA tC 2016Pages: 164, PDF Size: 6.21 MB
Page 64 of 164

1. BASIC INFORMATION BEFORE OPER ATION
3. REGISTERING AN ENTRY
REGISTERING A NEW E NTRY
6 C heck t h at the e n try is re gistered in the
“Favorites ” list.
REGISTERI NG FR OM THE
“Favor ites” SCREEN
1 Display th e “Pho ne” menu scre en a nd
select “F avorites ”. ( →P. 58)
2 Select “C rea te n ew e ntr y” .
3 Select o ne of 4 p hone ty pe s ( ,
, or ) an d e nte r
a numb er.
Y ou ca n en te r one p hon e numbe r f o r
e ach ph one ty pe.
4 Select .
5 Enter the entry n ame a nd th en select
“OK” .
Se lec t to dis pla y an d edi t the
e ntr y in format ion . ( → P.6 9)
R EGISTERING FAVOR ITES
FROM THE “ Dial” SC REEN
1 Displ ay th e “Ph one” m enu screen.
(→P. 58)
2 Select “Dial number ”.
3 En te r the num bers.
4 Select .
5 Fol low the st ep s “REGIS TERING
FROM THE “Favorite s”
SCREEN ” from “STEP 5”. (→ P.64)
INFORM ATION
The p hon e t yp e is re gis tere d a s .
Up to 200 numbers can be
registered in the “Favorites” list of
the Premium Audio System .
64
Page 65 of 164
1. BASIC INFORMATION BEFORE OPERATION
REGISTERING FAVORITES
FROM THE “Ph one b ook”
S C REEN
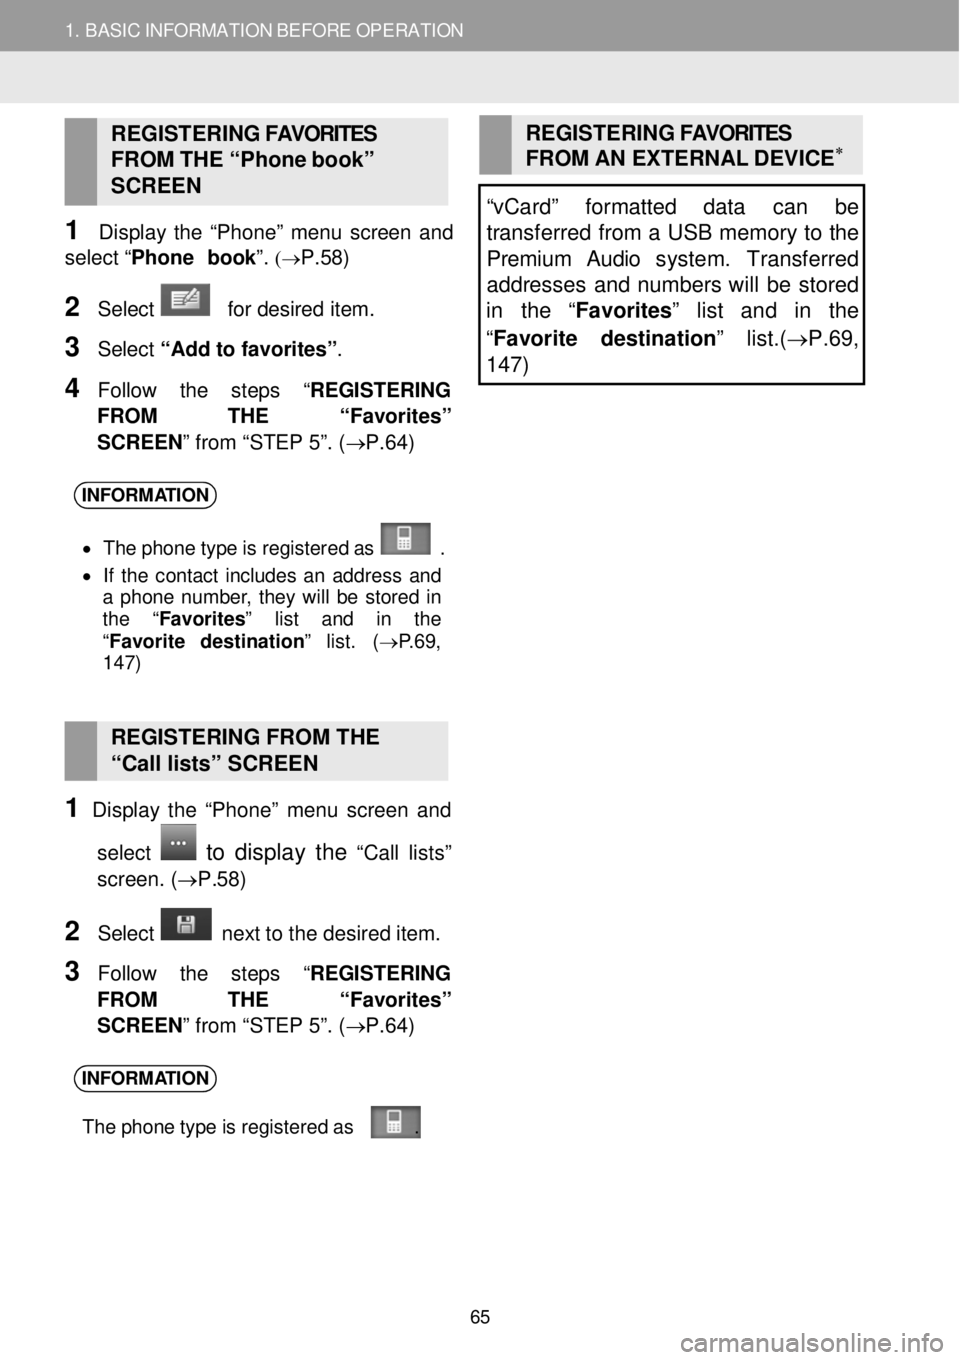
1 Disp lay th e “Pho ne” menu screen a nd
select “Phone b ook ”.
(→P. 58)
2 Sel ect for desired item.
3 Select “Add to favorites ”.
4 F ollow the st ep s “REGISTERING
FROM THE “Favorite s”
SCREEN ” from “STEP 5”. (→ P.64)
REGISTERING FAVORITES
FROM AN EXTERNAL DEVIC E∗
“vCard” formatted data can be
transferred from a U SB memory to the
Premium Audio s ystem. Tr ansfe rred
addresses and numbers will be stored
in the “Favorites” list and in the
“ Favorite destination ” list.(→P.69,
1 47)
INFORM ATION
• Th e p hon e t yp e is re gis tere d a s .
• If th e co ntact inc lu d es an a d dres s and
a ph on e numbe r, th ey w ill b e s tor ed in
t h e “Favorites” list and in the
“ Favo rite des tin ation ” lis t. (→ P.69 ,
1 47)
REGISTERING FROM THE
“Call lists” SCREEN
1 Disp lay th e “Pho ne” menu screen a nd
select
to display the “C all lists”
screen . (→P. 58)
2 Select n ext to the d esired item.
3 Follow the st ep s “REGISTERING
FROM THE “Favorite s”
SCREEN ” from “STEP 5”. (→ P.64)
INFORM ATION
The p hon e t yp e is re gis tere d a s .
65
Page 71 of 164
2. PHONE OPERATION 2. PHONE OPERATION
When is se lec ted , th e entr y is
r e gi ste re d in th e “F avori tes ” lis t o n the
“ Phon e” s creen . ( → P.6 9)
3 Se le ct the de sired entry.
4 C heck that the conne cting scre en is
displayed.
T o c ancel a c al l, s e le ct “ E nd call”.
1 Select “Call se nder” .
2 C heck that the conn ect ing scre en
i s displayed.
T o c ancel a c al l, s e le ct “ E nd call”.
1 Select
2 Check th at th e co nnecting screen is
displ ayed.
T o can ce l a ca ll, se lec t “End call”
BY A SHORT MESSAGE
The Premium Audio System offers
the feature to call the short
message sender’s phone number.
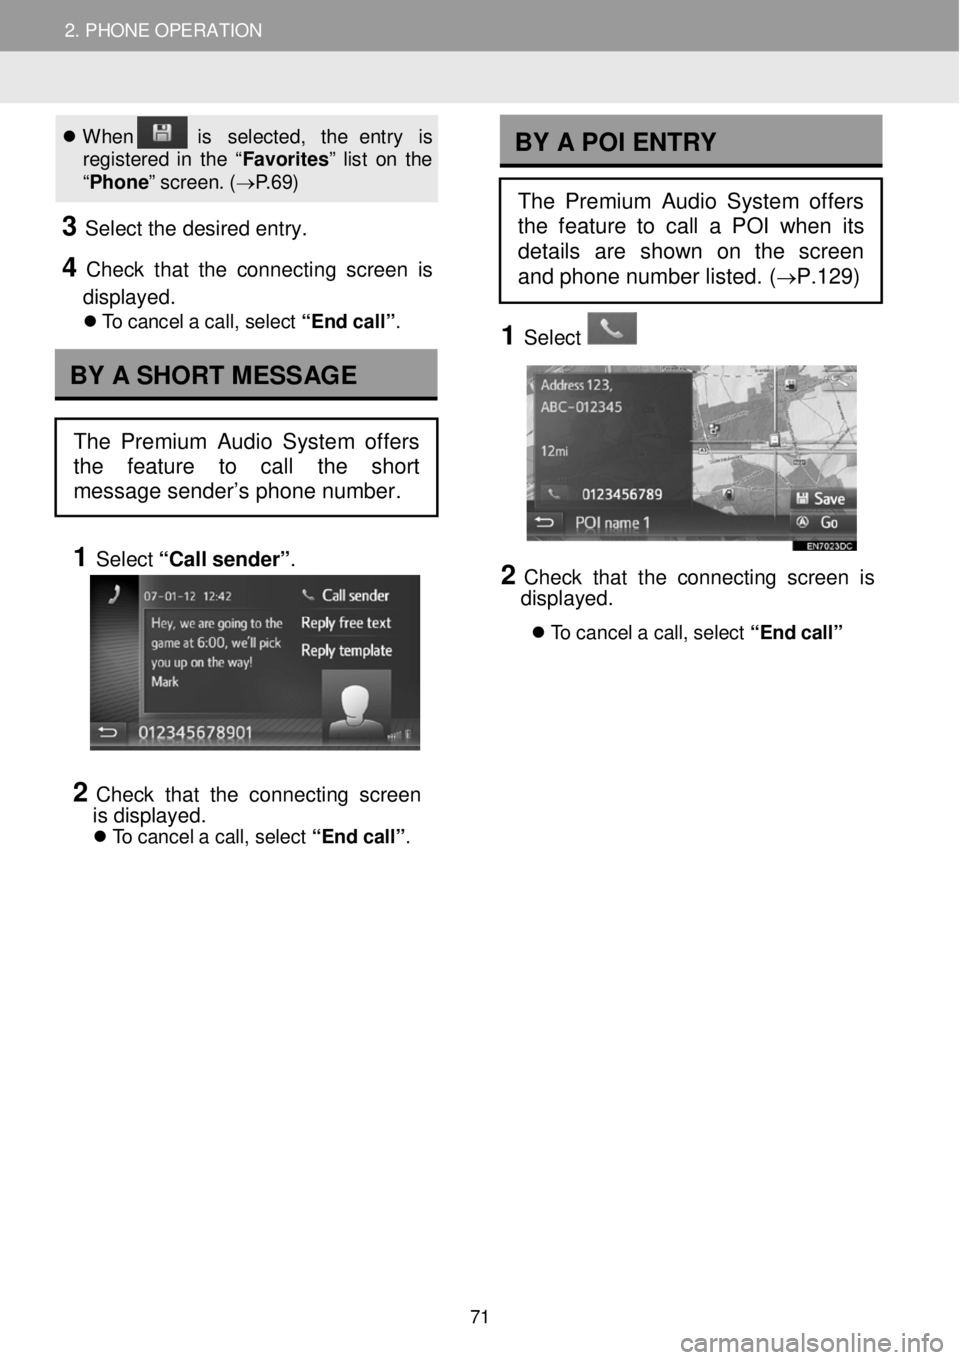
BY A POI ENTRY
The Premium Audio System offers
the feature to call a POI when its
details are shown on the screen
and phone number listed. (
→P.129)
71
Page 74 of 164
2. PHONE OPERATION 2. PHONE OPERATION
INFORMATION
• Wh en yo u chang e fro m a cel lu la r
phon e call to a han ds-fre e cal l, th e
h a nds -fr e e screen w ill be dis pla ye d
a nd th e ca ll ca n be controlled through
t h e scre en of the Premium Audio
system .
• D epen din g on th e ce llu la r ph on e
c onnec te d, th e Bl uetoo th
® conn ect io n
may be canc ele d if a nd whe n a c al l is
t r a ns fe rre d to th e ce llu la r phon e.
• Tra ns ferr in g me thods wi ll be d if f erent
de pend in g on th e typ e of ce llu la r
phon e whic h y o u have.
• Fo r th e oper atio n of th e ce llu la r
p h one, see th e man ual t hat co me s
wi th y our cel lu la r ph one.
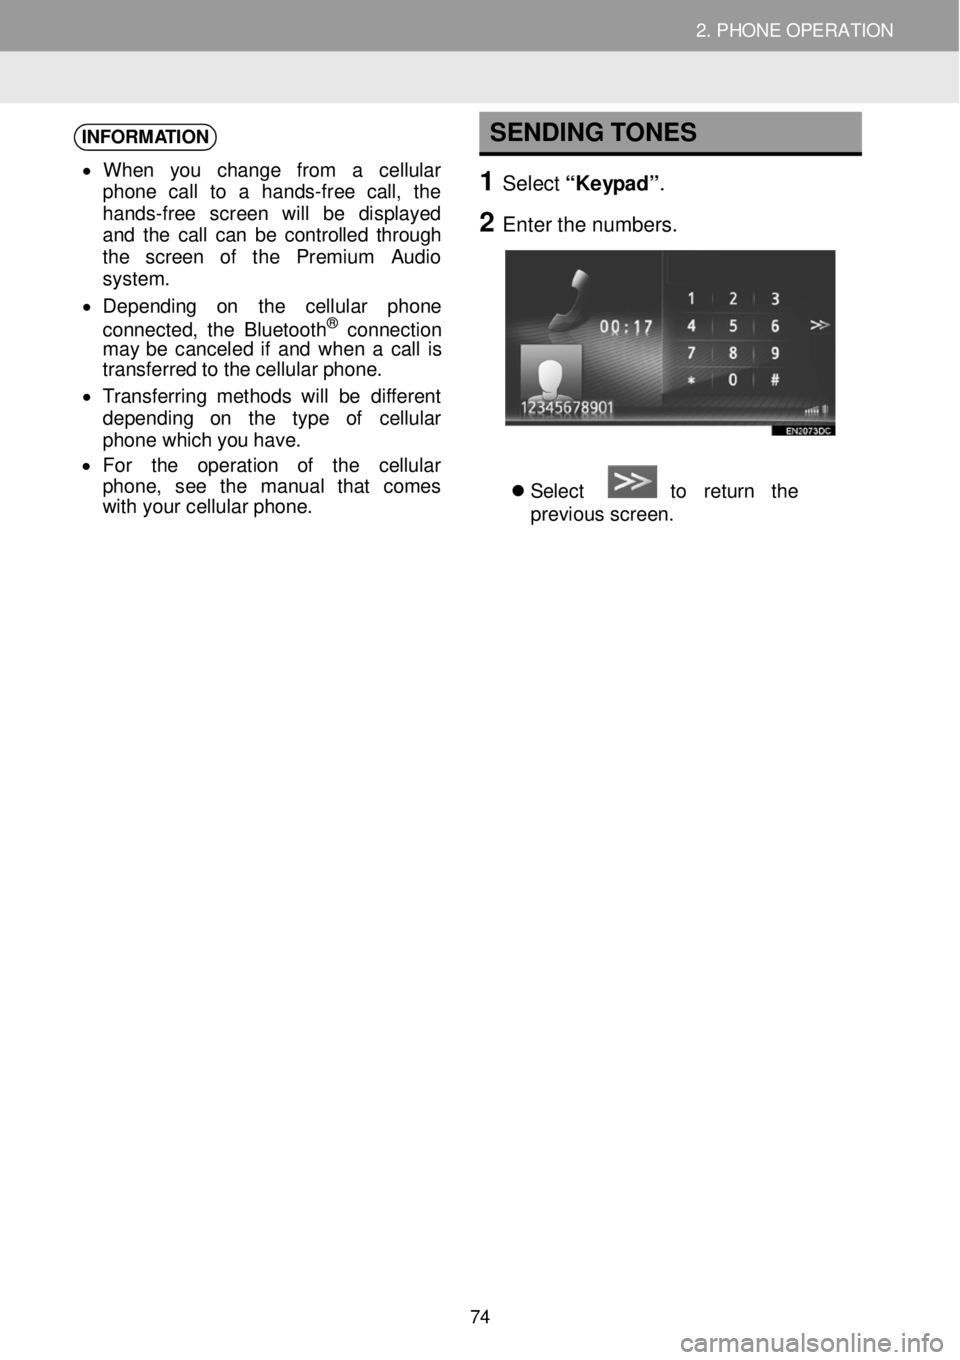
SENDING TONES
1 Select “Keypad” .
2 Enter t he numbe rs.
Select to re tu rn th e
previ ous sc re en.
74
Page 88 of 164
4
SETUP
1 SETUP OPERATION
1. Q UICK REFERENCE ..... ...... ..... ... 89
2. GENERAL SETTINGS. .... .......... ... 90
3 . DISPLAY SETTINGS…. .... ... .. .. ... 93
4. PHONE SETTIN GS..... ................ 95
5 . B lu eto ot h® SETTINGS........... ..... . 96
Bluetooth® FUNCTION ON/OFF... ..... 96
PAIRING A Bluetooth® DEVICE.. .. ..... 97
PAIRED DEVICE LIST….. .................. 101
EDITING THE SYSTEM NAME……. 102
SETTING PIN……………………… .... 102
6. AUDIO SETTINGS. .................... .. 103
7. VEHICLE SETTINGS……. .... ...... . 105
88
Page 89 of 164
1. SETUP OPERATION
1. QUICK REFERENCE
1. SETUP OPERATION
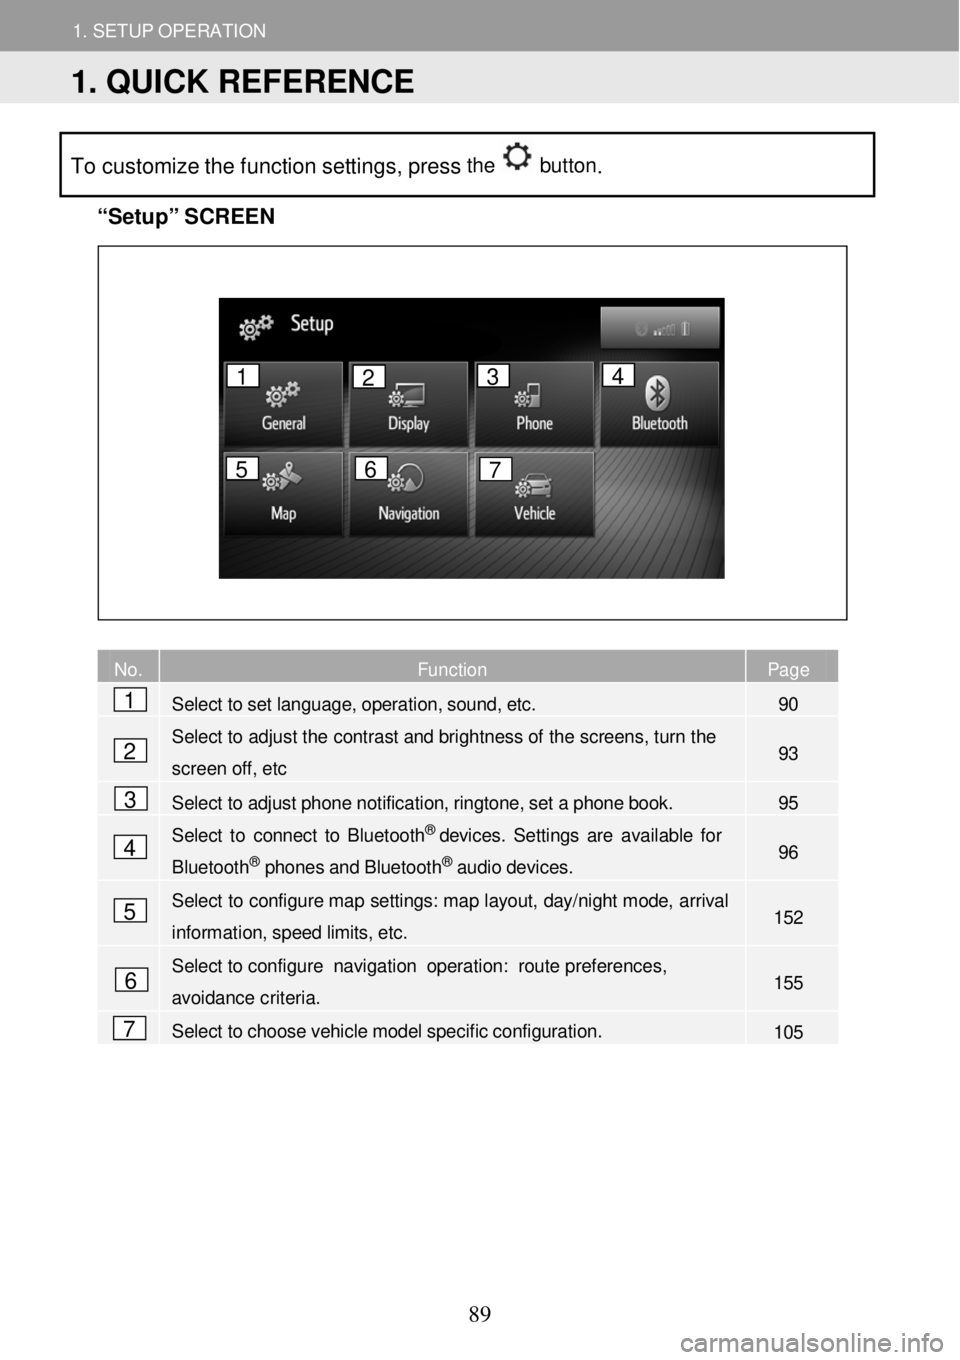
To customize the function settings, press the button.
“Se
tup” S C REEN
No. Function Page
Select to set language, operation, sound, etc. 90
Select to
adjust the contrast and bright ness of the sc reens, turn th e
screen off, etc 93
Select to adjust phone notification, ringtone, set a phone book. 95
Select to connect to B luetoot h® devices. Settin gs are available for
Bluetooth® phones and Bluetooth® audio devices. 96
Select to configure map se ttings: map layout, day/ night mode, ar rival
information, speed limits, etc. 152
Select to configu re navigation oper ation: route pr eferences,
avoidance criteria. 155
Select to choose vehicle model specific configuration. 105
No. Fu
1
2
3
4
5
6
7
1 2 3 4
5 6 7
1. QUICK REFERENCE
89
Page 91 of 164
1. SETUP OPERATION 1. SETUP OPERATION
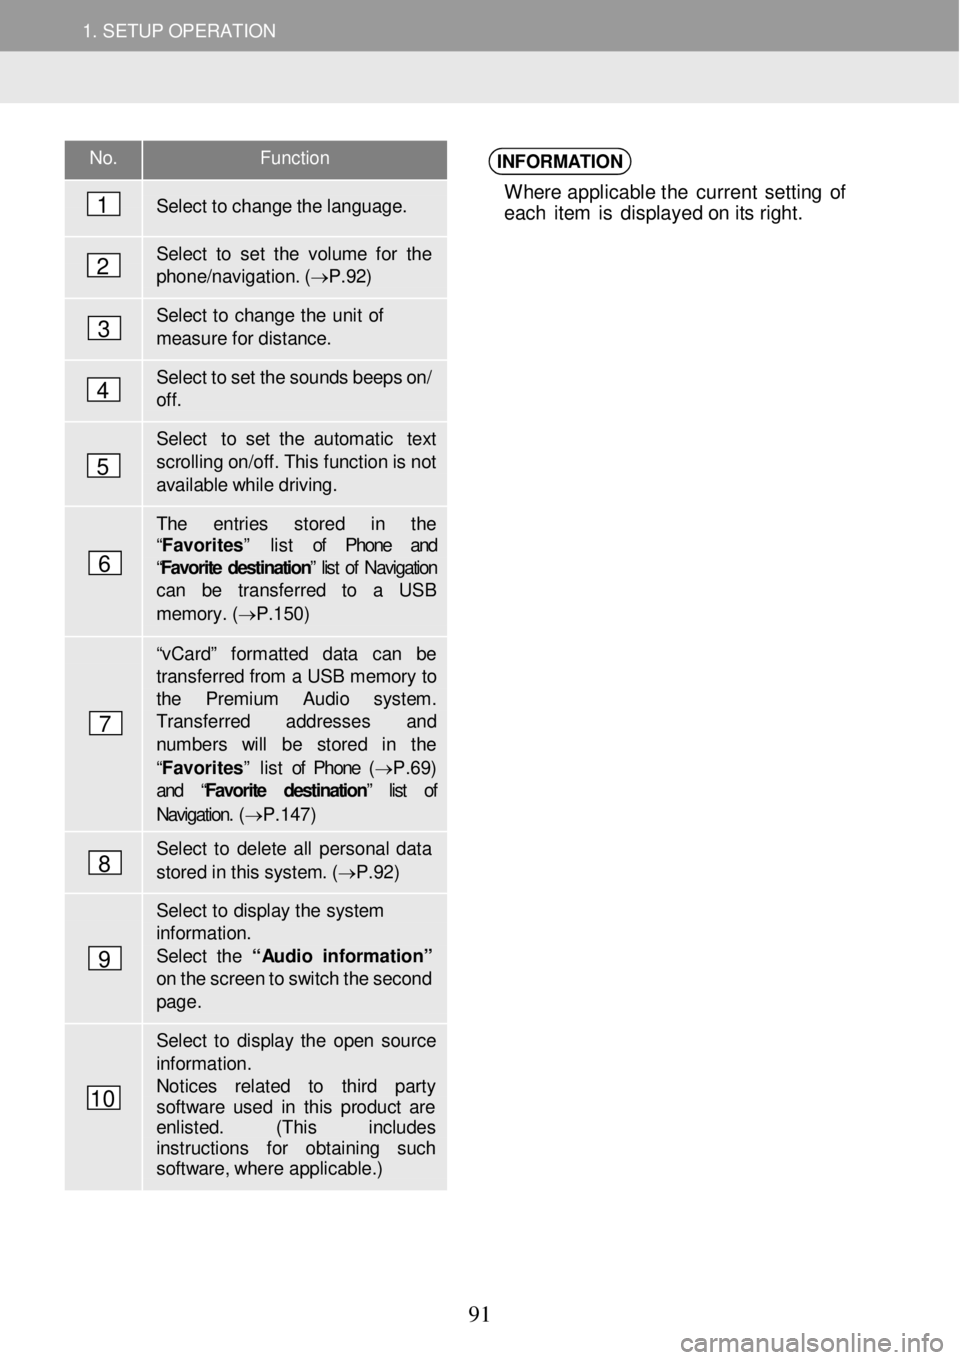
No. Function
Select to ch ange the language.
Select to set the vol ume for the phon e/navigation. ( → P.92)
Select to change the u nit of mea sure f o r dista nce.
Select to set the sounds b eeps o n/ off.
Select to set the a utomatic text
sc rolling on/of f. This functi on is n ot available while driving.
The entries s tored in the “Favorites” list of Phone and “Favorite destination ” list of Navigation can be transfer red to a USB
memor y. ( → P.1 50)
“v Ca rd” fo rmatted data can be transf erred from a USB memory to the Premium Audio syst em. Transfer red ad dresses and number s will be stored in the
“Favorites” list of Phone (→ P.69) and “ Favorite destination” list of
Navigation. ( → P.147)
Select to delet e all personal d ata
stored in this system. ( → P.92)
Select to di splay the system information. Select the “ Audio in for mati on” on the screen to switch the sec ond page .
Select to display the open so urce informat ion. Notices re lated to third party softwa re used in this p roduct ar e enlisted. (This includes instructions for obtai ning such softw are, whe re applicable.)
INFORMATION
Where applicable t he current se tting o f
eac h it e m is d isp lay ed o n i ts right.
1
2
3
4
5
6
7
8
9
10
91
Page 93 of 164
1. SETUP OPERATION 1. SETUP OPERATION
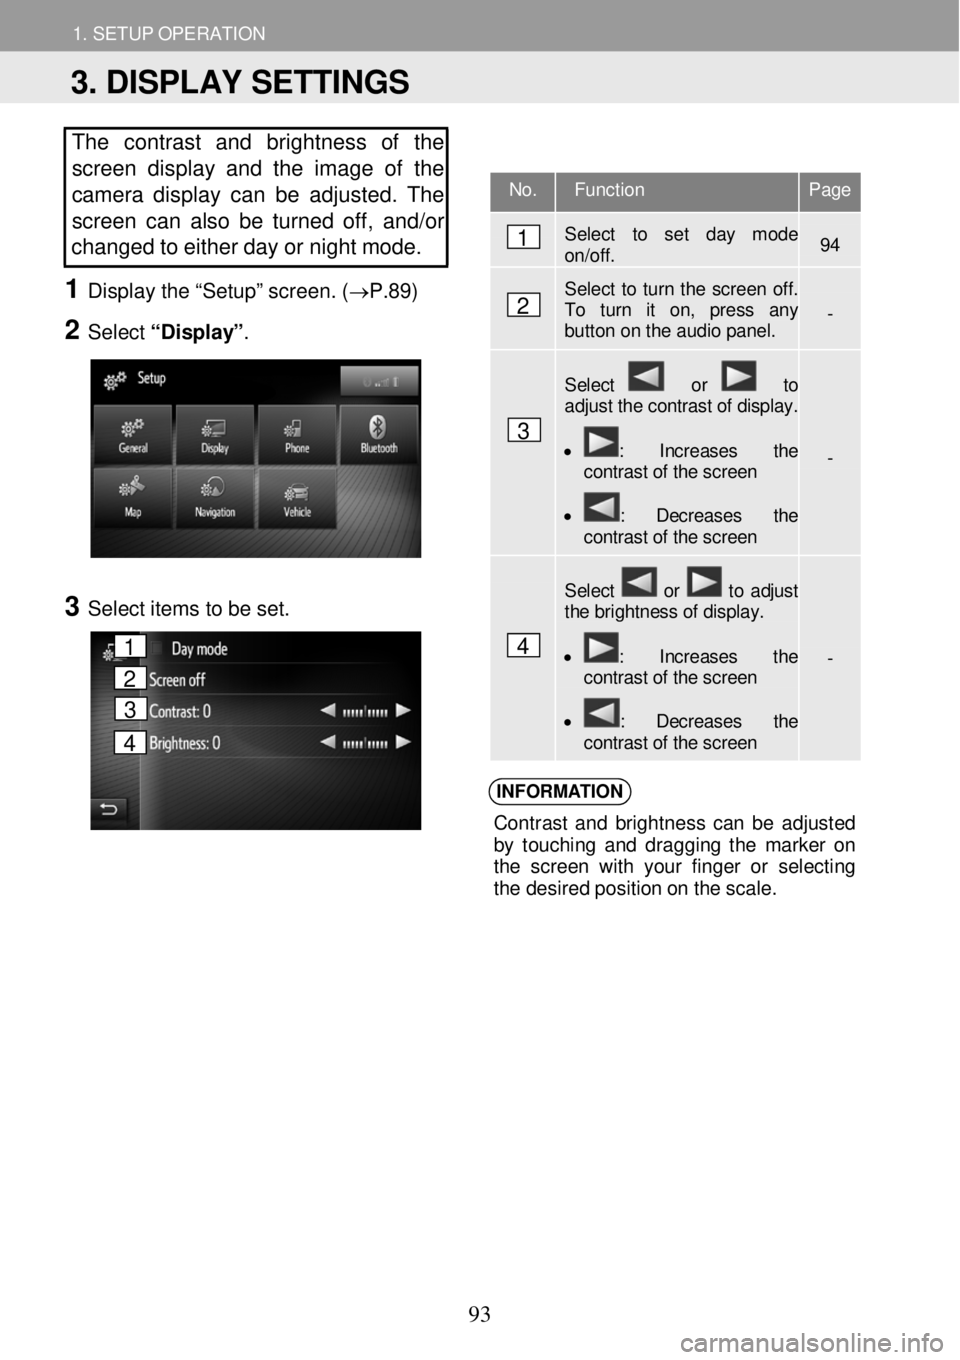
The contrast and brightness of the
screen display and the image of the
camera display can be adjusted. The
screen ca n also b e tur ned off, and/or
changed to either d ay or night mode.
1 Displ ay the “Setup” scr een. ( →P.89)
2 Select “Display” .
3 Select ite ms to be set.
INFORM ATION
Con tras t an d b righ tne ss ca n b e ad jus ted
b y to uch in g an d dragg in g th e m arke r on
t h e scre en with your fin ge r o r selecting
t h e des ired po sit io n o n t he s cal e.
No. Function Page
Select to set day mode on/off. 94
Select to turn the screen off. To turn it on, press any button on the audio panel. -
Select or to adjust the contrast of display.
• : Increases the contrast of the screen
• : Decreases the contrast of the screen
-
Select or to adjust the brightness of display.
• : Increases the contrast of the screen
• : Decreases the contrast of the screen
-
1
2
3
4
3. DISPLAY SETTINGS
1
2
3
4
93
Page 95 of 164
1. SETUP OPERATION 1. SETUP OPERATION
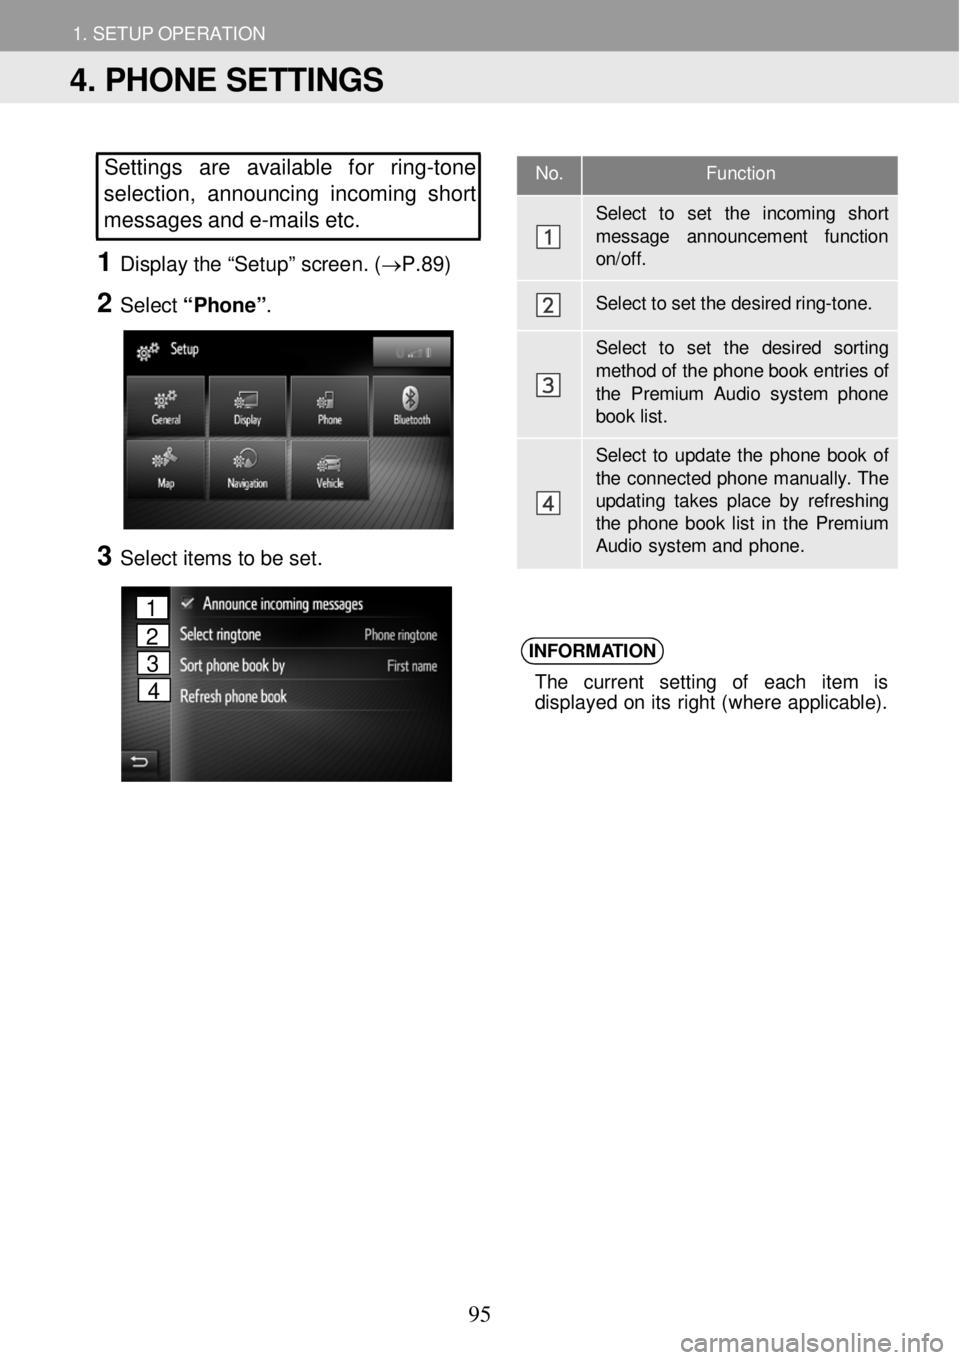
No. Function
Select to set the incoming shor t
message announcement functi on on/off.
Select to set the desired r in g-tone.
Select to set the desired sor tin g
method of the phone book entries of the Premium Audio system phon e book list.
Select to update the phone book of the connected phone manually. T he updating takes place by refreshing the phone book list in the Premium Audio system and phone.
Settings are available fo r ring -tone
selection, a nnounci ng i ncoming short
messages and e-m ails etc.
1 Disp lay the “Setu p” scree n. (→P.89)
2 Select “Ph one”.
4
3 Select i tems to be set.
INFORM
ATION
The cu rrent se ttin g of eac h it em is
d isp laye d o n it s r ight (wher e ap plicabl e).
4. PHONE SETTINGS
1
2
3
4
95
Page 97 of 164
1. SETUP OPERATION 1. SETUP OPERATION
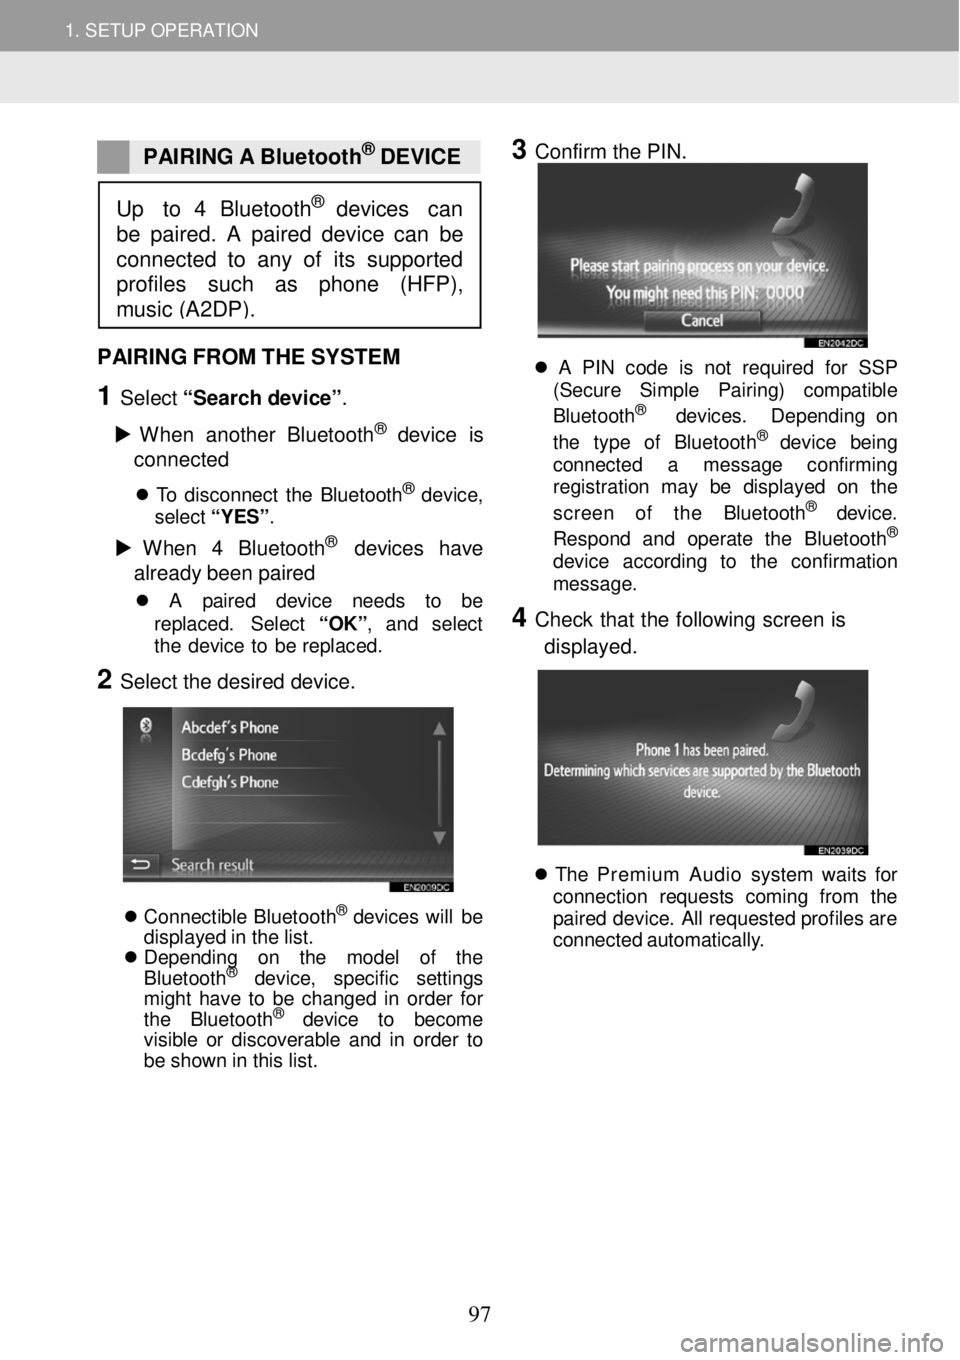
PAIRING A Bluetoot h® DEVICE
3 Confirm the PIN.
PAIRING FROM THE SYSTEM
1 Select “Sear ch devi ce ”.
W hen another Bl uet ooth
® device is
c o nne cted
T o disconn ect th e Bluet ooth® dev ice,
sel ect “ Y ES” .
W hen 4 Bl ue tooth® devices have
alr ea dy b een p aire d
A pa ir ed de vic e ne ed s to be
re pla ced. S ele ct “OK ”, an d se lec t
t h e de vic e to be repl aced.
2 Select the desired device.
Conne ctib le Blue too th® de vi ce s will be
d isp laye d in th e lis t.
Depending on the model of the
B lue toot h
® de vi ce , specific settings
might have to be changed in order for
the Blue too th
® de vi ce to become
visible or discoverable and in order to
be shown in this list.
A PIN code is not r eq ui re d fo r SSP
(S ecur e Simp le Pa ir ing) co m patib le
B lueto oth
® de vic es. Dep end in g on
t he typ e of Blue toot h® dev ic e bei ng
conn ect ed a messag e con firm in g
reg is tr a tion may be di spl aye d on th e
screen of the Bluet oot h
® devic e.
Respon d an d op era te the Blue tooth®
devi ce ac cordi ng to th e con firma tio n
messag e.
4 Check th at the fo llow ing screen is
d isp laye d.
Th e Premium Audio system wa it s fo r
conn ection re que sts com in g fr om th e
p a ir e d dev ice . A ll req ues te d pro file s ar e
c onne cted a ut omat ica lly .
Up to 4 Bluetooth® devices can
be paired. A paired device can be
connected to any of its suppor ted
profiles su ch as phone (HFP),
music (A2DP).
97