audio TOYOTA tC 2016 Accessories, Audio & Navigation (in English)
[x] Cancel search | Manufacturer: TOYOTA, Model Year: 2016, Model line: tC, Model: TOYOTA tC 2016Pages: 164, PDF Size: 6.21 MB
Page 100 of 164
1. SETUP OPERATION 1. SETUP OPERATION
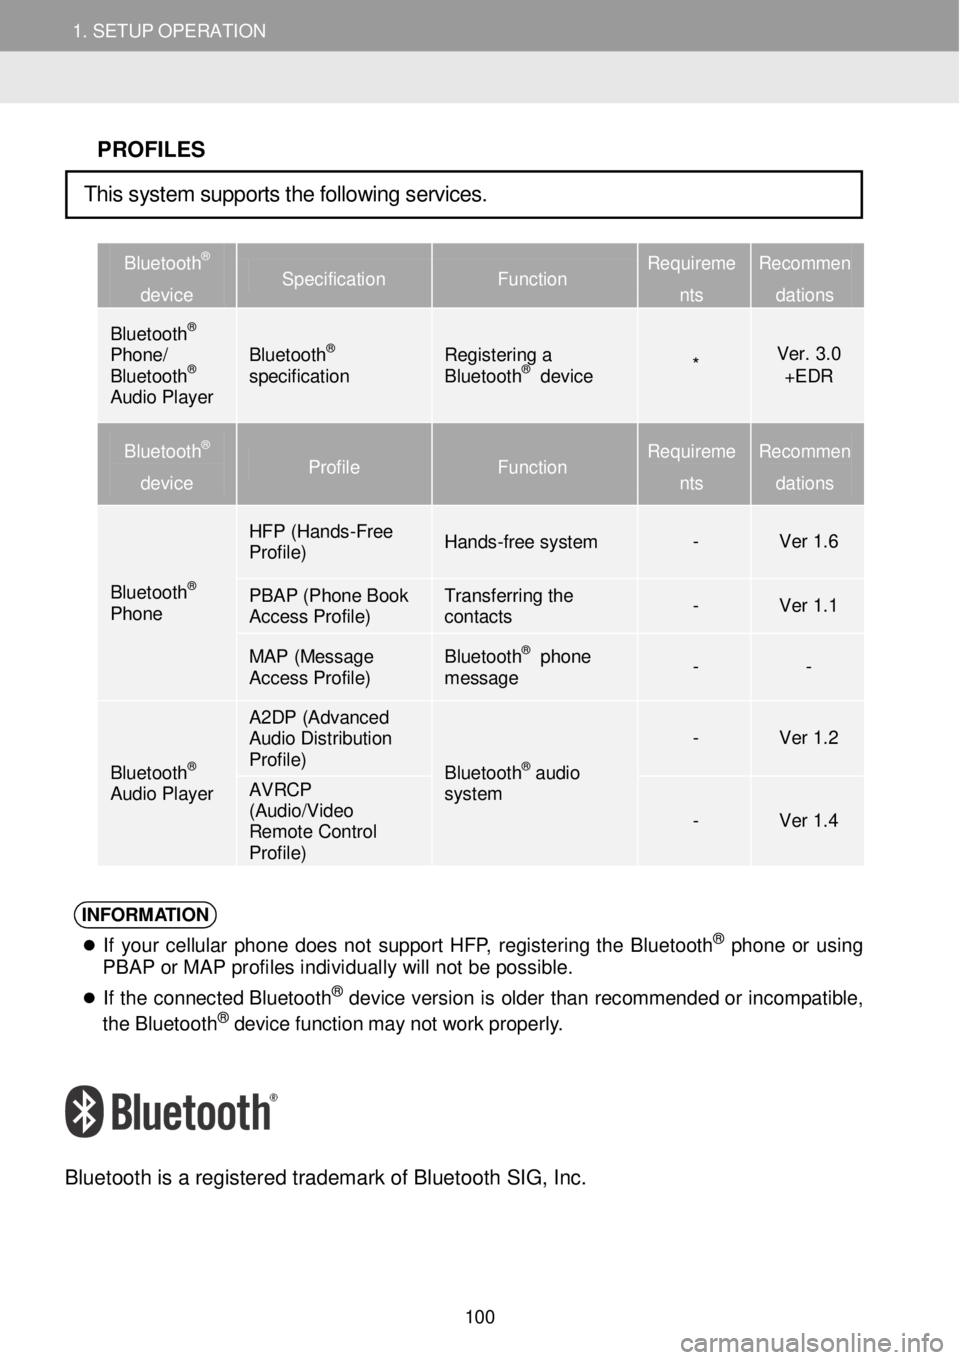
PROFILES
Bluetooth®
device Specification Function Requireme
nts
Recommen
dations
Bluetooth® Phone/ Bluetooth® Audio Player
Bluetooth® specification Registering a Bluetooth® device * Ver. 3.0 +EDR
Bluetooth®
device Profile Function Requireme
nts
Recommen
dations
Bluetooth® Phone
HFP (Hands -Free Profile) Hands-free system - Ver 1.6
PBAP (Phone Book Access Profile) Transferring the contacts - Ver 1.1
MAP (Message Access Profile) Bluetooth® phone message - -
Bluetooth® Audio Player
A2DP (Advanced Audio Distribution Profile) Bluetooth® audio system
- Ver 1.2
AVRCP (Audio/Video Remote Control Profile)
- Ver 1.4
INFORM ATION
If your ce llu la r p h on e do es no t s uppo rt HF P, reg is tering th e Bl uet ooth® phone o r us ing
PBAP or MAP profiles individually will not be possible.
If th e c o nnec ted Bl uet oot h® de vic e vers io n is o ld er than recomm ende d o r in com patibl e,
t h e B lue too th® de vi ce f u nct io n ma y no t w ork p ro perl y.
Bl uetooth is a re gistered tradem ark of B lueto oth SIG, Inc.
This system supports the following services.
100
Page 101 of 164
1. SETUP OPERATION 1. SETUP OPERATION
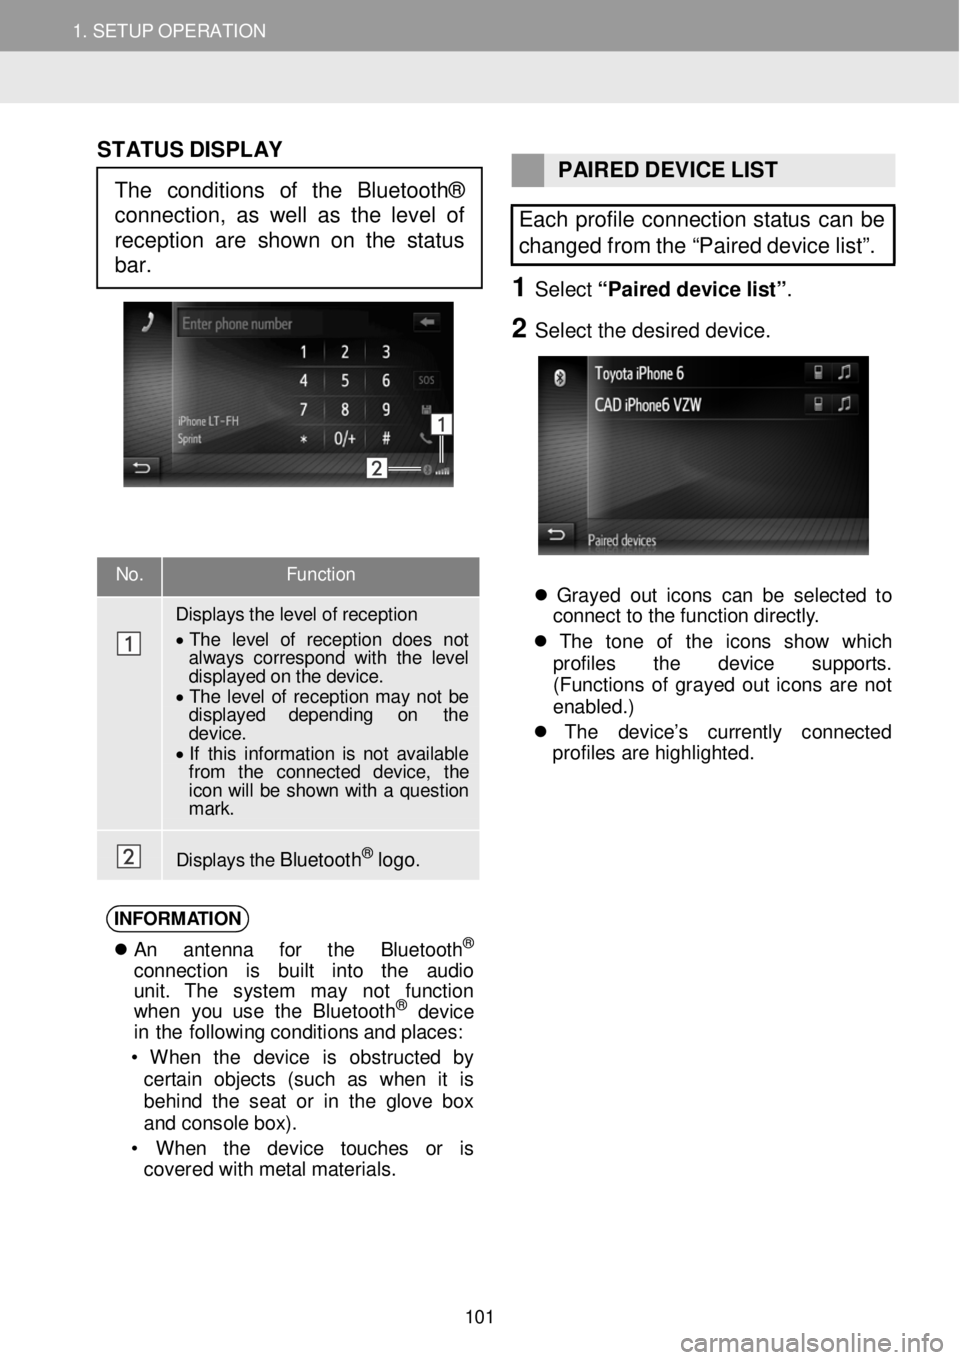
No. Function
Displays t h e level of reception
• T he level of r ecep tion does not always cor res pond with the level displayed on the device. • T he level of reception may not be displayed depending on the d evic e . • If this in formation is n ot available fr om the connected device, the icon will be show n with a question m ark.
Displays t h e B luet oot h® logo.
ST ATUS DISPLAY
PAIRED DEVICE LIST
Each profile connection status can be
changed from the “Paired device list”.
1 Select “Pair ed d evice list ”.
2 Se lect the de sired d evice.
Grayed out ico ns c a n b e se lec te d to
c onne ct to th e f un ctio n d ir e ct ly .
Th e to n e of th e icon s sh ow wh ic h
prof iles th e dev ic e su ppor ts .
( Functions of g rayed out ico ns are not
enabled .)
Th e de vi ce ’s cu rre ntly co nnec ted
prof iles ar e h igh lig ht ed.
INFORM ATIO N
A n antenn a fo r th e Bluet ooth®
conn ect io n is bu ilt into th e audio
unit . Th e system ma y not fu nct io n
w he n you us e th e B lue too th
® de vic e
i n th e fol lowin g c o ndi tion s a nd p la ces:
• W hen th e dev ice is ob struc te d by
cer tai n obj ects (su ch as w hen it is
be hind th e sea t or in th e g lo ve bo x
a nd c o nsole box ).
• W hen th e dev ic e touc hes or is
covered with me ta l ma te ri al s.
The conditions of the Bluetooth®
connection, as well as the level of
reception are shown on the status
bar.
101
Page 103 of 164
1. SETUP OPERATION 1. SETUP OPERATION
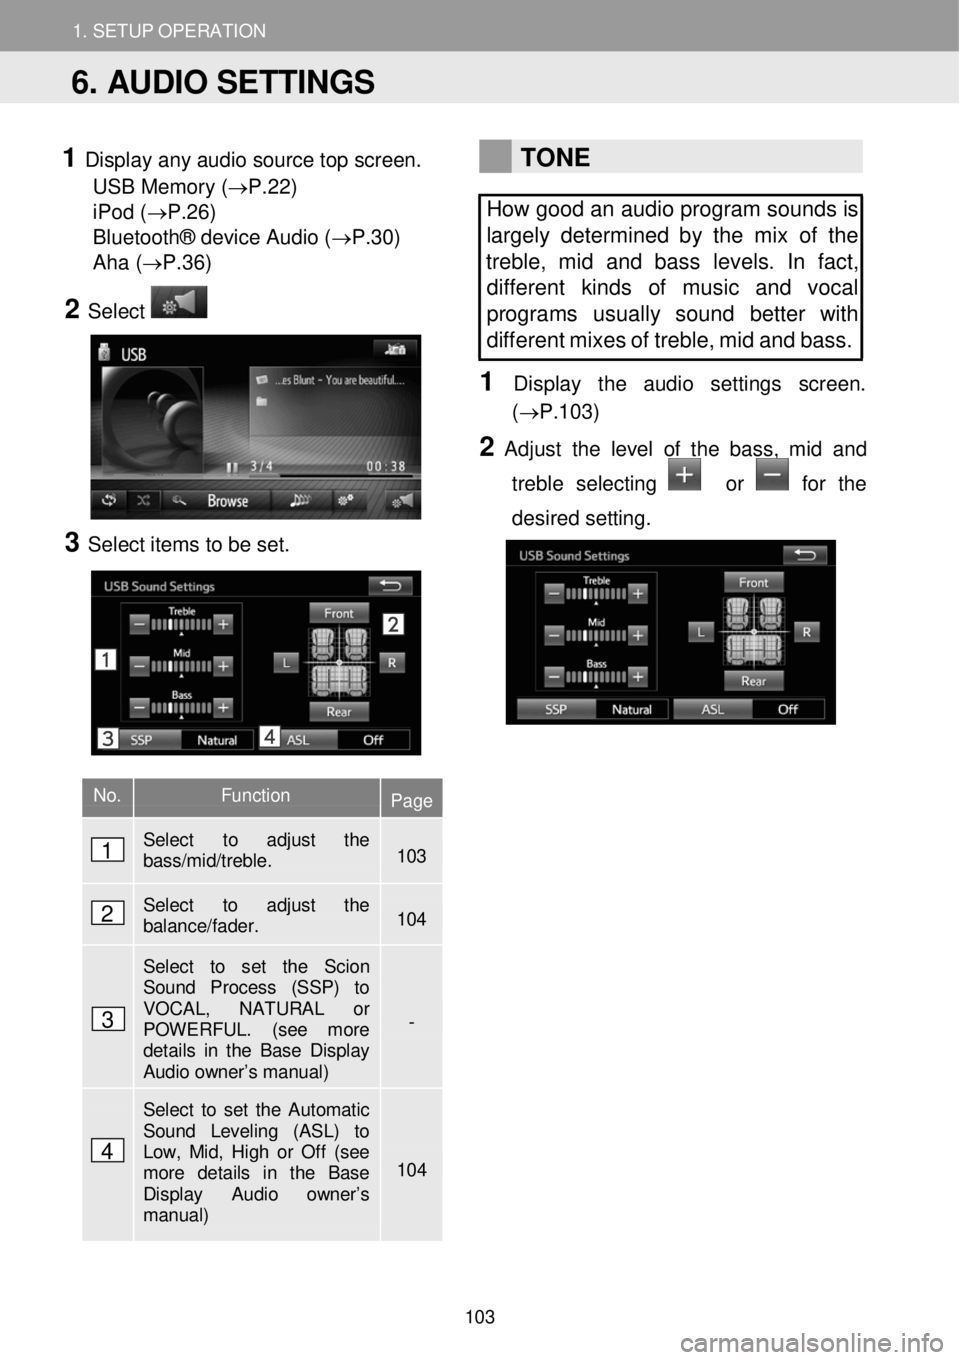
1 Display any audio sour ce top screen.
USB Memory (→P.22)
iPod ( →P.26)
Bluetooth® device Audio (→P.30)
Aha ( →P.36)
2 Select
3 Select ite ms to be set.
TONE
How good an audio program sounds is
largely determined by the mix of the
treble, mid and bass levels. In fact,
dif fere nt kinds of music and vocal
programs usually sound better with
different mi xes of treble, mid and bass.
1 Dis p lay t he audi o setti ngs scre en.
(→P.1 03)
2 Adju st th e le vel of the bass, mid and
treb le selecting
or for the
d esired setting.
No. Function Page
Select to adjust the bass/mid/treble. 103
Select to adjust the balance/fader. 104
Select to set the Scion Sound Process (SSP) to VOCAL, NATURAL or POWERFUL. (see more details in the Base Display Audio owner’s manual)
-
Select to set the Automatic Sound Leveling (ASL) to Low, Mid, High or Off (see more details in the Base Display Audio owner’s manual)
104
6. AUDIO SETTINGS
1
2
3
4
103
Page 108 of 164
1. BASIC INFORM AT ION BEFORE OPERATION
1. QUICK REFERENCE
1. BASIC INFORMATION BEFORE OPERATION
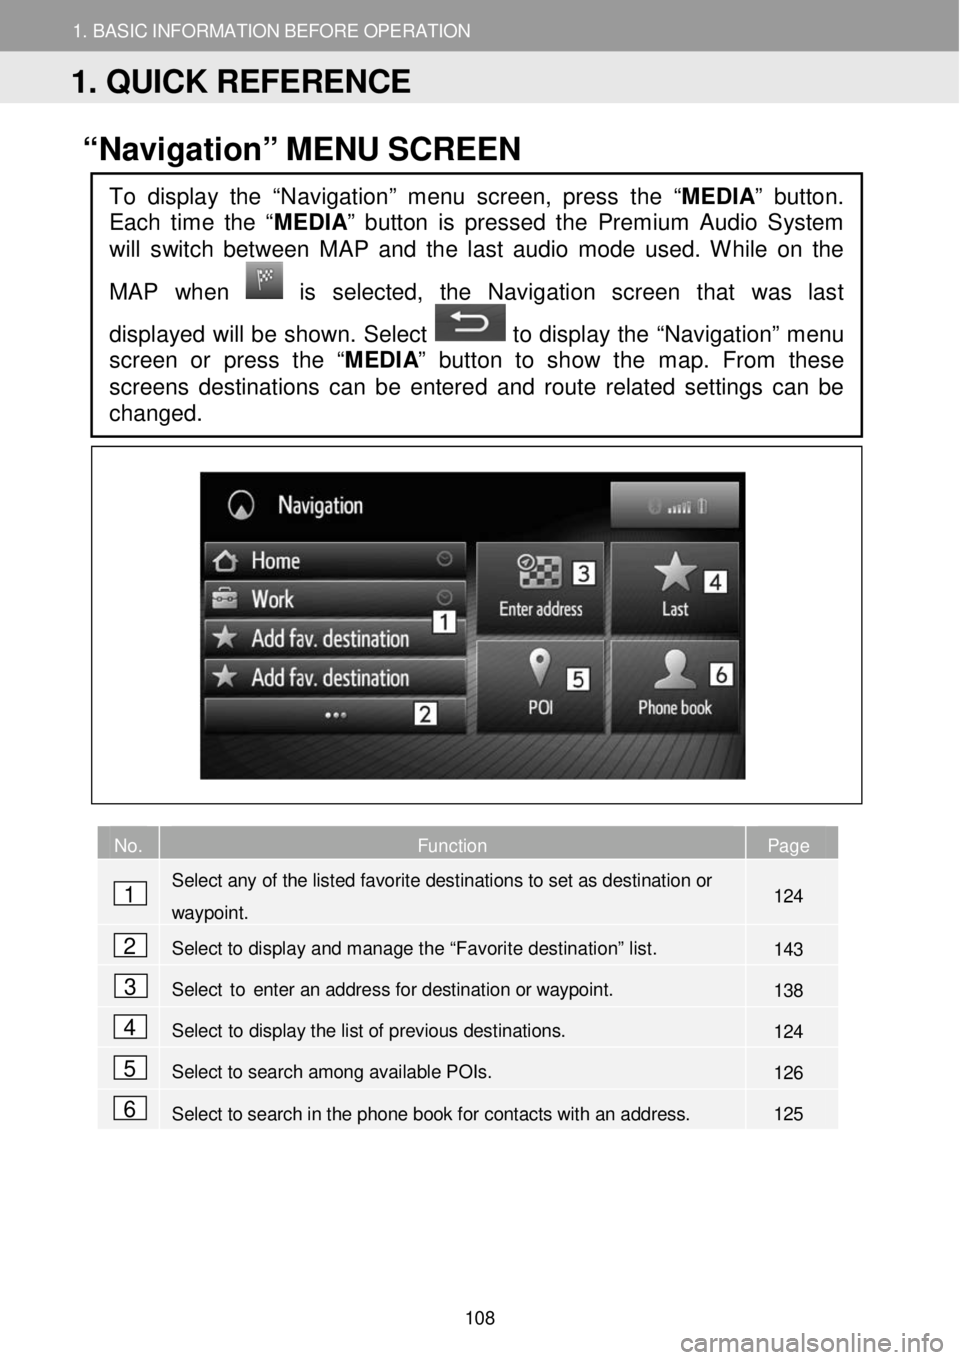
“Navigation” ME NU SC REEN
No. Function Page
Select any of the listed favorite destinations to set as destination or
waypoint. 124
Select to display and manage the “Favorite destination” list. 143
Select to enter an address for destination or way point. 138
Select to display the list of previous destinations. 124
Select to search among available POIs. 126
Select to search in the phone book for contacts with an address. 125
To display the “Navigation” menu screen, press the “MEDIA” button.
Each time the “
MEDIA” button is pressed the Premium Audio System
will switch between MAP and the last audio mode used. While on the
MAP when
is selected, the Navigation screen that was last
displayed will be shown. Select
to display the “Navigation” menu
screen or press the “ MEDIA” button to show the map. From these
screens destinations can be enter ed and route related settings can be
changed.
1
2
3
4
5
6
1. QUICK REFERENCE
108
Page 112 of 164
1. BASIC INFORMATION BEFORE OPERATION 1. BASIC INFORMATION BEFORE OPERATION
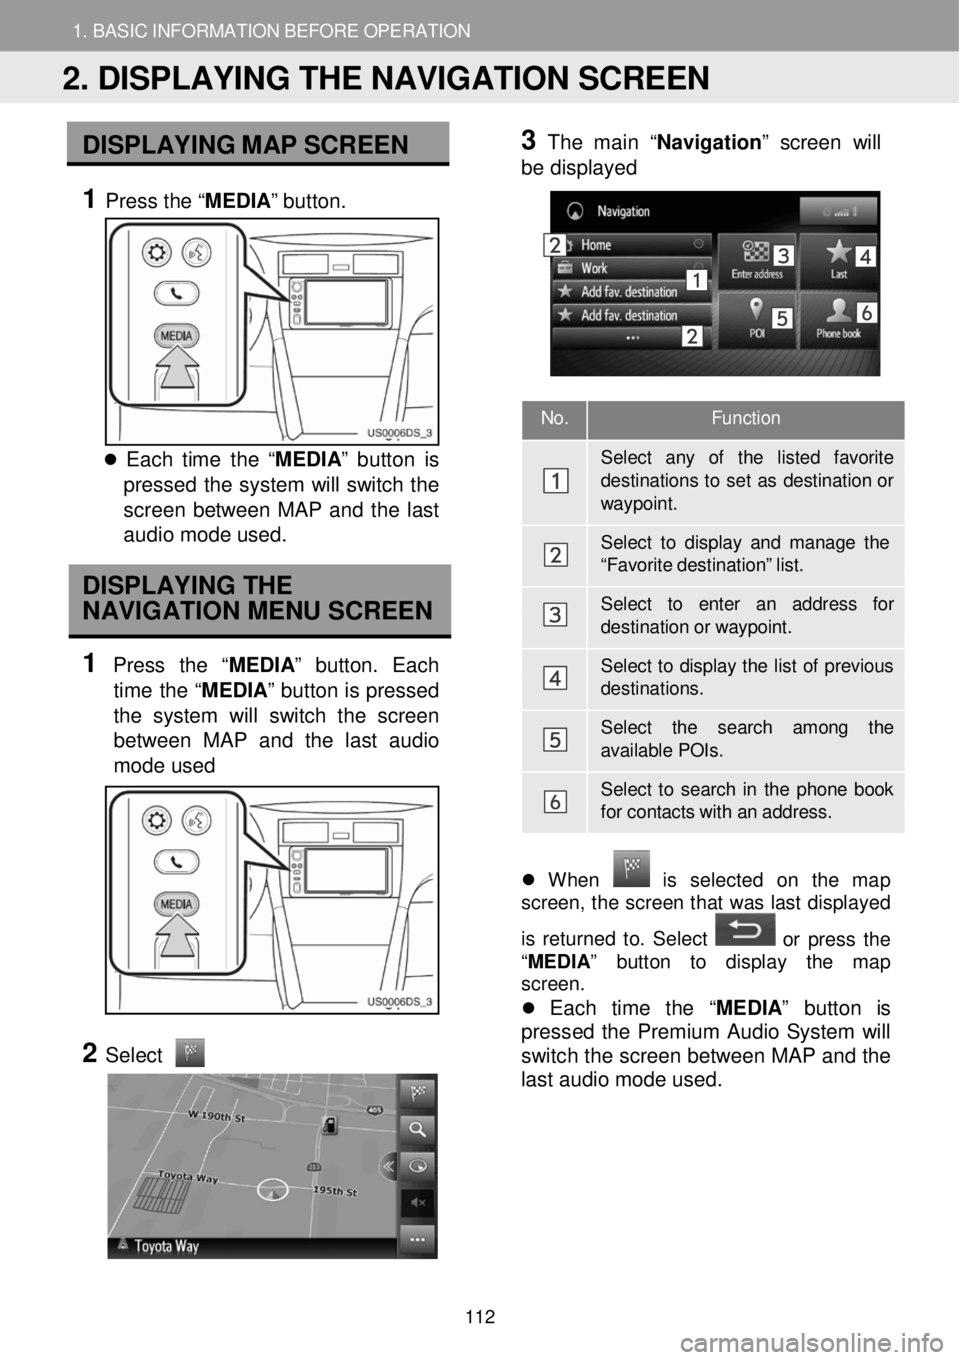
No. Function
Sel ect any of the listed favorite
destination s to s e t as destination or way point.
Select to display and mana ge the “F av orite destination” list.
Select to enter an addr ess for destination or w aypoint.
Select to display the list of p revious destina tions.
Select the search among the available POIs.
Select to sear ch in the phone book for contacts with an addr ess.
DISPLA YING M AP SCR EEN
1 Press the “ MEDIA” button.
Each time t he “ ME DIA ” b utton is
pressed th e system will switch the
scr een between MAP a nd the last
a udio mod e use d.
DISPLAYING THE
NAVIGATION MENU SCREEN
1 Press th e “MEDIA ” butt on. Ea ch
time the “MEDIA ” button is pressed
the sys tem w ill switch th e scr een
b etw een MAP and the last audi o
m ode used
2
Select
3 Th
e m ain “Na vigatio n” scre en will
b e displ ayed
Wh en is se lec te d on th e ma p
screen, t he scree n that wa s last disp layed
is returne d to. Se lec t
or pr ess t he
“ MEDIA ” butt o n to d ispla y th e map
screen.
Each time the “ MEDIA” button is
pr esse d the Premium Audio System w ill
switch t he screen betwee n MAP a nd the
last a udio mode us ed .
2. DISPLAYING THE NAVIGATION SCREEN
112
Page 129 of 164
3. DESTINATION SEARCH 3. DESTINATION SEARCH
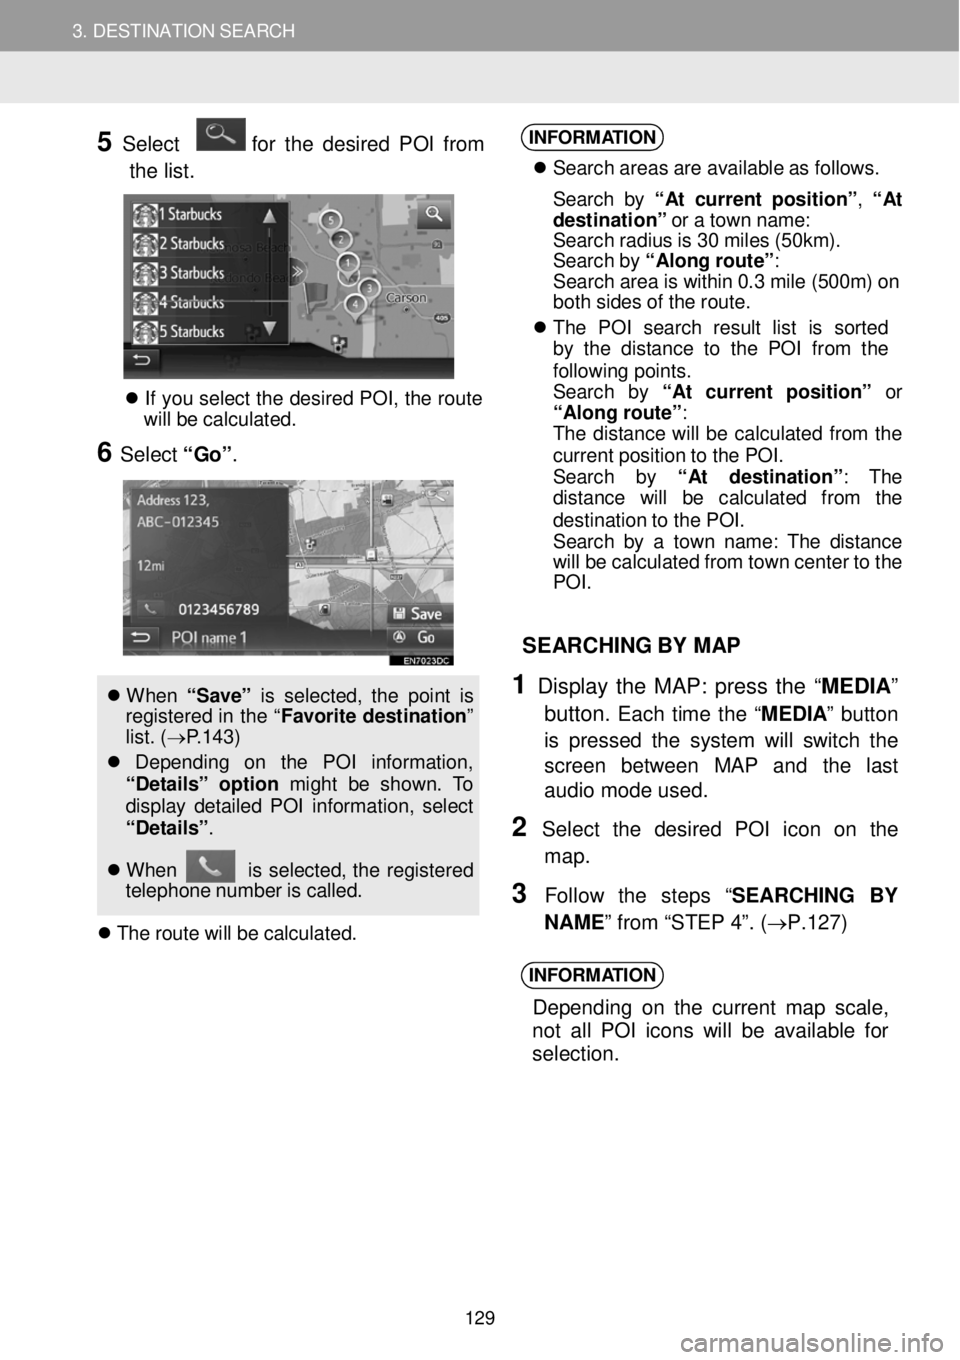
5 Select for the desired PO I from
t h e list.
If yo u se lec t th e d esire d P O I, th e rou te
w ill be ca lcu la ted.
6 Select “Go” .
W hen “ Sa ve” is s e le cte d, th e poi nt is
reg is tered in th e “ Fa vori te de stina tio n”
l ist. (→ P.1 43 )
Dep end in g on t he PO I in formati on,
“De ta ils ” option might be shown. To
di spl ay det aile d P OI in fo rmat io n, selec t
“De ta ils” .
W hen is se lec ted, th e re gi stered
t e leph on e numb er is c al led.
T he ro ute wi ll be c a lc ula ted.
INFORM ATION
S earc h areas ar e av ail able a s fo llows.
S earc h b y “ At cu rre nt p osit io n” , “ At
d estination ” o r a tow n nam e:
S earc h rad iu s is 3 0 m ile s (50 km) .
S earc h b y “Al ong ro ute ”:
S earc h area is w it h in 0. 3 mi le (50 0m ) on
bo th s ides o f th e rout e.
T he PO I se arc h res ult lis t is sorted
by t he d is tan ce to the P O I fro m th e
f o llow in g poin ts .
S earc h by “A t c urrent p osit io n” or
“Al on g ro ute ”:
T he d is tan ce w ill b e ca lcu lat ed fro m the
curren t pos it io n to th e POI .
S earc h by “A t destinati on ”: The
d is ta nc e wi ll be ca lcu la te d from th e
d es tina tio n t o th e PO I.
S earc h b y a tow n n ame : T he dis ta nce
wi ll be ca lcu lat ed fr om t ow n cen te r t o t he
PO I.
SEAR CHING BY MAP
1 Display th e MAP: press the “MED IA”
button.
Each time the “M EDIA ” button
is pressed the system will switch the
scre en be tween MAP and th e last
audio mode us ed.
2 Se lect th e desired POI ic on on the
map.
3 F ollow the step s “SEARC HING BY
N AME ” from “STEP 4”. ( →P.1 27)
INFORM ATION
Depend ing on th e current m ap scale,
n ot a ll POI icons w ill be a va ila ble for
selection.
129
Page 130 of 164
3. DESTINATION SEARCH 3. DESTINATION SEARCH
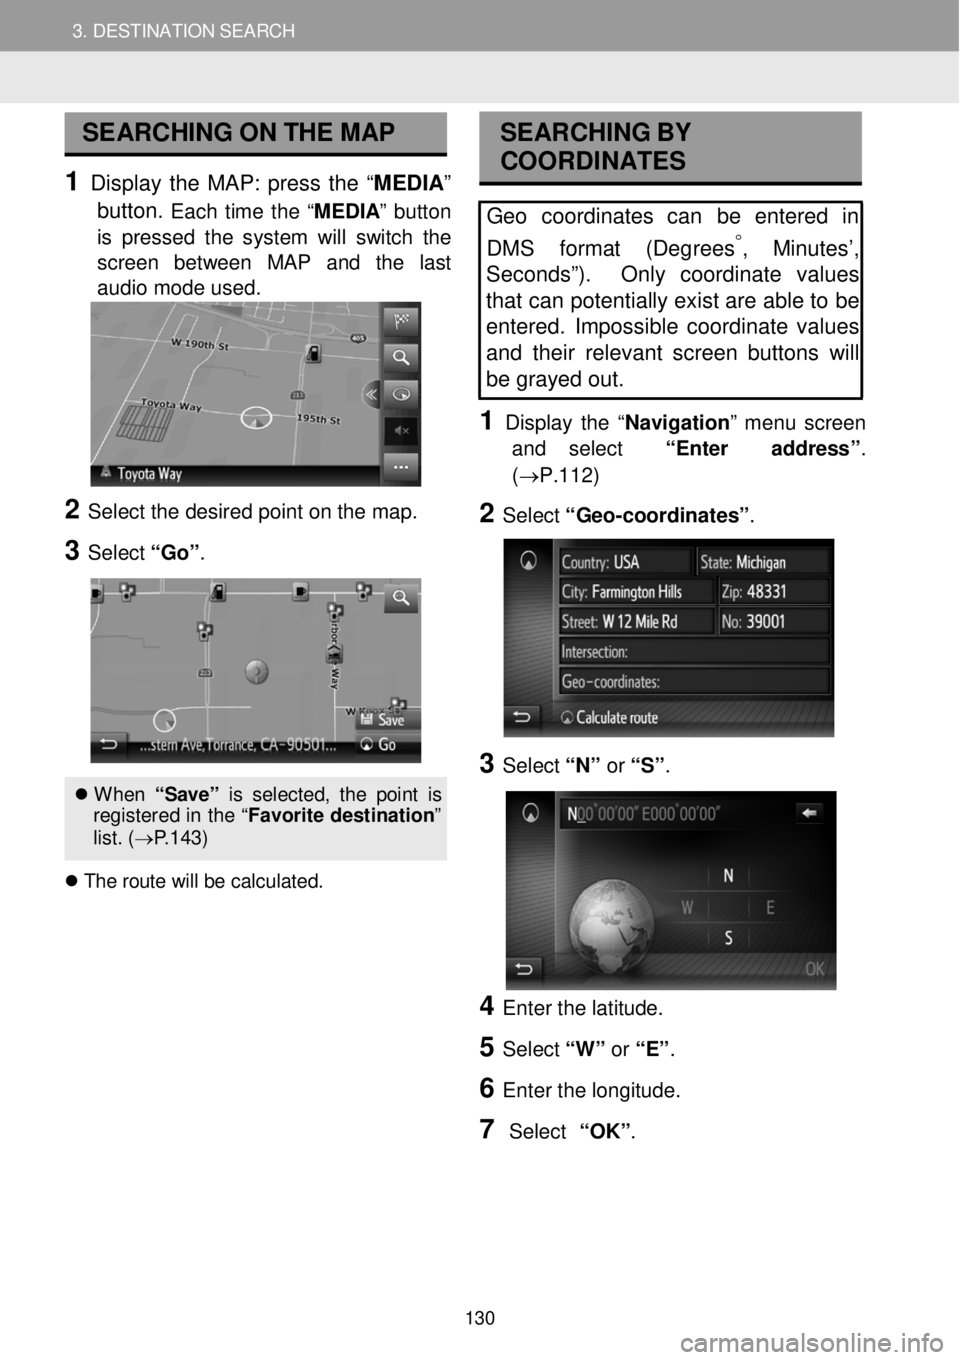
SEARCHING ON THE MAP
1 Display the MAP: press the “ME DIA ”
button.
Each time the “M EDIA ” button
is pressed the system will switch the
scre en bet ween MAP and the last
audio mode us ed.
2 Se lect the de sired po int o n t he m ap.
3 Select “Go ”.
When “S ave ” is s el ect ed, th e p oin t is
re gis tere d in th e “F avori te d est ina tion ”
l is t. ( → P.143)
T he r o ute w ill b e cal cul ate d.
SEA RCHING BY
COORDI NATES
Geo coordinates can be entered in
DMS f ormat (Degrees
°, Minutes’,
Sec onds”). Only coordinate values
tha t can potentially exist are able to be
entered . Impossible coordinate values
and their relevant screen buttons will
be gray ed out .
1 D is p lay the “Navigati on ” me nu screen
and select “Enter address ”.
(→P.112)
2 Select “G eo -coordinat es” .
3 Select “N” or “S” .
4 Enter th e latitude.
5 Select “W” or “E” .
6 Enter t he lo ngitud e.
7 Select “OK”.
130
Page 151 of 164
5. MY DESTINATIONS 5. FAVORITE DESTINATIONS
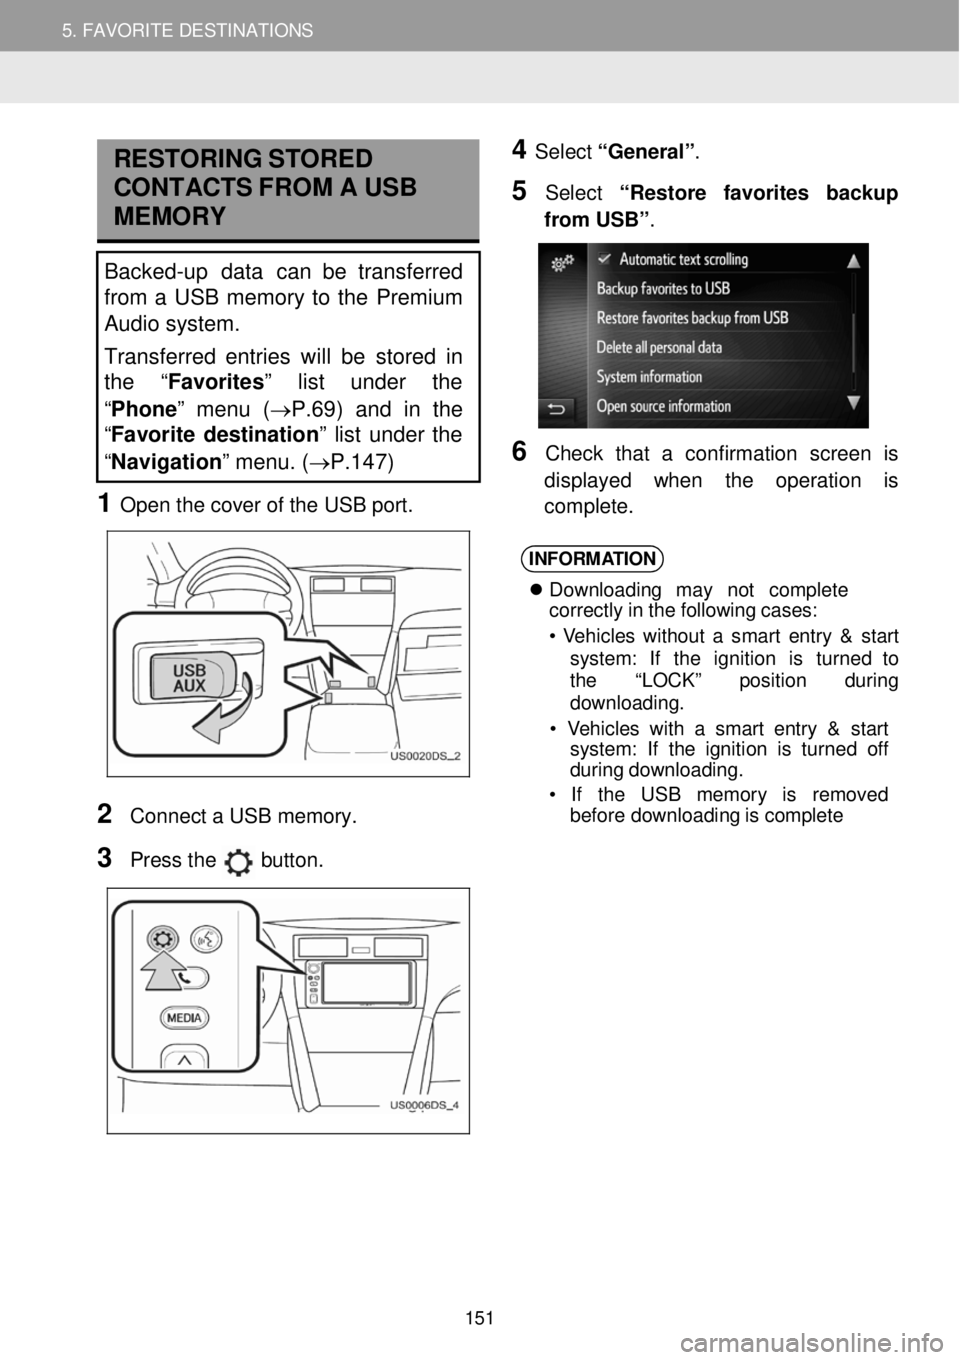
RESTORING STORED
C ONTA CTS F R OM A USB
MEMORY
Backed-up data can be transferred
from a USB memory to the Premium
Audio system.
Transferred entries will be stor ed in
th e “Favorites ” list under the
“ Phone ” menu ( →P.69) and in the
“ Favorite destination ” list under the
“ Navigation” menu. ( →P.147)
1 Open t he c over o f the USB port.
4 Select “General” .
5 Select “R estore favorites bac kup
fr om USB” .
6 C heck that a con fir mati on screen is
d ispl ayed when the operati on is
co mp lete.
2
Con nect a USB m emory.
3 Press the button.
INFORM ATION
Downl oad in g ma y n ot c o mpl ete
cor rectly in the following cases:
• V eh icl es w ith out a smar t ent ry & s ta rt
s yst em : If th e ignition is tu rn ed to
t h e “LOCK ” pos it io n during
downl oading.
• V ehicl es with a sm art entry & start
syst em: If th e ignition is turne d off
d uring d ow nlo ad ing.
• If th e US B m emor y is rem ove d
be fore downl oad in g is com ple te
151
Page 152 of 164
5. MY DESTINATIONS 6. NAVIGATION SETTING
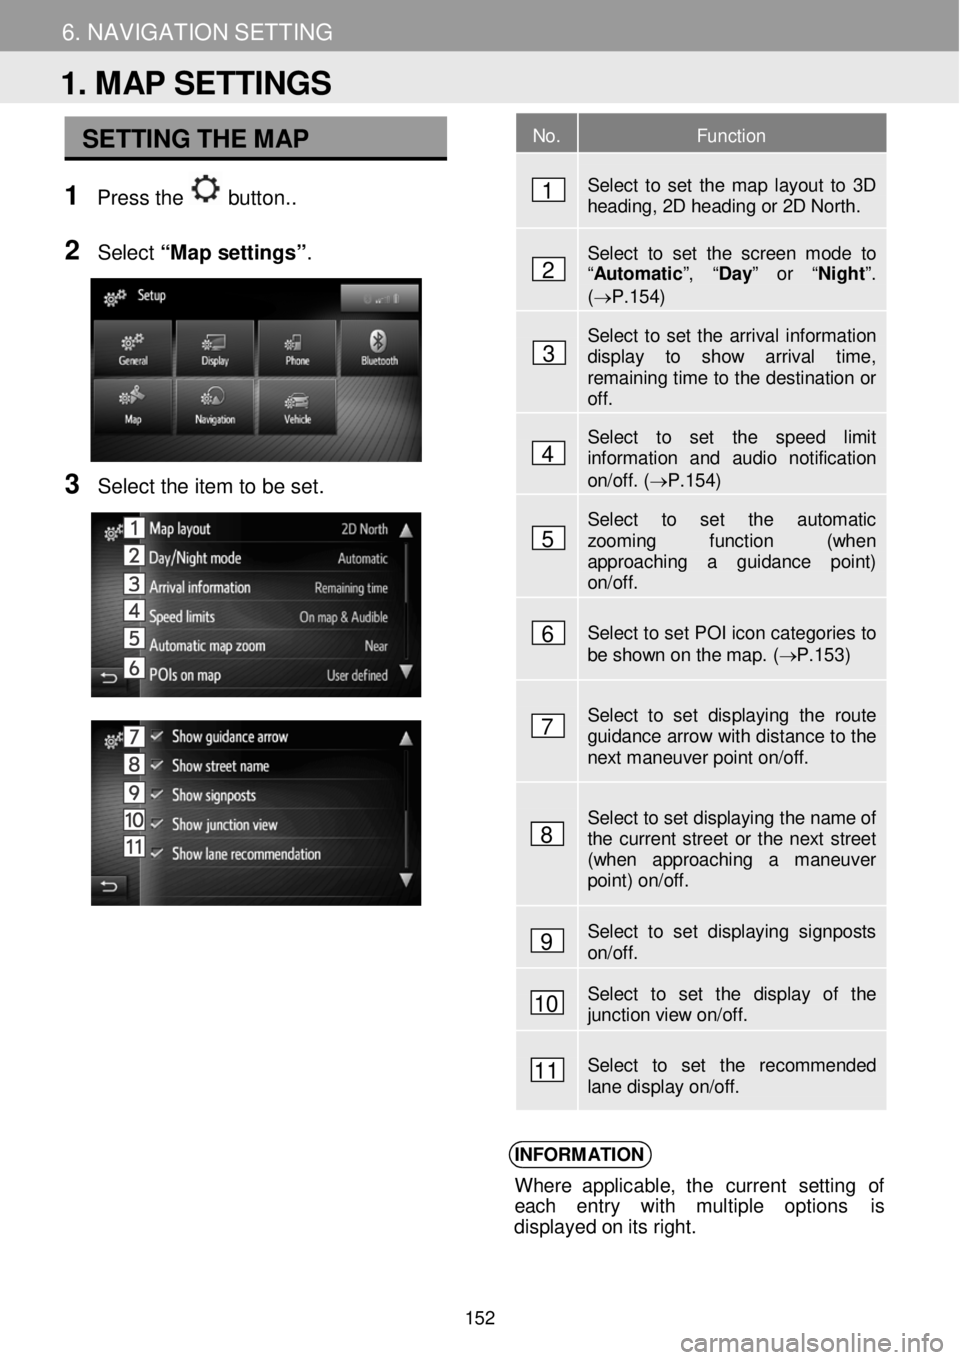
SETTING THE MAP
1 Pre ss the button. .
N
2 Select “Map setting s”.
3 Se lect the item to b e set.
INFORM ATION
Where applicable, t he curren t se ttin g of
e ach entry with multiple op tions is
d ispl aye d o n it s ri ght.
No. Function
Select to set the map layout to 3D heading, 2D heading or 2D North.
Select to set the screen mode to “Automatic ”, “Day” or “Night ”. (→P.154)
Select to set the arrival information display to show arrival time, remaining time to the destination or off.
Select to set the speed limit information and audio notification on/off. (→P.154)
Select to set the automatic zooming function (when approaching a guidance point) on/off.
Select to set POI icon categories to be shown on the map. ( → P.153 )
Select to set displaying the route guidance arrow with distance to the next maneuver point on/off.
Select to set displaying the name of the current street or the next street (when approaching a maneuver point) on/off.
Select to set displaying signposts on/off.
Select to set the display of the junction view on/off.
Select to set the recommended lane display on/off.
1. MAP SETTINGS
1
2
3
4
5
6
7
8
9
10
11
152
Page 160 of 164
1. VOICE COMMAND SYSTEM OPERATION
The vo ice command sys tem enables
the navigation, audio and hands -free
systems to be operated us in g voice
commands.
INFORMATION
V oi ce recog nitio n l angu age ca n be
c h ange d.(See “ SELECTING A
LAN GUAGE ”
→P.90)
M IC ROP HONE
USING THE VOICE
COMMAND SYSTEM FOR
NAVIG ATI ON, A U DIO,
HAN DS-FREE
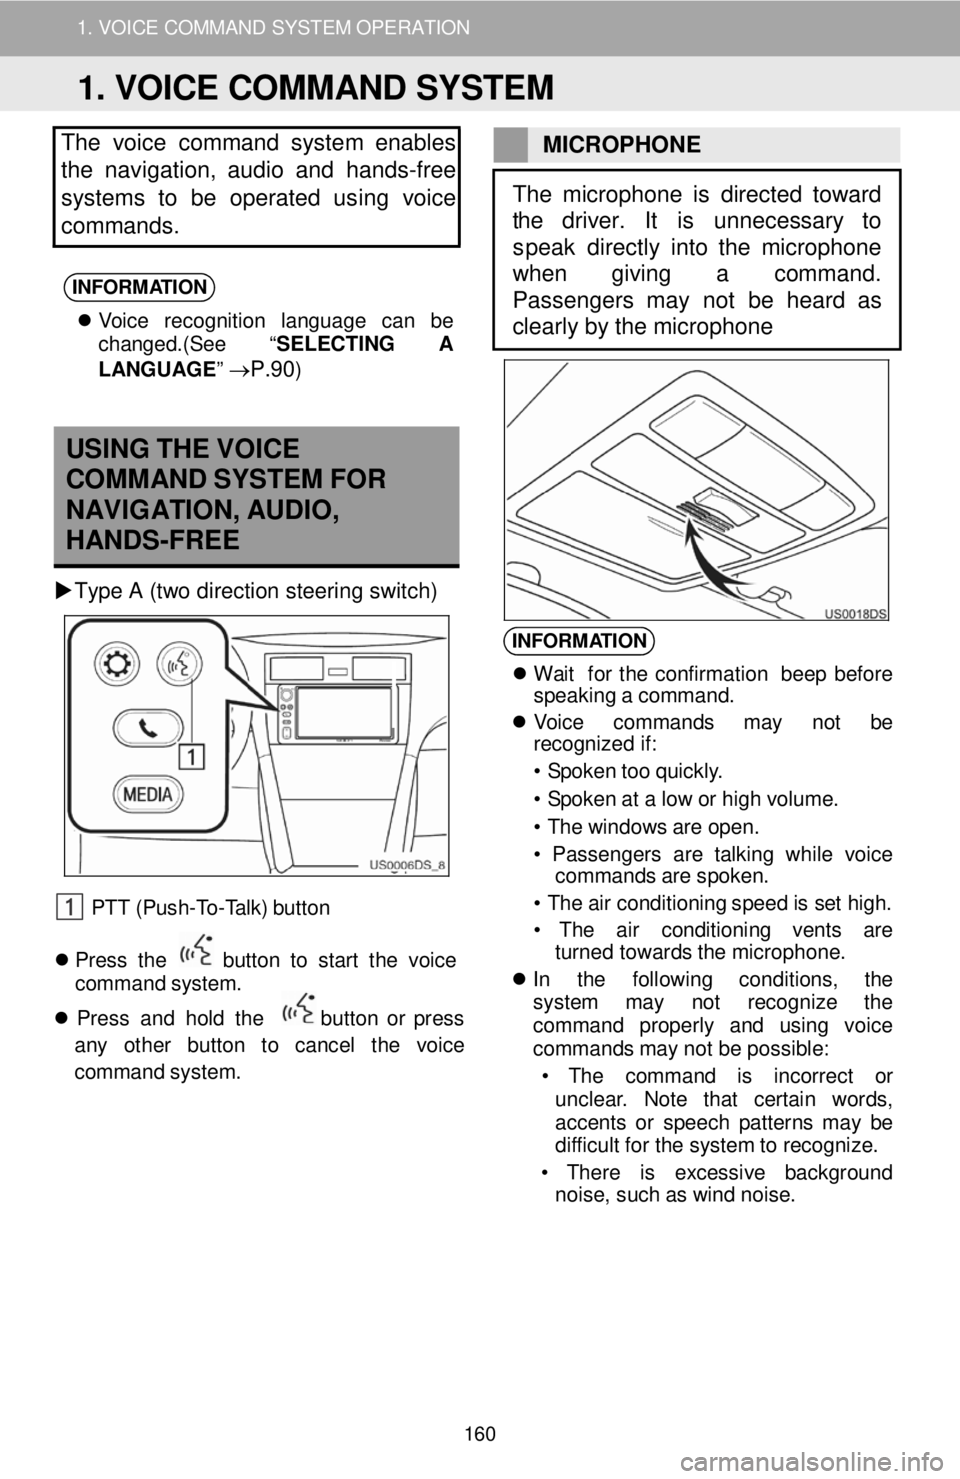
Type A (two d irection steering s w itc h)
PTT (Push- To -T a lk) butt on
Pres s th e b utto n to star t th e voi ce
command s yst em .
Pres s and ho ld th e
bu tton or press
any other button to ca ncel th e vo ic e
c o mman d system.
INFORM ATION
Wa it fo r th e co nf irma tio n be ep bef ore
spea kin g a c o mmand.
V oic e command s may not be
r e cogn ized i f:
• S poke n t o o qu ickl y.
• S poke n a t a lo w o r hig h v o lum e.
• T he w ind ow s ar e o p en.
• P asse nger s are ta lk in g wh il e voice
comm and s ar e sp oken.
• T he ai r con dit io ni ng spee d is set h ig h.
• The air cond it io ni ng ven ts are
t urned towards t h e microp hone.
In th e fo llow in g cond itio ns, th e
s yst em may not re cogn iz e th e
comm an d pro perl y and us in g vo ic e
c o mmand s m ay not be possi ble:
• T he co mman d is inc orre ct or
unc lea r. No te t hat cer tai n words ,
acc ents or spe ech p atterns ma y be
d if f icu lt f o r the sys tem to r e cogn ize.
• T here is excessi ve backgroun d
no ise, suc h a s w in d no ise.
The microphone is directed toward
the driver . It is unnecessary to
s peak directly into the microphone
w hen giving a command.
Passengers may not be heard as
clearly by the microphone
1. VOICE COMMAND SYSTEM
160