TOYOTA TUNDRA 2011 2.G Owners Manual
TUNDRA 2011 2.G
TOYOTA
TOYOTA
https://www.carmanualsonline.info/img/14/6832/w960_6832-0.png
TOYOTA TUNDRA 2011 2.G Owners Manual
Trending: dimensions, belt, wiper size, parking sensors, fog light, seat adjustment, air filter
Page 181 of 732
181
2-1. Driving procedures
2
When driving
Engine (ignition) switch
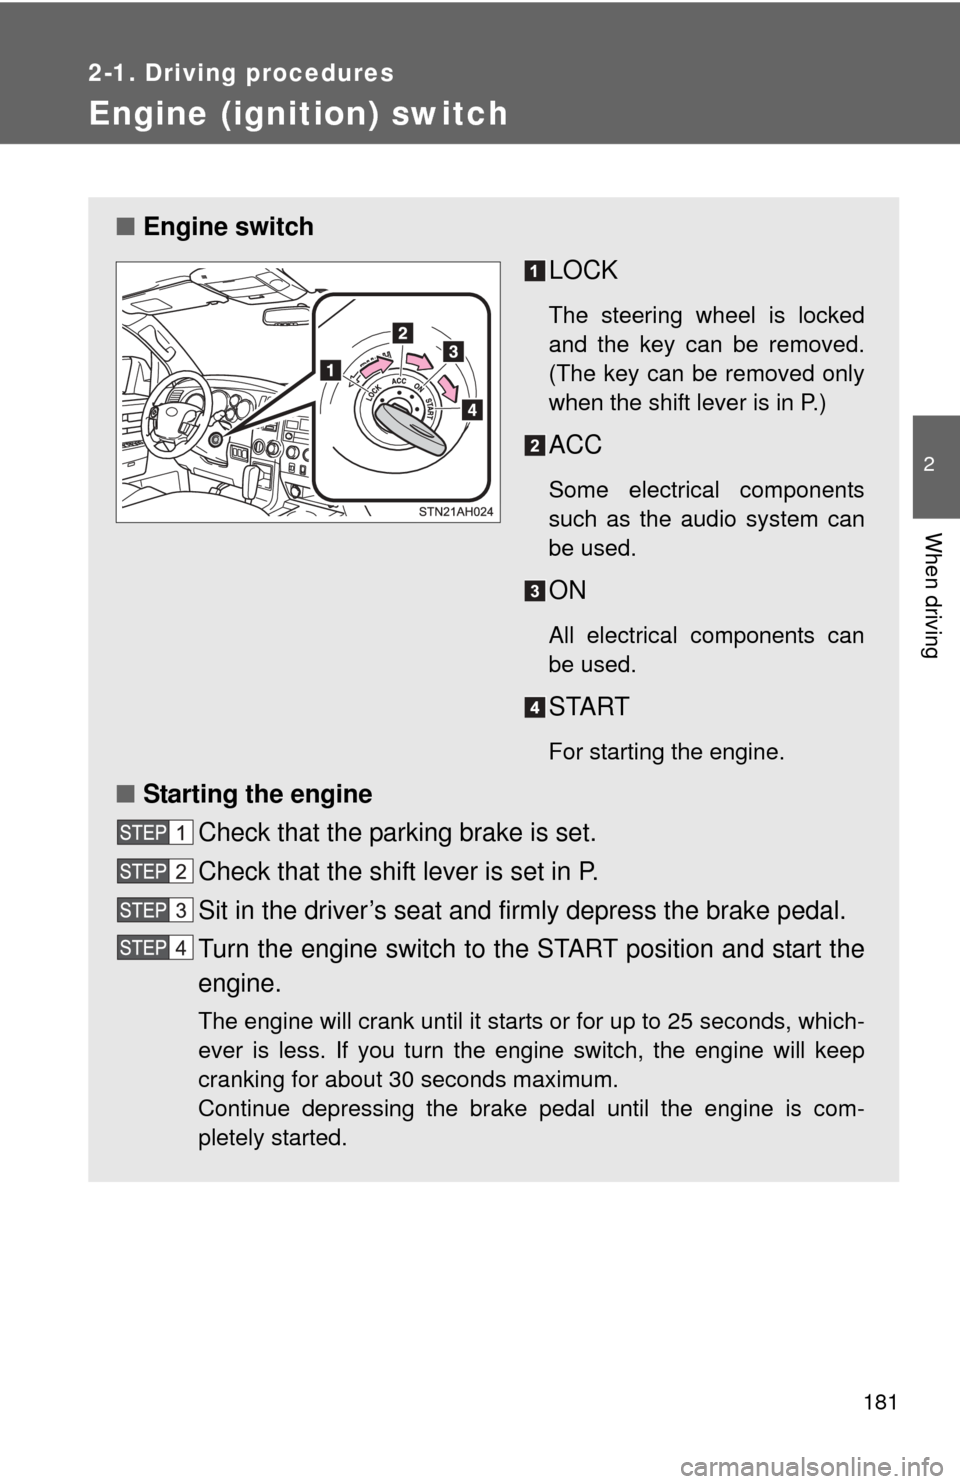
■Engine switch
LOCK
The steering wheel is locked
and the key can be removed.
(The key can be removed only
when the shift lever is in P.)
ACC
Some electrical components
such as the audio system can
be used.
ON
All electrical components can
be used.
START
For starting the engine.
■Starting the engine
Check that the parking brake is set.
Check that the shift lever is set in P.
Sit in the driver’s seat and firmly depress the brake pedal.
Turn the engine switch to the START position and start the
engine.
The engine will crank until it starts or for up to 25 seconds, which-
ever is less. If you turn the engine switch, the engine will keep
cranking for about 30 seconds maximum.
Continue depressing the brake pedal until the engine is com-
pletely started.
Page 182 of 732
182 2-1. Driving procedures
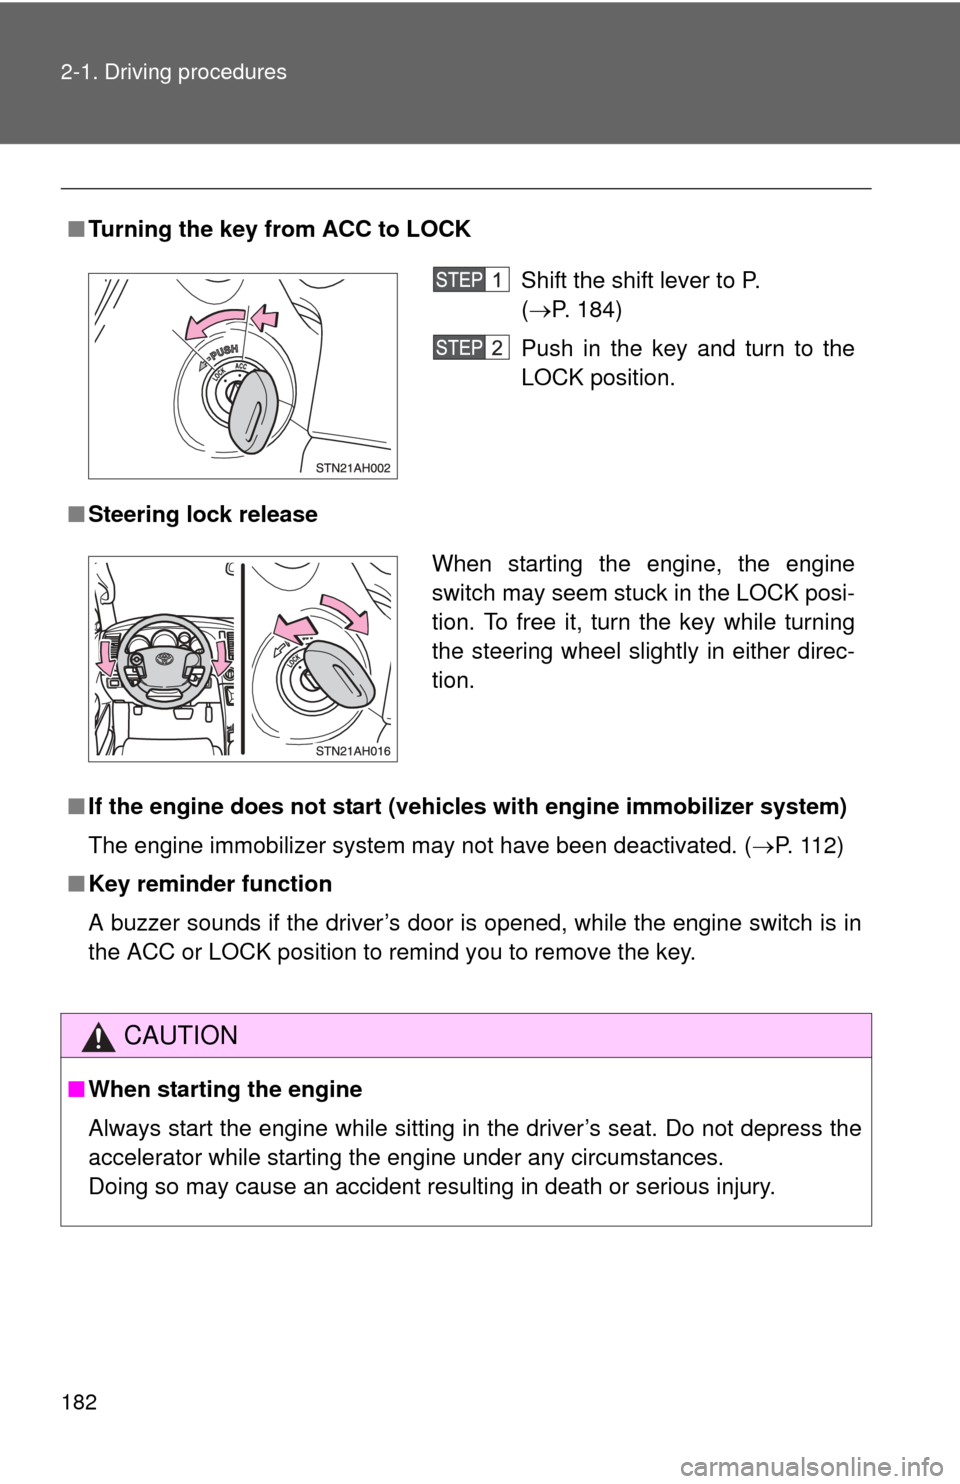
■Turning the key from ACC to LOCK
■ Steering lock release
■ If the engine does not start (vehic les with engine immobilizer system)
The engine immobilizer system may not have been deactivated. ( P. 112)
■ Key reminder function
A buzzer sounds if the driver’s door is opened, while the engine switch is in
the ACC or LOCK position to remind you to remove the key.
CAUTION
■When starting the engine
Always start the engine while sitting in the driver’s seat. Do not depress the
accelerator while starting the engine under any circumstances.
Doing so may cause an accident resulting in death or serious injury.
Shift the shift lever to P.
(P. 184)
Push in the key and turn to the
LOCK position.
When starting the engine, the engine
switch may seem stuck in the LOCK posi-
tion. To free it, turn the key while turning
the steering wheel slightly in either direc-
tion.
Page 183 of 732
183
2-1. Driving procedures
2
When driving
NOTICE
■
To prevent battery discharge
Do not leave the engine switch in the ACC or ON position for long periods if
the engine is not running.
■ When starting the engine
●Do not crank for more than 30 seconds at a time. This may overheat the
starter and wiring systems.
● Do not race a cold engine.
● If the engine becomes difficult to start or stalls frequently, have the engine
checked immediately.
Page 184 of 732
184
2-1. Driving procedures
Automatic transmission
Select a shift position appropriate for the driving conditions.
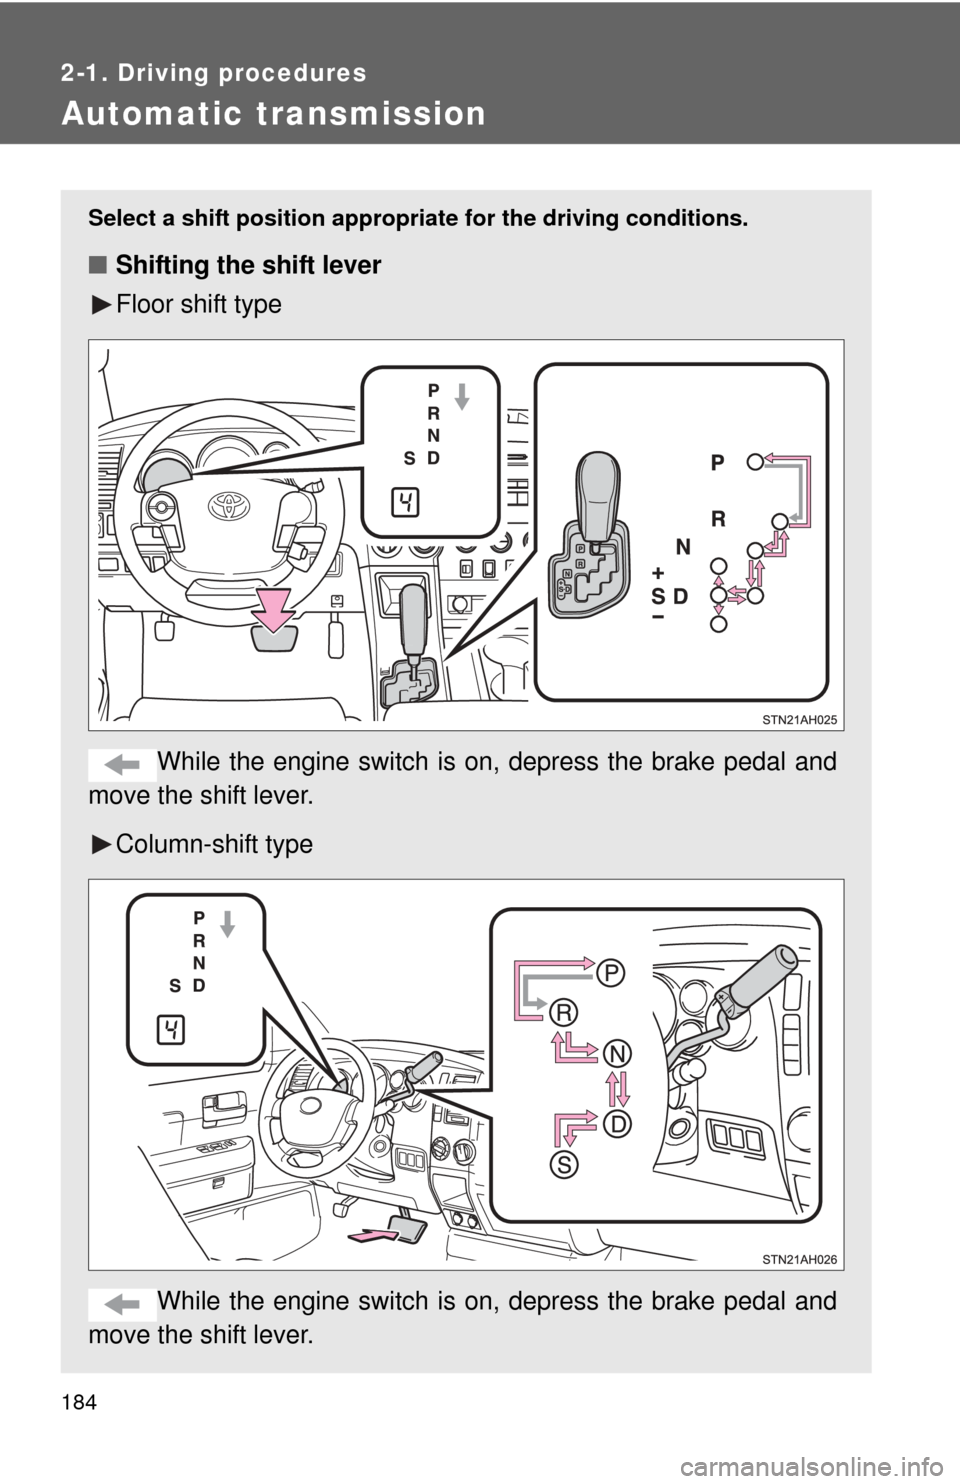
■Shifting the shift lever
Floor shift type
While the engine switch is on, depress the brake pedal and
move the shift lever.
Column-shift type
While the engine switch is on, depress the brake pedal and
move the shift lever.
Page 185 of 732
185
2-1. Driving procedures
2
When driving
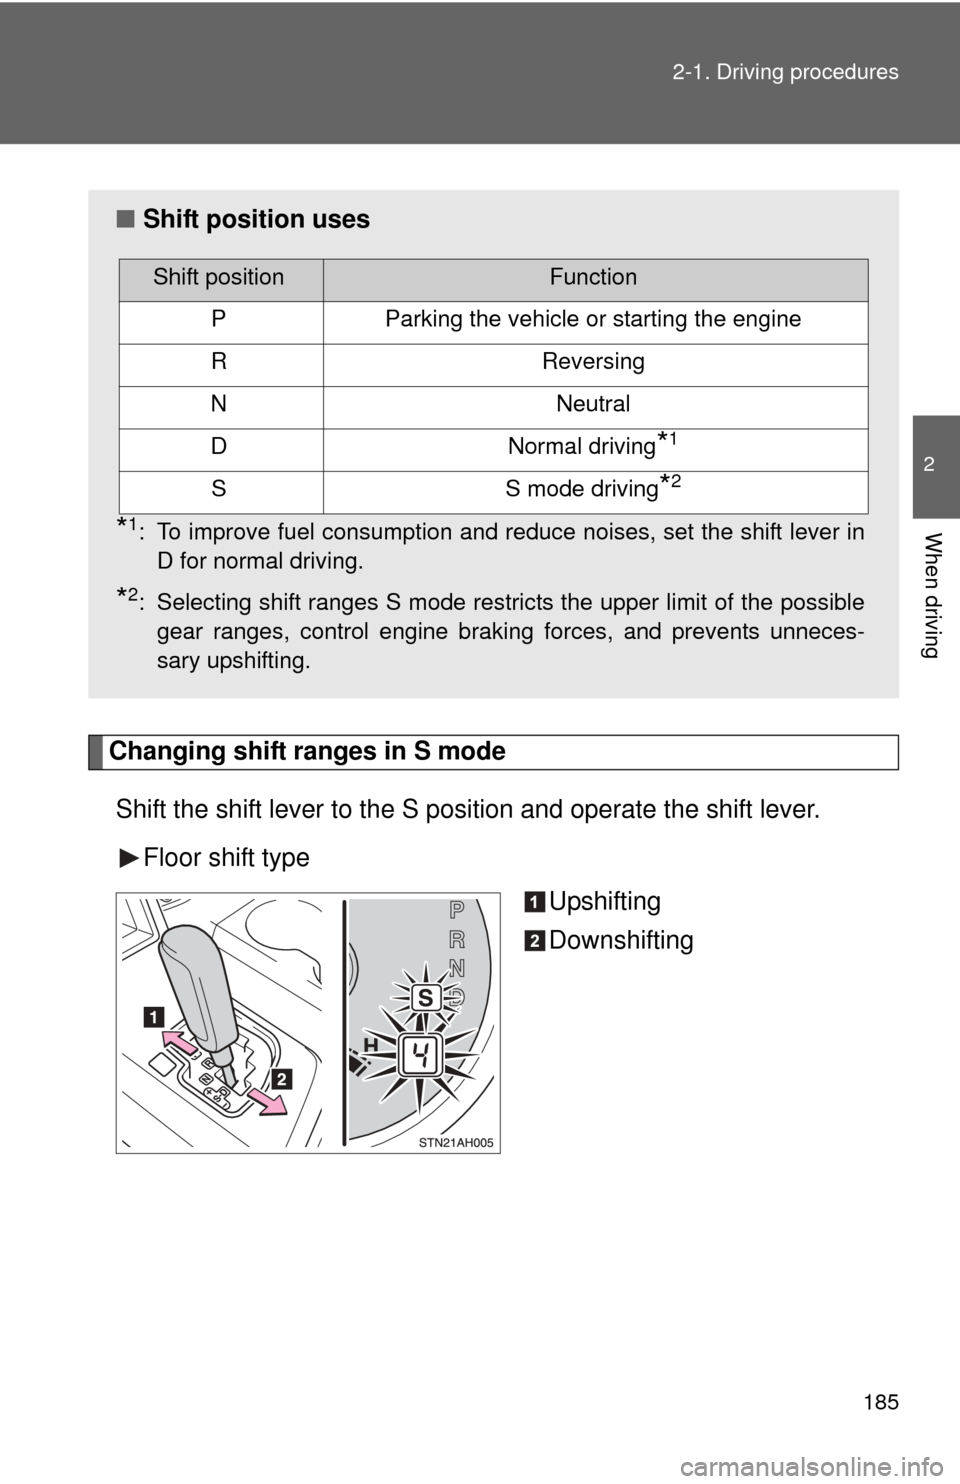
Changing shift ranges in S mode
Shift the shift lever to the S position and operate the shift lever. Floor shift type Upshifting
Downshifting
■Shift position uses
*1: To improve fuel consumption and reduce noises, set the shift lever in
D for normal driving.
*2: Selecting shift ranges S mode restricts the upper limit of the possiblegear ranges, control engine braking forces, and prevents unneces-
sary upshifting.
Shift positionFunction
PParking the vehicle or starting the engine
RReversing
NNeutral
DNormal driving*1
SS mode driving*2
Page 186 of 732
186 2-1. Driving procedures
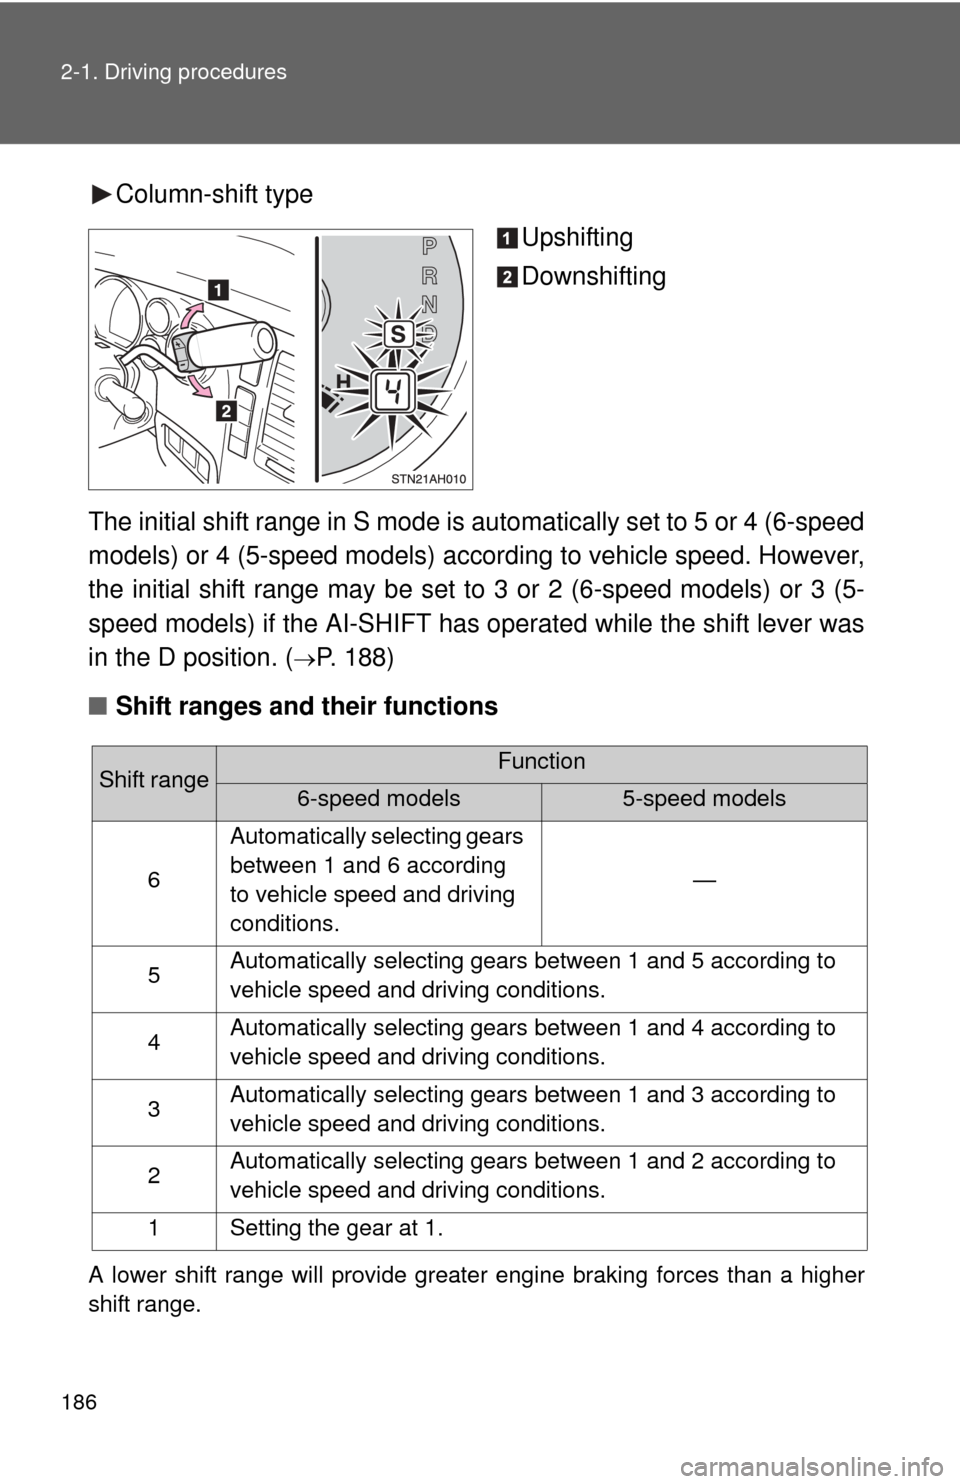
Column-shift typeUpshifting
Downshifting
The initial shift range in S mode is automatically set to 5 or 4 (6-speed
models) or 4 (5-speed models) according to vehicle speed. However,
the initial shift range may be set to 3 or 2 (6-speed models) or 3 (5-
speed models) if the AI-SHIFT has operated while the shift lever was
in the D position. (
P. 188)
■ Shift ranges and their functions
A lower shift range will provide greater engine braking forces than a higher
shift range.
Shift rangeFunction
6-speed models5-speed models
6
Automatically selecting gears
between 1 and 6 according
to vehicle speed and driving
conditions.
—
5Automatically selecting gears between 1 and 5 according to
vehicle speed and driving conditions.
4Automatically selecting gears between 1 and 4 according to
vehicle speed and driving conditions.
3Automatically selecting gears between 1 and 3 according to
vehicle speed and driving conditions.
2Automatically selecting gears between 1 and 2 according to
vehicle speed and driving conditions.
1Setting the gear at 1.
Page 187 of 732
187
2-1. Driving procedures
2
When driving
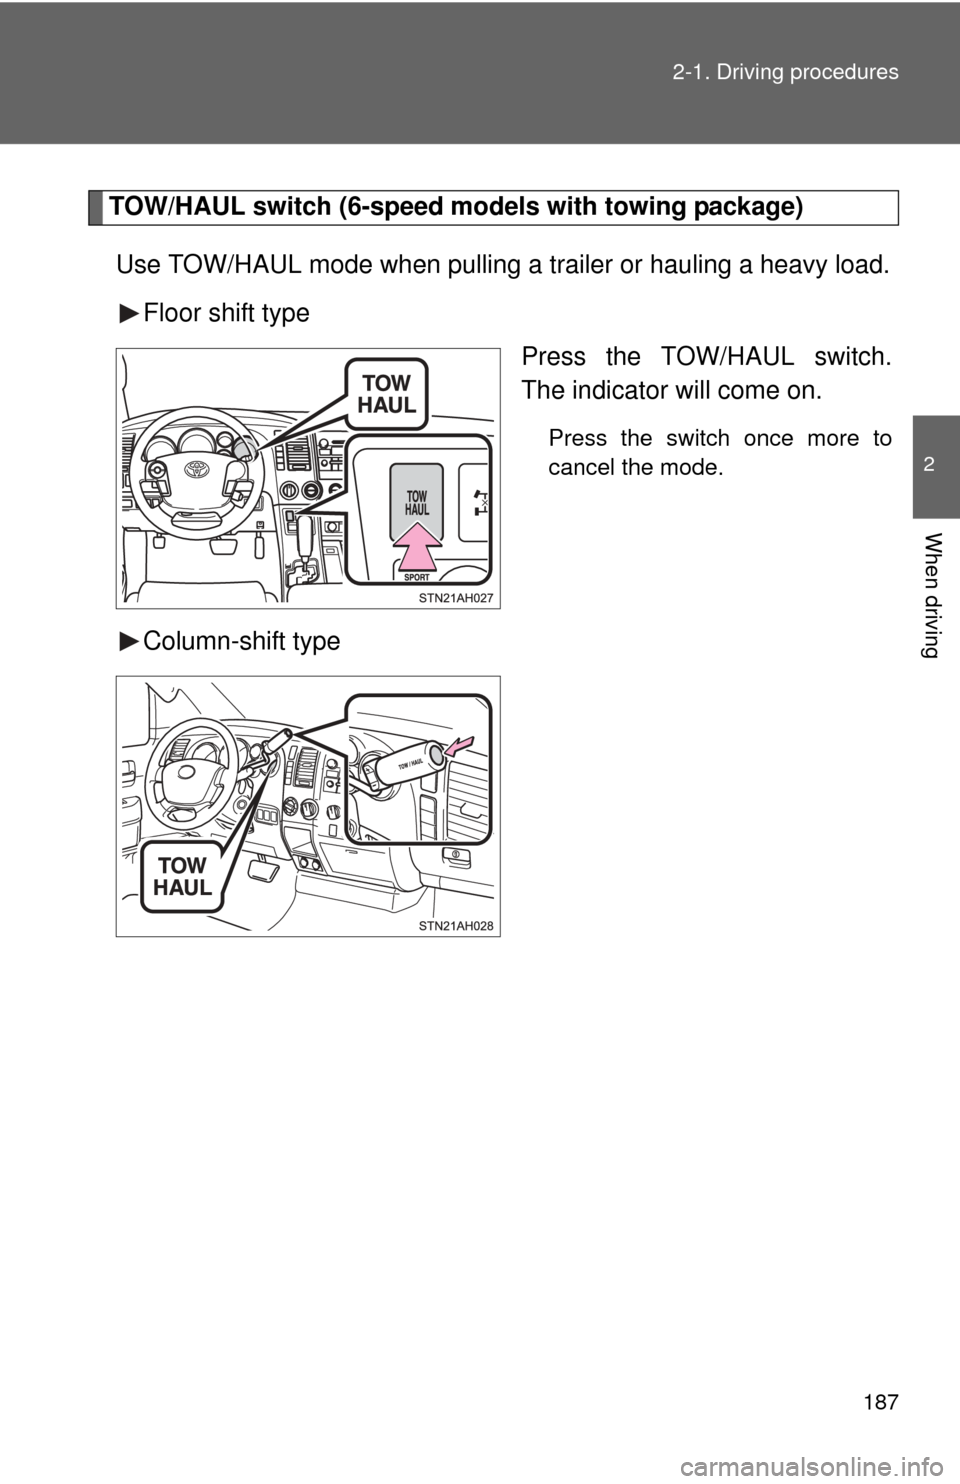
TOW/HAUL switch (6-speed
models with towing package)
Use TOW/HAUL mode when pulling a trailer or hauling a heavy load. Floor shift type Press the TOW/HAUL switch.
The indicator will come on.
Press the switch once more to
cancel the mode.
Column-shift type
Page 188 of 732

188 2-1. Driving procedures
■Gear range display when driving in S mode
The current gear range is displayed on the combination meter. ( P. 185)
■ When driving with the cruise control system (if equipped)
The engine brake will not operate in the S mode, even when downshifting to
5 or 4 (6-speed models) or 4 or 3 (5-speed models). ( P. 220)
■ If the shift lever cannot be shifted from P
P. 630
■ If the S indicator does not come on even after shifting the shift lever to
S
This may indicate a malfunction in the automatic transmission system. Have
the vehicle inspected by your Toyota dealer, immediately.
(In this situation, the vehicle will operate as if the shift lever is in D.)
■ AI-SHIFT
The AI-SHIFT automatically shifts the gear to the optimal position according
to the driver performance and driving conditions.
The AI-SHIFT automatically operates when the shift lever is in the D posi-
tion. (Shifting the shift lever to the S position cancels the function.)
■ Downshifting restrictions wa rning buzzer (in the S mode)
To help ensure safety and driving performance, downshifting operation may
sometimes be restricted. In some circumstances, downshifting may not be
possible even when the shift lever is operated. (The warning buzzer will
sound twice.)
Page 189 of 732
189
2-1. Driving procedures
2
When driving
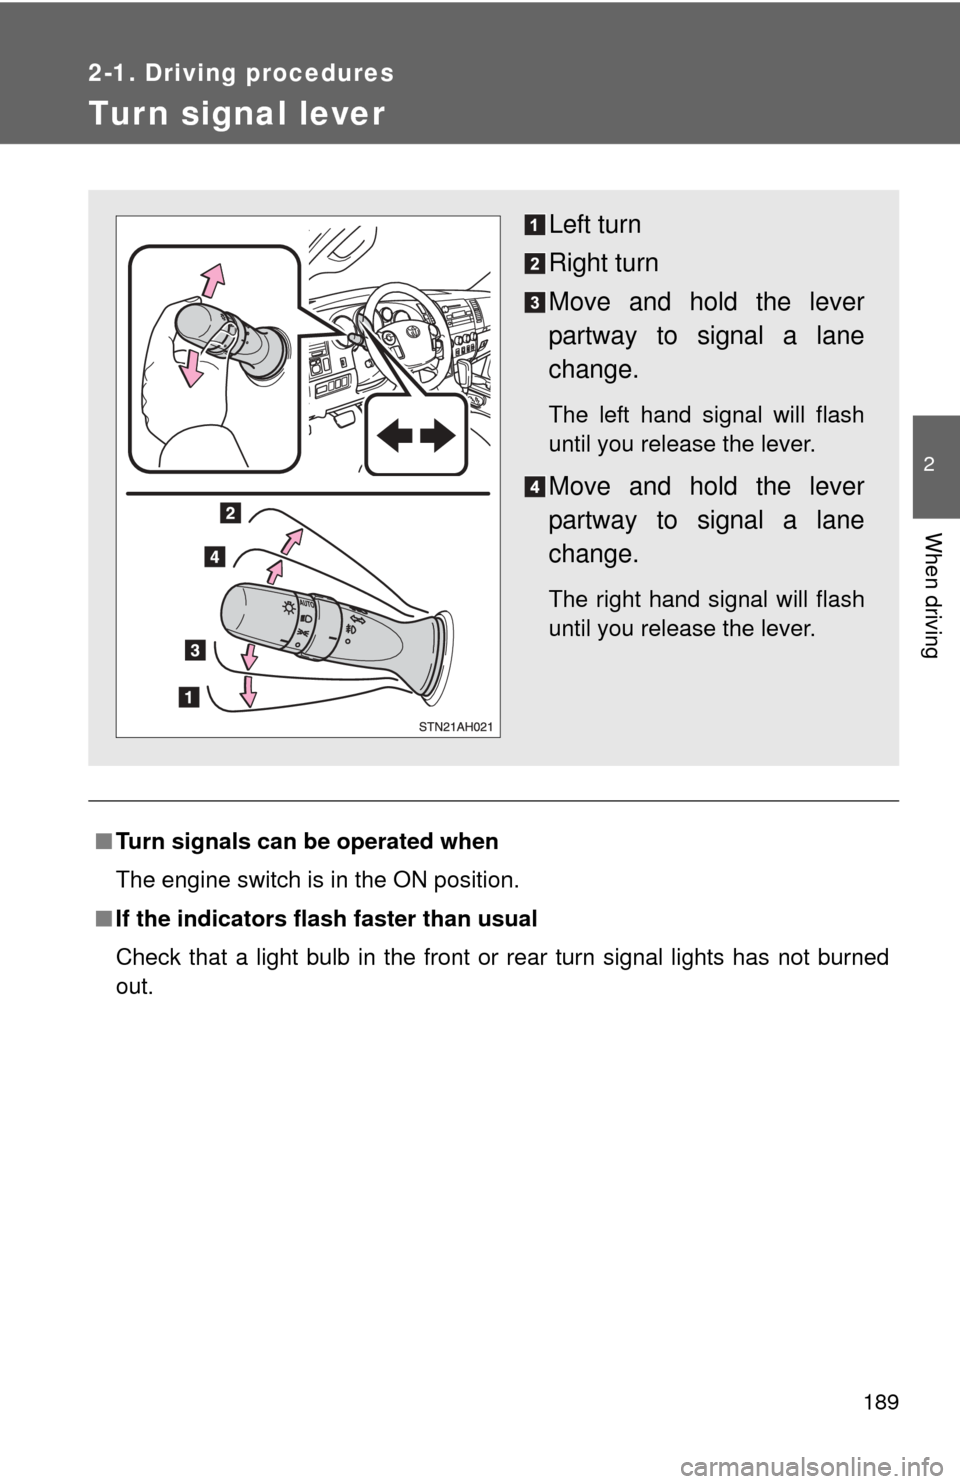
Tur n signal lever
■Turn signals can be operated when
The engine switch is in the ON position.
■ If the indicators flash faster than usual
Check that a light bulb in the front or rear turn signal lights has not burned
out.
Left turn
Right turn
Move and hold the lever
partway to signal a lane
change.
The left hand signal will flash
until you release the lever.
Move and hold the lever
partway to signal a lane
change.
The right hand signal will flash
until you release the lever.
Page 190 of 732
190
2-1. Driving procedures
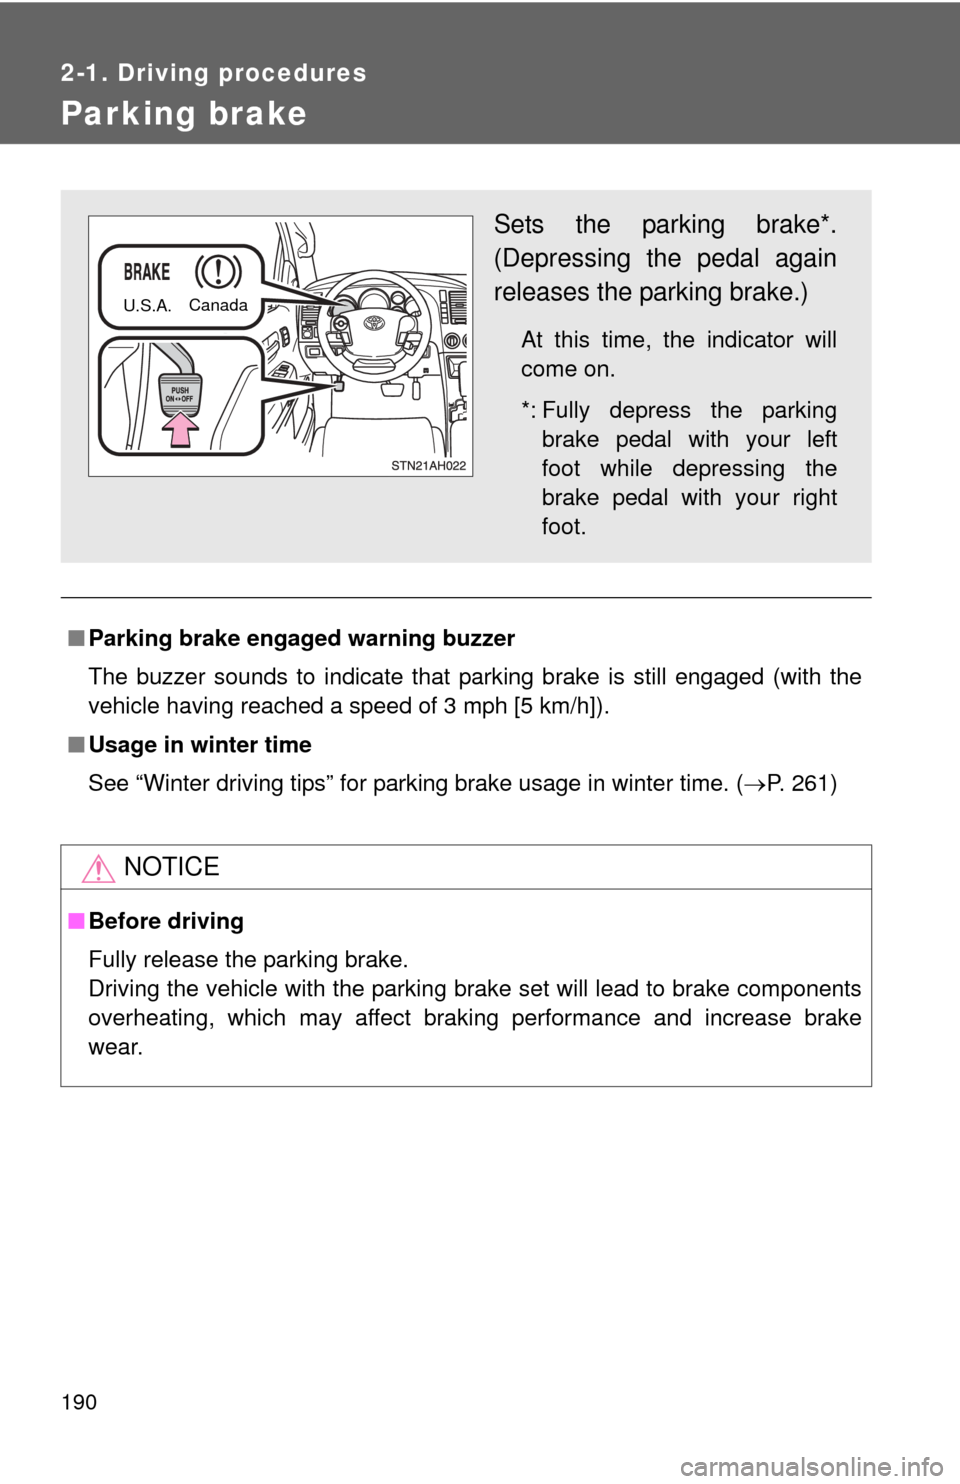
Parking brake
■Parking brake engaged warning buzzer
The buzzer sounds to indicate that parking brake is still engaged (with the
vehicle having reached a speed of 3 mph [5 km/h]).
■ Usage in winter time
See “Winter driving tips” for parking brake usage in winter time. ( P. 261)
NOTICE
■Before driving
Fully release the parking brake.
Driving the vehicle with the parking brake set will lead to brake components
overheating, which may affect braking performance and increase brake
wear.
Sets the parking brake*.
(Depressing the pedal again
releases the parking brake.)
At this time, the indicator will
come on.
*: Fully depress the parking
brake pedal with your left
foot while depressing the
brake pedal with your right
foot.
Canada
U.S.A.
Trending: navigation system, manual transmission, child lock, check engine light, fuel cap release, stop start, checking oil
