TOYOTA TUNDRA 2014 2.G Navigation Manual
Manufacturer: TOYOTA, Model Year: 2014, Model line: TUNDRA, Model: TOYOTA TUNDRA 2014 2.GPages: 276, PDF Size: 19.84 MB
Page 61 of 276
61
3. OTHER SETTINGS
2
BASIC FUNCTION
5. MAINTENANCE*
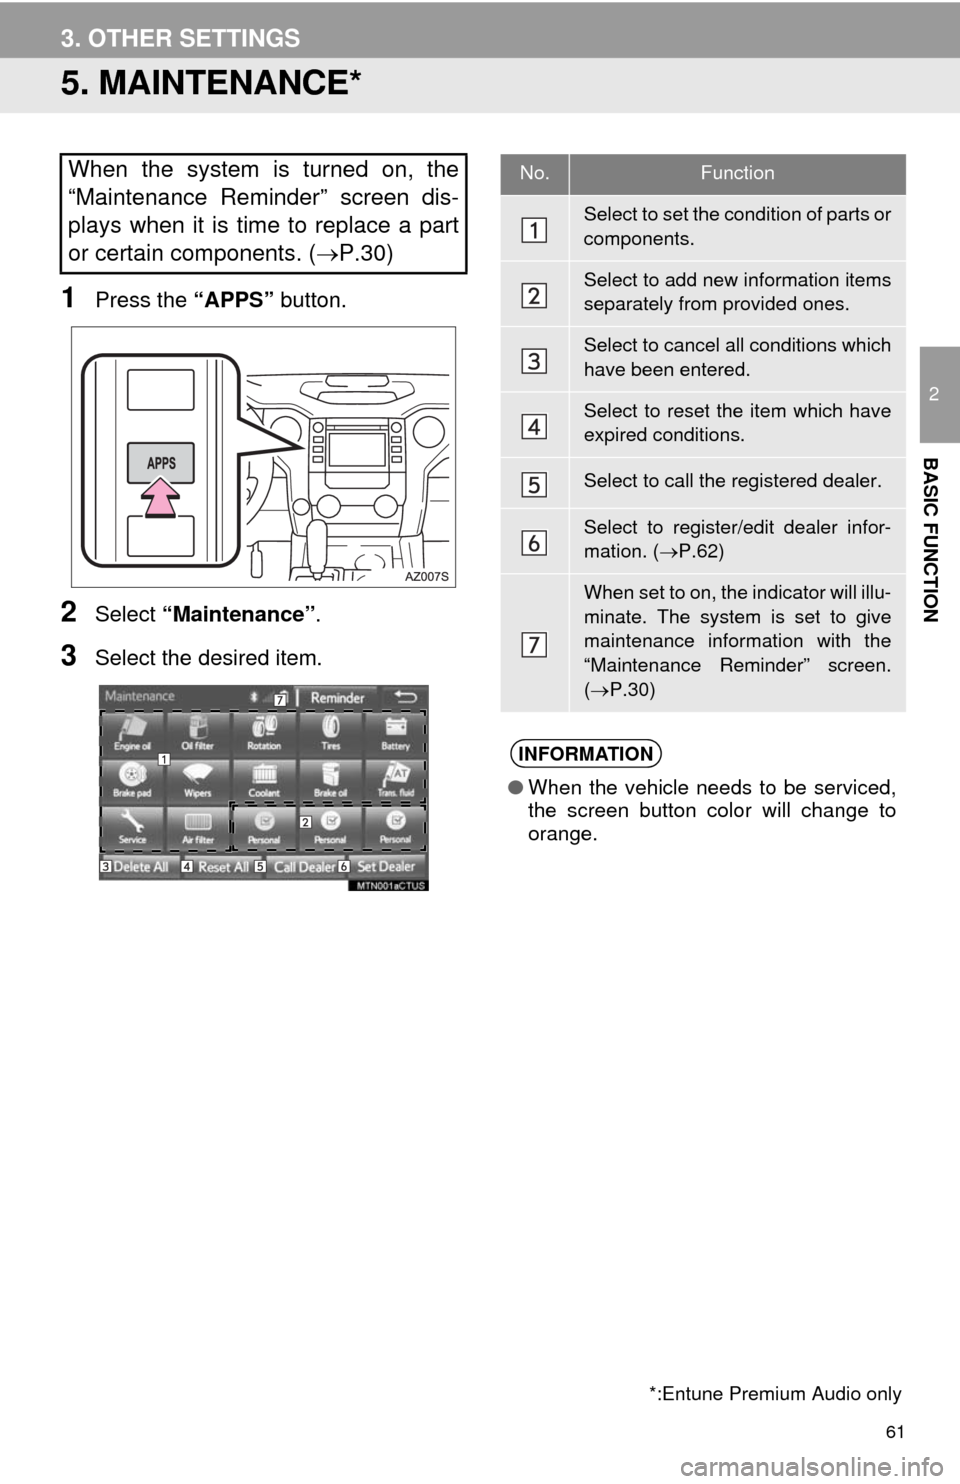
1Press the “APPS” button.
2Select “Maintenance”.
3Select the desired item.
When the system is turned on, the
“Maintenance Reminder” screen dis-
plays when it is time to replace a part
or certain components. (P.30)
*:Entune Premium Audio only
No.Function
Select to set the condition of parts or
components.
Select to add new information items
separately from provided ones.
Select to cancel all conditions which
have been entered.
Select to reset the item which have
expired conditions.
Select to call the registered dealer.
Select to register/edit dealer infor-
mation. (P.62)
When set to on, the indicator will illu-
minate. The system is set to give
maintenance information with the
“Maintenance Reminder” screen.
(P.30)
INFORMATION
●When the vehicle needs to be serviced,
the screen button color will change to
orange.
Page 62 of 276
62
3. OTHER SETTINGS
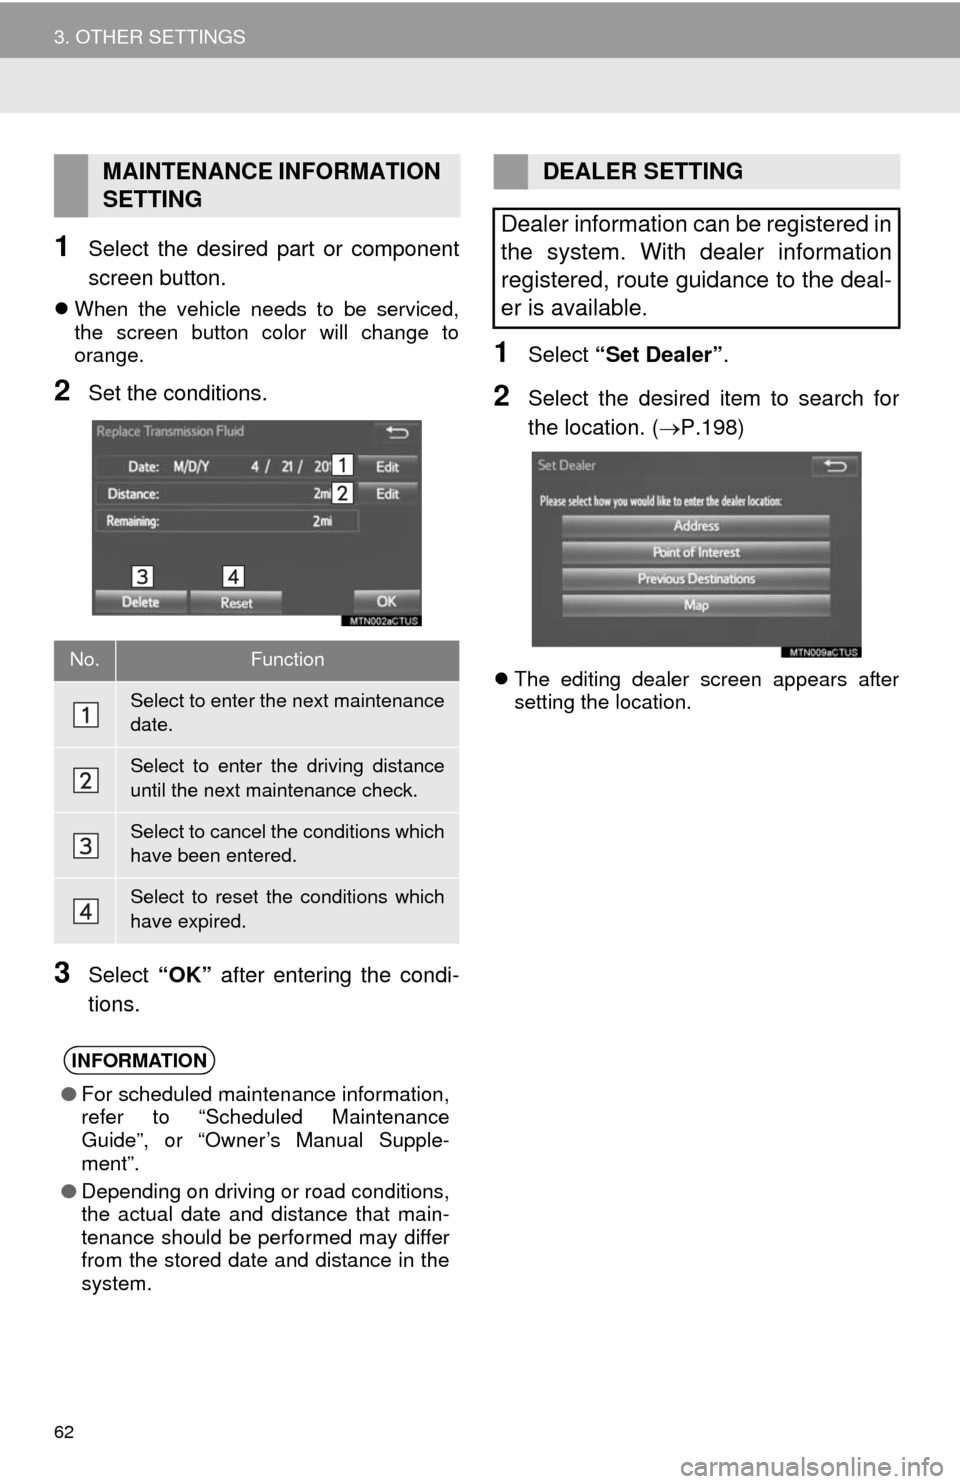
1Select the desired part or component
screen button.
When the vehicle needs to be serviced,
the screen button color will change to
orange.
2Set the conditions.
3Select “OK” after entering the condi-
tions.
1Select “Set Dealer”.
2Select the desired item to search for
the location. (P.198)
The editing dealer screen appears after
setting the location.
MAINTENANCE INFORMATION
SETTING
No.Function
Select to enter the next maintenance
date.
Select to enter the driving distance
until the next maintenance check.
Select to cancel the conditions which
have been entered.
Select to reset the conditions which
have expired.
INFORMATION
●For scheduled maintenance information,
refer to “Scheduled Maintenance
Guide”, or “Owner’s Manual Supple-
ment”.
●Depending on driving or road conditions,
the actual date and distance that main-
tenance should be performed may differ
from the stored date and distance in the
system.
DEALER SETTING
Dealer information can be registered in
the system. With dealer information
registered, route guidance to the deal-
er is available.
Page 63 of 276
63
3. OTHER SETTINGS
2
BASIC FUNCTION
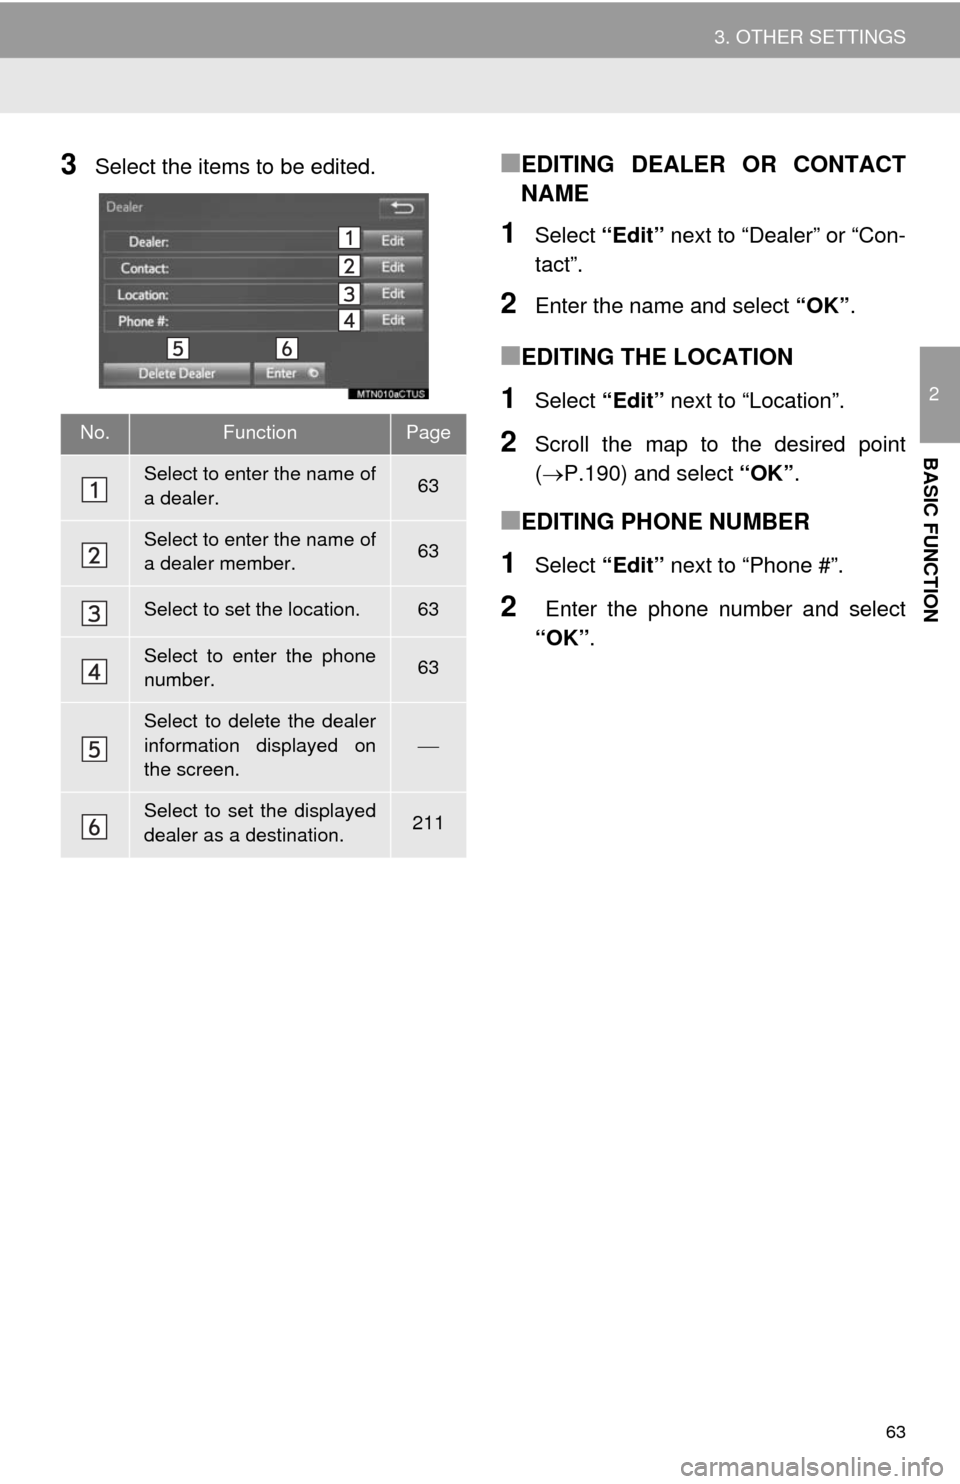
3Select the items to be edited.■EDITING DEALER OR CONTACT
NAME
1Select “Edit” next to “Dealer” or “Con-
tact”.
2Enter the name and select “OK”.
■EDITING THE LOCATION
1Select “Edit” next to “Location”.
2Scroll the map to the desired point
(P.190) and select “OK”.
■EDITING PHONE NUMBER
1Select “Edit” next to “Phone #”.
2 Enter the phone number and select
“OK”.
No.FunctionPage
Select to enter the name of
a dealer.63
Select to enter the name of
a dealer member.63
Select to set the location.63
Select to enter the phone
number.63
Select to delete the dealer
information displayed on
the screen.
Select to set the displayed
dealer as a destination.211
Page 64 of 276
64
1. QUICK REFERENCE ..................... 66
2. SOME BASICS............................... 68
TURNING THE SYSTEM ON AND OFF ...................................... 68
SELECTING AN AUDIO SOURCE ........ 69
DISC SLOT ............................................ 70
USB/AUX PORT .................................... 70
SOUND SETTINGS ............................... 71
VOICE COMMAND SYSTEM ................ 72
1. AM/FM RADIO...................................... 73
OVERVIEW ............................................ 73
PRESETTING A STATION .................... 75
SELECTING A STATION FROM THE LIST ................................. 75
CACHING A RADIO PROGRAM (ENTUNE PREMIUM AUDIO
ONLY) .................................................. 76
RADIO BROADCAST DATA SYSTEM .............................................. 77
TRAFFIC ANNOUNCEMENT (FM RADIO) ......................................... 78
USING HD Radio™ TECHNOLOGY...... 78
AVAILABLE HD Radio™ TECHNOLOGY.................................... 79
TROUBLESHOOTING GUIDE ............... 81
2. XM Satellite Radio ........................ 82
OVERVIEW ............................................ 82
HOW TO SUBSCRIBE TO XM Satellite Radio ............................... 84
DISPLAYING THE RADIO ID................. 86
PRESETTING A CHANNEL ................... 86
SELECTING A CHANNEL FROM THE LIST ................................. 86
IF THE SATELLITE RADIO TUNER MALFUNCTIONS ................................ 87
3. INTERNET RADIO......................... 88
LISTENING TO INTERNET RADIO ....... 88
1BASIC OPERATION2RADIO OPERATION
3
AUDIO SYSTEM
Page 65 of 276
3
65
1
2
4
3
5
6
7
8
9
1. CD .................................................. 89
OVERVIEW ........................................... 89
PLAYING AN AUDIO CD ...................... 91
PLAYING AN MP3/WMA/AAC DISC ..... 91
2. USB MEMORY ............................... 92
OVERVIEW ........................................... 92
PLAYING A USB AUDIO ....................... 95
3. iPod ................................................ 96
OVERVIEW ........................................... 96
PLAYING AN iPod ................................. 99
4. Bluetooth® AUDIO ...................... 100
OVERVIEW ......................................... 100
CONNECTING A Bluetooth®
DEVICE ............................................. 103
LISTENING TO Bluetooth
® AUDIO ..... 103
5.AUX ................................................. 104
OVERVIEW ......................................... 104
1. STEERING SWITCHES............... 106
1. AUDIO SETTINGS ...................... 107
“Audio Settings” SCREEN ................... 107
1. OPERATING INFORMATION ..... 109
RADIO.................................................. 109
CD PLAYER AND DISC ...................... 110
iPod ...................................................... 112
FILE INFORMATION ........................... 113
TERMS ................................................ 116
ERROR MESSAGES ........................... 117
3MEDIA OPERATION4AUDIO REMOTE CONTROLS
5SETUP
6TIPS FOR OPERATING
THE AUDIO SYSTEM
AUDIO SYSTEM
Page 66 of 276
66
1. BASIC OPERATION
1. QUICK REFERENCE
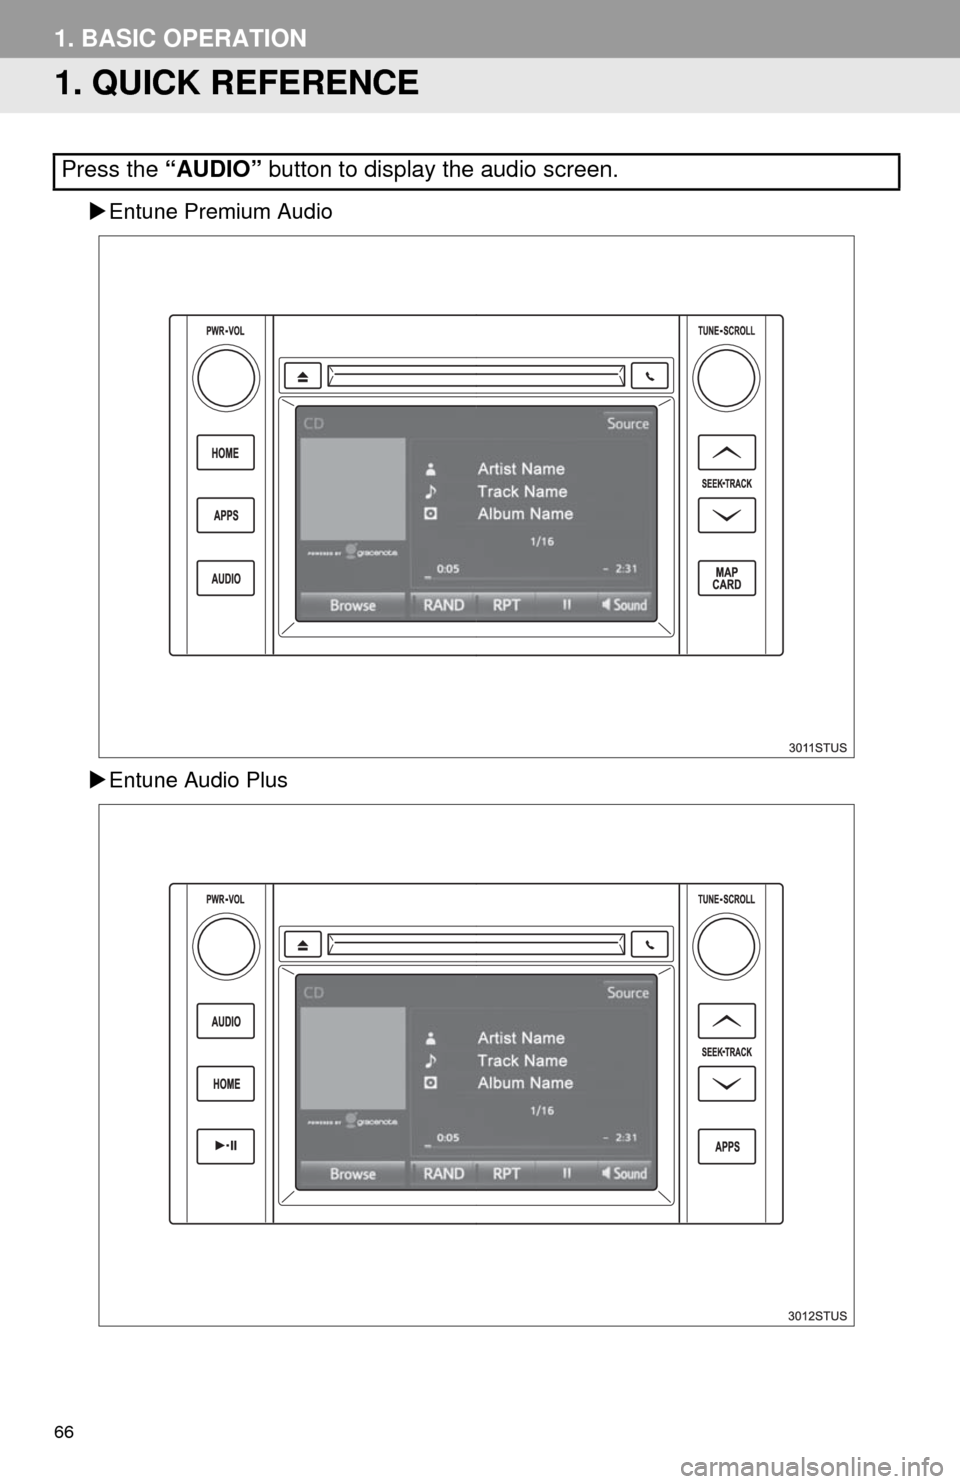
Entune Premium Audio
Entune Audio Plus
Press the “AUDIO” button to display the audio screen.
Page 67 of 276
67
1. BASIC OPERATION
3
AUDIO SYSTEM
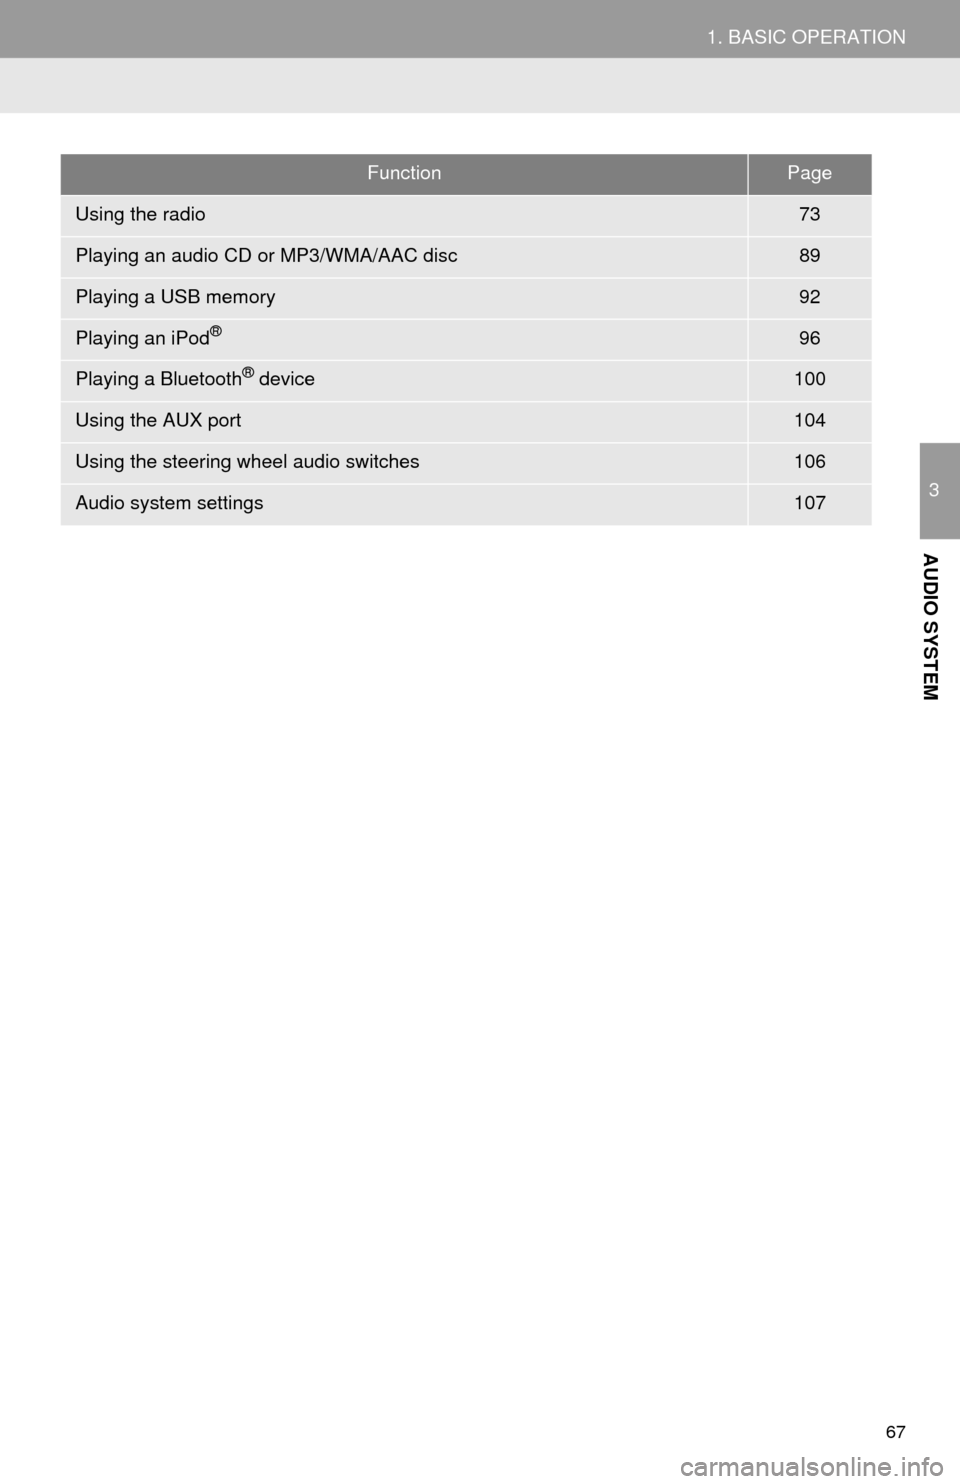
FunctionPage
Using the radio73
Playing an audio CD or MP3/WMA/AAC disc89
Playing a USB memory92
Playing an iPod®96
Playing a Bluetooth® device100
Using the AUX port104
Using the steering wheel audio switches106
Audio system settings107
Page 68 of 276
68
1. BASIC OPERATION
2. SOME BASICS
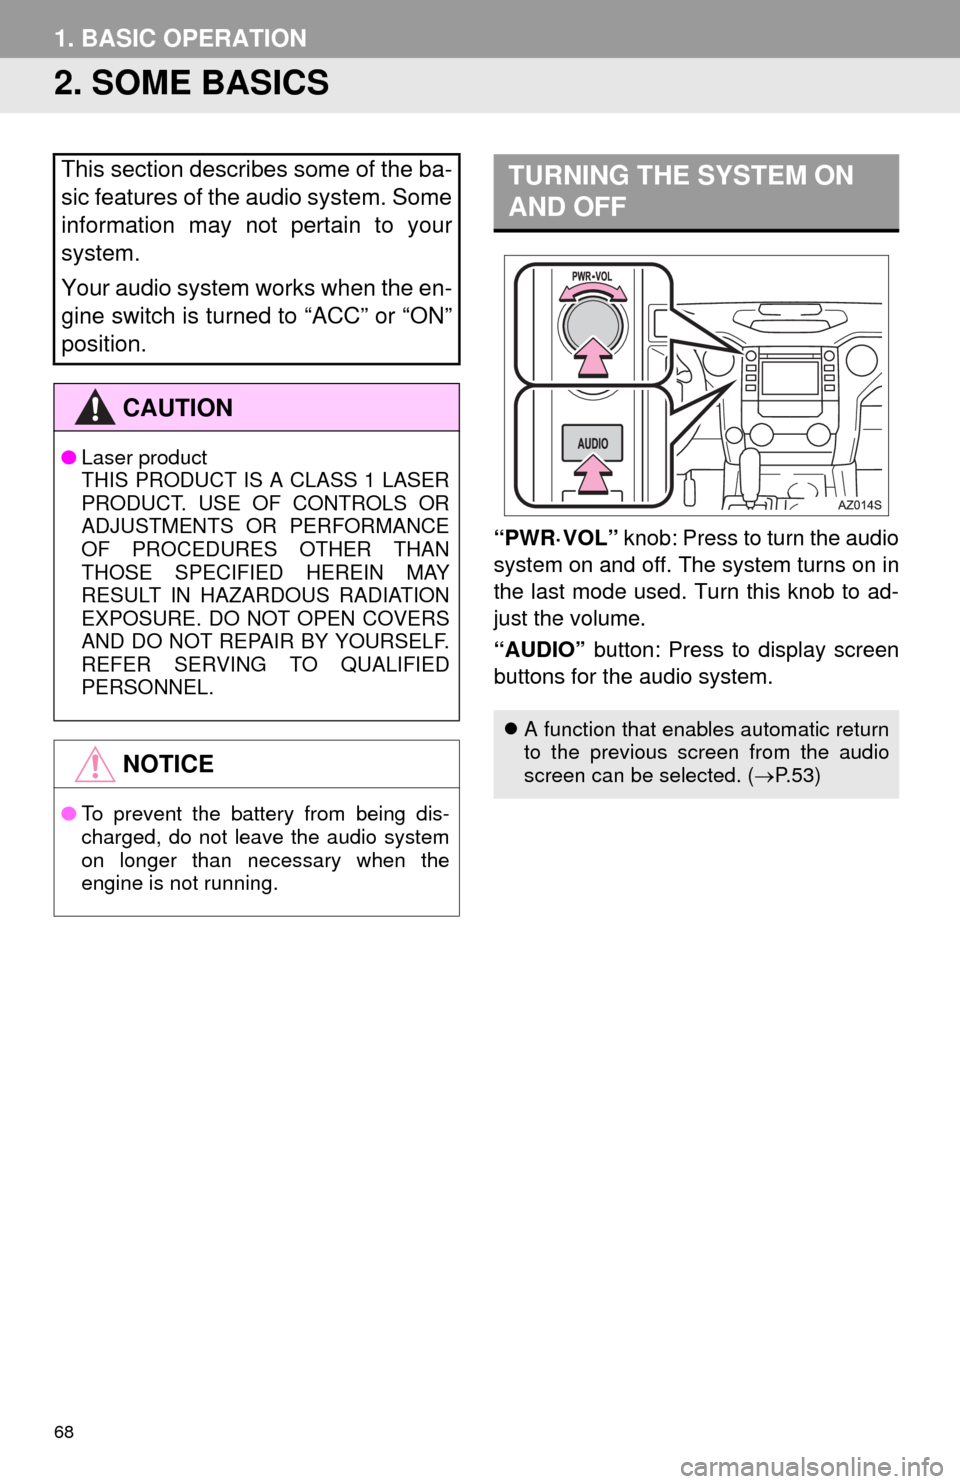
“PWR·VOL” knob: Press to turn the audio
system on and off. The system turns on in
the last mode used. Turn this knob to ad-
just the volume.
“AUDIO” button: Press to display screen
buttons for the audio system.
This section describes some of the ba-
sic features of the audio system. Some
information may not pertain to your
system.
Your audio system works when the en-
gine switch is turned to “ACC” or “ON”
position.
CAUTION
●Laser product
THIS PRODUCT IS A CLASS 1 LASER
PRODUCT. USE OF CONTROLS OR
ADJUSTMENTS OR PERFORMANCE
OF PROCEDURES OTHER THAN
THOSE SPECIFIED HEREIN MAY
RESULT IN HAZARDOUS RADIATION
EXPOSURE. DO NOT OPEN COVERS
AND DO NOT REPAIR BY YOURSELF.
REFER SERVING TO QUALIFIED
PERSONNEL.
NOTICE
●To prevent the battery from being dis-
charged, do not leave the audio system
on longer than necessary when the
engine is not running.
TURNING THE SYSTEM ON
AND OFF
A function that enables automatic return
to the previous screen from the audio
screen can be selected. (P. 5 3 )
Page 69 of 276
69
1. BASIC OPERATION
3
AUDIO SYSTEM
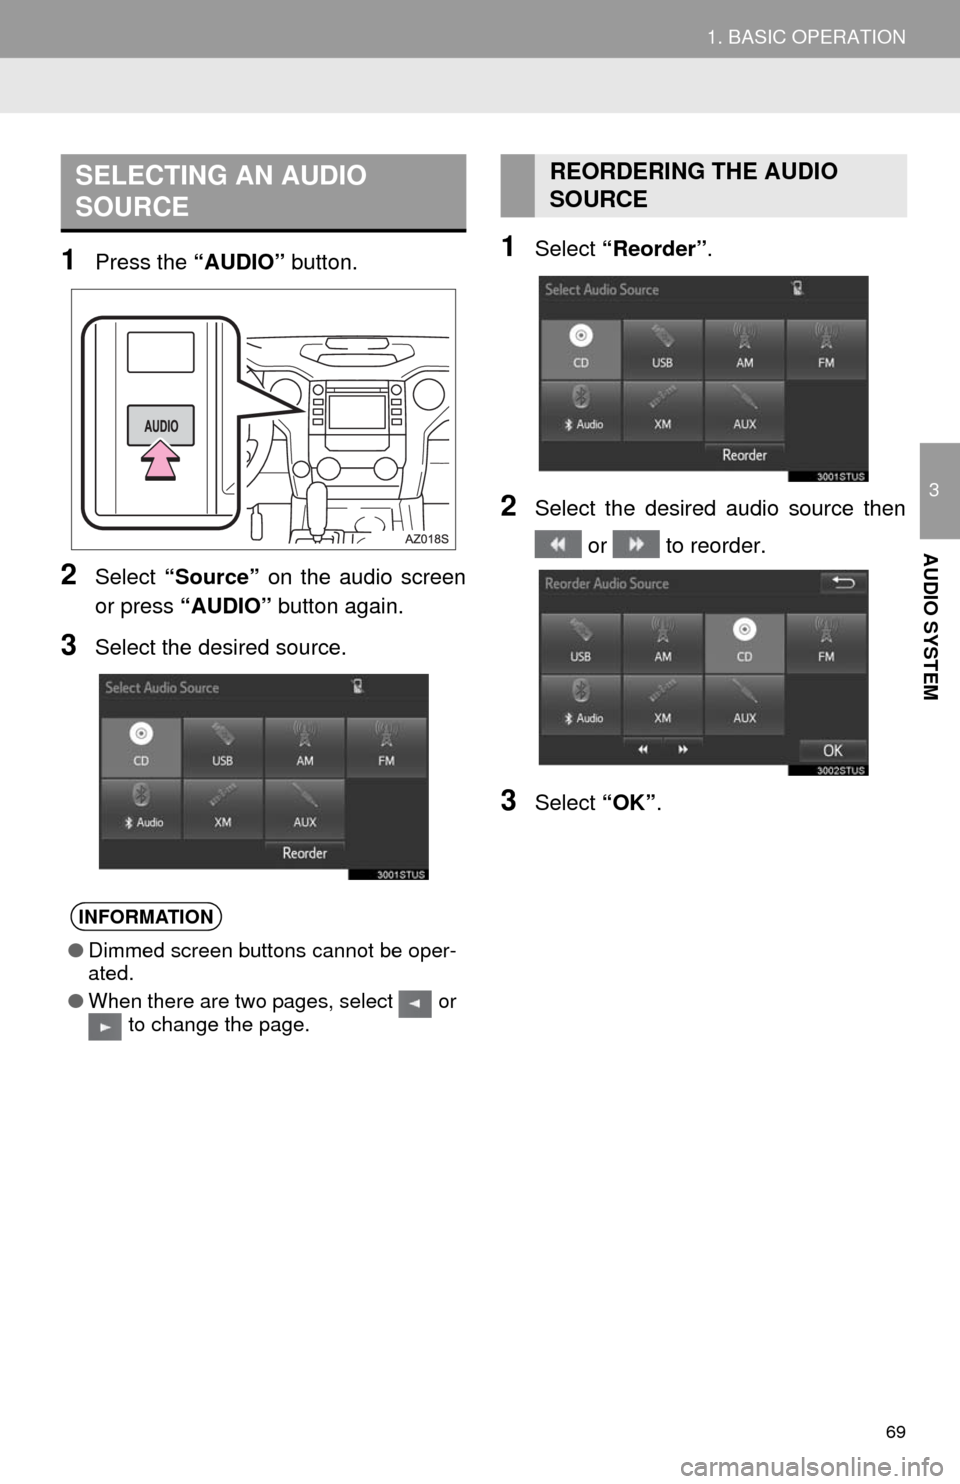
1Press the “AUDIO” button.
2Select “Source” on the audio screen
or press “AUDIO” button again.
3Select the desired source.
1Select “Reorder”.
2Select the desired audio source then
or to reorder.
3Select “OK”.
SELECTING AN AUDIO
SOURCE
INFORMATION
●Dimmed screen buttons cannot be oper-
ated.
●When there are two pages, select or
to change the page.
REORDERING THE AUDIO
SOURCE
Page 70 of 276
70
1. BASIC OPERATION
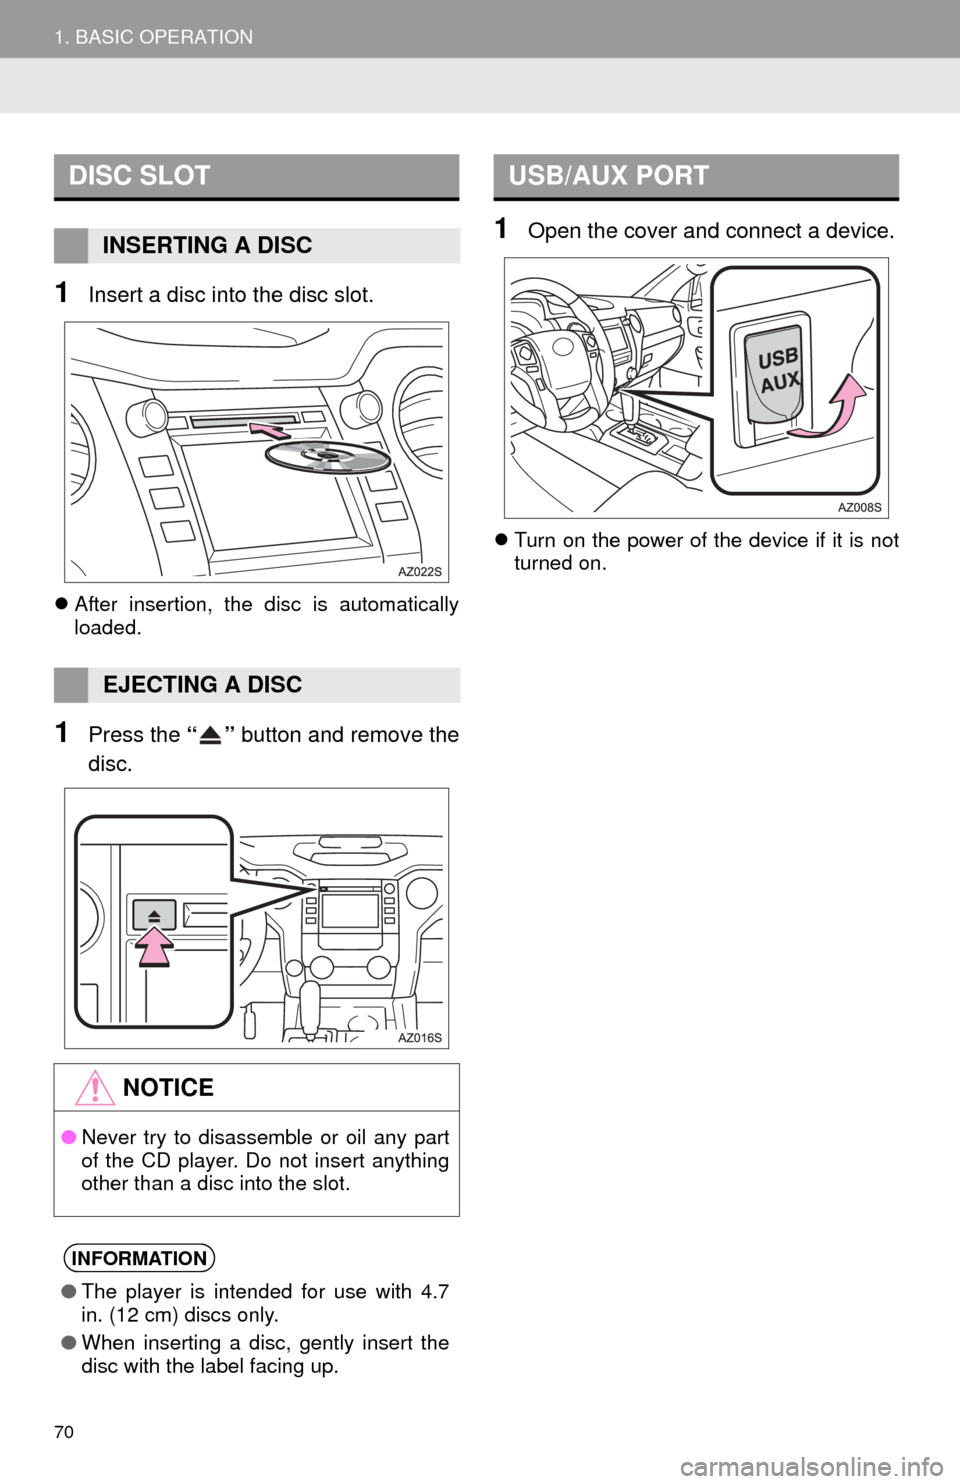
1Insert a disc into the disc slot.
After insertion, the disc is automatically
loaded.
1Press the “” button and remove the
disc.
1Open the cover and connect a device.
Turn on the power of the device if it is not
turned on.
DISC SLOT
INSERTING A DISC
EJECTING A DISC
NOTICE
●Never try to disassemble or oil any part
of the CD player. Do not insert anything
other than a disc into the slot.
INFORMATION
●The player is intended for use with 4.7
in. (12 cm) discs only.
●When inserting a disc, gently insert the
disc with the label facing up.
USB/AUX PORT