TOYOTA TUNDRA 2014 2.G Navigation Manual
Manufacturer: TOYOTA, Model Year: 2014, Model line: TUNDRA, Model: TOYOTA TUNDRA 2014 2.GPages: 276, PDF Size: 19.84 MB
Page 101 of 276
101
3. MEDIA OPERATION
3
AUDIO SYSTEM
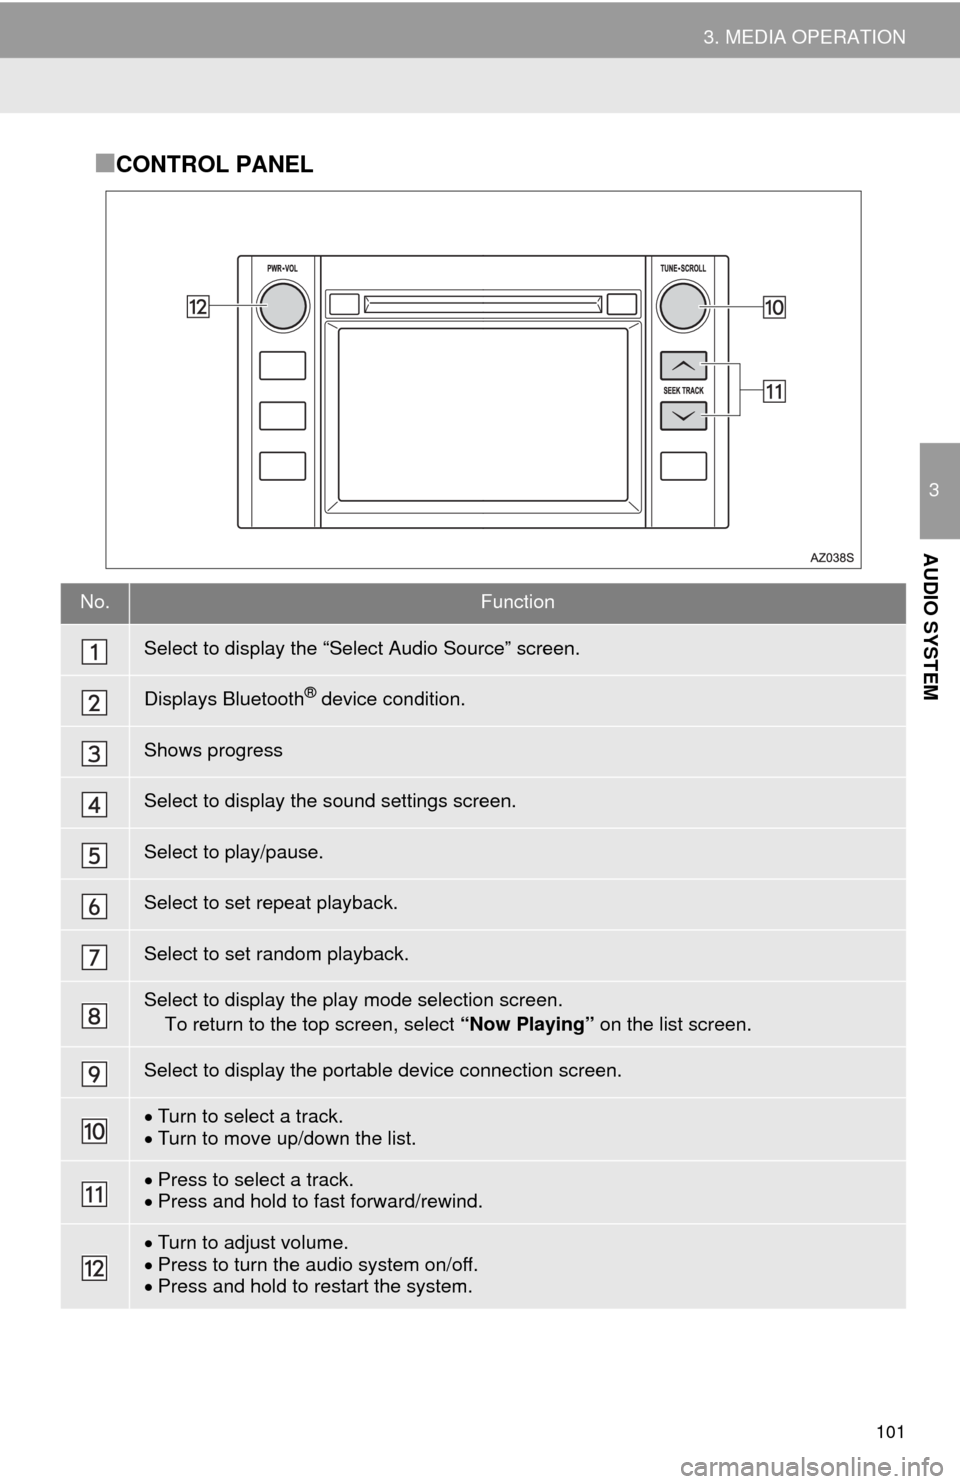
■CONTROL PANEL
No.Function
Select to display the “Select Audio Source” screen.
Displays Bluetooth® device condition.
Shows progress
Select to display the sound settings screen.
Select to play/pause.
Select to set repeat playback.
Select to set random playback.
Select to display the play mode selection screen.
To return to the top screen, select “Now Playing” on the list screen.
Select to display the portable device connection screen.
Turn to select a track.
Turn to move up/down the list.
Press to select a track.
Press and hold to fast forward/rewind.
Turn to adjust volume.
Press to turn the audio system on/off.
Press and hold to restart the system.
Page 102 of 276
102
3. MEDIA OPERATION
CAUTION
●Do not operate the player’s controls or connect to the Bluetooth® audio system while driv-
ing.
●Your audio unit is fitted with Bluetooth
® antennas. People with implanted pacemakers or
cardiac defibrillators should maintain a reasonable distance between themselves and the
Bluetooth
® antennas. The radio waves may affect the operation of such devices.
●Before using Bluetooth
® devices, users of any electrical medical device other than
implanted pacemakers and implanted cardiac defibrillators should consult the manufac-
turer of the device for information about its operation under the influence of radio waves.
Radio waves could have unexpected effects on the operation of such medical devices.
NOTICE
●Do not leave your portable player in the vehicle. In particular, high temperatures inside
the vehicle may damage the portable player.
INFORMATION
●Depending on the Bluetooth® device that is connected to the system, the music may start
playing when selecting while it is paused. Conversely, the music may pause when
selecting while it is playing.
●In the following conditions, the system may not function:
• The Bluetooth
® device is turned off.
• The Bluetooth
® device is not connected.
• The Bluetooth
® device has a low battery.
●It may take time to connect the phone when Bluetooth
® audio is being played.
●For operating the portable player, see the instruction manual that comes with it.
●If the Bluetooth
® device is disconnected due to poor reception from the Bluetooth® net-
work when the engine switch is in the “ACC” or “ON” position, the system automatically
reconnects the portable player.
●If the Bluetooth
® device is disconnected on purpose, such as it was turned off, this does
not happen. Reconnect the portable player manually.
●Bluetooth
® device information is registered when the Bluetooth® device is connected to
the Bluetooth® audio system. When selling or disposing of the vehicle, remove the
Bluetooth® audio information from the system. (P. 5 7 )
Page 103 of 276
103
3. MEDIA OPERATION
3
AUDIO SYSTEM
Registering an additional device
1Select “Select Device” on the
Bluetooth
® audio control screen.
2For more information: P.47
Selecting a registered device
1Select “Select Device” on the
Bluetooth
® audio control screen.
2For more information: P.48
1Select the repeat button to change on/
off.
1Select the random button to change
on/off.
CONNECTING A Bluetooth®
DEVICE
To use the Bluetooth® audio system, it
is necessary to register a Bluetooth
®
device with the system.
LISTENING TO Bluetooth®
AUDIO
REPEATING
The track or album currently being lis-
tened to can be repeated.
RANDOM ORDER
Tracks or albums can be automatically
and randomly selected.
Page 104 of 276
104
3. MEDIA OPERATION
5. AUX
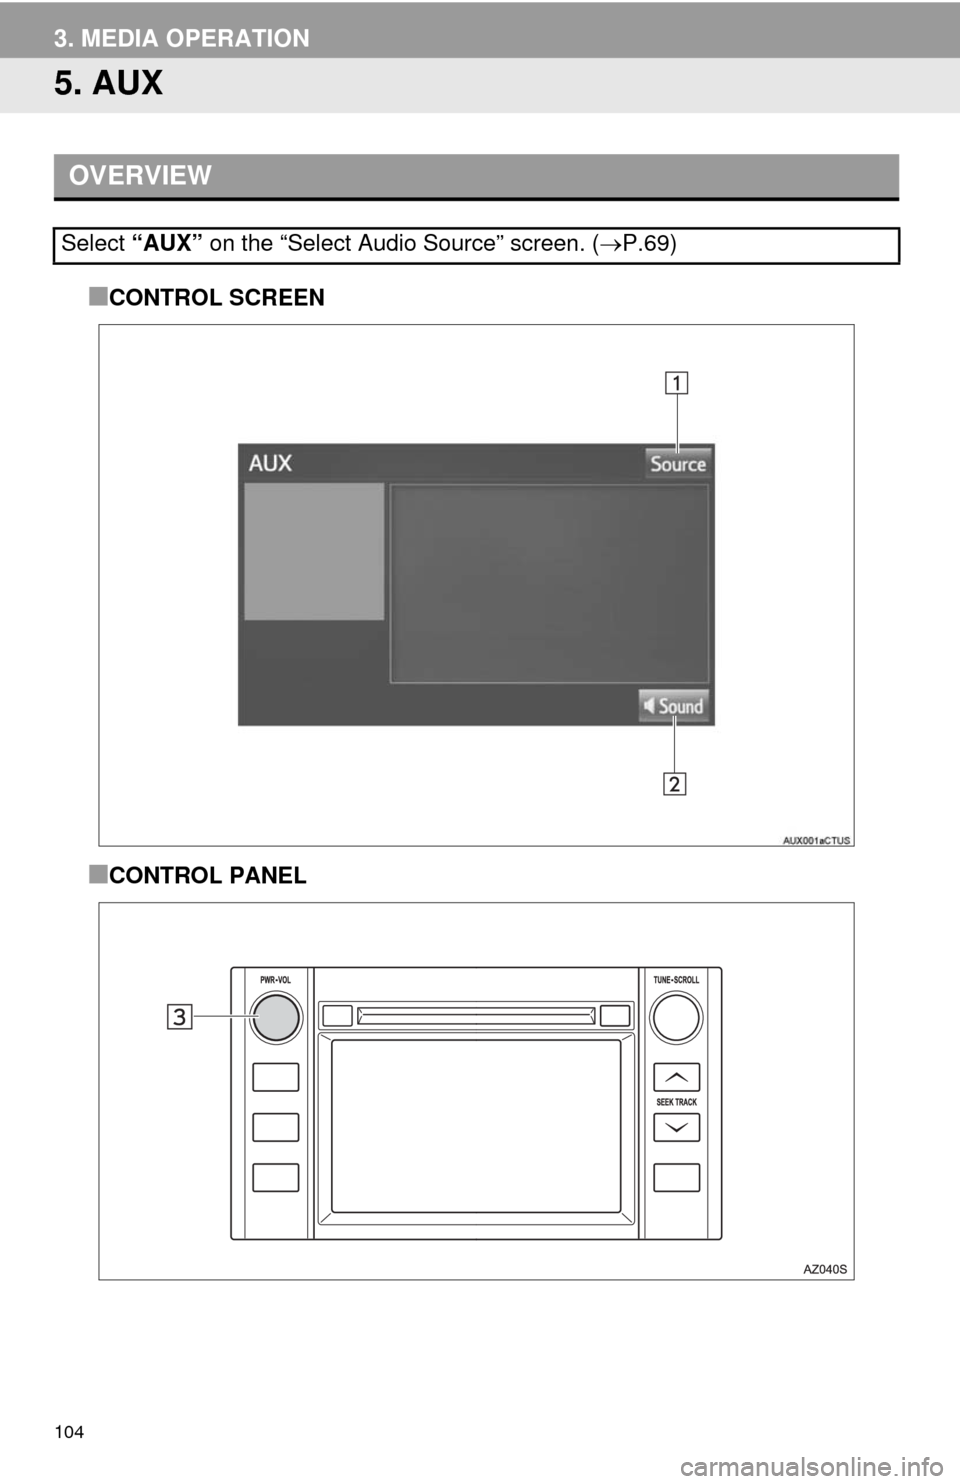
■CONTROL SCREEN
■CONTROL PANEL
OVERVIEW
Select “AUX” on the “Select Audio Source” screen. (P.69)
Page 105 of 276
105
3. MEDIA OPERATION
3
AUDIO SYSTEM
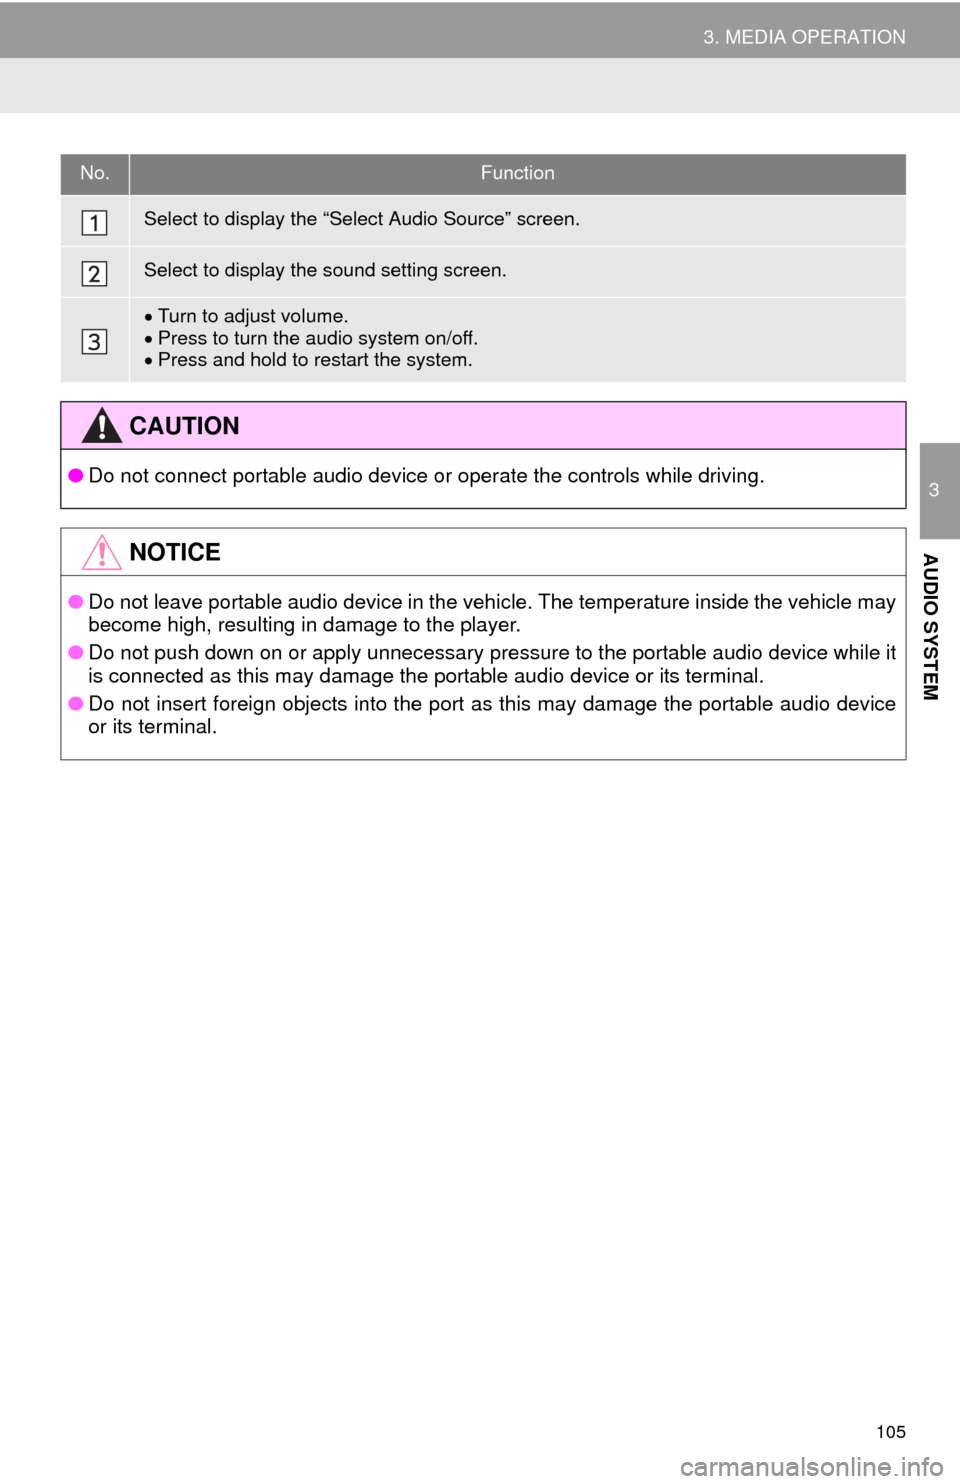
No.Function
Select to display the “Select Audio Source” screen.
Select to display the sound setting screen.
Turn to adjust volume.
Press to turn the audio system on/off.
Press and hold to restart the system.
CAUTION
●Do not connect portable audio device or operate the controls while driving.
NOTICE
●Do not leave portable audio device in the vehicle. The temperature inside the vehicle may
become high, resulting in damage to the player.
●Do not push down on or apply unnecessary pressure to the portable audio device while it
is connected as this may damage the portable audio device or its terminal.
●Do not insert foreign objects into the port as this may damage the portable audio device
or its terminal.
Page 106 of 276
106
4. AUDIO REMOTE CONTROLS
1. STEERING SWITCHES
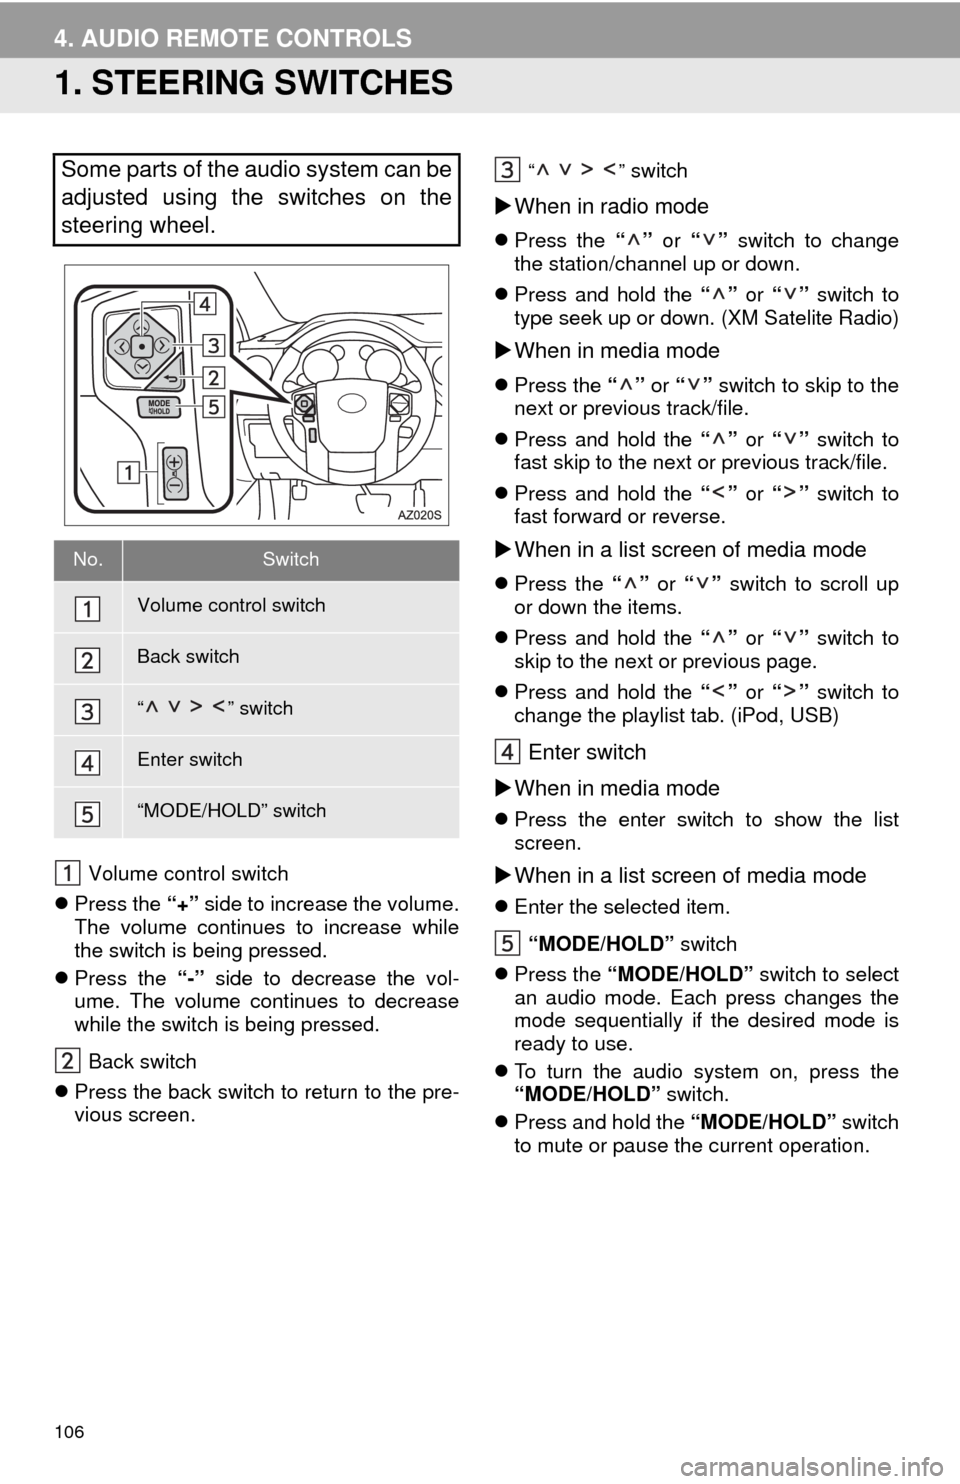
Volume control switch
Press the “+” side to increase the volume.
The volume continues to increase while
the switch is being pressed.
Press the “-” side to decrease the vol-
ume. The volume continues to decrease
while the switch is being pressed.
Back switch
Press the back switch to return to the pre-
vious screen.
“” switch
When in radio mode
Press the “” or “” switch to change
the station/channel up or down.
Press and hold the “” or “” switch to
type seek up or down. (XM Satelite Radio)
When in media mode
Press the “” or “” switch to skip to the
next or previous track/file.
Press and hold the “” or “” switch to
fast skip to the next or previous track/file.
Press and hold the “” or “” switch to
fast forward or reverse.
When in a list screen of media mode
Press the “” or “” switch to scroll up
or down the items.
Press and hold the “” or “” switch to
skip to the next or previous page.
Press and hold the “” or “” switch to
change the playlist tab. (iPod, USB)
Enter switch
When in media mode
Press the enter switch to show the list
screen.
When in a list screen of media mode
Enter the selected item.
“MODE/HOLD” switch
Press the “MODE/HOLD” switch to select
an audio mode. Each press changes the
mode sequentially if the desired mode is
ready to use.
To turn the audio system on, press the
“MODE/HOLD” switch.
Press and hold the “MODE/HOLD” switch
to mute or pause the current operation.
Some parts of the audio system can be
adjusted using the switches on the
steering wheel.
No.Switch
Volume control switch
Back switch
“” switch
Enter switch
“MODE/HOLD” switch
Page 107 of 276
107
3
AUDIO SYSTEM
5. SETUP
1. AUDIO SETTINGS
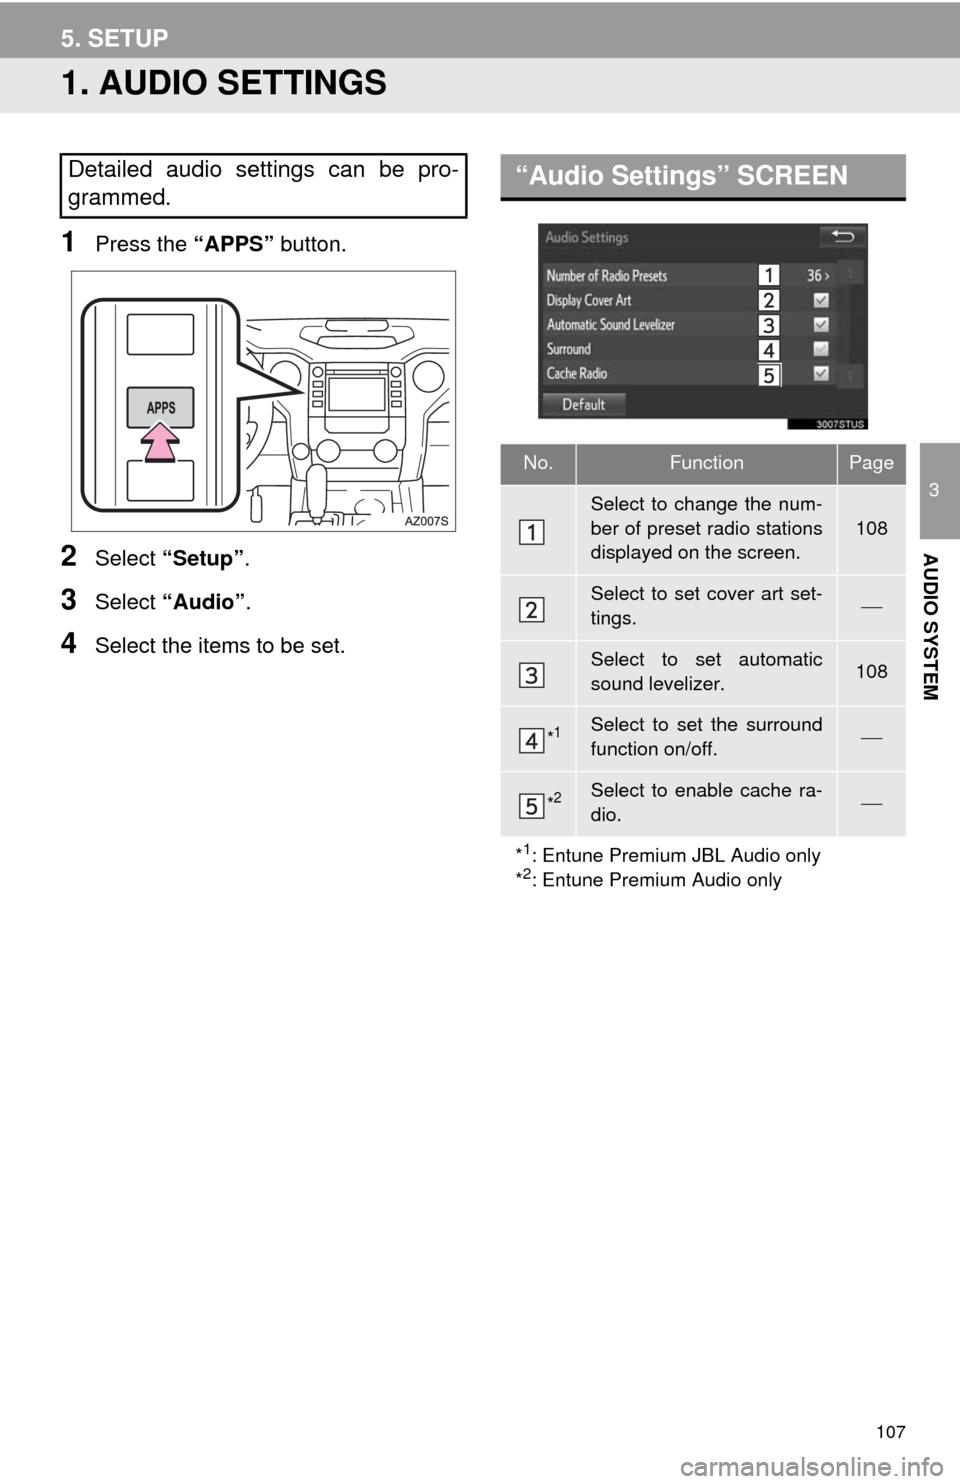
1Press the “APPS” button.
2Select “Setup”.
3Select “Audio”.
4Select the items to be set.
Detailed audio settings can be pro-
grammed.“Audio Settings” SCREEN
No.FunctionPage
Select to change the num-
ber of preset radio stations
displayed on the screen.
108
Select to set cover art set-
tings.
Select to set automatic
sound levelizer.108
*1Select to set the surround
function on/off.
*2Select to enable cache ra-
dio.
*
1: Entune Premium JBL Audio only
*2: Entune Premium Audio only
Page 108 of 276
108
5. SETUP
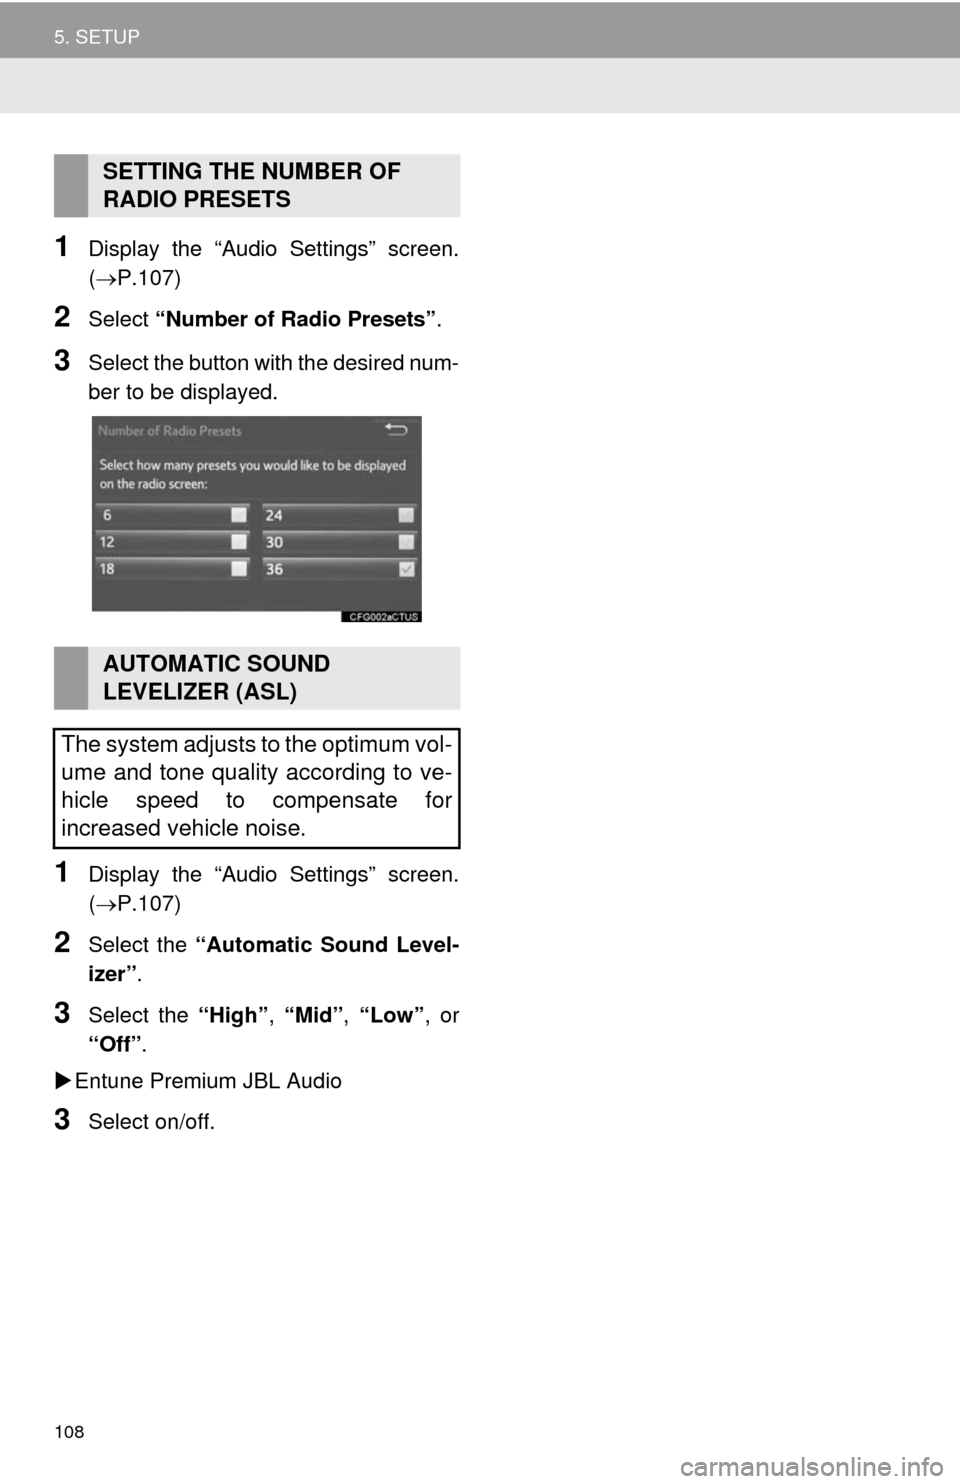
1Display the “Audio Settings” screen.
(P.107)
2Select “Number of Radio Presets”.
3Select the button with the desired num-
ber to be displayed.
1Display the “Audio Settings” screen.
(P.107)
2Select the “Automatic Sound Level-
izer”.
3Select the “High”, “Mid”, “Low”, or
“Off”.
Entune Premium JBL Audio
3Select on/off.
SETTING THE NUMBER OF
RADIO PRESETS
AUTOMATIC SOUND
LEVELIZER (ASL)
The system adjusts to the optimum vol-
ume and tone quality according to ve-
hicle speed to compensate for
increased vehicle noise.
Page 109 of 276
109
3
AUDIO SYSTEM
6. TIPS FOR OPERATING THE AUDIO SYSTEM
1. OPERATING INFORMATION
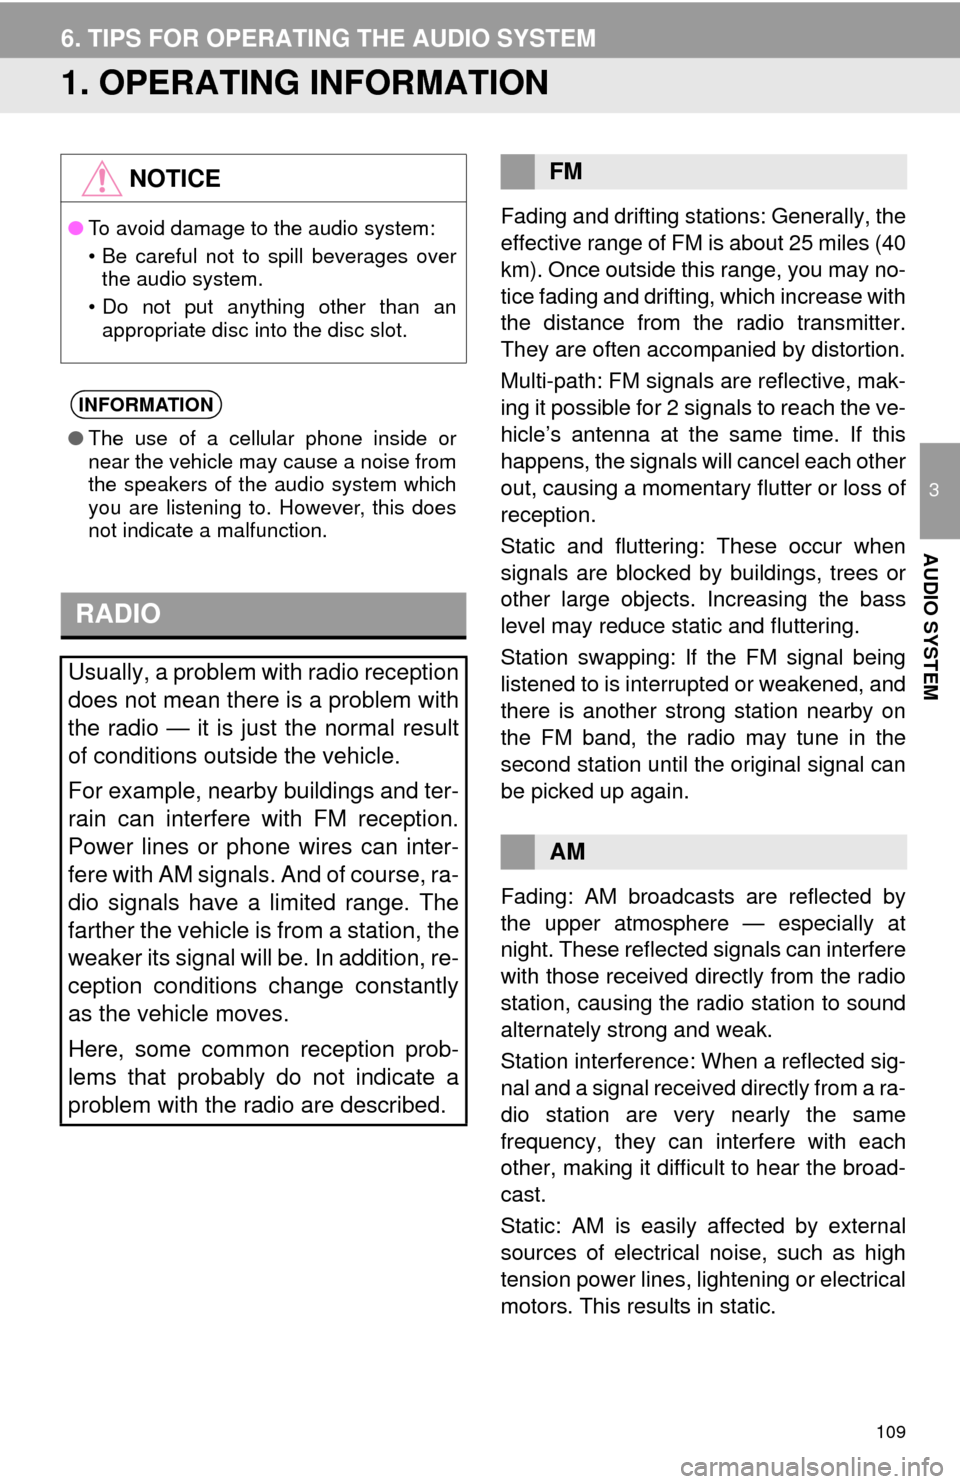
Fading and drifting stations: Generally, the
effective range of FM is about 25 miles (40
km). Once outside this range, you may no-
tice fading and drifting, which increase with
the distance from the radio transmitter.
They are often accompanied by distortion.
Multi-path: FM signals are reflective, mak-
ing it possible for 2 signals to reach the ve-
hicle’s antenna at the same time. If this
happens, the signals will cancel each other
out, causing a momentary flutter or loss of
reception.
Static and fluttering: These occur when
signals are blocked by buildings, trees or
other large objects. Increasing the bass
level may reduce static and fluttering.
Station swapping: If the FM signal being
listened to is interrupted or weakened, and
there is another strong station nearby on
the FM band, the radio may tune in the
second station until the original signal can
be picked up again.
Fading: AM broadcasts are reflected by
the upper atmosphere — especially at
night. These reflected signals can interfere
with those received directly from the radio
station, causing the radio station to sound
alternately strong and weak.
Station interference: When a reflected sig-
nal and a signal received directly from a ra-
dio station are very nearly the same
frequency, they can interfere with each
other, making it difficult to hear the broad-
cast.
Static: AM is easily affected by external
sources of electrical noise, such as high
tension power lines, lightening or electrical
motors. This results in static.
NOTICE
●To avoid damage to the audio system:
• Be careful not to spill beverages over
the audio system.
• Do not put anything other than an
appropriate disc into the disc slot.
INFORMATION
●The use of a cellular phone inside or
near the vehicle may cause a noise from
the speakers of the audio system which
you are listening to. However, this does
not indicate a malfunction.
RADIO
Usually, a problem with radio reception
does not mean there is a problem with
the radio — it is just the normal result
of conditions outside the vehicle.
For example, nearby buildings and ter-
rain can interfere with FM reception.
Power lines or phone wires can inter-
fere with AM signals. And of course, ra-
dio signals have a limited range. The
farther the vehicle is from a station, the
weaker its signal will be. In addition, re-
ception conditions change constantly
as the vehicle moves.
Here, some common reception prob-
lems that probably do not indicate a
problem with the radio are described.
FM
AM
Page 110 of 276
110
6. TIPS FOR OPERATING THE AUDIO SYSTEM
Cargo loaded on the roof luggage carrier,
especially metal objects, may adversely
affect the reception of XM Satellite Radio.
Alternation or modifications carried out
without appropriate authorization may
invalidate the user’s right to operate the
equipment.
This CD player is intended for use with 4.7
in. (12 cm). discs only.
Extremely high temperatures can keep the
CD player from working. On hot days, use
the air conditioning system to cool the
inside of the vehicle before using the
player.
Bumpy roads or other vibrations may
make the CD player skip.
If moisture gets into the CD player, the
discs may not be able to be played.
Remove the discs from the player and
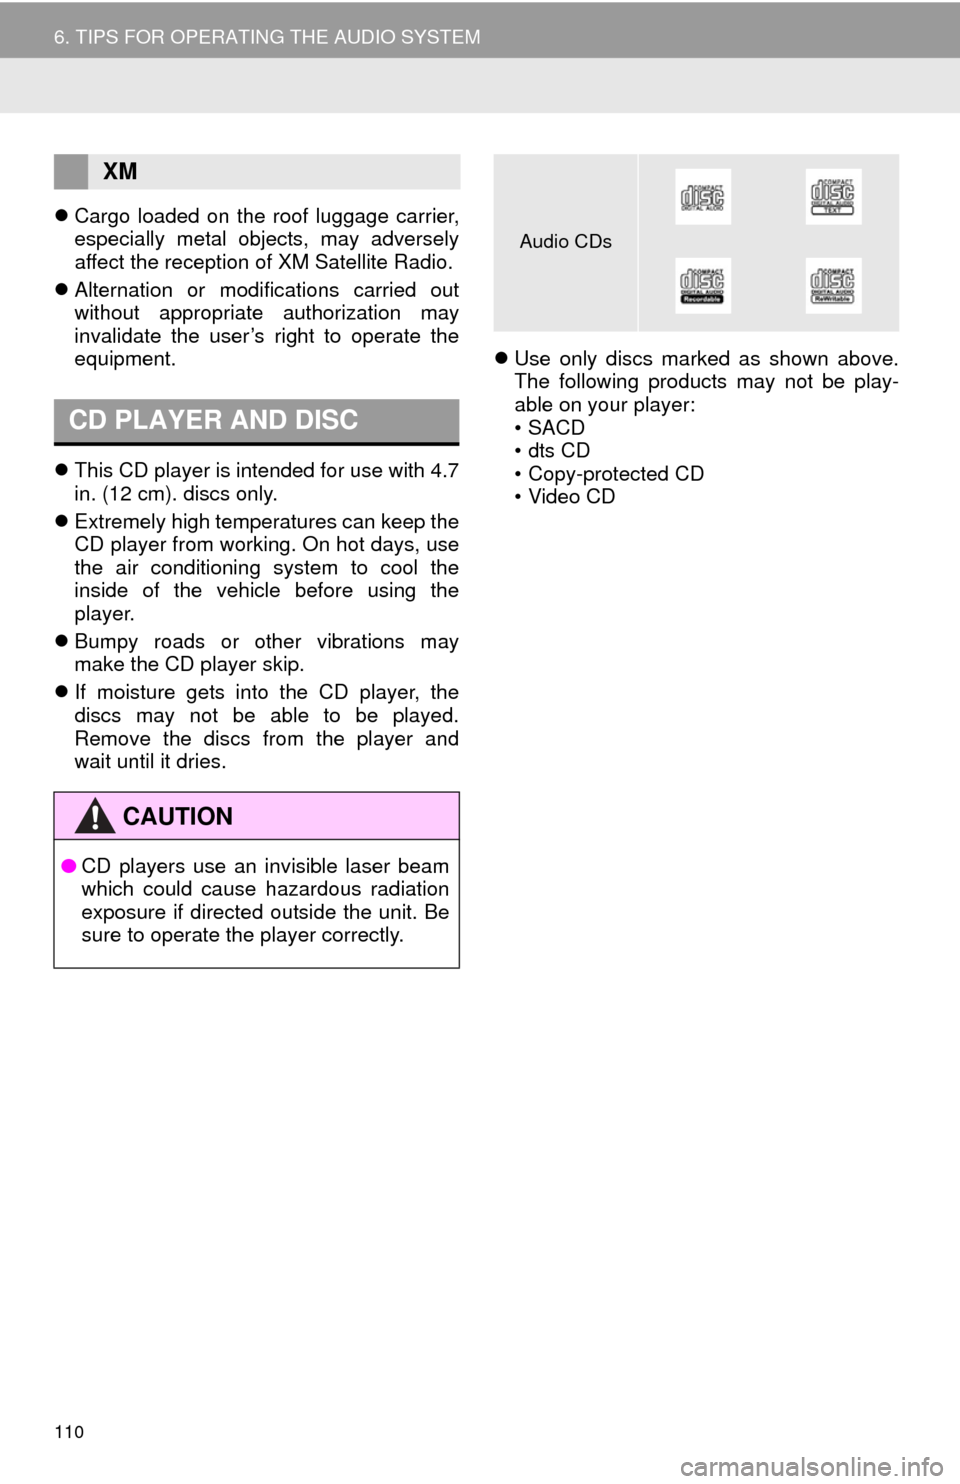
wait until it dries.Use only discs marked as shown above.
The following products may not be play-
able on your player:
•SACD
•dts CD
• Copy-protected CD
• Video CD
XM
CD PLAYER AND DISC
CAUTION
●CD players use an invisible laser beam
which could cause hazardous radiation
exposure if directed outside the unit. Be
sure to operate the player correctly.
Audio CDs