navigation system TOYOTA TUNDRA 2015 2.G Navigation Manual
[x] Cancel search | Manufacturer: TOYOTA, Model Year: 2015, Model line: TUNDRA, Model: TOYOTA TUNDRA 2015 2.GPages: 280, PDF Size: 7.57 MB
Page 231 of 280
231
4. MEMORY POINTS
NAVIGATION SYSTEM
8
1Display the “Navigation Settings”
screen. (P.227)
2Select “Address Book” .
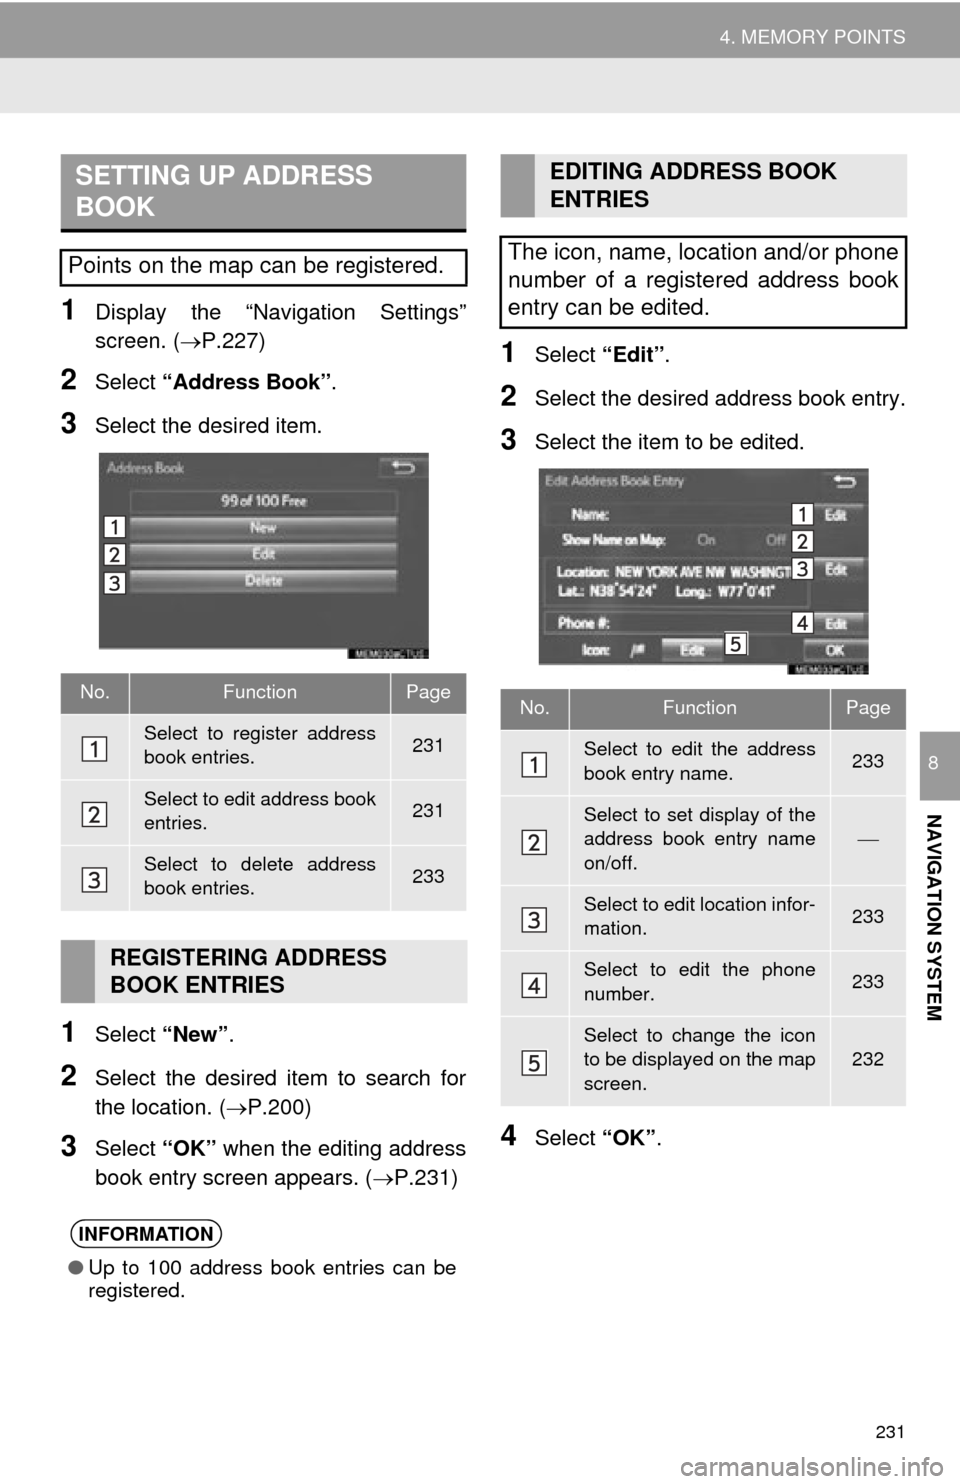
3Select the desired item.
1Select “New”.
2Select the desired item to search for
the location. ( P.200)
3Select “OK” when the editing address
book entry screen appears. ( P.231)
1Select “Edit”.
2Select the desired address book entry.
3Select the item to be edited.
4Select “OK”.
SETTING UP ADDRESS
BOOK
Points on the map can be registered.
No.FunctionPage
Select to register address
book entries.231
Select to edit address book
entries.231
Select to delete address
book entries.233
REGISTERING ADDRESS
BOOK ENTRIES
INFORMATION
●Up to 100 address book entries can be
registered.
EDITING ADDRESS BOOK
ENTRIES
The icon, name, location and/or phone
number of a registered address book
entry can be edited.
No.FunctionPage
Select to edit the address
book entry name.233
Select to set display of the
address book entry name
on/off.
Select to edit location infor-
mation.233
Select to edit the phone
number.233
Select to change the icon
to be displayed on the map
screen.232
Page 233 of 280
233
4. MEMORY POINTS
NAVIGATION SYSTEM
8
■CHANGING THE NAME
1Select “Edit” next to “Name”.
2Enter a name and select “OK”.
■CHANGING THE LOCATION
1Select “Edit” next to “Location”.
2Scroll the map to the desired point
(P.192 ) and select “OK”.
■CHANGING PHONE NUMBER
1Select “Edit” next to “Phone #”.
2Enter the phone number and select
“OK”.
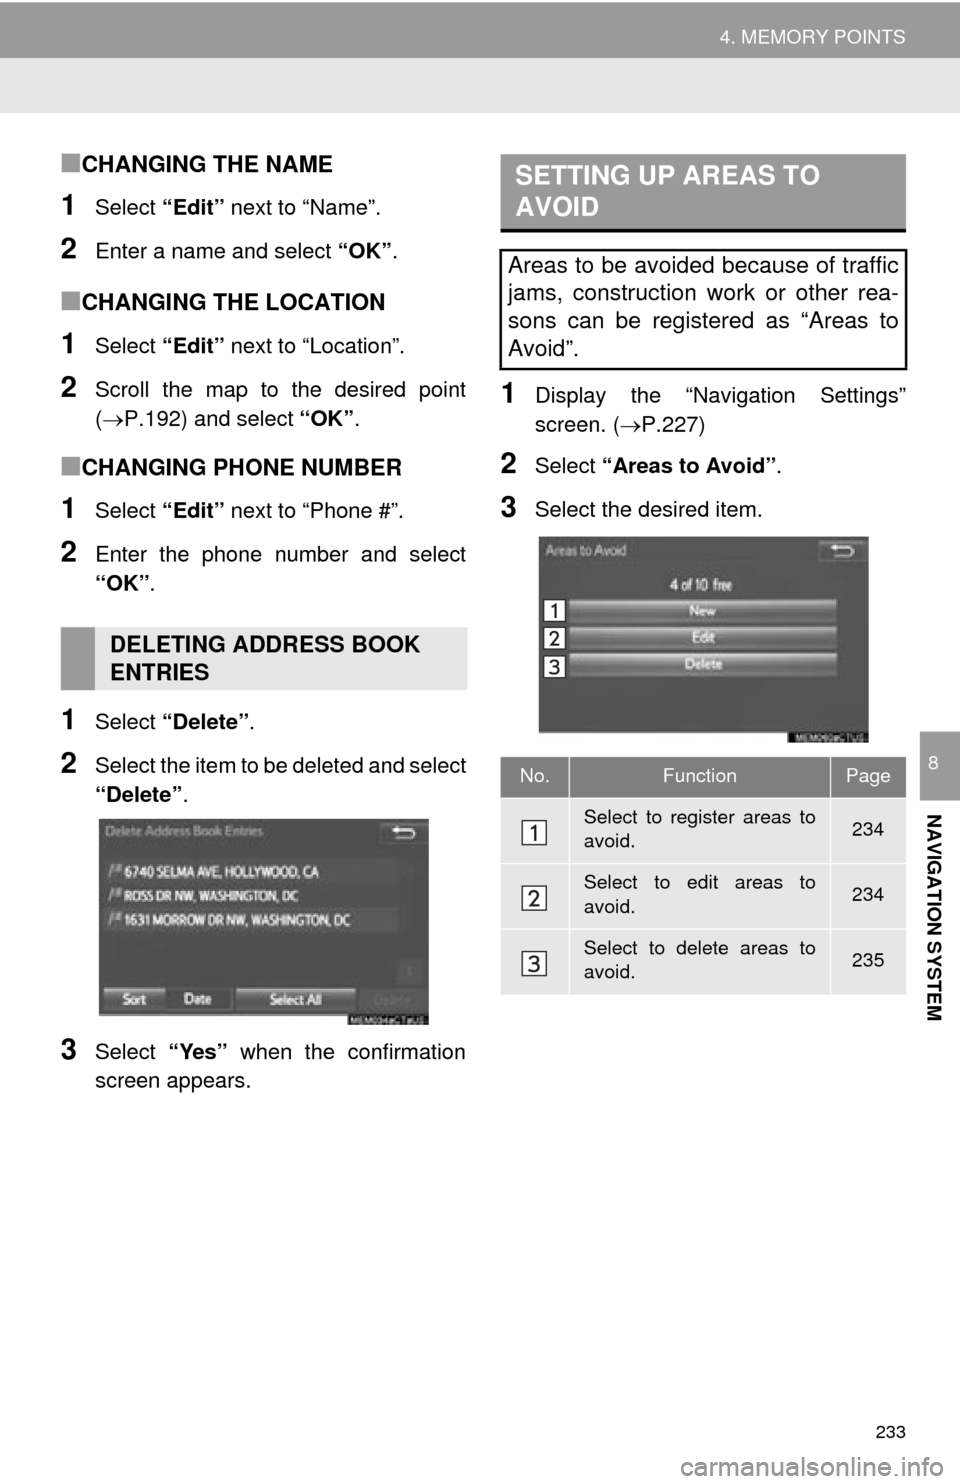
1Select “Delete” .
2Select the item to be deleted and select
“Delete” .
3Select “Yes” when the confirmation
screen appears.
1Display the “Navigation Settings”
screen. ( P.227)
2Select “Areas to Avoid” .
3Select the desired item.
DELETING ADDRESS BOOK
ENTRIES
SETTING UP AREAS TO
AVOID
Areas to be avoided because of traffic
jams, construction work or other rea-
sons can be registered as “Areas to
Avoid”.
No.FunctionPage
Select to register areas to
avoid.234
Select to edit areas to
avoid.234
Select to delete areas to
avoid.235
Page 235 of 280
235
4. MEMORY POINTS
NAVIGATION SYSTEM
8
■CHANGING THE NAME
1Select “Edit” next to “Name”.
2Enter a name and select “OK”.
■CHANGING THE LOCATION
1Select “Edit” next to “Location”.
2Scroll the map to the desired point
(P.192 ) and select “OK”.
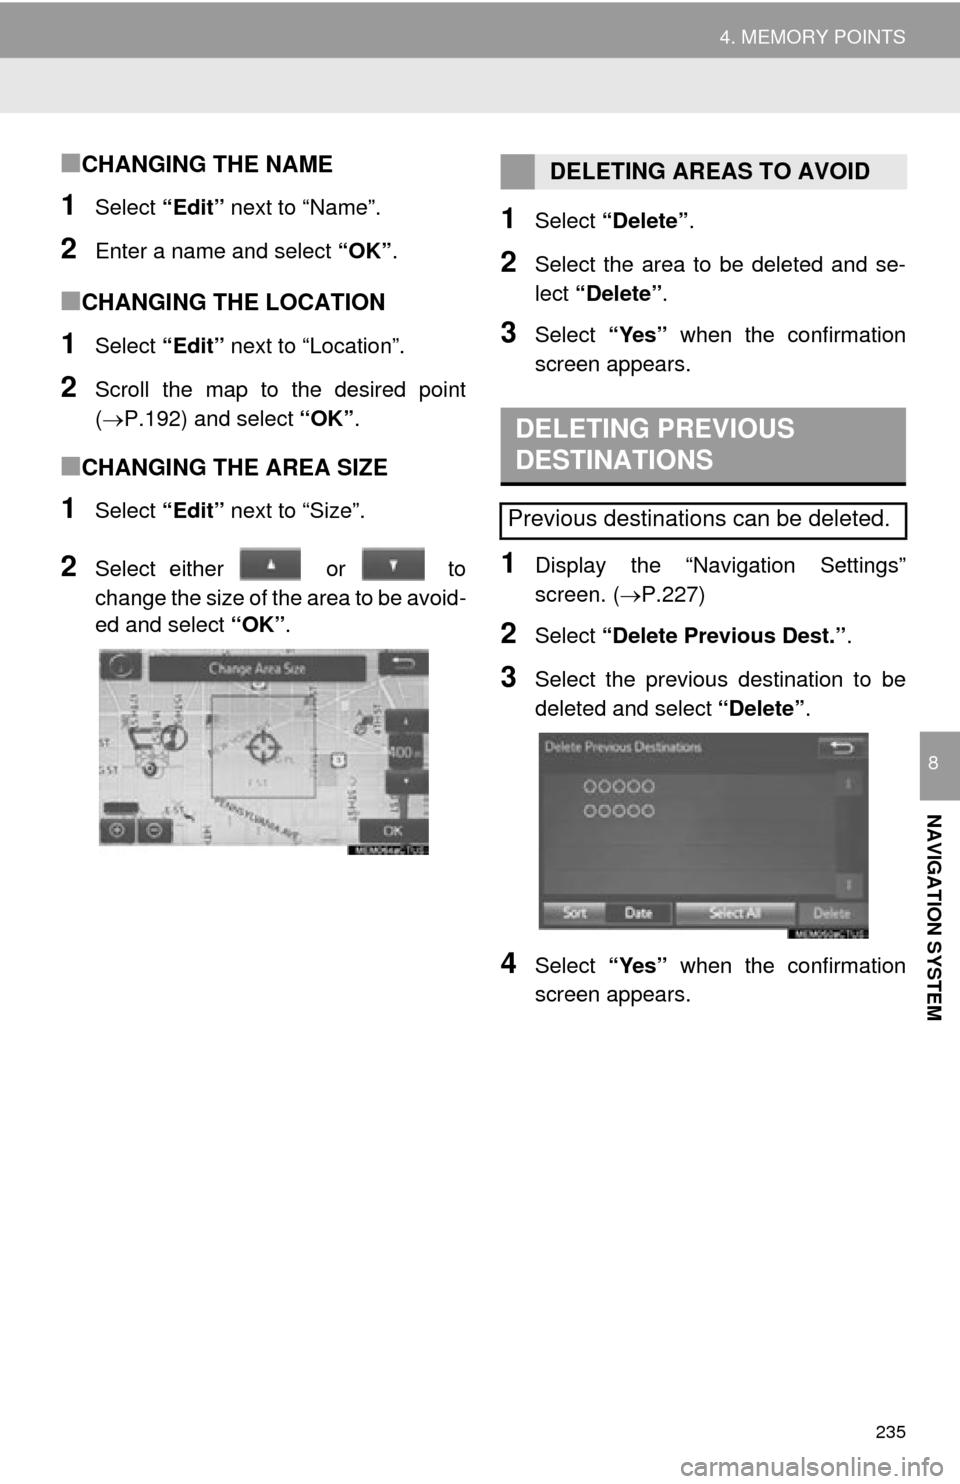
■CHANGING THE AREA SIZE
1Select “Edit” next to “Size”.
2Select either or to
change the size of the area to be avoid -
ed and select “OK”.
1Select “Delete” .
2Select the area to be deleted and se -
lect “Delete” .
3Select “Yes” when the confirmation
screen appears.
1Display the “Navigation Settings”
screen. ( P.227)
2Select “Delete Previous Dest.” .
3Select the previous destination to be
deleted and select “Delete”.
4Select “Yes” when the confirmation
screen appears.
DELETING AREAS TO AVOID
DELETING PREVIOUS
DESTINATIONS
Previous destinations can be deleted.
Page 237 of 280
237
5. SETUP
NAVIGATION SYSTEM
8
1Display the “Detailed Navi. Settings”
screen.
( P. 2 3 6 )
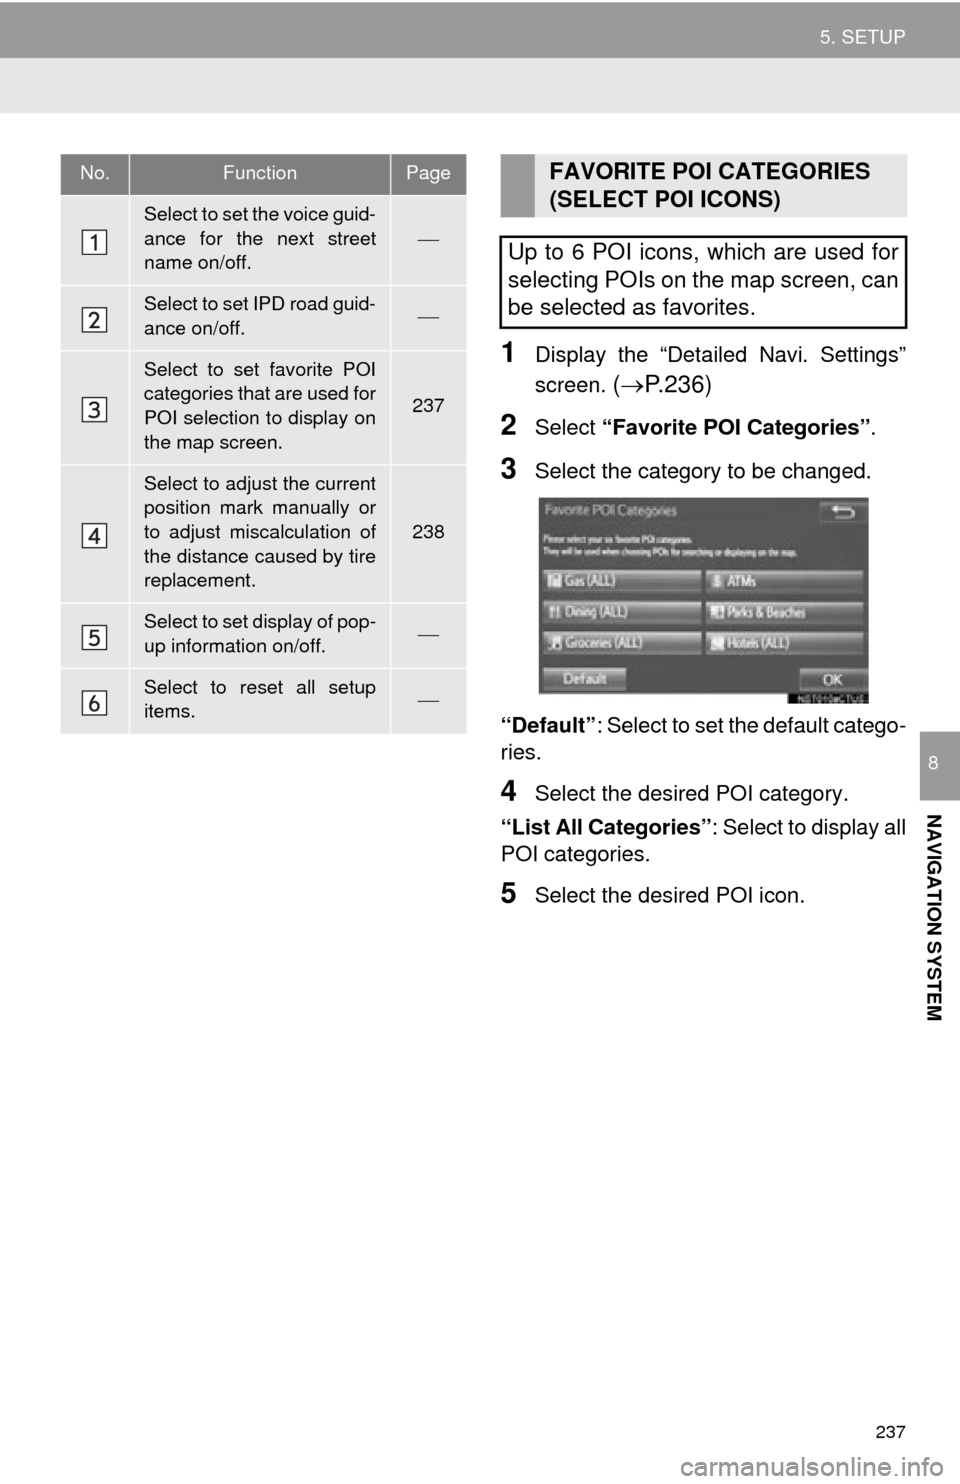
2Select “Favorite POI Categories” .
3Select the category to be changed.
“Default” : Select to
set the default catego-
ries.
4Select the desired POI category.
“List All Categories” : S
elect to display all
POI categories.
5Select the desired POI icon.
No.FunctionPage
Select to set the voice guid-
ance for the next street
name on/off.
Select to set IPD road guid-
ance on/off.
Select to set favorite POI
categories that are used for
POI selection to display on
the map screen.
237
Select to adjust the current
position mark manually or
to adjust miscalculation of
the distance caused by tire
replacement.
238
Select to set display of pop-
up information on/off.
Select to reset all setup
items.
FAVORITE POI CATEGORIES
(SELECT POI ICONS)
Up to 6 POI icons, which are used for
selecting POIs on the map screen, can
be selected as favorites.
Page 239 of 280

239
5. SETUP
NAVIGATION SYSTEM
8
■TIRE CHANGE CALIBRATION
1Select “Tire Change”.
The message appears and the quick dis -
tance calibration starts automatically.
The tire change calibration function will
be used when replacing the tires. This
function will adjust miscalculation
caused by the circumference differ-
ence between the old and new tires.
INFORMATION
● If this procedure is not performed when
the tires are replaced, the current posi-
tion mark may be incorrectly displayed.
Page 241 of 280
241
5. SETUP
NAVIGATION SYSTEM
8
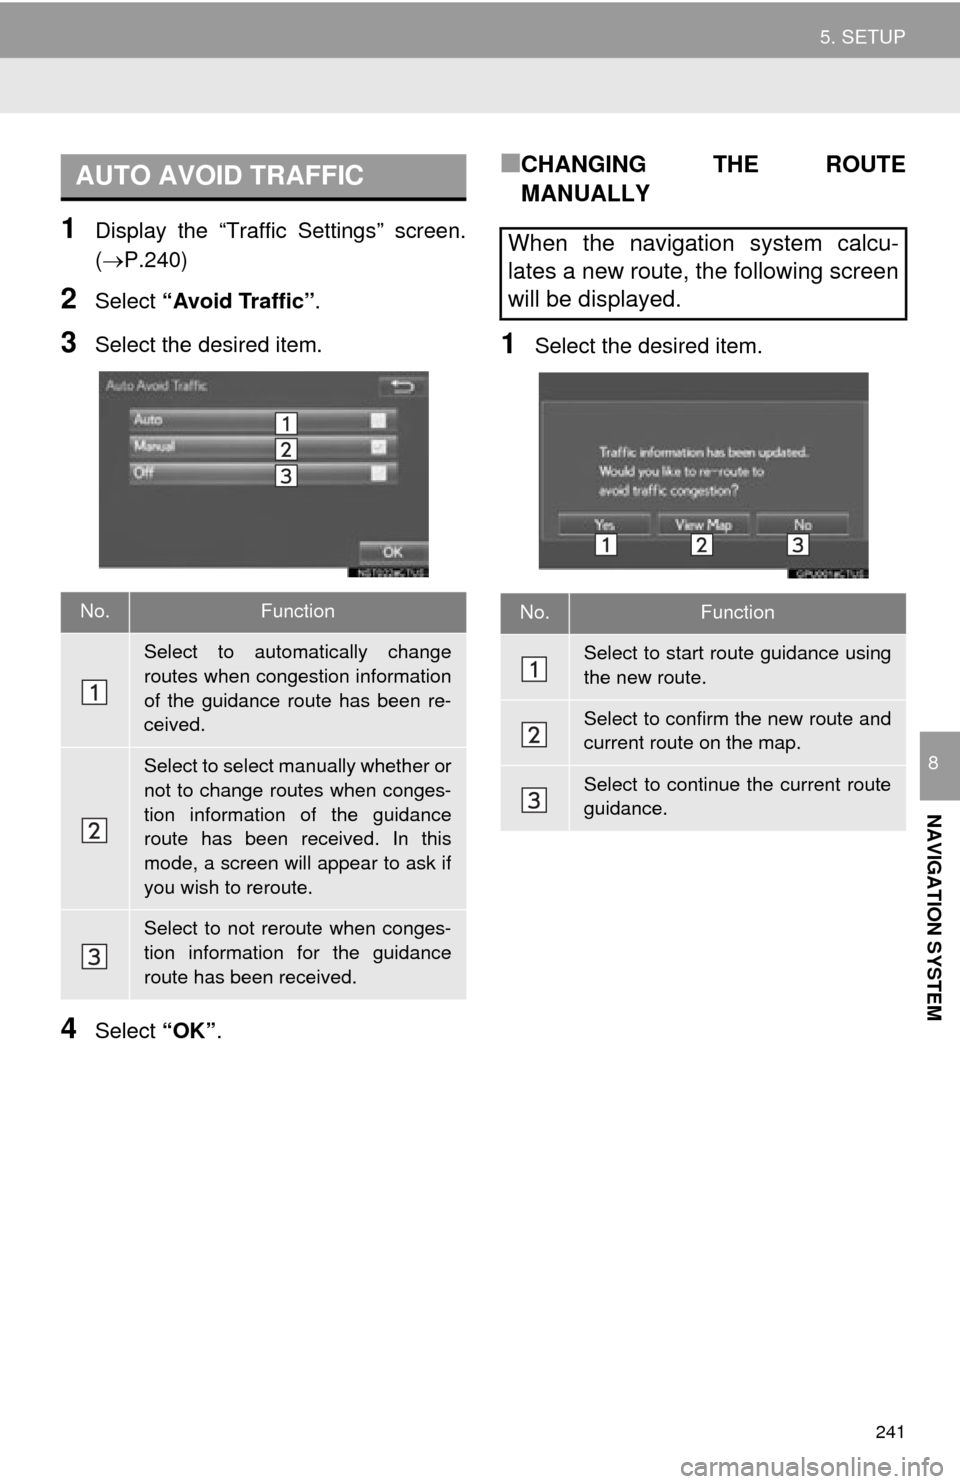
1Display the “Traffic Settings” screen.
(P.240)
2Select “Avoid Traffic” .
3Select the desired item.
4Select “OK”.
■CHANGING THE ROUTE
MANUALLY
1Select the desired item.
AUTO AVOID TRAFFIC
No.Function
Select to automatically change
routes when congestion information
of the guidance route has been re-
ceived.
Select to select manually whether or
not to change routes when conges-
tion information of the guidance
route has been received. In this
mode, a screen will appear to ask if
you wish to reroute.
Select to not reroute when conges-
tion information for the guidance
route has been received.
When the navigation system calcu-
lates a new route, the following screen
will be displayed.
No.Function
Select to start route guidance using
the new route.
Select to confirm the new route and
current route on the map.
Select to continue the current route
guidance.
Page 243 of 280
243
5. SETUP
NAVIGATION SYSTEM
8
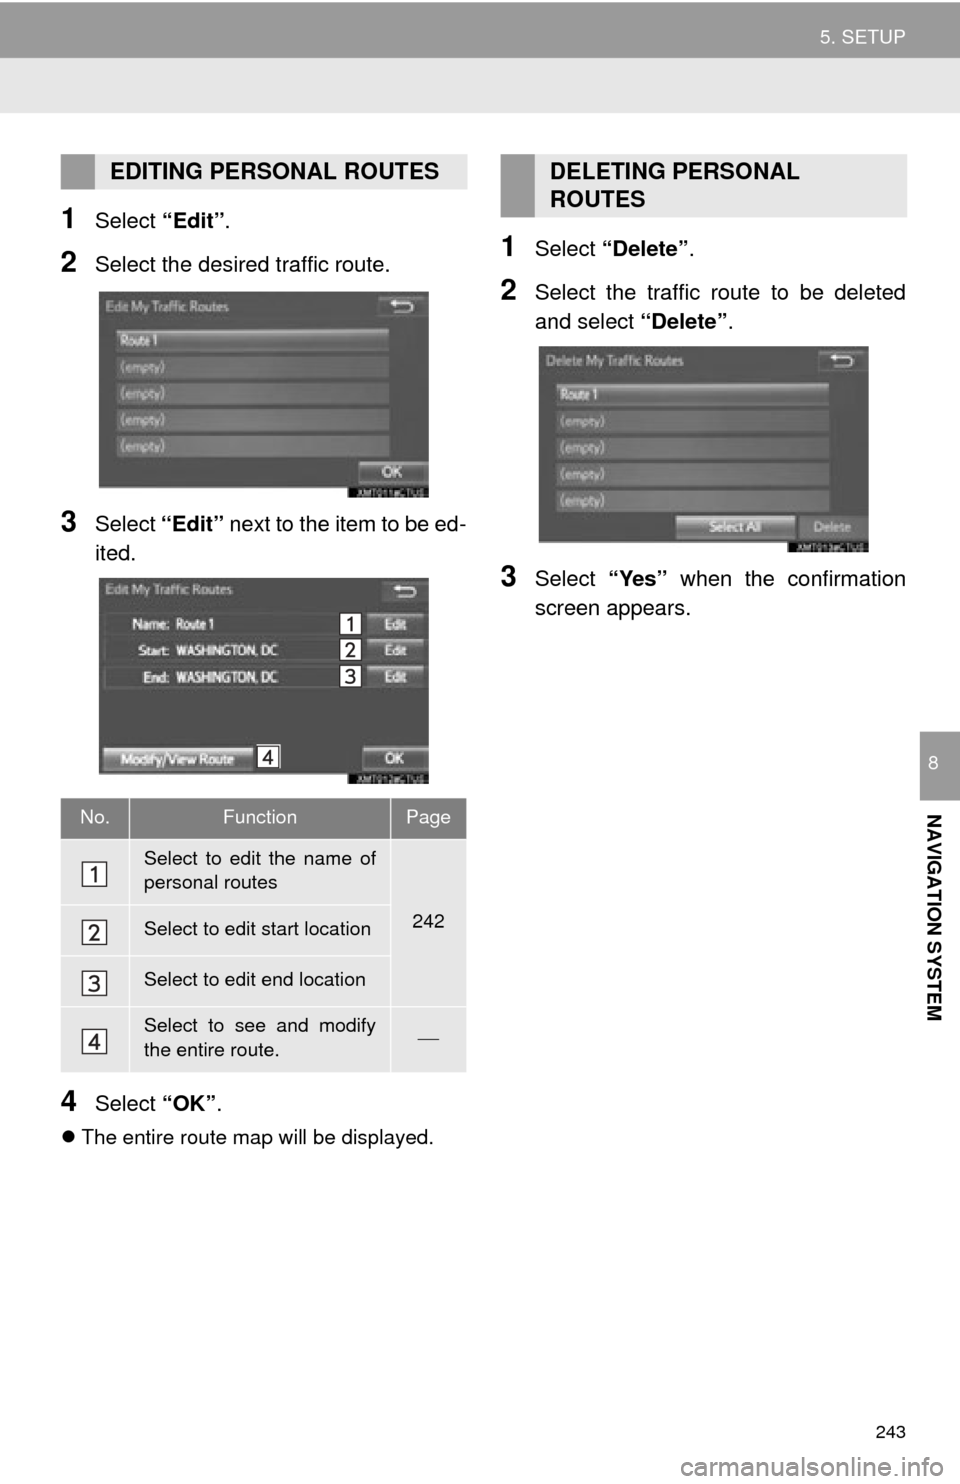
1Select “Edit”.
2Select the desired traffic route.
3Select “Edit” next to the item to be ed -
ited.
4Select “OK”.
The entire route map will be displayed.
1Select “Delete” .
2Select the traffic route to be deleted
and select “Delete”.
3Select “Yes” when the confirmation
screen appears.
EDITING PERSONAL ROUTES
No.FunctionPage
Select to edit the name of
personal routes
242Select to edit start location
Select to edit end location
Select to see and modify
the entire route.
DELETING PERSONAL
ROUTES
Page 245 of 280
245
5. SETUP
NAVIGATION SYSTEM
8
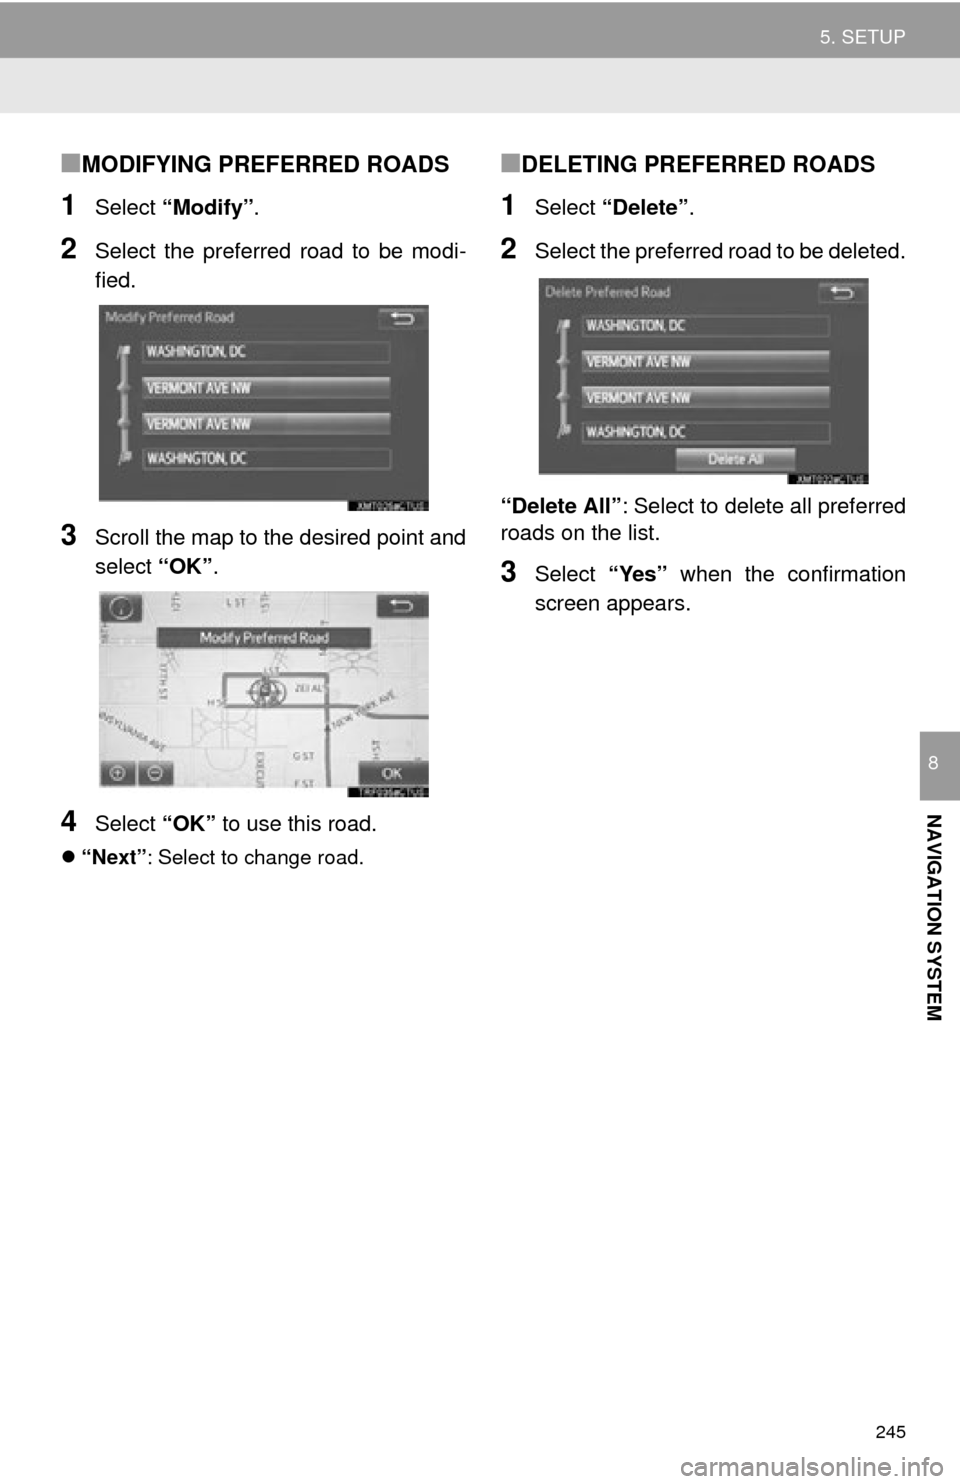
■MODIFYING PREFERRED ROADS
1Select “Modify” .
2Select the preferred road to be modi -
fied.
3Scroll the map to the desired point and
select “OK”.
4Select “OK” to use this road.
“Next” : Select to change road.
■DELETING PREFERRED ROADS
1Select “Delete” .
2Select the preferred road to be deleted.
“Delete All”: Sele
ct to delete all preferred
roads on the list.
3Select “Yes” when the confirmation
screen appears.
Page 246 of 280
246
6. TIPS FOR THE NAVIGATION SYSTEM
1. GPS (GLOBAL POSITIONING SYSTEM)
The Global Positioning System (GPS) de-
veloped and operated by the U.S. Depart-
ment of Defense provides an accurate
current position, normally using 4 or more
satellites, and in some case 3 satellites.
The GPS system has a certain level of in-
accuracy. While the navigation system
compensates for this most of the time, oc-
casional positioning errors of up to 300 ft.
(100 m) can and should be expected. Gen-
erally, position errors will be corrected
within a few seconds.
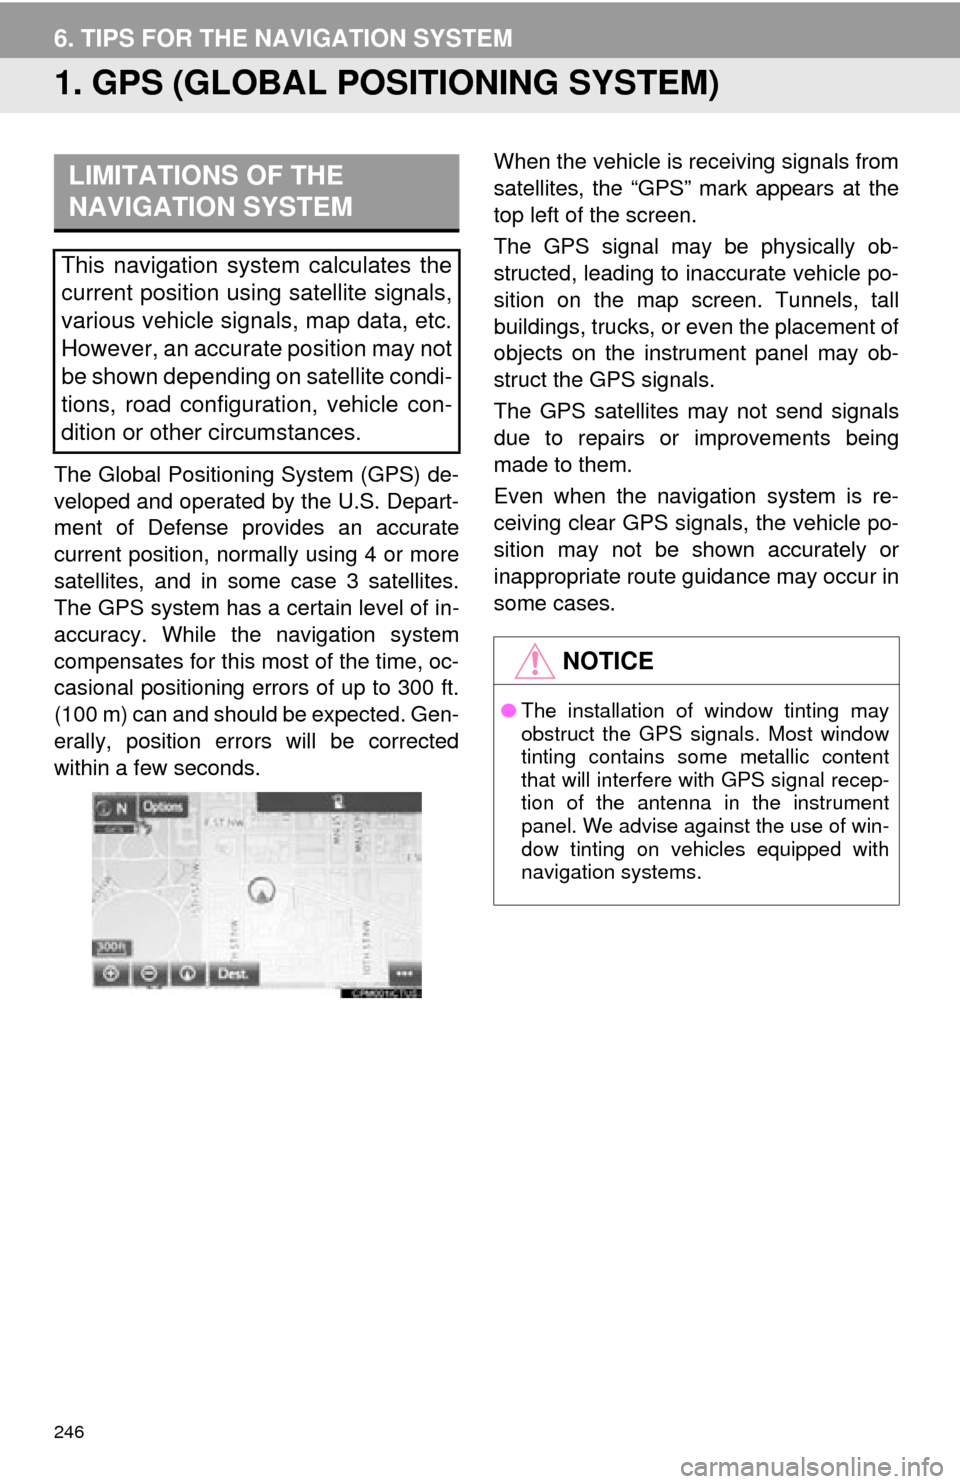
When the vehicle is receiving signals from
satellites, the “GPS” mark appears at the
top left of the screen.
The GPS signal may be physically ob-
structed, leading to inaccurate vehicle po-
sition on the map screen. Tunnels, tall
buildings, trucks, or even the placement of
objects on the instrument panel may ob-
struct the GPS signals.
The GPS satellites may not send signals
due to repairs or improvements being
made to them.
Even when the navigation system is re-
ceiving clear GPS signals, the vehicle po-
sition may not be shown accurately or
inappropriate route guidance may occur in
some cases.LIMITATIONS OF THE
NAVIGATION SYSTEM
This navigation system calculates the
current position using satellite signals,
various vehicle signals, map data, etc.
However, an accurate position may not
be shown depending on satellite condi-
tions, road configuration, vehicle con-
dition or other circumstances.
NOTICE
● The installation of window tinting may
obstruct the GPS signals. Most window
tinting contains some metallic content
that will interfere with GPS signal recep-
tion of the antenna in the instrument
panel. We advise against the use of win-
dow tinting on vehicles equipped with
navigation systems.
Page 247 of 280
247
6. TIPS FOR THE NAVIGATION SYSTEM
NAVIGATION SYSTEM
8
Accurate current position may not be
shown in the following cases:
• When driving on a small angled Y- shap
ed road.
• When driving on a winding road.
• When driving on a slippery road such as in
sand, gravel, snow, etc.
• When driving on a long straight road.
• When freeway and surface streets run in pa
rallel.
• After moving by ferry or vehicle carrier.
• When a long route is searched during hi
gh speed driving.
• When driving without setting the current
posi
tion calibration correctly.
• After repeating a change of direction by goi
ng forward and backward, or turning
on a turntable in a parking lot.
• When leaving a covered parking lot or
p
arking garage.
• When a roof carrier is installed.
• When driving with tire chains installed.
• When the tires are worn.
• After replacing a tire or tires.
• When using tires that are smaller or la
rger than the factory specifications.
• When the tire pressure in any of the 4 ti
res is not correct.
Inappropriate route guidance may occur in
the following cases:
• When turning at an intersection off the
de
signated route guidance.
• If you set more than 1 destination but
ski
p any of them, auto reroute will dis -
play a route returning to the destination
on
the previous route.
• When turning at an intersection for which t
here is no route guidance.
• When passing through an intersection
f
or which there is no route guidance.
• During auto reroute, the route guidance may
not be available for the next turn to
the right or left.
• During high speed driving, it may take a
l
ong time for auto reroute to operate. In
auto reroute, a detour route may be
shown.
• After auto reroute, the route may not be
cha
nged.
• If an unnecessary U-turn is shown or an
nounced.
• If a location has multiple names and the sys
tem announces 1 or more of them.
• When a route cannot be searched.
• If the route to your destination includes grav
el, unpaved roads or alleys, the
route guidance may not be shown.
• Your destination point might be shown on
the opposite side of the street.
• When a portion of the route has regula -
tions prohibiting the entry of the vehicle
t
hat vary by time or season or other rea -
sons.
• The road and map data stored in the na
vigation system may not be complete
or may not be the latest version.
If the vehicle cannot receive GPS sig-
nals, the current position can be
adjusted manually. For information on
setting the current position calibration:
P. 2 3 8
After replacing a tire: P. 2 3 9
INFORMATION
● This navigation system uses tire turning
data and is designed to work with fac-
tory-specified tires for the vehicle.
Installing tires that are larger or smaller
than the originally equipped diameter
may cause inaccurate display of the cur-
rent position. The tire pressure also
affects the diameter of the tires, so make
sure that the tire pressure of all 4 tires is
correct.