TOYOTA TUNDRA 2016 2.G Owners Manual
TUNDRA 2016 2.G
TOYOTA
TOYOTA
https://www.carmanualsonline.info/img/14/6842/w960_6842-0.png
TOYOTA TUNDRA 2016 2.G Owners Manual
Trending: immobilizer, turn signal bulb, engine oil, fold seats, Rear view mirror, maintenance reset, air condition
Page 481 of 588
4818-2. Steps to take in an emergency
8
When trouble arises
(If equipped)
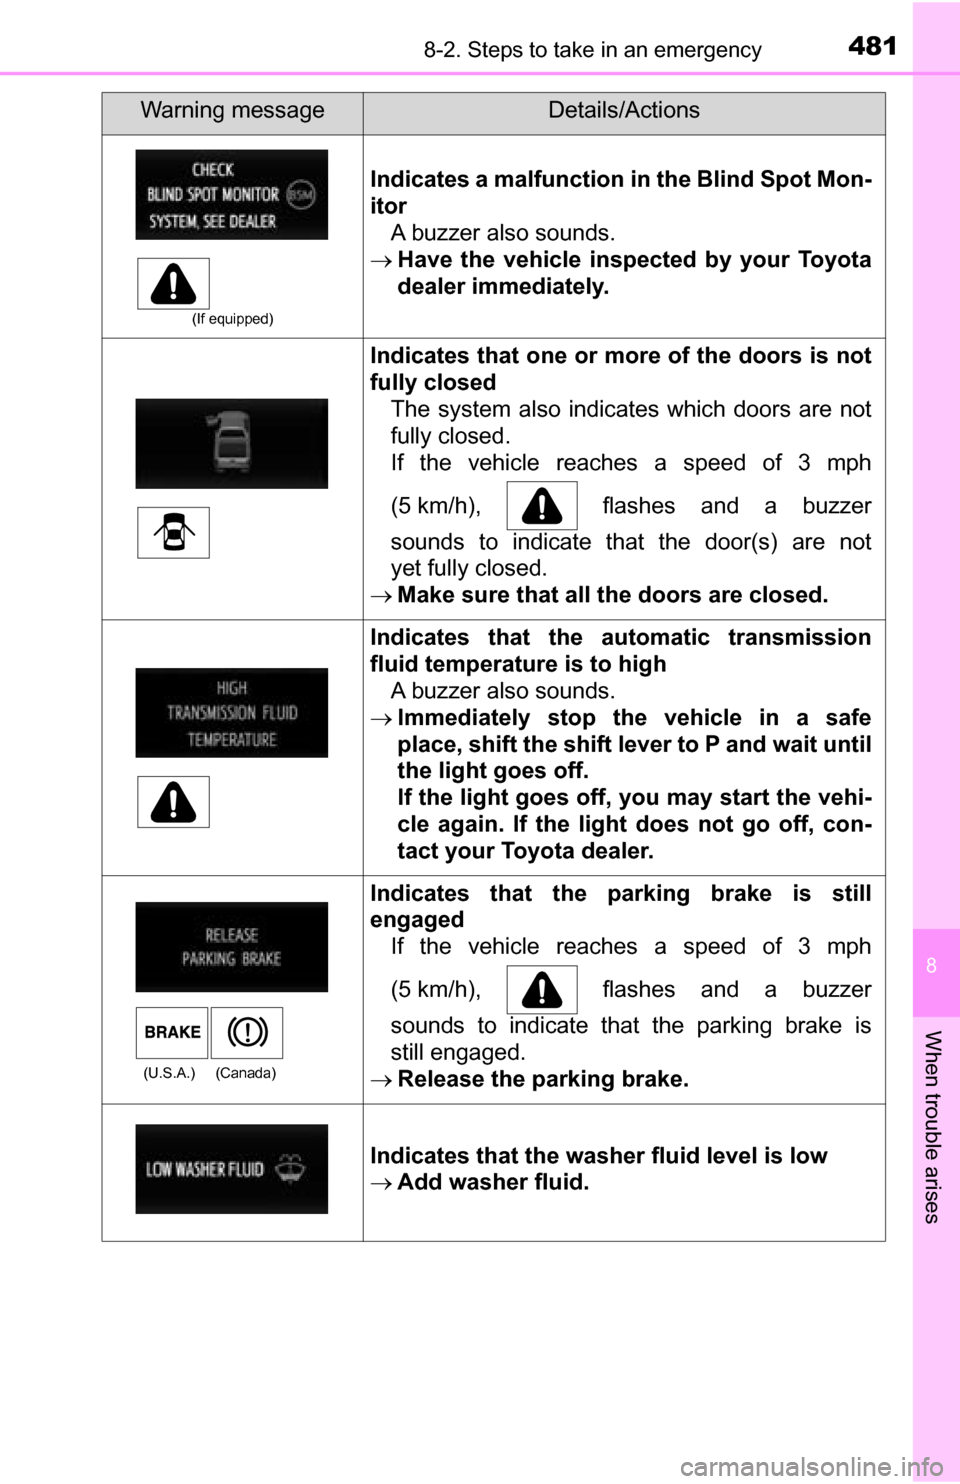
Indicates a malfunction in the Blind Spot Mon-
itorA buzzer also sounds.
Have the vehicle inspect ed by your Toyota
dealer immediately.
Indicates that one or more of the doors is not
fully closed The system also indicates which doors are not
fully closed.
If the vehicle reaches a speed of 3 mph
(5 km/h), flashes and a buzzer
sounds to indicate that the door(s) are not
yet fully closed.
Make sure that all the doors are closed.
Indicates that the automatic transmission
fluid temperature is to high
A buzzer also sounds.
Immediately stop the vehicle in a safe
place, shift the shift lever to P and wait until
the light goes off.
If the light goes off, you may start the vehi-
cle again. If the light does not go off, con-
tact your Toyota dealer.
(U.S.A.) (Canada)
Indicates that the parking brake is still
engaged If the vehicle reaches a speed of 3 mph
(5 km/h), flashes and a buzzer
sounds to indicate that the parking brake is
still engaged.
Release the parking brake.
Indicates that the washer fluid level is low
Add washer fluid.
Warning messageDetails/Actions
Page 482 of 588
4828-2. Steps to take in an emergency
(If equipped)
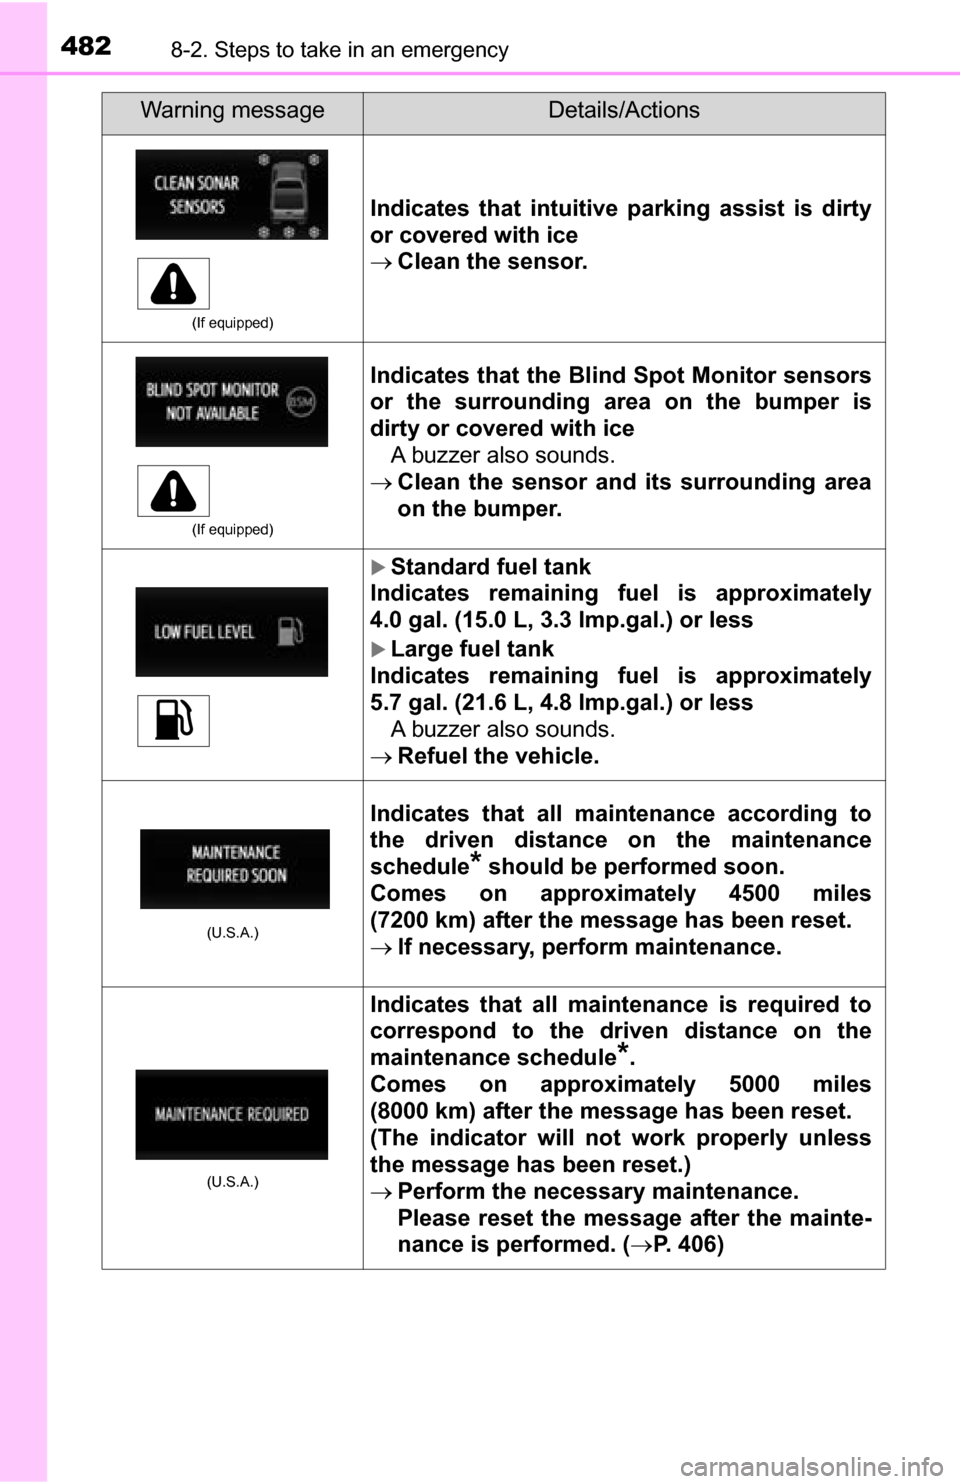
Indicates that intuitive parking assist is dirty
or covered with ice
Clean the sensor.
(If equipped)
Indicates that the Blind Spot Monitor sensors
or the surrounding area on the bumper is
dirty or covered with ice
A buzzer also sounds.
Clean the sensor and its surrounding area
on the bumper.
Standard fuel tank
Indicates remaining fuel is approximately
4.0 gal. (15.0 L, 3.3 Imp.gal.) or less
Large fuel tank
Indicates remaining fuel is approximately
5.7 gal. (21.6 L, 4.8 lmp.gal.) or less A buzzer also sounds.
Refuel the vehicle.
(U.S.A.)
Indicates that all maintenance according to
the driven distance on the maintenance
schedule
* should be performed soon.
Comes on approximately 4500 miles
(7200 km) after the message has been reset.
If necessary, perform maintenance.
(U.S.A.)
Indicates that all maintenance is required to
correspond to the driv en distance on the
maintenance schedule
*.
Comes on approximately 5000 miles
(8000 km) after the message has been reset.
(The indicator will not work properly unless
the message has been reset.)
Perform the necessary maintenance.
Please reset the message after the mainte-
nance is performed. ( P. 406)
Warning messageDetails/Actions
Page 483 of 588
4838-2. Steps to take in an emergency
8
When trouble arises
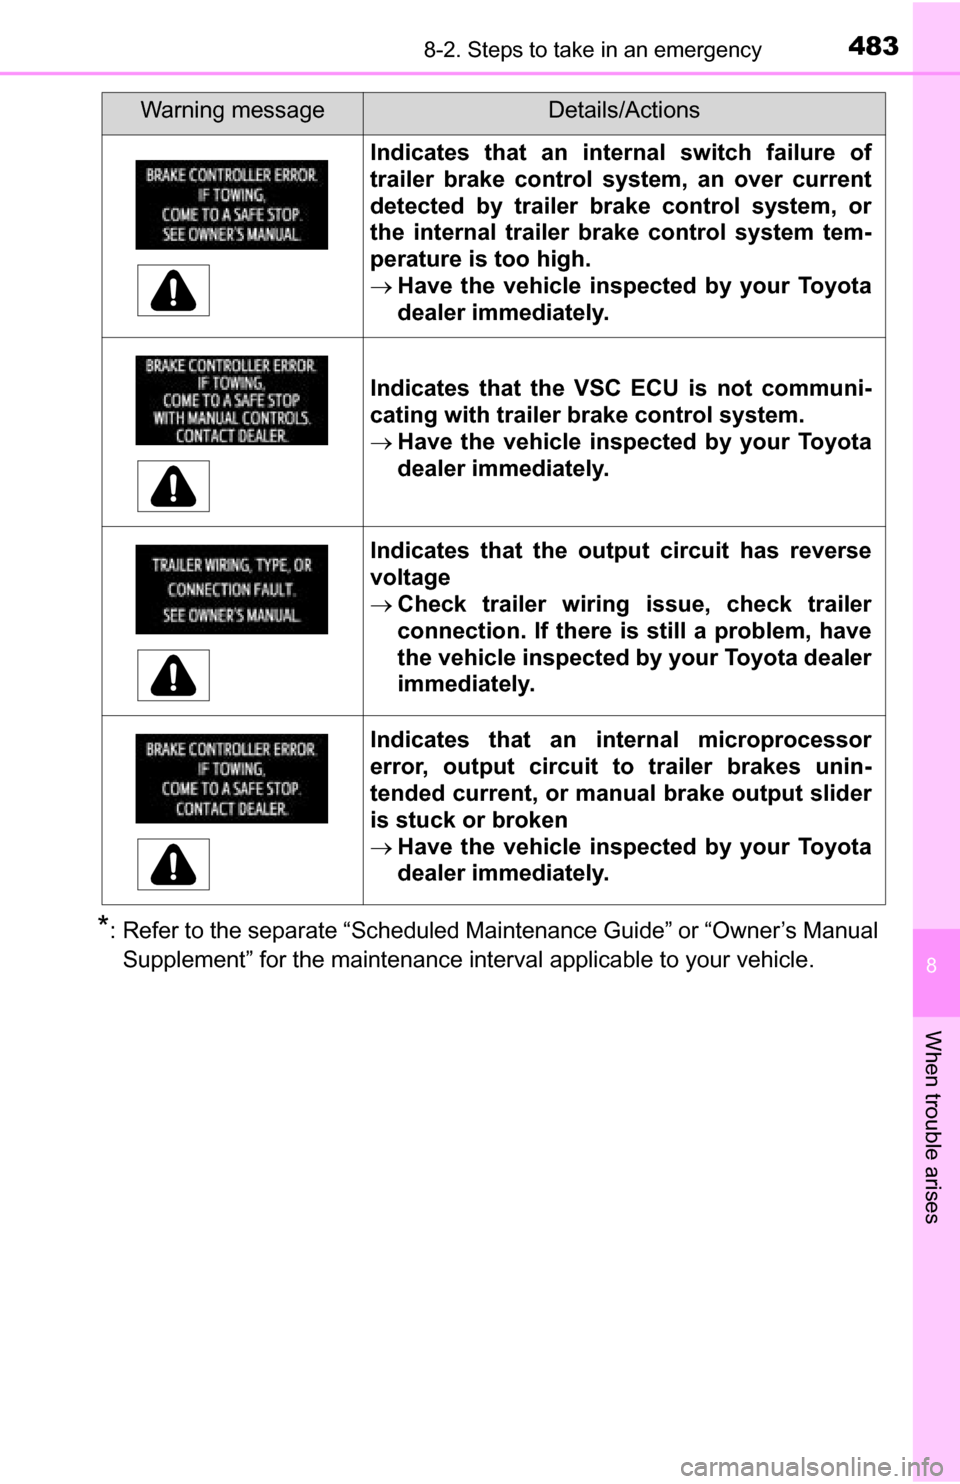
*: Refer to the separate “Scheduled Maintenance Guide” or “Owner’s ManualSupplement” for the maintenance interval applicable to your vehicle.
Indicates that an internal switch failure of
trailer brake control system, an over current
detected by trailer brake control system, or
the internal trailer brake control system tem-
perature is too high.
Have the vehicle inspect ed by your Toyota
dealer immediately.
Indicates that the VSC ECU is not communi-
cating with trailer brake control system.
Have the vehicle inspect ed by your Toyota
dealer immediately.
Indicates that the output circuit has reverse
voltage
Check trailer wiring issue, check trailer
connection. If there is still a problem, have
the vehicle inspected by your Toyota dealer
immediately.
Indicates that an internal microprocessor
error, output circuit to trailer brakes unin-
tended current, or ma nual brake output slider
is stuck or broken
Have the vehicle inspect ed by your Toyota
dealer immediately.
Warning messageDetails/Actions
Page 484 of 588
4848-2. Steps to take in an emergency
If you have a flat tire
●Stop the vehicle on a hard, flat surface.
● Set the parking brake.
● Shift the shift lever to P.
● Stop the engine.
● Turn on the emergency flashers. ( P. 464)
Your vehicle is equipped with a spare tire. The flat tire can be
replaced with the spare tire.
For details about tires: P. 4 2 4
CAUTION
■
If you have a flat tire
Do not continue driving with a flat tire.
Driving even a short dist ance with a flat tire can damage the tire and the
wheel beyond repair, which could result in an accident.
Before jacking up the vehicle
Page 485 of 588
4858-2. Steps to take in an emergency
8
When trouble arises
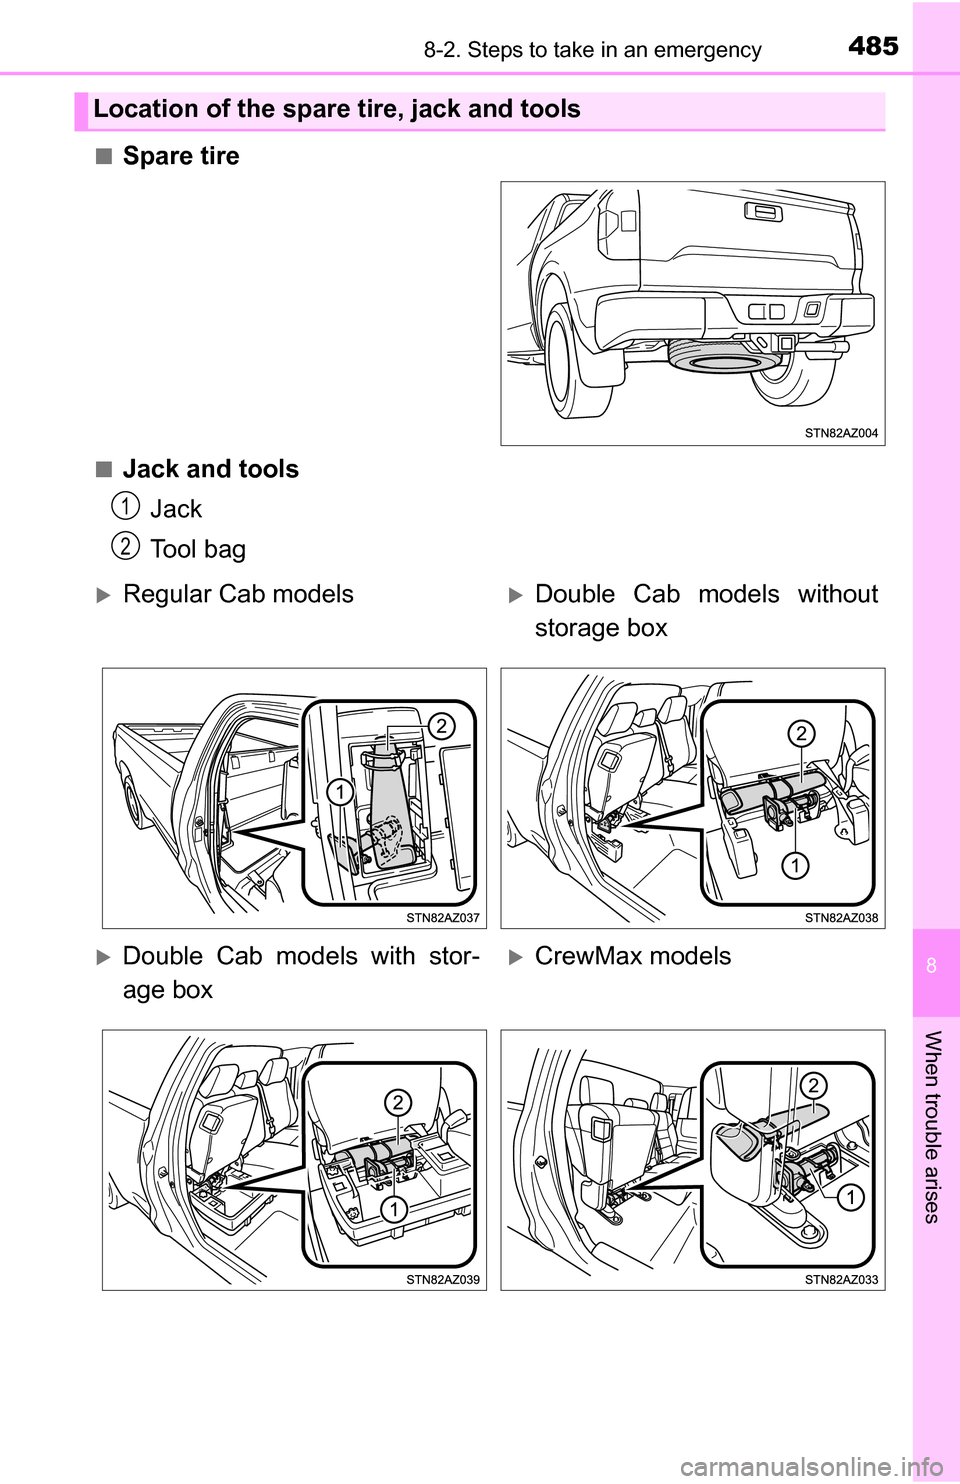
■Spare tire
■Jack and toolsJack
Tool bag
Location of the spare tire, jack and tools
1
2
Regular Cab modelsDouble Cab models without
storage box
Double Cab models with stor-
age boxCrewMax models
Page 486 of 588
4868-2. Steps to take in an emergency
CAUTION
■Using the tire jack
Observe the following precautions.
Improper use of the tire jack may cause the vehicle to suddenly fall off
the jack, leading to death or serious injury.
●Do not use the tire jack for any purpose other than replacing tires or
installing and removing tire chains.
●Only use the tire jack that comes with this vehicle for replacing a flat
tire.
Do not use it on other vehicles, and do not use other tire jacks for
replacing tires on this vehicle.
●Put the jack properly in its jack point.
●Do not put any part of your body under the vehicle while it is supported
by the jack.
●Do not start the engine or drive the vehicle while the vehicle is sup-
ported by the jack.
●Do not raise the vehicle while someone is inside.
●When raising the vehicle, do not put an object on or under the jack.
●Do not raise the vehicle to a height greater than that required to
replace the tire.
●Use a jack stand if it is necessary to get under the vehicle.
●When lowering the vehicle, make sure that there is no-one near the
vehicle. If there are people nearby, warn them vocally before lowering.
■Using the jack handle
Insert the square head securely until you hear a click to prevent the
extension parts from coming apart unexpectedly.
Page 487 of 588
4878-2. Steps to take in an emergency
8
When trouble arises
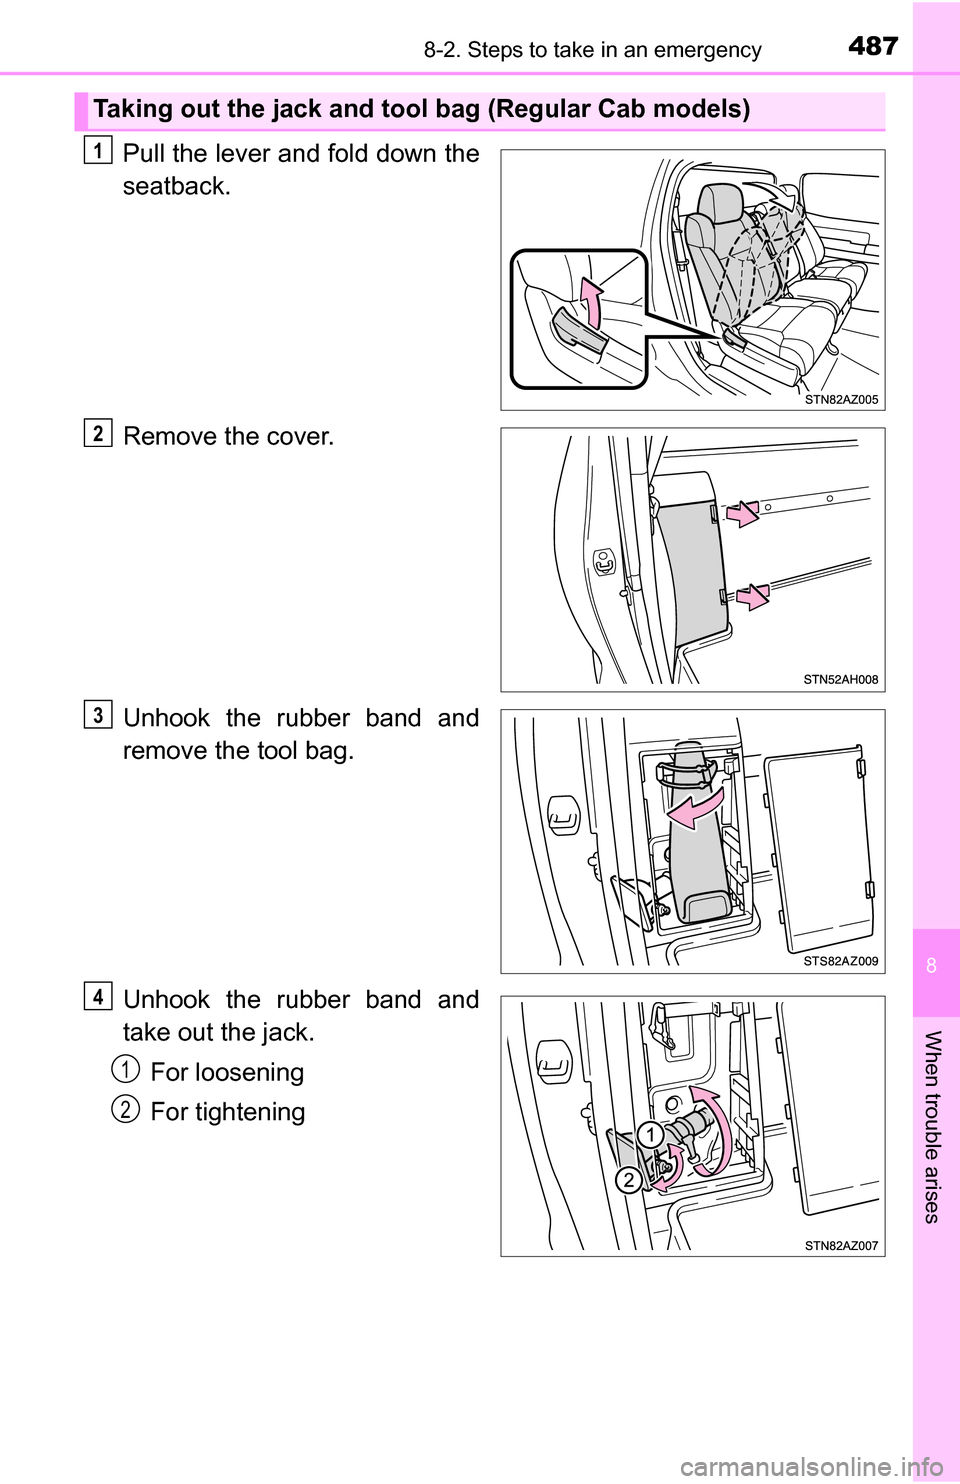
Pull the lever and fold down the
seatback.
Remove the cover.
Unhook the rubber band and
remove the tool bag.
Unhook the rubber band and
take out the jack.For loosening
For tightening
Taking out the jack and tool bag (Regular Cab models)
1
2
3
4
1
2
Page 488 of 588
4888-2. Steps to take in an emergency
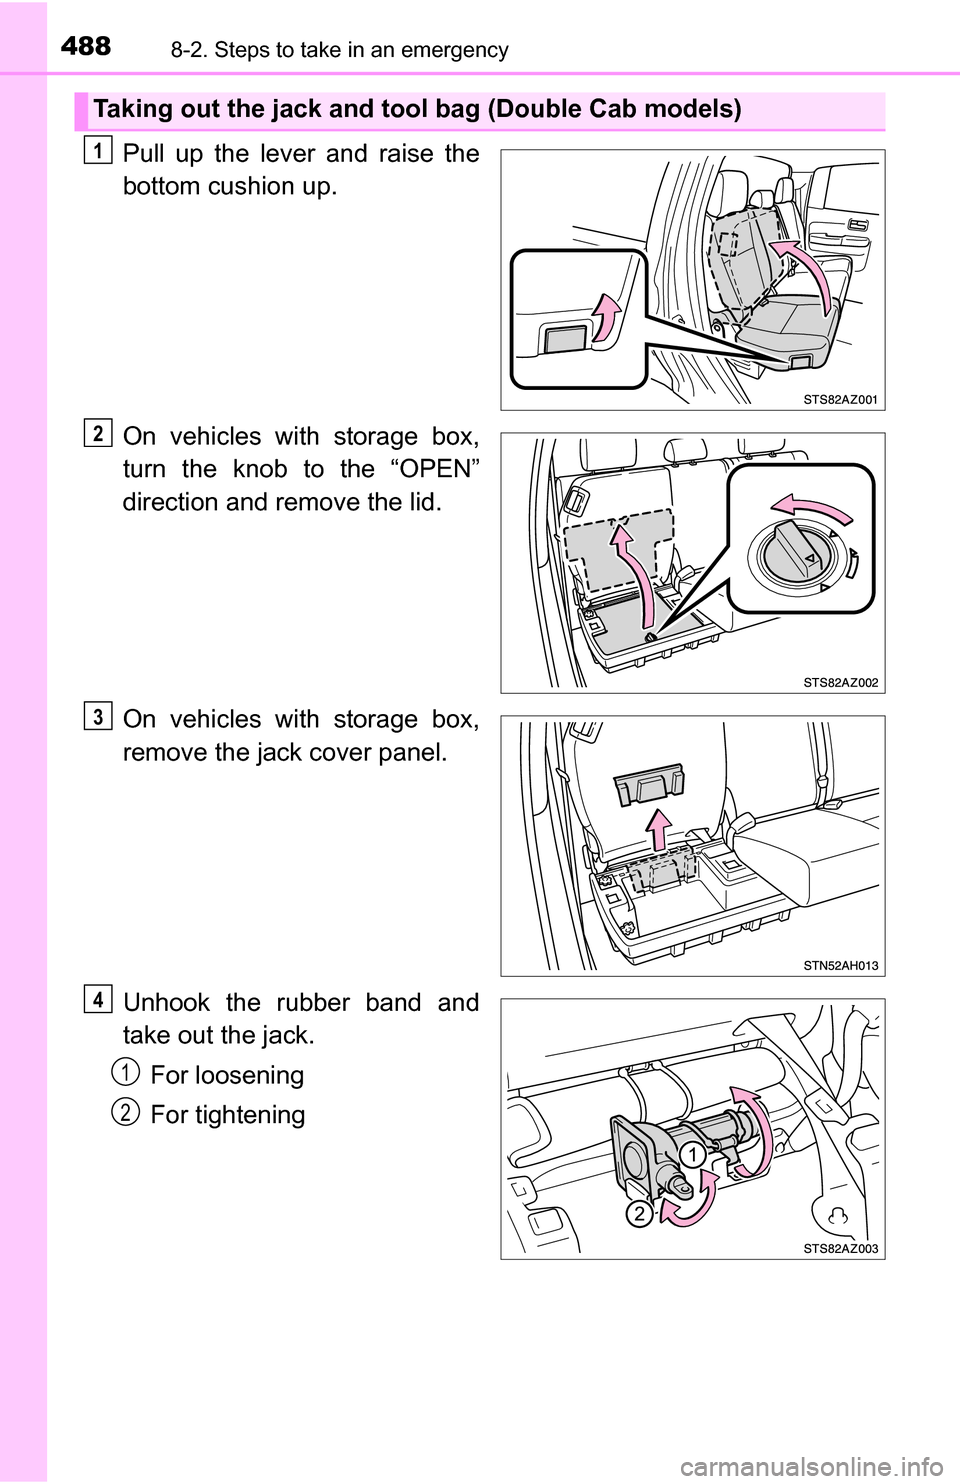
Pull up the lever and raise the
bottom cushion up.
On vehicles with storage box,
turn the knob to the “OPEN”
direction and remove the lid.
On vehicles with storage box,
remove the jack cover panel.
Unhook the rubber band and
take out the jack.For loosening
For tightening
Taking out the jack and tool bag (Double Cab models)
1
2
3
4
1
2
Page 489 of 588
4898-2. Steps to take in an emergency
8
When trouble arises
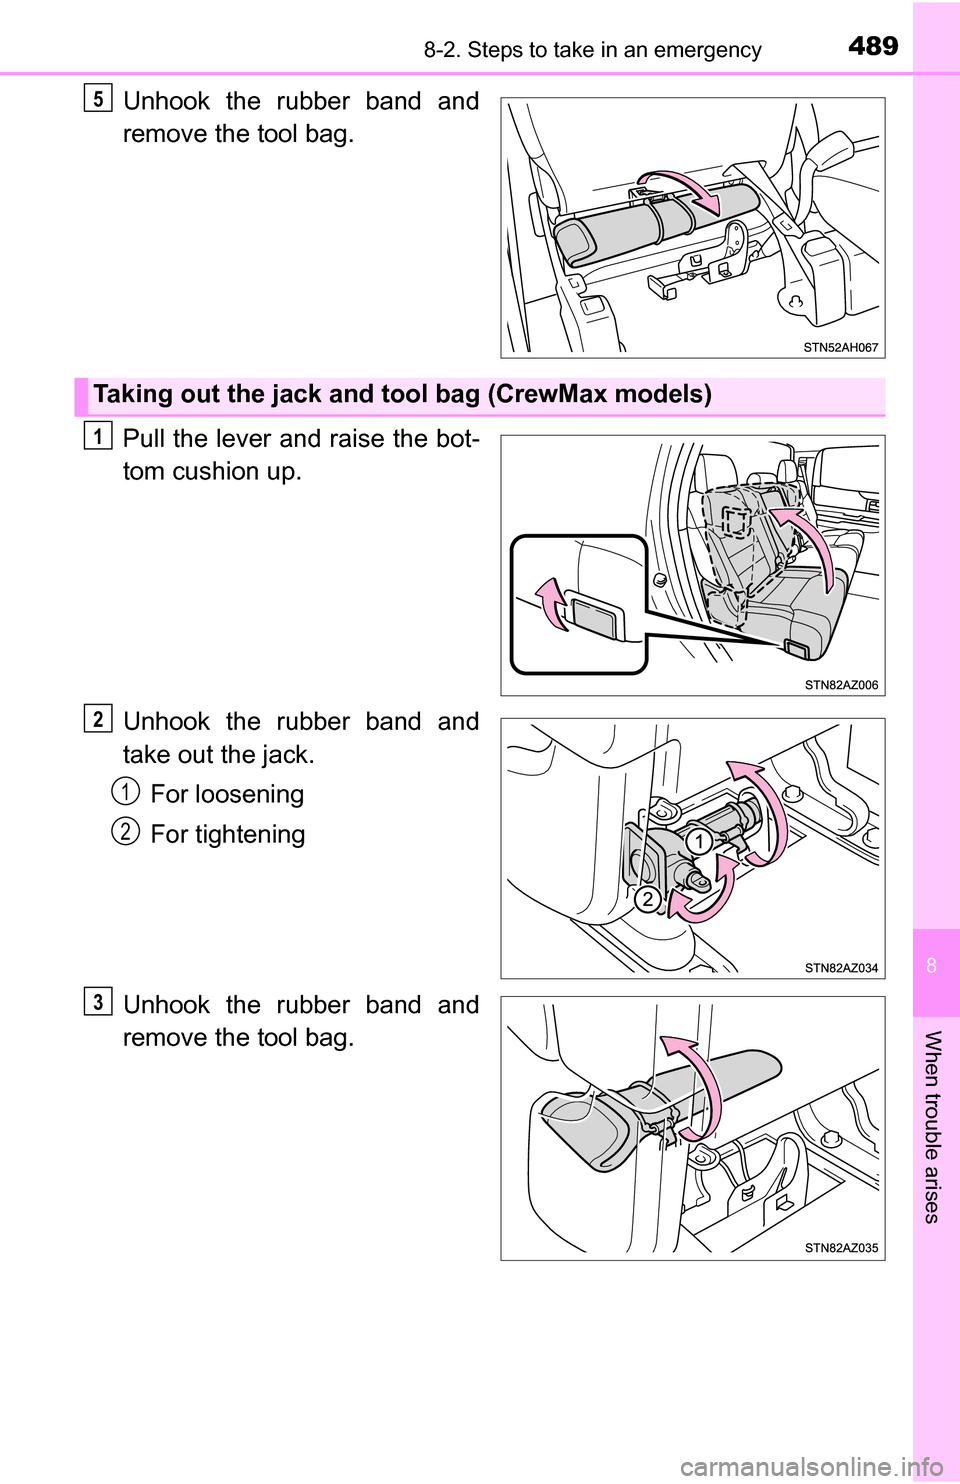
Unhook the rubber band and
remove the tool bag.
Pull the lever and raise the bot-
tom cushion up.
Unhook the rubber band and
take out the jack.For loosening
For tightening
Unhook the rubber band and
remove the tool bag.5
Taking out the jack and tool bag (CrewMax models)
1
2
1
2
3
Page 490 of 588
4908-2. Steps to take in an emergency
9
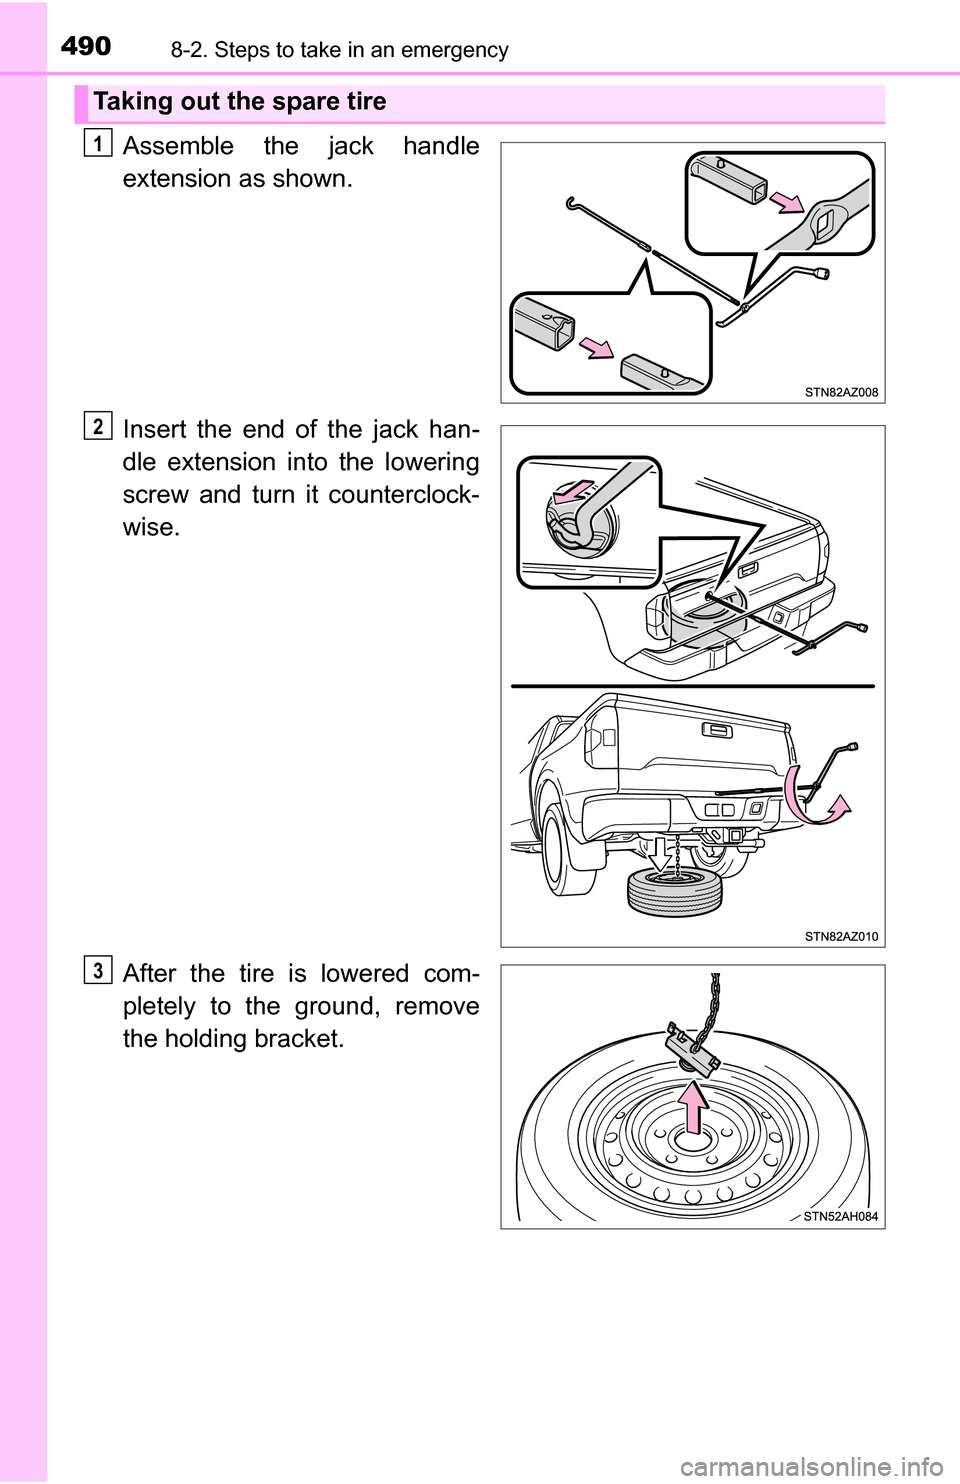
Assemble the jack handle
extension as shown.
Insert the end of the jack han-
dle extension into the lowering
screw and turn it counterclock-
wise.
After the tire is lowered com-
pletely to the ground, remove
the holding bracket.
Taking out the spare tire
1
2
3
Trending: dimensions, recommended oil, wheel bolt torque, service interval, fold seats, length, navigation system


