power steering TOYOTA TUNDRA HYBRID 2023 User Guide
[x] Cancel search | Manufacturer: TOYOTA, Model Year: 2023, Model line: TUNDRA HYBRID, Model: TOYOTA TUNDRA HYBRID 2023Pages: 618, PDF Size: 13.67 MB
Page 144 of 618
1443-4. Adjusting the steering wheel and mirrors
Owners Manual_USA_M0C052_enentered to memory and recalled
automatically by the driving position
memory system. (
P.137)
■Power easy access system (if
equipped)
The steering wheel and driver’s seat
move in accordance with power
switch mode and the driver’s seat
belt condition. ( P.137)
■After adjusting the steering
wheel (manual adjustment type)
Make sure that the steering wheel is
securely locked.
The horn may not sound if the steer-
ing wheel is not securely locked.
■Customization
Some functions can be customized.
( P.561)
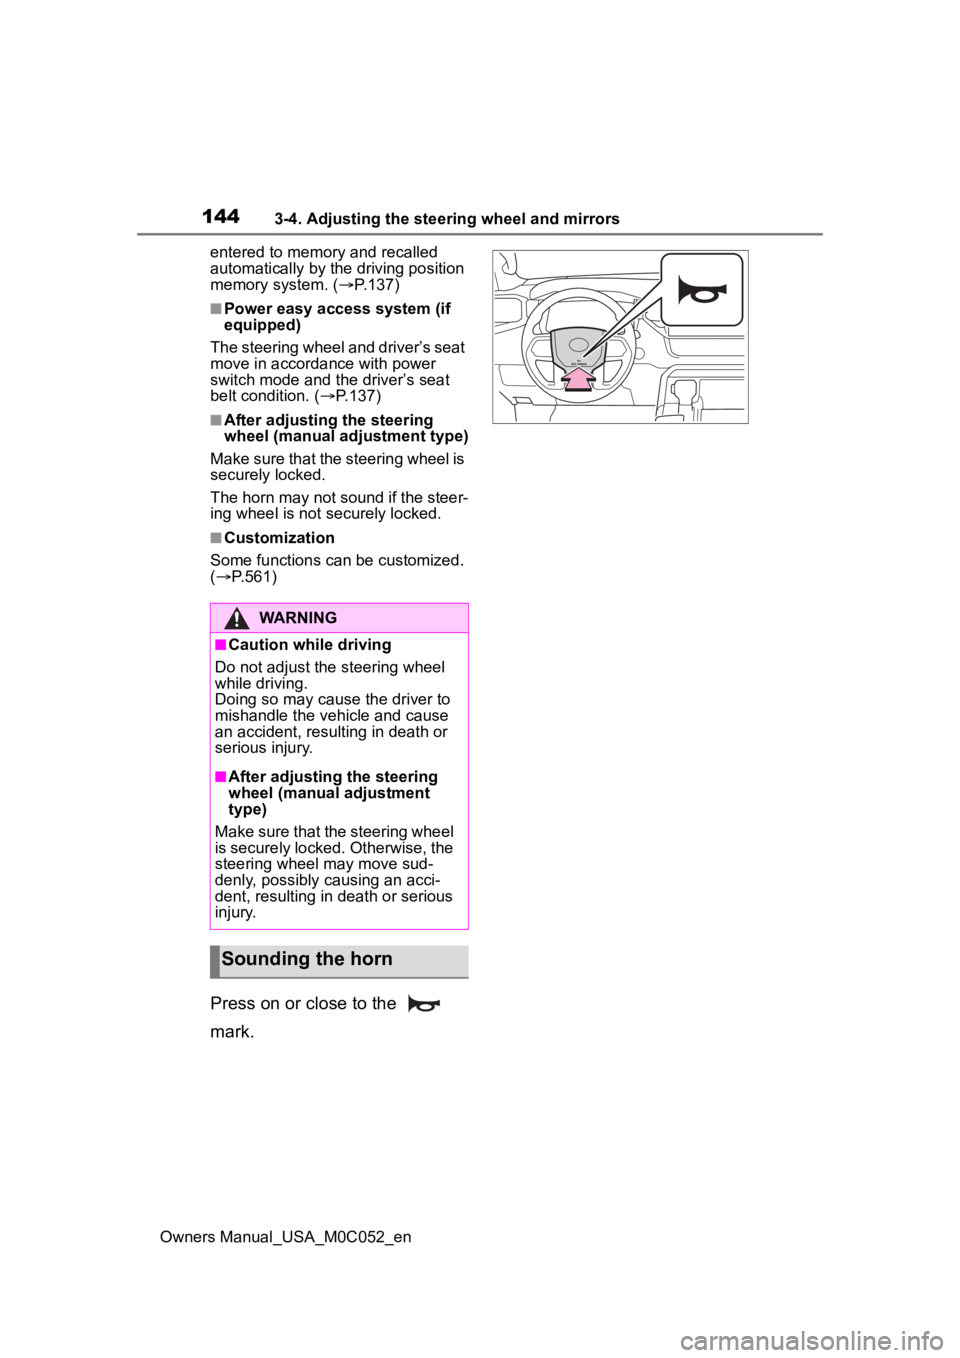
Press on or close to the
mark.
WARNING
■Caution while driving
Do not adjust the steering wheel
while driving.
Doing so may cause the driver to
mishandle the vehicle and cause
an accident, resul ting in death or
serious injury.
■After adjusting the steering
wheel (manual adjustment
type)
Make sure that the steering wheel
is securely locked. Otherwise, the
steering wheel may move sud-
denly, possibly causing an acci-
dent, resulting in death or serious
injury.
Sounding the horn
Page 145 of 618
1453-4. Adjusting the steering wheel and mirrors
Owners Manual_USA_M0C052_en
3
Before driving
*: If equipped
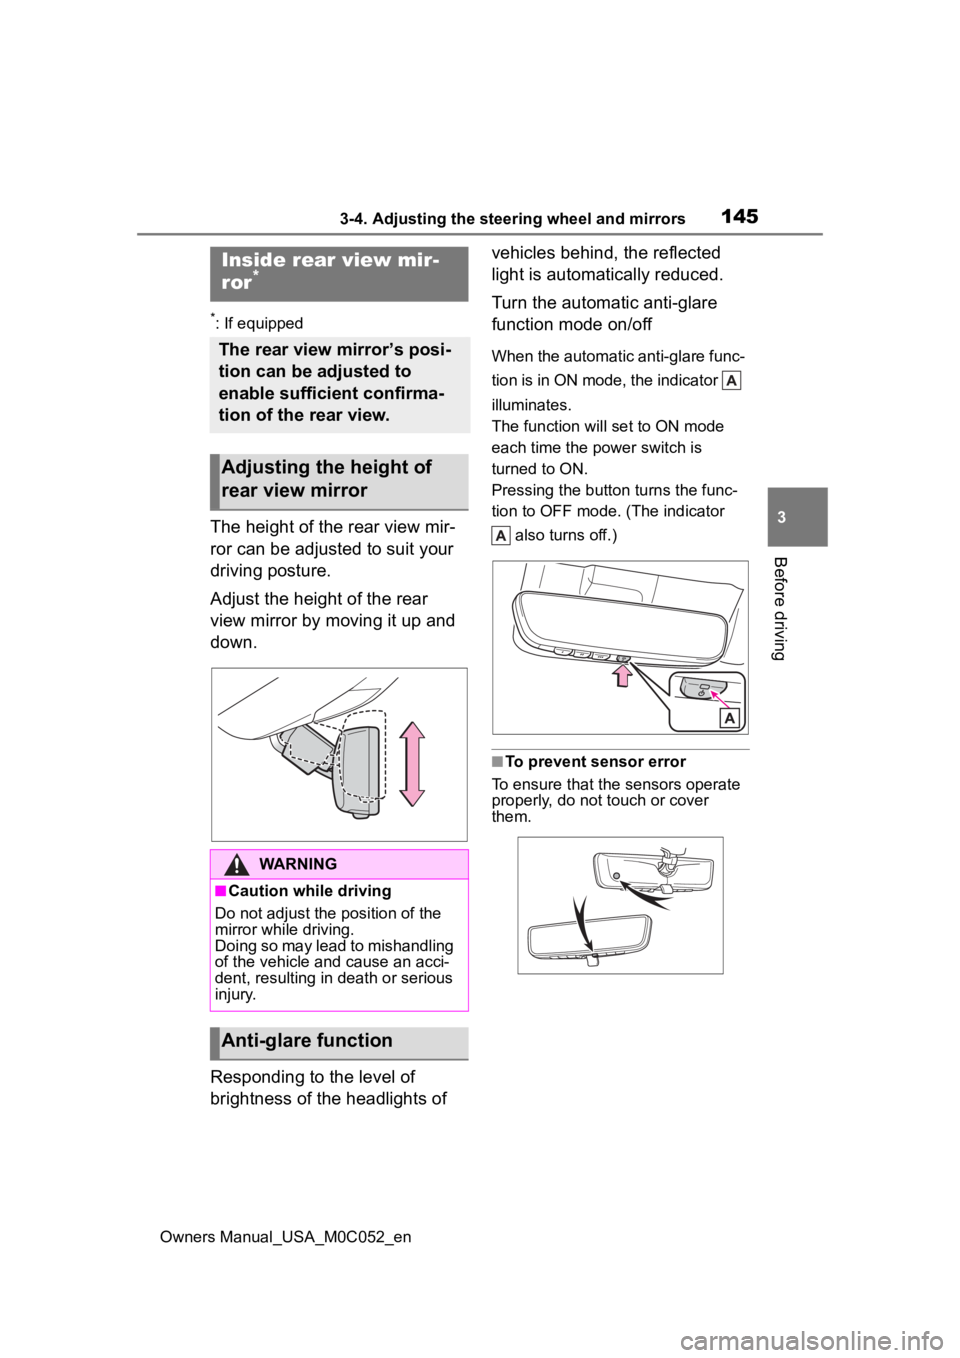
The height of the rear view mir-
ror can be adjusted to suit your
driving posture.
Adjust the height of the rear
view mirror by moving it up and
down.
Responding to the level of
brightness of the headlights of vehicles behind, the reflected
light is automatically reduced.
Turn the automatic anti-glare
function mode on/off
When the automatic anti-glare func-
tion is in ON mode, the indicator
illuminates.
The function will set to ON mode
each time the power switch is
turned to ON.
Pressing the button turns the func-
tion to OFF mode. (The indicator
also turns off.)
■To prevent sensor error
To ensure that the sensors operate
properly, do not touch or cover
them.
Inside rear view mir-
ror*
The rear view mirror’s posi-
tion can be adjusted to
enable sufficient confirma-
tion of the rear view.
Adjusting the height of
rear view mirror
WARNING
■Caution while driving
Do not adjust the position of the
mirror while driving.
Doing so may lead to mishandling
of the vehicle and cause an acci-
dent, resulting in death or serious
injury.
Anti-glare function
Page 147 of 618
1473-4. Adjusting the steering wheel and mirrors
Owners Manual_USA_M0C052_en
3
Before driving
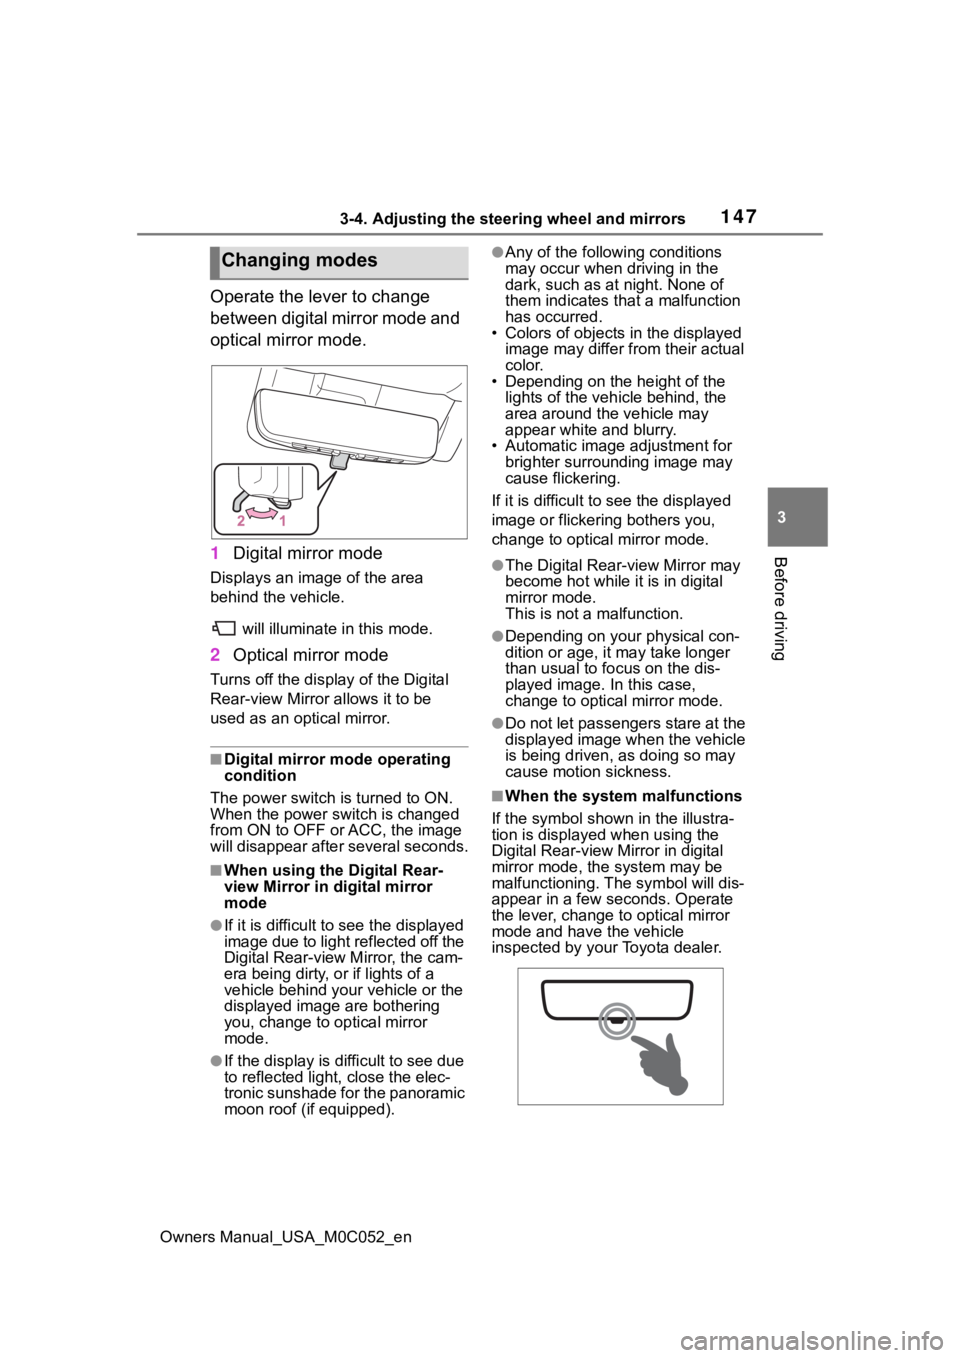
Operate the lever to change
between digital mirror mode and
optical mirror mode.
1 Digital mirror mode
Displays an image of the area
behind the vehicle.
will illuminate in this mode.
2Optical mirror mode
Turns off the display of the Digital
Rear-view Mirror allows it to be
used as an optical mirror.
■Digital mirror mode operating
condition
The power switch is turned to ON.
When the power switch is changed
from ON to OFF or ACC, the image
will disappear afte r several seconds.
■When using the Digital Rear-
view Mirror in digital mirror
mode
●If it is difficult to see the displayed
image due to light reflected off the
Digital Rear-view M irror, the cam-
era being dirty, or if lights of a
vehicle behind your vehicle or the
displayed image are bothering
you, change to optical mirror
mode.
●If the display is difficult to see due
to reflected light, close the elec-
tronic sunshade for the panoramic
moon roof (if equipped).
●Any of the following conditions
may occur when driving in the
dark, such as at night. None of
them indicates that a malfunction
has occurred.
• Colors of objects in the displayed
image may differ from their actual
color.
• Depending on the height of the
lights of the vehicle behind, the
area around the vehicle may
appear white and blurry.
• Automatic image adjustment for brighter surrounding image may
cause flickering.
If it is difficult to see the displayed
image or flickering bothers you,
change to optical mirror mode.
●The Digital Rear-view Mirror may
become hot while it is in digital
mirror mode.
This is not a malfunction.
●Depending on your physical con-
dition or age, it may take longer
than usual to fo cus on the dis-
played image. In this case,
change to optical mirror mode.
●Do not let passengers stare at the
displayed image when the vehicle
is being driven, as doing so may
cause motion sickness.
■When the system malfunctions
If the symbol shown in the illustra-
tion is displayed when using the
Digital Rear-view Mirror in digital
mirror mode, the system may be
malfunctioning. The symbol will dis-
appear in a few seconds. Operate
the lever, change to optical mirror
mode and have the vehicle
inspected by your Toyota dealer.
Changing modes
Page 148 of 618
1483-4. Adjusting the steering wheel and mirrors
Owners Manual_USA_M0C052_en
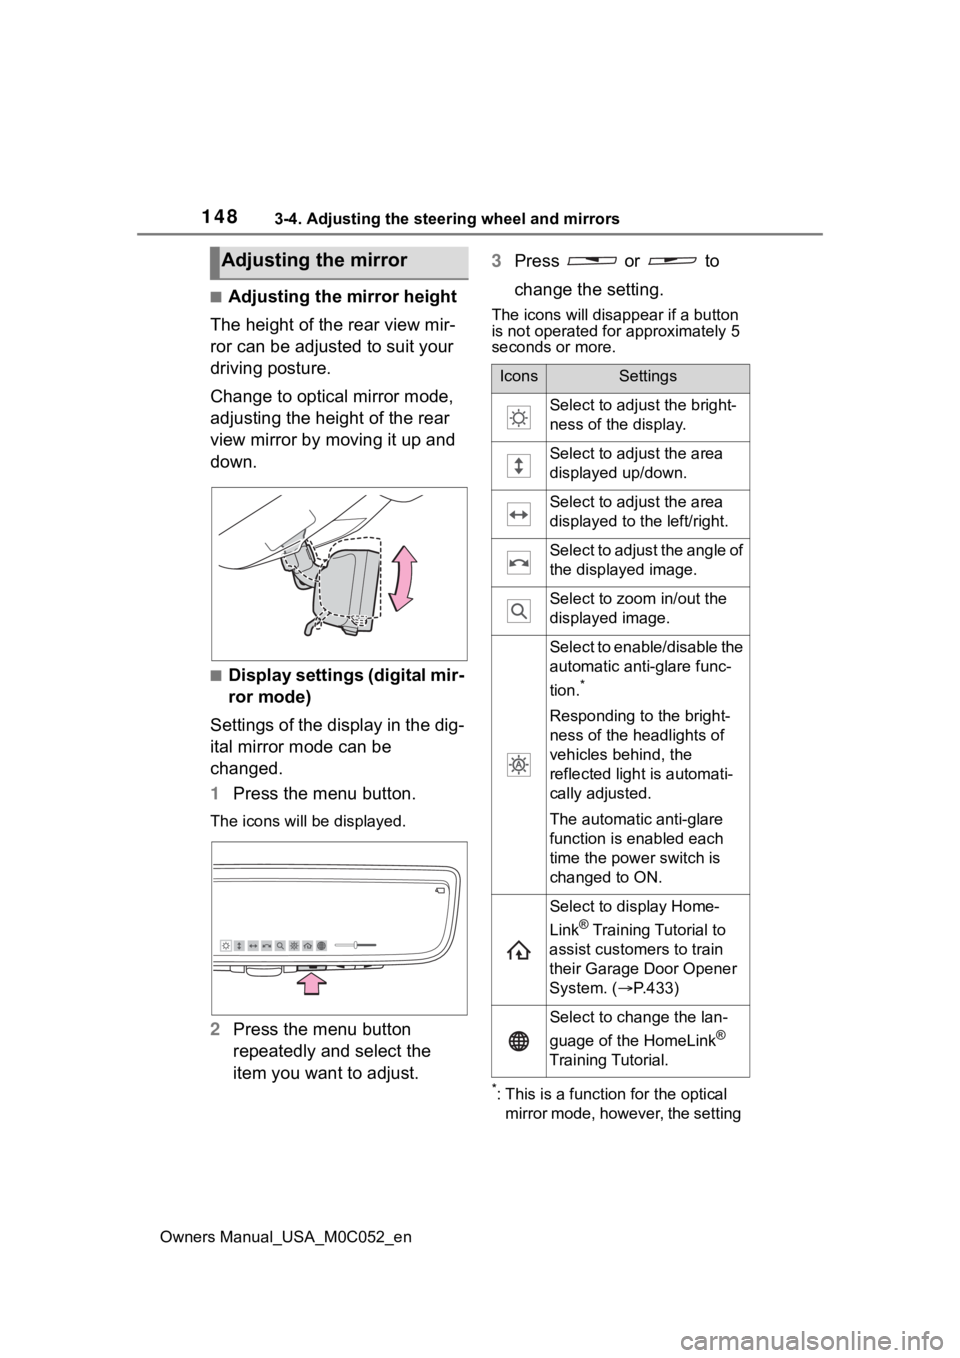
■Adjusting the mirror height
The height of the rear view mir-
ror can be adjusted to suit your
driving posture.
Change to optical mirror mode,
adjusting the height of the rear
view mirror by moving it up and
down.
■Display settings (digital mir-
ror mode)
Settings of the display in the dig-
ital mirror mode can be
changed.
1 Press the menu button.
The icons will be displayed.
2Press the menu button
repeatedly and select the
item you want to adjust. 3
Press or to
change the setting.
The icons will disappear if a button
is not operated fo r approximately 5
seconds or more.
*: This is a functi on for the optical
mirror mode, however, the setting
Adjusting the mirror
IconsSettings
Select to adjust the bright-
ness of the display.
Select to adjust the area
displayed up/down.
Select to adjust the area
displayed to the left/right.
Select to adjust the angle of
the displayed image.
Select to zoom in/out the
displayed image.
Select to enable/disable the
automatic anti-glare func-
tion.
*
Responding to the bright-
ness of the headlights of
vehicles behind, the
reflected light is automati-
cally adjusted.
The automatic anti-glare
function is enabled each
time the power switch is
changed to ON.
Select to display Home-
Link
® Training Tutorial to
assist customers to train
their Garage Door Opener
System. ( P.433)
Select to change the lan-
guage of the HomeLink
®
Training Tutorial.
Page 153 of 618
1533-4. Adjusting the steering wheel and mirrors
Owners Manual_USA_M0C052_en
3
Before driving
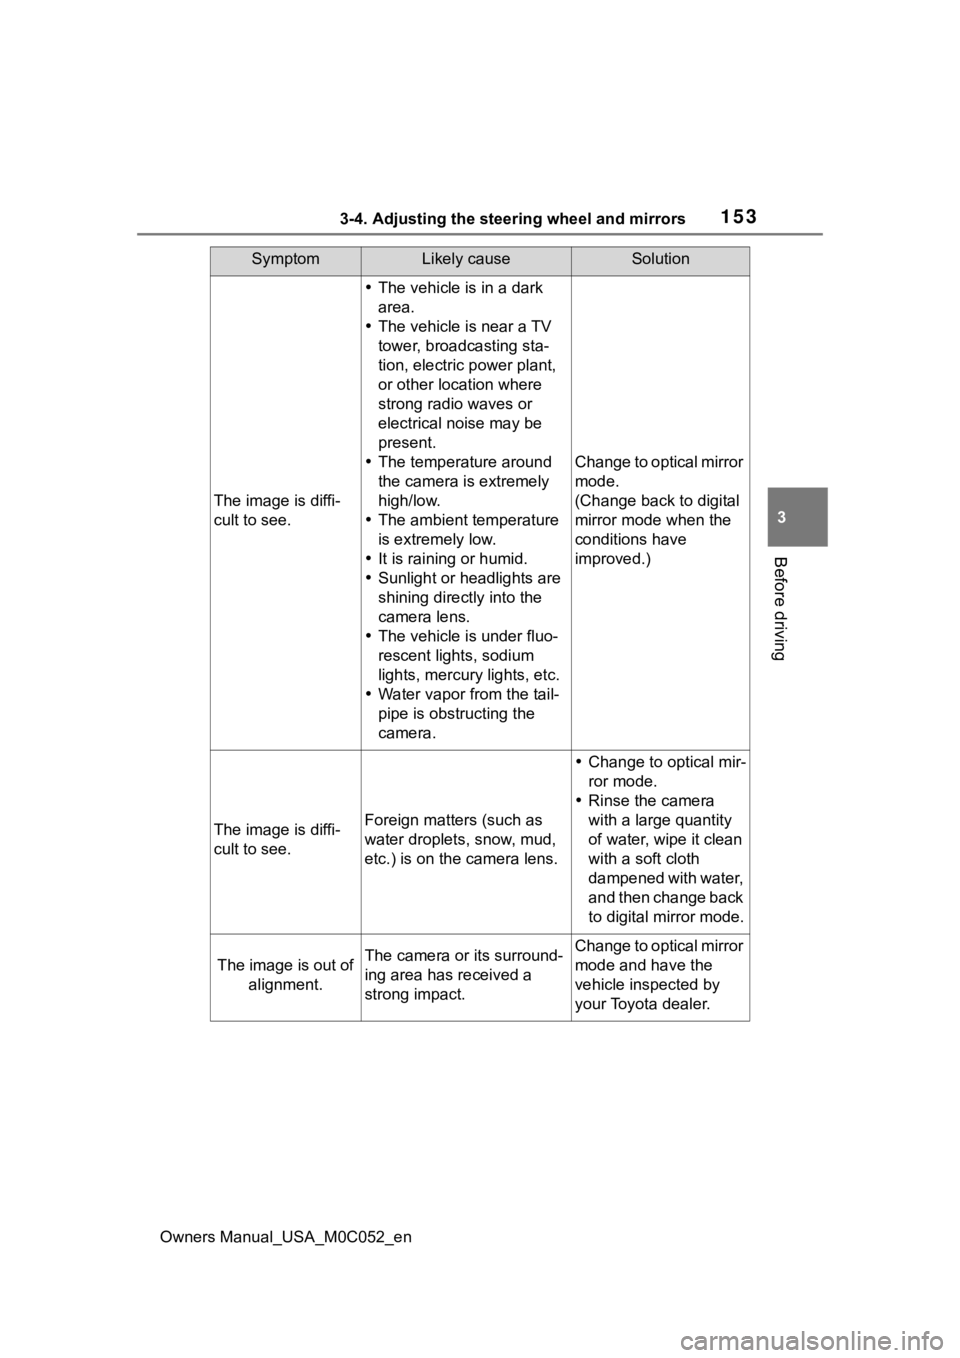
The image is diffi-
cult to see.
The vehicle is in a dark
area.
The vehicle is near a TV
tower, broadcasting sta-
tion, electric power plant,
or other location where
strong radio waves or
electrical noise may be
present.
The temperature around
the camera is extremely
high/low.
The ambient temperature
is extremely low.
It is raining or humid.
Sunlight or headlights are
shining directly into the
camera lens.
The vehicle is under fluo-
rescent lights, sodium
lights, mercury lights, etc.
Water vapor from the tail-
pipe is obstructing the
camera.
Change to optical mirror
mode.
(Change back to digital
mirror mode when the
conditions have
improved.)
The image is diffi-
cult to see.Foreign matters (such as
water droplets, snow, mud,
etc.) is on the camera lens.
Change to optical mir-
ror mode.
Rinse the camera
with a large quantity
of water, wipe it clean
with a soft cloth
dampened with water,
and then change back
to digital mirror mode.
The image is out of
alignment.The camera or its surround-
ing area has received a
strong impact.Change to optical mirror
mode and have the
vehicle inspected by
your Toyota dealer.
SymptomLikely causeSolution
Page 156 of 618
1563-4. Adjusting the steering wheel and mirrors
Owners Manual_USA_M0C052_en
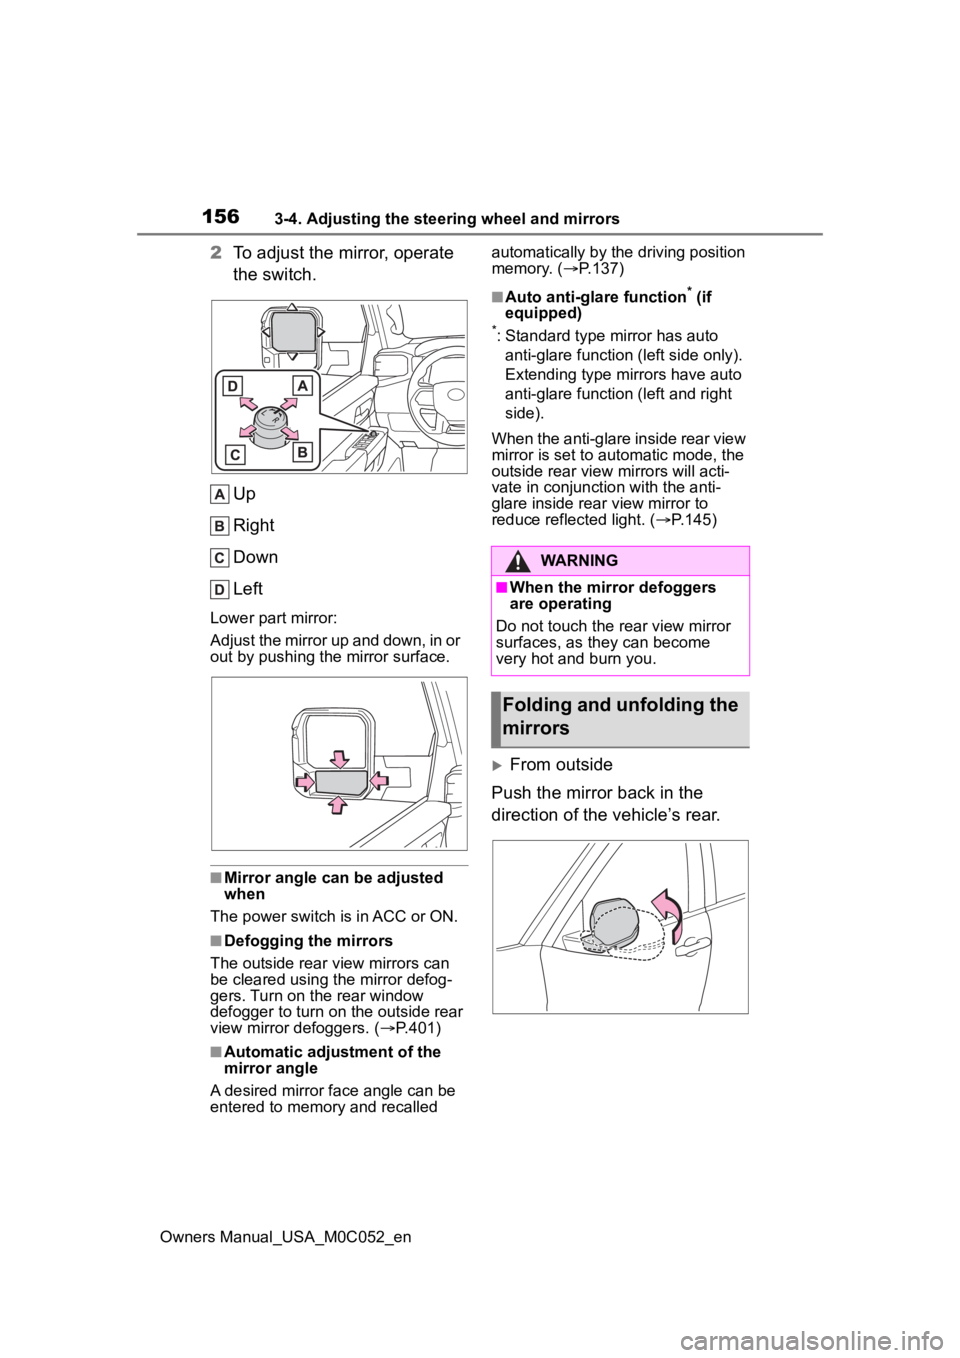
2To adjust the mirror, operate
the switch.
Up
Right
Down
Left
Lower part mirror:
Adjust the mirror up and down, in or
out by pushing the mirror surface.
■Mirror angle can be adjusted
when
The power switch i s in ACC or ON.
■Defogging the mirrors
The outside rear v iew mirrors can
be cleared using the mirror defog-
gers. Turn on the rear window
defogger to turn on the outside rear
view mirror defoggers. ( P.401)
■Automatic adjustment of the
mirror angle
A desired mirror face angle can be
entered to memory and recalled automatically by the driving position
memory. (
P.137)
■Auto anti-glare function* (if
equipped)
*: Standard type mirror has auto
anti-glare function (left side only).
Extending type mirrors have auto
anti-glare function (left and right
side).
When the anti-glare inside rear view
mirror is set to au tomatic mode, the
outside rear view mirrors will acti-
vate in conjunction with the anti-
glare inside rear view mirror to
reduce reflected light. ( P.145)
From outside
Push the mirror back in the
direction of the vehicle’s rear.
WARNING
■When the mirror defoggers
are operating
Do not touch the rear view mirror
surfaces, as they can become
very hot and burn you.
Folding and unfolding the
mirrors
Page 158 of 618
1583-4. Adjusting the steering wheel and mirrors
Owners Manual_USA_M0C052_en
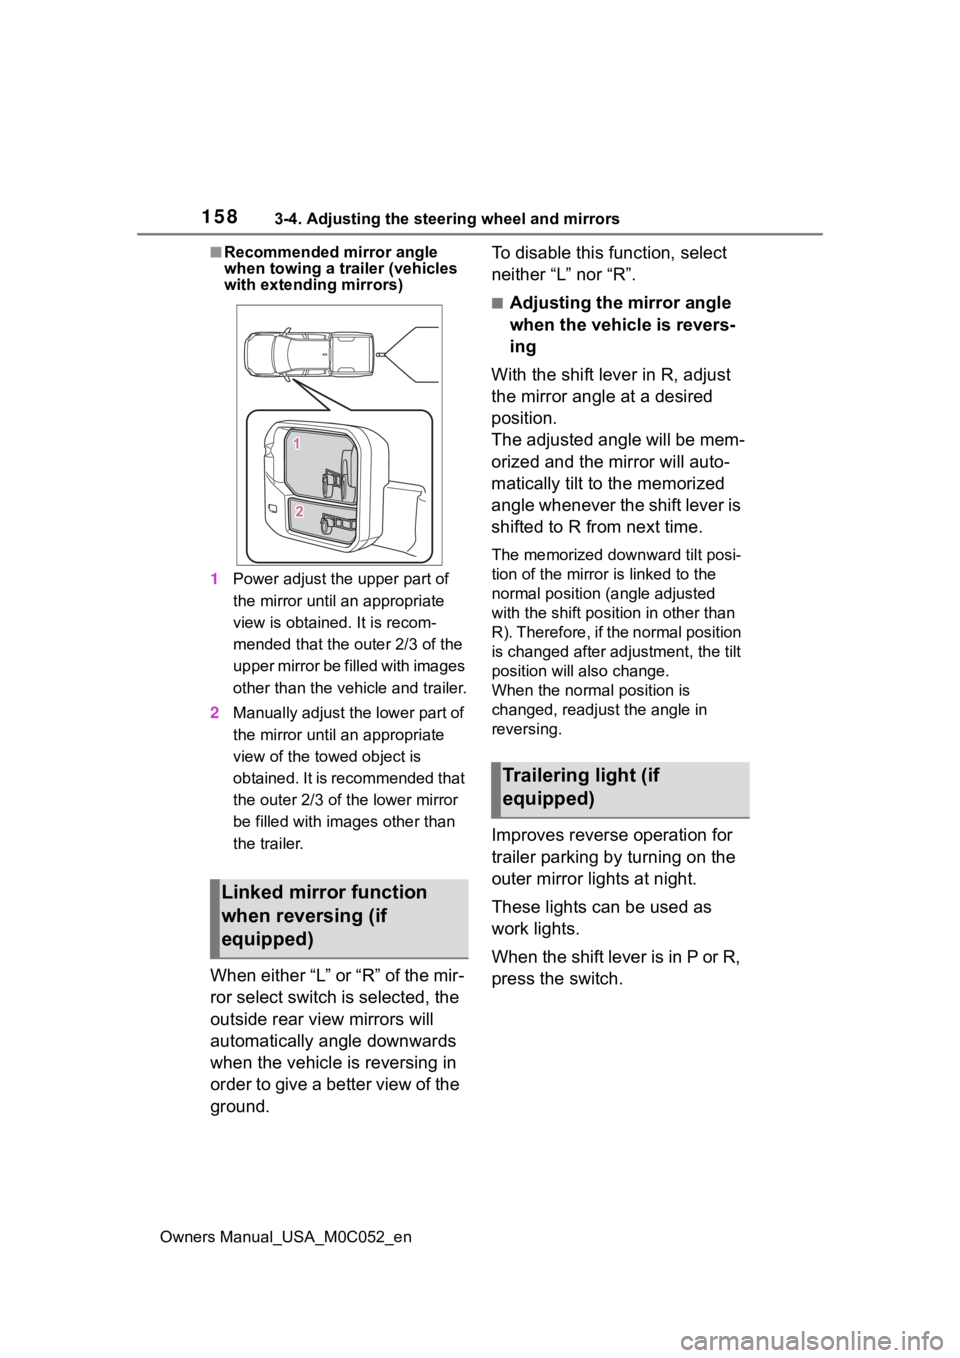
■Recommended mirror angle
when towing a trailer (vehicles
with extending mirrors)
1 Power adjust the upper part of
the mirror until an appropriate
view is obtained. It is recom-
mended that the outer 2/3 of the
upper mirror be f illed with images
other than the vehicle and trailer.
2 Manually adjust the lower part of
the mirror until an appropriate
view of the towed object is
obtained. It is recommended that
the outer 2/3 of the lower mirror
be filled with images other than
the trailer.
When either “L” or “R” of the mir-
ror select switch is selected, the
outside rear view mirrors will
automatically angle downwards
when the vehicle is reversing in
order to give a better view of the
ground. To disable this function, select
neither “L” nor “R”.
■Adjusting the mirror angle
when the vehicle is revers-
ing
With the shift lever in R, adjust
the mirror angle at a desired
position.
The adjusted angle will be mem-
orized and the mirror will auto-
matically tilt to the memorized
angle whenever the shift lever is
shifted to R from next time.
The memorized downward tilt posi-
tion of the mirror is linked to the
normal position (angle adjusted
with the shift posit ion in other than
R). Therefore, if the normal position
is changed after adjustment, the tilt
position will also change.
When the normal position is
changed, readjust the angle in
reversing.
Improves reverse operation for
trailer parking by turning on the
outer mirror lights at night.
These lights can be used as
work lights.
When the shift lever is in P or R,
press the switch.
Linked mirror function
when reversing (if
equipped)
Trailering light (if
equipped)
Page 176 of 618
1764-1. Before driving
Owners Manual_USA_M0C052_en
WARNING
■When taking a nap in the vehi-
cle
Always turn the hybrid system off.
Otherwise, if you accidentally
move the shift lever or depress
the accelerator pedal, this could
cause an accident or fire due to
hybrid system overheating. Addi-
tionally, if the vehicle is parked in
a poorly ventilated area, exhaust
gases may collect and enter the
vehicle, leading to death or a seri-
ous health hazard.
■When braking
●When the brakes a re wet, drive
more cautiously.
Braking distance increases
when the brakes are wet, and
this may cause one side of the
vehicle to brake differently than
the other side. Also, the parking
brake may not securely hold the
vehicle.
●If the electroni cally controlled
brake does not operate, do not
follow other vehicl es closely and
avoid hills or sharp turns that
require braking.
In this case, braking is still pos-
sible, but the brake pedal
should be depressed more
firmly than usual. Also, the brak-
ing distance will increase. Have
your brakes fixed immediately.
●The brake system consists of 2
or more individual hydraulic sys-
tems; if one of the systems fails,
the other will still operate. In this
case, the brake pedal should be
depressed more firmly than
usual and the braking distance
will increase. Have your brakes
fixed immediately.
■If the vehicle becomes stuck
Do not spin the wheels exces-
sively when a driven wheel is up
in the air, or the vehicle is stuck in
sand, mud, etc. This may damage
the driveline components or pro-
pel the vehicle forward or back-
ward, causing an accident.
NOTICE
■When driving the vehicle
●Do not depress the accelerator
and brake pedals at the same
time during driving, as this may
restrain the hybrid system out-
put.
●Do not use the accelerator
pedal or depress the accelera-
tor and brake pedals at the
same time to hold the vehicle on
a hill.
■When parking the vehicle
Always set the parking brake and
shift the shift lever to P. Failure to
do so may cause the vehicle to
move or the vehicle may acceler-
ate suddenly if t he accelerator
pedal is accidentally depressed.
■Avoiding damage to vehicle
parts
●Do not turn the steering wheel
fully in either direction and hold
it there for an extended period
of time.
Doing so may damage the
power steering motor.
●When driving over bumps in the
road, drive as slowly as possible
to avoid damaging the wheels,
underside of the vehicle, etc.
Page 197 of 618
1974-2. Driving procedures
Owners Manual_USA_M0C052_en
4
Driving
1 Stop the vehicle completely.
2 Set the parking brake
( P.205), and shift the shift
lever to P.
Check the parking brake indicator
is illuminated.
3 Press the power switch
shortly and firmly.
The hybrid system will stop, and the
meter display will be extinguished.
4Release the brake pedal and
check that “ACCESSORY” or
“IGNITION ON” is not shown
on the meter.
■Automatic hybrid system shut
off feature
●The vehicle is equipped with a
feature that automatically shuts off
the hybrid system when the shift
lever is in P with the hybrid system
operating for an extended period.
●The hybrid system will automati- cally shut off after approximately 1
hour if it has been left running
while the shift lever is in P.
●The timer for the automatic hybrid
system shut off feature will reset if
the brake pedal is depressed or if
the shift lever is in a position other
than P.
●After the vehicle
is parked, if the
door is locked with the door lock
switch ( P.116) from the inside or
the mechanical key ( P.112) from
the outside, the automatic hybrid
system shut off feature will be dis-
abled. The timer for the automatic
hybrid syste m shut off feature will
be re-enabled if the driver’s door
is opened.
NOTICE
■When starting the hybrid sys-
tem
If the hybrid system becomes diffi-
cult to start, have your vehicle
checked by your Toyota dealer
immediately.
■Symptoms indicating a mal-
function with the power
switch
If the power switch seems to be
operating somewh at differently
than usual, such as the switch
sticking slightly, there may be a
malfunction. Contact your Toyota
dealer immediately.
Stopping the hybrid sys-
temWARNING
■Stopping the hybrid system
in an emergency
●If you want to stop the hybrid
system in an emergency while
driving the vehicle, press and
hold the power s witch for more
than 2 seconds, or press it
briefly 3 times or more in suc-
cession. ( P.494)
However, do not touch the
power switch while driving
except in an emergency. Turn-
ing the hybrid s ystem off while
driving will not cause loss of
steering or braking control, but
the power assist to these sys-
tems will be lost. This will make
it more difficult to steer and
brake, so you should pull over
and stop the vehicle as soon as
it is safe to do so.
●If the power switch is operated
while the vehicle is running, a
warning message will be shown
on the multi-information display
and a buzzer sounds.
Page 203 of 618
2034-2. Driving procedures
Owners Manual_USA_M0C052_en
4
Driving
range when the fluid temperature
is high.
●When the shift range is 9 or lower,
holding the shift lever toward “+”
sets the shift range to 10.
■Downshifting restriction warn-
ing buzzer
To help ensure safety and driving
performance, downshifting opera-
tion may sometimes b e restricted. In
some circumstances, downshifting
may not be possible even when the
shift lever is opera ted. (A buzzer will
sound twice.)
■If the S indicator does not come
on even after shifting the shift
lever to S
This may indicate a malfunction in
the automatic tra nsmission system.
Have the vehicle inspected by your
Toyota dealer immediately.
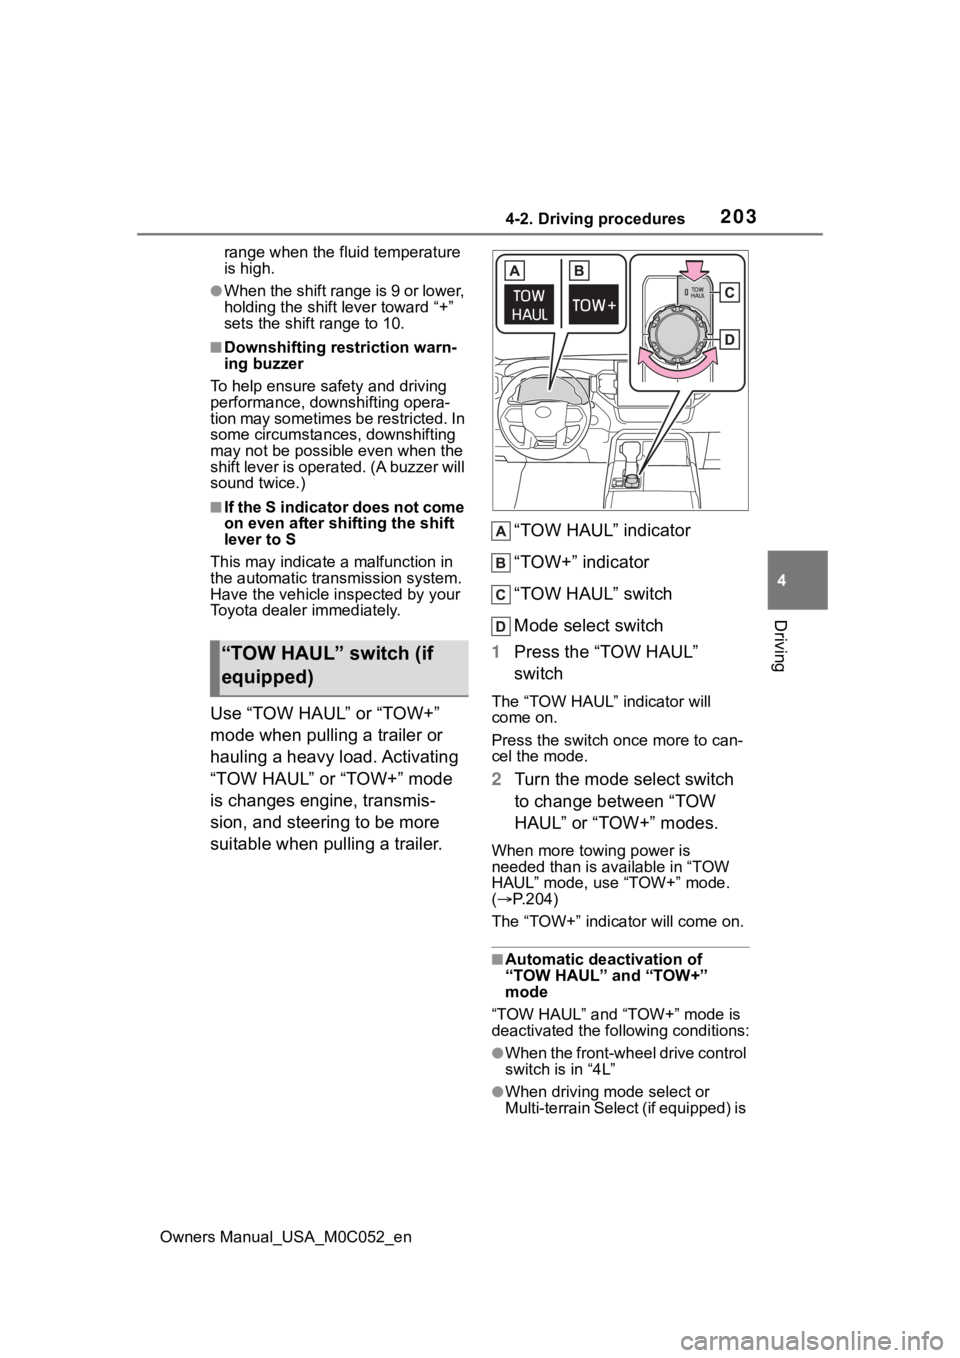
Use “TOW HAUL” or “TOW+”
mode when pulling a trailer or
hauling a heavy load. Activating
“TOW HAUL” or “TOW+” mode
is changes engine, transmis-
sion, and steering to be more
suitable when pulling a trailer. “TOW HAUL” indicator
“TOW+” indicator
“TOW HAUL” switch
Mode select switch
1 Press the “TOW HAUL”
switchThe “TOW HAUL” indicator will
come on.
Press the switch once more to can-
cel the mode.
2Turn the mode select switch
to change between “TOW
HAUL” or “TOW+” modes.
When more towing power is
needed than is available in “TOW
HAUL” mode, use “TOW+” mode.
( P.204)
The “TOW+” indicator will come on.
■Automatic deactivation of
“TOW HAUL” and “TOW+”
mode
“TOW HAUL” and “TOW+” mode is
deactivated the following conditions:
●When the front-wheel drive control
switch is in “4L”
●When driving m ode select or
Multi-terrain Select (if equipped) is
“TOW HAUL” switch (if
equipped)