reset TOYOTA VENZA HYBRID 2021 (in English) Owner's Manual
[x] Cancel search | Manufacturer: TOYOTA, Model Year: 2021, Model line: VENZA HYBRID, Model: TOYOTA VENZA HYBRID 2021Pages: 548, PDF Size: 18.43 MB
Page 128 of 548

1272-1. Instrument cluster
2
Vehicle status information and indicators
tions.
■Updating the history data
Update the latest fuel consumption
by selecting “Upda te” to measure
the current fuel consumption again.
■Resetting the data
The fuel consumption data can be
deleted by selecting “Clear”.
■Cruising range
Displays the estimated maximum
distance that can be driven with the
quantity of fuel remaining.
This distance is computed based on
your average fuel consumption.
As a result, the actual distance that
can be driven may differ from that
displayed.
■“Home” screen (vehicles with 8-
inch display only)
The average fuel consumption and
distance to empty can be displayed
on the “Home” screen of the multi-
media display.
For details of the “Home” screen,
refer to the separate “NAVIGATION
AND MULTIMEDIA SYSTEM
OWNER’S MANUAL”.
Page 136 of 548
1343-2. Opening, closing and locking the doors
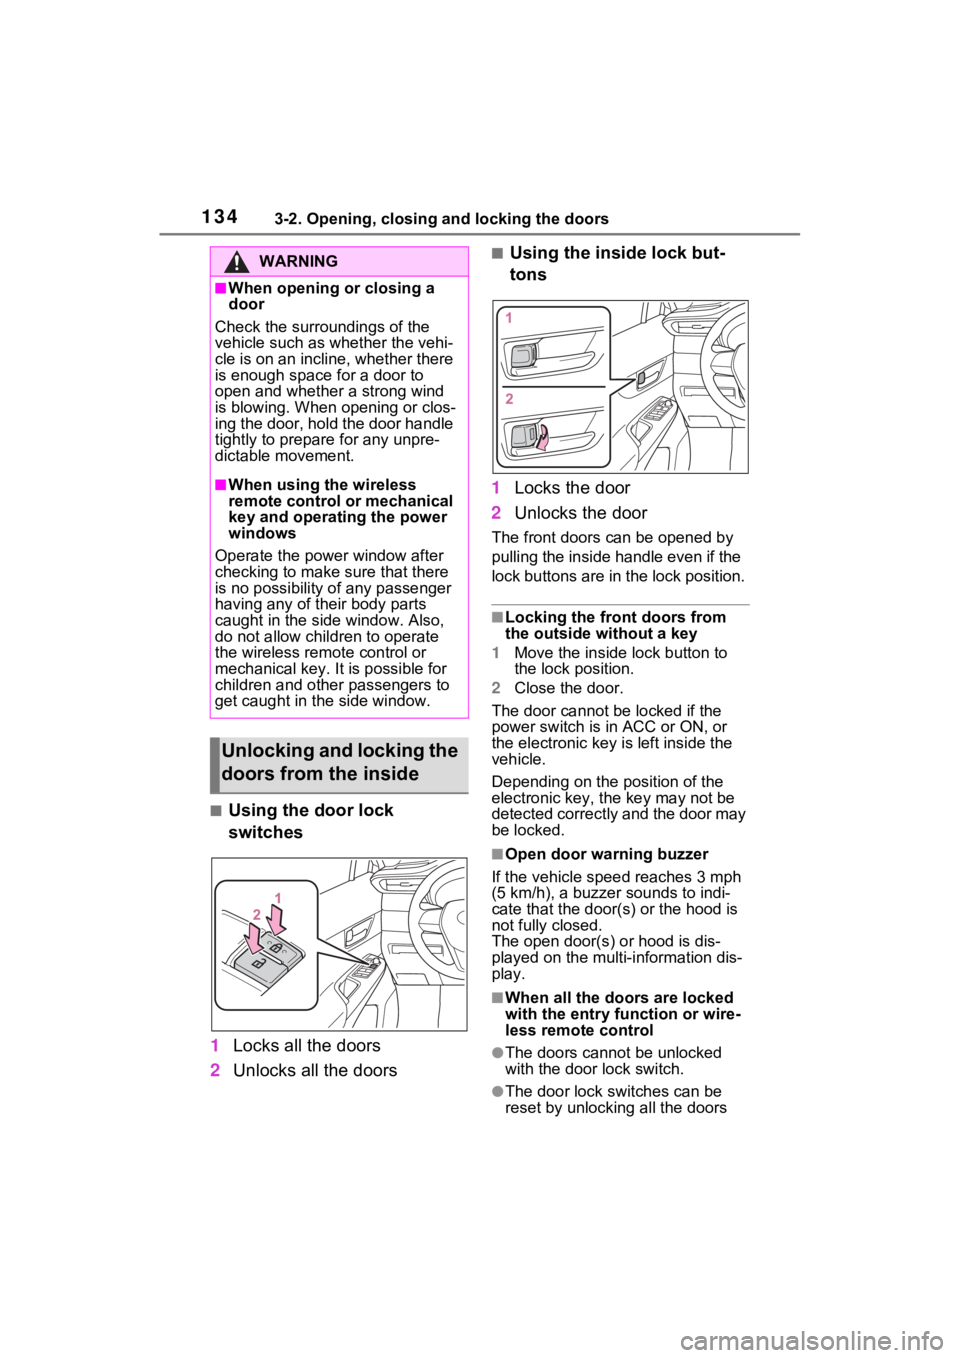
■Using the door lock
switches
1 Locks all the doors
2 Unlocks all the doors
■Using the inside lock but-
tons
1 Locks the door
2 Unlocks the door
The front doors c an be opened by
pulling the inside handle even if the
lock buttons are in the lock position.
■Locking the front doors from
the outside without a key
1 Move the inside l ock button to
the lock position.
2 Close the door.
The door cannot be locked if the
power switch is in ACC or ON, or
the electronic key is left inside the
vehicle.
Depending on the position of the
electronic key, the key may not be
detected correctly and the door may
be locked.
■Open door warning buzzer
If the vehicle speed reaches 3 mph
(5 km/h), a buzzer sounds to indi-
cate that the door( s) or the hood is
not fully closed.
The open door(s) or hood is dis-
played on the multi-information dis-
play.
■When all the doors are locked
with the entry function or wire-
less remote control
●The doors cannot be unlocked
with the door lock switch.
●The door lock switches can be
reset by unlockin g all the doors
WARNING
■When opening or closing a
door
Check the surroundings of the
vehicle such as whether the vehi-
cle is on an incline, whether there
is enough space for a door to
open and whether a strong wind
is blowing. When opening or clos-
ing the door, hold the door handle
tightly to prepare for any unpre-
dictable movement.
■When using the wireless
remote control or mechanical
key and operating the power
windows
Operate the power window after
checking to make sure that there
is no possibility of any passenger
having any of their body parts
caught in the side window. Also,
do not allow children to operate
the wireless remote control or
mechanical key. It is possible for
children and other passengers to
get caught in the side window.
Unlocking and locking the
doors from the inside
Page 149 of 548
1473-2. Opening, closing and locking the doors
3
Before driving
The settings of the power back
door system can be changed by
displaying the “Vehicle Set-
tings” - “PBD” screen from the
screen of the multi-informa-
tion display. ( P.100, 111)
The changed power back door set-
tings are not reset by turning the
power switch to OFF. In order to
restore the original settings, they
need to be changed back on the
screen of the mu lti-information
display.
The open position of the power
back door can be adjusted.
1 Stop the back door in the
desirable position. ( P.137)
2 Press and hold the
switch on the lower part of
the back door for approxi-
mately 2 seconds.
When the settings are completed,
the buzzer sounds 4 times.
When opening the back door the
next time, the back door will stop at
NOTICE
●Do not park the vehicle near
objects that may move and con-
tact the lower cen ter part of the
rear bumper, such as grass or
trees.
If the vehicle has been parked
for a while near objects that
may move and contact the
lower center par t of the rear
bumper, such as grass or trees,
the kick sensor may not oper-
ate. In this situation, move the
vehicle from the current position
and then check if the kick sen-
sor operates. If it does not oper-
ate, have the vehicle inspected
by your Toyota dealer.
●Do not subject the kick sensor
or its surrounding area to a
strong impact.
If the kick sensor or its sur-
rounding area has been sub-
jected to a strong impact, the
kick sensor may not operate
properly. If the kick sensor does
not operate in the following situ-
ations, have the vehicle
inspected by your Toyota
dealer.
• The kick sensor or its surround- ing area has been subjected to
a strong impact.
• The lower center part of the rear bumper is scratched or dam-
aged.
●Do not disassemble the rear
bumper.
●Do not attach stickers to the
rear bumper.
●Do not paint the rear bumper.
●If a bicycle carrier or similar
heavy object is attached to the
power back door, disable the
kick sensor. ( P.100, 111)
Changing settings of the
power back door system
Adjusting the open posi-
tion of the back door
Page 161 of 548
1593-3. Adjusting the seats
3
Before driving
The power switch has been
turned to OFF.
The driver’s seat belt has
been unfastened.
When any of the following has
been performed, the driver’s
seat and steering wheel auto-
matically return to their original
positions.
The power switch has been
turned to ACC or ON.
The driver’s seat belt has
been fastened.
■Operation of the power easy
access system
When exiting the vehicle, the power
easy access system may not oper-
ate if the seat is already close to the
rearmost position, etc.
■Customization
The seat movement amount set-
tings of the powe r easy access sys-
tem can be customized.
(Customizable features: P.507)
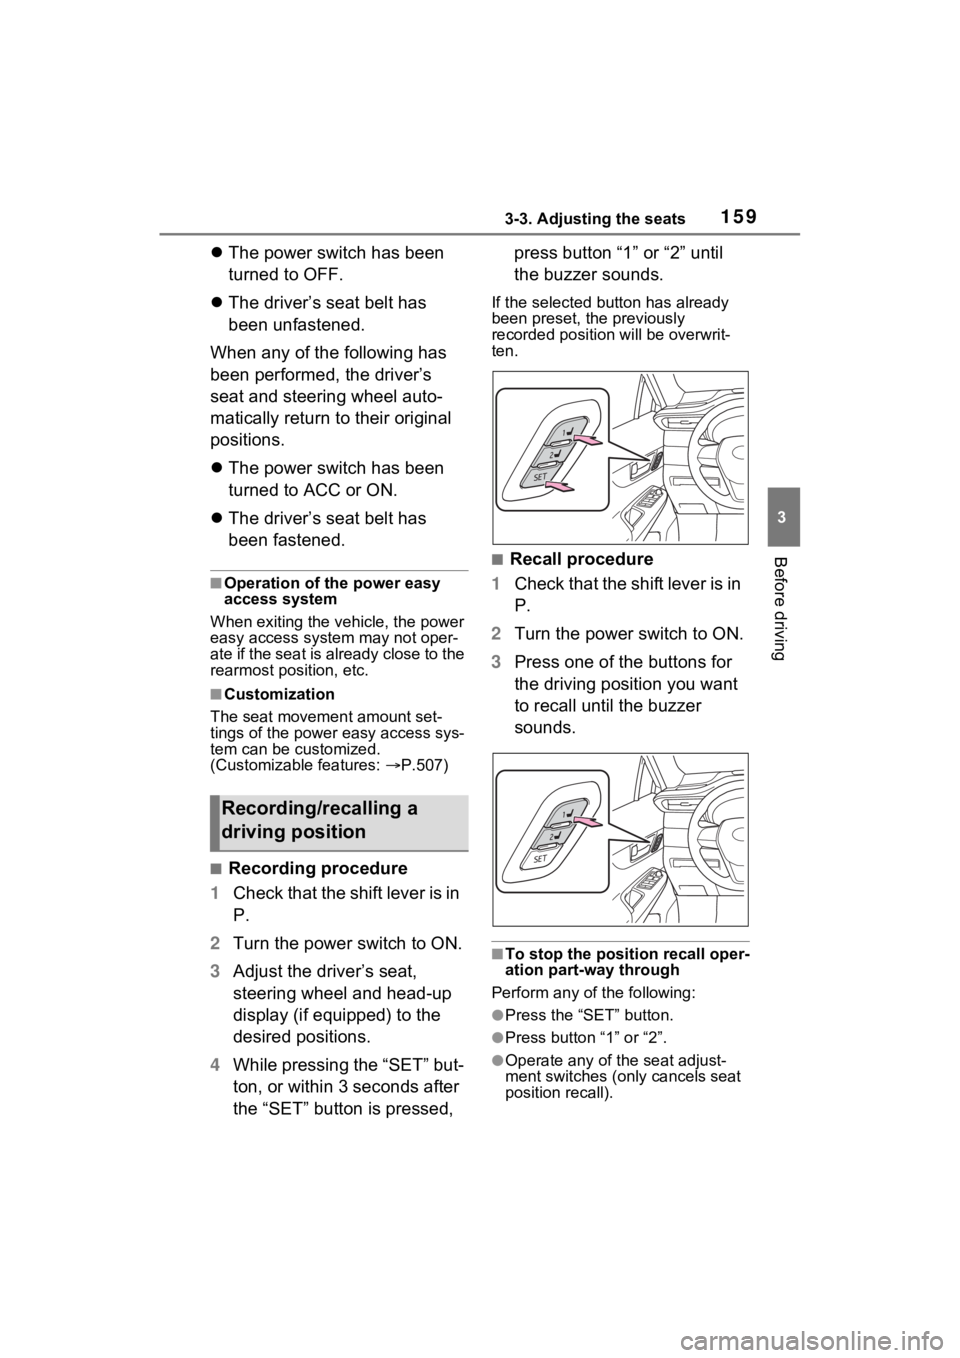
■Recording procedure
1 Check that the shift lever is in
P.
2 Turn the power switch to ON.
3 Adjust the driver’s seat,
steering wheel and head-up
display (if equipped) to the
desired positions.
4 While pressing the “SET” but-
ton, or within 3 seconds after
the “SET” button is pressed, press button “1” or “2” until
the buzzer sounds.
If the selected button has already
been preset, the previously
recorded positio
n will be overwrit-
ten.
■Recall procedure
1 Check that the shift lever is in
P.
2 Turn the power switch to ON.
3 Press one of the buttons for
the driving position you want
to recall until the buzzer
sounds.
■To stop the position recall oper-
ation part-way through
Perform any of the following:
●Press the “SET” button.
●Press button “1” or “2”.
●Operate any of t he seat adjust-
ment switches (only cancels seat
position recall).
Recording/recalling a
driving position
Page 200 of 548
1994-2. Driving procedures
4
Driving
ing the power switch.
5Release the brake pedal and
check that “ACCESSORY” or
“IGNITION ON” is not shown
on the multi-information dis-
play.
■Automatic hybrid system shut
off feature
●The vehicle is equipped with a
feature that automatically shuts off
the hybrid system when the shift
lever is in P with the hybrid system
operating for an extended period.
●The hybrid system will automati-
cally shut off after approximately 1
hour if it has been left operating
while the shift lever is in P.
●The message asking if you wish to
enable/disable the automatic
hybrid system shut off fe ature will
sometimes be displayed on the
multi-informat ion display.
Leaving the vehicle as is or select-
ing “Perform Auto Off” keeps the
automatic hybrid system shut off
feature enabled, and selecting
“Keep Vehicle On” disables the
automatic hybrid system shut off
feature.
●The timer for the automatic hybrid
system shut off feature will reset if
the brake pedal is depressed or if
the shift lever is in a position other
than P.
●After the vehicle is parked, if the
door is locked with the door lock
switch ( P.134) from the inside
or the mechanical key ( P.467)
from the outside, the automatic
hybrid system shut off fe ature will
be disabled. The timer for the
automatic hybrid system shut off
feature will be re- enabled if the
driver’s door is opened.
WARNING
■Stopping the hybrid system
in an emergency
●If you want to stop the hybrid
system in an emergency while
driving the vehicle, press and
hold the power s witch for more
than 2 seconds, or press it
briefly 3 times or more in suc-
cession. ( P.435)
However, do not touch the
power switch while driving
except in an emergency. Turn-
ing the hybrid s ystem off while
driving will not cause loss of
steering or braking control.
However, power assist for the
steering wheel may be lost mak-
ing it difficult to steer smoothly
before stopping the vehicle
depending on the remaining
charge in the 12-volt battery or
usage conditions. In this situa-
tion, you should p ull over and
stop the vehicle as soon as it is
safe to do so.
●If the power switch is operated
while the vehicle is running, a
warning message will be shown
on the multi-information display
and a buzzer sounds.
●When restarting the hybrid sys-
tem after an emergency shut-
down, shift the shift lever to N
and press the power switch
shortly and firmly.
Page 378 of 548
3786-2. Maintenance
■Resetting the message indicat-
ing maintenance is required
After the required maintenance is
performed according to the mainte-
nance schedule, please reset the
reminder light or message.
To reset the reminder light or mes-
sage, follow the procedure
described below:
Vehicles with 4.2-inch display
1 Press or of the meter
control switches and select
on the multi-information display.
2 Press or of the meter
control switches and select
“Vehicle Settings”. Then press
.
3 Press or of the meter
control switches and select
“Scheduled Maintenance”. Then
press .
4 Select “Yes” and press .
Vehicles with 7-inch display
1 Press or of the meter
control switches and select
on the multi-information display.
2 Press or of the meter
control switches and select
“ Vehicle Settings”.
Then press .
3 Press or of the meter
control switches and select
“Scheduled Maintenance”.
Then press .
4 Select “Yes” and press .
You can perform some mainte-
nance procedures by yourself.
Please be aware that do-it-your-
self maintenance may affect
warranty coverage.
The use of Toyota Repair Manuals
is recommended.
For details about warranty cover-
age, refer to the separate “Owner’s
Warranty Informat ion Booklet” or
“Owner’s Manual Supplement”.
Do-it-yourself mainte-
nance
Page 390 of 548
3906-3. Do-it-yourself maintenance
■Engine oil consumption
A certain amount o f engine oil will
be consumed while driving. In the
following situatio ns, oil consump-
tion may increase, and engine oil
may need to be refilled in between
oil maintenance intervals.
●When the engine is new, for
example directly after purchasing
the vehicle or after replacing the
engine
●If low quality oil or oil of an inap-
propriate viscosity is used
●When driving at high engine
speeds or with a heavy load, or
when driving while accelerating or
decelerating frequently
●When leaving the engine idling for
a long time, or wh en driving fre-
quently through heavy traffic
■After changing the engine oil
The engine oil maintenance data
should be reset. Perform the follow-
ing procedures:
Vehicles with 4.2-inch display
1 Press or of the meter
control switches and select
on the multi-information display.
2 Press or of the meter
control switches and select
“Vehicle Settings”. Then press
.
3 Press or of the meter
control switches and select “Oil
Maintenance”. Then press .
4 Select “Yes” and press .
Vehicles with 7-inch display
1 Press or of the meter
control switches and select
on the multi- information display. 2
Press or of the meter
control switch es and select
“ Vehicle Settings”.
Then press .
3 Press or of the meter
control switches and select “Oil
Maintenance”.
Then press .
4 Select “Yes” and press .
WARNING
■Used engine oil
●Used engine oil contains poten-
tially harmful contaminants
which may cause skin disorders
such as inflammation and skin
cancer, so care should be taken
to avoid prolonged and
repeated contact. To remove
used engine oil from your skin,
wash thoroughly with soap and
water.
●Dispose of used o il and filters
only in a safe and acceptable
manner. Do not dispose of used
oil and filters in h ousehold trash,
in sewers or onto the ground.
Call your Toyota dealer, service
station or auto parts store for
information concerning recy-
cling or disposal.
●Do not leave used engine oil
within the reach of children.
NOTICE
■To prevent serious engine
damage
Check the oil le vel on a regular
basis.
■When replacing the engine oil
●Be careful not to spill engine oil
on the vehicle components.
Page 406 of 548
4066-3. Do-it-yourself maintenance
●The tire pressure warning system
can be initialized by yourself, but
depending on the driving condi-
tions and driving environment, ini-
tialization may take some time to
complete.
■The initialization operation
●If you have accidentally turned the
power switch to OFF during initial-
ization, it is not necessary to
restart the initia lization again as
initialization will restart automati-
cally when the power switch has
been turned to ON for the next
time.
●If you accidentally perform initial-
ization when initi alization is not
necessary, adjust the tire inflation
pressure to the specified level
when the tires are cold, and con-
duct initialization again.
●While the position of each tire is
being determined and the inflation
pressures are not being displayed
on the multi-information display, if
the inflation pres sure of a tire
drops, the tire pressure warning
light will come on.
■If the tire pressure warning sys-
tem is not initialized properly
●In the following si tuations, initial-
ization may take longer than usual
to be completed or may not be
possible. Normally, initialization
completes within approximately
30 minutes.
• Vehicle is not driven at approxi-
mately 25 mph ( 40 km/h) or more
• Vehicle is driven on unpaved roads
• Vehicle is driven near other vehi- cles and system cannot recog-
nize tire pressure warning valve
and transmitters of your vehicle
over those of other vehicles.
• If the vehicle is driven in heavy traffic or another situation where
other vehicles are driven close by,
it may take time for the system to
recognize the tire pressure warn-
ing valve and tran smitters of your vehicle over those of other vehi-
cles.
●If initialization does not complete
after driving for 1 hour or more,
park the vehicle in a safe place for
approximately 20 minutes and
then drive the v
ehicle again.
●If the vehicle is reversed during
initialization, the data up to that
point is reset, so p erform the ini-
tialization procedure again from
the beginning.
●In the following situations, initial-
ization will not be started or was
not completed properly and the
system will not oper ate properly.
Perform the initialization proce-
dure again.
• If, when attempting to start initial- ization, the tire pressure warning
light does not blink 3 times.
• If, when the veh icle has been
driven for about 20 minutes after
performing initialization, the tire
pressure warning light blinks for
approximately 1 minute and then
illuminates.
If initialization cannot be completed
after performing the above proce-
dure, contact your Toyota dealer.
Every tire pressure warning
valve and transmitter has a
WARNING
■When initializing the tire pres-
sure warning system
Do not initialize tire inflation pres-
sure without first adjusting the tire
inflation pressure to the specified
level. Otherwise, the tire pressure
warning light may not come on
even if the tire inflation pressure is
low, or it may c ome on when the
tire inflation pre ssure is actually
normal.
Registering ID codes
Page 409 of 548
4096-3. Do-it-yourself maintenance
6
Maintenance and care
illuminate. The tire pressure warn-
ing system will be operational
when the tire pressure warning
light turns off.
●If the warning light does not turn
off even after se veral minutes
have elapsed, ID code registration
may not have bee n canceled cor-
rectly. To cancel registration, per-
form the ID code registration start
procedure again and then turn the
power switch off before driving.
■If ID codes are not registered
properly
●In the following situations, ID code
registration may take longer than
usual to be completed or may not
be possible. Normally, registra-
tion completes within approxi-
mately 30 minutes.
If ID code registration is not com-
plete after driving for approxi-
mately 30 minutes, continue
driving for a while.
• Vehicle is not parked for approxi- mately 20 minutes or more before
driving
• Vehicle is not driven at approxi- mately 25 mph ( 40 km/h) or more
• Vehicle is driven on unpaved roads
• Vehicle is driven near other vehi-
cles and system cannot recog-
nize tire pressure warning valve
and transmitters of your vehicle
over those of other vehicles
• Wheel with tire p ressure warning
valve and transmitter installed is
inside or near the vehicle
If registration does not complete
after driving for 1 hour or more, per-
form the ID code registration proce-
dure again from the beginning.
●If the vehicle is reversed during
registration, the data up to that
point is reset, so perform the reg-
istration procedure again from the
beginning.
●In the following situations, ID code
registration will not be started or
was not completed properly and the system will not operate prop-
erly. Perform the ID code registra-
tion procedure again.
• If, when attempt ing to start ID
code registration, the tire pressure
warning light does not blink slowly
3 times.
• If, when the veh icle has been
driven for about 20 minutes after
performing ID code registration,
the tire pressure warning light
blinks for approximately 1 minute
and then illuminates.
●If ID code registration cannot be
completed after performing the
above procedure, contact your
Toyota dealer.
Your vehicle is equipped with
tire pressure warning system
with the function to have ID
codes registered for a second
wheel set, for example a winter
set. You can register a second
wheel set by yourself or your
Toyota dealer.
After registration of a second
wheel set, either of these two
wheel sets can be selected for
usage with the tire pressure
warning system.
■Operating conditions for
the function
This function will perform the
change of wheel set only if a
second wheel set has been
registered. If no second wheel
set has been registered, no
change will be made when
selecting this function in the
menu.
Selecting wheel set
Page 455 of 548

4557-2. Steps to take in an emergency
7
When trouble arises
■If “Traction Battery Needs to be
Protected Shift into P to
Restart” is shown
This message is displayed when the
hybrid battery (traction battery)
charge has become extremely low
because the shift lever has been left
in N for a certain amount of time.
When operating the vehicle, shift to
P and restart the hybrid system.
■If “Shift is in N Release Acceler-
ator Before Shif ting” is shown
Message is displayed when the
accelerator pedal has been
depressed and the shift lever is in N.
Release the accelerator pedal and
shift the shift lever to D or R.
■If “Press Brake when Vehicle is
Stopped Hybrid System may
Overheat” is shown
Message is displayed when the
accelerator pedal is depressed to
maintain the vehicle position when
stopped on a upward slope, etc.
If this continues, the hybrid system
may overheat.
Release the accelerator pedal and
depress the brake pedal.
■If “Auto Power OFF to Conserve
Battery” is shown
Power was turned off due to the
automatic power off function.
Next time when starting the hybrid
system, operate th e hybrid system
for approximatel y 5 minutes to
recharge the 12-volt battery.
■If “Engine Oil Level Low Add or
Replace” is displayed
The engine oil level may be low.
Check the level of the engine oil,
and add engine oil if necessary.
This message may be displayed if
the vehicle is sto pped on a slope.
Move the vehicle to a level surface
and check if the message disap-
pears.
■If “Maintenance Required
Soon” is shown
Indicates that all maintenance
according to the driven distance on
the maintenance schedule
* should
be performed soon.
Comes on approximately 4500
miles (7200 km) after the message
has been reset.
If necessary, perform maintenance.
Please reset the m essage after the
maintenance is performed.
( P.378)
*: Refer to the separate “Scheduled
Maintenance Guide” or “Owner’
Manual Supplement” for the main-
tenance interval applicable to your
vehicle.
■If “Maintenance Required Visit
Your Dealer” is shown
Indicates that all maintenance is
required to correspond to the driven
distance on the maintenance sched-
ule
*.
Comes on approximately 5000
miles (8000 km) after the message
has been reset. (The indicator will
not work properly unless the mes-
sage has been reset.)
Perform the necessary mainte-
nance. Please reset the message
after the maintenance is performed.
( P.378)
*: Refer to the separate “Scheduled
Maintenance Guide” or “Owner’
Manual Supplement” for the main-
tenance interval applicable to your
vehicle.
■If “Oil Maintenance Required
Soon” is displayed
Indicates that the engine oil should
be scheduled to be changed.
Check the engine oil and change it if
necessary.
After changing the engine oil, make
sure to reset t he message.