TOYOTA VENZA HYBRID 2021 Owners Manual (in English)
Manufacturer: TOYOTA, Model Year: 2021, Model line: VENZA HYBRID, Model: TOYOTA VENZA HYBRID 2021Pages: 548, PDF Size: 18.43 MB
Page 341 of 548
3415-3. Using the storage features
5
Interior features
●The bottle may not be stored
depending on its size or shape.
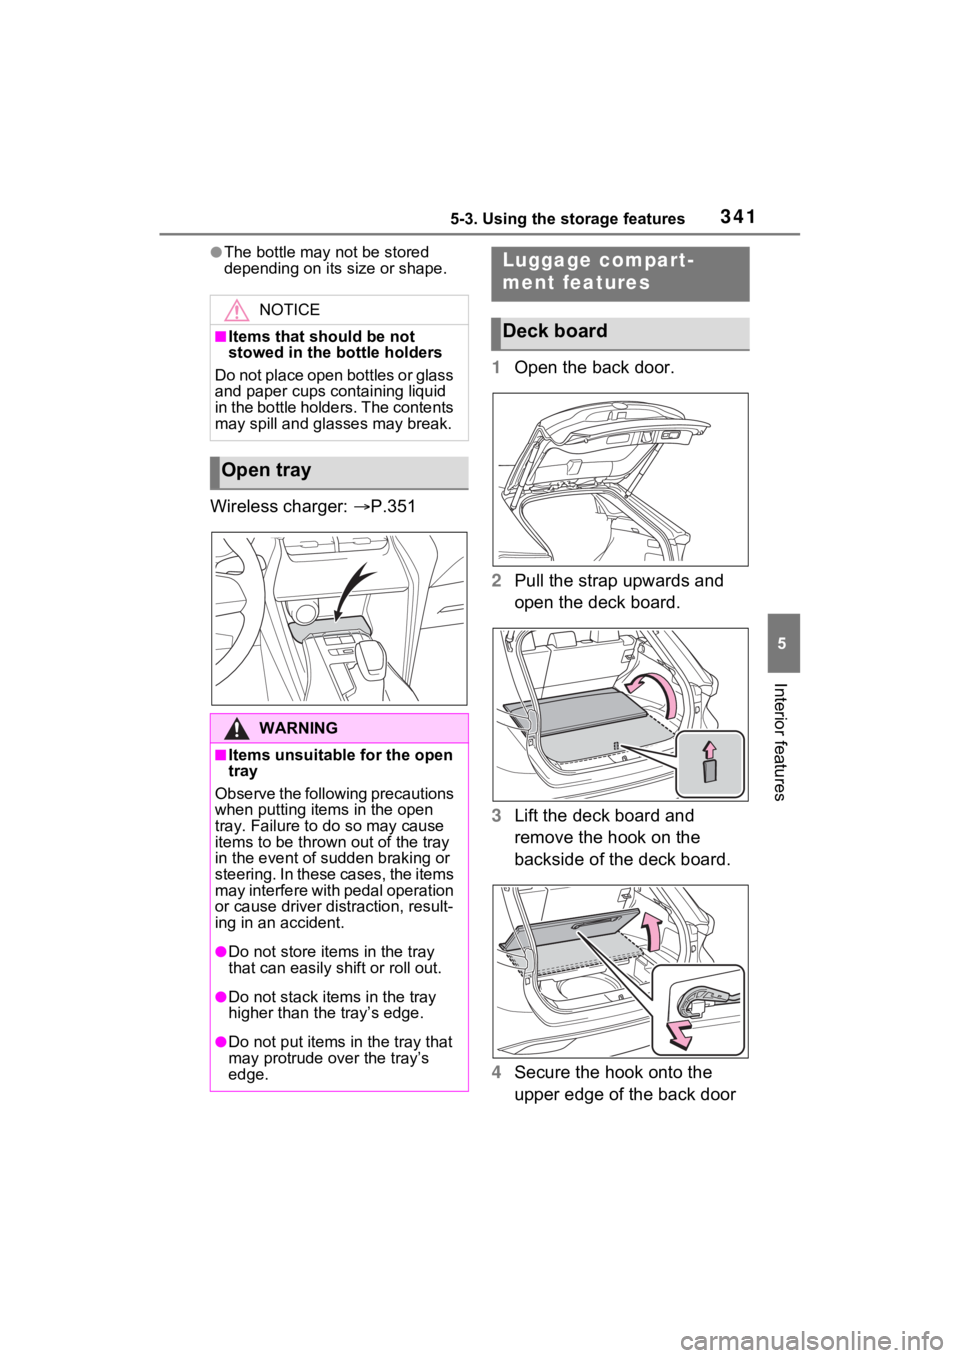
Wireless charger: P.351 1
Open the back door.
2 Pull the strap upwards and
open the deck board.
3 Lift the deck board and
remove the hook on the
backside of the deck board.
4 Secure the hook onto the
upper edge of the back door
NOTICE
■Items that should be not
stowed in the bottle holders
Do not place open bottles or glass
and paper cups containing liquid
in the bottle holders. The contents
may spill and glasses may break.
Open tray
WARNING
■Items unsuitable for the open
tray
Observe the following precautions
when putting items in the open
tray. Failure to do so may cause
items to be thrown out of the tray
in the event of sudden braking or
steering. In these cases, the items
may interfere with pedal operation
or cause driver distraction, result-
ing in an accident.
●Do not store items in the tray
that can easily shift or roll out.
●Do not stack items in the tray
higher than the tray’s edge.
●Do not put items in the tray that
may protrude over the tray’s
edge.
Luggage compart-
ment features
Deck board
Page 342 of 548
3425-3. Using the storage features
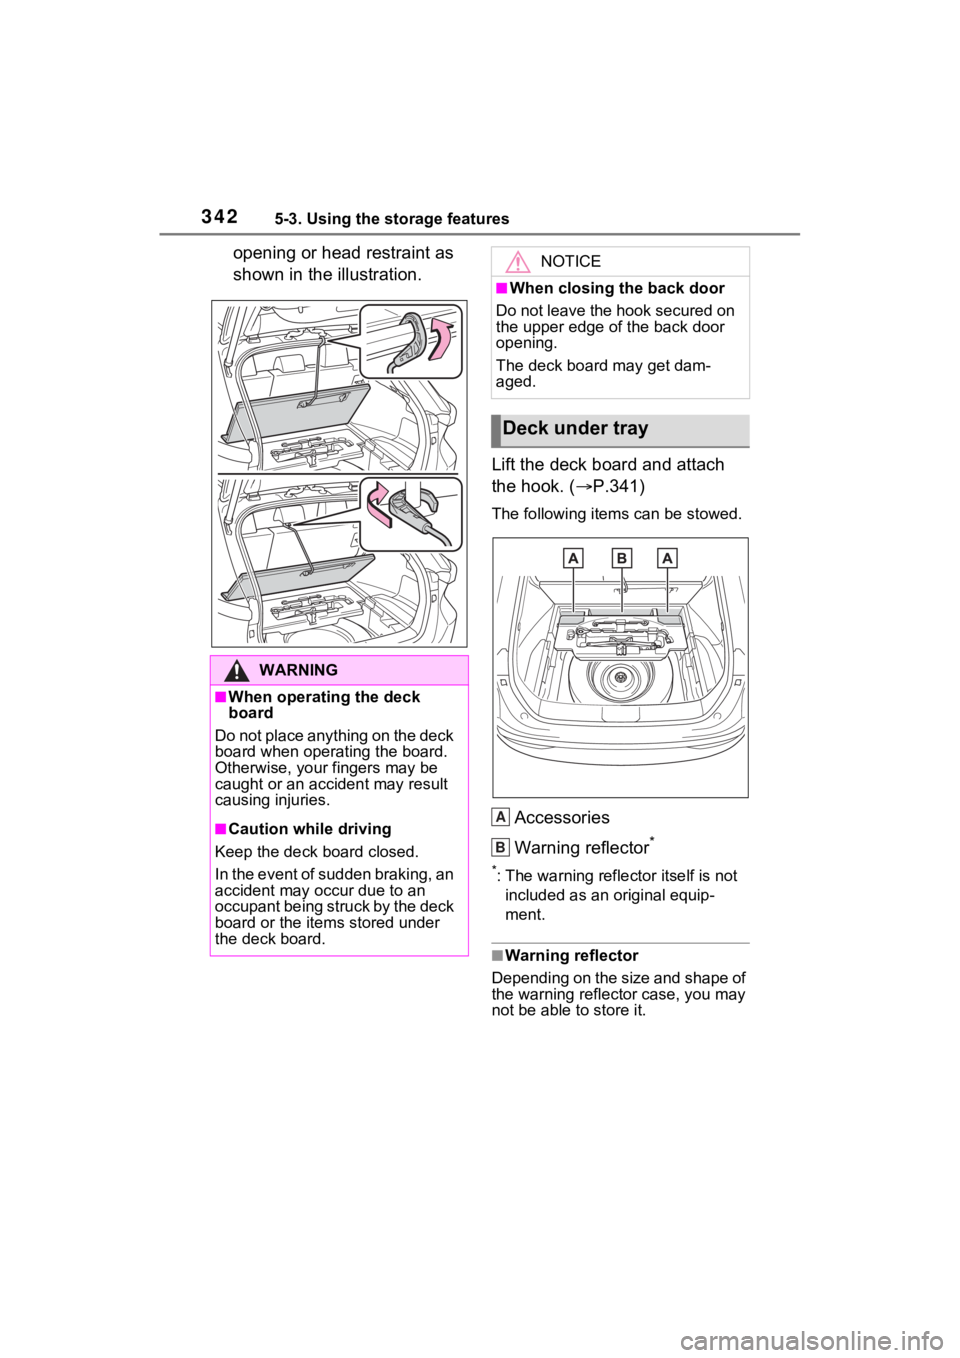
opening or head restraint as
shown in the illustration.Lift the deck board and attach
the hook. (P.341)
The following item s can be stowed.
Accessories
Warning reflector
*
*: The warning reflector itself is not
included as an original equip-
ment.
■Warning reflector
Depending on the size and shape of
the warning reflector case, you may
not be able to store it.
WARNING
■When operating the deck
board
Do not place anything on the deck
board when operating the board.
Otherwise, your fingers may be
caught or an accident may result
causing injuries.
■Caution while driving
Keep the deck board closed.
In the event of sudden braking, an
accident may occur due to an
occupant being struck by the deck
board or the items stored under
the deck board.
NOTICE
■When closing the back door
Do not leave the hook secured on
the upper edge of the back door
opening.
The deck board may get dam-
aged.
Deck under tray
A
B
Page 343 of 548
3435-3. Using the storage features
5
Interior features
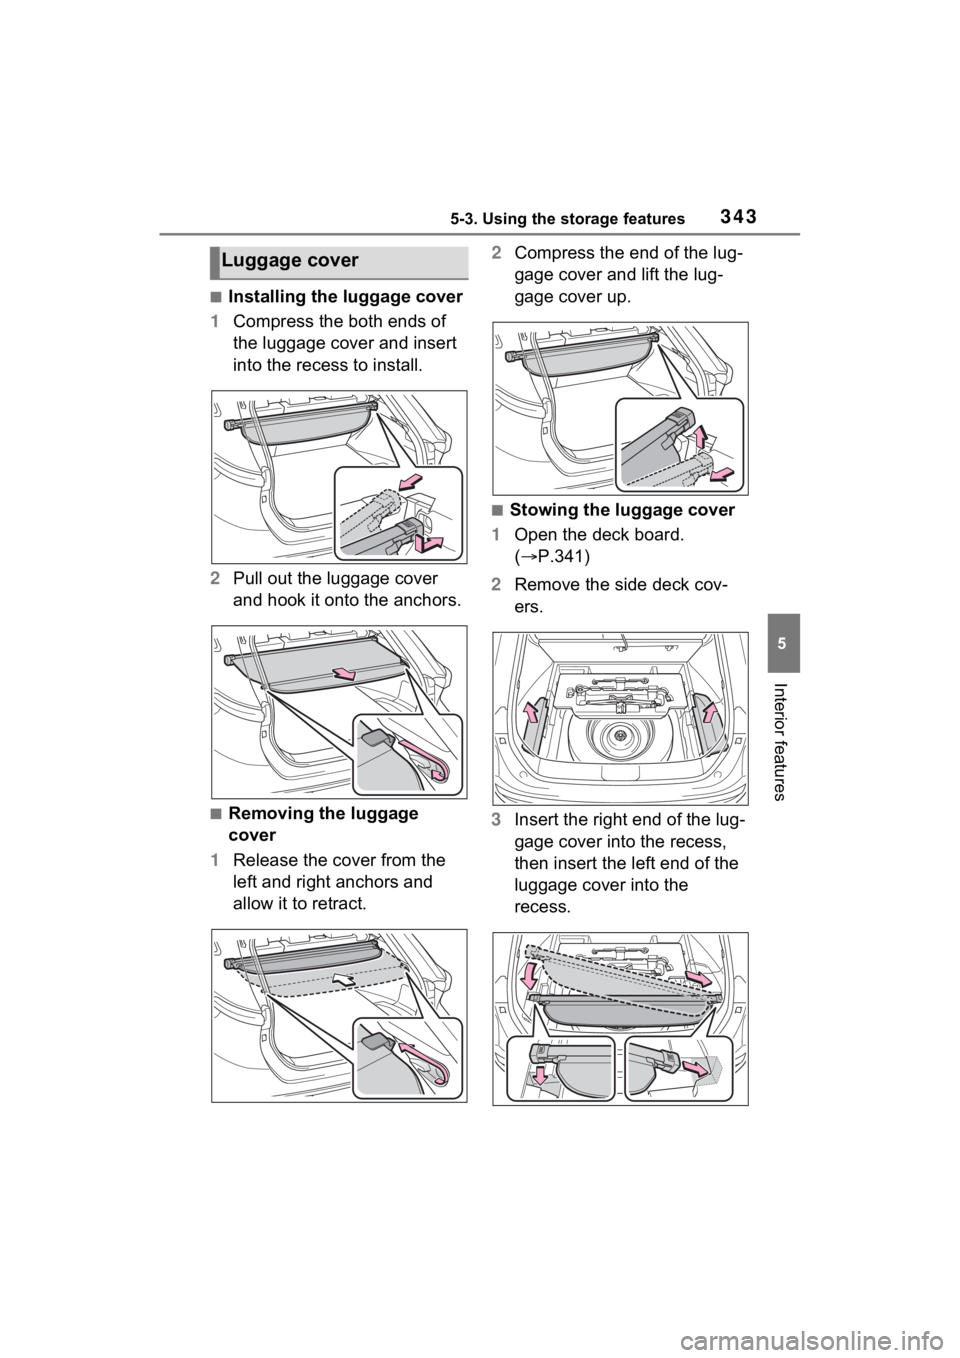
■Installing the luggage cover
1 Compress the both ends of
the luggage cover and insert
into the recess to install.
2 Pull out the luggage cover
and hook it onto the anchors.
■Removing the luggage
cover
1 Release the cover from the
left and right anchors and
allow it to retract. 2
Compress the end of the lug-
gage cover and lift the lug-
gage cover up.
■Stowing the luggage cover
1 Open the deck board.
( P.341)
2 Remove the side deck cov-
ers.
3 Insert the right end of the lug-
gage cover into the recess,
then insert the left end of the
luggage cover into the
recess.
Luggage cover
Page 344 of 548
3445-3. Using the storage features
4Attach the side deck covers
and close the deck board.
When taking out the luggage cover,
reverse the steps listed.
WARNING
■Luggage cover
●When installing/stowing the lug-
gage cover, make sure that the
luggage cover is securely
installed/stowed. Failure to do
so may result in serious injury in
the event of sudden braking or a
collision.
●Do not place anything on the
luggage cover. In the event of
sudden braking or turning, the
item may go flying and strike an
occupant. This could lead to an
unexpected accident, resulting
in death or serious injury.
●Do not allow ch ildren to climb
on the luggage cover. Climbing
on the luggage cover could
result in damage to the luggage
cover, possibly causing death or
serious injury to the child.
NOTICE
■To prevent damage to the lug-
gage cover
Do not place anything on top of
the luggage cover. When rolling
up the luggage cover, objects
may be caught in the cover, dam-
aging the cover and generating
noise.
Page 345 of 548
3455-4. Using the other interior features
5
Interior features
5-4.Using the other interior features
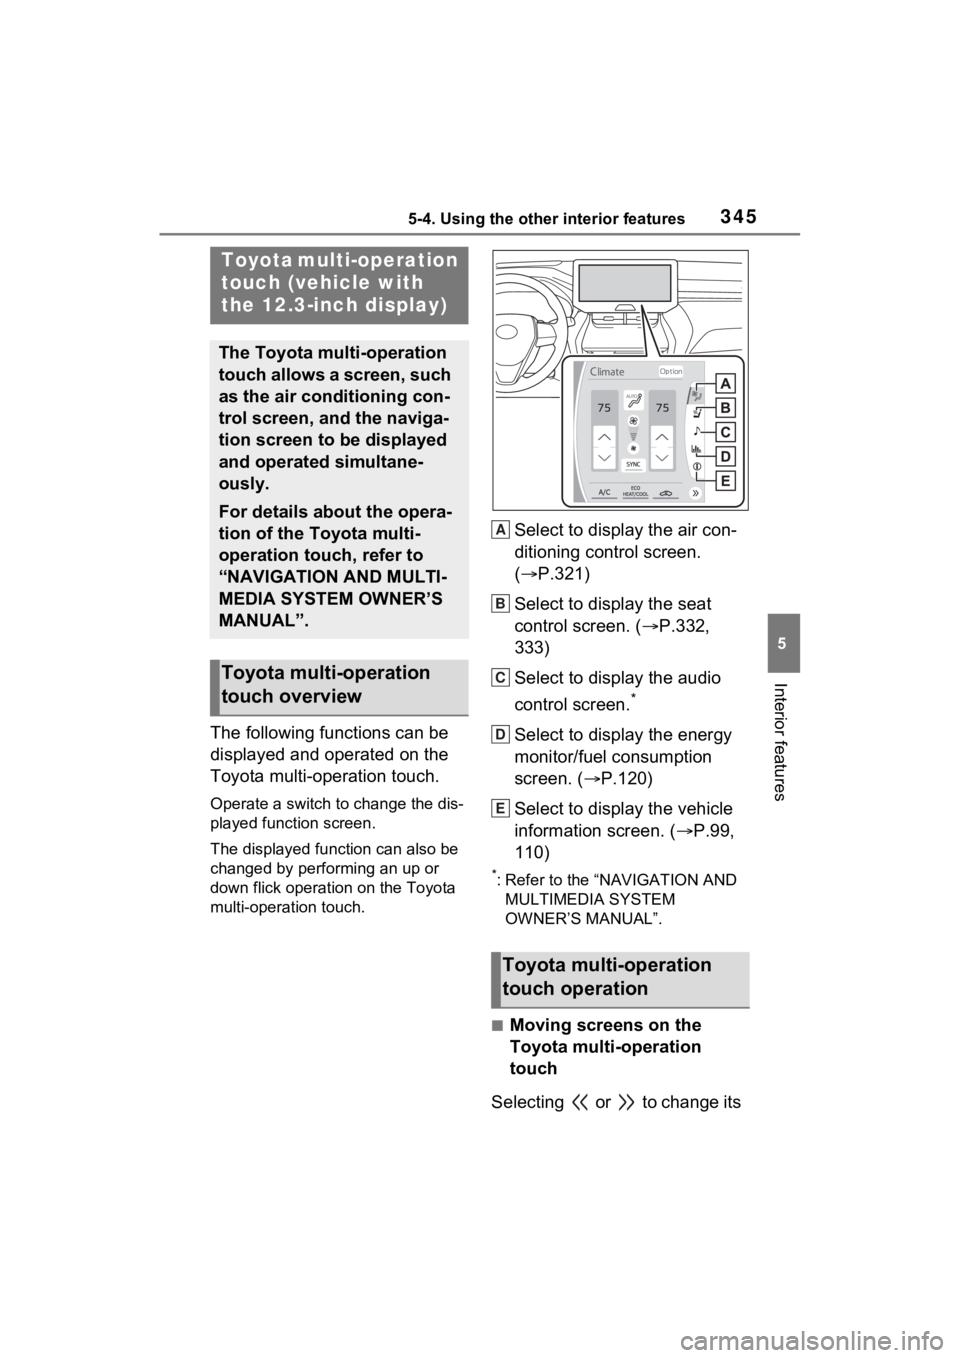
The following functions can be
displayed and operated on the
Toyota multi-operation touch.
Operate a switch to change the dis-
played function screen.
The displayed function can also be
changed by performing an up or
down flick operation on the Toyota
multi-operation touch.
Select to display the air con-
ditioning control screen.
( P.321)
Select to display the seat
control screen. ( P.332,
333)
Select to display the audio
control screen.
*
Select to display the energy
monitor/fuel consumption
screen. ( P.120)
Select to display the vehicle
information screen. ( P.99,
110)
*: Refer to the “NAVIGATION AND MULTIMEDIA SYSTEM
OWNER’S MANUAL”.
■Moving screens on the
Toyota multi-operation
touch
Selecting or to change its
Toyota multi-operation
touch (vehicle with
the 12.3-inch display)
The Toyota multi-operation
touch allows a screen, such
as the air conditioning con-
trol screen, and the naviga-
tion screen to be displayed
and operated simultane-
ously.
For details about the opera-
tion of the Toyota multi-
operation touch, refer to
“NAVIGATION AND MULTI-
MEDIA SYSTEM OWNER’S
MANUAL”.
Toyota multi-operation
touch overview
Toyota multi-operation
touch operation
A
B
C
D
E
Page 346 of 548
3465-4. Using the other interior features
displayed position on the Toyota
multi-operation touch.
The screen position can also be
changed by perform a left or right
flick operation on a screen.
■Displaying a screen in full
screen
Selecting or on the
energy monitor/consumption
screen or vehicle information
screen will display that screen in
full screen.
Select or to return to the
split-screen display.
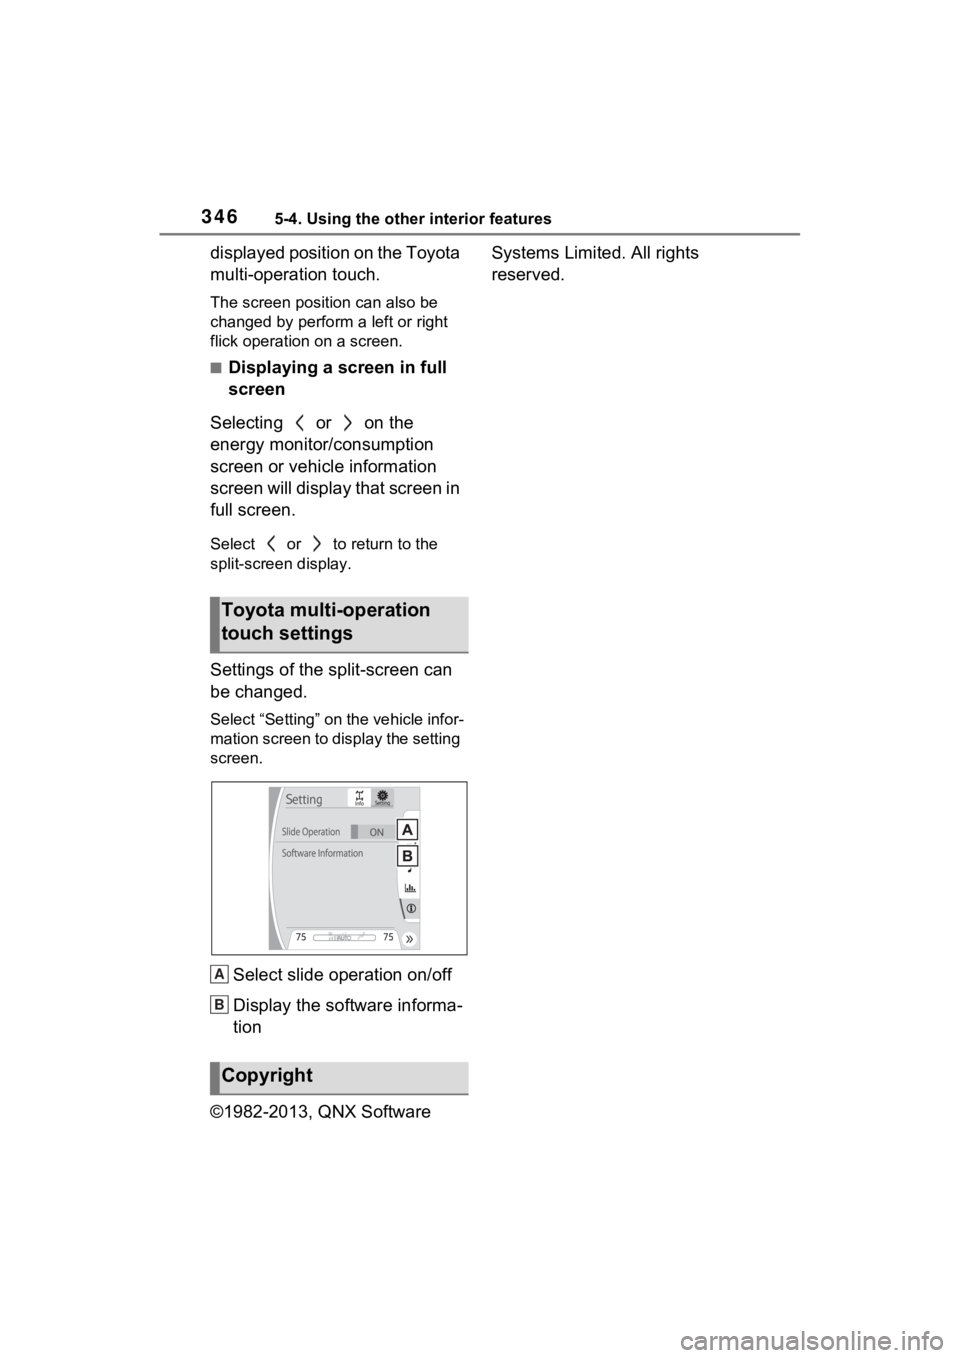
Settings of the split-screen can
be changed.
Select “Setting” on the vehicle infor-
mation screen to display the setting
screen.
Select slide operation on/off
Display the software informa-
tion
©1982-2013, QNX Software Systems Limited. All rights
reserved.
Toyota multi-operation
touch settings
Copyright
A
B
Page 347 of 548
3475-4. Using the other interior features
5
Interior features
*: If equipped
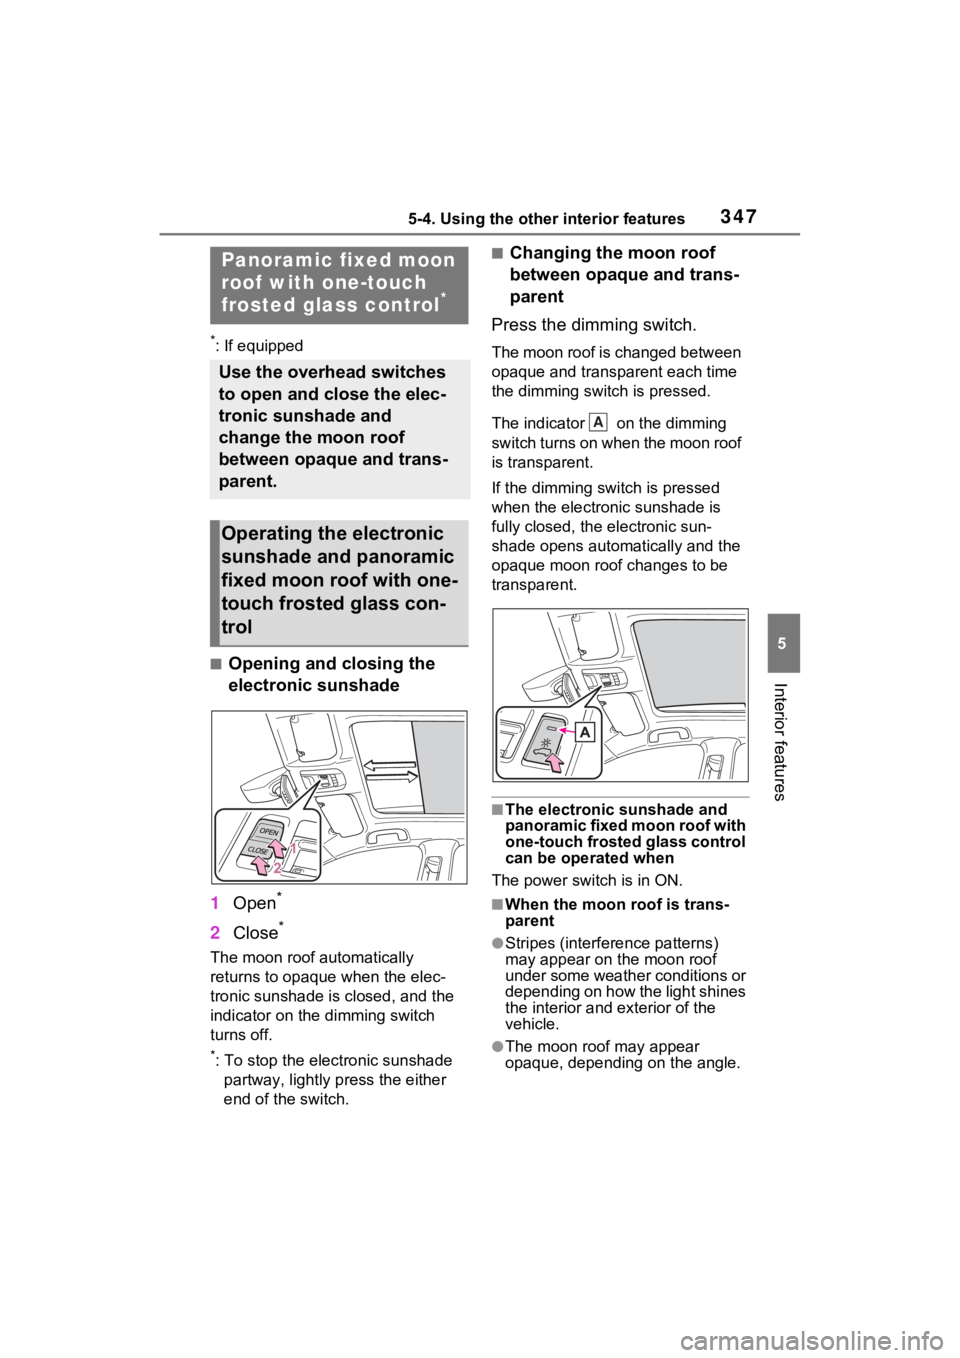
■Opening and closing the
electronic sunshade
1 Open
*
2Close*
The moon roof automatically
returns to opaque when the elec-
tronic sunshade is closed, and the
indicator on the dimming switch
turns off.
*: To stop the electronic sunshade
partway, lightly p ress the either
end of the switch.
■Changing the moon roof
between opaque and trans-
parent
Press the dimming switch.
The moon roof is changed between
opaque and transparent each time
the dimming switch is pressed.
The indicator on the dimming
switch turns on when the moon roof
is transparent.
If the dimming swit ch is pressed
when the electronic sunshade is
fully closed, the electronic sun-
shade opens automat ically and the
opaque moon roof changes to be
transparent.
■The electronic sunshade and
panoramic fixed moon roof with
one-touch frosted glass control
can be operated when
The power switch is in ON.
■When the moon roof is trans-
parent
●Stripes (interference patterns)
may appear on the moon roof
under some weather conditions or
depending on how the light shines
the interior and exterior of the
vehicle.
●The moon roof may appear
opaque, depending on the angle.
Panoramic fixed moon
roof with one-touch
frosted glass control
*
Use the overhead switches
to open and close the elec-
tronic sunshade and
change the moon roof
between opaque and trans-
parent.
Operating the electronic
sunshade and panoramic
fixed moon roof with one-
touch frosted glass con-
trol
A
Page 348 of 548
3485-4. Using the other interior features
■The moon roof at low tempera-
tures
The moon roof may take some time
to change between opaque and
transparent. Allow the interior of the
vehicle to warm up before use.
■Turning the power switch to
OFF
The transparent moon roof automat-
ically returns to opaque when the
power switch is turned to OFF.
■If the indicator on the dimming
switch flashes
The panoramic fixed moon roof with
one-touch frosted glass control may
be malfunctioning. Have the vehicle
inspected by your Toyota dealer
immediately.
■When the vehicle is subjected
to a strong impact
The moon roof changes to opaque
and cannot be changed back to
transparent. Have the vehicle
inspected by your Toyota dealer.
■Jam protection function for the
electronic sunshade
●If an object becomes jammed
between the electronic sunshade
and the sunshade frame while the
electronic sunshade is closing, the
electronic sunshade movement is
stopped and the electronic sun-
shade is opened slightly.
●When the jam protection function
has operated, even if the
“CLOSE” side of the switch is
pressed again, t he electronic sun-
shade will not m ove in the close
direction until the reverse opera-
tion has stopped completely.
●The electronic sunshade may
operate in reverse if the electronic
sunshade is subject to an impact
due to the surroundings or the
driving conditions.
■When the automatic opening
and closing f unction of the
electronic sunshade does not
work
Perform the following initialization
procedure.
1 Turn the power switch to ON.
2 Press and hold the “CLOSE”
side of the switch.
It closes until it is near the fully
closed position and then stops. After
that, it and operates in the opening
direction then closes to the fully
closed position.
If the switch is released at the incor-
rect time, the proc edure will have to
be performed again from the begin-
ning.
If the automatic opening and closing
function does not work normally
even after performing the operations
above, have the vehicle inspected
by your Toyo ta dealer.
■Customization
Some functions can be customized.
(Customizable features: P.513)
WARNING
Observe the following precau-
tions.
Failure to do so may result in
death or serious injury.
■Panoramic fixed moon roof
with one-touch frosted glass
control
Do not disassemb le or repair the
panoramic fixed moon roof with
one-touch frosted glass control
because it contains high voltage
parts. Contact your Toyota dealer
if the panoramic fixed moon roof
with one-touch frosted glass con-
trol needs repair.
Page 349 of 548
3495-4. Using the other interior features
5
Interior features
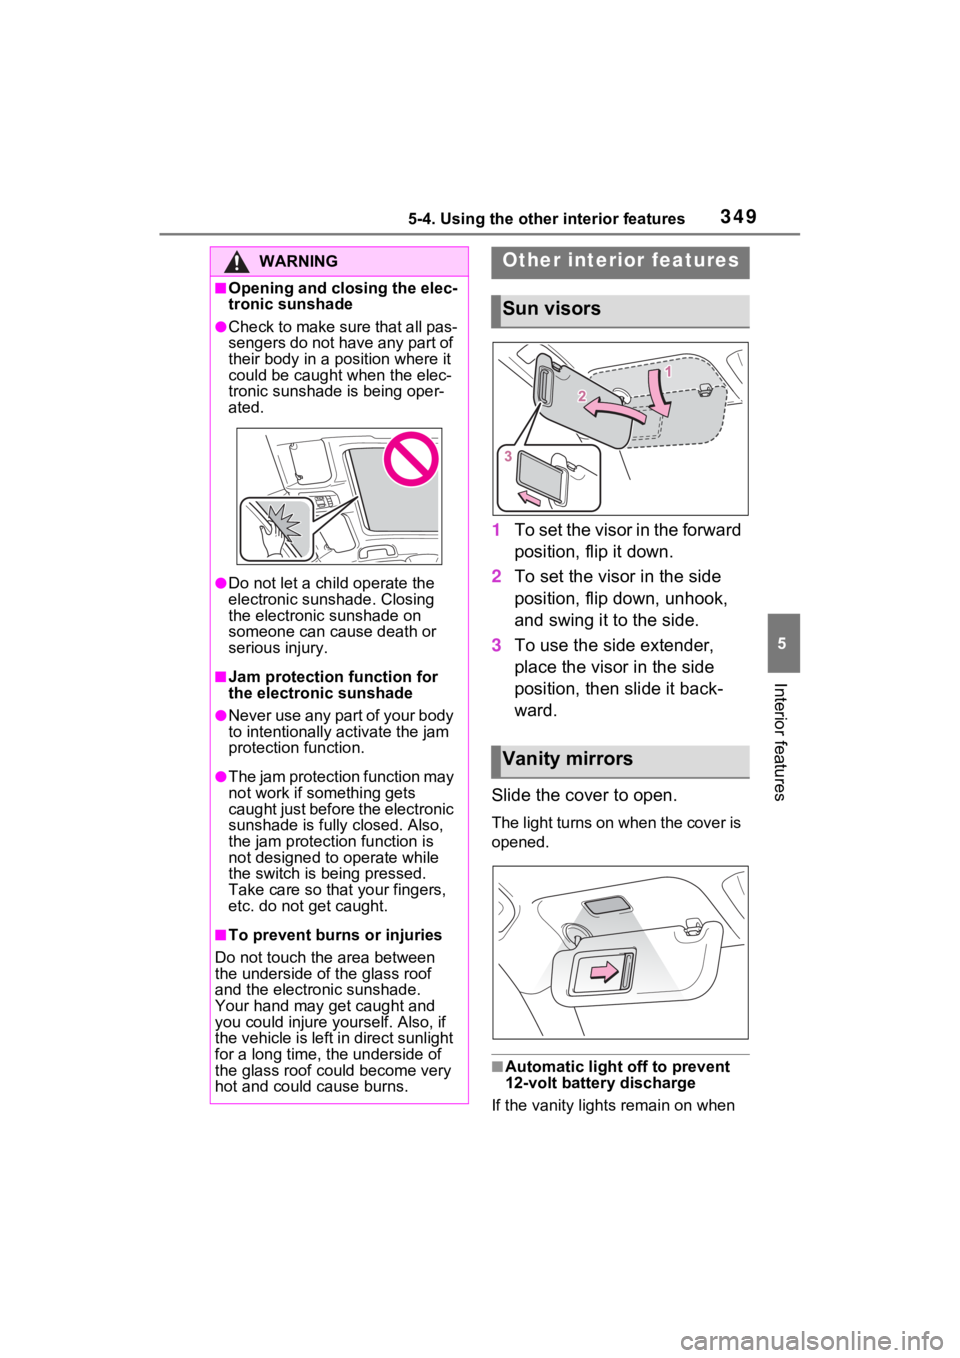
1To set the visor in the forward
position, flip it down.
2 To set the visor in the side
position, flip down, unhook,
and swing it to the side.
3 To use the side extender,
place the visor in the side
position, then slide it back-
ward.
Slide the cover to open.
The light turns on when the cover is
opened.
■Automatic light off to prevent
12-volt battery discharge
If the vanity lights remain on when
WARNING
■Opening and closing the elec-
tronic sunshade
●Check to make sure that all pas-
sengers do not have any part of
their body in a position where it
could be caught when the elec-
tronic sunshade is being oper-
ated.
●Do not let a child operate the
electronic sunshade. Closing
the electronic sunshade on
someone can cause death or
serious injury.
■Jam protection function for
the electronic sunshade
●Never use any part of your body
to intentionally a ctivate the jam
protection function.
●The jam protection function may
not work if something gets
caught just before the electronic
sunshade is fully closed. Also,
the jam protecti on function is
not designed to operate while
the switch is being pressed.
Take care so that your fingers,
etc. do not get caught.
■To prevent burns or injuries
Do not touch the area between
the underside of the glass roof
and the electronic sunshade.
Your hand may get caught and
you could injure yourself. Also, if
the vehicle is left in direct sunlight
for a long time, the underside of
the glass roof could become very
hot and could cause burns.
Other interior features
Sun visors
Vanity mirrors
Page 350 of 548
3505-4. Using the other interior features
the power switch is turned to OFF,
the lights will go off automatically
after 20 minutes.
Please use a power supply for
electronic goods that use less
than 12 VDC /10 A (power con-
sumption of 120 W).
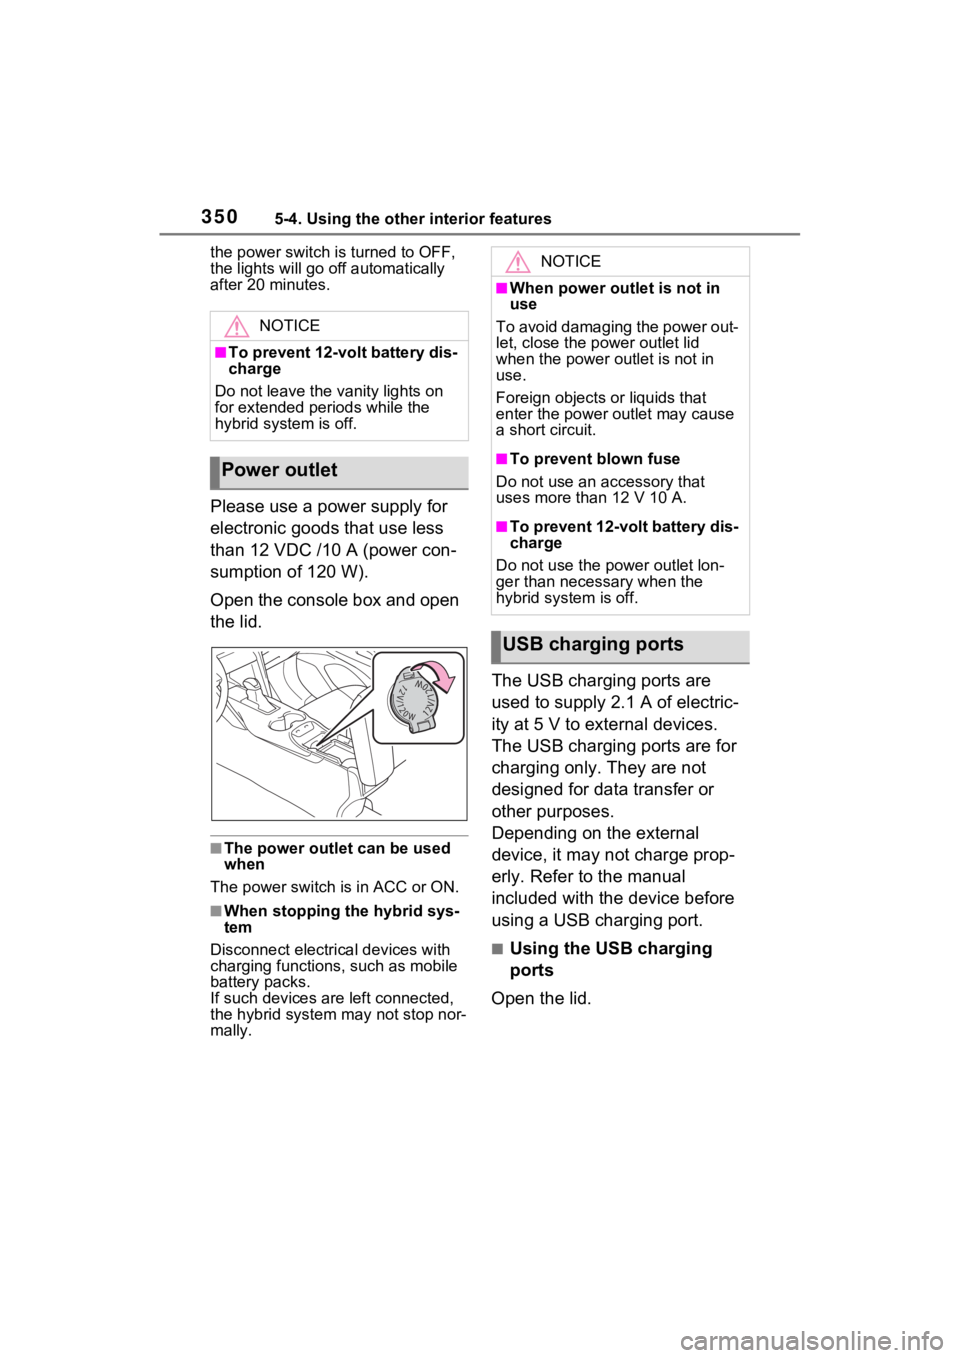
Open the console box and open
the lid.
■The power outlet can be used
when
The power switch i s in ACC or ON.
■When stopping the hybrid sys-
tem
Disconnect electrical devices with
charging functions, such as mobile
battery packs.
If such devices are left connected,
the hybrid system may not stop nor-
mally.
The USB charging ports are
used to supply 2.1 A of electric-
ity at 5 V to external devices.
The USB charging ports are for
charging only. They are not
designed for data transfer or
other purposes.
Depending on the external
device, it may not charge prop-
erly. Refer to the manual
included with the device before
using a USB charging port.
■Using the USB charging
ports
Open the lid.
NOTICE
■To prevent 12-volt battery dis-
charge
Do not leave the vanity lights on
for extended periods while the
hybrid system is off.
Power outlet
NOTICE
■When power outlet is not in
use
To avoid damaging the power out-
let, close the po wer outlet lid
when the power outlet is not in
use.
Foreign objects or liquids that
enter the power outlet may cause
a short circuit.
■To prevent blown fuse
Do not use an accessory that
uses more than 12 V 10 A.
■To prevent 12-volt battery dis-
charge
Do not use the p ower outlet lon-
ger than necessary when the
hybrid system is off.
USB charging ports