inflation pressure TOYOTA VERSO 2014 Owner's Manual
[x] Cancel search | Manufacturer: TOYOTA, Model Year: 2014, Model line: VERSO, Model: TOYOTA VERSO 2014Pages: 650, PDF Size: 36.61 MB
Page 561 of 650

5
561 5-2. Steps to take in an emergency
When trouble arises
Check the specified inflation pressure.
The label is placed as shown in the illustration.
Left-hand drive vehicles
Right-hand drive vehicles
Turn the compressor switch on
and fill the tire with air until the
specified inflation pressure is
reached.
Switch
VERSO_WE.book Page 561 Thursday, June 19, 2014 11:31 AM
Page 562 of 650
562 5-2. Steps to take in an emergency
Turn the switch off when the pressure gauge connected to the
hose reads the specified pressure.
If the inflation pressure is not attained within 5 minutes, emergency
repair is not possible due to severe damage. Contact any authorized
Toyota dealer or repairer, or another duly qualified and equipped pro-
fessional.
After completely filling the tire with air, disconnect the hose
from the valve on the tire.
Pull the power plug of the compressor out of the power outlet
on the vehicle.
To spread the liquid sealant evenly in the tire, immediately
drive for about 5 km (3 miles) or 10 minutes.
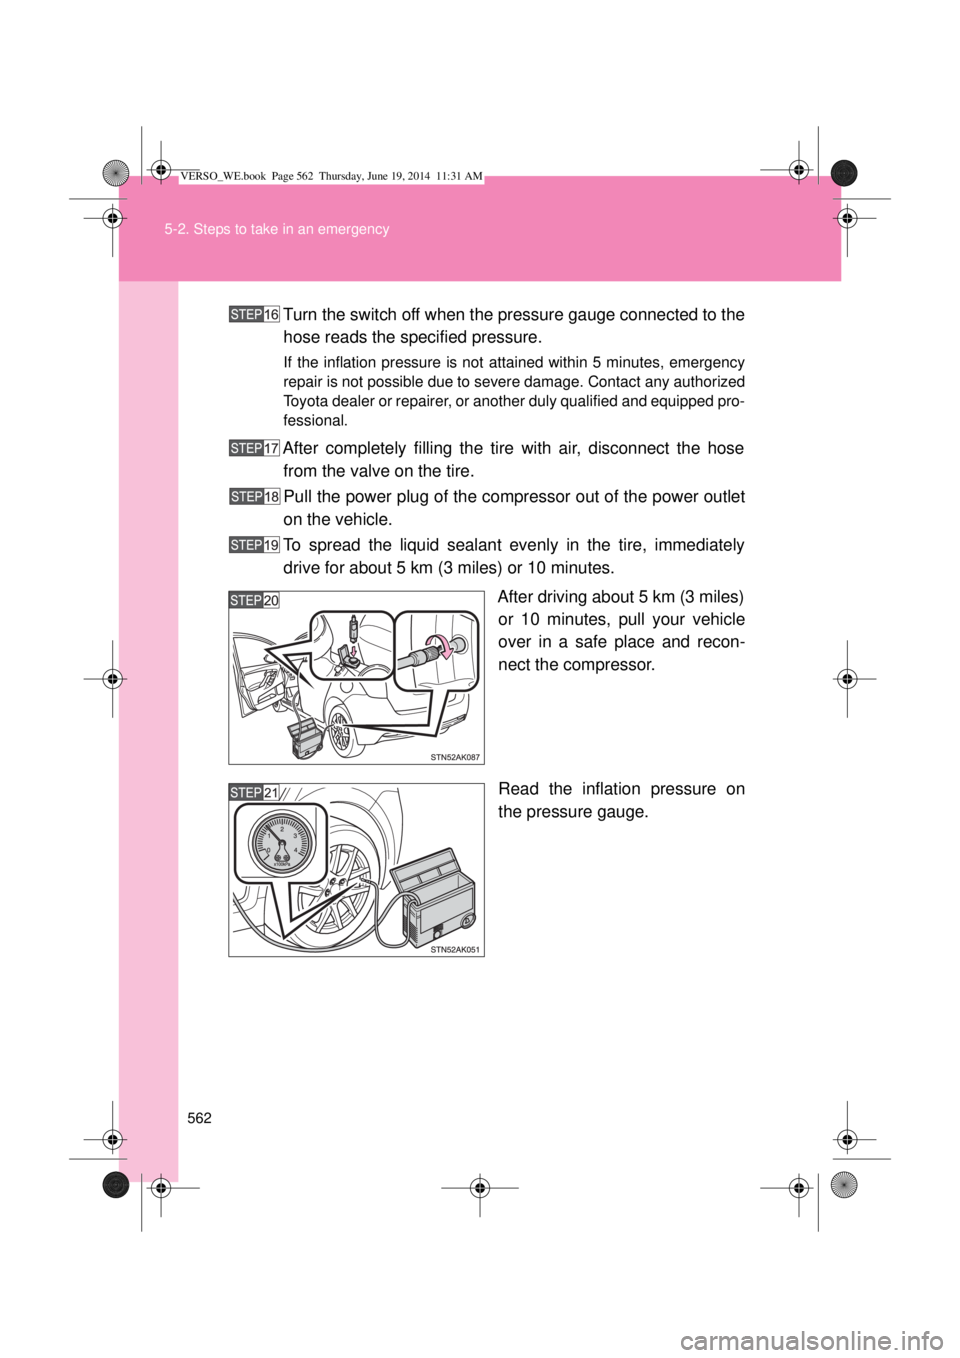
After driving about 5 km (3 miles)
or 10 minutes, pull your vehicle
over in a safe place and recon-
nect the compressor.
Read the inflation pressure on
the pressure gauge.
VERSO_WE.book Page 562 Thursday, June 19, 2014 11:31 AM
Page 567 of 650

5
567 5-2. Steps to take in an emergency
When trouble arises
Check the specified inflation pressure.
The label is placed as shown in the illustration.
Left-hand drive vehicles
Right-hand drive vehicles
Start the vehicle’s engine.
To inject the sealant and inflate
the tire, turn the compressor
switch on.
VERSO_WE.book Page 567 Thursday, June 19, 2014 11:31 AM
Page 568 of 650

568 5-2. Steps to take in an emergency
Inflate the tire until the specified
air pressure is reached.
The sealant will be injected
and the pressure will surge
and then gradually decrease.
The air pressure gauge will
display the actual tire inflation
pressure about 1 minute (5
minutes at low temperature)
after the switch is turned on.
Inflate the tire until the speci-
fied air pressure.
• If the tire inflation pressure is
still lower than the specified
point after inflation for 35 min-
utes with the switch on, the tire
is too damaged to be repaired.
Turn the compressor switch off
and contact any authorized
Toyota dealer or repairer, or
another duly qualified and
equipped professional.
• If the tire inflation pressure
exceeds the specified air pres-
sure, let out some air to adjust
the tire inflation pressure.
(P. 571, 621)
Turn the compressor off, then
press the button to release pres-
sure from the bottle.
VERSO_WE.book Page 568 Thursday, June 19, 2014 11:31 AM
Page 570 of 650

570 5-2. Steps to take in an emergency
Check the tire inflation pressure.
If the tire inflation pressure is
under 130 kPa (1.3 kgf/cm
2 or
bar, 19 psi): The puncture can-
not be repaired. Contact any
authorized Toyota dealer or
repairer, or another duly quali-
fied and equipped profes-
sional.
If the tire inflation pressure is
130 kPa (1.3 kgf/cm
2 or bar,
19 psi) or higher, but less than
the specified air pressure:
Proceed to .
If the tire inflation pressure is
the specified air pressure
(P. 621): Proceed to .
Turn the compressor switch on to inflate the tire until the spec-
ified air pressure is reached. Drive for about 5 km (3 miles)
and then perform .
Store the compressor in the luggage compartment.
Taking precautions to avoid sudden braking, sudden accelera-
tion and sharp turns, drive carefully at under 80 km/h (50
mph) to the nearest authorized Toyota dealer or repairer, or
another duly qualified and equipped professional for tire repair
or replacement.
VERSO_WE.book Page 570 Thursday, June 19, 2014 11:31 AM
Page 571 of 650

5
571 5-2. Steps to take in an emergency
When trouble arises
If the tire is inflated to more than the specified air pressure (type B)
Check that the air pressure indicator shows the specified air pres-
sure.
If the air pressure is under the designated pressure, turn the com-
pressor switch on again and repeat the inflation procedure until the
specified air pressure is reached.
The valve of a tire that has been repaired
After a tire is repaired with the emergency tire puncture repair kit, the valve
should be replaced.
Note for checking the emergency tire puncture repair kit
Check the sealant expiry date occasionally.
The expiry date is shown on the bottle. Do not use sealant whose expiry
date has already passed. Otherwise, repairs conducted using the emer-
gency tire puncture repair kit may not be performed properly.Press the button to let some air out.
VERSO_WE.book Page 571 Thursday, June 19, 2014 11:31 AM
Page 574 of 650
574 5-2. Steps to take in an emergency
CAUTION
Connect the valve and hose securely with the tire installed on the vehicle.
If the hose is not properly connected to the valve, air leakage may occur
as sealant may be sprayed out.
If the hose comes off the valve while inflating the tire, there is a risk that
the hose will move abruptly due to air pressure.
After inflation of the tire has completed, the sealant may splatter when the
hose is disconnected or some air is let out of the tire.
Follow the operation procedure to repair the tire. If the procedures not fol-
lowed, the sealant may spray out.
Keep back from the tire while it is being repaired, as there is a chance of it
bursting while the repair operation is being performed. If you notice any
cracks or deformation of the tire, turn off the compressor switch and stop
the repair operation immediately.
The repair kit may overheat if operated for a long period of time. Do not
operate the repair kit continuously for more than 40 minutes.
Parts of the repair kit become hot during operation. Be careful when han-
dling the repair kit during and after operation. Do not touch the metal part
around the connecting area between the bottle and compressor. It will be
extremely hot.
Do not attach the vehicle speed warning sticker to an area other than the
one indicated. If the sticker is attached to an area where an SRS airbag is
located, such as the pad of the steering wheel, it may prevent the SRS air-
bag from operating properly.
Driving to spread the liquid sealant evenly
Observe the following precautions to reduce the risk of accidents.
Failing to do so may result in a loss of vehicle control and cause death or
serious injury.
Drive the vehicle carefully at a low speed. Be especially careful when turn-
ing and cornering.
If the vehicle does not drive straight or you feel a pull through the steering
wheel, stop the vehicle and check the following.
• Tire condition. The tire may have separated from the wheel.
• Tire inflation pressure. If the tire inflation pressure is 130 kPa (1.3
kgf/cm
2 or bar, 19 psi) or less, the tire may be severely damaged.
VERSO_WE.book Page 574 Thursday, June 19, 2014 11:31 AM
Page 621 of 650

621 6-1. Specifications
6
Vehicle specifications
Tires and wheels
16 inch tires
Tire size205/60R16 92V,
T145/70D17 106M (compact spare)
1ZR-FAE and
2ZR-FAE engines
Tire inflation pressure
(Recommended cold tire
inflation pressure)Vehicle
speedFront wheel
kPa (kgf/cm
2
or bar, psi)Rear wheel
kPa (kgf/cm2
or bar, psi)
160 km/h
(99 mph) or
less240 (2.4, 35) 230 (2.3, 33)
More than
160 km/h
(99 mph)270 (2.7, 40) 260 (2.6, 38)
1AD-FTV and
1WW-FHV engines
Tire inflation pressure
(Recommended cold tire
inflation pressure)Vehicle
speedFront wheel
kPa (kgf/cm
2
or bar, psi)Rear wheel
kPa (kgf/cm2
or bar, psi)
160 km/h
(99 mph) or
less250 (2.5, 36) 230 (2.3, 33)
More than
160 km/h
(99 mph)280 (2.8, 41) 260 (2.6, 38)
Tire inflation pressure
(compact spare)
(Recommended cold tire
inflation pressure)420 kPa (4.2 kgf/cm
2 or bar, 60 psi)
Wheel size16 6 1/2J,
17 4T (compact spare)
Wheel nut torque 103 N·m (10.5 kgf·m, 76 ft·lbf)
VERSO_WE.book Page 621 Thursday, June 19, 2014 11:31 AM
Page 622 of 650

622 6-1. Specifications
17 inch tires
Tire size215/55R17 94W,
T145/70D17 106M (compact spare)
1ZR-FAE and
2ZR-FAE engines
Tire inflation pressure
(Recommended cold tire
inflation pressure)Vehicle
speedFront wheel
kPa (kgf/cm
2
or bar, psi)Rear wheel
kPa (kgf/cm2
or bar, psi)
190 km/h
(118 mph)
or less240 (2.4, 35) 230 (2.3, 33)
More than
190 km/h
(118 mph)270 (2.7, 40) 260 (2.6, 38)
1AD-FTV, 2AD-FHV and
1WW-FHV engines
Tire inflation pressure
(Recommended cold tire
inflation pressure)Vehicle
speedFront wheel
kPa (kgf/cm
2
or bar, psi)Rear wheel
kPa (kgf/cm2
or bar, psi)
190 km/h
(118 mph)
or less250 (2.5, 36) 230 (2.3, 33)
More than
190 km/h
(118 mph)280 (2.8, 41) 260 (2.6, 38)
Tire inflation pressure
(compact spare)
(Recommended cold tire
inflation pressure)420 kPa (4.2 kgf/cm
2 or bar, 60 psi)
Wheel size17 7J,
17 4T (compact spare)
Wheel nut torque 103 N·m (10.5 kgf·m, 76 ft·lbf)
VERSO_WE.book Page 622 Thursday, June 19, 2014 11:31 AM
Page 623 of 650

623 6-1. Specifications
6
Vehicle specifications
When towing a trailer
Add 20.0 kPa (0.2 kgf/cm
2 or bar, 3 psi) to the recommended tire inflation
pressure, and drive at speeds below 100 km/h (62 mph).
When installing a compact spare tire (vehicles with compact spare tire)
Do not tow if your vehicle has a compact spare tire installed.
VERSO_WE.book Page 623 Thursday, June 19, 2014 11:31 AM