headlight TOYOTA VERSO S 2011 User Guide
[x] Cancel search | Manufacturer: TOYOTA, Model Year: 2011, Model line: VERSO S, Model: TOYOTA VERSO S 2011Pages: 664, PDF Size: 160.56 MB
Page 282 of 664
2824-4. Adjusting the steering wheel and mirrors
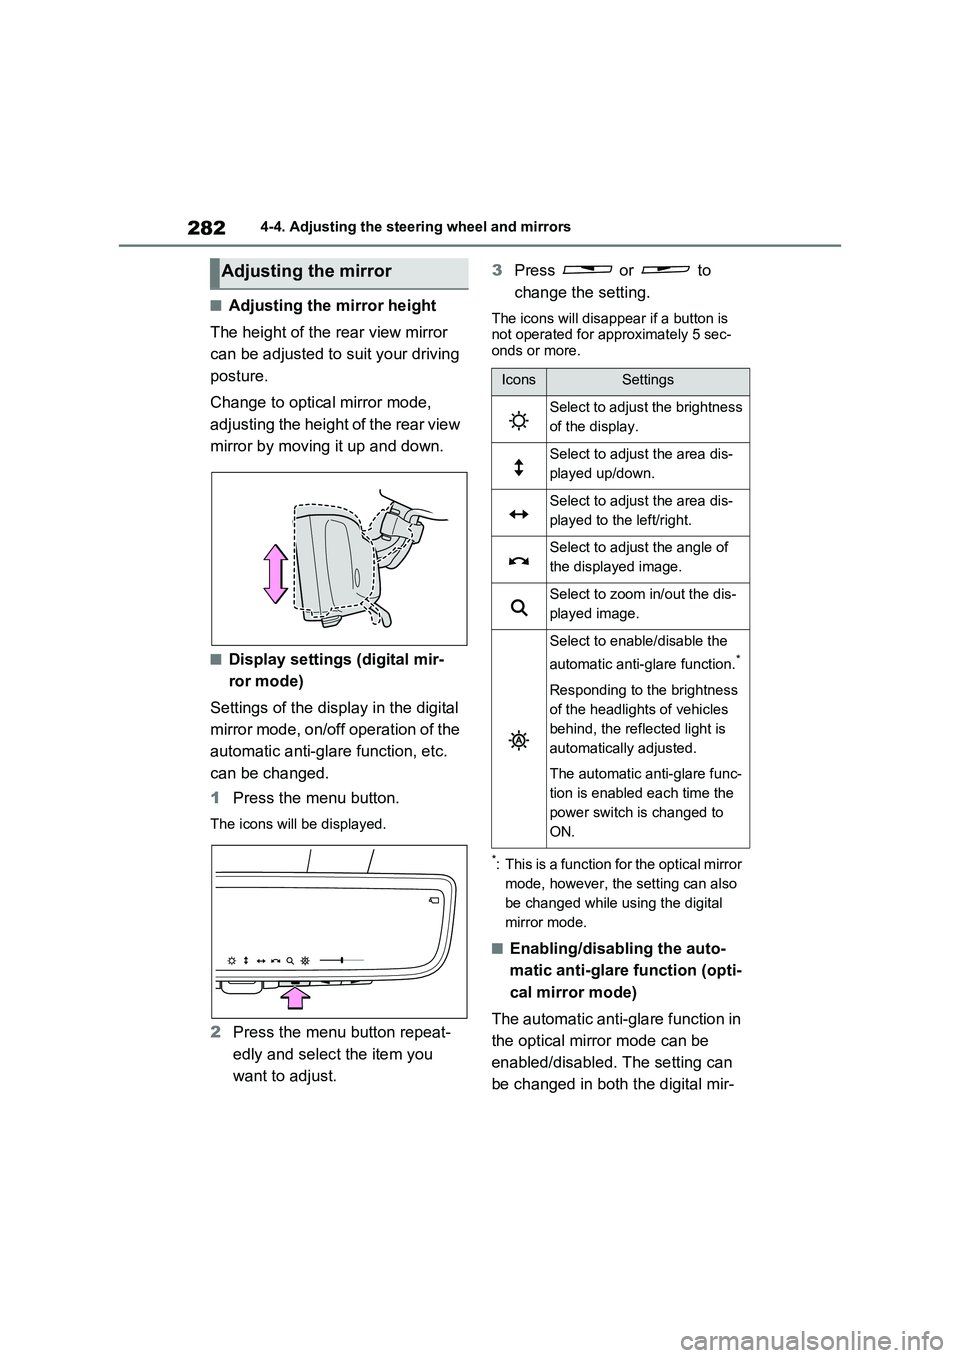
■Adjusting the mirror height
The height of the rear view mirror
can be adjusted to suit your driving
posture.
Change to optical mirror mode,
adjusting the height of the rear view
mirror by moving it up and down.
■Display settings (digital mir-
ror mode)
Settings of the display in the digital
mirror mode, on/off operation of the
automatic anti-glare function, etc.
can be changed.
1Press the menu button.
The icons will be displayed.
2Press the menu button repeat-
edly and select the item you
want to adjust.3Press or to
change the setting.
The icons will disappear if a button is
not operated for approximately 5 sec-
onds or more.
*: This is a function for the optical mirror
mode, however, the setting can also
be changed while using the digital
mirror mode.
■Enabling/disabling the auto-
matic anti-glare function (opti-
cal mirror mode)
The automatic anti-glare function in
the optical mirror mode can be
enabled/disabled. The setting can
be changed in both the digital mir-
Adjusting the mirror
IconsSettings
Select to adjust the brightness
of the display.
Select to adjust the area dis-
played up/down.
Select to adjust the area dis-
played to the left/right.
Select to adjust the angle of
the displayed image.
Select to zoom in/out the dis-
played image.
Select to enable/disable the
automatic anti-glare function.
*
Responding to the brightness
of the headlights of vehicles
behind, the reflected light is
automatically adjusted.
The automatic anti-glare func-
tion is enabled each time the
power switch is changed to
ON.
Page 286 of 664
2864-4. Adjusting the steering wheel and mirrors
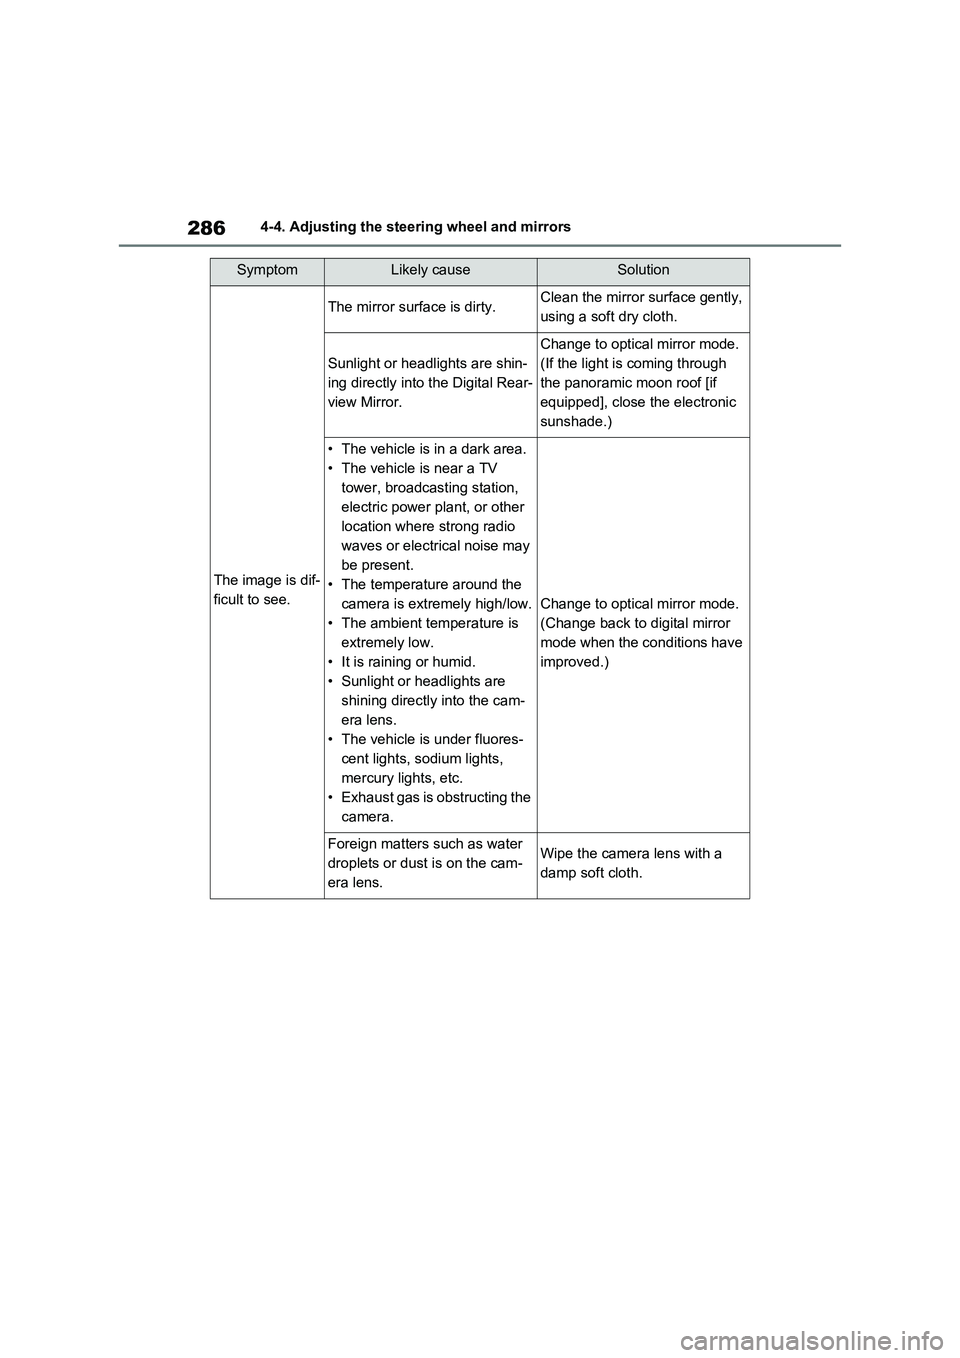
SymptomLikely causeSolution
The image is dif-
ficult to see.
The mirror surface is dirty.Clean the mirror surface gently,
using a soft dry cloth.
Sunlight or headlights are shin-
ing directly into the Digital Rear-
view Mirror.
Change to optical mirror mode.
(If the light is coming through
the panoramic moon roof [if
equipped], close the electronic
sunshade.)
• The vehicle is in a dark area.
• The vehicle is near a TV
tower, broadcasting station,
electric power plant, or other
location where strong radio
waves or electrical noise may
be present.
• The temperature around the
camera is extremely high/low.
• The ambient temperature is
extremely low.
• It is raining or humid.
• Sunlight or headlights are
shining directly into the cam-
era lens.
• The vehicle is under fluores-
cent lights, sodium lights,
mercury lights, etc.
• Exhaust gas is obstructing the
camera.
Change to optical mirror mode.
(Change back to digital mirror
mode when the conditions have
improved.)
Foreign matters such as water
droplets or dust is on the cam-
era lens.Wipe the camera lens with a
damp soft cloth.
Page 299 of 664
5
299
5
Driving
Driving
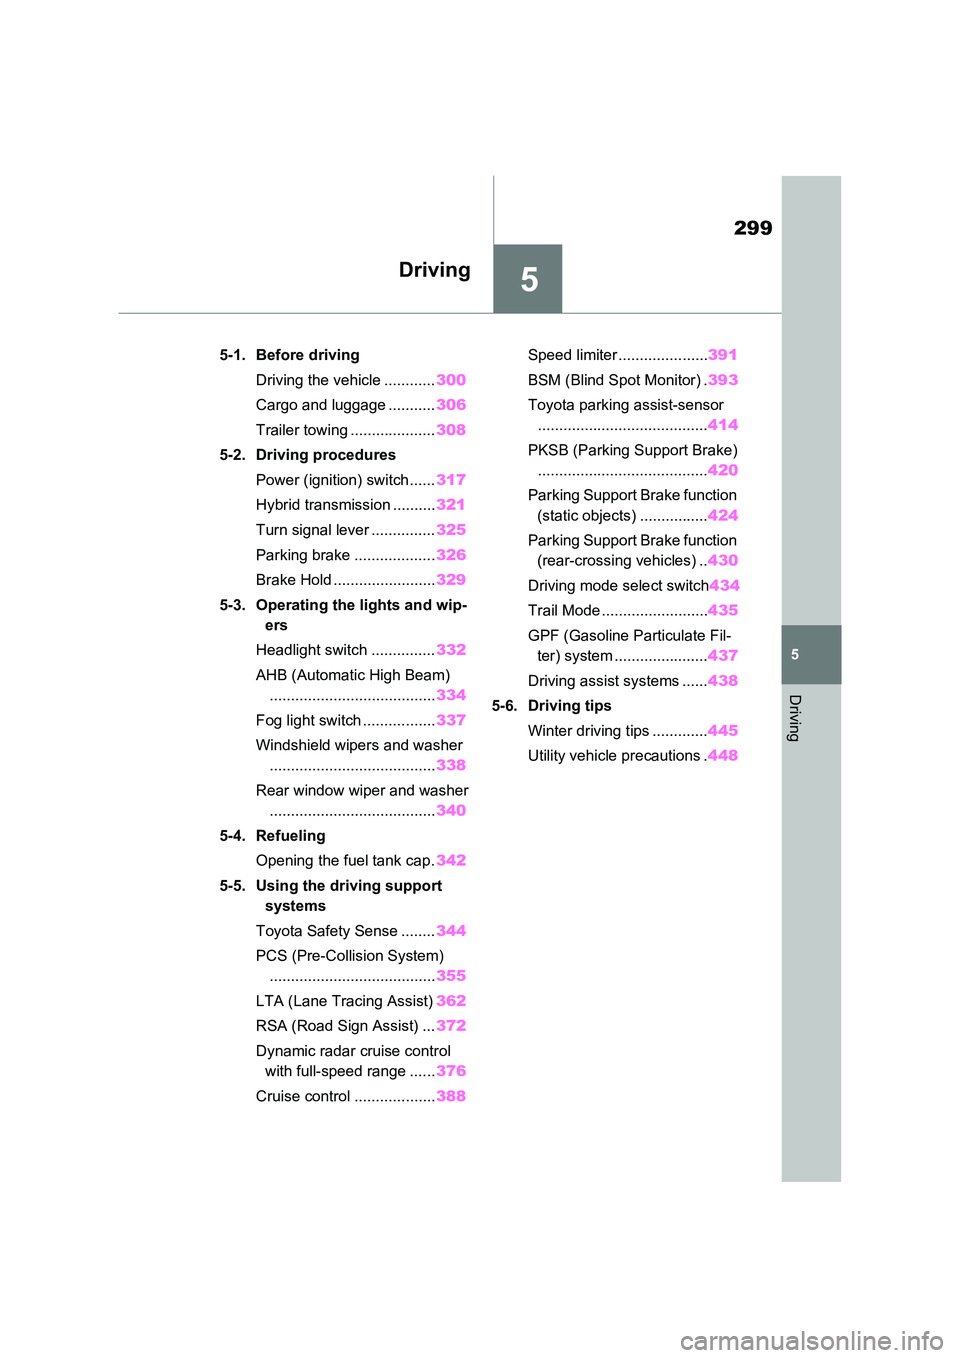
5-1. Before driving
Driving the vehicle ............ 300
Cargo and luggage ........... 306
Trailer towing .................... 308
5-2. Driving procedures
Power (ignition) switch ...... 317
Hybrid transmission .......... 321
Turn signal lever ............... 325
Parking brake ................... 326
Brake Hold ........................ 329
5-3. Operating the lights and wip-
ers
Headlight switch ............... 332
AHB (Automatic High Beam)
....................................... 334
Fog light switch ................. 337
Windshield wipers and washer
....................................... 338
Rear window wiper and washer
....................................... 340
5-4. Refueling
Opening the fuel tank cap. 342
5-5. Using the driving support
systems
Toyota Safety Sense ........ 344
PCS (Pre-Collision System)
....................................... 355
LTA (Lane Tracing Assist) 362
RSA (Road Sign Assist) ... 372
Dynamic radar cruise control
with full-speed range ...... 376
Cruise control ................... 388
Speed limiter ..................... 391
BSM (Blind Spot Monitor) . 393
Toyota parking assist-sensor
........................................ 414
PKSB (Parking Support Brake)
........................................ 420
Parking Support Brake function
(static objects) ................ 424
Parking Support Brake function
(rear-crossing vehicles) .. 430
Driving mode select switch 434
Trail Mode ......................... 435
GPF (Gasoline Particulate Fil-
ter) system ...................... 437
Driving assist systems ...... 438
5-6. Driving tips
Winter driving tips ............. 445
Utility vehicle precautions . 448
Page 332 of 664
3325-3. Operating the lights and wipers
5-3.Operating the lights and wipers
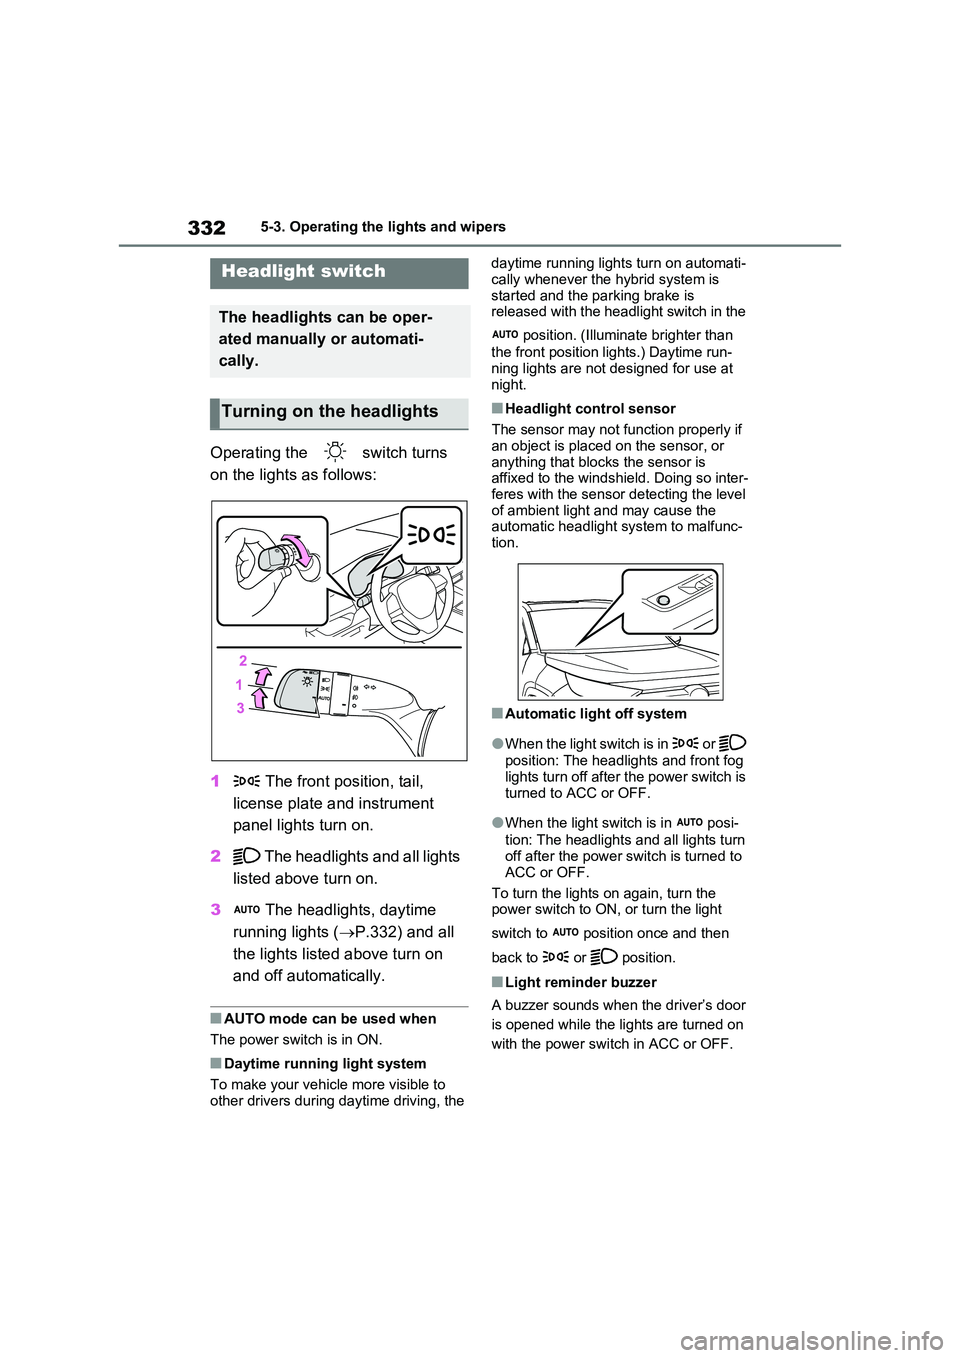
Operating the switch turns
on the lights as follows:
1 The front position, tail,
license plate and instrument
panel lights turn on.
2 The headlights and all lights
listed above turn on.
3 The headlights, daytime
running lights ( P.332) and all
the lights listed above turn on
and off automatically.
■AUTO mode can be used when
The power switch is in ON.
■Daytime running light system
To make your vehicle more visible to
other drivers during daytime driving, the
daytime running lights turn on automati-
cally whenever the hybrid system is started and the parking brake is released with the headlight switch in the
position. (Illuminate brighter than
the front position lights.) Daytime run- ning lights are not designed for use at
night.
■Headlight control sensor
The sensor may not function properly if an object is placed on the sensor, or
anything that blocks the sensor is affixed to the windshield. Doing so inter-feres with the sensor detecting the level
of ambient light and may cause the automatic headlight system to malfunc-tion.
■Automatic light off system
●When the light switch is in or
position: The headlights and front fog
lights turn off after the power switch is turned to ACC or OFF.
●When the light switch is in posi-
tion: The headlights and all lights turn off after the power switch is turned to
ACC or OFF.
To turn the lights on again, turn the power switch to ON, or turn the light
switch to position once and then
back to or position.
■Light reminder buzzer
A buzzer sounds when the driver’s door
is opened while the lights are turned on
with the power switch in ACC or OFF.
Headlight switch
The headlights can be oper-
ated manually or automati-
cally.
Turning on the headlights
Page 333 of 664
333
5
5-3. Operating the lights and wipers
Driving
■Automatic headlight leveling sys-
tem
The level of the headlights is automati- cally adjusted according to the number
of passengers and the loading condition of the vehicle to ensure that the head-lights do not interfere with other road
users.
■12-volt battery-saving function
In order to prevent the 12-volt battery of the vehicle from discharging, if the light
switch is in position when the
power switch is turned to OFF, the 12- volt battery-saving function will operate
and automatically turn off all the lights after approximately 20 minutes.
When any of the following are per-
formed, the 12-volt battery-saving func- tion is canceled once and then reactivated. All the lights will turn off
automatically 20 minutes after the 12- volt battery-saving function has been reactivated:
●When the headlight switch is operated
●When a door is opened or closed
■If “Headlight System Malfunction Visit Your Dealer” is displayed on the multi-information display
The system may be malfunctioning. Have the vehicle inspected by any authorized Toyota retailer or Toyota
authorized repairer, or any reliable repairer.
■Customization
Settings (e.g. light sensor sensitivity)
can be changed. (Customizable features: P.637)
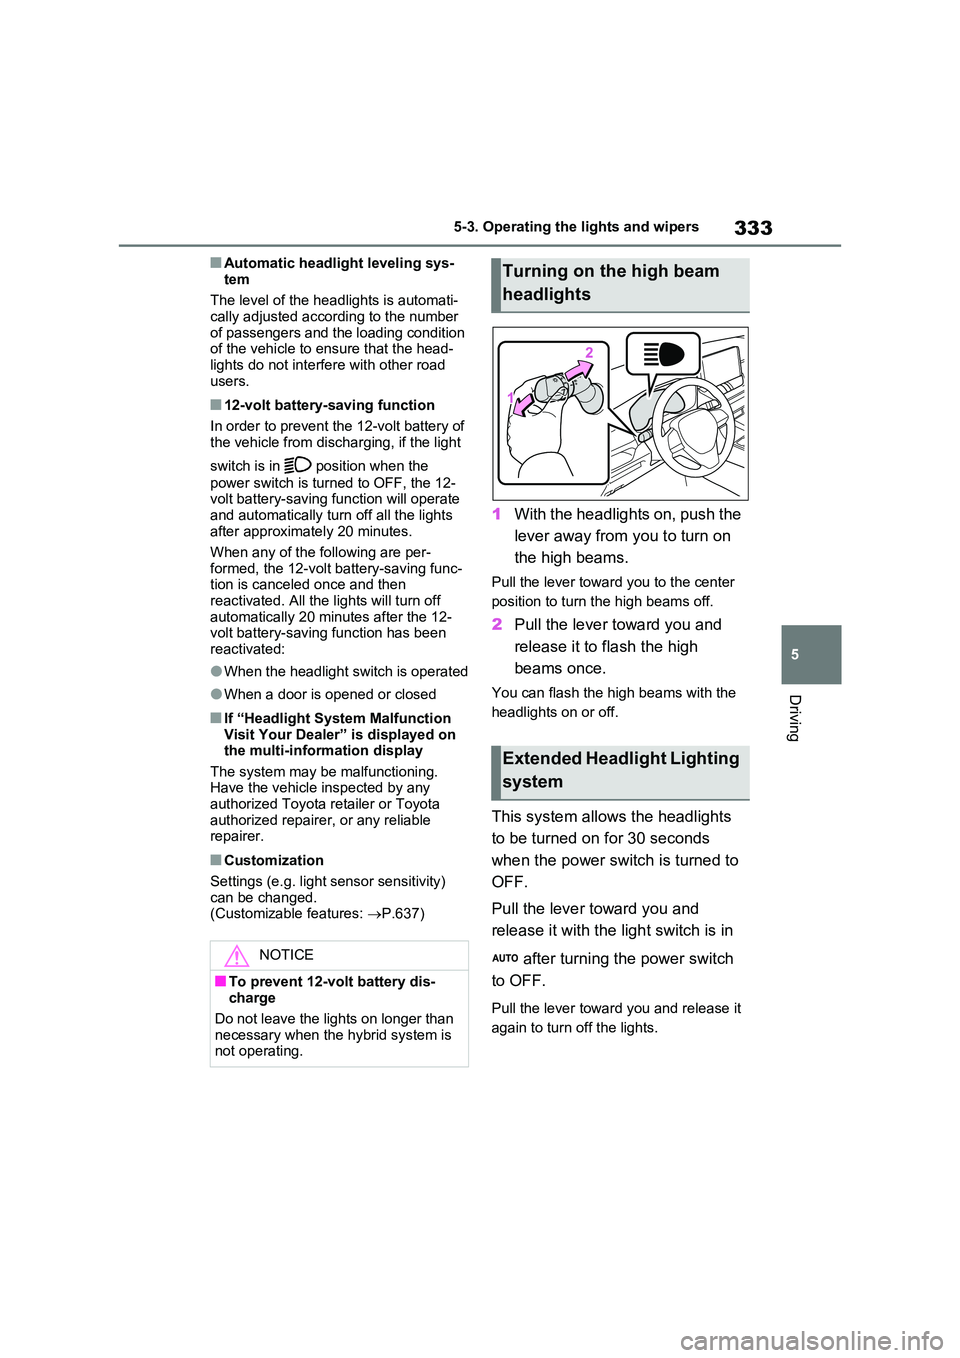
1With the headlights on, push the
lever away from you to turn on
the high beams.
Pull the lever toward you to the center
position to turn the high beams off.
2 Pull the lever toward you and
release it to flash the high
beams once.
You can flash the high beams with the
headlights on or off.
This system allows the headlights
to be turned on for 30 seconds
when the power switch is turned to
OFF.
Pull the lever toward you and
release it with the light switch is in
after turning the power switch
to OFF.
Pull the lever toward you and release it
again to turn off the lights.
NOTICE
■To prevent 12-volt battery dis- charge
Do not leave the lights on longer than
necessary when the hybrid system is not operating.
Turning on the high beam
headlights
Extended Headlight Lighting
system
Page 334 of 664
3345-3. Operating the lights and wipers
*: If equipped
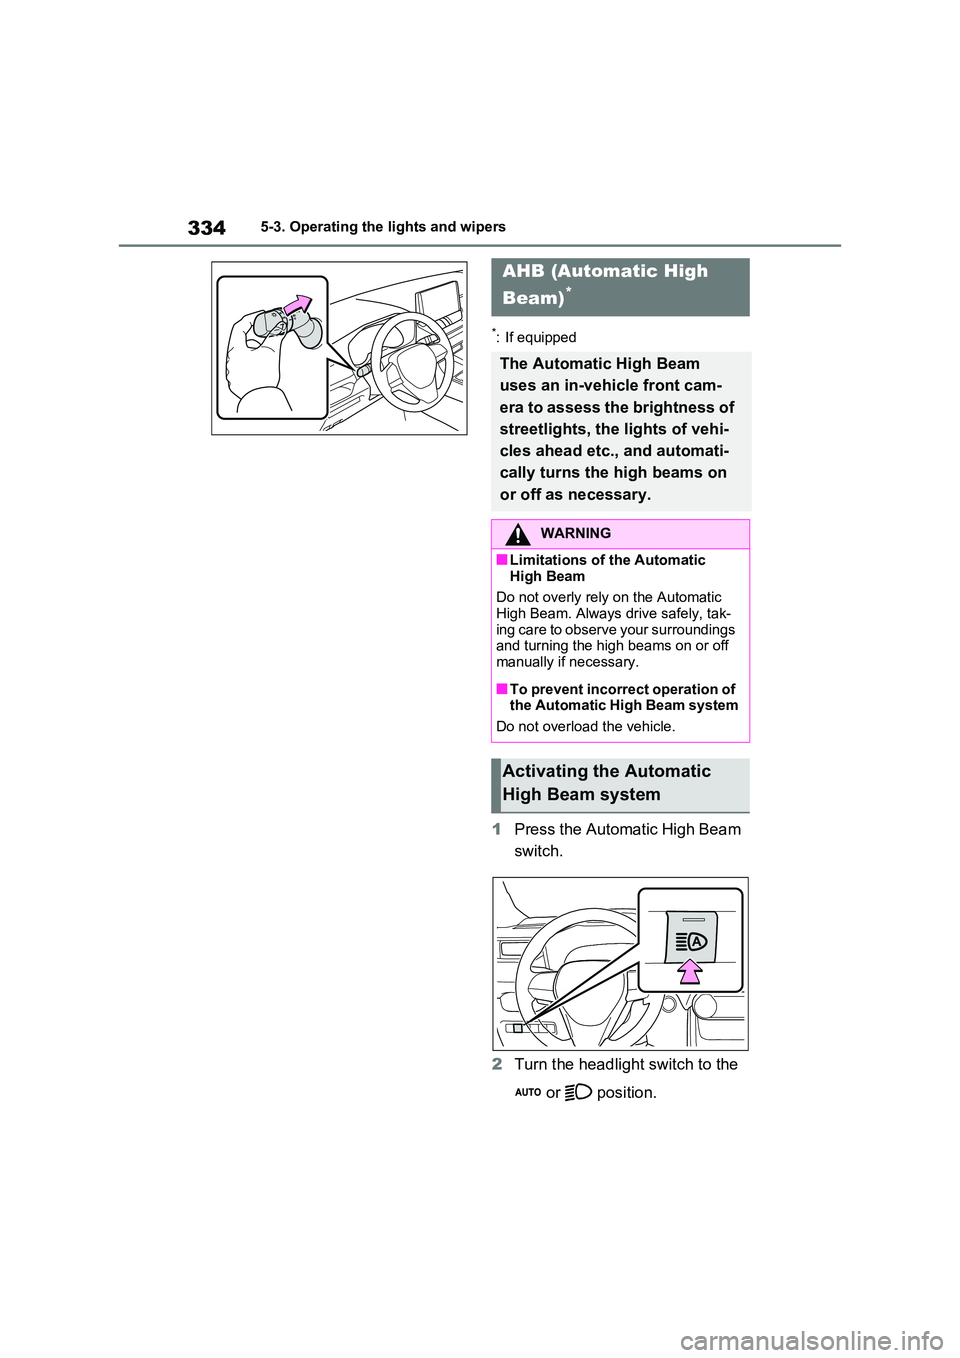
1Press the Automatic High Beam
switch.
2 Turn the headlight switch to the
or position.
AHB (Automatic High
Beam)*
The Automatic High Beam
uses an in-vehicle front cam-
era to assess the brightness of
streetlights, the lights of vehi-
cles ahead etc., and automati-
cally turns the high beams on
or off as necessary.
WARNING
■Limitations of the Automatic
High Beam
Do not overly rely on the Automatic High Beam. Always drive safely, tak-
ing care to observe your surroundings and turning the high beams on or off manually if necessary.
■To prevent incorrect operation of the Automatic High Beam system
Do not overload the vehicle.
Activating the Automatic
High Beam system
Page 335 of 664
335
5 5-3. Operating the lights and wipers
Driving
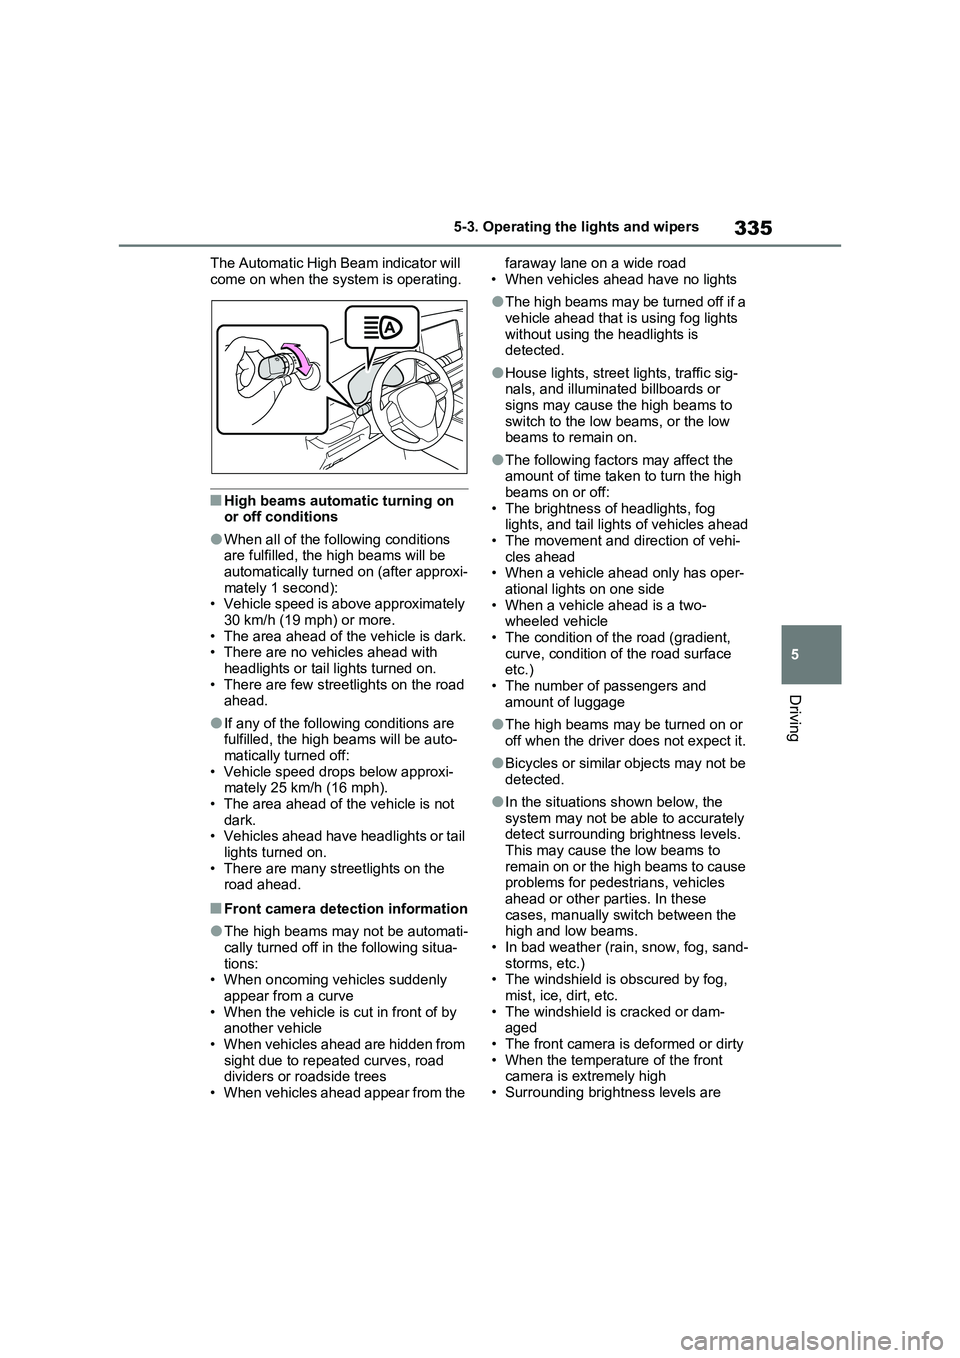
The Automatic High Beam indicator will
come on when the system is operating.
■High beams automatic turning on
or off conditions
●When all of the following conditions
are fulfilled, the high beams will be
automatically turned on (after approxi-
mately 1 second):
• Vehicle speed is above approximately
30 km/h (19 mph) or more.
• The area ahead of the vehicle is dark.
• There are no vehicles ahead with
headlights or tail lights turned on.
• There are few streetlights on the road
ahead.
●If any of the following conditions are
fulfilled, the high beams will be auto-
matically turned off:
• Vehicle speed drops below approxi-
mately 25 km/h (16 mph).
• The area ahead of the vehicle is not
dark.
• Vehicles ahead have headlights or tail
lights turned on.
• There are many streetlights on the
road ahead.
■Front camera detection information
●The high beams may not be automati-
cally turned off in the following situa-
tions:
• When oncoming vehicles suddenly
appear from a curve
• When the vehicle is cut in front of by
another vehicle
• When vehicles ahead are hidden from
sight due to repeated curves, road
dividers or roadside trees
• When vehicles ahead appear from the faraway lane on a wide road
• When vehicles ahead have no lights
●The high beams may be turned off if a
vehicle ahead that is using fog lights
without using the headlights is
detected.
●House lights, street lights, traffic sig-
nals, and illuminated billboards or
signs may cause the high beams to
switch to the low beams, or the low
beams to remain on.
●The following factors may affect the
amount of time taken to turn the high
beams on or off:
• The brightness of headlights, fog
lights, and tail lights of vehicles ahead
• The movement and direction of vehi-
cles ahead
• When a vehicle ahead only has oper-
ational lights on one side
• When a vehicle ahead is a two-
wheeled vehicle
• The condition of the road (gradient,
curve, condition of the road surface
etc.)
• The number of passengers and
amount of luggage
●The high beams may be turned on or
off when the driver does not expect it.
●Bicycles or similar objects may not be
detected.
●In the situations shown below, the
system may not be able to accurately
detect surrounding brightness levels.
This may cause the low beams to
remain on or the high beams to cause
problems for pedestrians, vehicles
ahead or other parties. In these
cases, manually switch between the
high and low beams.
• In bad weather (rain, snow, fog, sand-
storms, etc.)
• The windshield is obscured by fog,
mist, ice, dirt, etc.
• The windshield is cracked or dam-
aged
• The front camera is deformed or dirty
• When the temperature of the front
camera is extremely high
• Surrounding brightness levels are
Page 336 of 664
3365-3. Operating the lights and wipers
equal to those of headlights, tail lights
or fog lights
• When headlights or tail lights of vehi-
cles ahead are turned off, dirty,
changing color, or not aimed properly
• When the vehicle is hit by water,
snow, dust, etc. from a preceding
vehicle
• When driving through an area of inter-
mittently changing brightness and
darkness
• When frequently and repeatedly driv-
ing ascending/descending roads, or
roads with rough, bumpy or uneven
surfaces (such as stone-paved roads,
gravel roads, etc.)
• When frequently and repeatedly tak-
ing curves or driving on a winding
road
• There is a highly reflective object
ahead of the vehicle, such as a sign or
mirror
• The back of a vehicle ahead is highly
reflective, such as a container on a
truck
• The vehicle’s headlights are damaged
or dirty, or are not aimed properly
• The vehicle is listing or titling due to a
flat tire, a trailer being towed, etc.
• The high beams and low beams are
repeatedly being switched between in
an abnormal manner
• The driver believes that the high
beams may be causing problems or
distress to other drivers or pedestrians
nearby
• The vehicle is used in a territory in
which vehicles travel on the opposite
side of the road of the country for
which the vehicle is approved, for
example using a vehicle designed for
right-hand traffic in a left-hand traffic
territory, or vice versa
• When going through the Straits of
Dover
■If “Headlight System Malfunction
Visit Your Dealer” is displayed on
the multi-information display
The system may be malfunctioning.
Have the vehicle inspected by any
authorized Toyota retailer or Toyota
authorized repairer, or any reliable repairer.
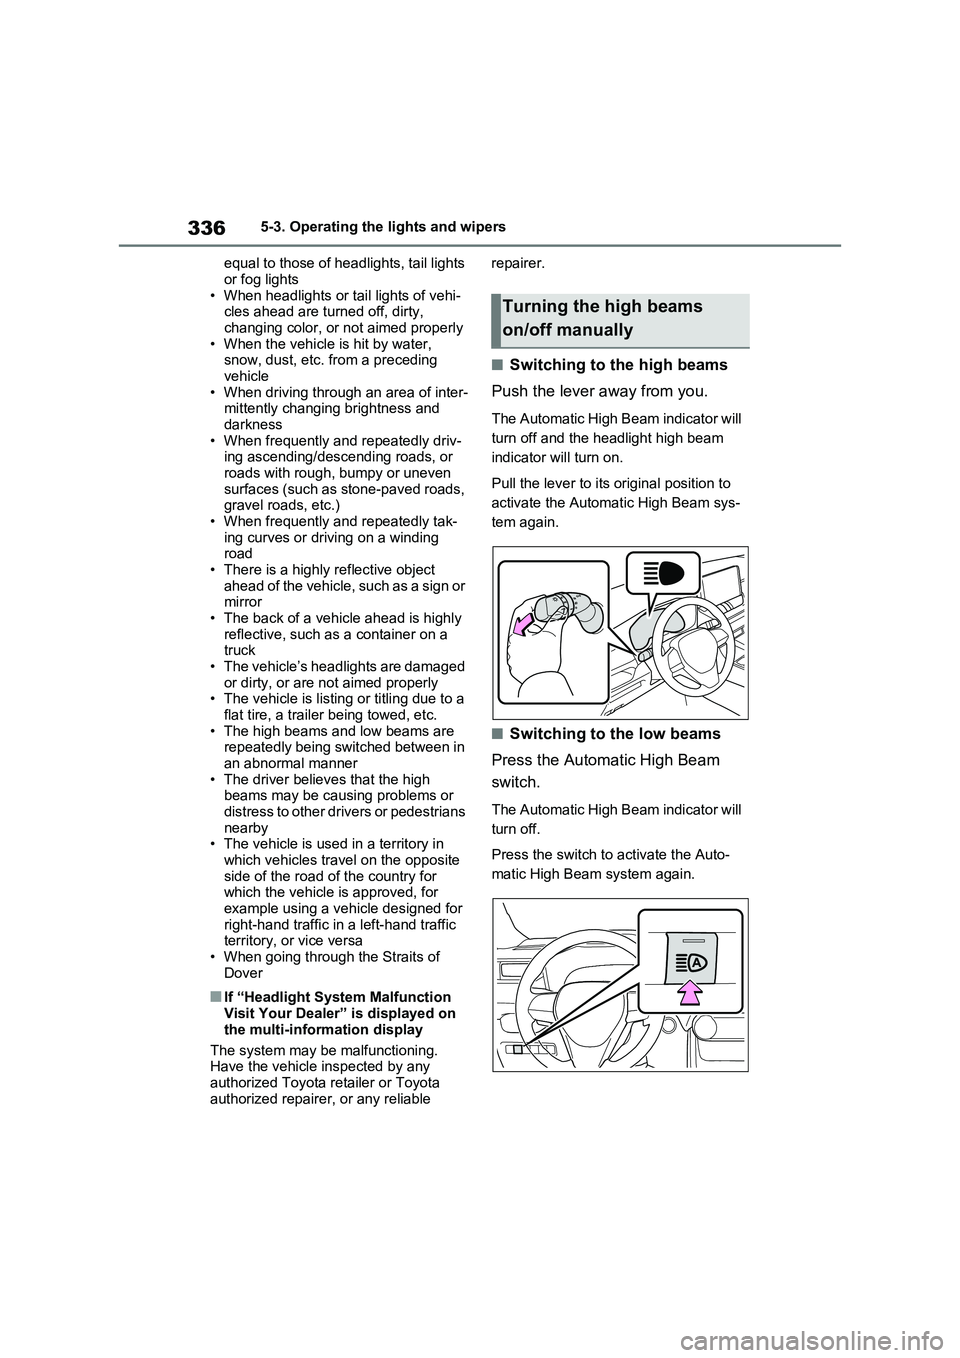
■Switching to the high beams
Push the lever away from you.
The Automatic High Beam indicator will
turn off and the headlight high beam
indicator will turn on.
Pull the lever to its original position to
activate the Automatic High Beam sys-
tem again.
■Switching to the low beams
Press the Automatic High Beam
switch.
The Automatic High Beam indicator will
turn off.
Press the switch to activate the Auto-
matic High Beam system again.
Turning the high beams
on/off manually
Page 337 of 664
337
5
5-3. Operating the lights and wipers
Driving
■Temporarily switching to the
low beams
Pull the lever toward you and then
return it to its original position.
The high beams are on while the lever
is pulled toward you, however, after the
lever is returned to its original position,
the low beams remain on for a certain
amount of time. Afterwards, the Auto-
matic High Beam will be activated
again.
■Temporarily switching to the low beams
It is recommended to switch to the low
beams when the high beams may cause problems or distress to other drivers or pedestrians nearby.
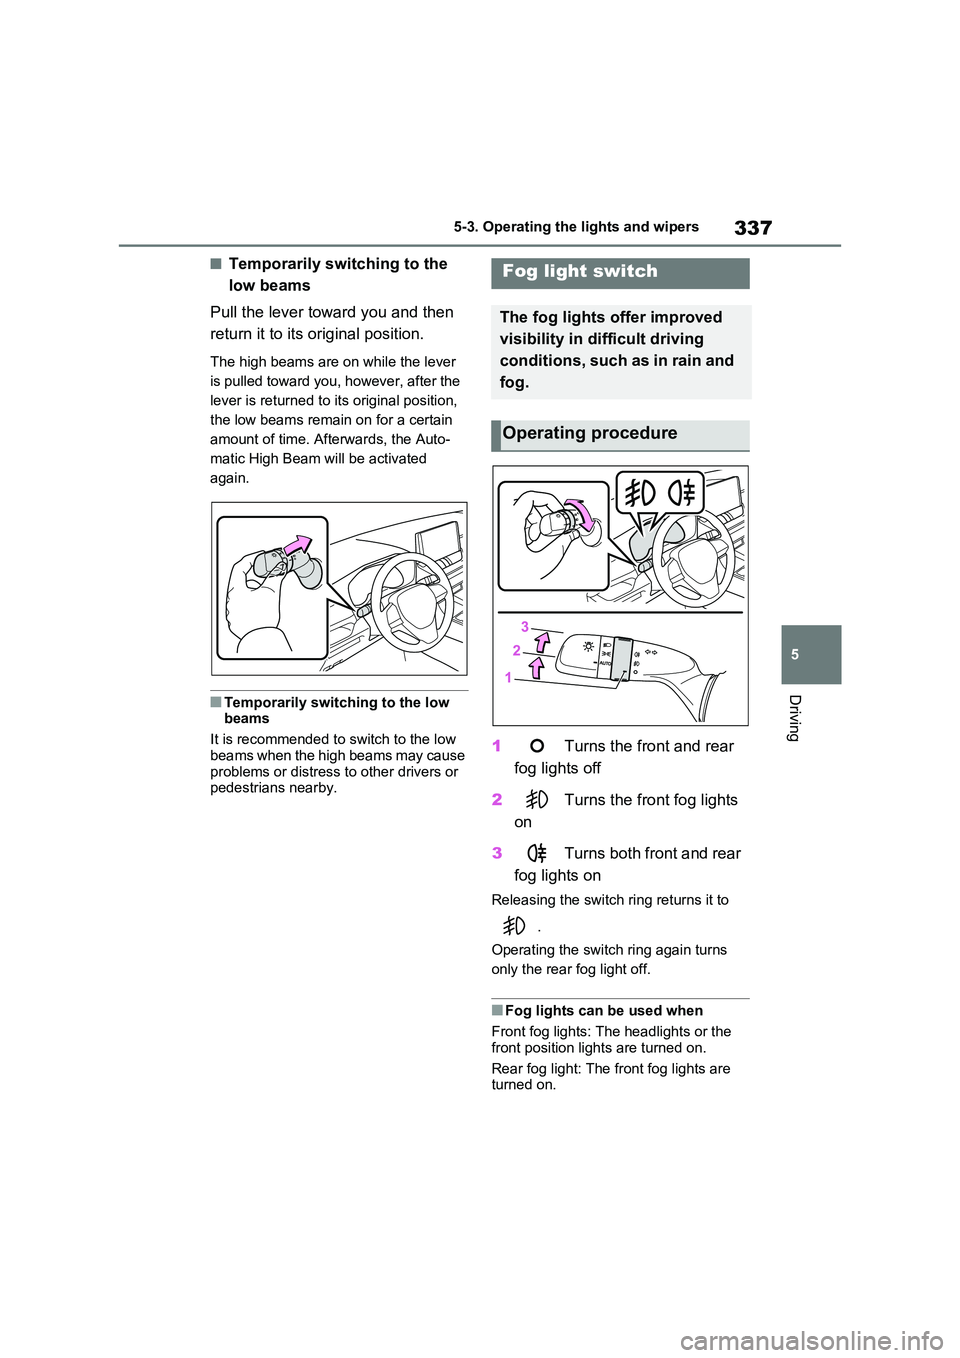
1 Turns the front and rear
fog lights off
2 Turns the front fog lights
on
3 Turns both front and rear
fog lights on
Releasing the switch ring returns it to
.
Operating the switch ring again turns
only the rear fog light off.
■Fog lights can be used when
Front fog lights: The headlights or the
front position lights are turned on.
Rear fog light: The front fog lights are turned on.
Fog light switch
The fog lights offer improved
visibility in difficult driving
conditions, such as in rain and
fog.
Operating procedure
Page 338 of 664
3385-3. Operating the lights and wipers
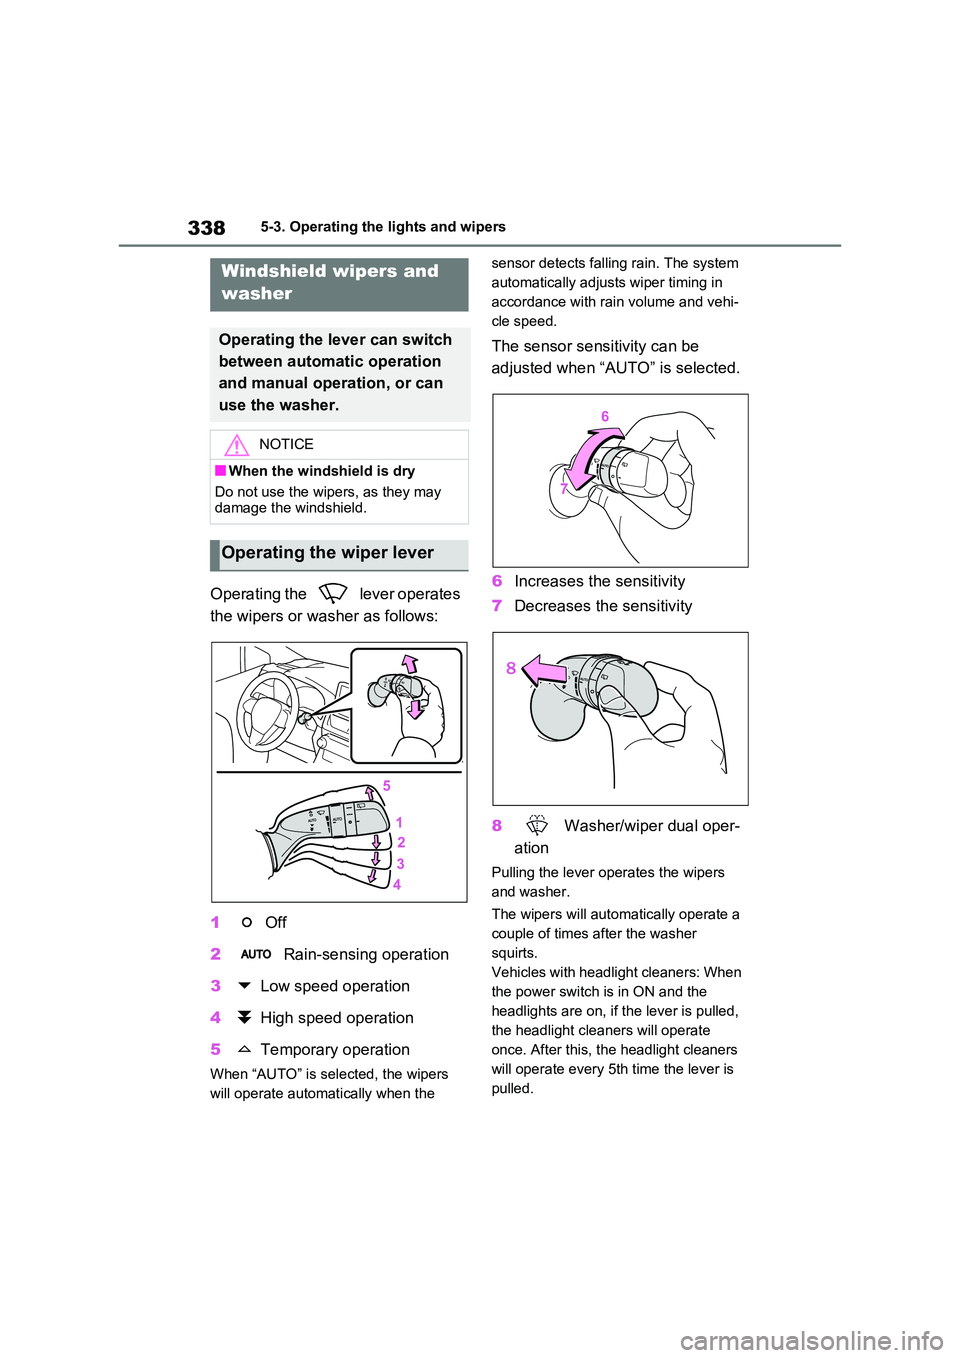
Operating the lever operates
the wipers or washer as follows:
1 Off
2 Rain-sensing operation
3 Low speed operation
4 High speed operation
5 Temporary operation
When “AUTO” is selected, the wipers
will operate automatically when the
sensor detects falling rain. The system
automatically adjusts wiper timing in
accordance with rain volume and vehi-
cle speed.
The sensor sensitivity can be
adjusted when “AUTO” is selected.
6 Increases the sensitivity
7 Decreases the sensitivity
8 Washer/wiper dual oper-
ation
Pulling the lever operates the wipers
and washer.
The wipers will automatically operate a
couple of times after the washer
squirts.
Vehicles with headlight cleaners: When
the power switch is in ON and the
headlights are on, if the lever is pulled,
the headlight cleaners will operate
once. After this, the headlight cleaners
will operate every 5th time the lever is
pulled.
Windshield wipers and
washer
Operating the lever can switch
between automatic operation
and manual operation, or can
use the washer.
NOTICE
■When the windshield is dry
Do not use the wipers, as they may damage the windshield.
Operating the wiper lever