TOYOTA VERSO S 2012 Owners Manual
VERSO S 2012
TOYOTA
TOYOTA
https://www.carmanualsonline.info/img/14/49149/w960_49149-0.png
TOYOTA VERSO S 2012 Owners Manual
Trending: steering wheel adjustment, start stop button, oil temperature, oil type, automatic transmission, flat tire, driver seat adjustment
Page 441 of 540
5
441 5-2. Steps to take in an emergency
When trouble arises
VERSO-S_EE
CAUTION
When the electric power steering system warning light comes on
The steering wheel may become extremely heavy.
If the steering wheel becomes heavier than usual when operating, hold
firmly and operate using more force than usual.
When driving to clean the DPF catalytic converter (diesel engine only)
When driving, pay sufficient attention to weather, road conditions, terrain and
traffic conditions, and be sure to observe traffic laws and/or regulations. Fail-
ure to do so may cause an unexpected accident, resulting in death or seri-
ous injury.
NOTICE
If the fuel filter warning light comes on (diesel engine only)
Never drive the vehicle with the warning light on. Continued driving with
water accumulated in the fuel filter will damage the fuel injection pump.
When the DPF system warning light comes on (diesel engine only)
If the DPF system warning light is left on without performing cleaning, after
an additional 100 to 300 km (62 to 187 miles), the malfunction indicator lamp
may come on. If this happens, have the vehicle inspected by any authorized
Toyota dealer or repairer, or another duly qualified and equipped profes-
sional immediately.
Page 442 of 540
442
5-2. Steps to take in an emergency
VERSO-S_EE
If you have a flat tire (vehicles with a spare tire)
Remove the flat tire and replace it with the spare tire provided.
Before jacking up the vehicle
Stop the vehicle on a hard, flat surface.
Set the parking brake.
Vehicles with a Multidrive: Shift the shift lever to P.
Vehicles with a multi-mode manual transmission: Shift the
shift lever to M, E or R.
Vehicles with a manual transmission: Shift the shift lever to R.
Stop the engine.
Turn on the emergency flashers.
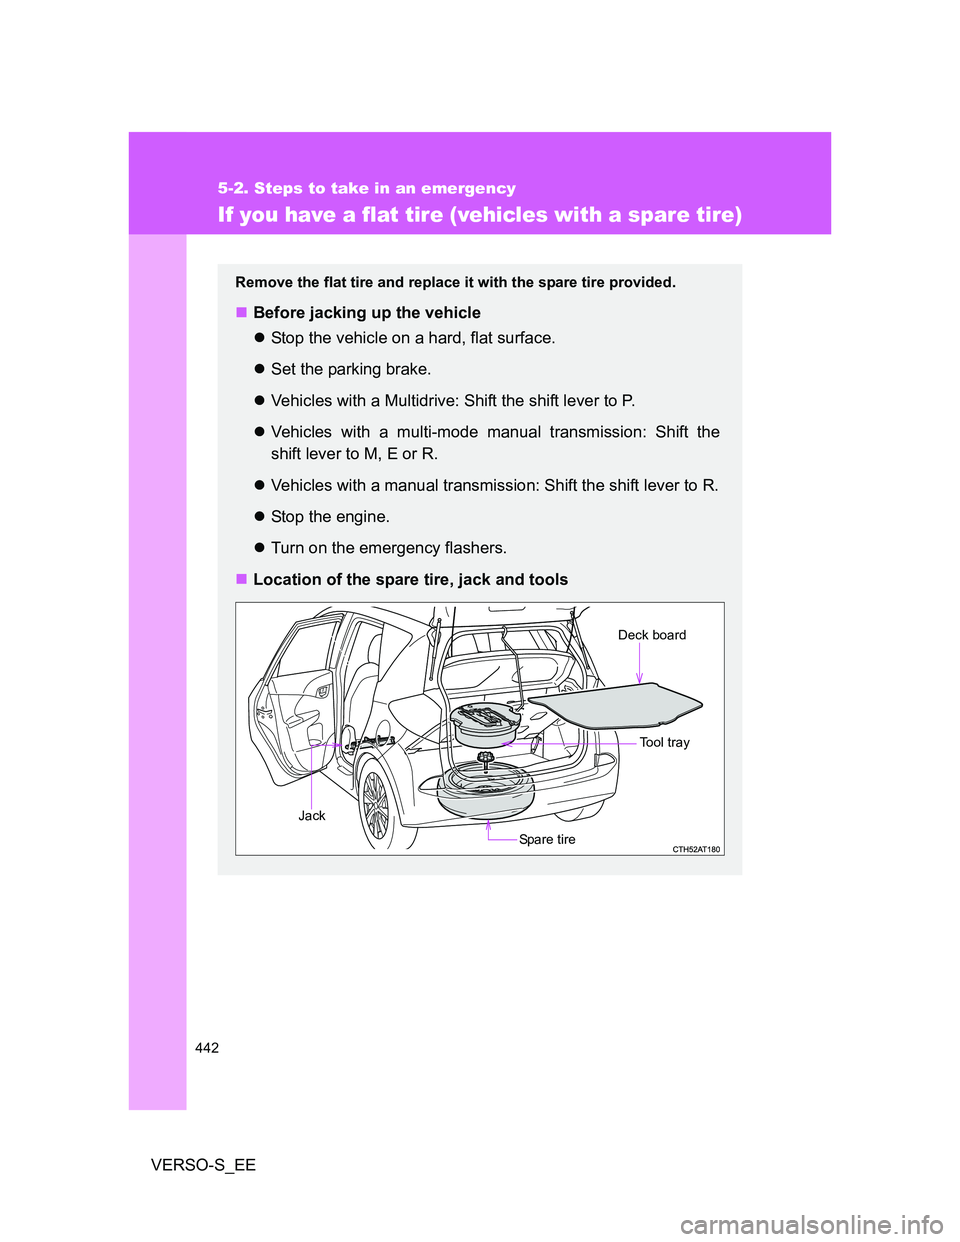
Location of the spare tire, jack and tools
To o l t r a y
Spare tire Jack
Deck board
Page 443 of 540
5
443 5-2. Steps to take in an emergency
When trouble arises
VERSO-S_EE
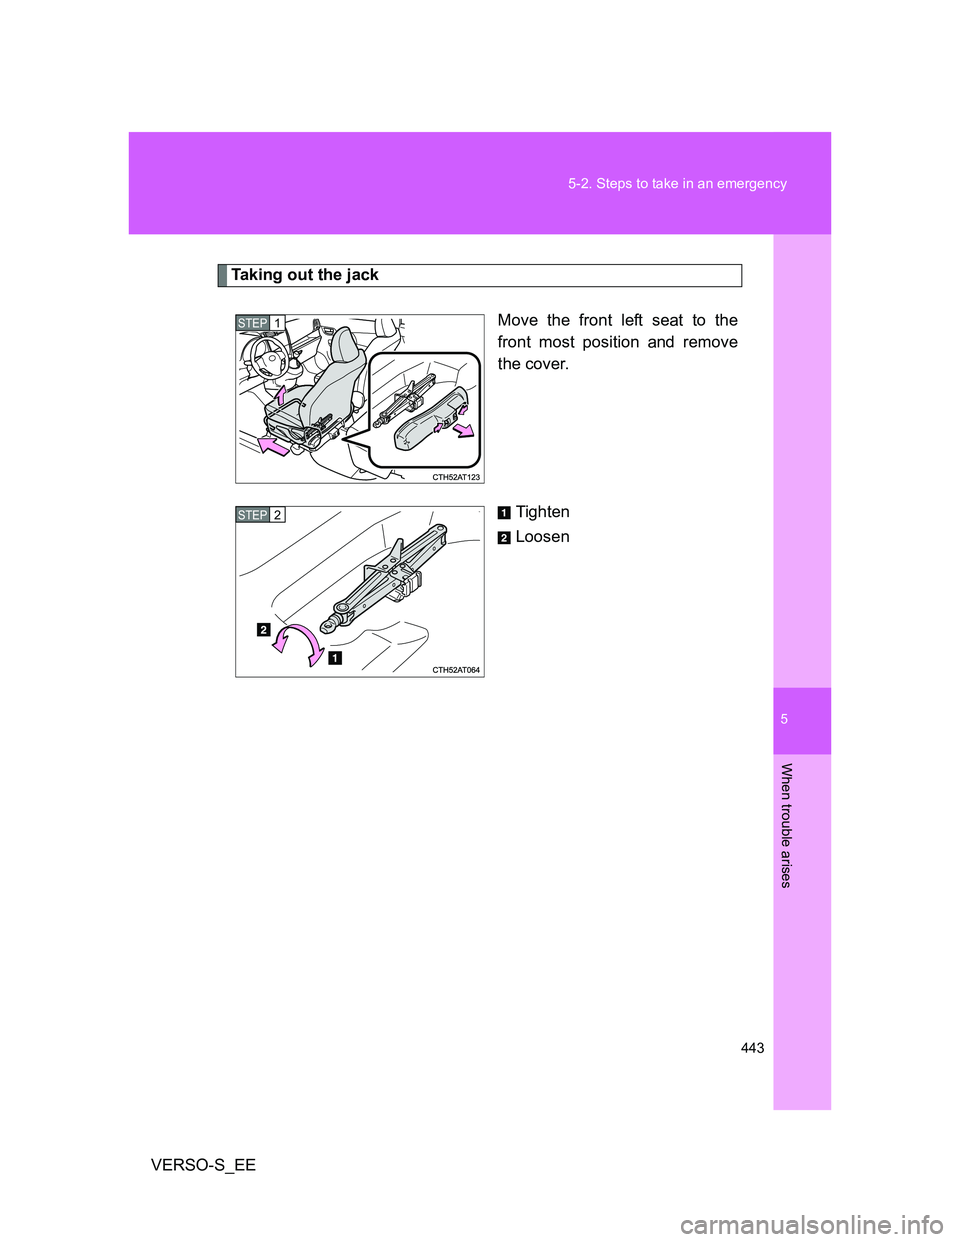
Taking out the jack
Move the front left seat to the
front most position and remove
the cover.
Tighten
Loosen
STEP1
STEP2
Page 444 of 540
444 5-2. Steps to take in an emergency
VERSO-S_EE
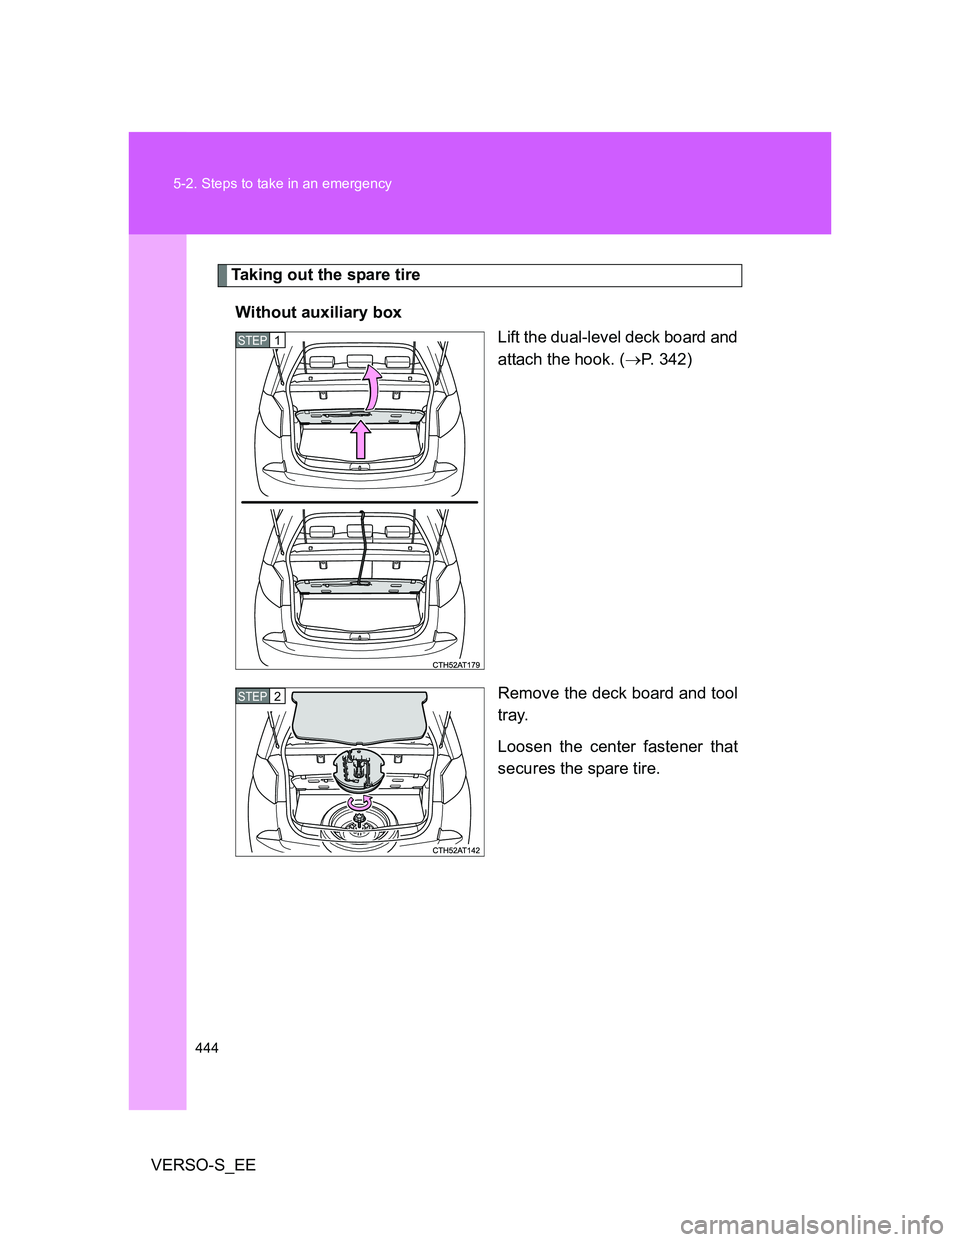
Taking out the spare tire
Without auxiliary box
Lift the dual-level deck board and
attach the hook. (P. 342)
Remove the deck board and tool
tray.
Loosen the center fastener that
secures the spare tire.
STEP1
STEP2
Page 445 of 540
5
445 5-2. Steps to take in an emergency
When trouble arises
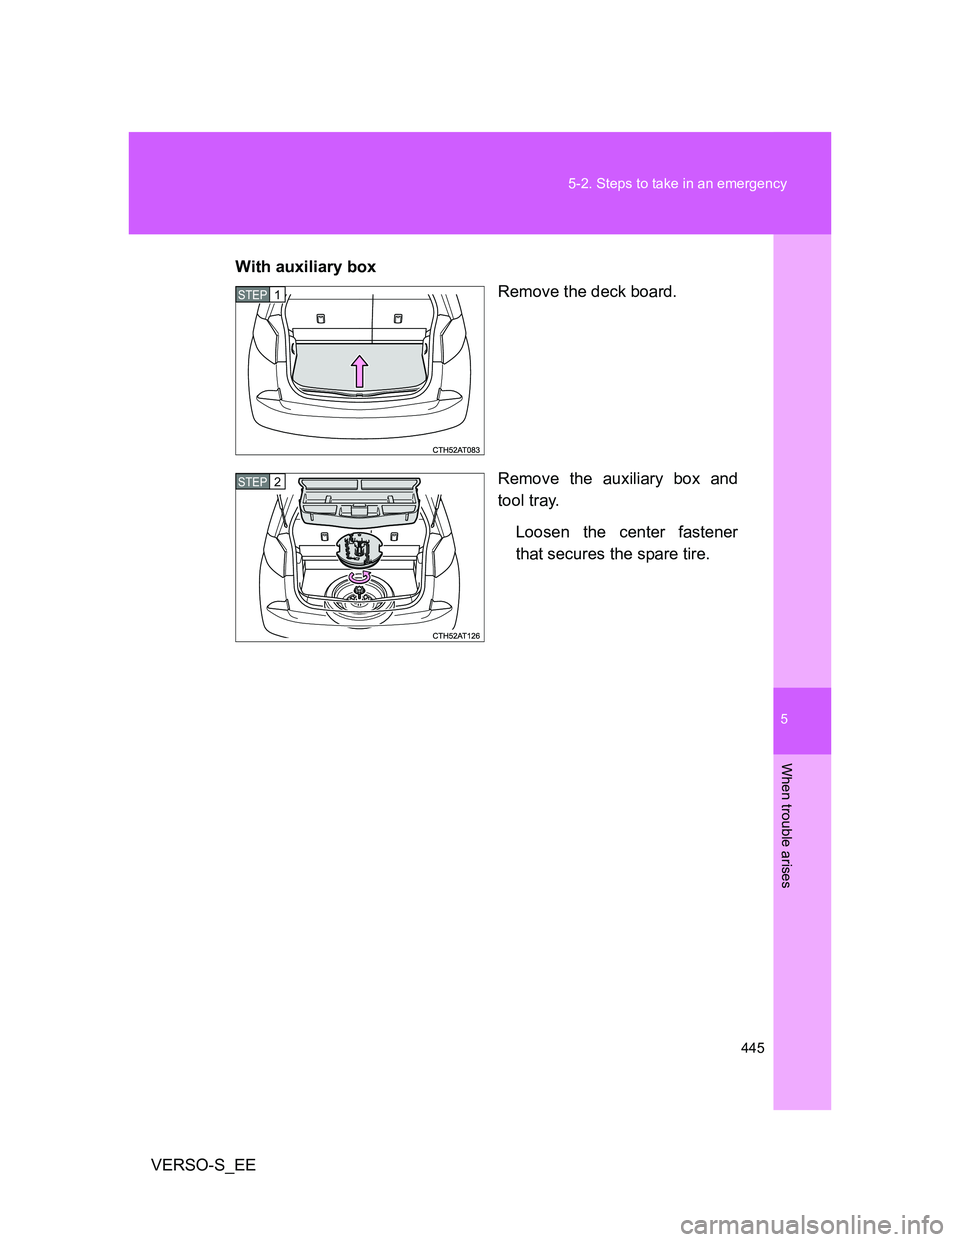
VERSO-S_EEWith auxiliary box
Remove the deck board.
Remove the auxiliary box and
tool tray.
Loosen the center fastener
that secures the spare tire.
STEP1
STEP2
Page 446 of 540
446 5-2. Steps to take in an emergency
VERSO-S_EE
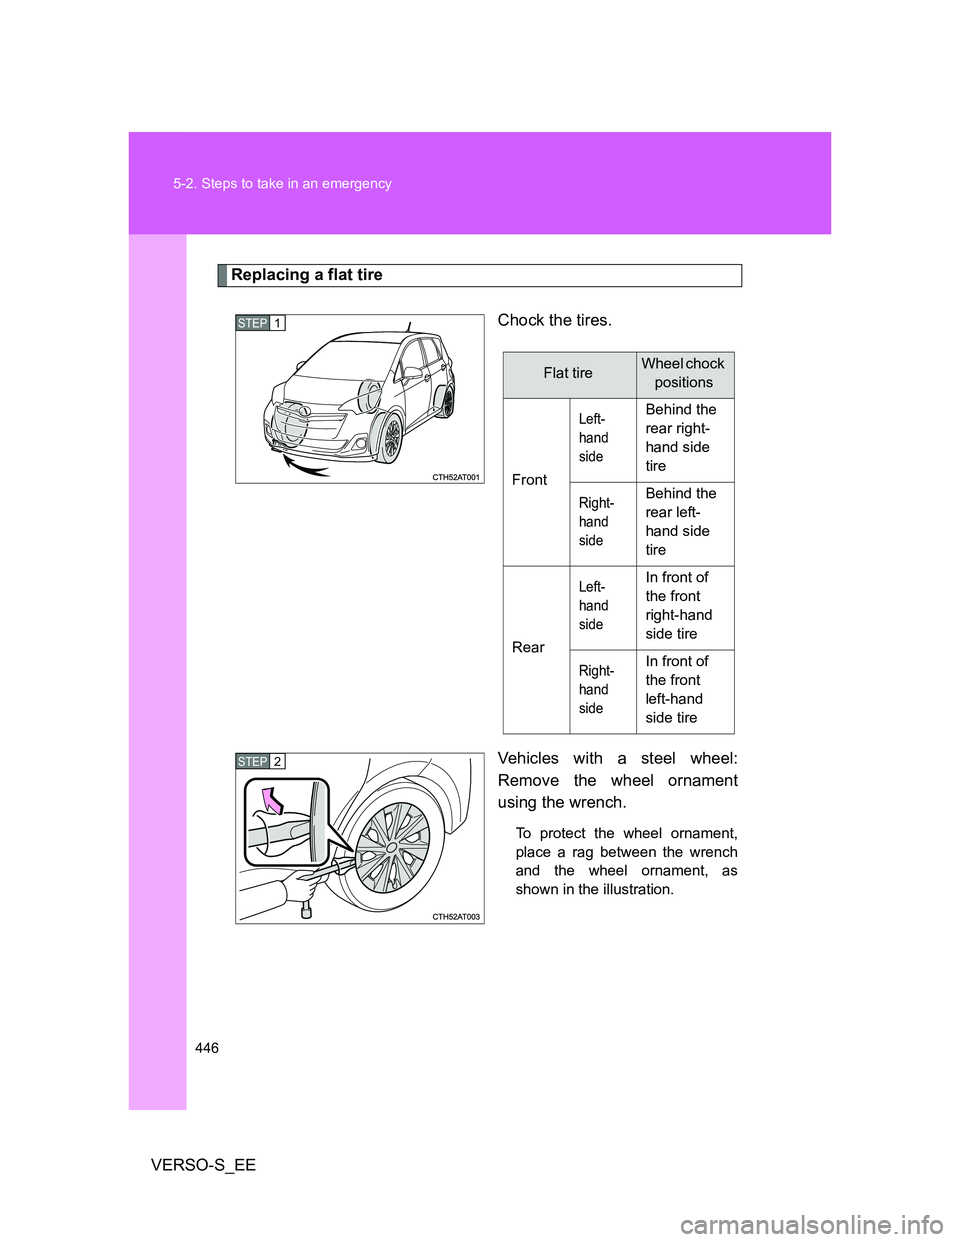
Replacing a flat tire
Chock the tires.
Vehicles with a steel wheel:
Remove the wheel ornament
using the wrench.
To protect the wheel ornament,
place a rag between the wrench
and the wheel ornament, as
shown in the illustration.
STEP1STEP1
Flat tireWheel chock
positions
Front
Left-
hand
sideBehind the
rear right-
hand side
tire
Right-
hand
sideBehind the
rear left-
hand side
tire
Rear
Left-
hand
sideIn front of
the front
right-hand
side tire
Right-
hand
sideIn front of
the front
left-hand
side tire
STEP2
Page 447 of 540
5
447 5-2. Steps to take in an emergency
When trouble arises
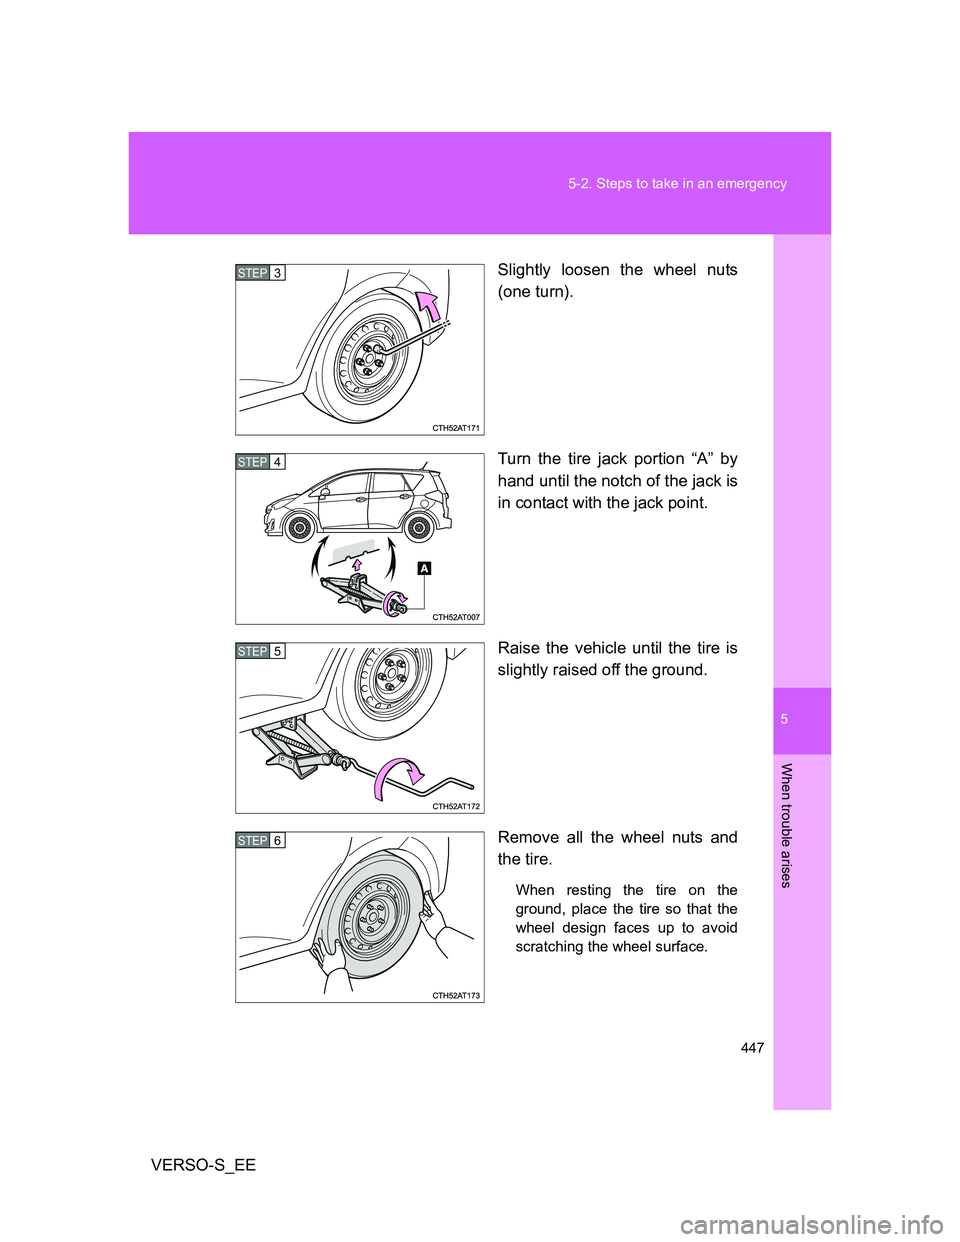
VERSO-S_EESlightly loosen the wheel nuts
(one turn).
Turn the tire jack portion “A” by
hand until the notch of the jack is
in contact with the jack point.
Raise the vehicle until the tire is
slightly raised off the ground.
Remove all the wheel nuts and
the tire.
When resting the tire on the
ground, place the tire so that the
wheel design faces up to avoid
scratching the wheel surface.
STEP3
STEP4
STEP5
STEP6
Page 448 of 540
448 5-2. Steps to take in an emergency
VERSO-S_EE
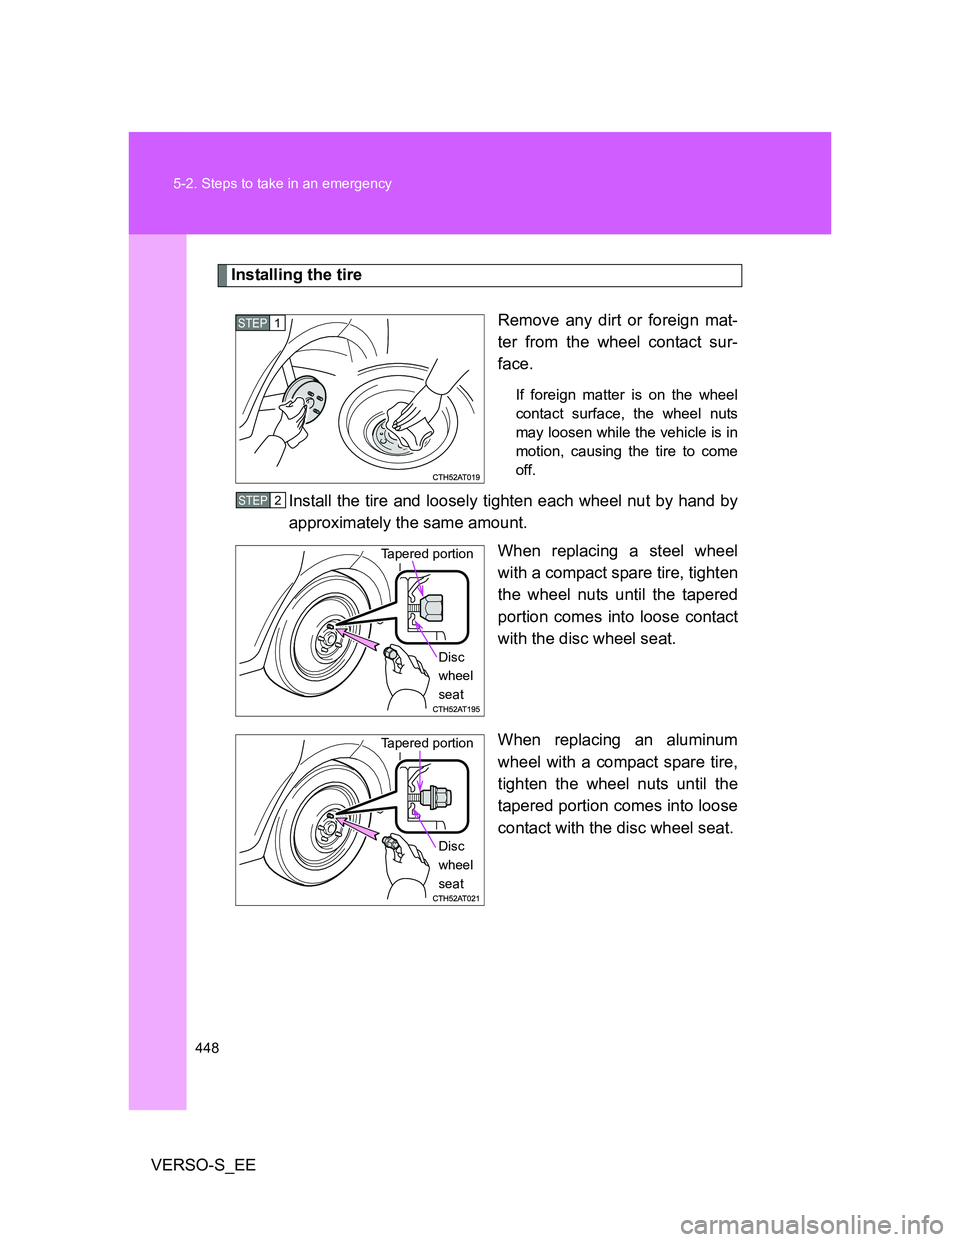
Installing the tire
Remove any dirt or foreign mat-
ter from the wheel contact sur-
face.
If foreign matter is on the wheel
contact surface, the wheel nuts
may loosen while the vehicle is in
motion, causing the tire to come
off.
Install the tire and loosely tighten each wheel nut by hand by
approximately the same amount.
When replacing a steel wheel
with a compact spare tire, tighten
the wheel nuts until the tapered
portion comes into loose contact
with the disc wheel seat.
When replacing an aluminum
wheel with a compact spare tire,
tighten the wheel nuts until the
tapered portion comes into loose
contact with the disc wheel seat.
STEP1
STEP2
Tapered portion
Disc
wheel
seat
Tapered portion
Disc
wheel
seat
Page 449 of 540
5
449 5-2. Steps to take in an emergency
When trouble arises
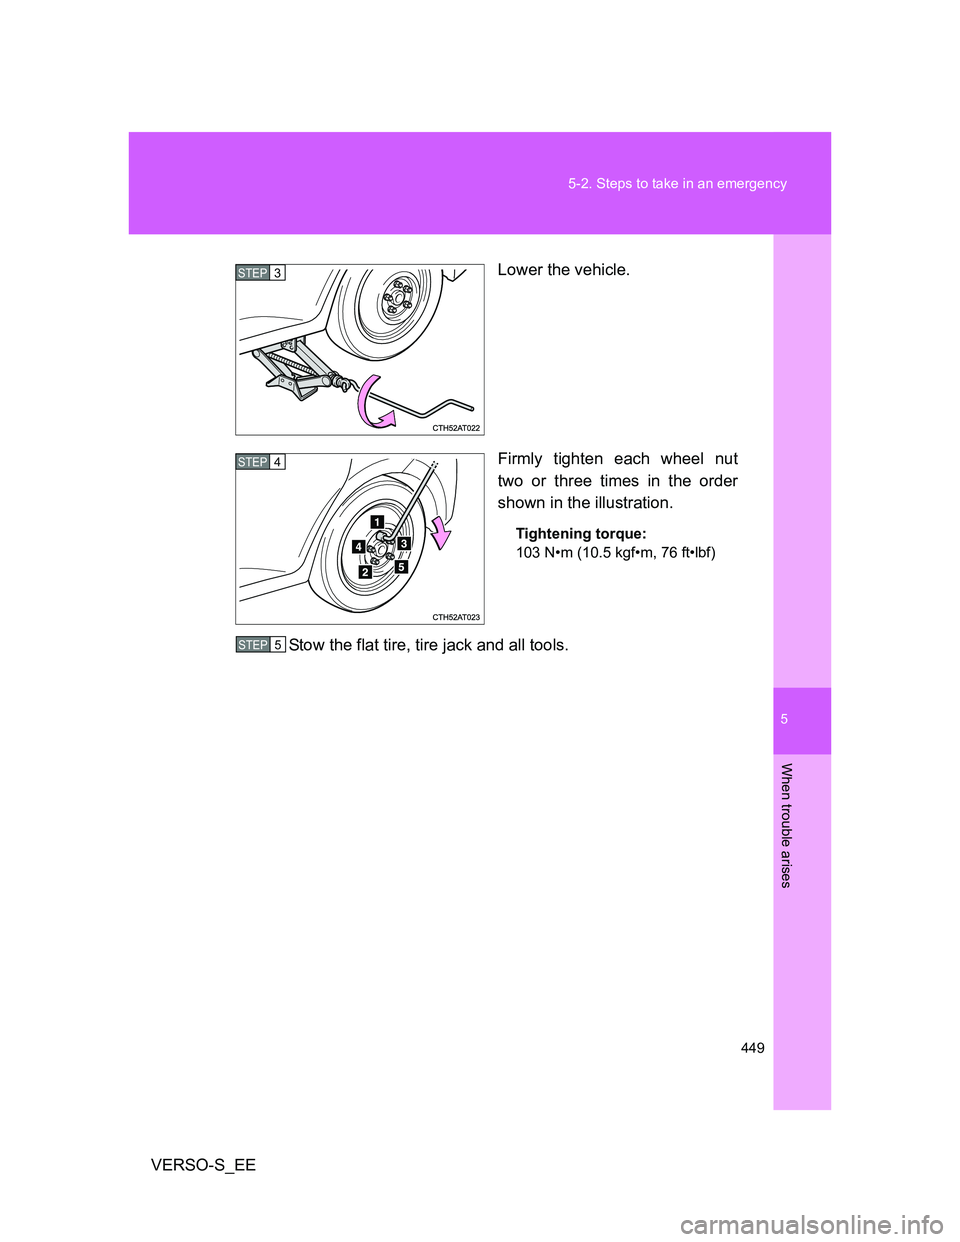
VERSO-S_EELower the vehicle.
Firmly tighten each wheel nut
two or three times in the order
shown in the illustration.
Tightening torque:
103 N•m (10.5 kgf•m, 76 ft•lbf)
Stow the flat tire, tire jack and all tools.
STEP3
STEP4
STEP5
Page 450 of 540
450 5-2. Steps to take in an emergency
VERSO-S_EE
The compact spare tire
The compact spare tire is identified by the label “TEMPORARY USE
ONLY” on the tire sidewall.
Use the compact spare tire temporarily, and only in an emergency.
Make sure to check the tire inflation pressure of the compact spare tire.
(P. 513)
If you have a flat front tire on a road covered with snow or ice
Install the compact spare tire on one of the rear wheels of the vehicle. Per-
form the following steps and fit tire chains to the front tires:
Replace a rear tire with the compact spare tire.
Replace the flat front tire with the tire removed from the rear of the
vehicle.
Fit tire chains to the front tires.
When reinstalling the wheel ornament (vehicles with steel wheels)
STEP1
STEP2
STEP3
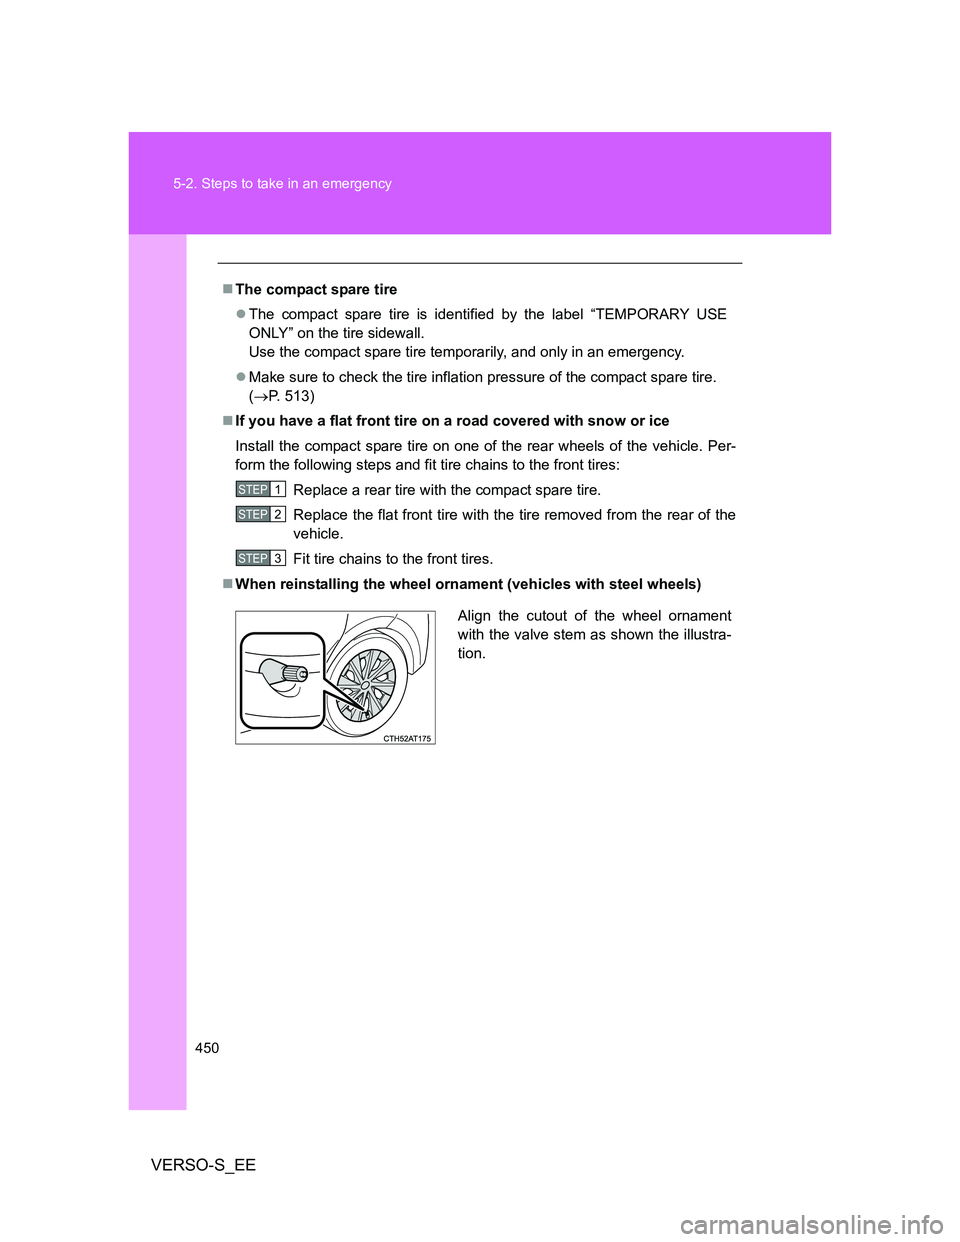
Align the cutout of the wheel ornament
with the valve stem as shown the illustra-
tion.
Trending: tire size, spare wheel, deactivate passenger airbag, alarm, washer fluid, oil, steering wheel adjustment

