ECO mode TOYOTA xB 2009 Accessories, Audio & Navigation (in English)
[x] Cancel search | Manufacturer: TOYOTA, Model Year: 2009, Model line: xB, Model: TOYOTA xB 2009Pages: 32, PDF Size: 0.33 MB
Page 12 of 32

128-7907A
12 of 32
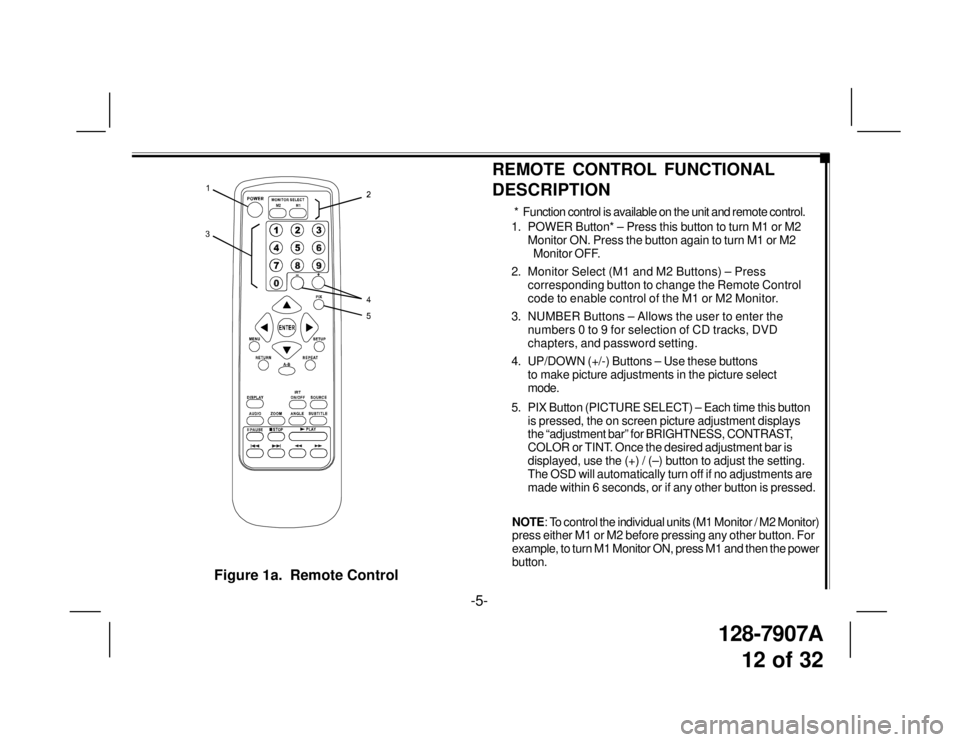
Figure 1a. Remote Control
-5-
1. POWER Button* – Press this button to turn M1 or M2
Monitor ON. Press the button again to turn M1 or M2
Monitor OFF.
2. Monitor Select (M1 and M2 Buttons) – Press
corresponding button to change the Remote Control
code to enable control of the M1 or M2 Monitor.
3. NUMBER Buttons – Allows the user to enter the
numbers 0 to 9 for selection of CD tracks, DVD
chapters, and password setting.
4. UP/DOWN (+/-) Buttons – Use these buttons
to make picture adjustments in the picture select
mode.
5. PIX Button (PICTURE SELECT) – Each time this button
is pressed, the on screen picture adjustment displays
the “adjustment bar” for BRIGHTNESS, CONTRAST,
COLOR or TINT. Once the desired adjustment bar is
displayed, use the (+) / (–) button to adjust the setting.
The OSD will automatically turn off if no adjustments are
made within 6 seconds, or if any other button is pressed.
REMOTE CONTROL FUNCTIONAL
DESCRIPTION
* Function control is available on the unit and remote control.
NOTE: To control the individual units (M1 Monitor / M2 Monitor)
press either M1 or M2 before pressing any other button. For
example, to turn M1 Monitor ON, press M1 and then the power
button.
Page 19 of 32

128-7907A
19 of 32
DVD Basics
To get the optimum use out of your DVD Headrest System,
please read this section completely.
Region Coding
Both the DVD player and DVDs are coded by region. These
region codes must match in order for the disc to play. If
the codes don’t match, the disc won’t play. This unit is set to
region 1 (USA) and will not play discs that have a region code
different from region 1. The unit will display “Wrong Region”.
Types of Discs Your System Will Play
• DVD disc* - DVD discs which contain video.
• Audio discs - Audio CDs contain musical or sound
content only.
• MP3 discs - A disc that contains audio files (for
example, a CD-R with downloaded MP3 files).
* This system is capable of playing most recordable DVD
formats. However, due to the variety of disc manufacturers and
software, playback cannot be guaranteed for every disc.
Disc Compatibility
Before you load a disc, make sure that it is compatible with the
player. Insert the disc with the label facing the driver.
NOTE:The following discs
cannot be played with this player:
• MiniDisc
• Laserdisc
• CD-I, CD-ROM, DVD-ROM, Super Audio CD (SACD),
DVD Audio
• BD (Blue-Ray Disc™) and HD (High Definition) DVD
discs
Loading and Playing Discs
To Load and Play a Disc
Press the Power button to turn the unit ON. Pivot the screen
forward, select DVD mode and insert the disc (label towards
driver) into the disc insertion slot.
Source Selection
M1 Sources:
DVD, AV1, AUX
DVD - Select DVD to view the internal (M1) DVD player.
AV1 - Select AV1 to view the source that is selected on the
M2 monitor.
AUX - Select AUX to view the source that is connected to the
AUX input* on the front of the unit.
M2 Sources:
DVD, AV1, AUX
DVD - Select DVD to view the internal (M2) DVD player.
AV1 - Select AV1 to view the source that is selected on the
M1 monitor.
AUX - Select AUX to view the source that is connected to the
AUX input* on the front of the unit.
*The AUX input requires the use of the supplied AV adapter
cable (1/8"-to-RCA). Plug the external source into the 3 RCA
jacks (red-to-red, white-to-white, yellow-to-yellow) and plug the
1/8" plug into the AUX jack on the front of the screen.
-12-