TOYOTA xB 2010 Accessories, Audio & Navigation (in English)
Manufacturer: TOYOTA, Model Year: 2010, Model line: xB, Model: TOYOTA xB 2010Pages: 284, PDF Size: 32.36 MB
Page 91 of 284
ADVANCED FUNCTIONS
90
V573_E
The XM® NavTraffic service allows the
navigation system to display traffic in-
formation on the map if it is available and
if your satellite radio tuner can receive
traffic information.
To receive the XM
® NavTraffic service, a
subscription to the XM® Satellite Radio
with NavTraffic is necessary.
The XM
® NavTraffic is available in the
contiguous 48 U.S. states and some
Canadian cities. For details about the
XM
® NavTraffic service coverage area,
refer to www.xmradio.com
(U.S.A.) or
www.xmradio.ca
(CANADA).
�z How to activate the XM® NavTraffic
service
To receive the XM
® NavTraffic ser-
vice, it is necessary to activate the
service. To activate the service, an
extra fee is required in addition to
subscription fees for the XM
® Satel-
lite Radio. For details about service
and activation, call XM
® Listener
Care Center at 1-800-967-2346
(U.S.A.) or 1-877-438-9677
(CANADA).
Customers should have their radio ID
ready; the radio ID can be found by se-
lecting “channel 000” on the radio. For
details, see “ �z Displaying the radio ID”
on page 196.
XM
® Satellite Radio has the responsibil-
ity for all fees and service, they are sub-
ject to change.
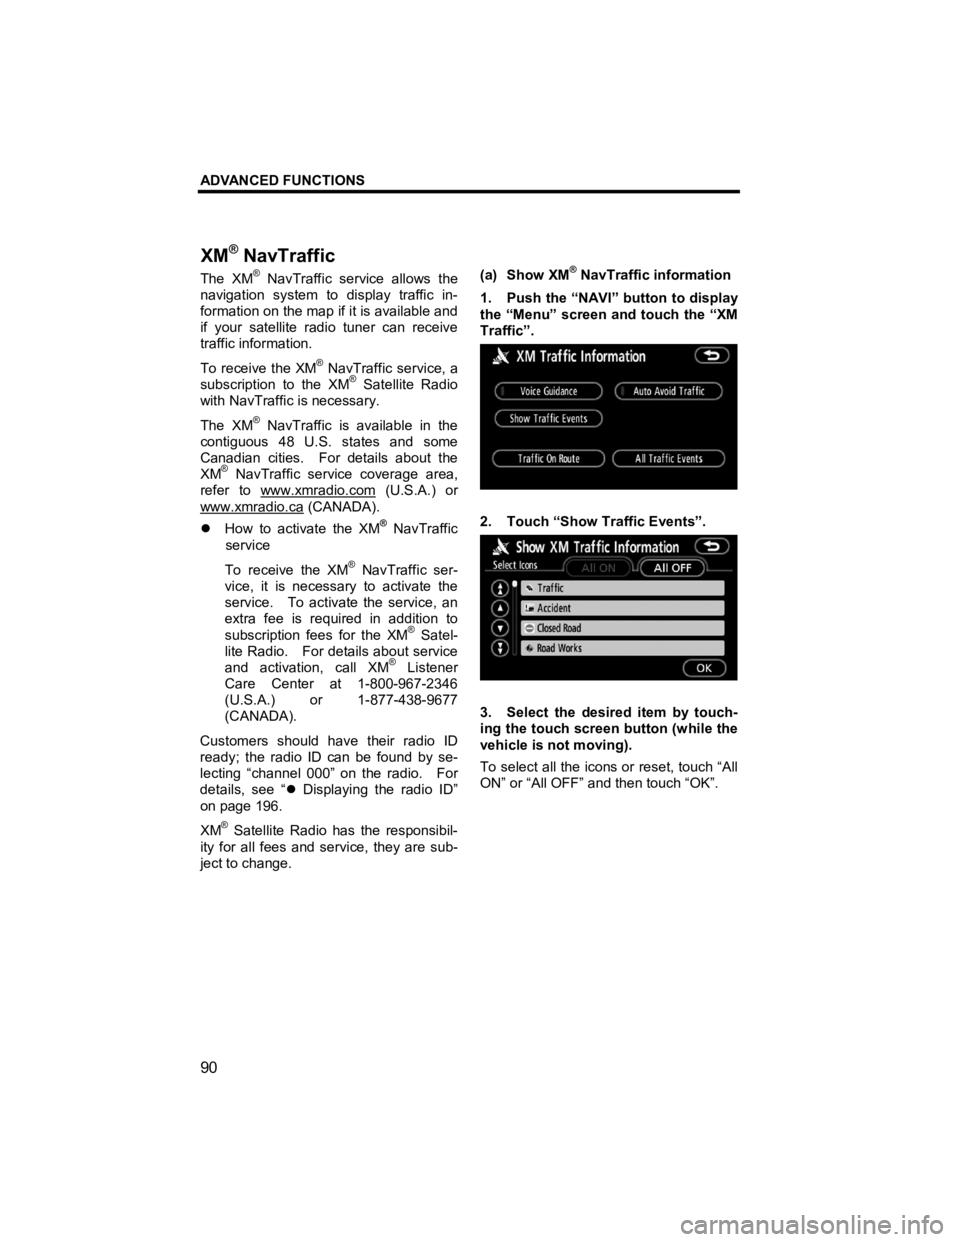
(a) Show XM
® NavTraffic information
1. Push the “NAVI” button to display
the “Menu” screen and touch the “XM
Traffic”.
2. Touch “Show Traffic Events”.
3. Select the desired item by touch-
ing the touch screen button (while the
vehicle is not moving).
To select all the icons or reset, touch “All
ON” or “All OFF” and then touch “OK”.
XM
® NavTraffic
Page 92 of 284
ADVANCED FUNCTIONS
91
V573_E
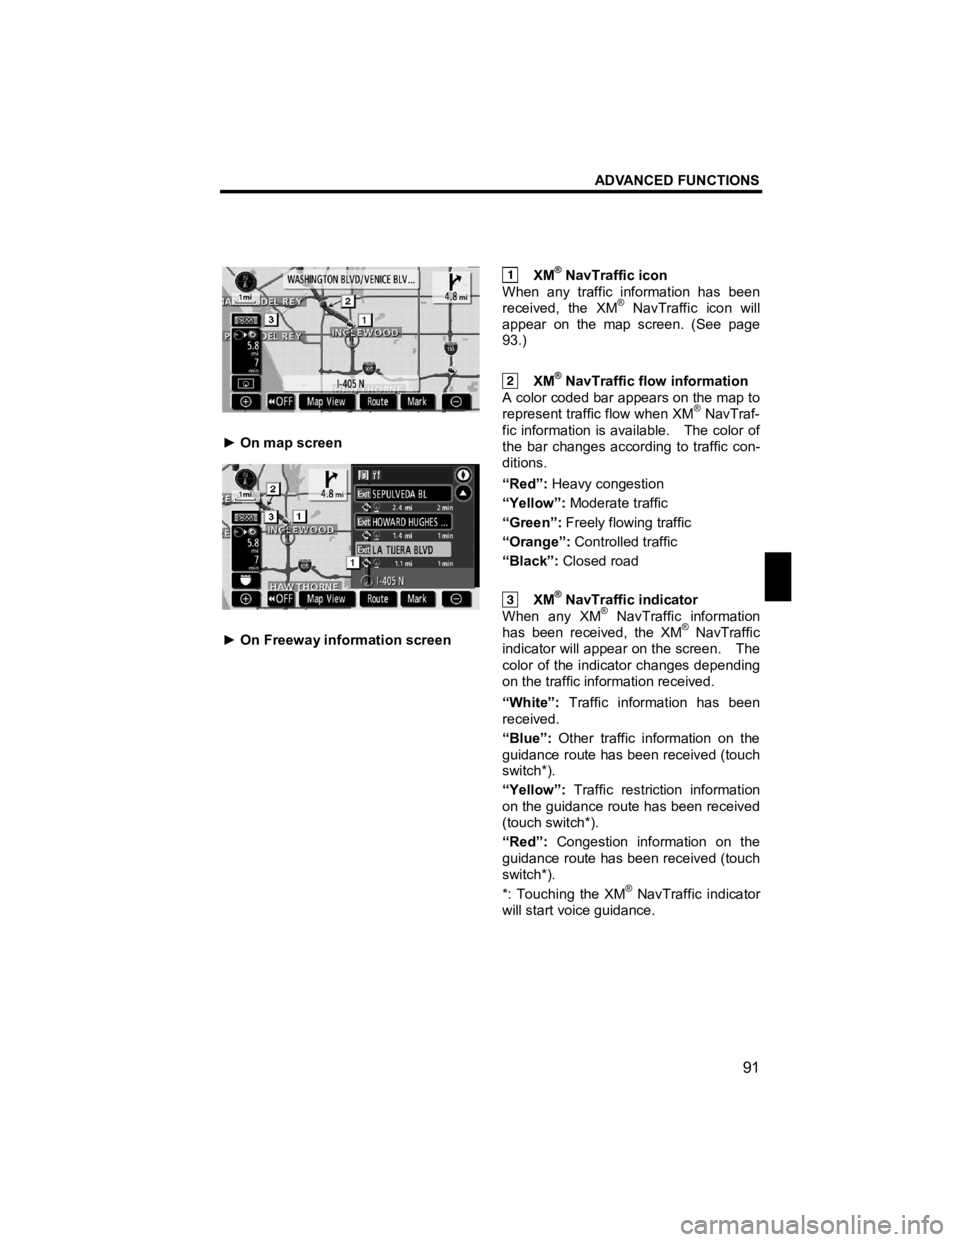
► On map screen
► On Freeway information screen
XM® NavTraffic icon
When any traffic information has been
received, the XM
® NavTraffic icon will
appear on the map screen. (See page
93.)
XM® NavTraffic flow information
A color coded bar appears on the map to
represent traffic flow when XM
® NavTraf-
fic information is available. The color of
the bar changes according to traffic con-
ditions.
“Red”: Heavy congestion
“Yellow”: Moderate traffic
“Green”: Freely flowing traffic
“Orange”: Controlled traffic
“Black”: Closed road
XM® NavTraffic indicator
When any XM® NavTraffic information
has been received, the XM® NavTraffic
indicator will appear on the screen. The
color of the indicator changes depending
on the traffic information received.
“White”: Traffic information has been
received.
“Blue”: Other traffic information on the
guidance route has been received (touch
switch*).
“Yellow”: Traffic restriction information
on the guidance route has been received
(touch switch*).
“Red”: Congestion information on the
guidance route has been received (touch
switch*).
*: Touching the XM
® NavTraffic indicator
will start voice guidance.
Page 93 of 284
ADVANCED FUNCTIONS
92
V573_E
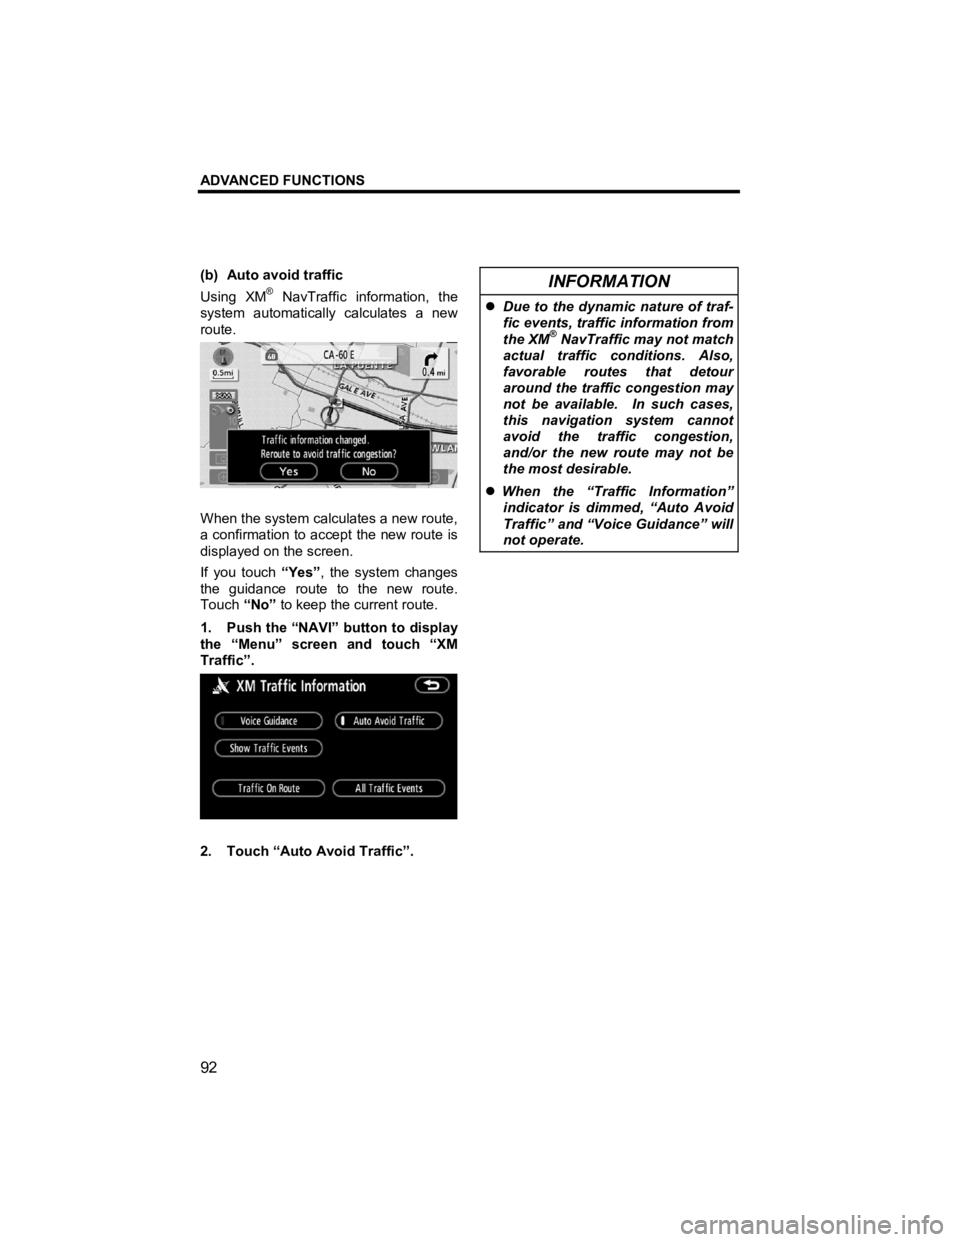
(b) Auto avoid traffic
Using XM® NavTraffic information, the
system automatically calculates a new
route.
When the system calculates a new route,
a confirmation to accept the new route is
displayed on the screen.
If you touch “Yes”, the system changes
the guidance route to the new route.
Touch “No” to keep the current route.
1. Push the “NAVI” button to display
the “Menu” screen and touch “XM
Traffic”.
2. Touch “Auto Avoid Traffic”.
INFORMATION
�z Due to the dynamic nature of traf-
fic events, traffic information from
the XM
® NavTraffic may not match
actual traffic conditions. Also,
favorable routes that detour
around the traffic congestion may
not be available. In such cases,
this navigation system cannot
avoid the traffic congestion,
and/or the new route may not be
the most desirable.
�z When the “Traffic Information”
indicator is dimmed, “Auto Avoid
Traffic” and “Voice Guidance” will
not operate.
Page 94 of 284
ADVANCED FUNCTIONS
93
V573_E
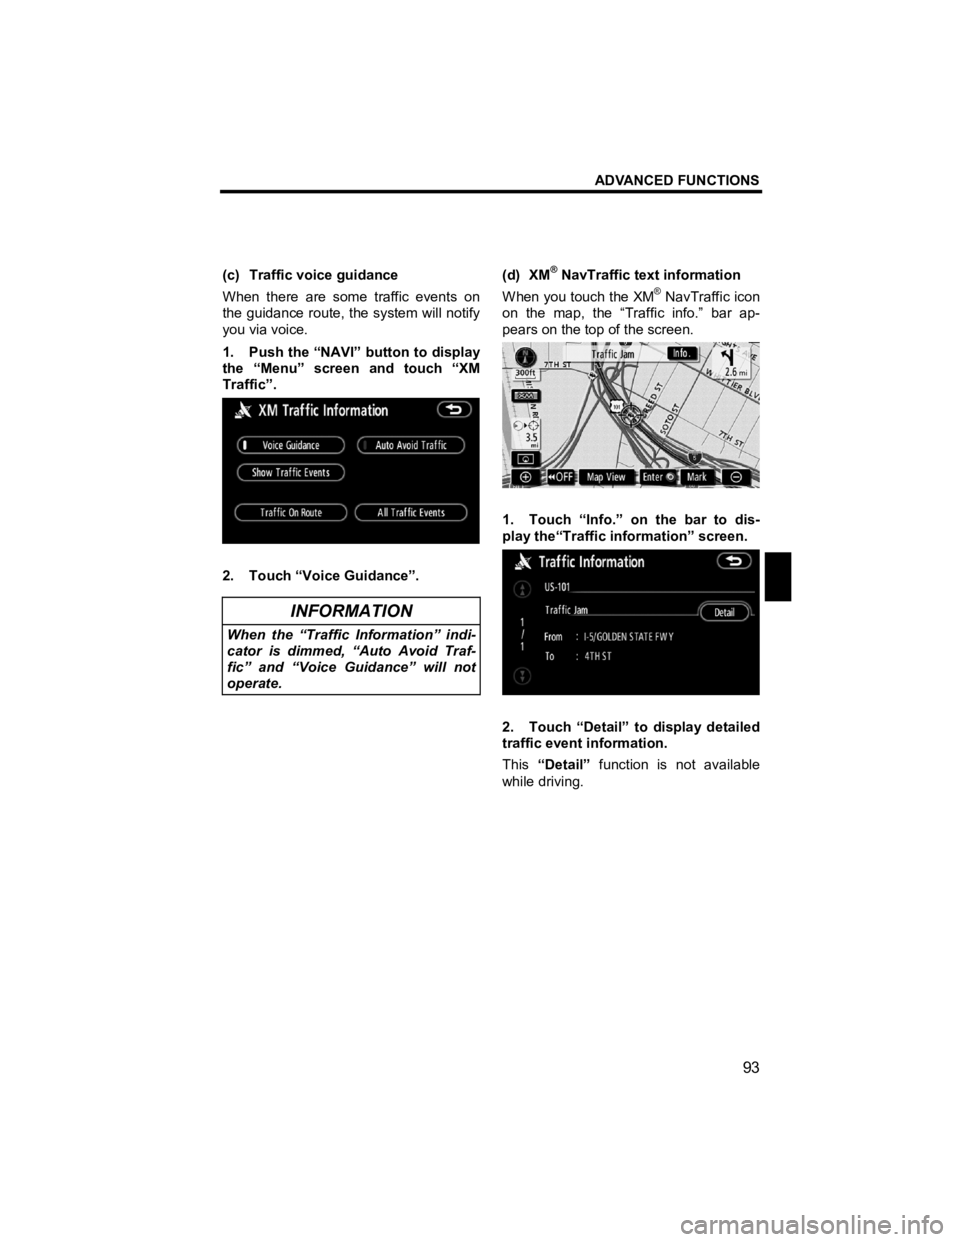
(c) Traffic voice guidance
When there are some traffic events on
the guidance route, the system will notify
you via voice.
1. Push the “NAVI” button to display
the “Menu” screen and touch “XM
Traffic”.
2. Touch “Voice Guidance”.
INFORMATION
When the “Traffic Information” indi-
cator is dimmed, “Auto Avoid Traf-
fic” and “Voice Guidance” will not
operate.
(d) XM
® NavTraffic text information
When you touch the XM® NavTraffic icon
on the map, the “Traffic info.” bar ap-
pears on the top of the screen.
1. Touch “Info.” on the bar to dis-
play the“Traffic information” screen.
2. Touch “Detail” to display detailed
traffic event information.
This “Detail” function is not available
while driving.
Page 95 of 284
ADVANCED FUNCTIONS
94
V573_E
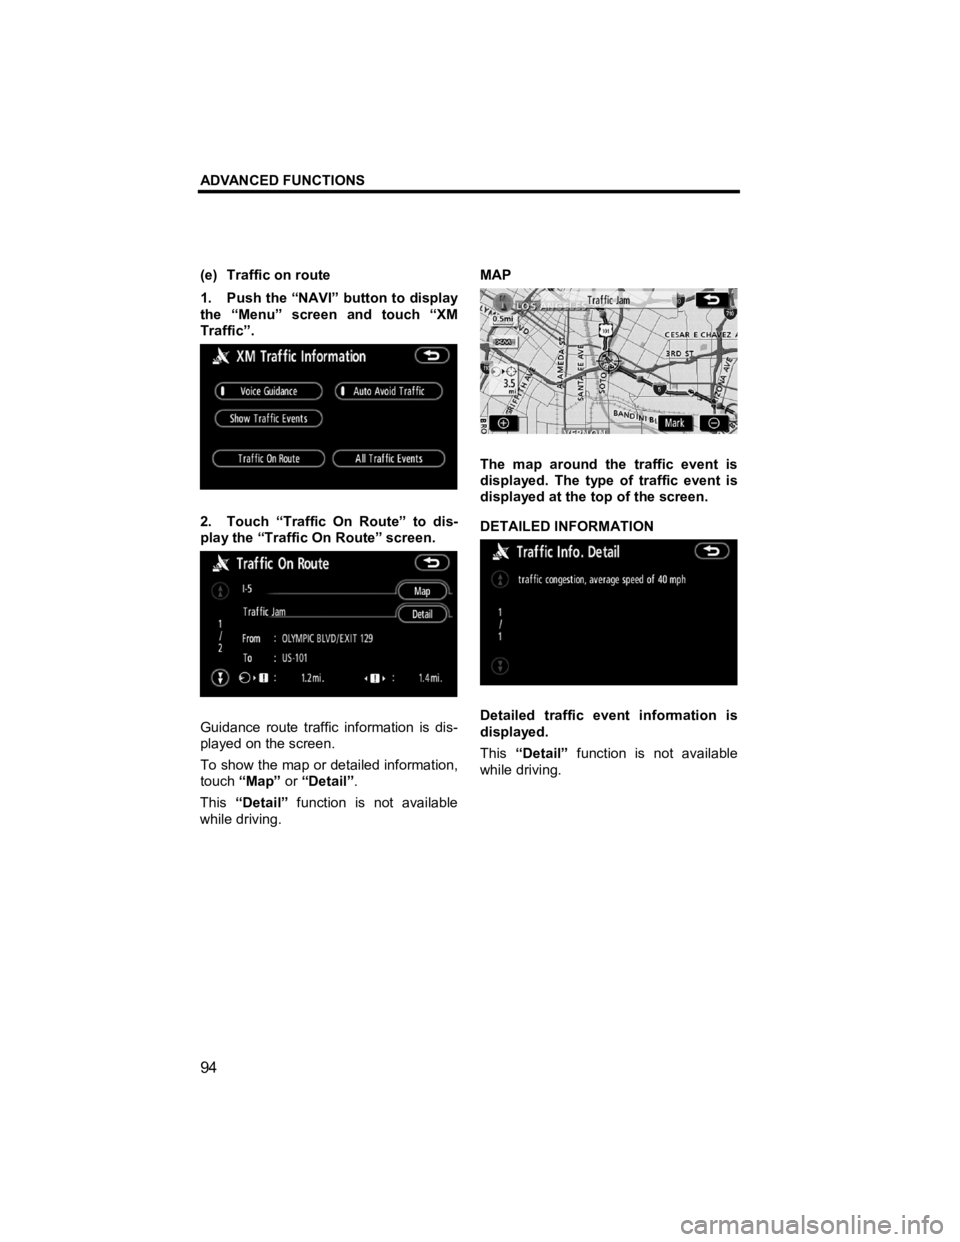
(e) Traffic on route
1. Push the “NAVI” button to display
the “Menu” screen and touch “XM
Traffic”.
2. Touch “Traffic On Route” to dis-
play the “Traffic On Route” screen.
Guidance route traffic information is dis-
played on the screen.
To show the map or detailed information,
touch “Map” or “Detail” .
This “Detail” function is not available
while driving.
MAP
The map around the traffic event is
displayed. The type of traffic event is
displayed at the top of the screen.
DETAILED INFORMATION
Detailed traffic event information is
displayed.
This
“Detail” function is not available
while driving.
Page 96 of 284
ADVANCED FUNCTIONS
95
V573_E
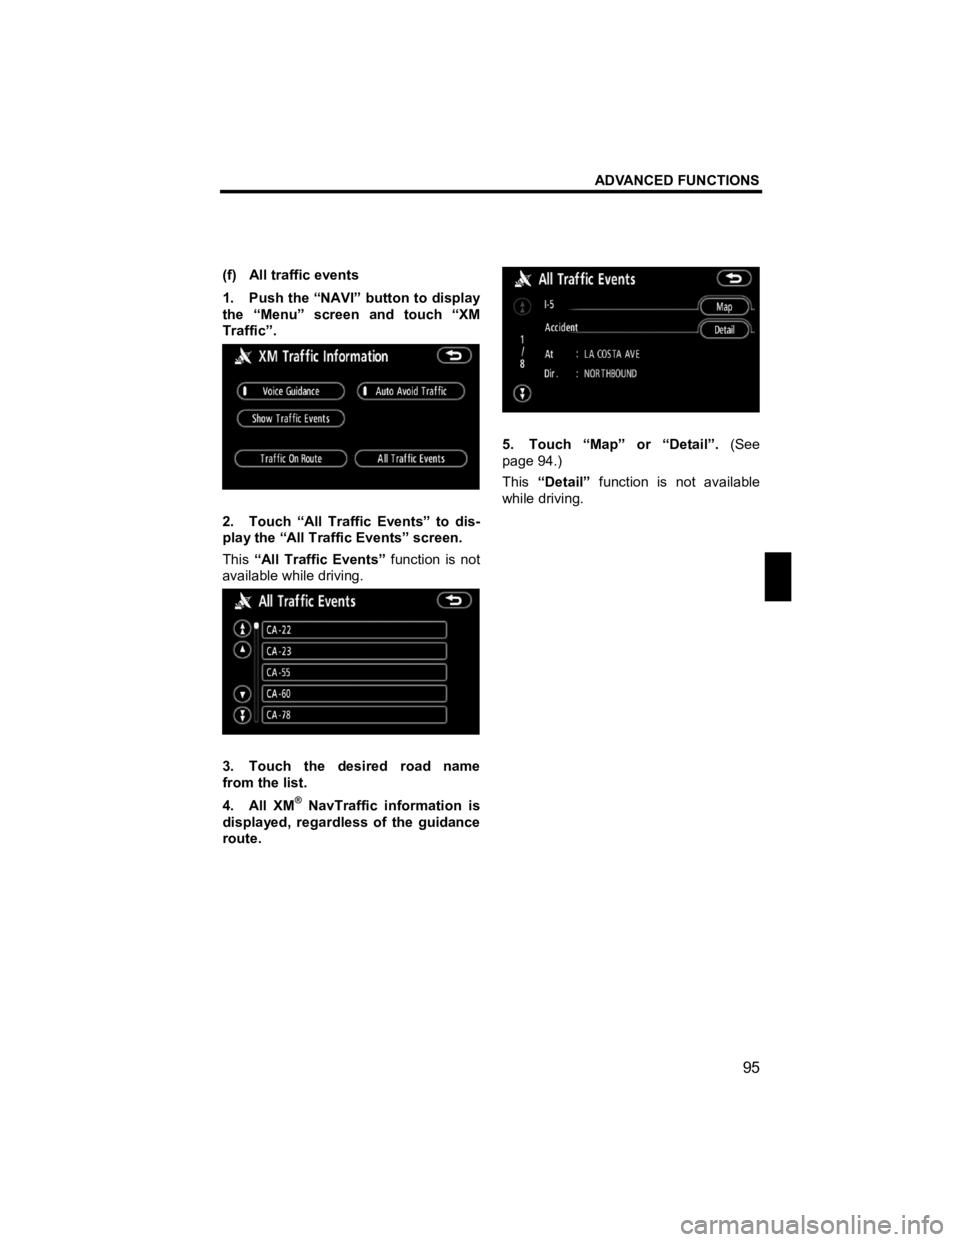
(f) All traffic events
1. Push the “NAVI” button to display
the “Menu” screen and touch “XM
Traffic”.
2. Touch “All Traffic Events” to dis-
play the “All Traffic Events” screen.
This “All Traffic Events” function is not
available while driving.
3. Touch the desired road name
from the list.
4. All XM
® NavTraffic information is
displayed, regardless of the guidance
route.
5. Touch “Map” or “Detail”. (See
page 94.)
This “Detail” function is not available
while driving.
Page 97 of 284
ADVANCED FUNCTIONS
96
V573_E
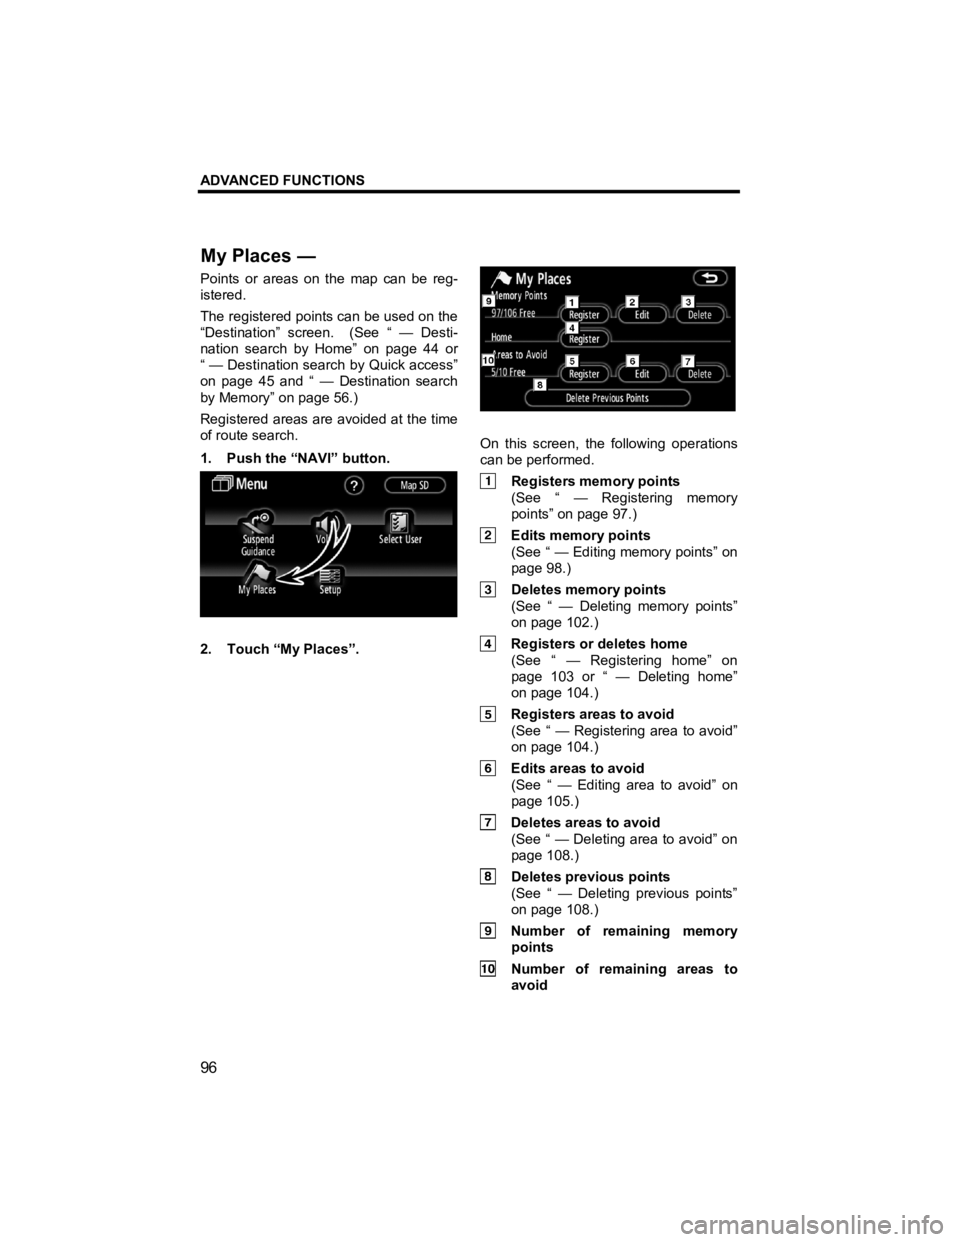
Points or areas on the map can be reg-
istered.
The registered points can be used on the
“Destination” screen. (See “ — Desti-
nation search by Home” on page 44 or
“ — Destination search by Quick access”
on page 45 and “ — Destination search
by Memory” on page 56.)
Registered areas are avoided at the time
of route search.
1. Push the “NAVI” button.
2. Touch “My Places”.
On this screen, the following operations
can be performed.
Registers memory points (See “ — Registering memory
points” on page 97.)
Edits memory points (See “ — Editing memory points” on
page 98.)
Deletes memory points (See “ — Deleting memory points”
on page 102.)
Registers or deletes home (See “ — Registering home” on
page 103 or “ — Deleting home”
on page 104.)
Registers areas to avoid (See “ — Registering area to avoid”
on page 104.)
Edits areas to avoid (See “ — Editing area to avoid” on
page 105.)
Deletes areas to avoid (See “ — Deleting area to avoid” on
page 108.)
Deletes previous points (See “ — Deleting previous points”
on page 108.)
Number of remaining memory points
Number of remaining areas to avoid
M
y Places —
Page 98 of 284
ADVANCED FUNCTIONS
97
V573_E
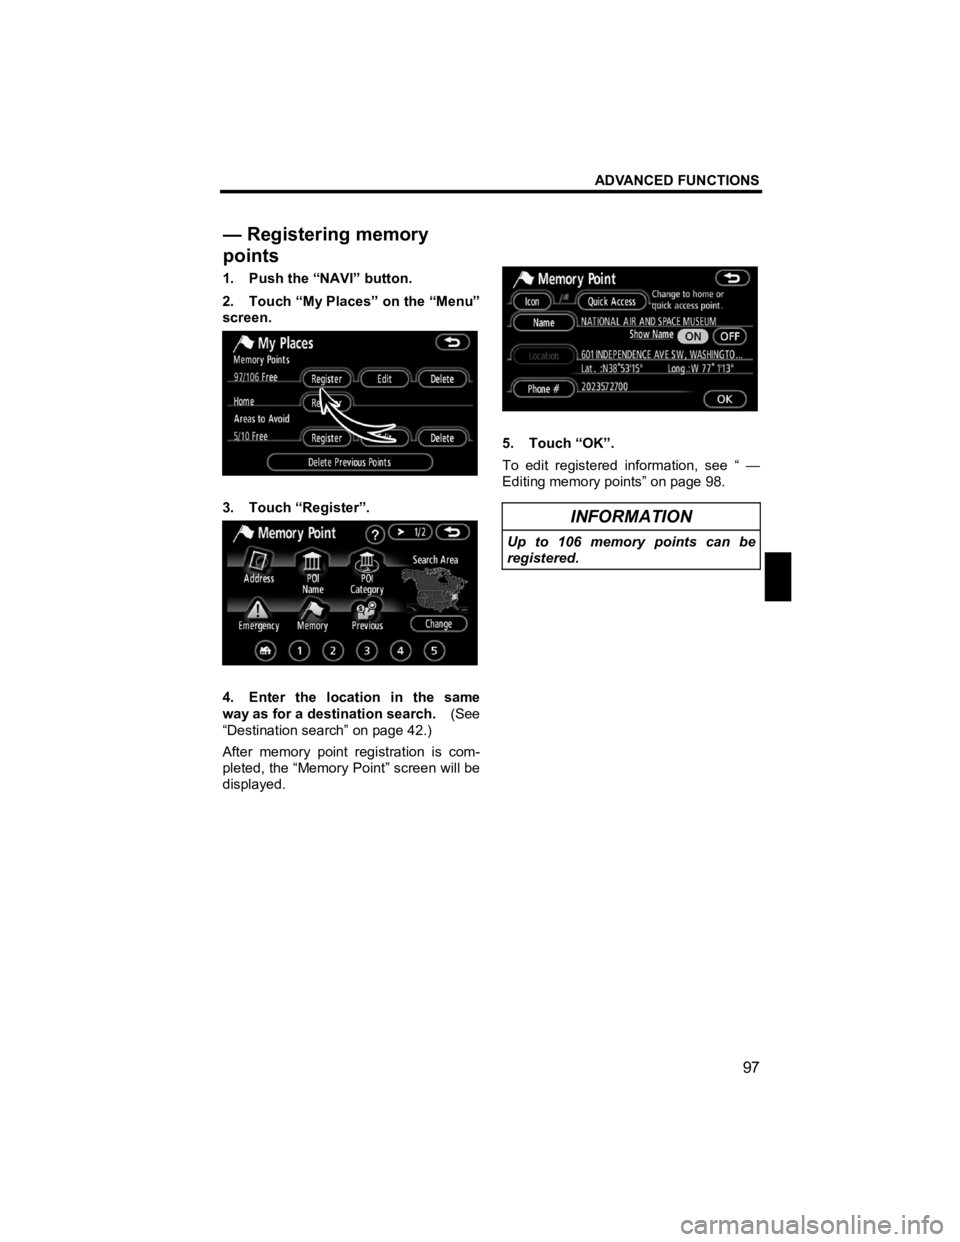
1. Push the “NAVI” button.
2. Touch “My Places” on the “Menu”
screen.
3. Touch “Register”.
4. Enter the location in the same
way as for a destination search. (See
“Destination search” on page 42.)
After memory point registration is com-
pleted, the “Memory Point” screen will be
displayed.
5. Touch “OK”.
To edit registered information, see “ —
Editing memory points” on page 98.
INFORMATION
Up to 106 memory points can be
registered.
— Registering memory
points
Page 99 of 284
ADVANCED FUNCTIONS
98
V573_E
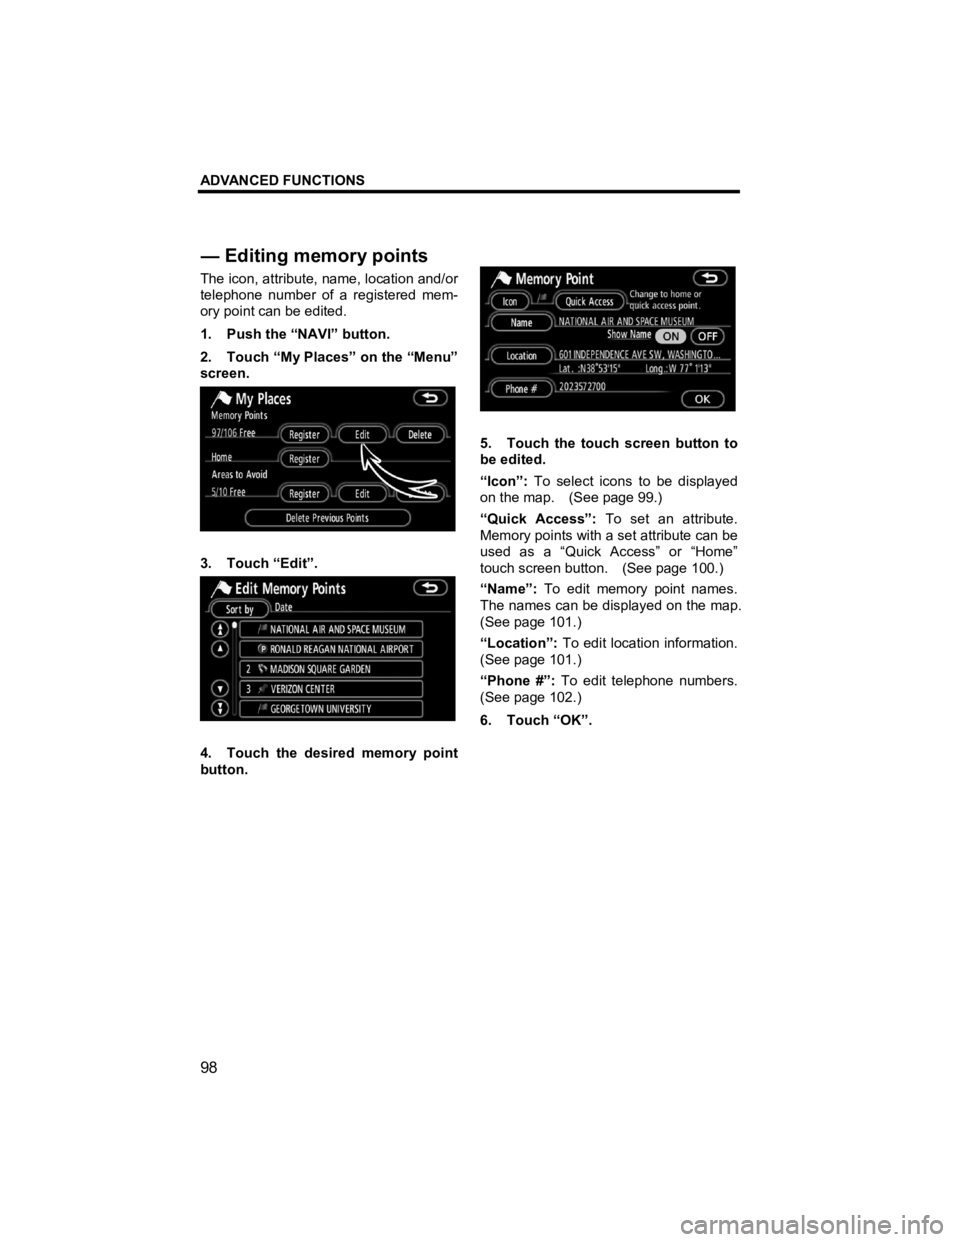
The icon, attribute, name, location and/or
telephone number of a registered mem-
ory point can be edited.
1. Push the “NAVI” button.
2. Touch “My Places” on the “Menu”
screen.
3. Touch “Edit”.
4. Touch the desired memory point
button.
5. Touch the touch screen button to
be edited.
“Icon”: To select icons to be displayed
on the map. (See page 99.)
“Quick Access”: To set an attribute.
Memory points with a set attribute can be
used as a “Quick Access” or “Home”
touch screen button. (See page 100.)
“Name”: To edit memory point names.
The names can be displayed on the map.
(See page 101.)
“Location”: To edit location information.
(See page 101.)
“Phone #”: To edit telephone numbers.
(See page 102.)
6. Touch “OK”.
— Editin
g memory points
Page 100 of 284
ADVANCED FUNCTIONS
99
V573_E
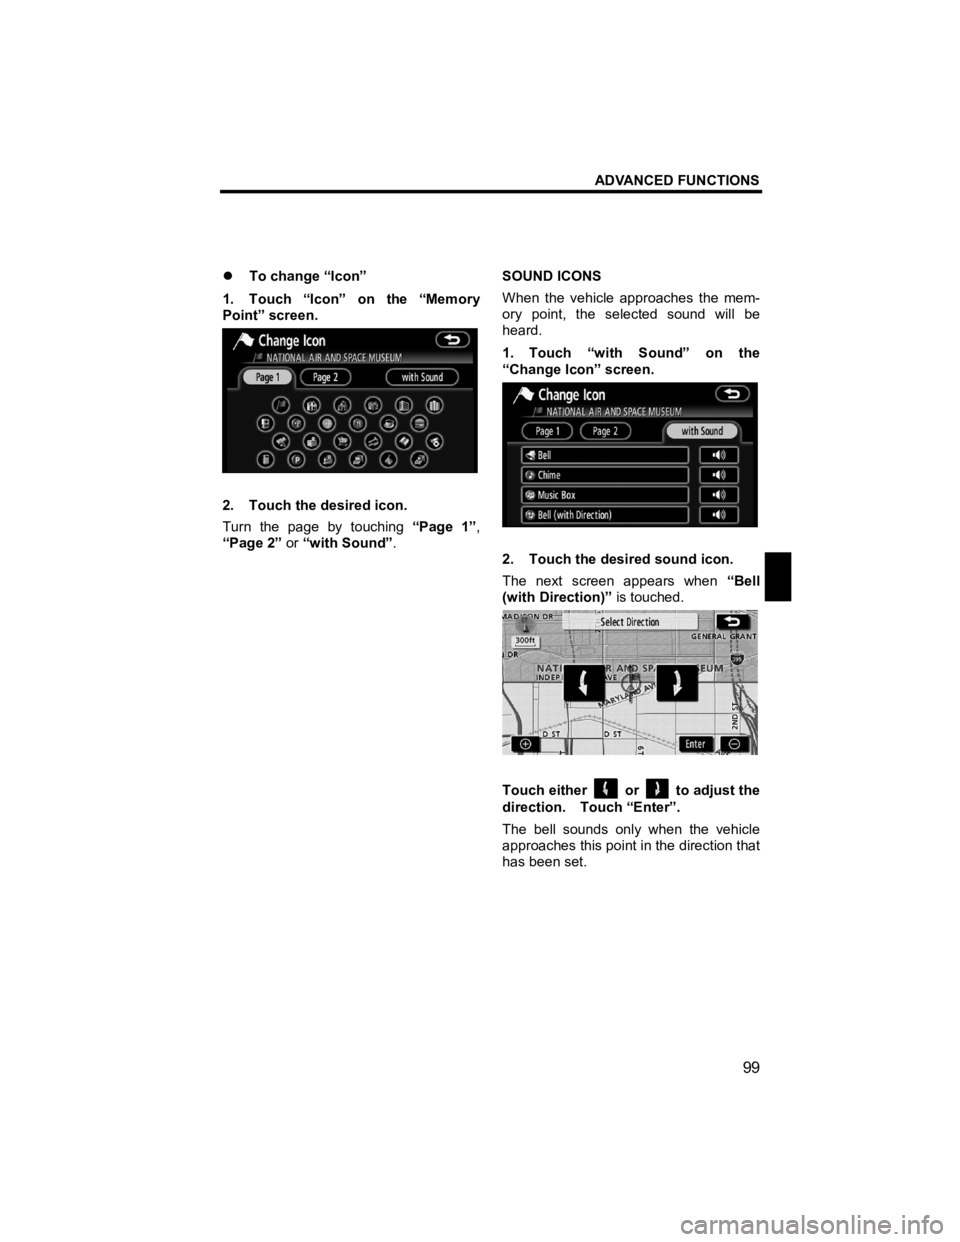
�z To change “Icon”
1. Touch “Icon” on the “Memory
Point” screen.
2. Touch the desired icon.
Turn the page by touching “Page 1”,
“Page 2” or “with Sound” . SOUND ICONS
When the vehicle approaches the mem-
ory point, the selected sound will be
heard.
1. Touch “with Sound” on the
“Change Icon” screen.
2. Touch the desired sound icon.
The next screen appears when
“Bell
(with Direction)” is touched.
Touch either or to adjust the
direction. Touch “Enter”.
The bell sounds only when the vehicle
approaches this point in the direction that
has been set.