TOYOTA YARIS 2021 Owners Manual
Manufacturer: TOYOTA, Model Year: 2021, Model line: YARIS, Model: TOYOTA YARIS 2021Pages: 568, PDF Size: 110.34 MB
Page 351 of 568
351
6
YARIS(HB) Owner's Manual_Europe_MK0001_en
6-3. Do-it-yourself maintenance
Maintenance and care
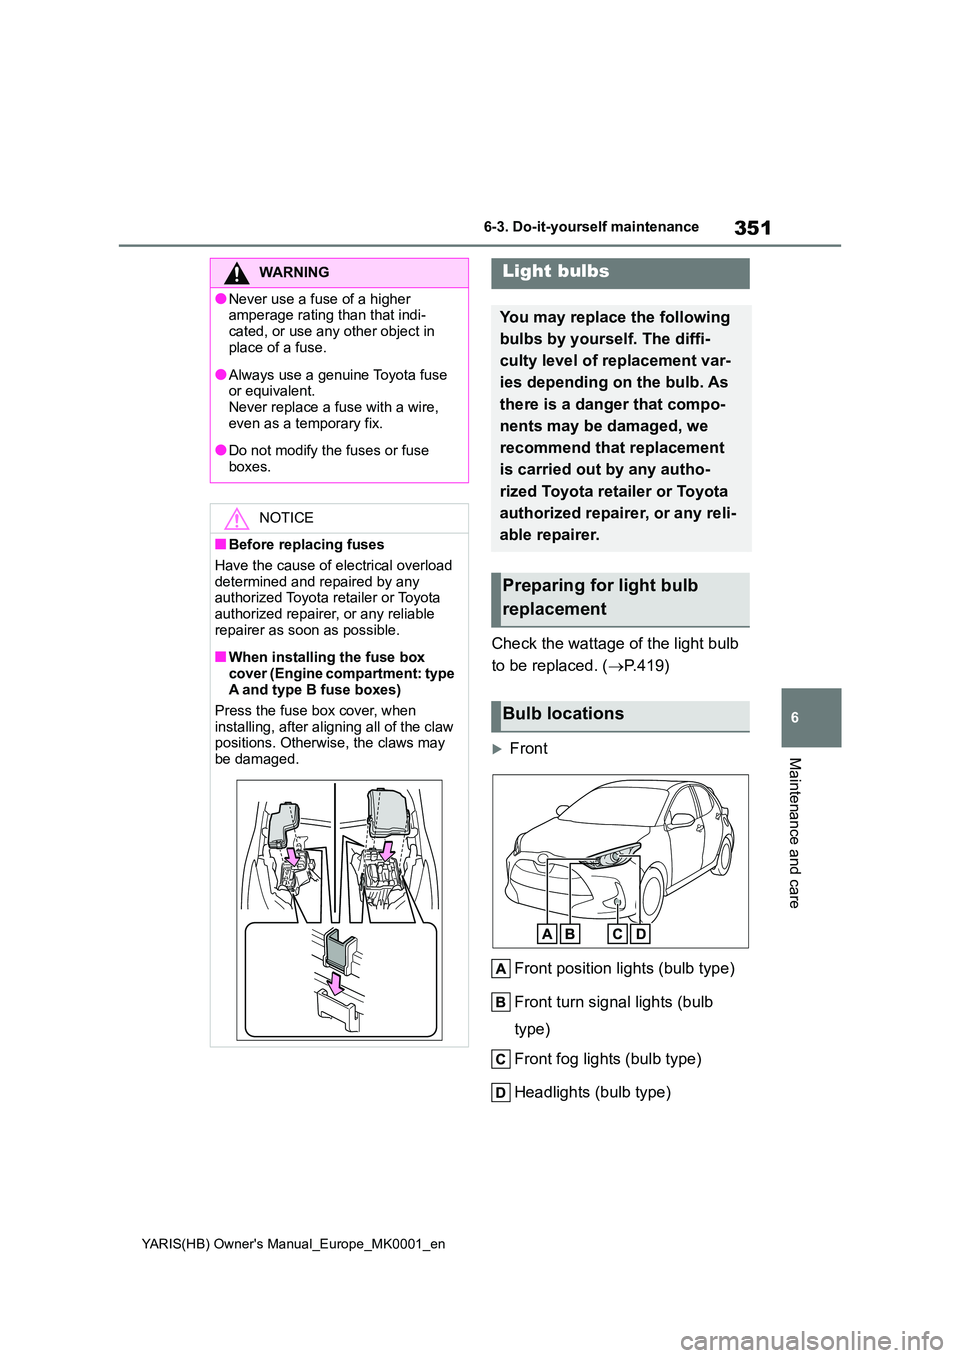
Check the wattage of the light bulb
to be replaced. ( →P.419)
Front
Front position lights (bulb type)
Front turn signal lights (bulb
type)
Front fog lights (bulb type)
Headlights (bulb type)
WARNING
●Never use a fuse of a higher amperage rating than that indi-
cated, or use any other object in place of a fuse.
●Always use a genuine Toyota fuse or equivalent.Never replace a fuse with a wire,
even as a temporary fix.
●Do not modify the fuses or fuse
boxes.
NOTICE
■Before replacing fuses
Have the cause of electrical overload
determined and repaired by any authorized Toyota retailer or Toyota authorized repairer, or any reliable
repairer as soon as possible.
■When installing the fuse box
cover (Engine compartment: type A and type B fuse boxes)
Press the fuse box cover, when
installing, after aligning all of the claw positions. Otherwise, the claws may
be damaged.
Light bulbs
You may replace the following
bulbs by yourself. The diffi-
culty level of replacement var-
ies depending on the bulb. As
there is a danger that compo-
nents may be damaged, we
recommend that replacement
is carried out by any autho-
rized Toyota retailer or Toyota
authorized repairer, or any reli-
able repairer.
Preparing for light bulb
replacement
Bulb locations
Page 352 of 568
352
YARIS(HB) Owner's Manual_Europe_MK0001_en
6-3. Do-it-yourself maintenance
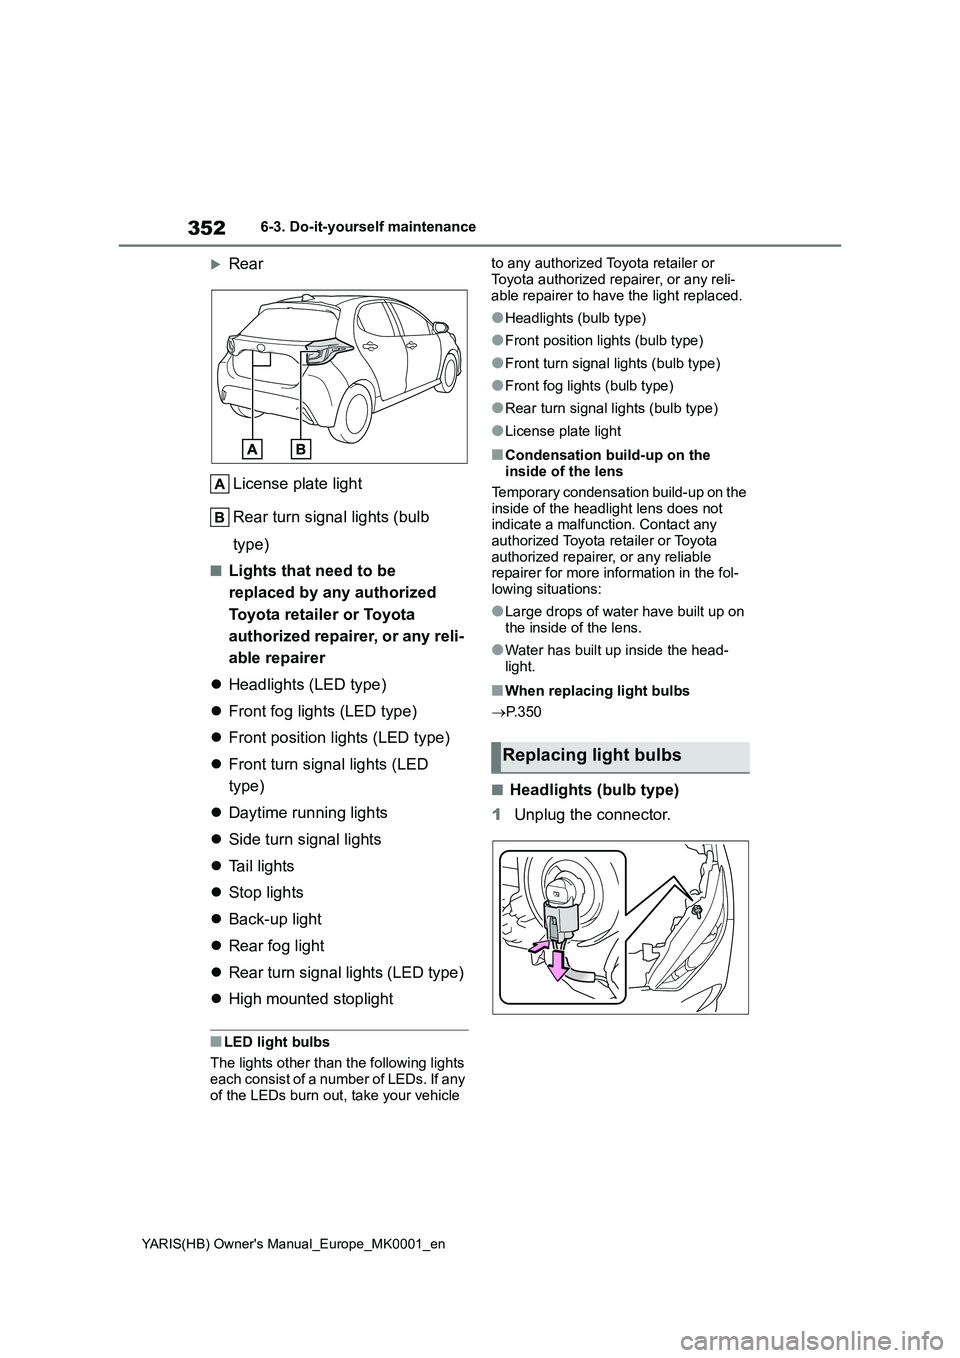
Rear
License plate light
Rear turn signal lights (bulb
type)
■Lights that need to be
replaced by any authorized
Toyota retailer or Toyota
authorized repairer, or any reli-
able repairer
�zHeadlights (LED type)
�zFront fog lights (LED type)
�zFront position lights (LED type)
�zFront turn signal lights (LED
type)
�zDaytime running lights
�zSide turn signal lights
�zTail lights
�zStop lights
�zBack-up light
�zRear fog light
�zRear turn signal lights (LED type)
�zHigh mounted stoplight
■LED light bulbs
The lights other than the following lights
each consist of a number of LEDs. If any
of the LEDs burn out, take your vehicle to any authorized Toyota retailer or
Toyota authorized repairer, or any reli-
able repairer to have the light replaced.
●Headlights (bulb type)
●Front position lights (bulb type)
●Front turn signal lights (bulb type)
●Front fog lights (bulb type)
●Rear turn signal lights (bulb type)
●License plate light
■Condensation build-up on the
inside of the lens
Temporary condensation build-up on the
inside of the headlight lens does not
indicate a malfunction. Contact any
authorized Toyota retailer or Toyota
authorized repairer, or any reliable
repairer for more information in the fol-
lowing situations:
●Large drops of water have built up on
the inside of the lens.
●Water has built up inside the head-
light.
■When replacing light bulbs
→P. 3 5 0
■Headlights (bulb type)
1Unplug the connector.
Replacing light bulbs
Page 353 of 568
353
6
YARIS(HB) Owner's Manual_Europe_MK0001_en
6-3. Do-it-yourself maintenance
Maintenance and care
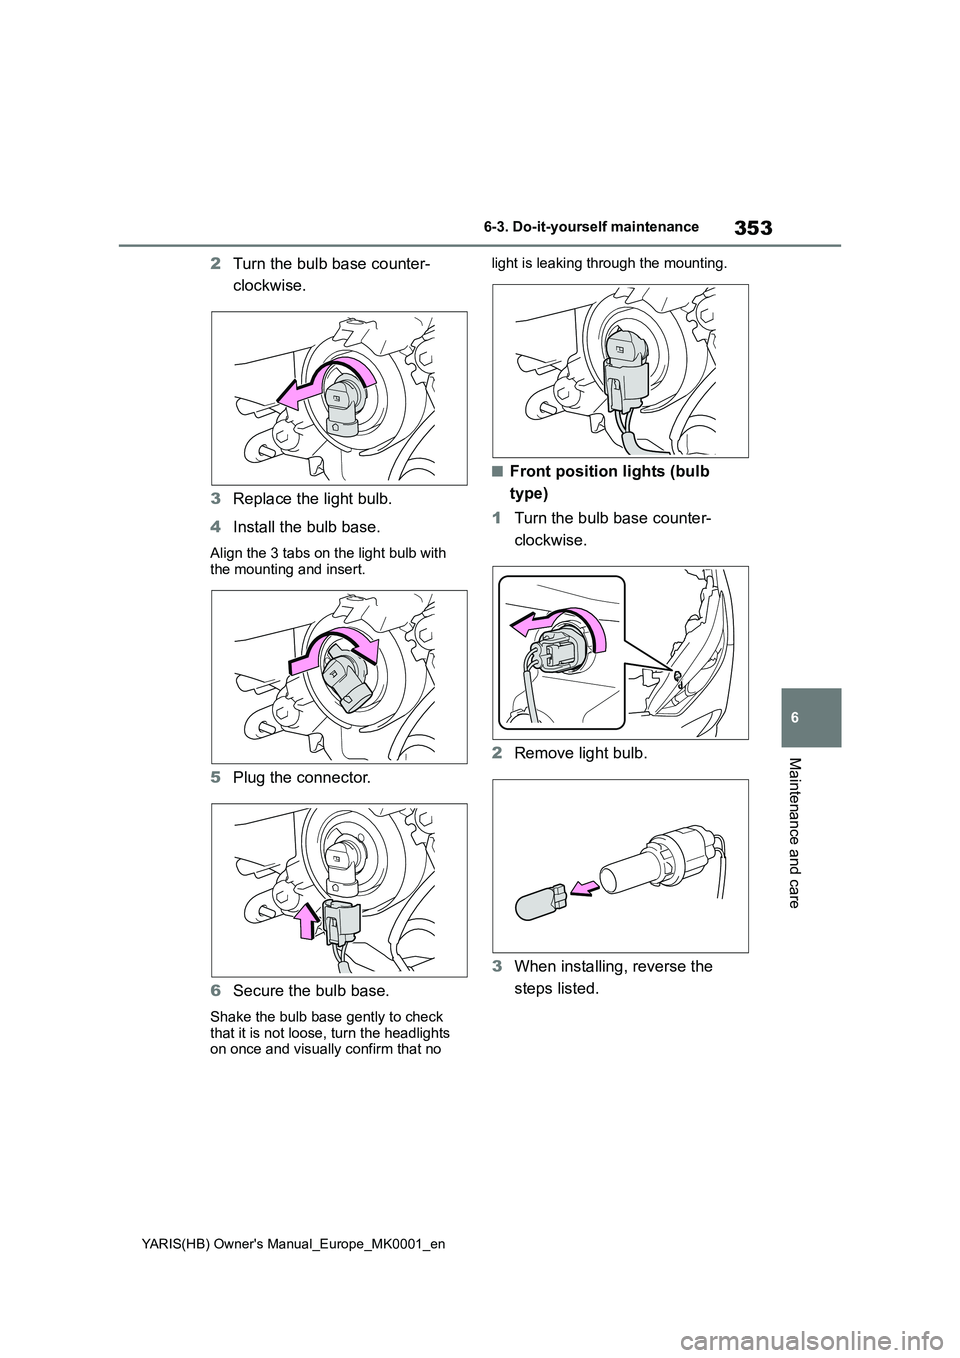
2Turn the bulb base counter-
clockwise.
3 Replace the light bulb.
4 Install the bulb base.
Align the 3 tabs on the light bulb with the mounting and insert.
5 Plug the connector.
6 Secure the bulb base.
Shake the bulb base gently to check
that it is not loose, turn the headlights on once and visually confirm that no
light is leaking through the mounting.
■Front position lights (bulb
type)
1 Turn the bulb base counter-
clockwise.
2 Remove light bulb.
3 When installing, reverse the
steps listed.
Page 354 of 568
354
YARIS(HB) Owner's Manual_Europe_MK0001_en
6-3. Do-it-yourself maintenance
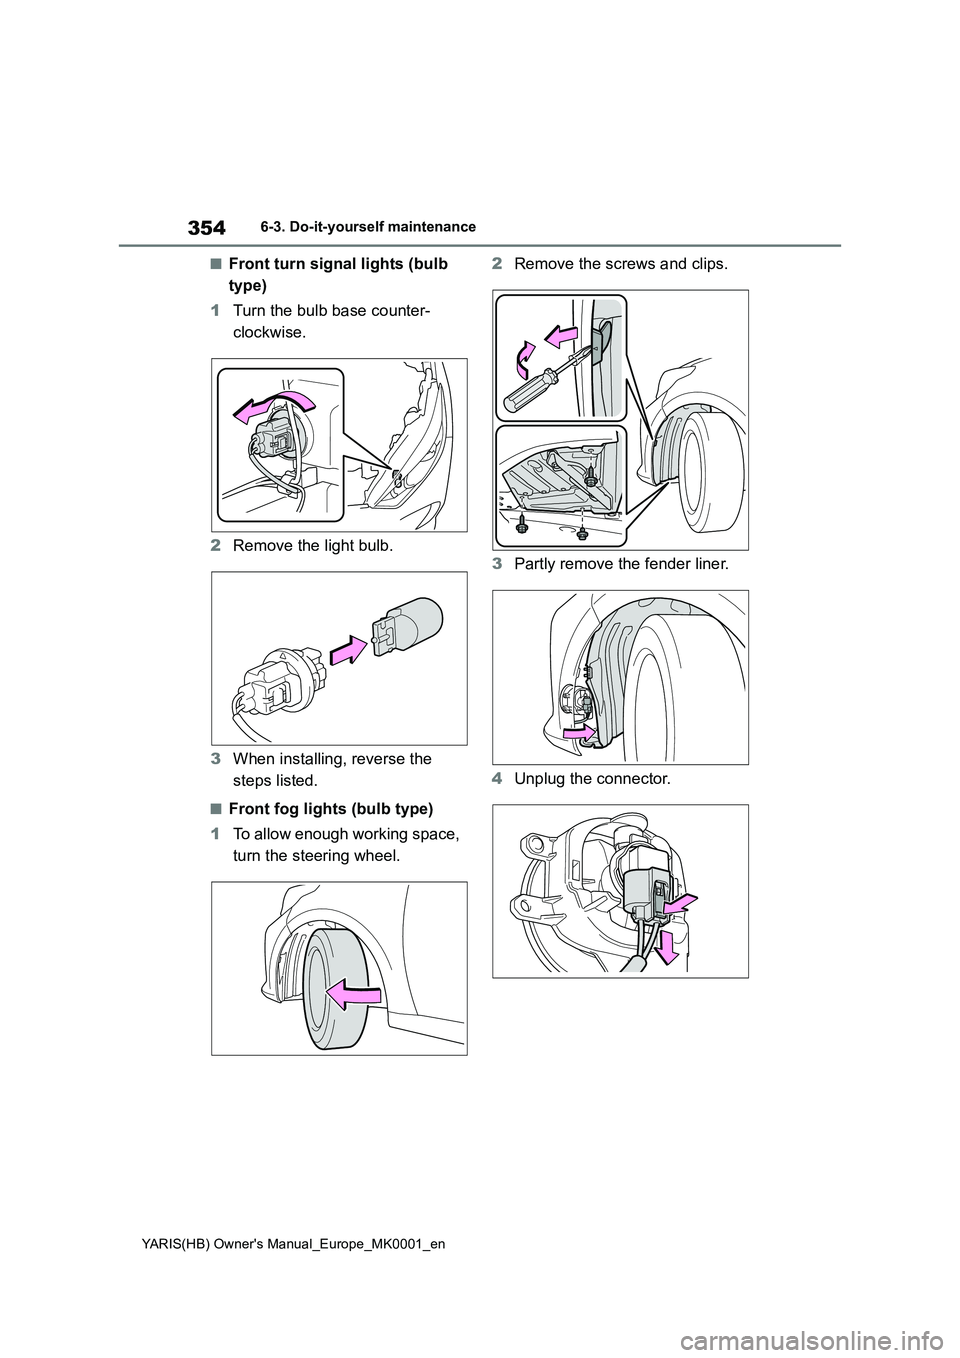
■Front turn signal lights (bulb
type)
1 Turn the bulb base counter-
clockwise.
2 Remove the light bulb.
3 When installing, reverse the
steps listed.
■Front fog lights (bulb type)
1 To allow enough working space,
turn the steering wheel.
2 Remove the screws and clips.
3 Partly remove the fender liner.
4 Unplug the connector.
Page 355 of 568
355
6
YARIS(HB) Owner's Manual_Europe_MK0001_en
6-3. Do-it-yourself maintenance
Maintenance and care
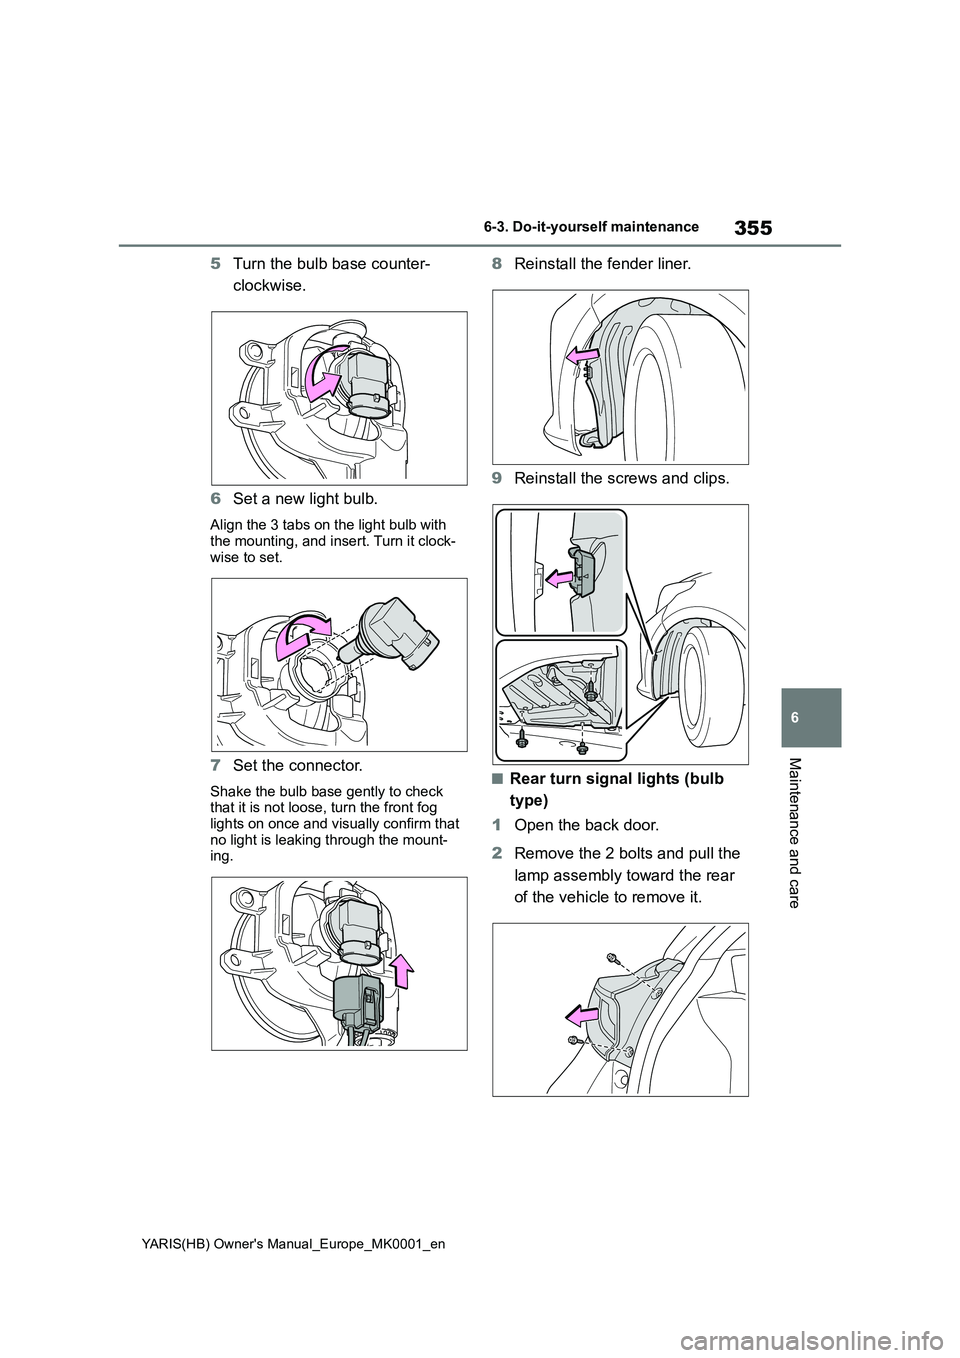
5Turn the bulb base counter-
clockwise.
6 Set a new light bulb.
Align the 3 tabs on the light bulb with the mounting, and insert. Turn it clock-
wise to set.
7 Set the connector.
Shake the bulb base gently to check that it is not loose, turn the front fog
lights on once and visually confirm that no light is leaking through the mount-ing.
8 Reinstall the fender liner.
9 Reinstall the screws and clips.
■Rear turn signal lights (bulb
type)
1 Open the back door.
2 Remove the 2 bolts and pull the
lamp assembly toward the rear
of the vehicle to remove it.
Page 356 of 568
356
YARIS(HB) Owner's Manual_Europe_MK0001_en
6-3. Do-it-yourself maintenance
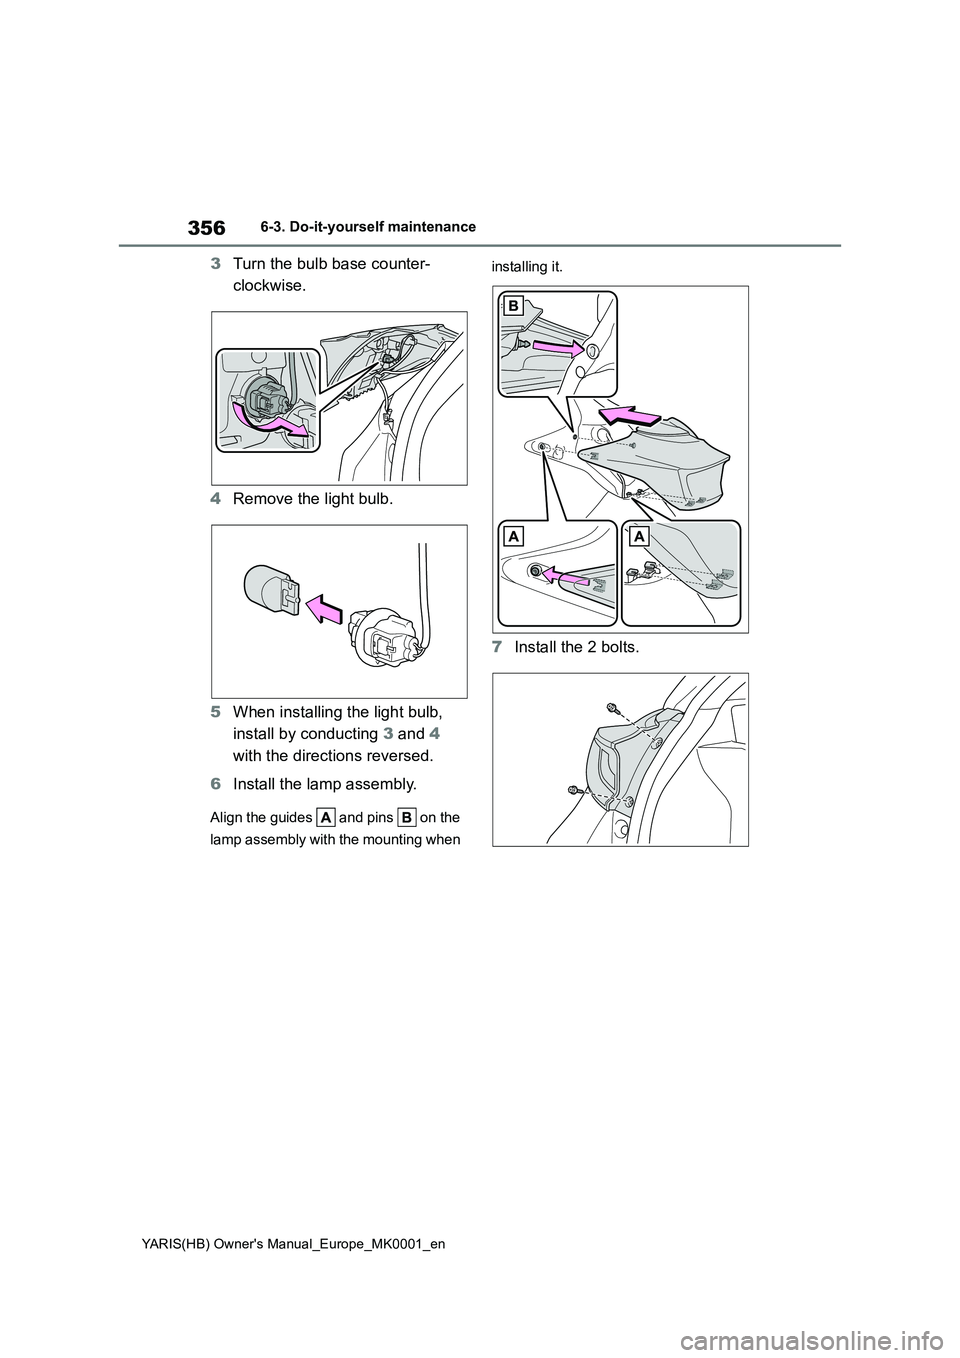
3Turn the bulb base counter-
clockwise.
4 Remove the light bulb.
5 When installing the light bulb,
install by conducting 3 and 4
with the directions reversed.
6 Install the lamp assembly.
Align the guides and pins on the
lamp assembly with the mounting when
installing it.
7 Install the 2 bolts.
Page 357 of 568
357
6
YARIS(HB) Owner's Manual_Europe_MK0001_en
6-3. Do-it-yourself maintenance
Maintenance and care
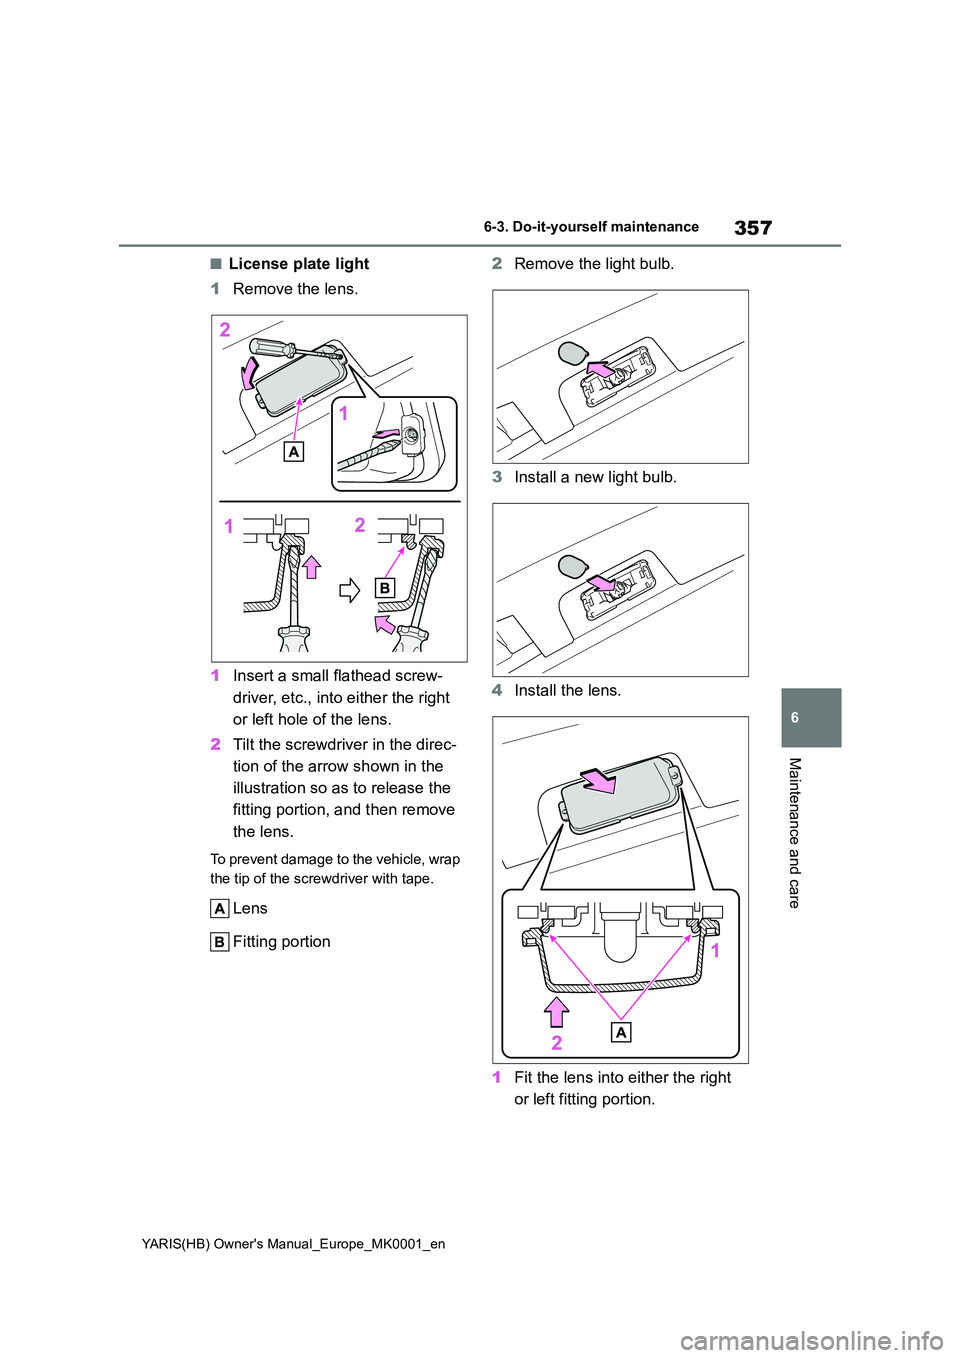
■License plate light
1 Remove the lens.
1 Insert a small flathead screw-
driver, etc., into either the right
or left hole of the lens.
2 Tilt the screwdriver in the direc-
tion of the arrow shown in the
illustration so as to release the
fitting portion, and then remove
the lens.
To prevent damage to the vehicle, wrap
the tip of the screwdriver with tape.
Lens
Fitting portion
2 Remove the light bulb.
3 Install a new light bulb.
4 Install the lens.
1 Fit the lens into either the right
or left fitting portion.
Page 358 of 568
358
YARIS(HB) Owner's Manual_Europe_MK0001_en
6-3. Do-it-yourself maintenance
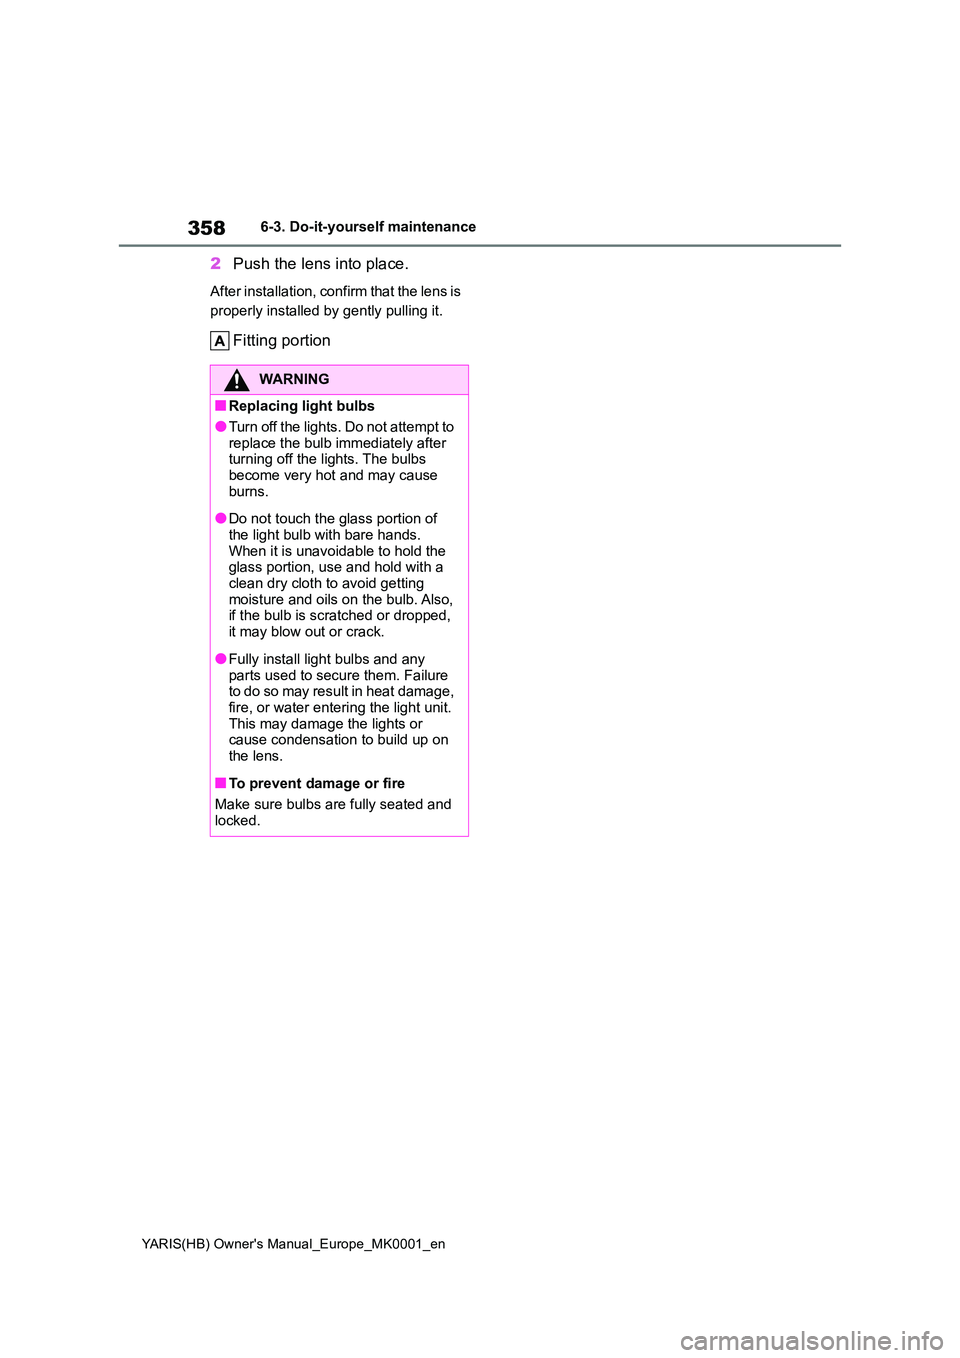
2Push the lens into place.
After installation, confirm that the lens is
properly installed by gently pulling it.
Fitting portion
WARNING
■Replacing light bulbs
●Turn off the lights. Do not attempt to
replace the bulb immediately after turning off the lights. The bulbs become very hot and may cause
burns.
●Do not touch the glass portion of
the light bulb with bare hands. When it is unavoidable to hold the glass portion, use and hold with a
clean dry cloth to avoid getting moisture and oils on the bulb. Also, if the bulb is scratched or dropped,
it may blow out or crack.
●Fully install light bulbs and any
parts used to secure them. Failure to do so may result in heat damage, fire, or water entering the light unit.
This may damage the lights or cause condensation to build up on the lens.
■To prevent damage or fire
Make sure bulbs are fully seated and
locked.
Page 359 of 568
7
359
YARIS(HB) Owner's Manual_Europe_MK0001_en
7
When trouble arises
When trouble arises
7-1. Essential information
Emergency flashers .......... 360
If your vehicle has to be
stopped in an emergency 360
If the vehicle is trapped in rising
water............................... 361
7-2. Steps to take in an emer-
gency
If your vehicle needs to be
towed .............................. 363
If you think something is wrong
....................................... 366
Fuel pump shut off system 367
If a warning light turns on or a
warning buzzer sounds... 368
If a warning message is dis-
played ............................. 377
If you have a flat tire (vehicles
with an emergency tire punc-
ture repair kit) ................. 379
If you have a flat tire (vehicles
with a spare tire) ............. 389
If the engine will not start .. 397
If you lose your keys ......... 399
If the electronic key does not
operate properly (vehicles
with a smart entry & start sys-
tem) ................................ 399
If the vehicle battery is dis-
charged .......................... 401
If your vehicle overheats... 405
If the vehicle becomes stuck
....................................... 408
Page 360 of 568
360
YARIS(HB) Owner's Manual_Europe_MK0001_en
7-1. Essential information
7-1.Essential information
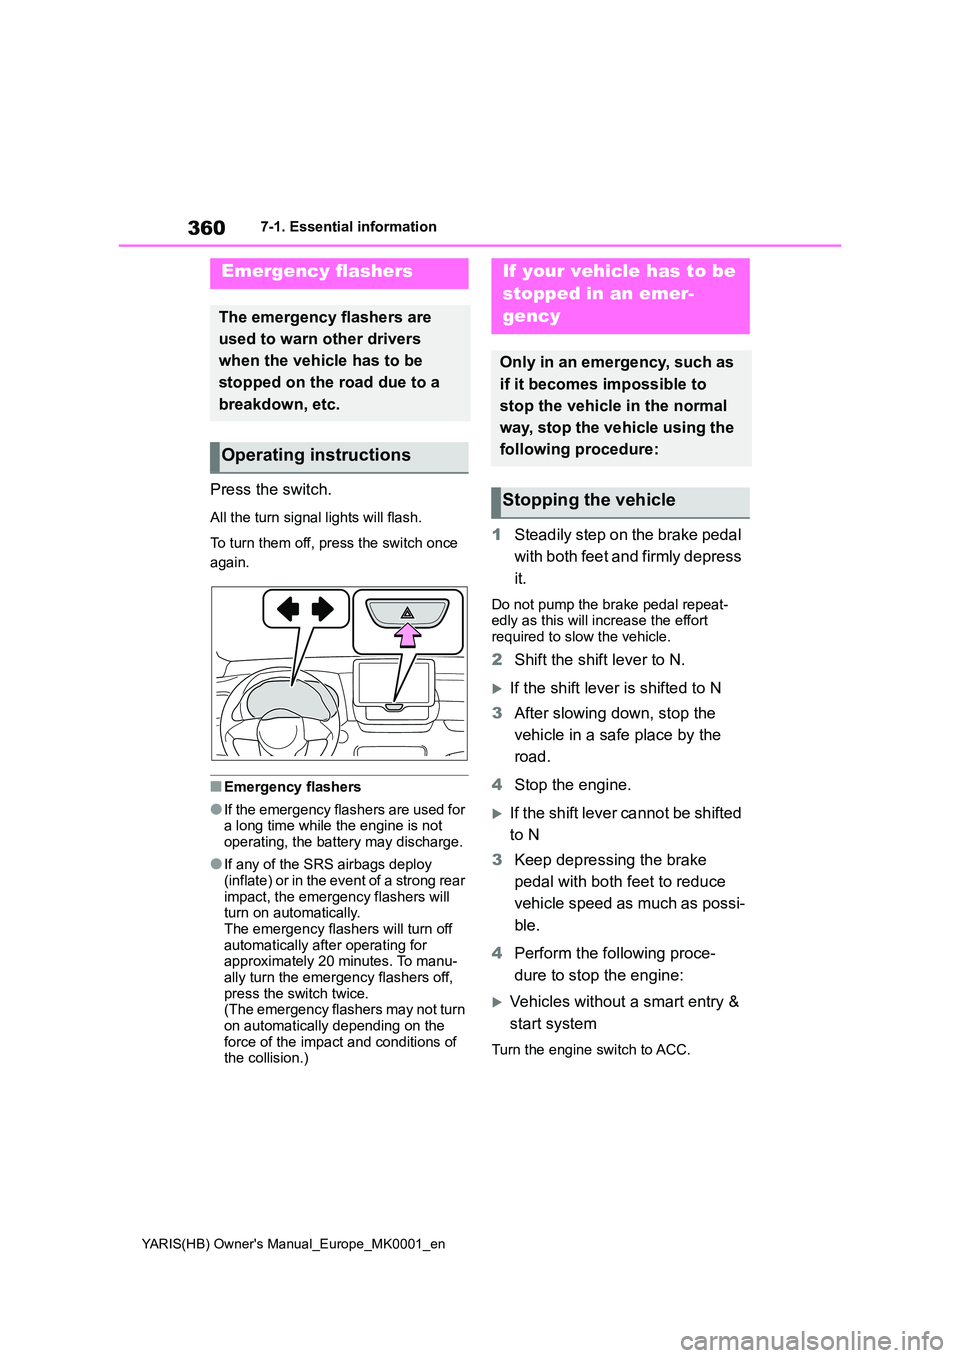
Press the switch.
All the turn signal lights will flash.
To turn them off, press the switch once
again.
■Emergency flashers
●If the emergency flashers are used for a long time while the engine is not
operating, the battery may discharge.
●If any of the SRS airbags deploy
(inflate) or in the event of a strong rear impact, the emergency flashers will turn on automatically.
The emergency flashers will turn off automatically after operating for approximately 20 minutes. To manu-
ally turn the emergency flashers off, press the switch twice.(The emergency flashers may not turn
on automatically depending on the force of the impact and conditions of the collision.)
1 Steadily step on the brake pedal
with both feet and firmly depress
it.
Do not pump the brake pedal repeat- edly as this will increase the effort required to slow the vehicle.
2 Shift the shift lever to N.
If the shift lever is shifted to N
3 After slowing down, stop the
vehicle in a safe place by the
road.
4 Stop the engine.
If the shift lever cannot be shifted
to N
3 Keep depressing the brake
pedal with both feet to reduce
vehicle speed as much as possi-
ble.
4 Perform the following proce-
dure to stop the engine:
Vehicles without a smart entry &
start system
Turn the engine switch to ACC.
Emergency flashers
The emergency flashers are
used to warn other drivers
when the vehicle has to be
stopped on the road due to a
breakdown, etc.
Operating instructions
If your vehicle has to be
stopped in an emer-
gency
Only in an emergency, such as
if it becomes impossible to
stop the vehicle in the normal
way, stop the vehicle using the
following procedure:
Stopping the vehicle