height TOYOTA YARIS 2021 Owners Manual
[x] Cancel search | Manufacturer: TOYOTA, Model Year: 2021, Model line: YARIS, Model: TOYOTA YARIS 2021Pages: 568, PDF Size: 110.34 MB
Page 48 of 568
48
YARIS(HB) Owner's Manual_Europe_MK0001_en
1-2. Child safety
■When installing a child
restraint system to a front pas-
senger seat
For the safety of a child, install a
child restraint system to a rear seat.
When installing a child restraint
system to a front passenger seat is
unavoidable, adjust the seat as fol-
lows and install the child restraint
system:
�z Move the front seat fully rear-
ward.
�z Adjust the seat height to the
upper most position.
�z Adjust the seatback angle to the
most upright position.
When installing a forward-facing child
WARNING
●For effective protection in automo- bile accidents and sudden stops, a
child must be properly restrained, using a seat belt or child restraint system which is correctly installed.
For installation details, refer to the operation manual enclosed with the child restraint system. General
installation instruction is provided in this manual.
●Toyota strongly urges the use of a proper child restraint system that conforms to the weight and size of
the child, installed on the rear seat. According to accident statistics, the child is safer when properly
restrained in the rear seat than in the front seat.
●Holding a child in your or someone else’s arms is not a substitute for a child restraint system. In an acci-
dent, the child can be crushed against the windshield or between the holder and the interior of the
vehicle.
■Handling the child restraint sys-
tem
If the child restraint system is not properly fixed in place, the child or
other passengers may be seriously injured or even killed in the event of sudden braking, sudden swerving, or
an accident.
●If the vehicle were to receive a
strong impact from an accident, etc., it is possible that the child restraint system has damage that is
not readily visible. In such cases, do not reuse the restraint system.
●Depending on the child restraint system, installation may be difficult or impossible. In those cases,
check whether the child restraint system is suitable for installment in the vehicle. ( →P.51) Be sure to
install and observe the usage rules after carefully reading the child restraint system fixing method in
this manual, as well as the opera- tion manual enclosed with the child restraint system.
●Keep the child restraint system properly secured on the seat even if
it is not in use. Do not store the child restraint system unsecured in the passenger compartment.
●If it is necessary to detach the child restraint system, remove it from the
vehicle or store it securely in the luggage compartment.
When using a child restraint
system
Page 52 of 568
52
YARIS(HB) Owner's Manual_Europe_MK0001_en
1-2. Child safety
indicated.
UN (ECE) R129 approval
mark*3
The height range of the child
who is applicable as well as
available weights for an UN
(ECE) R129 approval mark is
indicated.
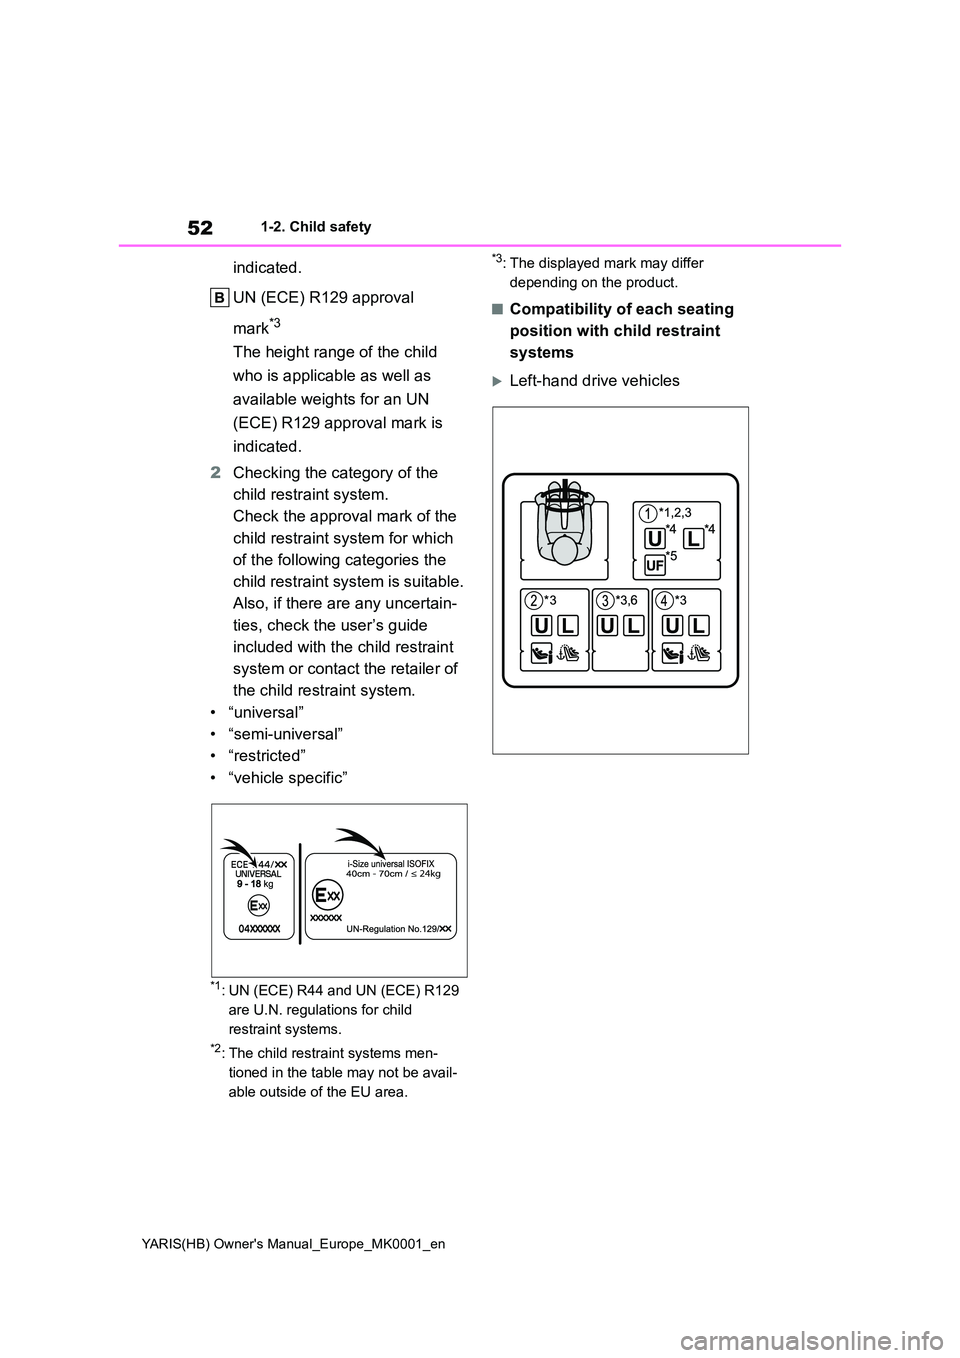
2 Checking the category of the
child restraint system.
Check the approval mark of the
child restraint system for which
of the following categories the
child restraint system is suitable.
Also, if there are any uncertain-
ties, check the user’s guide
included with the child restraint
system or contact the retailer of
the child restraint system.
•“universal”
• “semi-universal”
• “restricted”
• “vehicle specific”
*1: UN (ECE) R44 and UN (ECE) R129
are U.N. regulations for child
restraint systems.
*2: The child restraint systems men-
tioned in the table may not be avail-
able outside of the EU area.
*3: The displayed mark may differ
depending on the product.
■Compatibility of each seating
position with child restraint
systems
Left-hand drive vehicles
Page 53 of 568
53
1
YARIS(HB) Owner's Manual_Europe_MK0001_en
1-2. Child safety
For safety and security
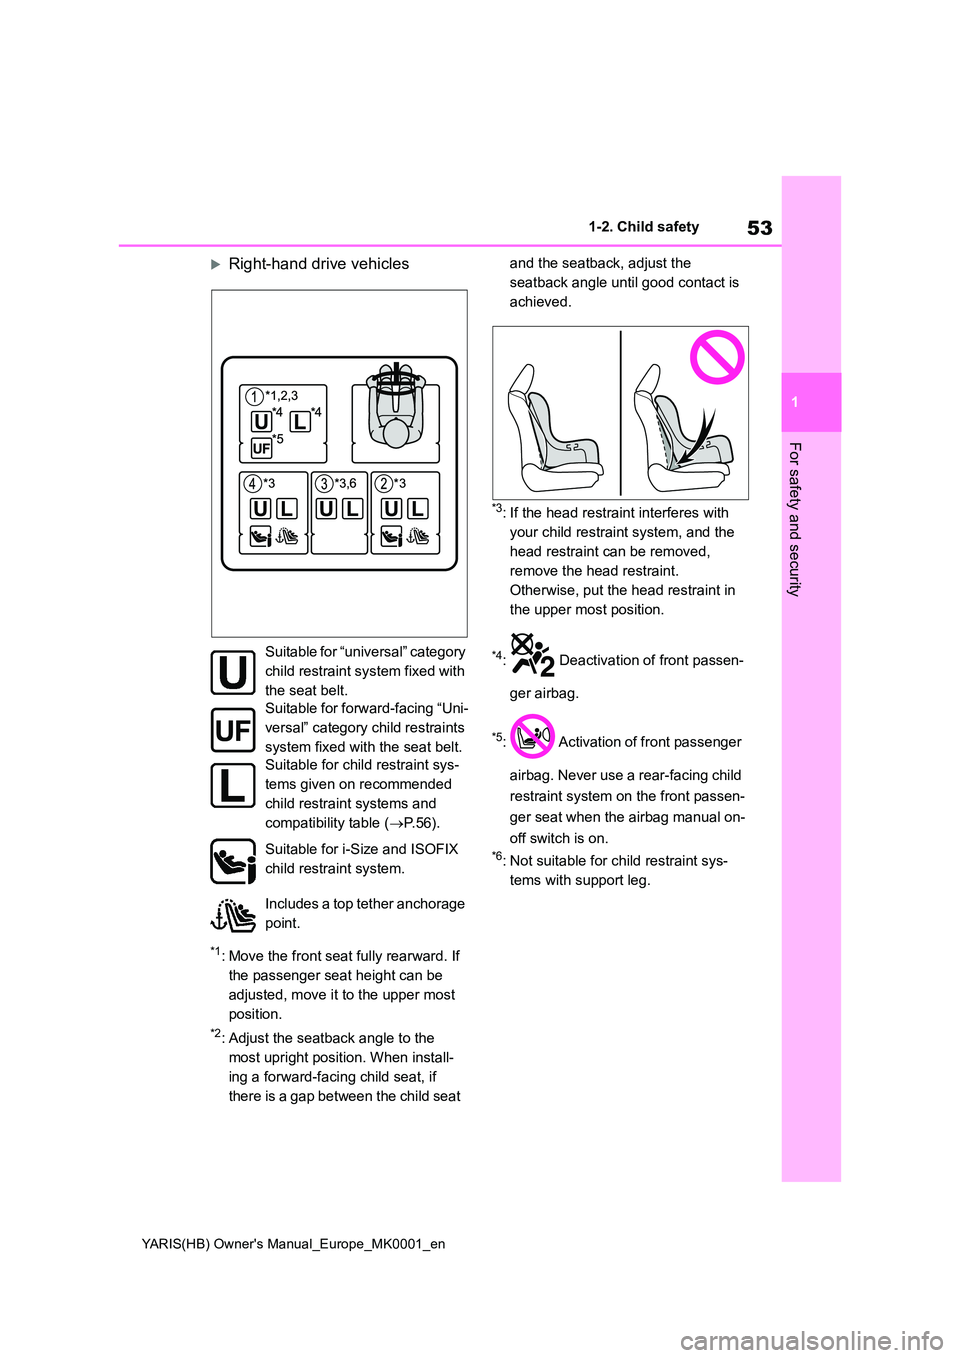
Right-hand drive vehicles
*1: Move the front seat fully rearward. If
the passenger seat height can be
adjusted, move it to the upper most
position.
*2: Adjust the seatback angle to the
most upright position. When install-
ing a forward-facing child seat, if
there is a gap between the child seat
and the seatback, adjust the
seatback angle until good contact is
achieved.
*3: If the head restraint interferes with
your child restraint system, and the
head restraint can be removed,
remove the head restraint.
Otherwise, put the head restraint in
the upper most position.
*4: Deactivation of front passen-
ger airbag.
*5: Activation of front passenger
airbag. Never use a rear-facing child
restraint system on the front passen-
ger seat when the airbag manual on-
off switch is on.
*6: Not suitable for child restraint sys-
tems with support leg.
Suitable for “universal” category
child restraint system fixed with
the seat belt.
Suitable for forward-facing “Uni-
versal” category child restraints
system fixed with the seat belt.
Suitable for child restraint sys-
tems given on recommended
child restraint systems and
compatibility table ( →P.56).
Suitable for i-Size and ISOFIX
child restraint system.
Includes a top tether anchorage
point.
Page 56 of 568
56
YARIS(HB) Owner's Manual_Europe_MK0001_en
1-2. Child safety
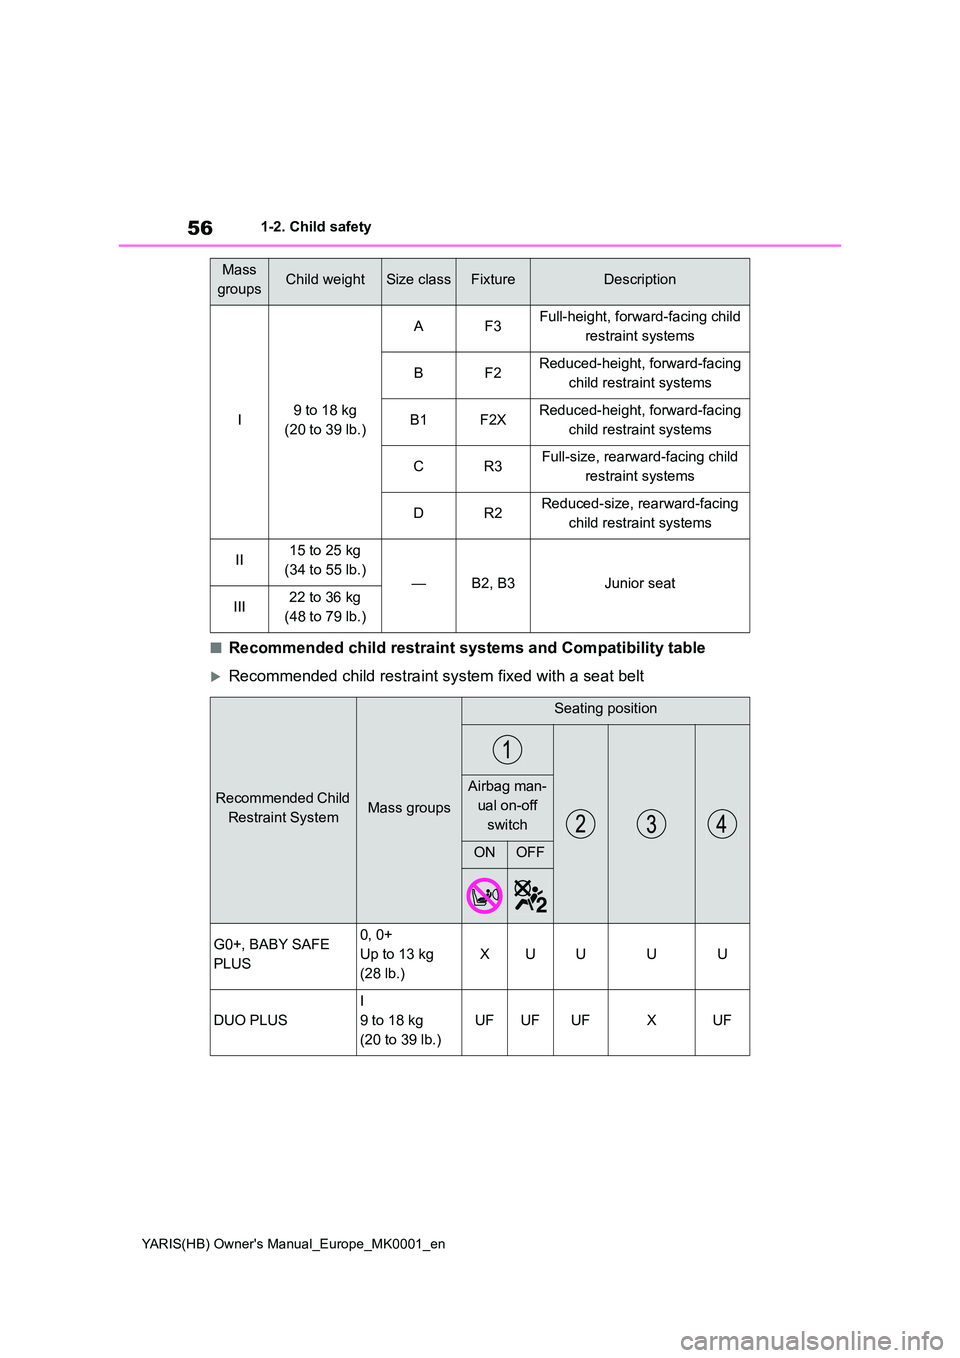
■Recommended child restraint systems and Compatibility table
Recommended child restraint system fixed with a seat belt
I9 to 18 kg
(20 to 39 lb.)
AF3Full-height, forward-facing child
restraint systems
BF2Reduced-height, forward-facing
child restraint systems
B1F2XReduced-height, forward-facing
child restraint systems
CR3Full-size, rearward-facing child
restraint systems
DR2Reduced-size, rearward-facing
child restraint systems
II15 to 25 kg
(34 to 55 lb.)—B2, B3Junior seat
III22 to 36 kg
(48 to 79 lb.)
Recommended Child
Restraint SystemMass groups
Seating position
Airbag man-
ual on-off
switch
ONOFF
G0+, BABY SAFE
PLUS
0, 0+
Up to 13 kg
(28 lb.)
XUUUU
DUO PLUS
I
9 to 18 kg
(20 to 39 lb.)
UFUFUFXUF
Mass
groupsChild weightSize classFixtureDescription
Page 128 of 568
128
YARIS(HB) Owner's Manual_Europe_MK0001_en
3-3. Adjusting the seats
3-3.Adjusting the sea ts
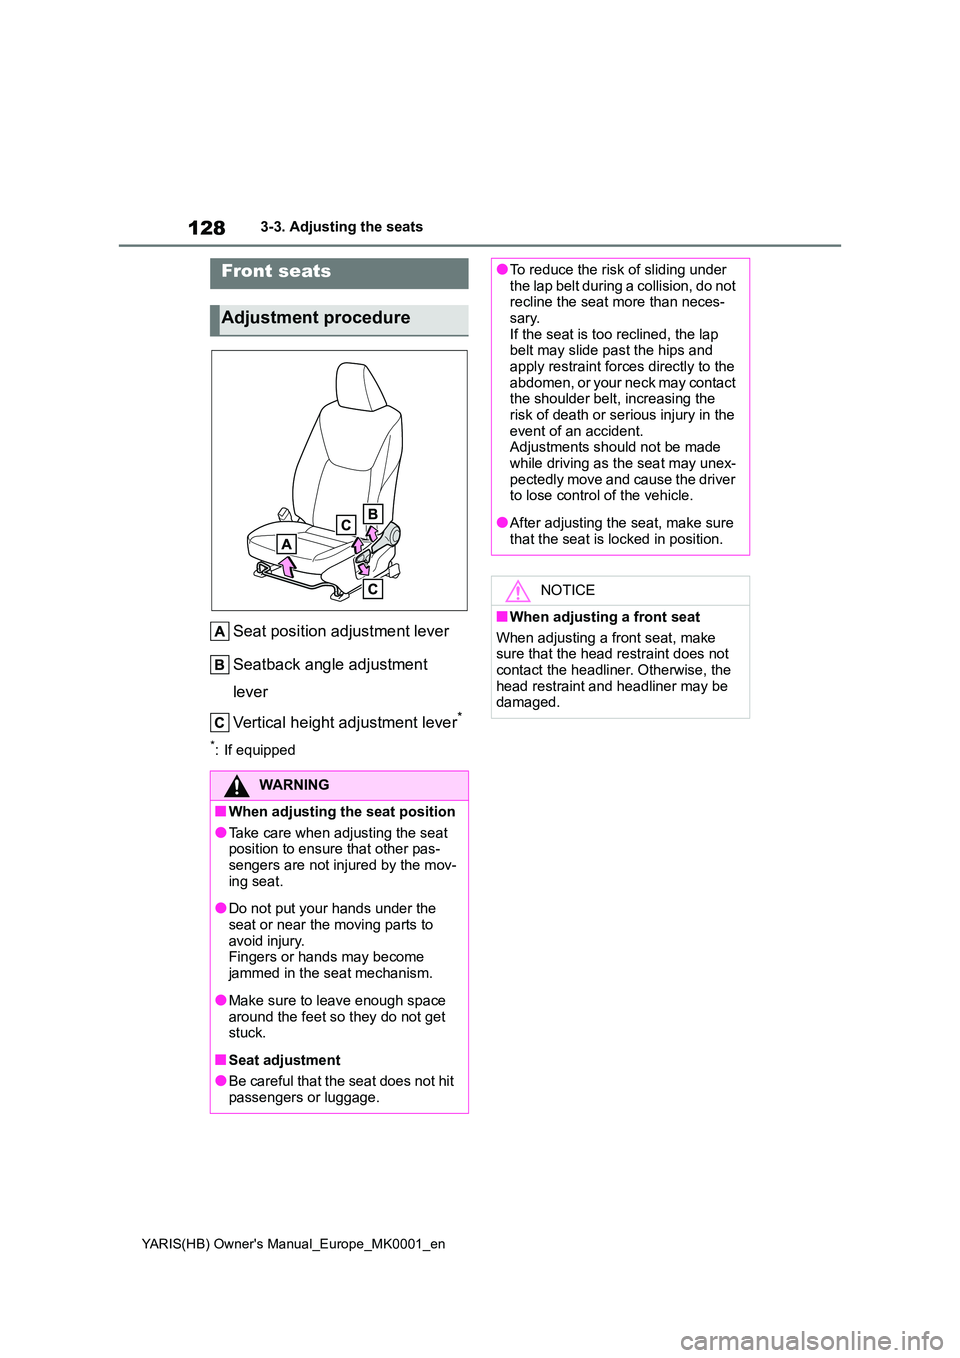
Seat position adjustment lever
Seatback angle adjustment
lever
Vertical height adjustment lever*
*: If equipped
Front seats
Adjustment procedure
WARNING
■When adjusting the seat position
●Take care when adjusting the seat position to ensure that other pas-sengers are not injured by the mov-
ing seat.
●Do not put your hands under the
seat or near the moving parts to avoid injury.Fingers or hands may become
jammed in the seat mechanism.
●Make sure to leave enough space
around the feet so they do not get stuck.
■Seat adjustment
●Be careful that the seat does not hit passengers or luggage.
●To reduce the risk of sliding under the lap belt during a collision, do not recline the seat more than neces-
sary. If the seat is too reclined, the lap belt may slide past the hips and
apply restraint forces directly to the abdomen, or your neck may contact the shoulder belt, increasing the
risk of death or serious injury in the event of an accident.Adjustments should not be made
while driving as the seat may unex- pectedly move and cause the driver to lose control of the vehicle.
●After adjusting the seat, make sure that the seat is locked in position.
NOTICE
■When adjusting a front seat
When adjusting a front seat, make sure that the head restraint does not
contact the headliner. Otherwise, the head restraint and headliner may be damaged.
Page 131 of 568
131
3
YARIS(HB) Owner's Manual_Europe_MK0001_en
3-3. Adjusting the seats
Before driving
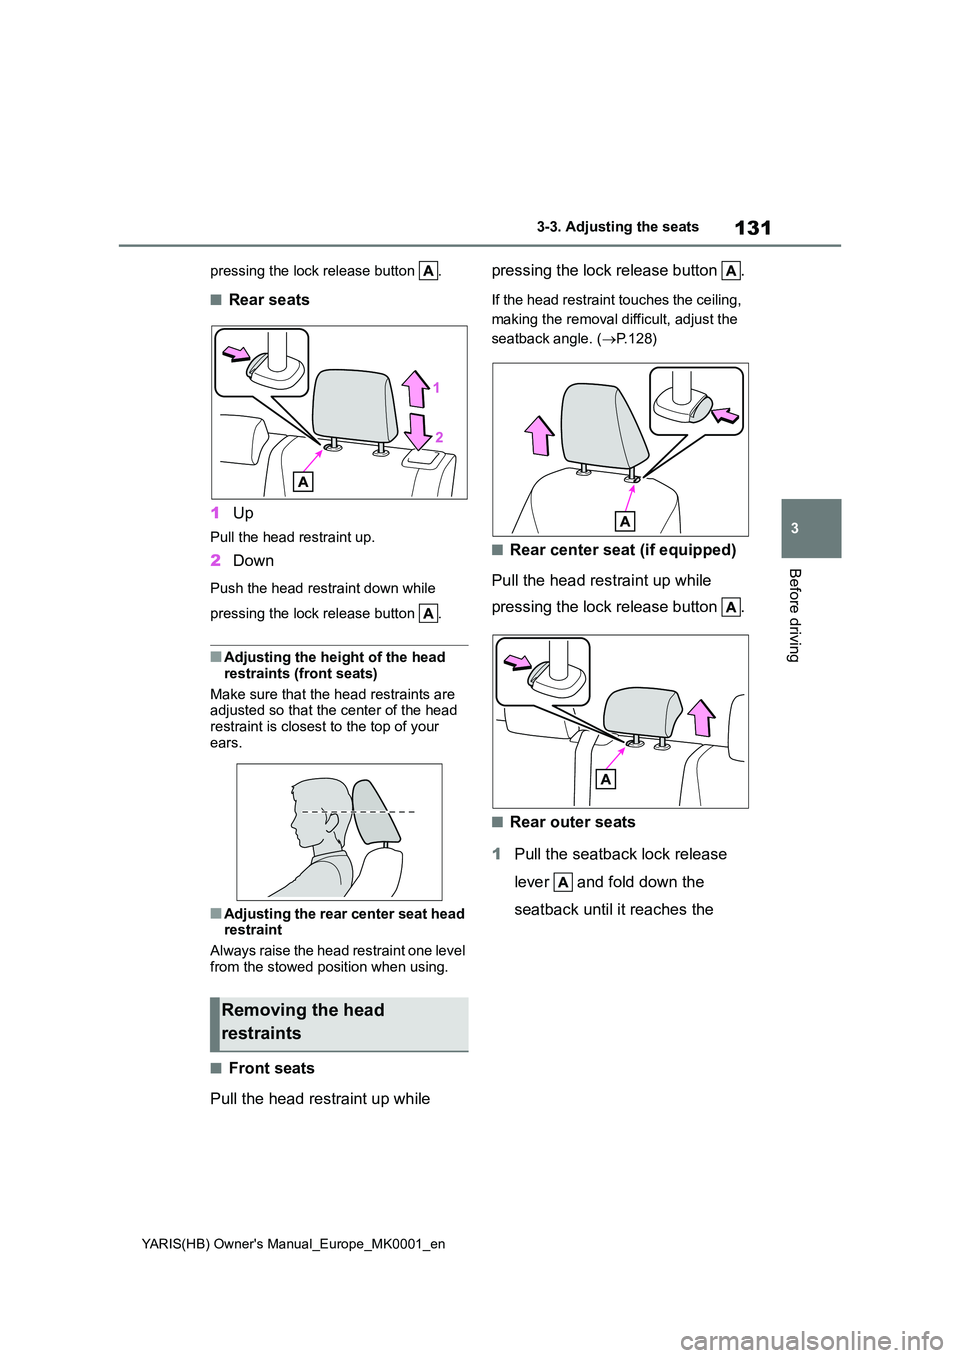
pressing the lock release button .
■Rear seats
1 Up
Pull the head restraint up.
2Down
Push the head restraint down while
pressing the lock release button .
■Adjusting the height of the head
restraints (front seats)
Make sure that the head restraints are adjusted so that the center of the head
restraint is closest to the top of your ears.
■Adjusting the rear center seat head restraint
Always raise the head restraint one level
from the stowed position when using.
■Front seats
Pull the head restraint up while
pressing the lock release button .
If the head restraint touches the ceiling,
making the removal difficult, adjust the
seatback angle. ( →P.128)
■Rear center seat (if equipped)
Pull the head restraint up while
pressing the lock release button .
■Rear outer seats
1 Pull the seatback lock release
lever and fold down the
seatback until it reaches the
Removing the head
restraints
Page 135 of 568
135
3
YARIS(HB) Owner's Manual_Europe_MK0001_en
3-4. Adjusting the steering wheel and mirrors
Before driving
The height of the rear view mirror
can be adjusted to suit your driving
posture.
Adjust the height of the rear view
mirror by moving it up and down.
Manual anti-glare inside rear
view mirror
Reflected light from the headlights
of vehicles behind can be reduced
by operating the lever.
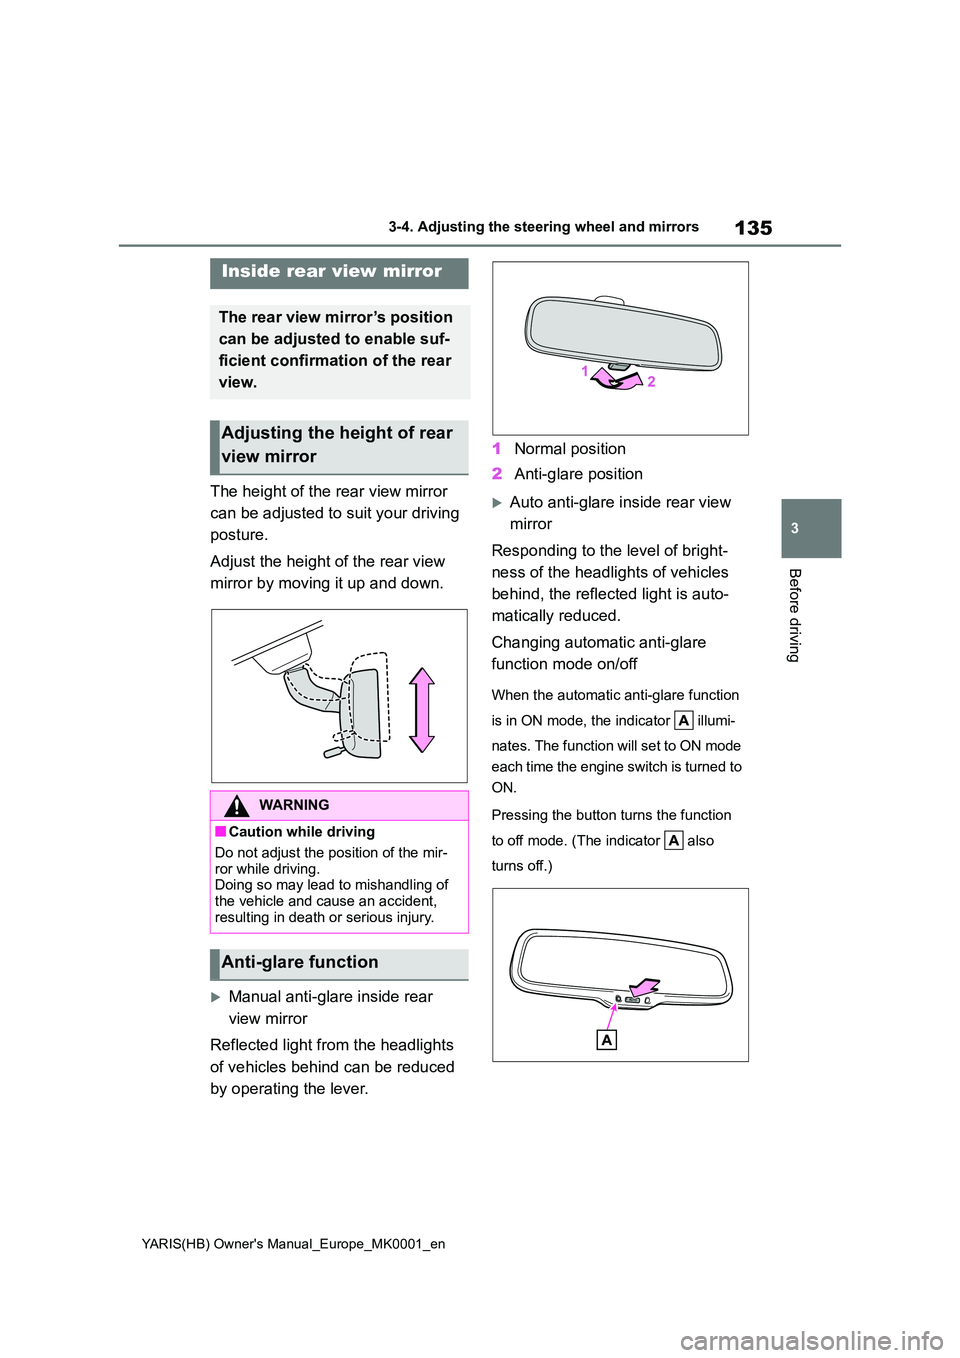
1 Normal position
2 Anti-glare position
Auto anti-glare inside rear view
mirror
Responding to the level of bright-
ness of the headlights of vehicles
behind, the reflected light is auto-
matically reduced.
Changing automatic anti-glare
function mode on/off
When the automatic anti-glare function
is in ON mode, the indicator illumi-
nates. The function will set to ON mode
each time the engine switch is turned to
ON.
Pressing the button turns the function
to off mode. (The indicator also
turns off.)
Inside rear view mirror
The rear view mirror’s position
can be adjusted to enable suf-
ficient confirmation of the rear
view.
Adjusting the height of rear
view mirror
WARNING
■Caution while driving
Do not adjust the position of the mir-
ror while driving. Doing so may lead to mishandling of the vehicle and cause an accident,
resulting in death or serious injury.
Anti-glare function
Page 201 of 568
201
4
YARIS(HB) Owner's Manual_Europe_MK0001_en
4-5. Using the driving support systems
Driving
■Situations in which the system may
not operate properly
●In some situations such as the follow-
ing, an object may not be detected by
the radar sensor and front camera,
preventing the system from operating
properly:
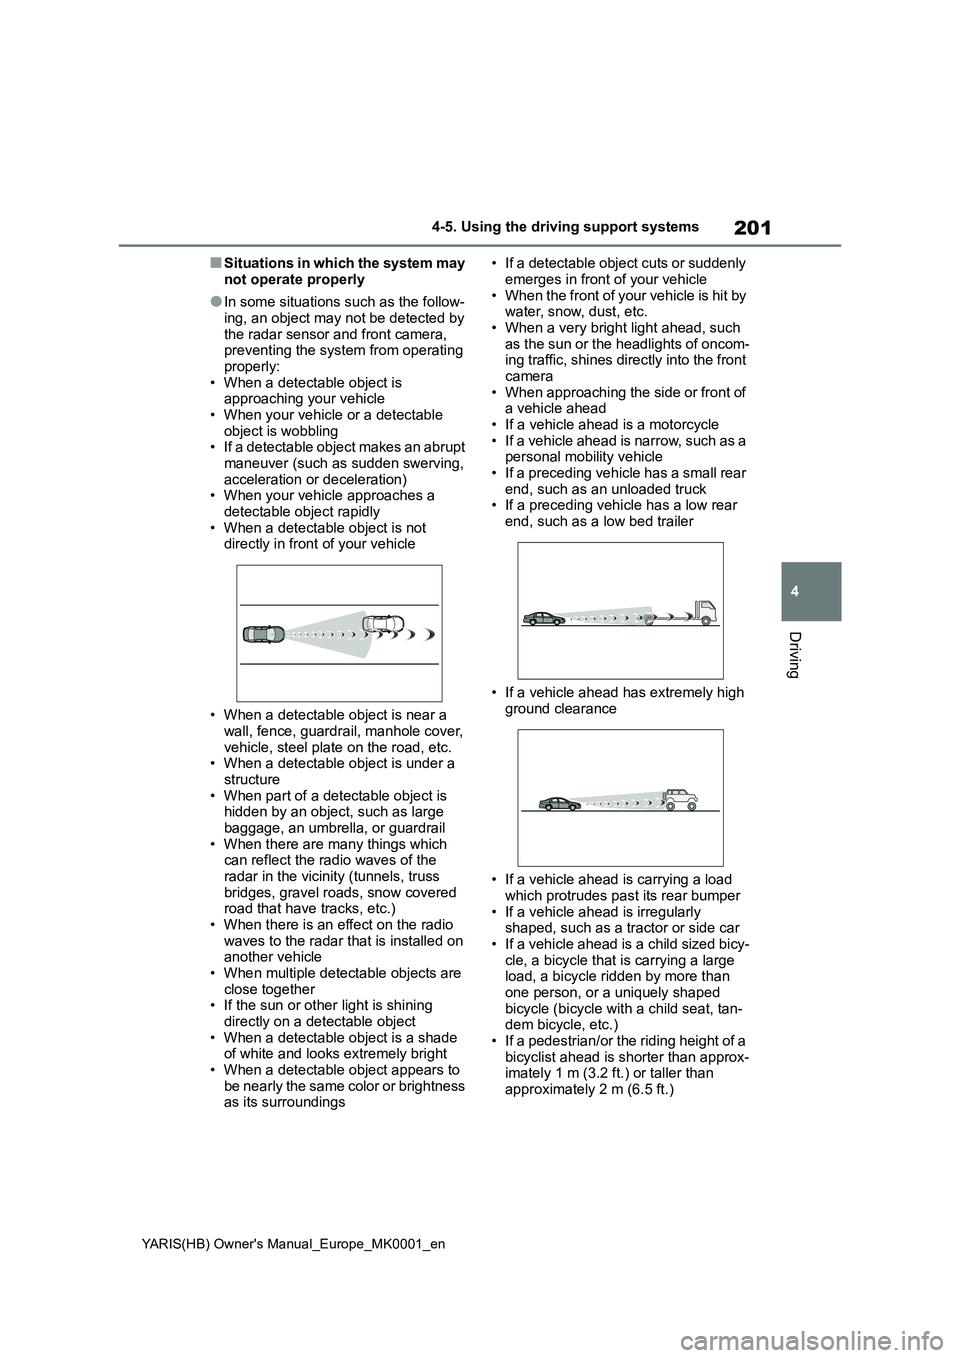
• When a detectable object is
approaching your vehicle
• When your vehicle or a detectable
object is wobbling
• If a detectable object makes an abrupt
maneuver (such as sudden swerving,
acceleration or deceleration)
• When your vehicle approaches a
detectable object rapidly
• When a detectable object is not
directly in front of your vehicle
• When a detectable object is near a
wall, fence, guardrail, manhole cover,
vehicle, steel plate on the road, etc.
• When a detectable object is under a
structure
• When part of a detectable object is
hidden by an object, such as large
baggage, an umbrella, or guardrail
• When there are many things which
can reflect the radio waves of the
radar in the vicinity (tunnels, truss
bridges, gravel roads, snow covered
road that have tracks, etc.)
• When there is an effect on the radio
waves to the radar that is installed on
another vehicle
• When multiple detectable objects are
close together
• If the sun or other light is shining
directly on a detectable object
• When a detectable object is a shade
of white and looks extremely bright
• When a detectable object appears to
be nearly the same color or brightness
as its surroundings• If a detectable object cuts or suddenly
emerges in front of your vehicle
• When the front of your vehicle is hit by
water, snow, dust, etc.
• When a very bright light ahead, such
as the sun or the headlights of oncom-
ing traffic, shines directly into the front
camera
• When approaching the side or front of
a vehicle ahead
• If a vehicle ahead is a motorcycle
• If a vehicle ahead is narrow, such as a
personal mobility vehicle
• If a preceding vehicle has a small rear
end, such as an unloaded truck
• If a preceding vehicle has a low rear
end, such as a low bed trailer
• If a vehicle ahead has extremely high
ground clearance
• If a vehicle ahead is carrying a load
which protrudes past its rear bumper
• If a vehicle ahead is irregularly
shaped, such as a tractor or side car
• If a vehicle ahead is a child sized bicy-
cle, a bicycle that is carrying a large
load, a bicycle ridden by more than
one person, or a uniquely shaped
bicycle (bicycle with a child seat, tan-
dem bicycle, etc.)
• If a pedestrian/or the riding height of a
bicyclist ahead is shorter than approx-
imately 1 m (3.2 ft.) or taller than
approximately 2 m (6.5 ft.)
Page 241 of 568
241
4
YARIS(HB) Owner's Manual_Europe_MK0001_en
4-5. Using the driving support systems
Driving
■The Blind Spot Monitor is opera-
tional when
The Blind Spot Monitor is operational
when all of the following conditions are
met:
●The Blind Spot Monitor is on.
●The shift lever is in a position other
than R.
●The vehicle speed is greater than
approximately 16 km/h (10 mph).
■The Blind Spot Monitor will detect a
vehicle when
The Blind Spot Monitor will detect a
vehicle present in the detection area in
the following situations:
●A vehicle in an adjacent lane over-
takes your vehicle.
●You overtake a vehicle in adjacent
lane slowly.
●Another vehicle enters the detection
area when it changes lanes.
■Conditions under which the Blind
Spot Monitor will not detect a vehi-
cle
The Blind Spot Monitor is not designed
to detect the following types of vehicles
and/or objects:
●Small motorcycles, bicycles, pedestri-
ans, etc.*
●Vehicles traveling in the opposite
direction
●Guardrails, walls, signs, parked vehi-
cles and similar stationary objects*
●Following vehicles that are in the
same lane*
●Vehicles traveling 2 lanes away from
your vehicle*
●Vehicles which are being overtaken
rapidly by your vehicle*
*
: Depending on the conditions, detec-
tion of a vehicle and/or object may
occur.
■Conditions under which the Blind
Spot Monitor may not function cor-
rectly
●The Blind Spot Monitor may not detect
vehicles correctly in the following situ-
ations:
• When the sensor is misaligned due to
a strong impact to the sensor or its
surrounding area
• When mud, snow, ice, a sticker, etc.,
is covering the sensor or surrounding
area on the rear bumper
• When driving on a road surface that is
wet with standing water during bad
weather, such as heavy rain, snow, or
fog
• When multiple vehicles are approach-
ing with only a small gap between
each vehicle
• When the distance between your vehi-
cle and a following vehicle is short
• When there is a significant difference
in speed between your vehicle and
the vehicle that enters the detection
area
• When the difference in speed
between your vehicle and another
vehicle is changing
• When a vehicle enters a detection
area traveling at about the same
speed as your vehicle
• As your vehicle starts from a stop, a
vehicle remains in the detection area
• When driving up and down consecu-
tive steep inclines, such as hills, dips
in the road, etc.
• When driving on roads with sharp
bends, consecutive curves, or uneven
surfaces
• When vehicle lanes are wide, or when
driving on the edge of a lane, and the
vehicle in an adjacent lane is far away
from your vehicle
• When towing a trailer
• When an accessory (such as a bicycle
carrier) is installed to the rear of the
vehicle
• When there is a significant difference
in height between your vehicle and
the vehicle that enters the detection
area
• Immediately after the Blind Spot Moni-
Page 258 of 568
258
YARIS(HB) Owner's Manual_Europe_MK0001_en
4-5. Using the driving support systems
■The Parking Support Brake func- tion (static object) will operate
when
The function will operate when the PKSB OFF indicator is not illuminated or
flashing ( →P.83, 84) and all of the fol- lowing conditions are met:
●Engine output restriction control• The Parking Support Brake is enabled.
• The vehicle speed is 15 km/h (9 mph) or less.
WARNING
●Do not replace a sensor with a part other than a genuine part.
●Do not subject a sensor or its sur-rounding area to a strong impact.
●Do not damage the sensors, and always keep them clean.
●If the area around a radar sensor is subjected to an impact, the system
may not operate properly due to a sensor malfunction. Have the vehi-cle inspected by any authorized
Toyota retailer or Toyota authorized repairer, or any reliable repairer.
■Handling the suspension
Do not modify the suspension, as changes to the height or inclination of
the vehicle may prevent the sensors from detecting objects correctly or cause the system to not operate or
operate unnecessarily.
■If the Parking Support Brake
function (static objects) oper- ates unnecessarily, such as at a railroad crossing
In the event that the Parking Support Brake function (static objects) oper-ates unnecessarily, such as at a rail-
road crossing, brake control will be canceled after approximately 2 sec-onds, allowing you to proceed forward
and leave the area, brake control can also be canceled by depressing the brake pedal. Depressing the acceler-
ator pedal after brake control is can- celed will allow you to proceed forward and leave the area.
■Notes when washing the vehicle
Do not apply intensive bursts of water
or steam to the sensor area.
Doing so may result in the sensor malfunctioning.
●When using a high pressure washer to wash the vehicle, do not spray the sensors directly, as doing
so may cause a sensor to malfunc- tion.
●When using steam to clean the vehicle, do not direct steam too close to the sensors as doing so
may cause a sensor to malfunction.
■When to disable the Parking Sup-
port Brake
In the following situations, disable the Parking Support Brake as the system
may operate even though there is no possibility of a collision.
●When inspecting the vehicle using a chassis roller, chassis dynamo or free roller
●When loading the vehicle onto a boat, truck or other transport vessel
●If the suspension has been modi-fied or tires of a size other than
specified are installed
●If the front of the vehicle is raised or
lowered due to the carried load
●When equipment that may obstruct
a sensor is installed, such as a tow- ing eyelet, bumper protector (an additional trim strip, etc.), bicycle
carrier, or snow plow
●When using an automatic car wash