display TOYOTA YARIS 2022 Owners Manual
[x] Cancel search | Manufacturer: TOYOTA, Model Year: 2022, Model line: YARIS, Model: TOYOTA YARIS 2022Pages: 590, PDF Size: 128.6 MB
Page 280 of 590
278
HV Owner's Manual_Europe_M52N30_en
4-5. Using the driving support systems
lights are automatically controlled
to reduce the vehicle speed and
help reduce the possibility of further
damage due to a secondary colli-
sion.
■When the TRC/VSC/ABS systems
are operating
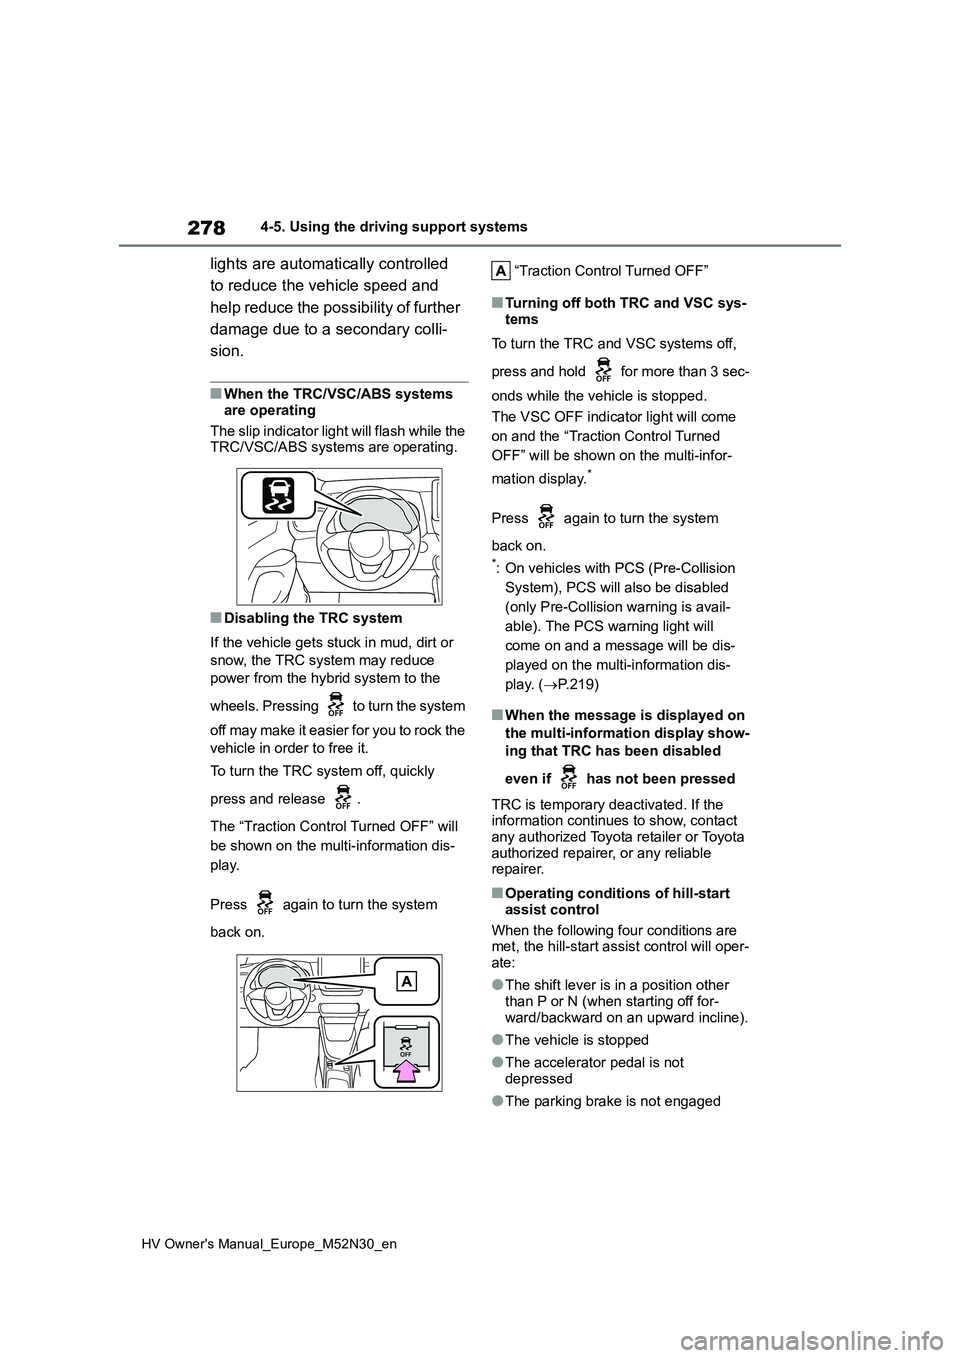
The slip indicator light will flash while the TRC/VSC/ABS systems are operating.
■Disabling the TRC system
If the vehicle gets stuck in mud, dirt or
snow, the TRC system may reduce
power from the hybrid system to the
wheels. Pressing to turn the system
off may make it easier for you to rock the
vehicle in order to free it.
To turn the TRC system off, quickly
press and release .
The “Traction Control Turned OFF” will
be shown on the multi-information dis-
play.
Press again to turn the system
back on.
“Traction Control Turned OFF”
■Turning off both TRC and VSC sys-
tems
To turn the TRC and VSC systems off,
press and hold for more than 3 sec-
onds while the vehicle is stopped.
The VSC OFF indicator light will come
on and the “Traction Control Turned
OFF” will be shown on the multi-infor-
mation display.*
Press again to turn the system
back on.
*: On vehicles with PCS (Pre-Collision
System), PCS will also be disabled
(only Pre-Collision warning is avail-
able). The PCS warning light will
come on and a message will be dis-
played on the multi-information dis-
play. ( P.219)
■When the message is displayed on
the multi-information display show-
ing that TRC has been disabled
even if has not been pressed
TRC is temporary deactivated. If the information continues to show, contact
any authorized Toyota retailer or Toyota authorized repairer, or any reliable repairer.
■Operating conditions of hill-start
assist control
When the following four conditions are met, the hill-start assist control will oper-
ate:
●The shift lever is in a position other
than P or N (when starting off for- ward/backward on an upward incline).
●The vehicle is stopped
●The accelerator pedal is not
depressed
●The parking brake is not engaged
Page 290 of 590
288
HV Owner's Manual_Europe_M52N30_en
5-1. Using the air conditioning system and defogger
5-1.Using the a ir c onditioning sys te m and de fog ger
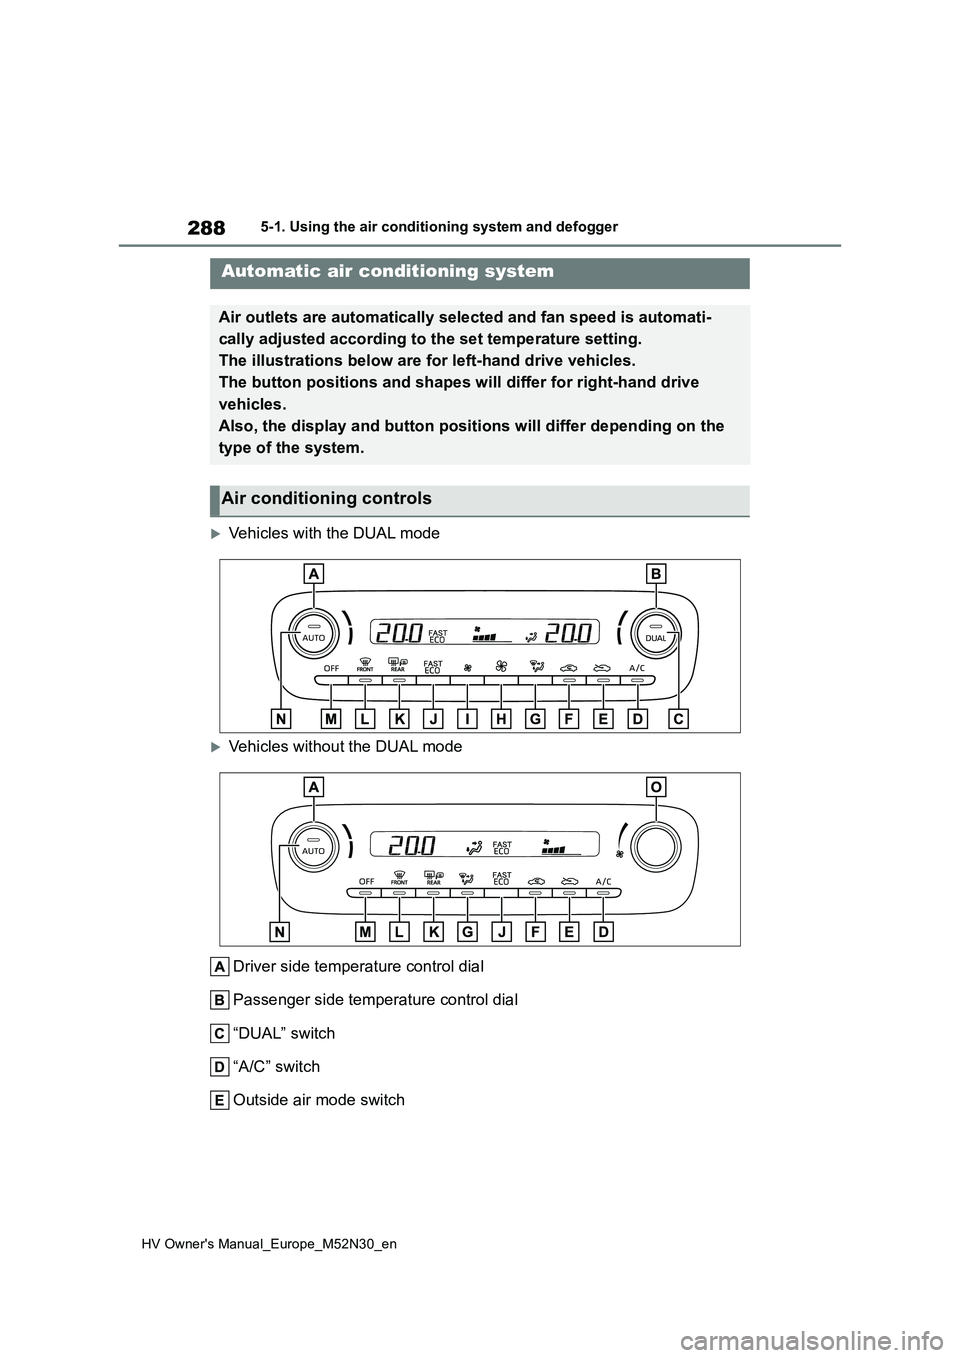
Vehicles with the DUAL mode
Vehicles without the DUAL mode
Driver side temperature control dial
Passenger side temperature control dial
“DUAL” switch
“A/C” switch
Outside air mode switch
Automatic air conditioning system
Air outlets are automatically selected and fan speed is automat i-
cally adjusted according to the set temperature setting.
The illustrations below are for left-hand drive vehicles.
The button positions and shapes w ill differ for right-hand drive
vehicles.
Also, the display and button positions will differ depending on the
type of the system.
Air conditioning controls
Page 292 of 590
290
HV Owner's Manual_Europe_M52N30_en
5-1. Using the air conditioning system and defogger
■Switching between outside air
and recirculated air modes
To change to recirculated air
mode, press the recirculated air
mode switch.
The indicator illuminates on the recircu-
lated air mode switch.
To change to outside air mode,
press the outside air mode
switch.
The indicator illuminates on the outside
air mode switch.
■Set cooling and dehumidifica-
tion function
Press the “A/C” switch.
When the function is on, the indicator
illuminates on the “A/C” switch.
■Defogging the windshield
Defoggers are used to defog the
windshield and front side windows.
Press the windshield defogger
switch.
Set the outside/recirculated air mode
switch to outside air mode if the recircu-
lated air mode is used. (It may switch
automatically.)
To defog the windshield and the side
windows quickly, turn the air flow and
temperature up.
To return to the previous mode, press
the windshield defogger switch again
when the windshield is defogged.
When the windshield defogger switch is
on, the indicator illuminates on the
windshield defogger switch.
■Defogging the rear window
and outside rear view mirrors
Defoggers are used to defog the
rear window, and to remove rain-
drops, dew and frost from the out-
side rear view mirrors.
Press the rear window and outside
rear view mirror defoggers switch.
The defoggers will automatically turn off
after a while.
When the rear window and outside rear
view mirror defoggers switch is on, the
indicator illuminates on the rear window
and outside rear view mirror defoggers
switch.
■Using the Climate Preference
1 Press the automatic mode
switch.
2 Press the “FAST/ECO” switch.
Each time the “FAST/ECO” switch
is pressed, the fan speed setting
mode toggles as follows.
Normal “ECO” “FAST” Nor-
mal
When “ECO” is displayed on the air
conditioning screen, the air condi-
tioning is controlled with low fuel
consumption prioritized such as
reducing fan speed, etc.
When “FAST” is displayed on the
screen, fan speed will be
increased.
■Fogging up of the windows
●The windows will easily fog up when
the humidity in the vehicle is high. Turning “A/C” on will dehumidify the air from the outlets and defog the
Page 309 of 590
307
5
HV Owner's Manual_Europe_M52N30_en
5-4. Other interior features
Interior features
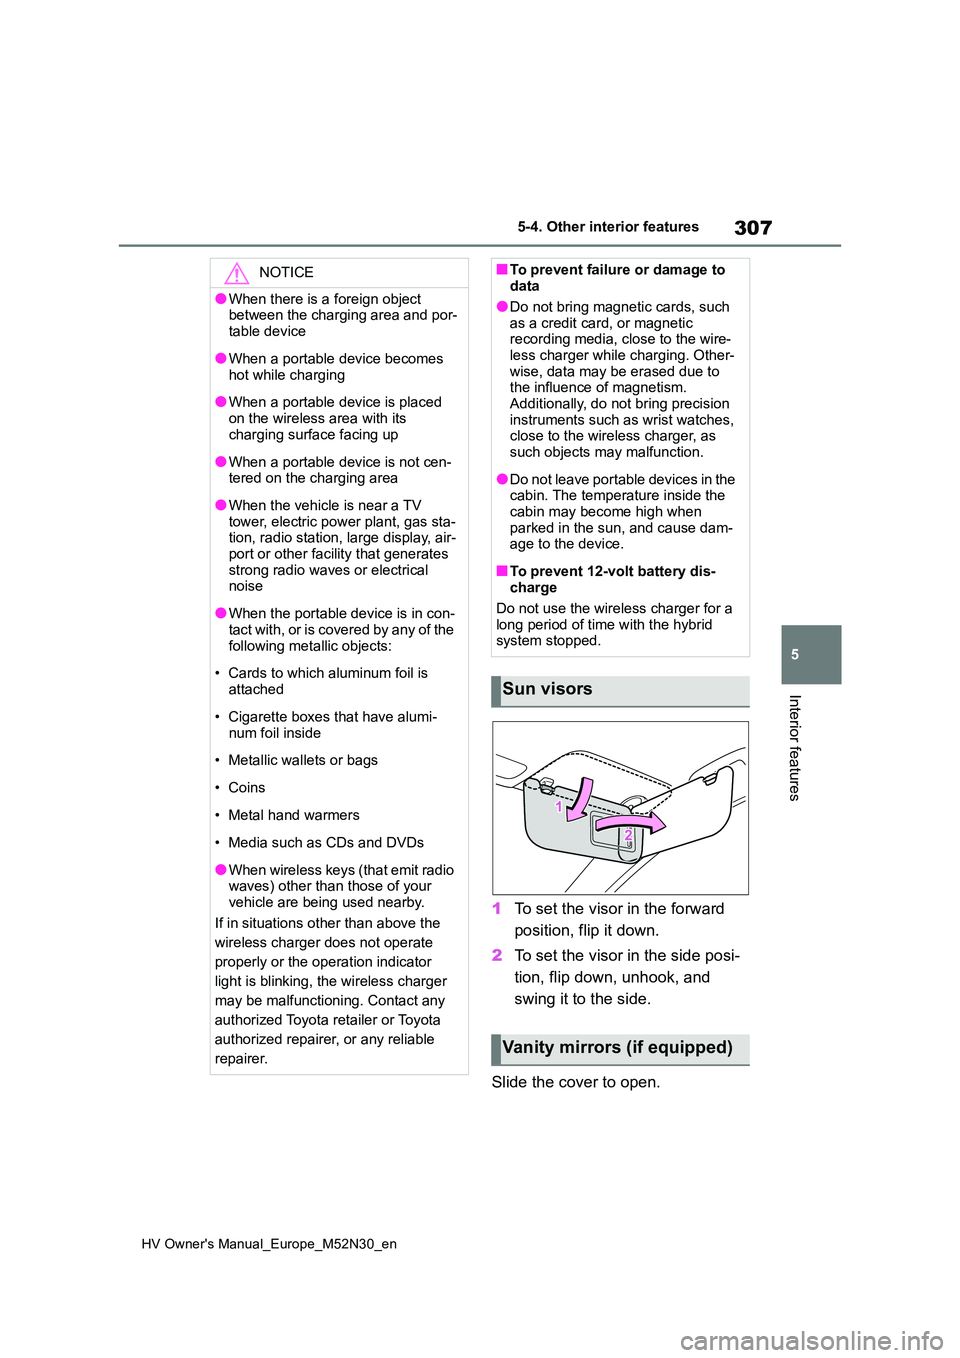
1To set the visor in the forward
position, flip it down.
2 To set the visor in the side posi-
tion, flip down, unhook, and
swing it to the side.
Slide the cover to open.
NOTICE
●When there is a foreign object between the charging area and por-
table device
●When a portable device becomes
hot while charging
●When a portable device is placed
on the wireless area with its charging surface facing up
●When a portable device is not cen-tered on the charging area
●When the vehicle is near a TV tower, electric power plant, gas sta-tion, radio station, large display, air-
port or other facility that generates strong radio waves or electrical noise
●When the portable device is in con-tact with, or is covered by any of the
following metallic objects:
• Cards to which aluminum foil is
attached
• Cigarette boxes that have alumi-
num foil inside
• Metallic wallets or bags
•Coins
• Metal hand warmers
• Media such as CDs and DVDs
●When wireless keys (that emit radio waves) other than those of your
vehicle are being used nearby.
If in situations other than above the
wireless charger does not operate
properly or the operation indicator
light is blinking, the wireless charger
may be malfunctioning. Contact any
authorized Toyota retailer or Toyota
authorized repairer, or any reliable
repairer.
■To prevent failure or damage to data
●Do not bring magnetic cards, such
as a credit card, or magnetic recording media, close to the wire-less charger while charging. Other-
wise, data may be erased due to the influence of magnetism.Additionally, do not bring precision
instruments such as wrist watches, close to the wireless charger, as such objects may malfunction.
●Do not leave portable devices in the cabin. The temperature inside the
cabin may become high when parked in the sun, and cause dam-age to the device.
■To prevent 12-volt battery dis-charge
Do not use the wireless charger for a long period of time with the hybrid system stopped.
Sun visors
Vanity mirrors (if equipped)
Page 322 of 590
320
HV Owner's Manual_Europe_M52N30_en
6-3. Do-it-yourself maintenance
6-3.Do-it-y ours elf main ten ance
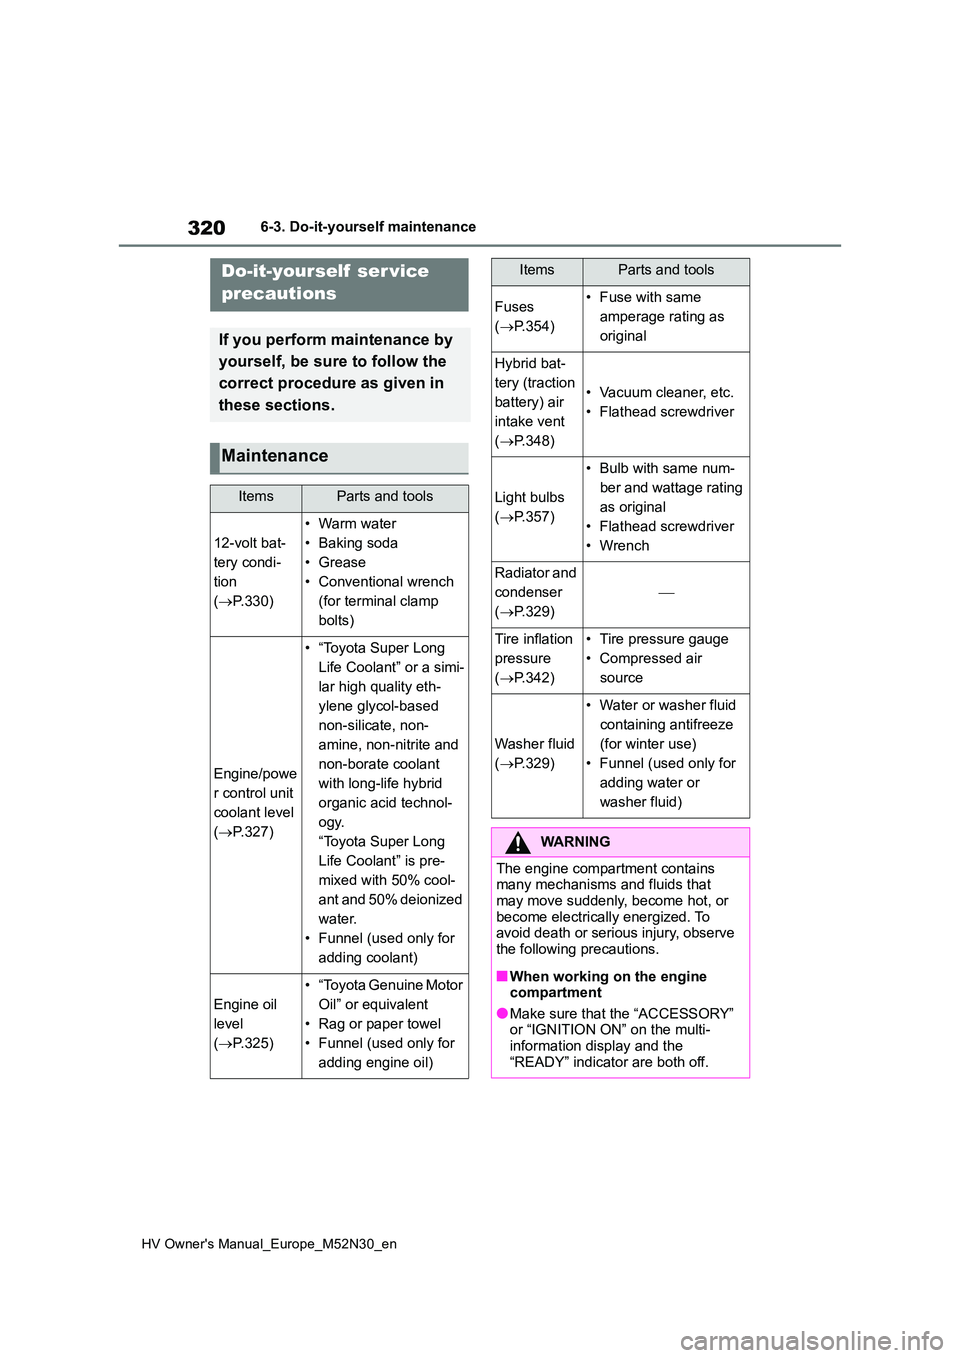
Do-it-yourself ser vice
precautions
If you perform maintenance by
yourself, be sure to follow the
correct procedure as given in
these sections.
Maintenance
ItemsParts and tools
12-volt bat-
tery condi-
tion
( P.330)
•Warm water
• Baking soda
• Grease
• Conventional wrench
(for terminal clamp
bolts)
Engine/powe
r control unit
coolant level
( P.327)
• “Toyota Super Long
Life Coolant” or a simi-
lar high quality eth-
ylene glycol-based
non-silicate, non-
amine, non-nitrite and
non-borate coolant
with long-life hybrid
organic acid technol-
ogy.
“Toyota Super Long
Life Coolant” is pre-
mixed with 50% cool-
ant and 50% deionized
water.
• Funnel (used only for
adding coolant)
Engine oil
level
( P.325)
• “Toyota Genuine Motor
Oil” or equivalent
• Rag or paper towel
• Funnel (used only for
adding engine oil)
Fuses
( P.354)
• Fuse with same
amperage rating as
original
Hybrid bat-
tery (traction
battery) air
intake vent
( P.348)
• Vacuum cleaner, etc.
• Flathead screwdriver
Light bulbs
( P.357)
• Bulb with same num-
ber and wattage rating
as original
• Flathead screwdriver
•Wrench
Radiator and
condenser
( P.329)
Tire inflation
pressure
( P.342)
• Tire pressure gauge
• Compressed air
source
Washer fluid
( P.329)
• Water or washer fluid
containing antifreeze
(for winter use)
• Funnel (used only for
adding water or
washer fluid)
WARNING
The engine compartment contains many mechanisms and fluids that may move suddenly, become hot, or
become electrically energized. To avoid death or serious injury, observe the following precautions.
■When working on the engine compartment
●Make sure that the “ACCESSORY” or “IGNITION ON” on the multi-information display and the
“READY” indicator are both off.
ItemsParts and tools
Page 329 of 590
327
6
HV Owner's Manual_Europe_M52N30_en
6-3. Do-it-yourself maintenance
Maintenance and care
■Engine oil consumption
A certain amount of engine oil will be
consumed while driving. In the following situations, oil consumption may increase, and engine oil may need to be
refilled in between oil maintenance inter- vals.
●When the engine is new, for example directly after purchasing the vehicle or after replacing the engine
●If low quality oil or oil of an inappropri-ate viscosity is used
●When driving at high engine speeds or with a heavy load, when towing
(vehicles with towing packages), or when driving while accelerating or decelerating frequently
●When leaving the engine idling for a long time, or when driving frequently
through heavy traffic
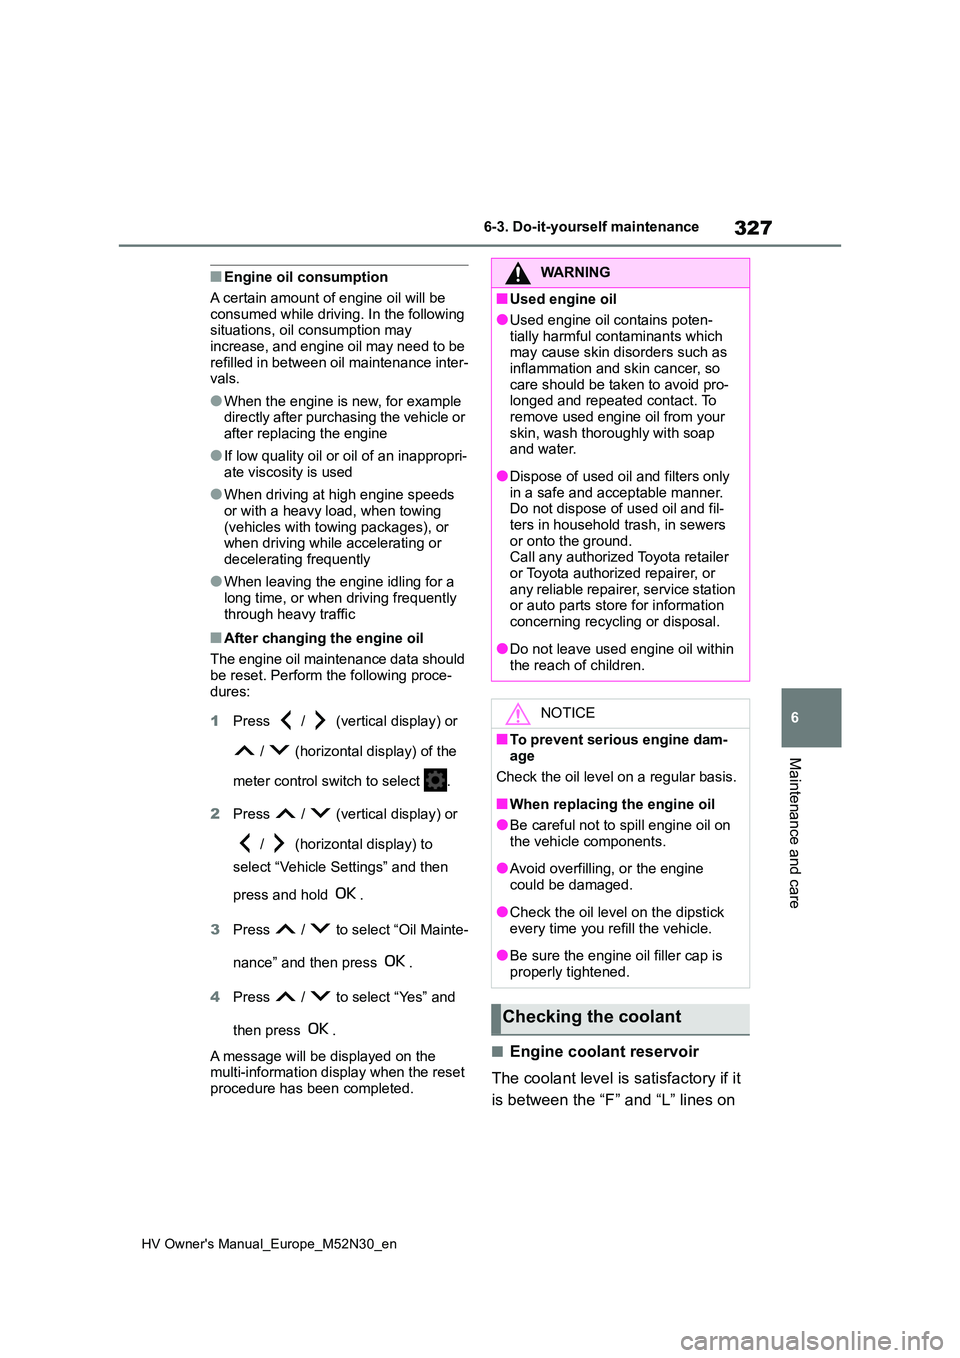
■After changing the engine oil
The engine oil maintenance data should be reset. Perform the following proce-
dures:
1 Press / (vertical display) or
/ (horizontal display) of the
meter control switch to select .
2 Press / (vertical display) or
/ (horizontal display) to
select “Vehicle Settings” and then
press and hold .
3 Press / to select “Oil Mainte-
nance” and then press .
4 Press / to select “Yes” and
then press .
A message will be displayed on the multi-information display when the reset
procedure has been completed.
■Engine coolant reservoir
The coolant level is satisfactory if it
is between the “F” and “L” lines on
WARNING
■Used engine oil
●Used engine oil contains poten-
tially harmful contaminants which may cause skin disorders such as inflammation and skin cancer, so
care should be taken to avoid pro- longed and repeated contact. To remove used engine oil from your
skin, wash thoroughly with soap and water.
●Dispose of used oil and filters only in a safe and acceptable manner. Do not dispose of used oil and fil-
ters in household trash, in sewers or onto the ground.Call any authorized Toyota retailer
or Toyota authorized repairer, or any reliable repairer, service station or auto parts store for information
concerning recycling or disposal.
●Do not leave used engine oil within
the reach of children.
NOTICE
■To prevent serious engine dam- age
Check the oil level on a regular basis.
■When replacing the engine oil
●Be careful not to spill engine oil on
the vehicle components.
●Avoid overfilling, or the engine
could be damaged.
●Check the oil level on the dipstick
every time you refill the vehicle.
●Be sure the engine oil filler cap is
properly tightened.
Checking the coolant
Page 336 of 590
334
HV Owner's Manual_Europe_M52N30_en
6-3. Do-it-yourself maintenance
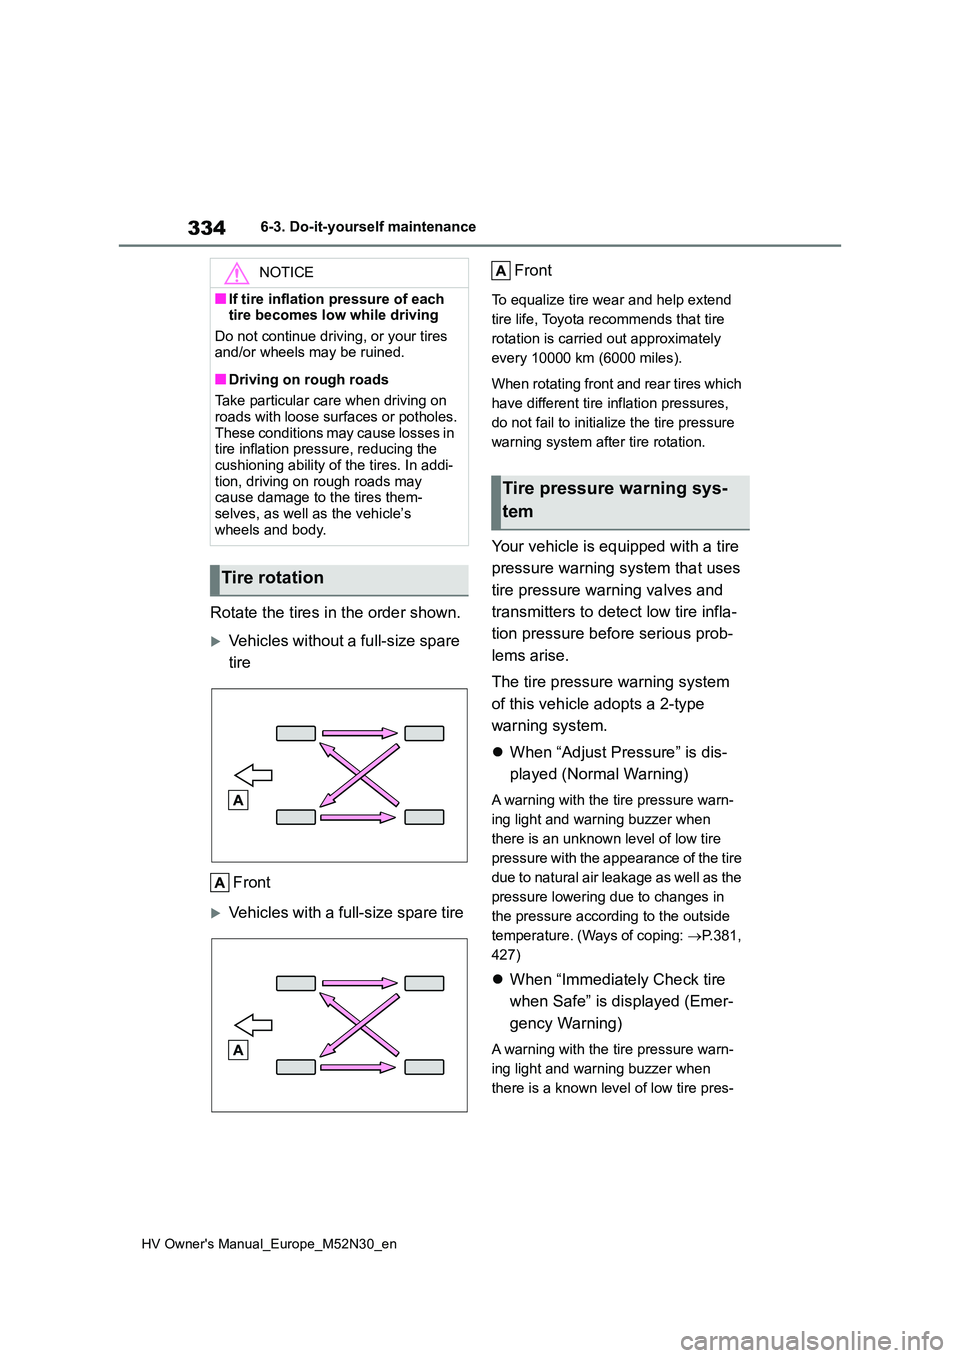
Rotate the tires in the order shown.
Vehicles without a full-size spare
tire
Front
Vehicles with a full-size spare tire
Front
To equalize tire wear and help extend
tire life, Toyota recommends that tire
rotation is carried out approximately
every 10000 km (6000 miles).
When rotating front and rear tires which
have different tire inflation pressures,
do not fail to initialize the tire pressure
warning system after tire rotation.
Your vehicle is equipped with a tire
pressure warning system that uses
tire pressure warning valves and
transmitters to detect low tire infla-
tion pressure before serious prob-
lems arise.
The tire pressure warning system
of this vehicle adopts a 2-type
warning system.
When “Adjust Pressure” is dis-
played (Normal Warning)
A warning with the tire pressure warn-
ing light and warning buzzer when
there is an unknown level of low tire
pressure with the appearance of the tire
due to natural air leakage as well as the
pressure lowering due to changes in
the pressure according to the outside
temperature. (Ways of coping: P.381,
427)
When “Immediately Check tire
when Safe” is displayed (Emer-
gency Warning)
A warning with the tire pressure warn-
ing light and warning buzzer when
there is a known level of low tire pres-
NOTICE
■If tire inflation pressure of each tire becomes low while driving
Do not continue driving, or your tires and/or wheels may be ruined.
■Driving on rough roads
Take particular care when driving on roads with loose surfaces or potholes.
These conditions may cause losses in tire inflation pressure, reducing the cushioning ability of the tires. In addi-
tion, driving on rough roads may cause damage to the tires them-selves, as well as the vehicle’s
wheels and body.
Tire rotation
Tire pressure warning sys-
tem
Page 337 of 590
335
6
HV Owner's Manual_Europe_M52N30_en
6-3. Do-it-yourself maintenance
Maintenance and care
sure with the appearance of the tire due
to pressure suddenly lowering. (Ways
of coping: P.386, 397)
However, the system may not be able
to detect sudden tire ruptures (bursting,
etc.).
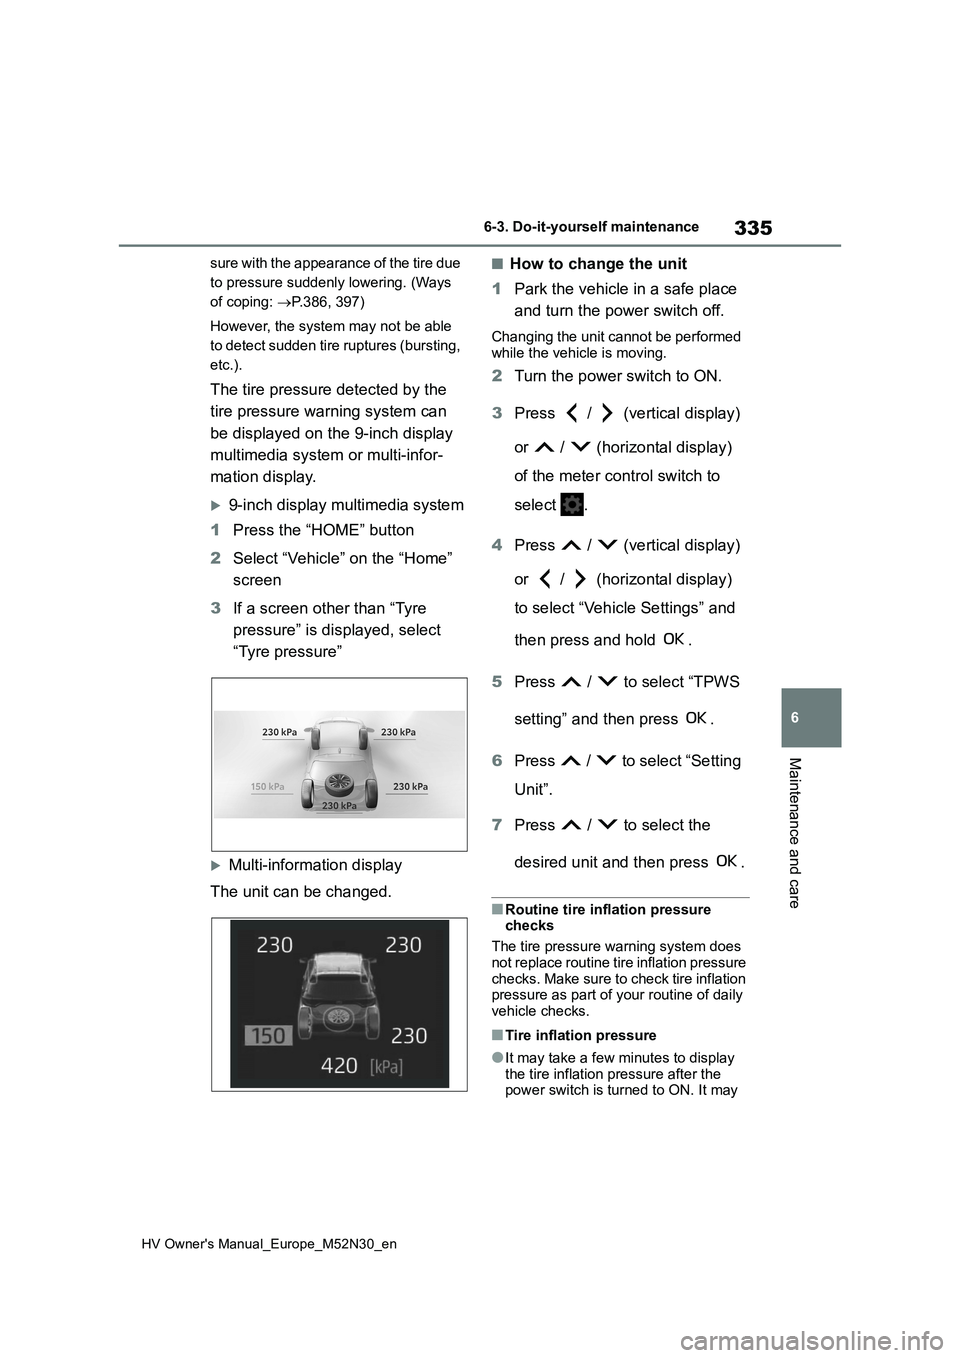
The tire pressure detected by the
tire pressure warning system can
be displayed on the 9-inch display
multimedia system or multi-infor-
mation display.
9-inch display multimedia system
1 Press the “HOME” button
2 Select “Vehicle” on the “Home”
screen
3 If a screen other than “Tyre
pressure” is displayed, select
“Tyre pressure”
Multi-information display
The unit can be changed.
■How to change the unit
1 Park the vehicle in a safe place
and turn the power switch off.
Changing the unit cannot be performed
while the vehicle is moving.
2 Turn the power switch to ON.
3 Press / (vertical display)
or / (horizontal display)
of the meter control switch to
select .
4 Press / (vertical display)
or / (horizontal display)
to select “Vehicle Settings” and
then press and hold .
5 Press / to select “TPWS
setting” and then press .
6 Press / to select “Setting
Unit”.
7 Press / to select the
desired unit and then press .
■Routine tire inflation pressure checks
The tire pressure warning system does
not replace routine tire inflation pressure checks. Make sure to check tire inflation pressure as part of your routine of daily
vehicle checks.
■Tire inflation pressure
●It may take a few minutes to display
the tire inflation pressure after the power switch is turned to ON. It may
Page 338 of 590
336
HV Owner's Manual_Europe_M52N30_en
6-3. Do-it-yourself maintenance
also take a few minutes to display the
tire inflation pressure after inflation pressure has been adjusted.
●Tire inflation pressure changes with temperature. The displayed values may also be different from the values
measured using a tire pressure gauge.
■Situations in which the tire pres-sure warning system may not oper-
ate properly
●In the following cases, the tire pres-
sure warning system may not operate properly.• If non-genuine Toyota wheels are
used. • A tire has been replaced with a tire that is not an OE (Original Equipment)
tire. • A tire has been replaced with a tire that is not of the specified size.
• Tire chains, etc. are equipped. • An auxiliary-supported run-flat tire is equipped.
• If a window tint that affects the radio wave signals is installed.• If there is a lot of snow or ice on the
vehicle, particularly around the wheels or wheel housings.• If the tire inflation pressure is
extremely higher than the specified level.• If tires not equipped with tire pressure
warning valves and transmitters are used.• If the ID code on the tire pressure
warning valves and transmitters is not registered in the tire pressure warning computer.
●Performance may be affected in the following situations.
• Near a TV tower, electric power plant, gas station, radio station, large dis-play, airport or other facility that gen-
erates strong radio waves or electrical noise.• When carrying a portable radio, cellu-
lar phone, cordless phone or other wireless communication device.
●When the vehicle is parked, the time taken for the warning to start or go off
could be extended.
●When tire inflation pressure declines rapidly for example when a tire has
burst, the warning may not function.
■Warning performance of the tire pressure warning system
The warning of the tire pressure warning
system will change in accordance with driving conditions. For this reason, the system may give a warning even if the
tire pressure does not reach a low enough level, or if the pressure is higher than the pressure that was adjusted to
when the system was initialized.
When replacing tires or wheels, tire
pressure warning valves and trans-
mitters must also be installed.
When new tire pressure warning
valves and transmitters are
installed, new ID codes must be
registered in the tire pressure warn-
ing computer and the tire pressure
warning system must be initialized.
Have tire pressure warning valves
and transmitter ID codes regis-
tered any authorized Toyota retailer
or Toyota authorized repairer, or
any reliable repairer. ( P.339)
■Replacing tires and wheels
If the ID code of the tire pressure warn-
ing valve and transmitter is not regis- tered, the tire pressure warning system will not work properly. After driving for
about 10 minutes, the tire pressure warning light blinks for 1 minute and stays on to indicate a system malfunc-
tion.
Installing tire pressure warn-
ing valves and transmitters
Page 339 of 590
337
6
HV Owner's Manual_Europe_M52N30_en
6-3. Do-it-yourself maintenance
Maintenance and care
■The tire pressure warning sys-
tem must be init ialized in the
following circumstances:
When rotating front and rear tires
which have different tire inflation
pressures.
When changing the tire size.
When the tire inflation pressure
is changed such as when chang-
ing traveling speed or load
weight.
When changing between two
registered wheel sets.
When the tire pressure warning
system is initialized, the current tire
inflation pressure is set as the
benchmark pressure.
■How to initialize the tire pres-
sure warning system
1 Park the vehicle in a safe place
and turn the power switch off,
wait for approximately 15 min-
utes or more, and then perform
the procedure.
2 Adjust the tire inflation pressure
to the specified cold tire inflation
pressure level. ( P.427)
Make sure to adjust the tire pressure to the specified cold tire inflation pressure level. The tire pressure warning system
will operate based on this pressure level.
3 Turn the power switch to ON.
Initialization cannot be performed while the vehicle is moving.
4 Press / (vertical display)
or / (horizontal display)
of the meter control switch to
select .
NOTICE
■Repairing or replacing tires, wheels, tire pressure warning
valves, transmitters and tire valve caps
●When removing or fitting the
wheels, tires or the tire pressure warning valves and transmitters, contact any authorized Toyota
retailer or Toyota authorized repairer, or any reliable repairer as the tire pressure warning valves
and transmitters may be damaged if not handled correctly.
●Make sure to install the tire valve caps. If the tire valve caps are not installed, water could enter the tire
pressure warning valves and the tire pressure warning valves could be bound.
●When replacing tire valve caps, do not use tire valve caps other than
those specified. The cap may become stuck.
■To avoid damage to the tire pres-sure warning valves and trans-mitters
When a tire is repaired with liquid sealants, the tire pressure warning valve and transmitter may not operate
properly. If a liquid sealant is used, contact any authorized Toyota retailer or Toyota authorized repairer, or any
reliable repairer as soon as possible. Make sure to replace the tire pressure warning valve and transmitter when
replacing the tire. ( P.336)
Initializing the tire pressure
warning system