key TOYOTA YARIS CROSS 2022 Service Manual
[x] Cancel search | Manufacturer: TOYOTA, Model Year: 2022, Model line: YARIS CROSS, Model: TOYOTA YARIS CROSS 2022Pages: 618, PDF Size: 130.77 MB
Page 343 of 618
6
341
CV Owner's Manual_Europe_M52N20_en
6
Maintenance and care
Maintenance and care
6-1. Maintenance and care
Cleaning and protecting the
vehicle exterior ............... 342
Cleaning and protecting the
vehicle interior ................ 345
6-2. Maintenance
Maintenance requirements 348
6-3. Do-it-yourself maintenance
Do-it-yourself service precau-
tions ................................ 350
Hood ................................. 351
Positioning a floor jack...... 353
Engine compartment ........ 354
Tires .................................. 363
Tire inflation pressure ....... 373
Wheels.............................. 374
Air conditioning filter ......... 376
Wireless remote control/elec-
tronic key battery ............ 378
Checking and replacing fuses
....................................... 381
Light bulbs ........................ 386
Page 344 of 618
342
CV Owner's Manual_Europe_M52N20_en
6-1. Maintenance and care
6-1.Mainte nance a nd care
Working from top to bottom, lib-
erally apply water to the vehicle
body, wheel wells and underside
of the vehicle to remove any dirt
and dust.
Wash the vehicle body using a
sponge or soft cloth, such as a
chamois.
For hard-to-remove marks, use
car wash soap and rinse thor-
oughly with water.
Wipe away any water.
Wax the vehicle when the water-
proof coating deteriorates.
If water does not bead on a clean sur-
face, apply wax when the vehicle body
is cool.
■Automatic car washes
●Before washing the vehicle: • Fold the mirrors.
Start washing from the front of the vehi-
cle. Extend the mirrors before driving.
●Turn off the power back door (if equipped).
●Brushes used in automatic car washes may scratch the vehicle sur-
face, parts (wheel, etc.) and harm your vehicle’s paint.
●In certain automatic car washes, the
rear spoiler may interfere with
machine operation. This may prevent the vehicle from being cleaned prop-erly or result in damage to the rear
spoiler.
■High pressure car washes
As water may enter the cabin, do not bring the nozzle tip near the gaps
around the doors or perimeter of the windows, or spray these areas continu-ously.
■When using a car wash (vehicles
with a smart entry & start system)
If the door handle becomes wet while the electronic key is within the effective
range, the door may lock and unlock repeatedly. In that case, follow the fol-lowing correction procedures to wash
the vehicle:
●Place the key in a position 2 m (6 ft.)
or more separate from the vehicle while the vehicle is being washed. (Take care to ensure that the key is
not stolen.)
●Set the electronic key to battery-sav-
ing mode to disable the smart entry & start system. ( P.137)
■Wheels and wheel ornaments (if equipped)
●Remove any dirt immediately by using a neutral detergent.
●Wash detergent off with water immedi-ately after use.
●To protect the paint from damage, make sure to observe the following
precautions. • Do not use acidic, alkaline or abrasive detergent
• Do not use hard brushes • Do not use detergent on the wheels when they are hot, such as after driv-
ing or parking in hot weather
■Bumpers
Do not scrub with abrasive cleaners.
■Plated portions (if equipped)
If dirt cannot be removed, clean the
parts as follows:
Cleaning and protecting
the vehicle exterior
Perform cleaning in a manner
appropriate to each compo-
nent and its material.
Cleaning instructions
Page 361 of 618
359
6
CV Owner's Manual_Europe_M52N20_en
6-3. Do-it-yourself maintenance
Maintenance and care
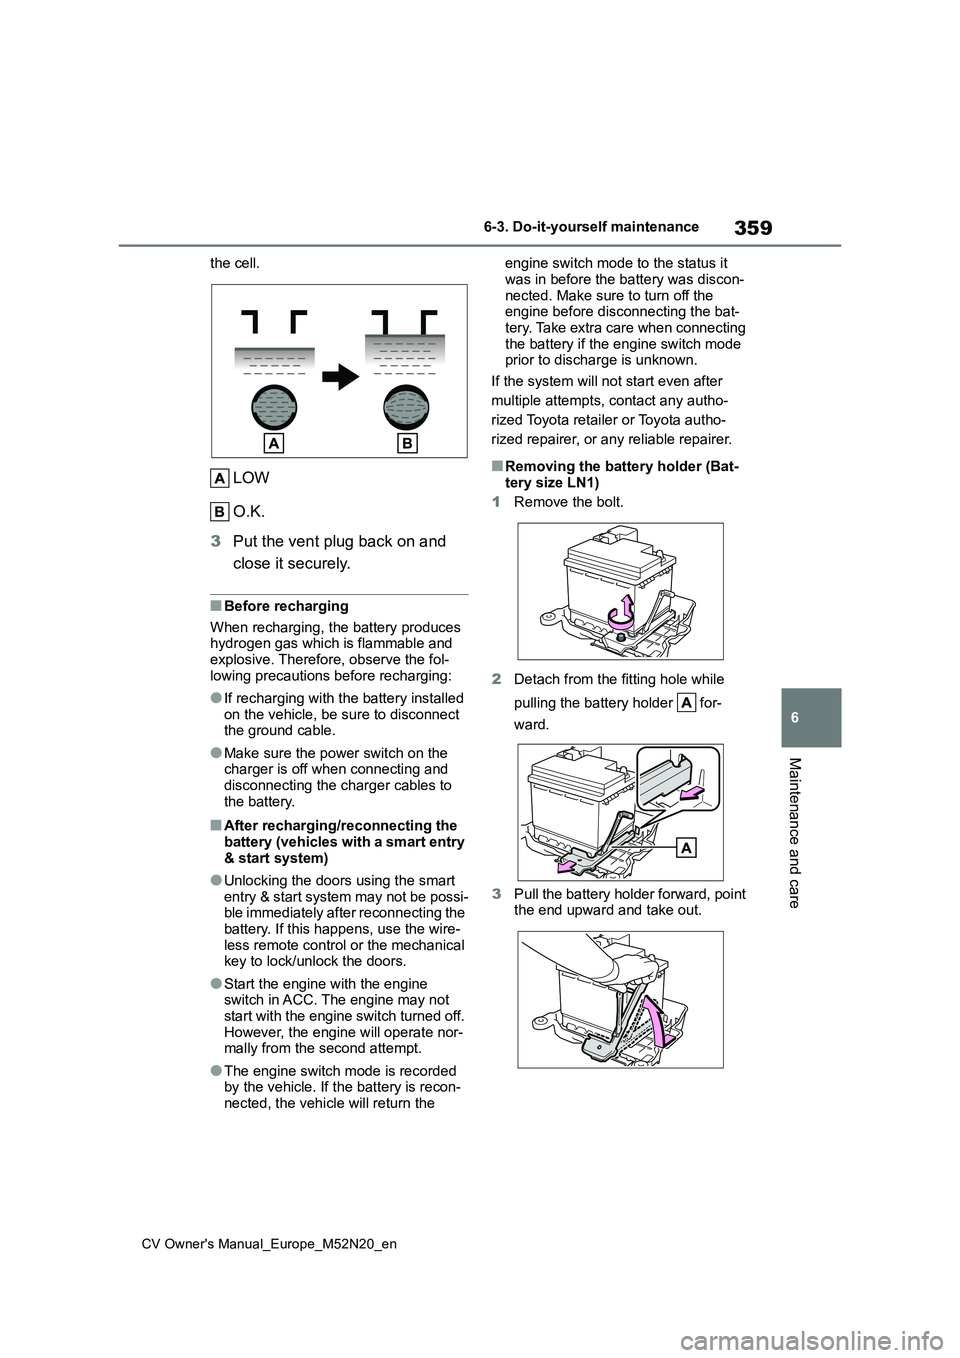
the cell.
LOW
O.K.
3 Put the vent plug back on and
close it securely.
■Before recharging
When recharging, the battery produces hydrogen gas which is flammable and explosive. Therefore, observe the fol-
lowing precautions before recharging:
●If recharging with the battery installed
on the vehicle, be sure to disconnect the ground cable.
●Make sure the power switch on the charger is off when connecting and
disconnecting the charger cables to the battery.
■After recharging/reconnecting the battery (vehicles with a smart entry
& start system)
●Unlocking the doors using the smart
entry & start system may not be possi- ble immediately after reconnecting the battery. If this happens, use the wire-
less remote control or the mechanical key to lock/unlock the doors.
●Start the engine with the engine switch in ACC. The engine may not start with the engine switch turned off.
However, the engine will operate nor- mally from the second attempt.
●The engine switch mode is recorded by the vehicle. If the battery is recon-nected, the vehicle will return the
engine switch mode to the status it
was in before the battery was discon- nected. Make sure to turn off the engine before disconnecting the bat-
tery. Take extra care when connecting the battery if the engine switch mode prior to discharge is unknown.
If the system will not start even after
multiple attempts, contact any autho-
rized Toyota retailer or Toyota autho-
rized repairer, or any reliable repairer.
■Removing the battery holder (Bat-
tery size LN1)
1 Remove the bolt.
2 Detach from the fitting hole while
pulling the battery holder for-
ward.
3 Pull the battery holder forward, point the end upward and take out.
Page 380 of 618
378
CV Owner's Manual_Europe_M52N20_en
6-3. Do-it-yourself maintenance
■If the key battery is depleted
The following symptoms may occur:
●The smart entry & start system (if equipped) and wireless remote control will not function properly.
●The operational range will be reduced.
Flathead screwdriver
Small flathead screwdriver
Lithium battery CR2032 (vehi-
cles without a smart entry & start
system), or CR2450 (vehicles
with a smart entry & start sys-
tem)
■Use a CR2032 (vehicles without a smart entry & start system) or
CR2450 (vehicles with a smart entry & start system) lithium bat-tery
●Batteries can be purchased at any authorized Toyota retailer or Toyota
authorized repairer, or any reliable repairer, local electrical appliance
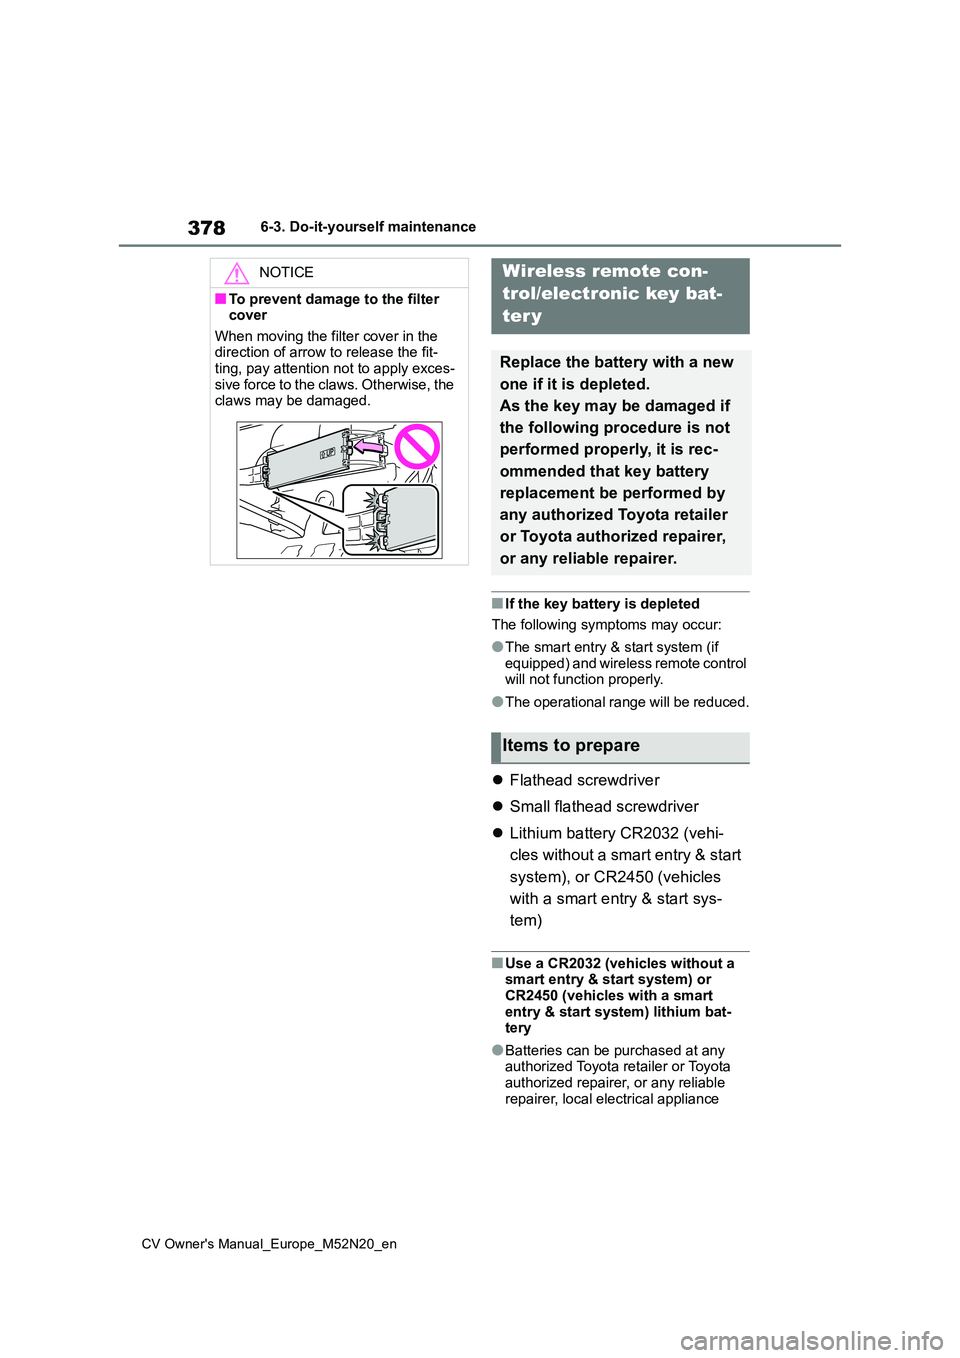
NOTICE
■To prevent damage to the filter cover
When moving the filter cover in the direction of arrow to release the fit-ting, pay attention not to apply exces-
sive force to the claws. Otherwise, the claws may be damaged.
Wireless remote con-
trol/electronic key bat-
ter y
Replace the battery with a new
one if it is depleted.
As the key may be damaged if
the following procedure is not
performed properly, it is rec-
ommended that key battery
replacement be performed by
any authorized Toyota retailer
or Toyota authorized repairer,
or any reliable repairer.
Items to prepare
Page 381 of 618
379
6
CV Owner's Manual_Europe_M52N20_en
6-3. Do-it-yourself maintenance
Maintenance and care
shops or camera stores.
●Replace only with the same or equiva- lent type recommended by the manu-
facturer.
●Dispose of used batteries according to
local laws.
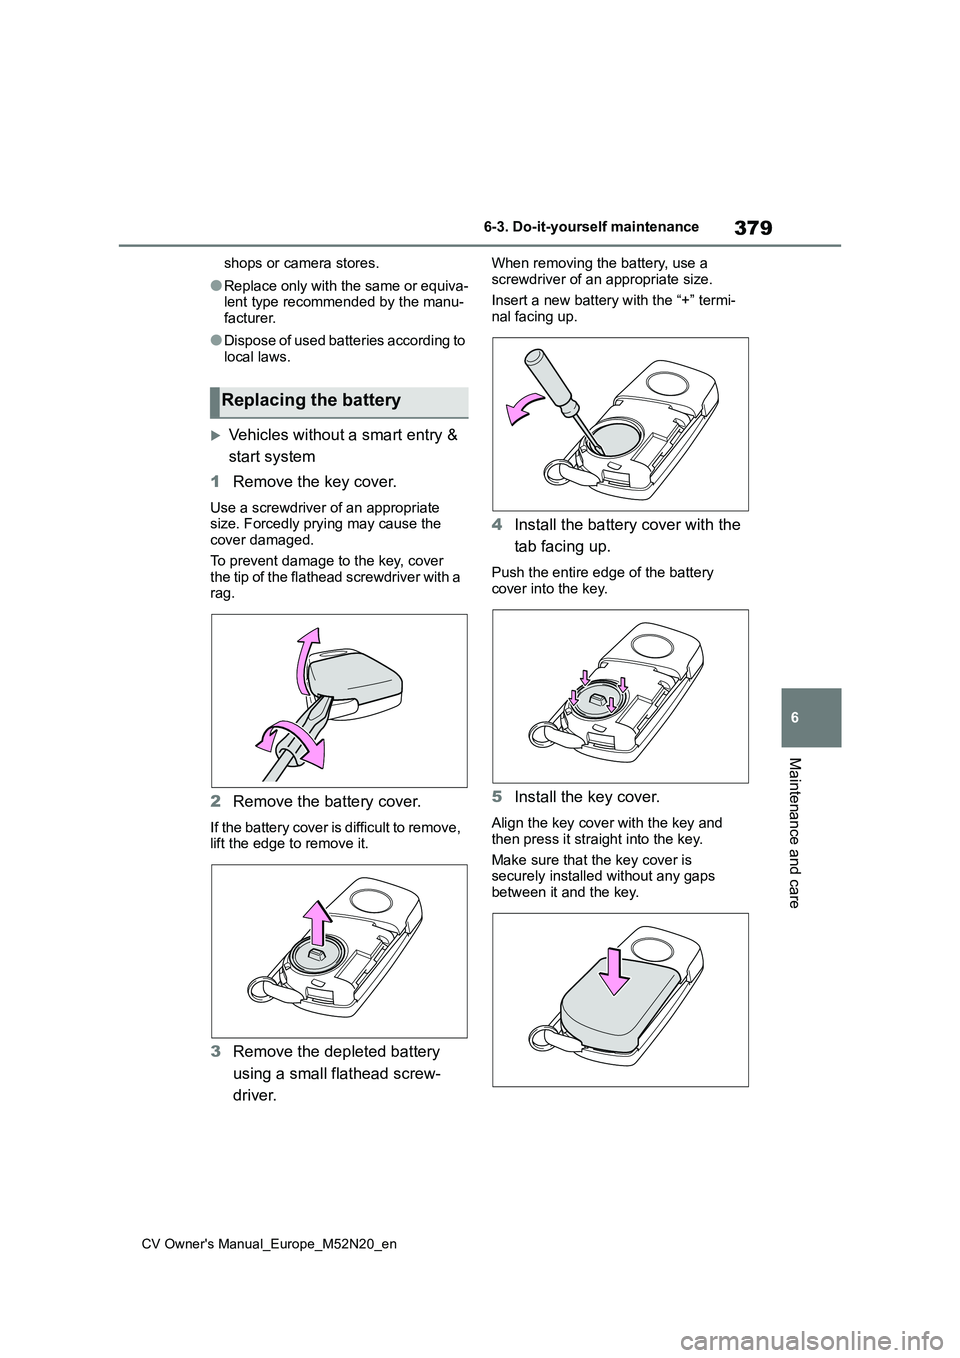
Vehicles without a smart entry &
start system
1 Remove the key cover.
Use a screwdriver of an appropriate size. Forcedly prying may cause the cover damaged.
To prevent damage to the key, cover the tip of the flathead screwdriver with a rag.
2 Remove the battery cover.
If the battery cover is difficult to remove, lift the edge to remove it.
3 Remove the depleted battery
using a small flathead screw-
driver.
When removing the battery, use a
screwdriver of an appropriate size.
Insert a new battery with the “+” termi- nal facing up.
4 Install the battery cover with the
tab facing up.
Push the entire edge of the battery cover into the key.
5 Install the key cover.
Align the key cover with the key and
then press it straight into the key.
Make sure that the key cover is securely installed without any gaps
between it and the key.
Replacing the battery
Page 382 of 618
380
CV Owner's Manual_Europe_M52N20_en
6-3. Do-it-yourself maintenance
6Operate the or switch
and check that the doors can be
locked/unlocked.
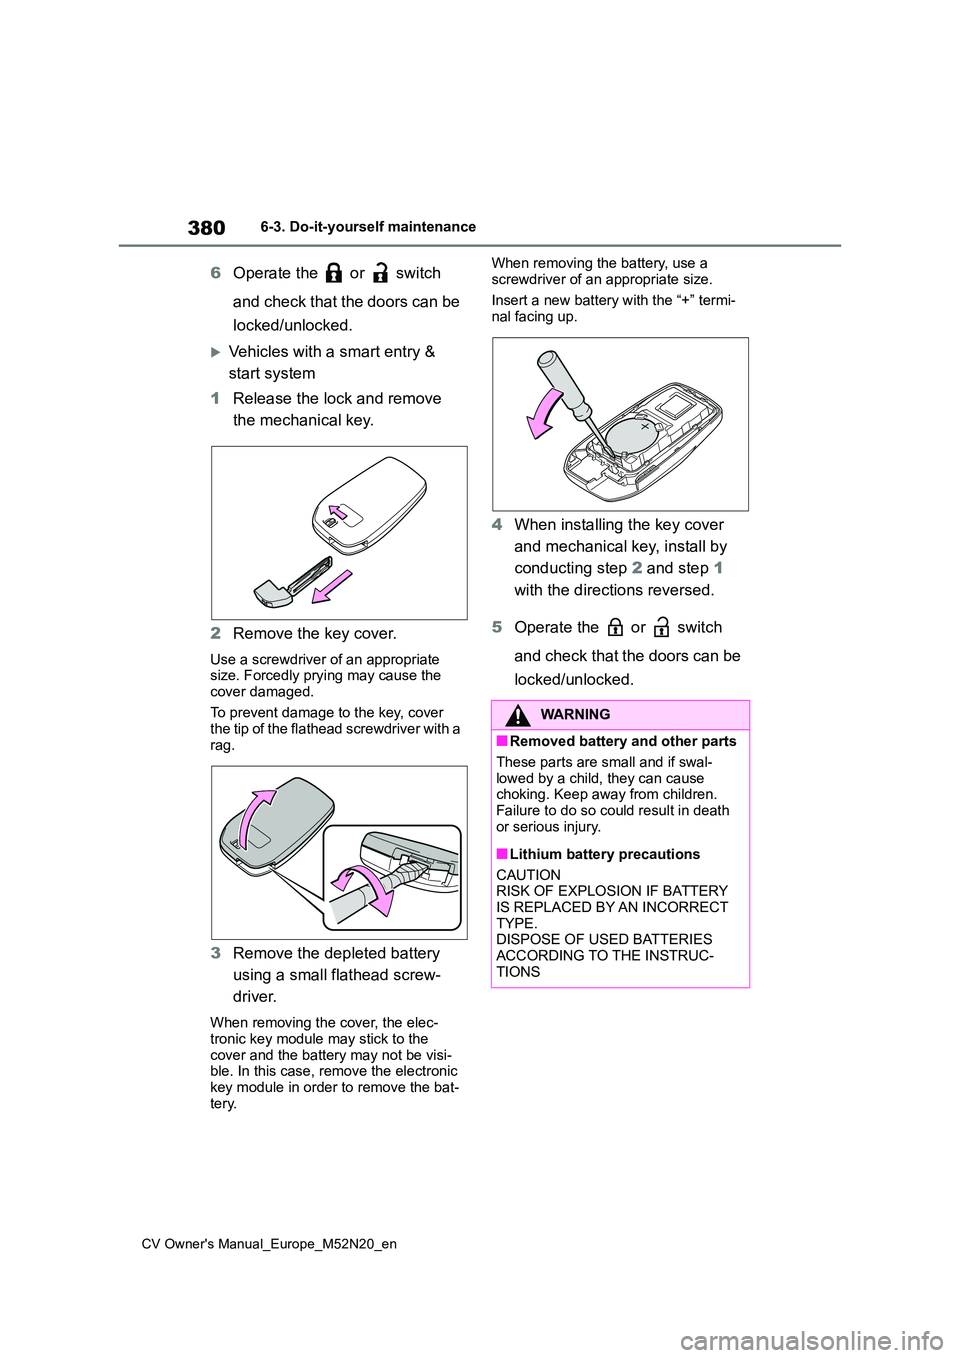
Vehicles with a smart entry &
start system
1 Release the lock and remove
the mechanical key.
2 Remove the key cover.
Use a screwdriver of an appropriate size. Forcedly prying may cause the
cover damaged.
To prevent damage to the key, cover the tip of the flathead screwdriver with a
rag.
3 Remove the depleted battery
using a small flathead screw-
driver.
When removing the cover, the elec- tronic key module may stick to the
cover and the battery may not be visi- ble. In this case, remove the electronic key module in order to remove the bat-
tery.
When removing the battery, use a
screwdriver of an appropriate size.
Insert a new battery with the “+” termi- nal facing up.
4 When installing the key cover
and mechanical key, install by
conducting step 2 and step 1
with the directions reversed.
5 Operate the or switch
and check that the doors can be
locked/unlocked.
WARNING
■Removed battery and other parts
These parts are small and if swal-
lowed by a child, they can cause choking. Keep away from children.
Failure to do so could result in death or serious injury.
■Lithium battery precautions
CAUTION RISK OF EXPLOSION IF BATTERY
IS REPLACED BY AN INCORRECT TYPE.DISPOSE OF USED BATTERIES
ACCORDING TO THE INSTRUC- TIONS
Page 395 of 618
7
393
CV Owner's Manual_Europe_M52N20_en
7
When trouble arises
When trouble arises
7-1. Essential information
Emergency flashers .......... 394
If your vehicle has to be
stopped in an emergency 394
If the vehicle is submerged or
water on the road is rising
....................................... 395
7-2. Steps to take in an emer-
gency
If your vehicle needs to be
towed .............................. 397
If you think something is wrong
....................................... 401
Fuel pump shut off system 402
If a warning light turns on or a
warning buzzer sounds... 403
If a warning message is dis-
played ............................. 413
If you have a flat tire (vehicles
with an emergency tire punc-
ture repair kit) ................. 415
If you have a flat tire (vehicles
with a spare tire) ............. 426
If the engine will not start .. 435
If you lose your keys ......... 436
If the electronic key does not
operate properly (vehicles
with a smart entry & start sys-
tem) ................................ 437
If the vehicle battery is dis-
charged .......................... 439
If your vehicle overheats... 442
If the vehicle becomes stuck
....................................... 444
Page 397 of 618
395
7
CV Owner's Manual_Europe_M52N20_en
7-1. Essential information
When trouble arises
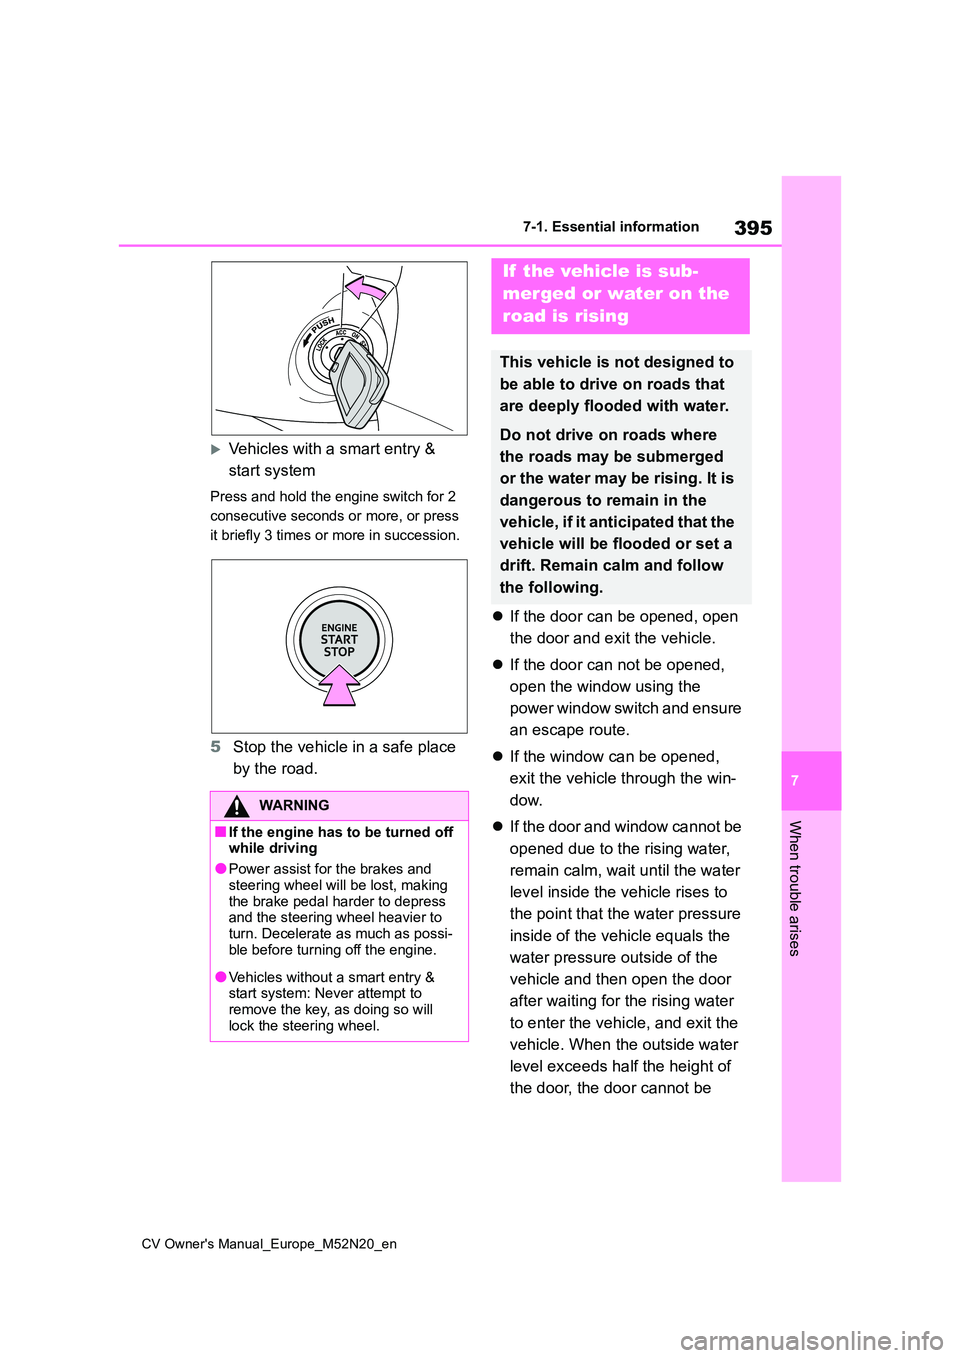
Vehicles with a smart entry &
start system
Press and hold the engine switch for 2
consecutive seconds or more, or press
it briefly 3 times or more in succession.
5 Stop the vehicle in a safe place
by the road.
If the door can be opened, open
the door and exit the vehicle.
If the door can not be opened,
open the window using the
power window switch and ensure
an escape route.
If the window can be opened,
exit the vehicle through the win-
dow.
If the door and window cannot be
opened due to the rising water,
remain calm, wait until the water
level inside the vehicle rises to
the point that the water pressure
inside of the vehicle equals the
water pressure outside of the
vehicle and then open the door
after waiting for the rising water
to enter the vehicle, and exit the
vehicle. When the outside water
level exceeds half the height of
the door, the door cannot be
WARNING
■If the engine has to be turned off while driving
●Power assist for the brakes and
steering wheel will be lost, making the brake pedal harder to depress and the steering wheel heavier to
turn. Decelerate as much as possi- ble before turning off the engine.
●Vehicles without a smart entry & start system: Never attempt to remove the key, as doing so will
lock the steering wheel.
If the vehicle is sub-
merged or water on the
road is rising
This vehicle is not designed to
be able to drive on roads that
are deeply flooded with water.
Do not drive on roads where
the roads may be submerged
or the water may be rising. It is
dangerous to remain in the
vehicle, if it anticipated that the
vehicle will be flooded or set a
drift. Remain calm and follow
the following.
Page 435 of 618
433
7
CV Owner's Manual_Europe_M52N20_en
7-2. Steps to take in an emergency
When trouble arises
system. Also, if you replace the compact
spare tire after the tire pressure warning light comes on, the light remains on.
■If you have a flat rear tire (vehicles
with a compact spare tire in some
countries*)
Do not install the compact spare tire to rear axles.
Install the compact spare tire on one of the front wheels of the vehicle.
1 Replace a front tire with the compact spare tire.
2 Replace the flat rear tire with the tire
removed from the front of the vehi- cle.*: Guadelope, Martinique, F. Guiana,
Ceuta & Melilla, Ukraine, Turkey, New
Caledonia, Tahiti, Egypt
■If you have a flat front tire on a road covered with snow or ice (vehicles
with a compact spare tire)
Install the compact spare tire on one of the rear wheels of the vehicle. Perform
the following steps and fit tire chains to the front tires:
1 Replace a rear tire with the compact spare tire.
2 Replace the flat front tire with the tire
removed from the rear of the vehicle.
3 Fit tire chains to the front tires.
■When reinstalling the wheel orna- ment (steel wheels except compact spare tire)
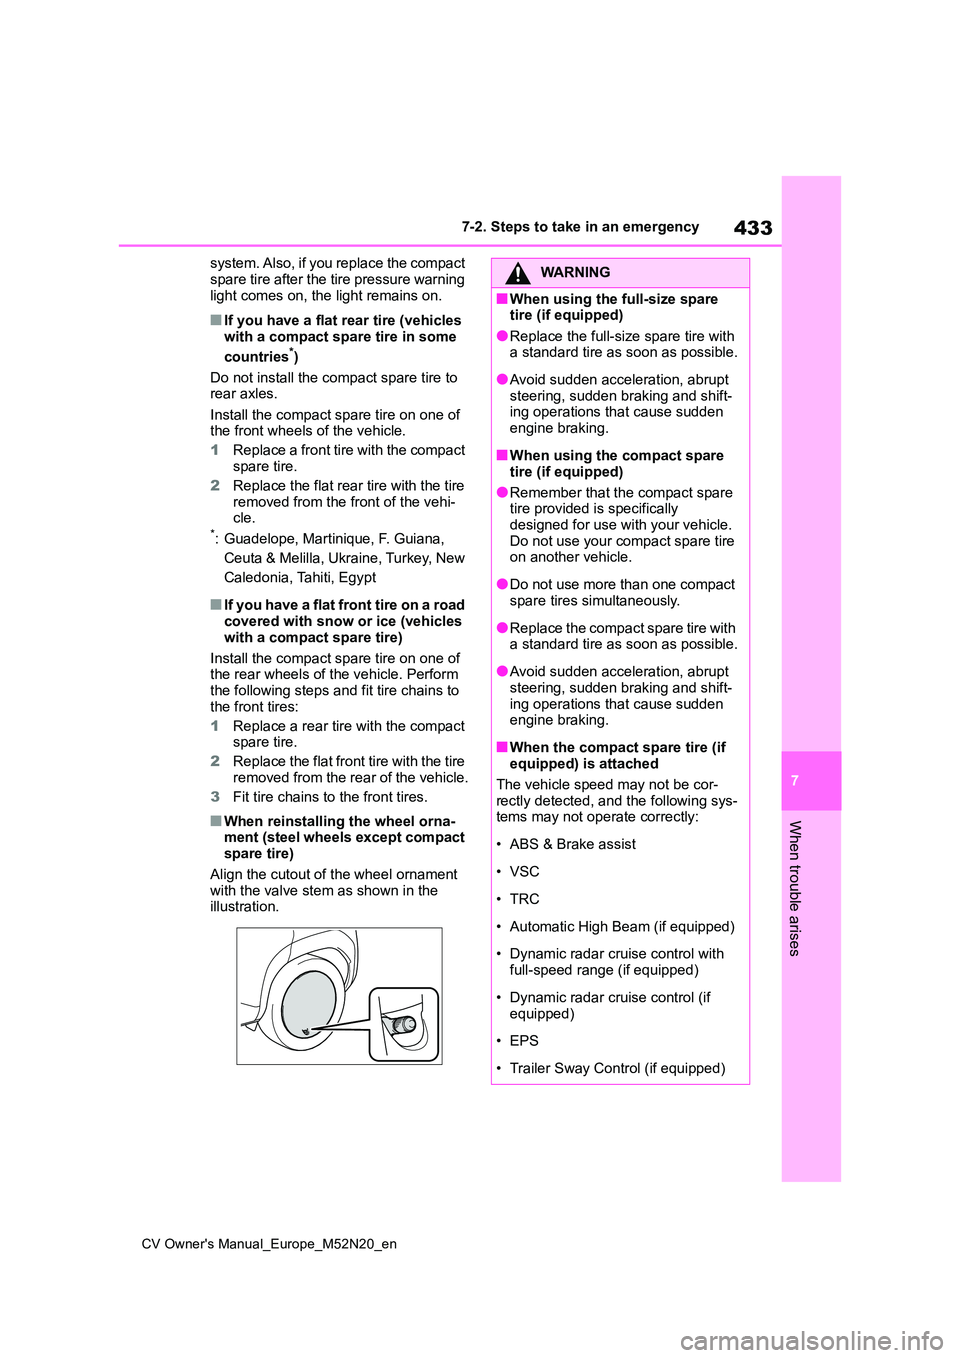
Align the cutout of the wheel ornament with the valve stem as shown in the illustration.
WARNING
■When using the full-size spare tire (if equipped)
●Replace the full-size spare tire with a standard tire as soon as possible.
●Avoid sudden acceleration, abrupt steering, sudden braking and shift-ing operations that cause sudden
engine braking.
■When using the compact spare
tire (if equipped)
●Remember that the compact spare tire provided is specifically
designed for use with your vehicle. Do not use your compact spare tire on another vehicle.
●Do not use more than one compact spare tires simultaneously.
●Replace the compact spare tire with a standard tire as soon as possible.
●Avoid sudden acceleration, abrupt steering, sudden braking and shift-
ing operations that cause sudden engine braking.
■When the compact spare tire (if equipped) is attached
The vehicle speed may not be cor-
rectly detected, and the following sys- tems may not operate correctly:
• ABS & Brake assist
• VSC
•TRC
• Automatic High Beam (if equipped)
• Dynamic radar cruise control with
full-speed range (if equipped)
• Dynamic radar cruise control (if
equipped)
• EPS
• Trailer Sway Control (if equipped)
Page 437 of 618
435
7
CV Owner's Manual_Europe_M52N20_en
7-2. Steps to take in an emergency
When trouble arises
One of the following may be the
cause of the problem:
There may not be sufficient fuel
in the vehicle’s tank. Refuel the
vehicle.
The engine may be flooded. Try
to restart the engine again fol-
lowing correct starting proce-
dures. ( P.173, 174)
There may be a malfunction in
the engine immobilizer system.
( P. 7 5 )
One of the following may be the
cause of the problem:
The battery may be discharged.
( P.439)
The battery terminal connec-
tions may be loose or corroded.
( P.358)
The engine starting system may be
malfunctioning due to an electrical
problem such as electronic key bat-
tery depletion or a blown fuse.
However, an interim measure is
available to start the engine.
( P.436)
One of the following may be the
cause of the problem:
The battery may be discharged.
( P.439)
One or both of the battery termi-
nals may be disconnected.
( P.358)
Vehicles with a smart entry &
start system: There may be a
malfunction in the steering lock
system.
Contact any authorized Toyota retailer
or Toyota authorized repairer, or any
reliable repairer if the problem cannot
be repaired, or if repair procedures are
unknown.
If the engine will not
start
If the engine will not start even
though correct starting proce-
dures are being followed
( P.173, 174), consider each of
the following points:
The engine will not start
even though the starter
motor operates normally.
The starter motor turns over
slowly, the interior lights
and headlights are dim, or
the horn does not sound or
sounds at a low volume.
The starter motor does not
turn over (vehicles with a
smart entry & start system)
The starter motor does not
turn over, the interior lights
and headlights do not turn
on, or the horn does not
sound.