remove seats TOYOTA YARIS CROSS 2022 Owners Manual
[x] Cancel search | Manufacturer: TOYOTA, Model Year: 2022, Model line: YARIS CROSS, Model: TOYOTA YARIS CROSS 2022Pages: 618, PDF Size: 130.77 MB
Page 64 of 618
62
CV Owner's Manual_Europe_M52N20_en
1-2. Child safety
(Part No. 73119-22010)
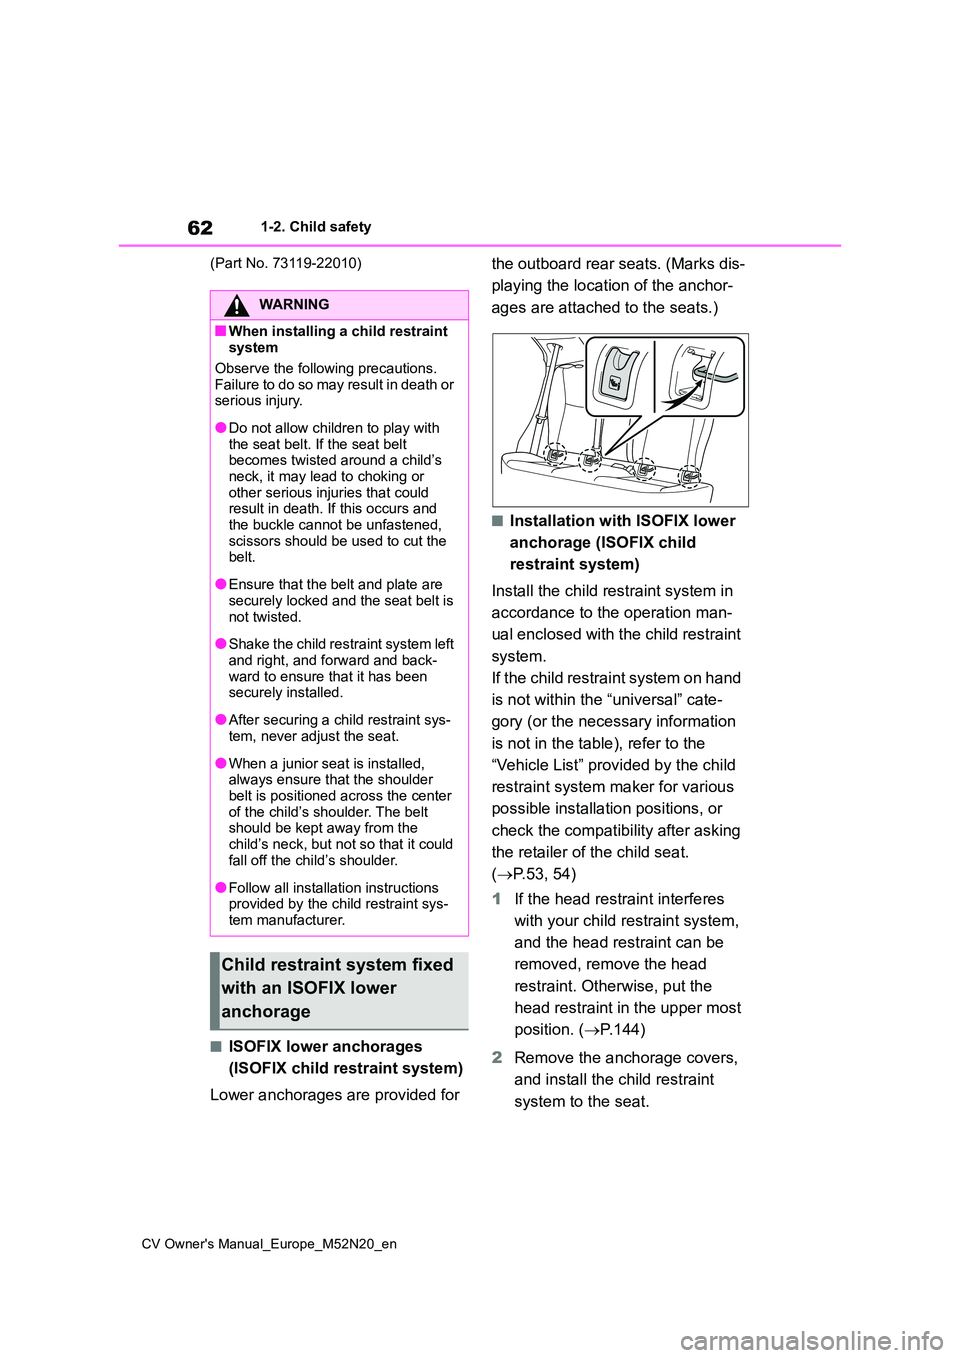
■ISOFIX lower anchorages
(ISOFIX child restraint system)
Lower anchorages are provided for
the outboard rear seats. (Marks dis-
playing the location of the anchor-
ages are attached to the seats.)
■Installation with ISOFIX lower
anchorage (ISOFIX child
restraint system)
Install the child restraint system in
accordance to the operation man-
ual enclosed with the child restraint
system.
If the child restraint system on hand
is not within the “universal” cate-
gory (or the necessary information
is not in the table), refer to the
“Vehicle List” provided by the child
restraint system maker for various
possible installation positions, or
check the compatibility after asking
the retailer of the child seat.
( P.53, 54)
1 If the head restraint interferes
with your child restraint system,
and the head restraint can be
removed, remove the head
restraint. Otherwise, put the
head restraint in the upper most
position. ( P.144)
2 Remove the anchorage covers,
and install the child restraint
system to the seat.
WARNING
■When installing a child restraint system
Observe the following precautions.
Failure to do so may result in death or serious injury.
●Do not allow children to play with the seat belt. If the seat belt becomes twisted around a child’s
neck, it may lead to choking or other serious injuries that could result in death. If this occurs and
the buckle cannot be unfastened, scissors should be used to cut the belt.
●Ensure that the belt and plate are securely locked and the seat belt is
not twisted.
●Shake the child restraint system left
and right, and forward and back- ward to ensure that it has been securely installed.
●After securing a child restraint sys-tem, never adjust the seat.
●When a junior seat is installed, always ensure that the shoulder
belt is positioned across the center of the child’s shoulder. The belt should be kept away from the
child’s neck, but not so that it could fall off the child’s shoulder.
●Follow all installation instructions provided by the child restraint sys-tem manufacturer.
Child restraint system fixed
with an ISOFIX lower
anchorage
Page 65 of 618
63
1
CV Owner's Manual_Europe_M52N20_en
1-2. Child safety
For safety and security
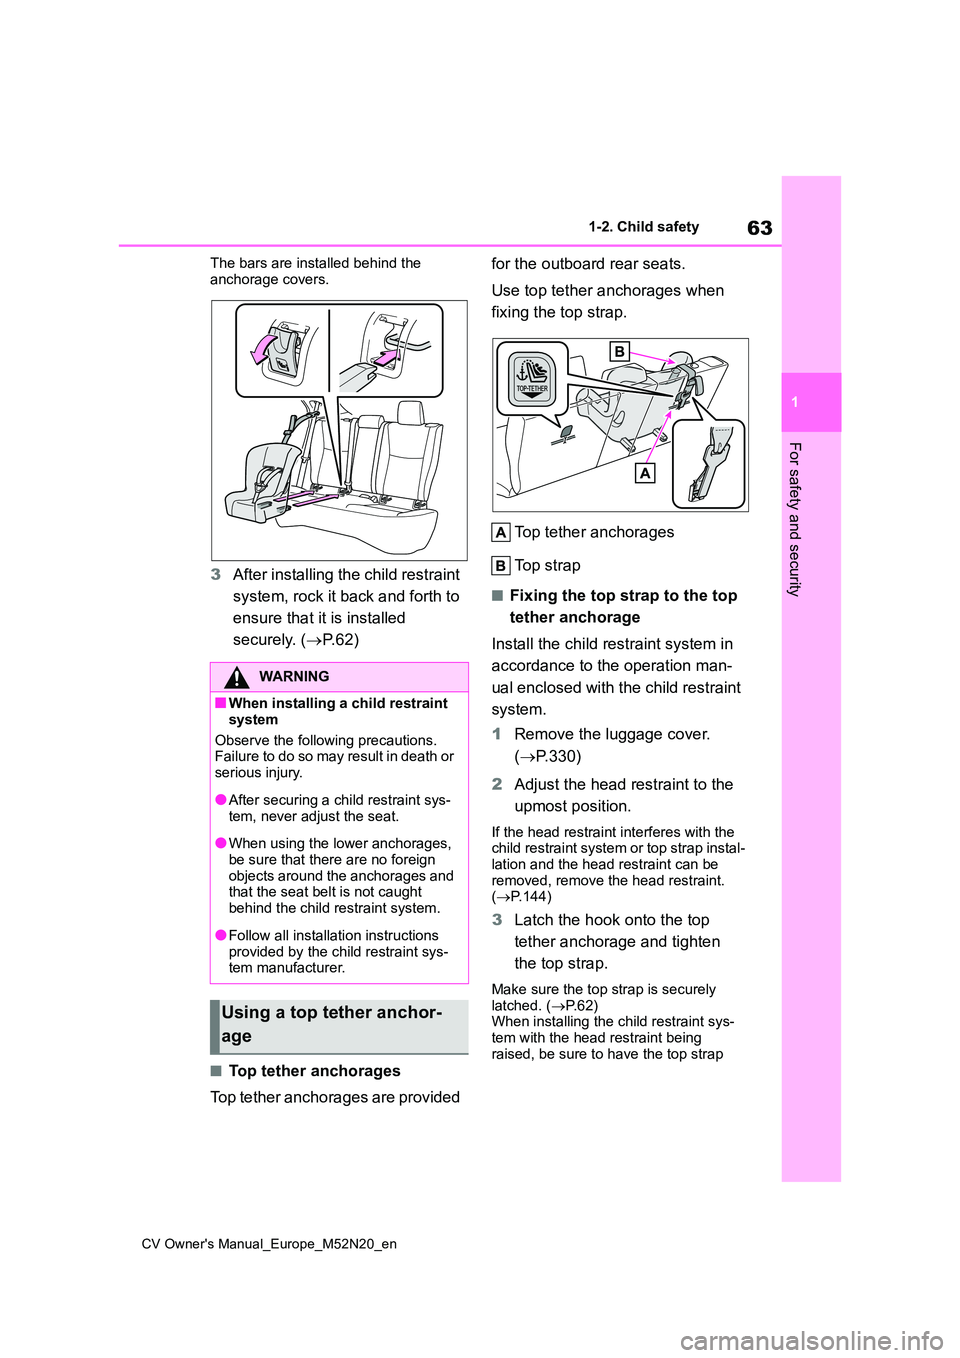
The bars are installed behind the
anchorage covers.
3 After installing the child restraint
system, rock it back and forth to
ensure that it is installed
securely. ( P. 6 2 )
■Top tether anchorages
Top tether anchorages are provided
for the outboard rear seats.
Use top tether anchorages when
fixing the top strap.
Top tether anchorages
Top strap
■Fixing the top strap to the top
tether anchorage
Install the child restraint system in
accordance to the operation man-
ual enclosed with the child restraint
system.
1 Remove the luggage cover.
( P.330)
2 Adjust the head restraint to the
upmost position.
If the head restraint interferes with the child restraint system or top strap instal-
lation and the head restraint can be removed, remove the head restraint. ( P.144)
3Latch the hook onto the top
tether anchorage and tighten
the top strap.
Make sure the top strap is securely latched. ( P. 6 2 ) When installing the child restraint sys-
tem with the head restraint being raised, be sure to have the top strap
WARNING
■When installing a child restraint
system
Observe the following precautions. Failure to do so may result in death or
serious injury.
●After securing a child restraint sys-
tem, never adjust the seat.
●When using the lower anchorages,
be sure that there are no foreign objects around the anchorages and that the seat belt is not caught
behind the child restraint system.
●Follow all installation instructions
provided by the child restraint sys- tem manufacturer.
Using a top tether anchor-
age
Page 146 of 618
144
CV Owner's Manual_Europe_M52N20_en
3-3. Adjusting the seats
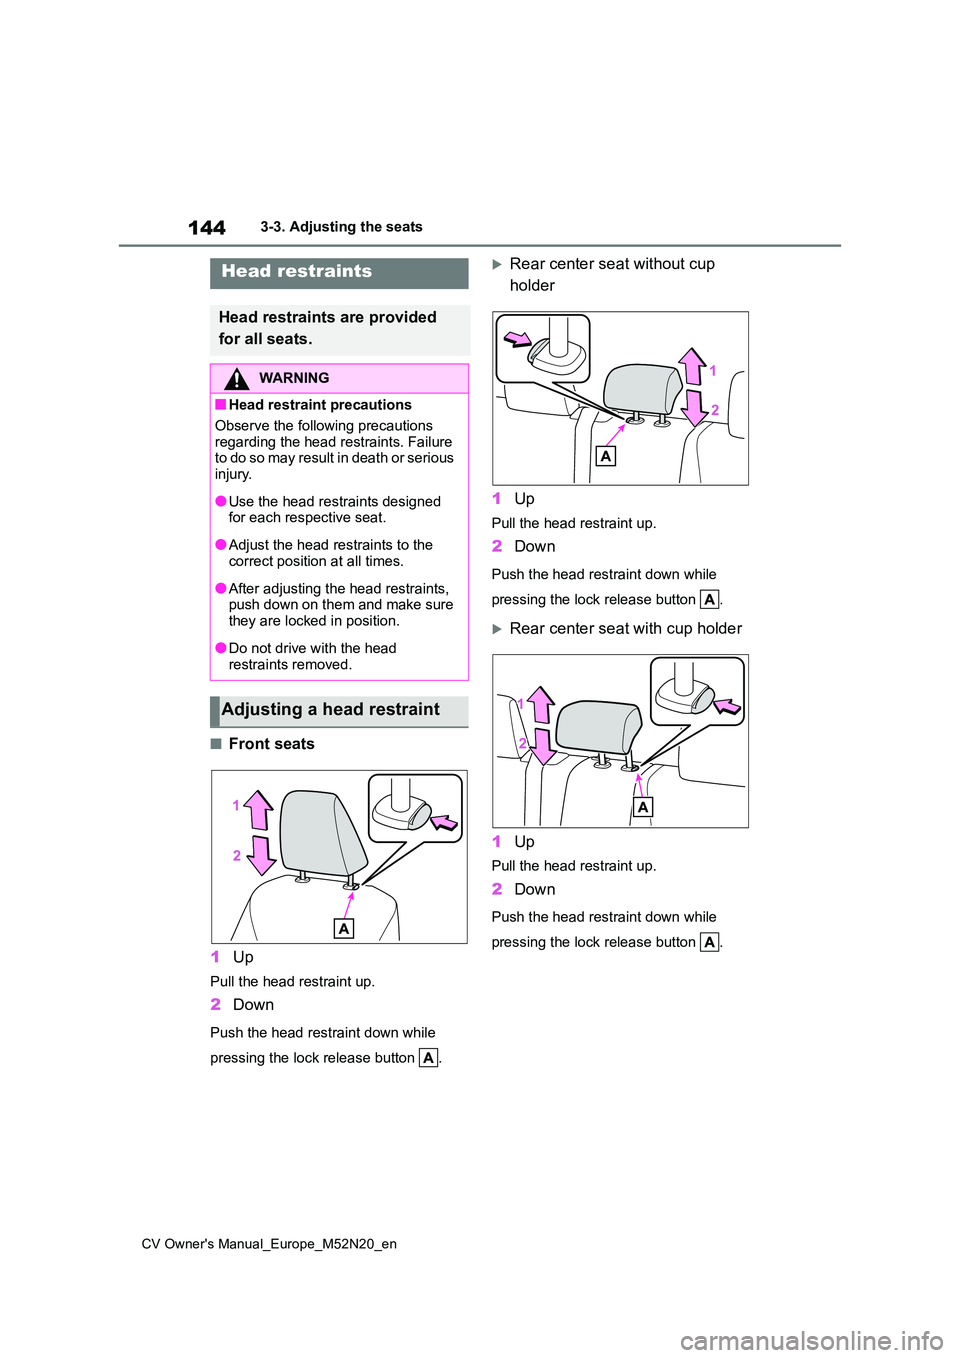
■Front seats
1 Up
Pull the head restraint up.
2Down
Push the head restraint down while
pressing the lock release button .
Rear center seat without cup
holder
1 Up
Pull the head restraint up.
2Down
Push the head restraint down while
pressing the lock release button .
Rear center seat with cup holder
1 Up
Pull the head restraint up.
2Down
Push the head restraint down while
pressing the lock release button .
Head restraints
Head restraints are provided
for all seats.
WARNING
■Head restraint precautions
Observe the following precautions
regarding the head restraints. Failure t o d o so ma y r e su lt i n d ea t h o r s e ri o us injury.
●Use the head restraints designed for each respective seat.
●Adjust the head restraints to the correct position at all times.
●After adjusting the head restraints, push down on them and make sure
they are locked in position.
●Do not drive with the head
restraints removed.
Adjusting a head restraint
Page 148 of 618
146
CV Owner's Manual_Europe_M52N20_en
3-3. Adjusting the seats
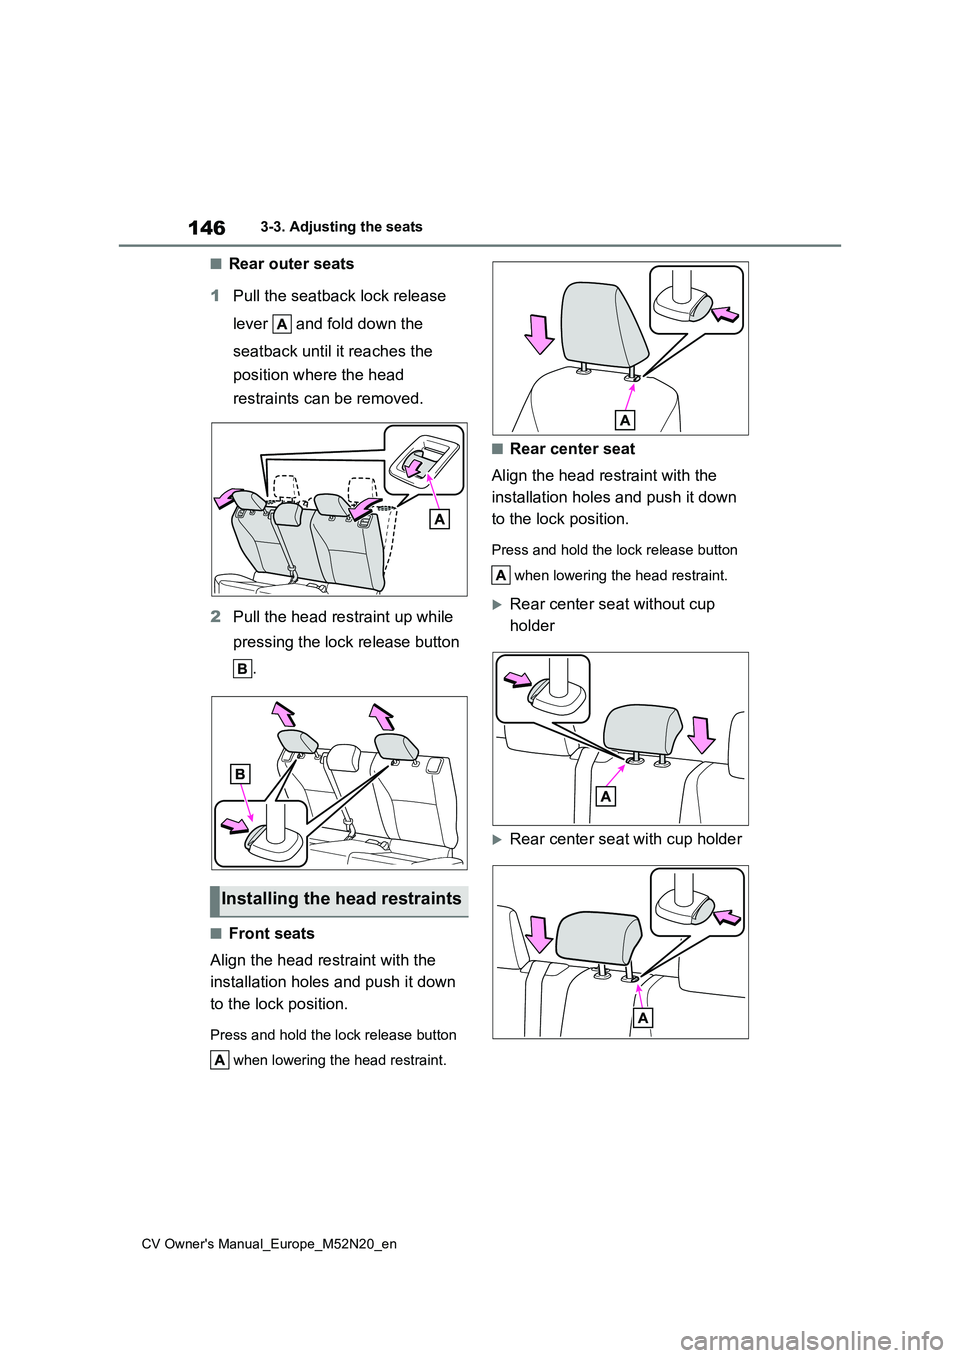
■Rear outer seats
1 Pull the seatback lock release
lever and fold down the
seatback until it reaches the
position where the head
restraints can be removed.
2 Pull the head restraint up while
pressing the lock release button
.
■Front seats
Align the head restraint with the
installation holes and push it down
to the lock position.
Press and hold the lock release button
when lowering the head restraint.
■Rear center seat
Align the head restraint with the
installation holes and push it down
to the lock position.
Press and hold the lock release button
when lowering the head restraint.
Rear center seat without cup
holder
Rear center seat with cup holder
Installing the head restraints
Page 347 of 618
345
6
CV Owner's Manual_Europe_M52N20_en
6-1. Maintenance and care
Maintenance and care
Remove dirt and dust using a
vacuum cleaner. Wipe dirty sur-
faces with a cloth dampened with
lukewarm water.
If dirt cannot be removed, wipe it
off with a soft cloth dampened
with neutral detergent diluted to
approximately 1%.
Wring out any excess water from
the cloth and thoroughly wipe off
remaining traces of detergent
and water.
■Shampooing the carpets
There are several commercial foaming-
type cleaners available. Use a sponge or brush to apply the foam. Rub in over-lapping circles. Do not use water. Wipe
dirty surfaces and let them dry. Excellent results are obtained by keeping the car-pet as dry as possible.
■Handling the seat belts
Clean with mild soap and lukewarm water using a cloth or sponge. Also check the belts periodically for exces-
sive wear, fraying or cuts.
Cleaning and protecting
the vehicle interior
Perform cleaning in a manner
appropriate to each compo-
nent and its material.
Protecting the vehicle inte-
rior
WARNING
■Water in the vehicle
●Do not splash or spill liquid in the
vehicle. Doing so may cause electrical com-ponents, etc. to malfunction or
catch fire.
●Do not get any of the SRS compo-
nents or wiring in the vehicle interior wet. ( P.38) An electrical malfunction may
cause the airbags to deploy or not function properly, resulting in death or serious injury.
●Vehicles with wireless charger:Do not let the wireless charger
( P.333) get wet. Failure to do so may cause the charger to become hot and cause burns or could cause
electric shock resulting in death or serious injury.
■Cleaning the interior (especially instrument panel)
Do not use a polish wax or polish
cleaner. The instrument panel may reflect off the windshield, obstructing the driver’s view and leading to an
accident, resulting in death or serious injury.
NOTICE
■Cleaning detergents
●Do not use the following types of
detergent, as they may discolor the vehicle interior or cause streaks or damage to painted surfaces:
• Non-seat portions: Organic sub- stances such as benzene or gaso-line, alkaline or acidic solutions,
dye, and bleach
• Seats: Alkaline or acidic solutions, such as thinner, benzene, and alco-
hol