reset TOYOTA YARIS LIFTBACK 2020 Accessories, Audio & Navigation (in English)
[x] Cancel search | Manufacturer: TOYOTA, Model Year: 2020, Model line: YARIS LIFTBACK, Model: TOYOTA YARIS LIFTBACK 2020Pages: 164, PDF Size: 3.77 MB
Page 65 of 164
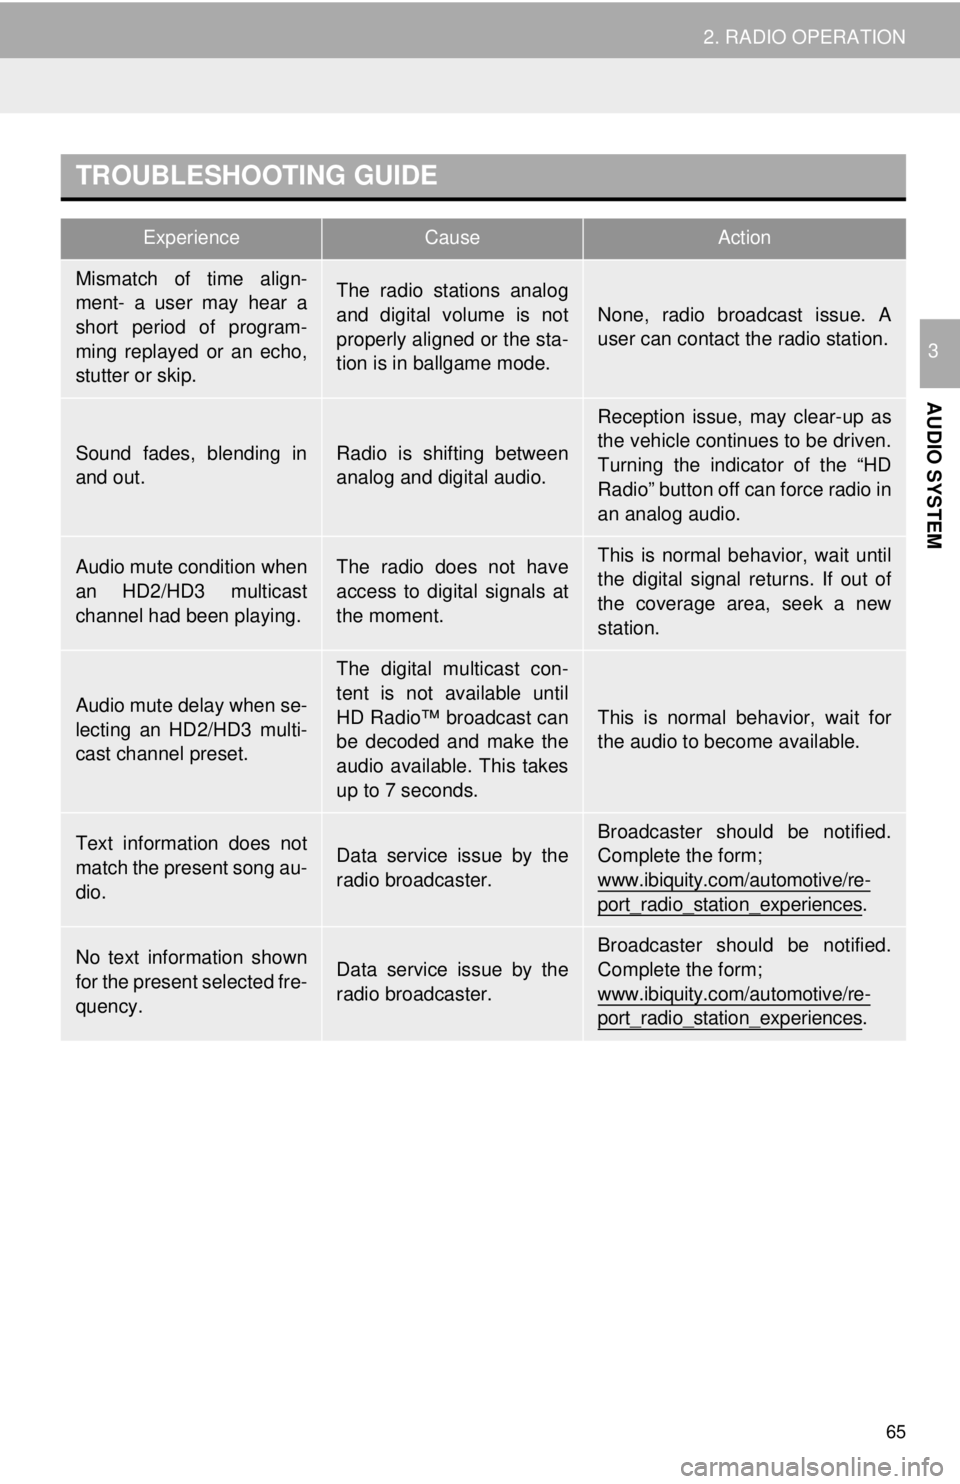
TROUBLESHOOTING GUIDE
ExperienceCauseAction
65
2. RADIO OPERATION
AUDIO SYSTEM
3
Mismatch of time align-
ment- a user may hear a
short period of program-
ming replayed or an echo,
stutter or skip.The radio stations analog
and digital volume is not
properly aligned or the sta-
tion is in ballgame mode.
None, radio broadcast issue. A
user can contact the radio station.
Sound fades, blending in
and out.Radio is shifting between
analog and digital audio.
Reception issue, may clear-up as
the vehicle continues to be driven.
Turning the indicator of the “HD
Radio” button off can force radio in
an analog audio.
Audio mute condition when
an HD2/HD3 multicast
channel had been playing.The radio does not have
access to digital signals at
the moment.This is normal behavior, wait until
the digital signal returns. If out of
the coverage area, seek a new
station.
Audio mute delay when se-
lecting an HD2/HD3 multi-
cast channel preset.
The digital multicast con-
tent is not available until
HD Radio™ broadcast can
be decoded and make the
audio available. This takes
up to 7 seconds.
This is normal behavior, wait for
the audio to become available.
Text information does not
match the present song au-
dio.Data service issue by the
radio broadcaster.
Broadcaster should be notified.
Complete the form;
www.ibiquity.com/automotive/re-
port_radio_station_experiences.
No text information shown
for the present selected fre-
quency.Data service issue by the
radio broadcaster.
Broadcaster should be notified.
Complete the form;
www.ibiquity.com/automotive/re-
port_radio_station_experiences.
Page 67 of 164
67
2. RADIO OPERATION
AUDIO SYSTEM
3
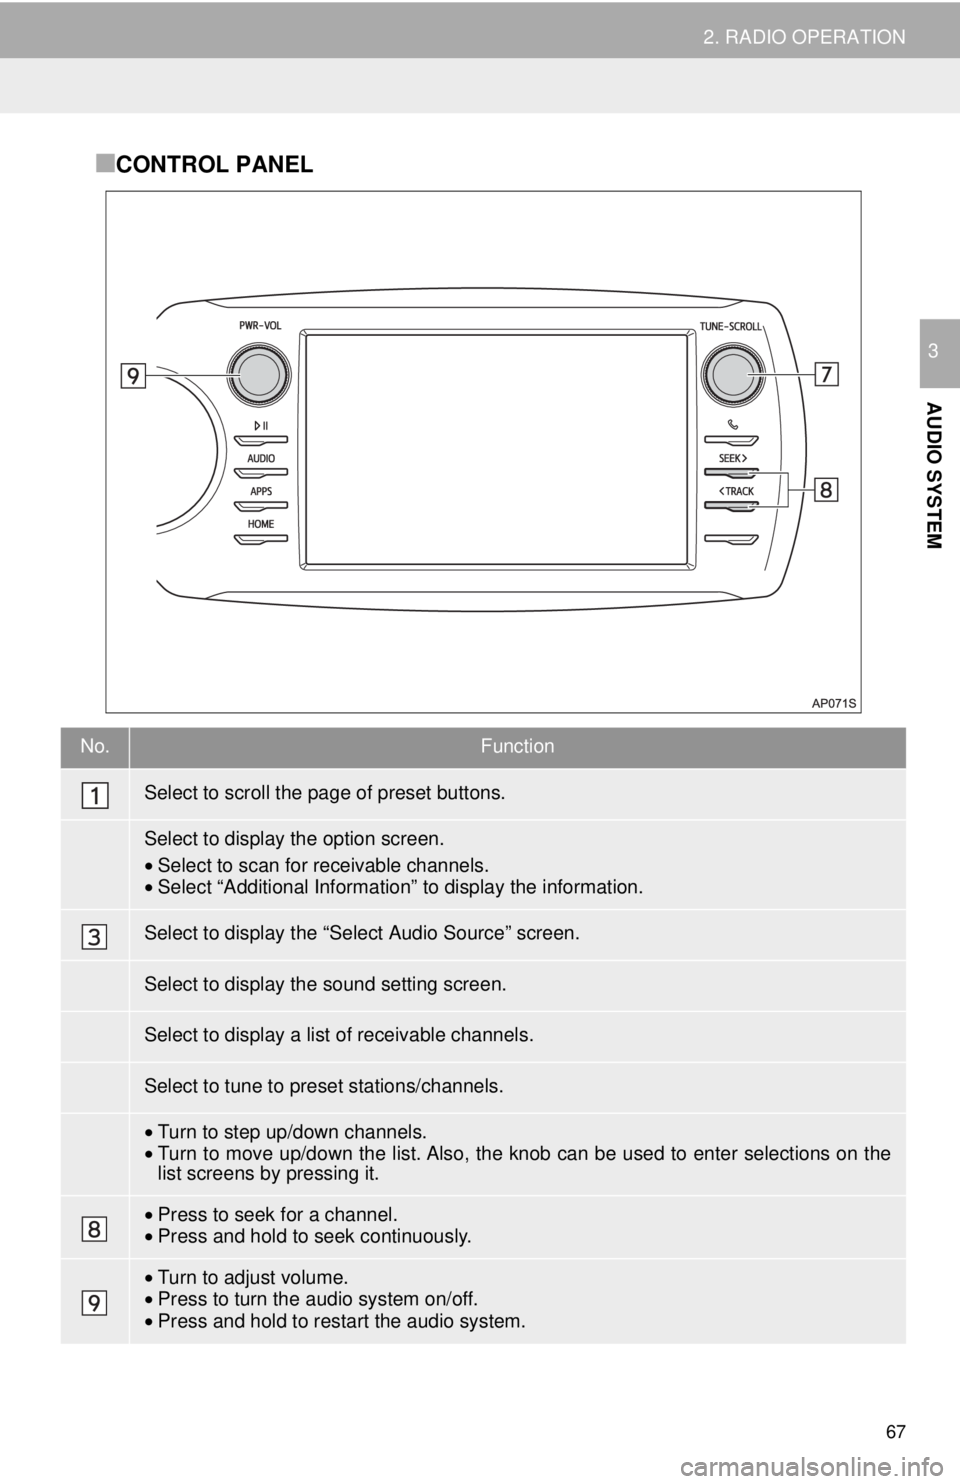
■CONTROL PANEL
No.Function
•Select to scan for receivable channels.•Select “Additional Information” to display the information.
•Turn to step up/down channels.•Turn to move up/down the list. Also, the knob can be used to enter selections on the
list screens by pressing it.
• Press to seek for a channel.•Press and hold to seek continuously.
•Turn to adjust volume.
• Press to turn th e audio system on/of f.
• Press and hold to re star t the audio system.
Select to scroll the page of preset buttons.
Select to display the option screen.
Select to display the “Select Audio Source” screen.
Select to display the sound setting screen.
Select to display a list of receivable channels.
Select to tune to preset stations/channels.
Page 70 of 164
DISPLAYING THE RADIO ID
70
2. RADIO OPERATION
If “Ch 000” is selected using the
“TUNE-SCROLL” knob, the ID code,
which is 8 alphanumeric characters, will
be displayed. If another channel is
selected, the ID code will no longer be dis-
played. The channel (000) alternates
bet we
en displaying the radio ID and the
specific radio code.
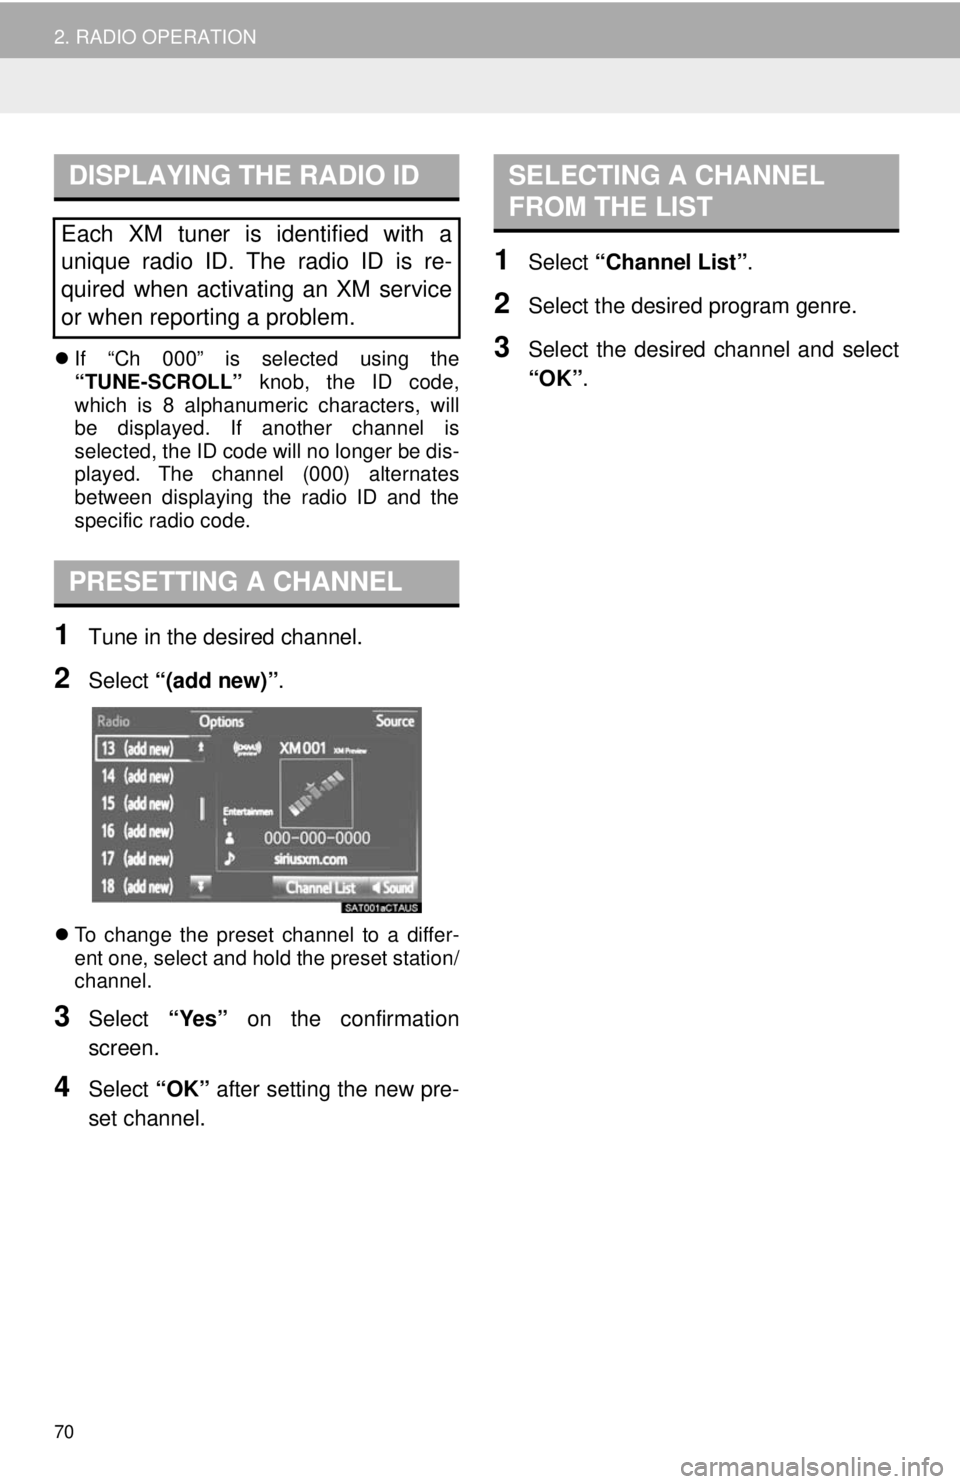
PRESETTING A CHANNEL
1Tune in the desired channel.
2Select “(add new)” .
To change the preset channel to a differ -
ent one, select and hold the preset station/
chann el.
3Select “Yes” on the confirmation
screen.
4Select “OK” after setting the new pre -
set channel.
SELECTING A CHANNEL
FROM THE LIST
1Select “Channel List” .
2Select the desired program genre.
3Select the desired channel and select
“OK” .
Each XM tuner is identified with a
unique radio ID. The radio ID is re-
quired when activating an XM service
or when reporting a problem.
Page 89 of 164
89
AUDIO SYSTEM
3
5. SETUP
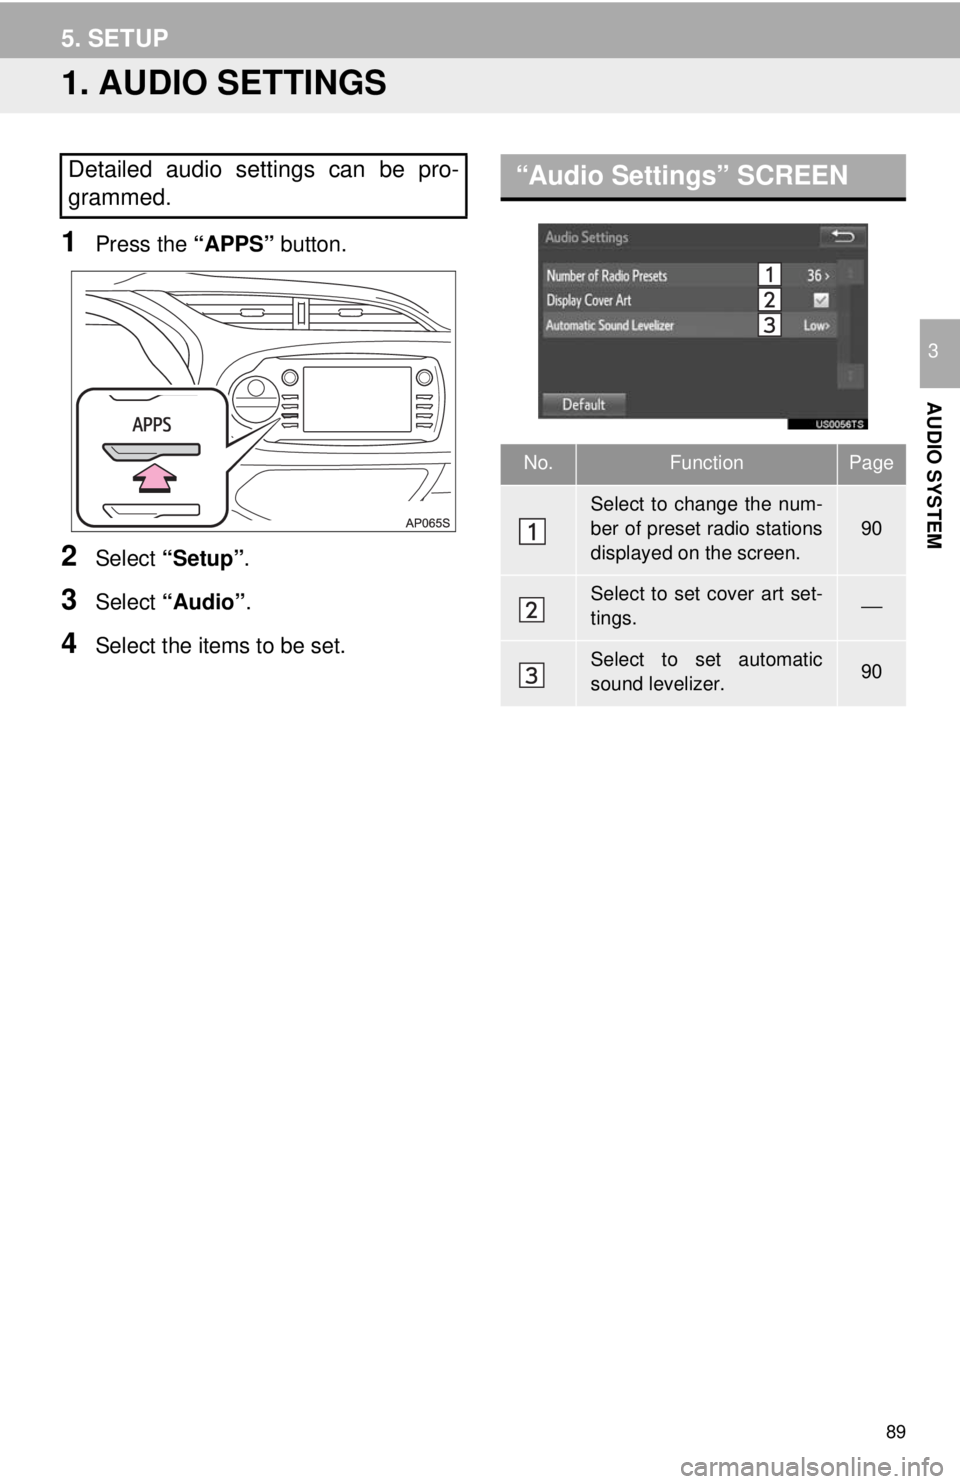
1. AUDIO SETTINGS
1Press the “APPS” button.
2Select “Setup” .
3Select “Audio” .
4Select the items to be set.
“Audio Settings” SCREENDetailed audio settings can be pro-
grammed.
No.FunctionPage
Select to change the num-
ber of preset radio stations
displayed on the screen.
90
Select to set cover art set-
tings.⎯
Select to set automatic
sound levelizer.90
Page 90 of 164
90
5. SETUP
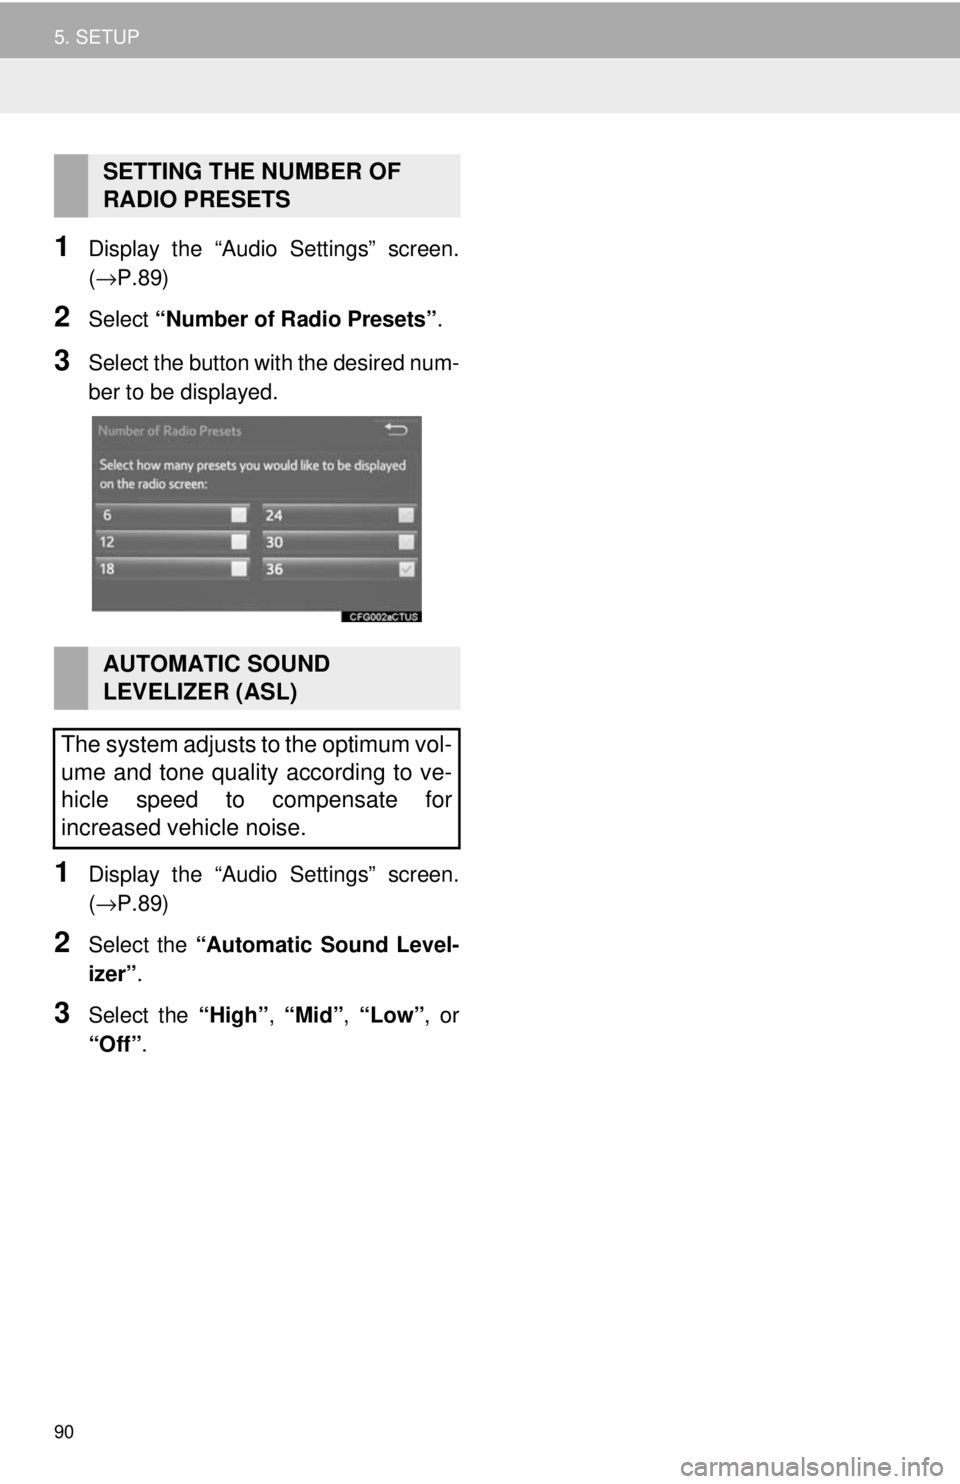
1Display the “Audio Settings” screen.
(→P.89 )
2Select “Number of Radio Presets” .
3Select the button with the desired num -
ber to be displayed.
1Display the “Audio Settings” screen.
(→P.89 )
2Select the “Automatic Sound Level-
izer” .
3Select the “High”, “Mid”, “Low”, or
“Off” .
SETTING THE NUMBER OF
RADIO PRESETS
AUTOMATIC SOUND
LEVELIZER (ASL)
The system adjusts to the optimum vol-
ume and tone quality according to ve-
hicle speed to compensate for
increased vehicle noise.
Page 134 of 164
134
1. PHONE OPERATION (HANDS-FREE SYSTEM FOR CELLULAR PHONES)
■BY SELECTING “Release Tones”
1Select “Release Tones” .
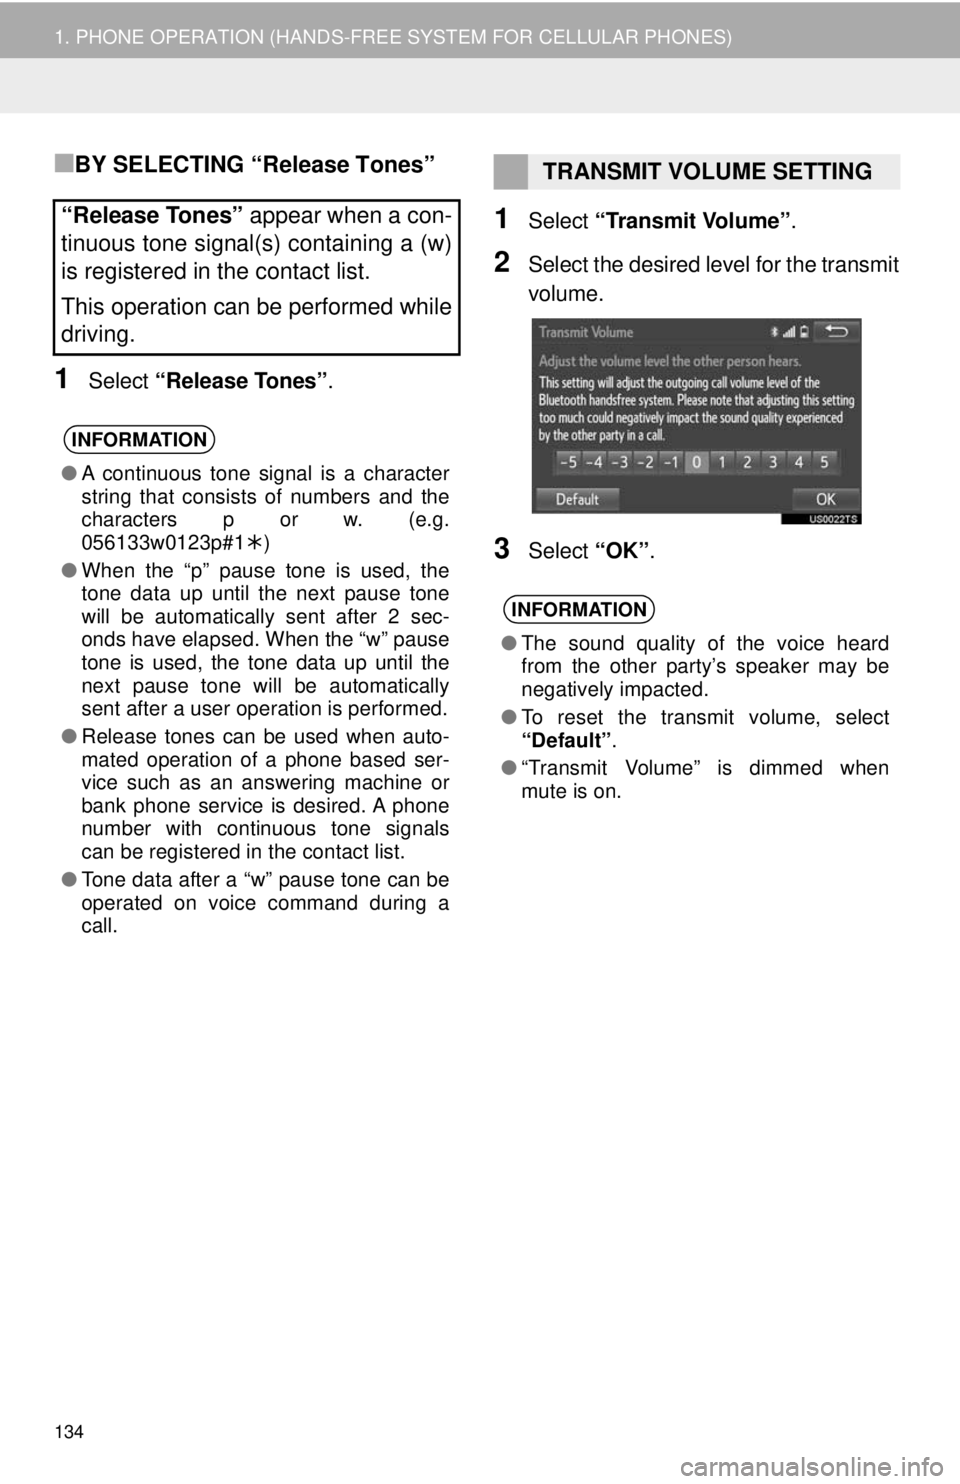
1Select “Transmit Volume” .
2Select the desired level for the transmit
volume.
3Select “OK”.
“Release Tones” appear when a con-
tinuous tone signal(s) containing a (w)
is registered in the contact list.
This operation can be performed while
driving.
INFORMATION
● A continuous tone signal is a character
string that consists of numbers and the
characters p or w. (e.g.
056133w0123p#1 )
● When the “p” pause tone is used, the
tone data up until the next pause tone
will be automatically sent after 2 sec-
onds have elapsed. When the “w” pause
tone is used, the tone data up until the
next pause tone will be automatically
sent after a user operation is performed.
● Release tones can be used when auto-
mated operation of a phone based ser-
vice such as an answering machine or
bank phone service is desired. A phone
number with continuous tone signals
can be registered in the contact list.
● Tone data after a “w” pause tone can be
operated on voice command during a
call.
TRANSMIT VOLUME SETTING
INFORMATION
● The sound quality of the voice heard
from the other party’s speaker may be
negatively impacted.
● To reset the transmit volume, select
“Default”.
● “Transmit Volume” is dimmed when
mute is on.
Page 139 of 164
REPLYING TO A MESSAGE
(QUICK REPLY)
139
1. PHONE OPERATION (HANDS-FREE SYSTEM FOR CELLULAR PHONES)
PHONE
7
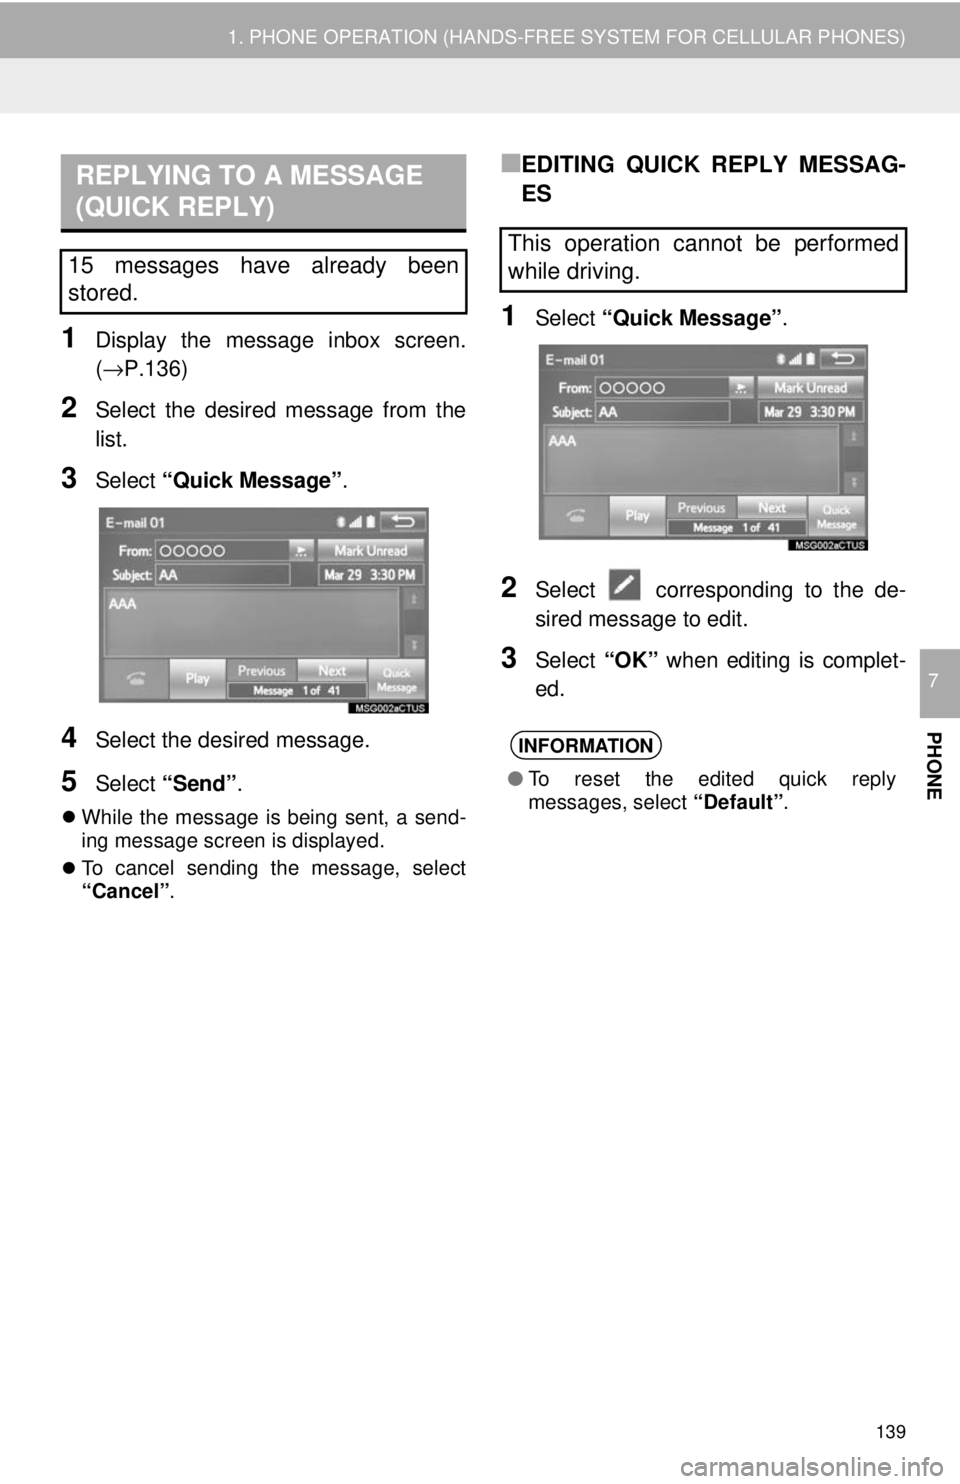
1Display the message inbox screen.
(→P.136 )
2Select the desired message from the
list.
3Select “Quick Message” .
4Select the desired message.
5Select “Send” .
While the message is being sent, a send -
ing message screen is displayed.
To cancel sending the message, select
“Cancel
”.
■EDITING QUICK REPLY MESSAG-
ES
1Select “Quick Message” .
2Select corresponding to the de -
sired message to edit.
3Select “OK” when editing is complet -
ed.
15 messages have already been
stored.This operation cannot be performed
while driving.
INFORMATION
● To reset the edited quick reply
messages, select “Default”.
Page 142 of 164
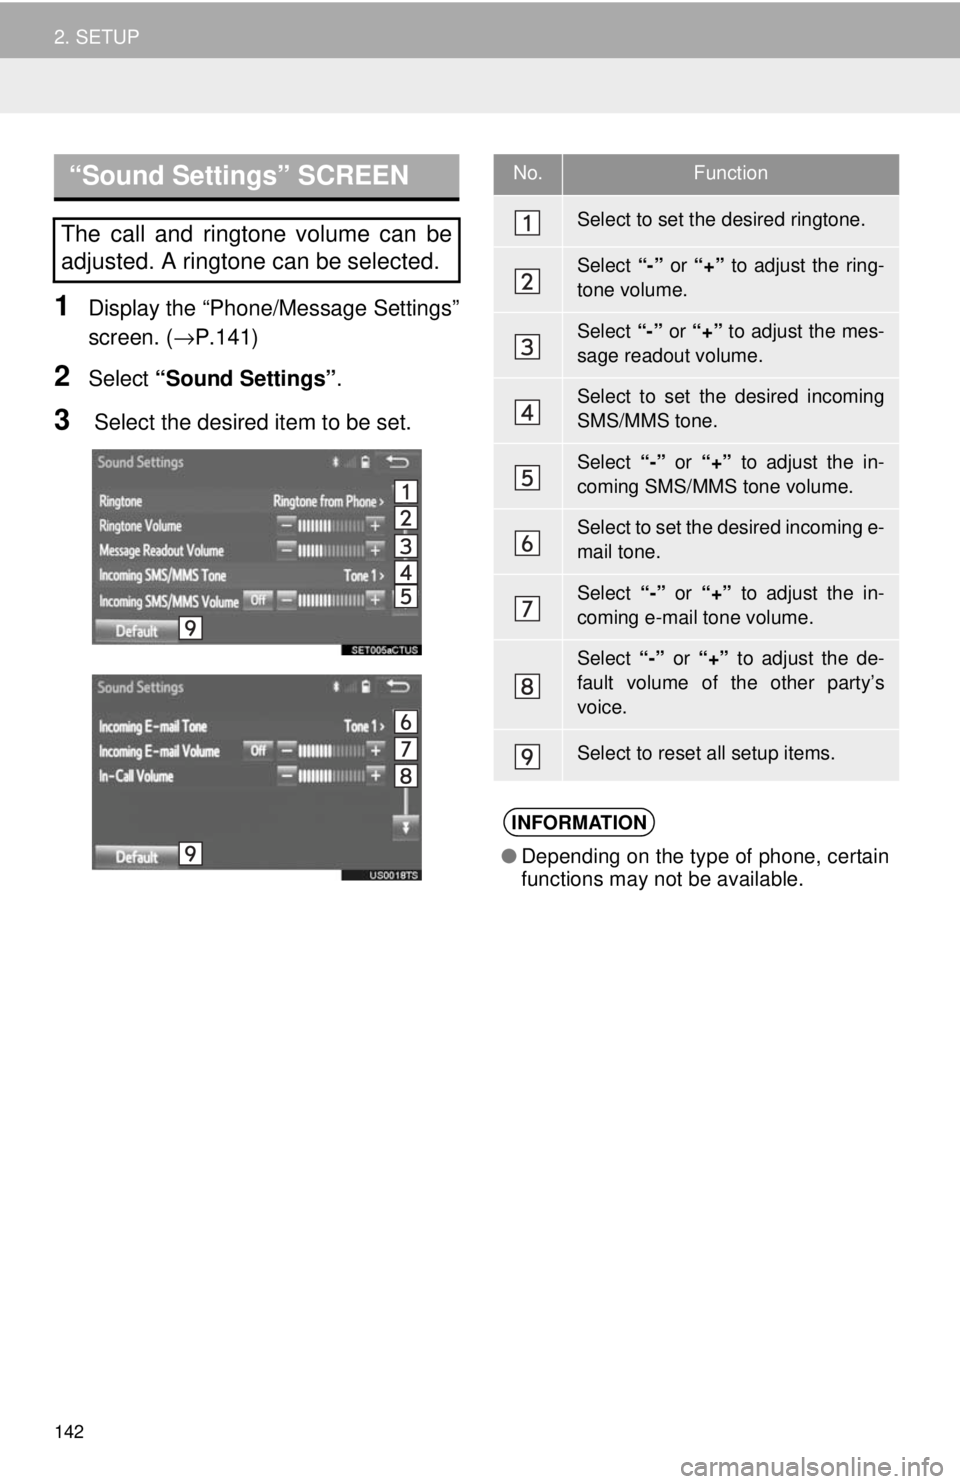
“Sound Settings” SCREEN
142
2. SETUP
1Display the “Phone/Message Settings”
screen. ( →P.141)
2Select “Sound Settings” .
3 Select the desired item to be set.
The call and ringtone volume can be
adjusted. A ringtone can be selected.
No.Function
Select to set the desired ringtone.
Select “-” or “+” to adjust the ring-
tone volume.
Select “-” or “+” to adjust the mes-
sage readout volume.
Select to set the desired incoming
SMS/MMS tone.
Select “-” or “+” to adjust the in-
coming SMS/MMS tone volume.
Select to set the desired incoming e-
mail tone.
Select “-” or “+” to adjust the in-
coming e-mail tone volume.
Select “-” or “+” to adjust the de-
fault volume of the other party’s
voice.
Select to reset all setup items.
INFORMATION
● Depending on the type of phone, certain
functions may not be available.
Page 143 of 164
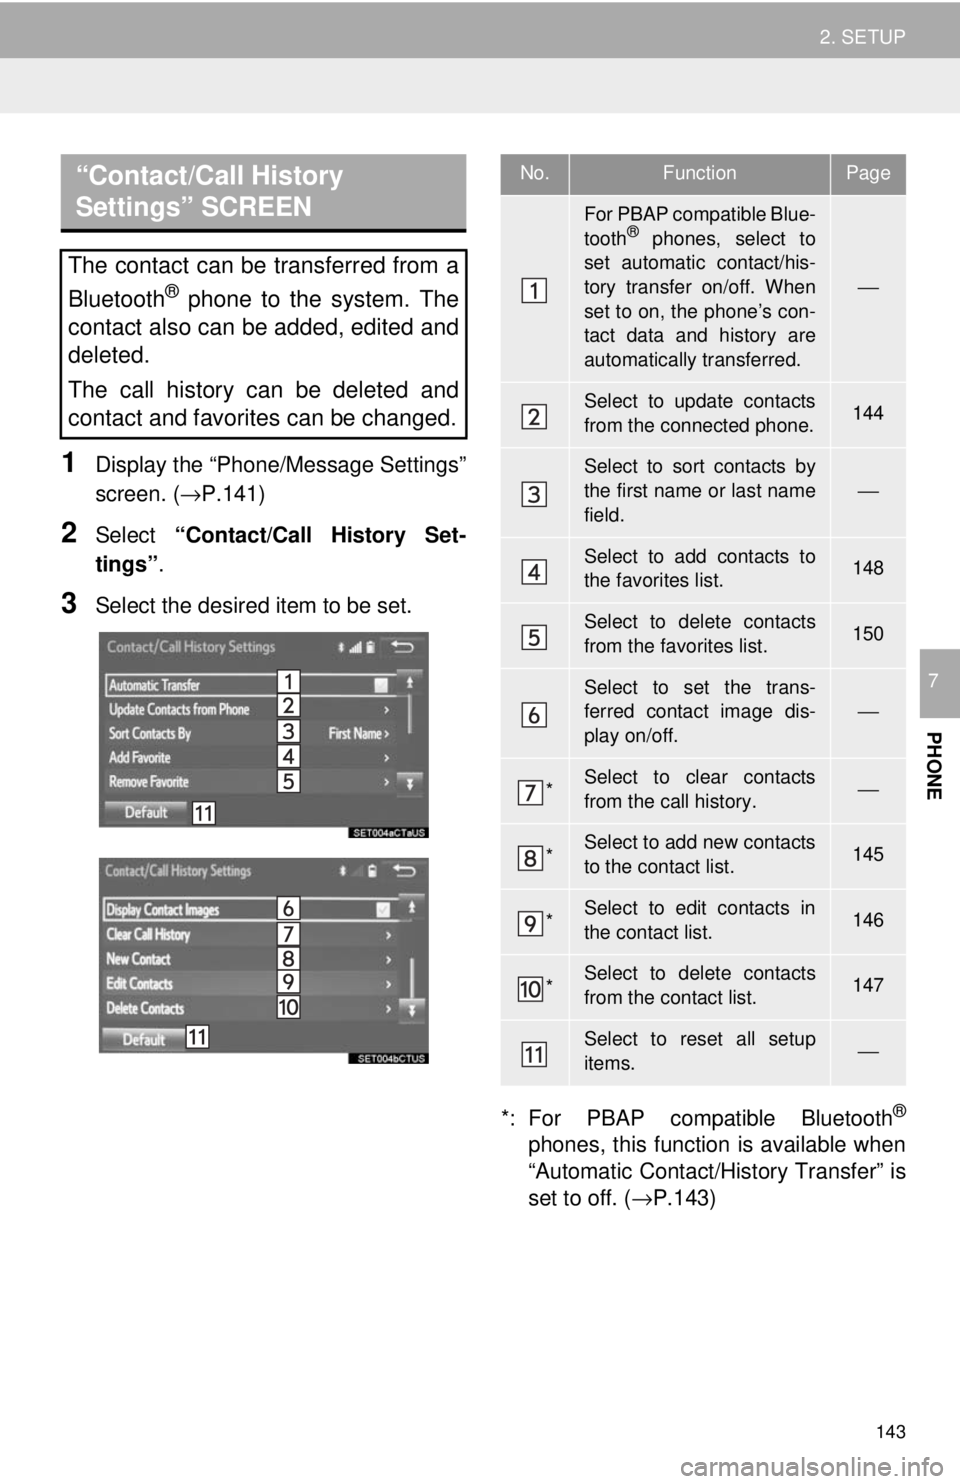
“Contact/Call History
Settings” SCREEN
143
2. SETUP
PHONE
7
1Display the “Phone/Message Settings”
screen. ( →P.141)
2Select “Contact/Call History Set -
tings” .
3Select the desired item to be set.
*: For PBAP compatible Bluetooth®
phones, this function is available when
“Automatic Contact/History Transfer” is
set to off. ( →P.143)
The contact can be transferred from a
Bluetooth
® phone to the system. The
contact also can be added, edited and
deleted.
The call history can be deleted and
contact and favorites can be changed.
No.FunctionPage
For PBAP compatible Blue-
tooth® phones, select to
set automatic contact/his-
tory transfer on/off. When
set to on, the phone’s con-
tact data and history are
automatically transferred.
⎯
Select to update contacts
from the connected phone.144
Select to sort contacts by
the first name or last name
field.
⎯
Select to add contacts to
the favorites list. 148
Select to delete contacts
from the favorites list. 150
Select to set the trans-
ferred contact image dis-
play on/off.
⎯
*Select to clear contacts
from the call history.⎯
*Select to add new contacts
to the contact list.145
*Select to edit contacts in
the contact list.146
*Select to delete contacts
from the contact list.147
Select to reset all setup
items.⎯
Page 151 of 164
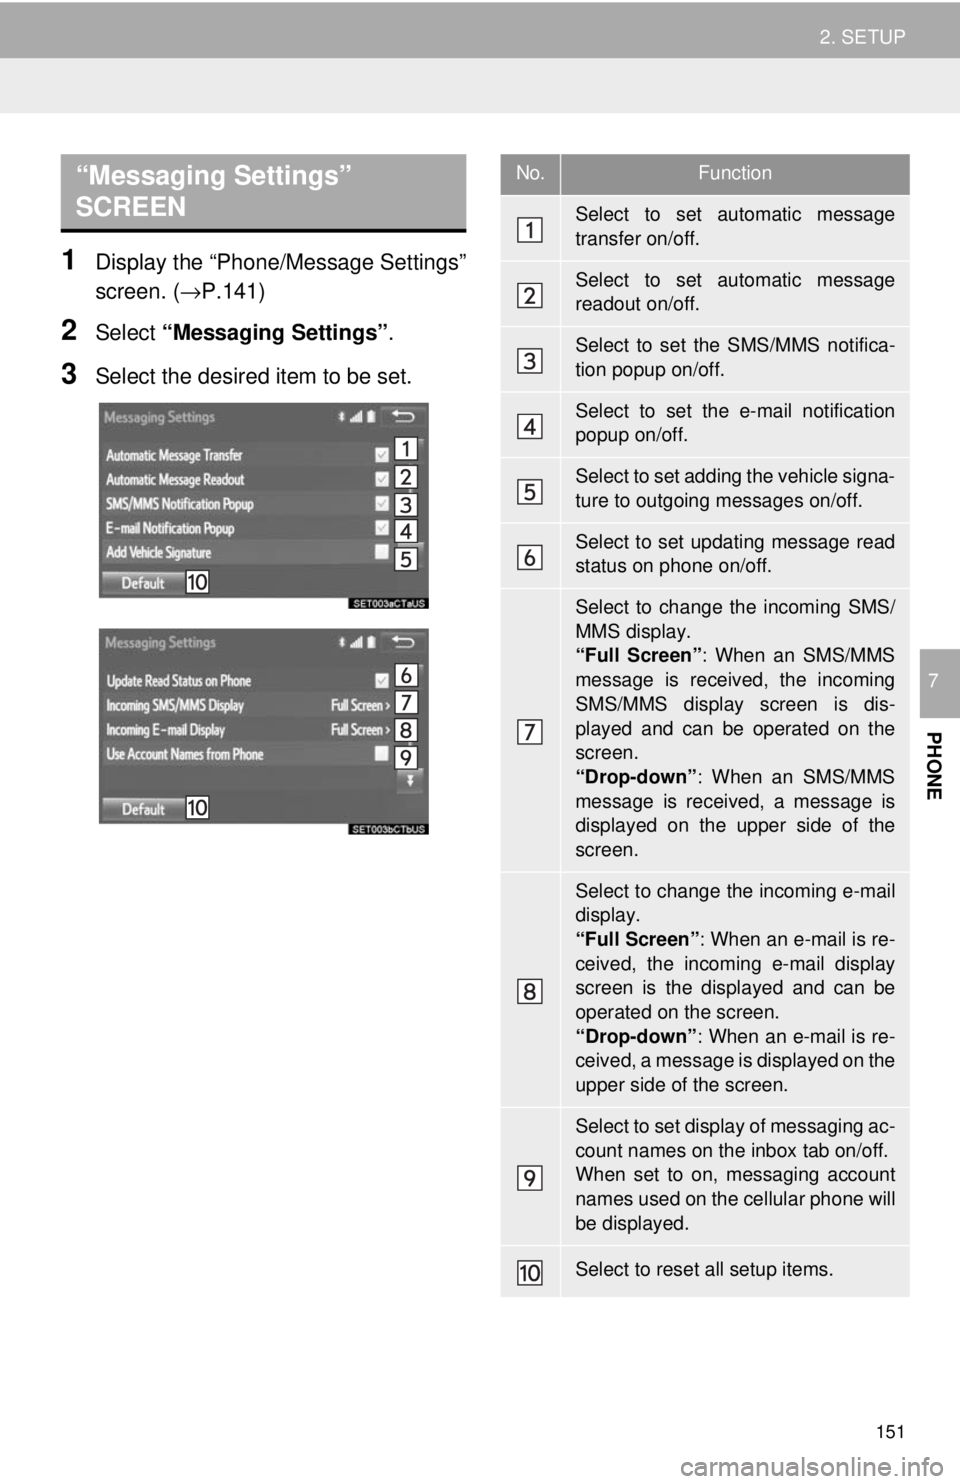
“Messaging Settings”
SCREEN
151
2. SETUP
PHONE
7
1Display the “Phone/Message Settings”
screen. ( →P.141)
2Select “Messaging Settings” .
3Select the desired item to be set.
No.Function
Select to set automatic message
transfer on/off.
Select to set automatic message
readout on/off.
Select to set the SMS/MMS notifica-
tion popup on/off.
Select to set the e-mail notification
popup on/off.
Select to set adding the vehicle signa-
ture to outgoing messages on/off.
Select to set updating message read
status on phone on/off.
Select to change the incoming SMS/
MMS display.
“Full Screen” : When an SMS/MMS
message is received, the incoming
SMS/MMS display screen is dis-
played and can be operated on the
screen.
“Drop-down” : When an SMS/MMS
message is received, a message is
displayed on the upper side of the
screen.
Select to change the incoming e-mail
display.
“Full Screen” : When an e-mail is re-
ceived, the incoming e-mail display
screen is the displayed and can be
operated on the screen.
“Drop-down” : When an e-mail is re-
ceived, a message is displayed on the
upper side of the screen.
Select to set display of messaging ac-
count names on the inbox tab on/off.
When set to on, messaging account
names used on the cellular phone will
be displayed.
Select to reset all setup items.