reset TOYOTA YARIS LIFTBACK 2020 Accessories, Audio & Navigation (in English)
[x] Cancel search | Manufacturer: TOYOTA, Model Year: 2020, Model line: YARIS LIFTBACK, Model: TOYOTA YARIS LIFTBACK 2020Pages: 164, PDF Size: 3.77 MB
Page 19 of 164
No.FunctionPage
41
25
46
27
34
141
⎯
89
48
“Owner’s Manual”
*⎯
19
1. CONTROLS AND FEATURES
QUICK GUIDE
1
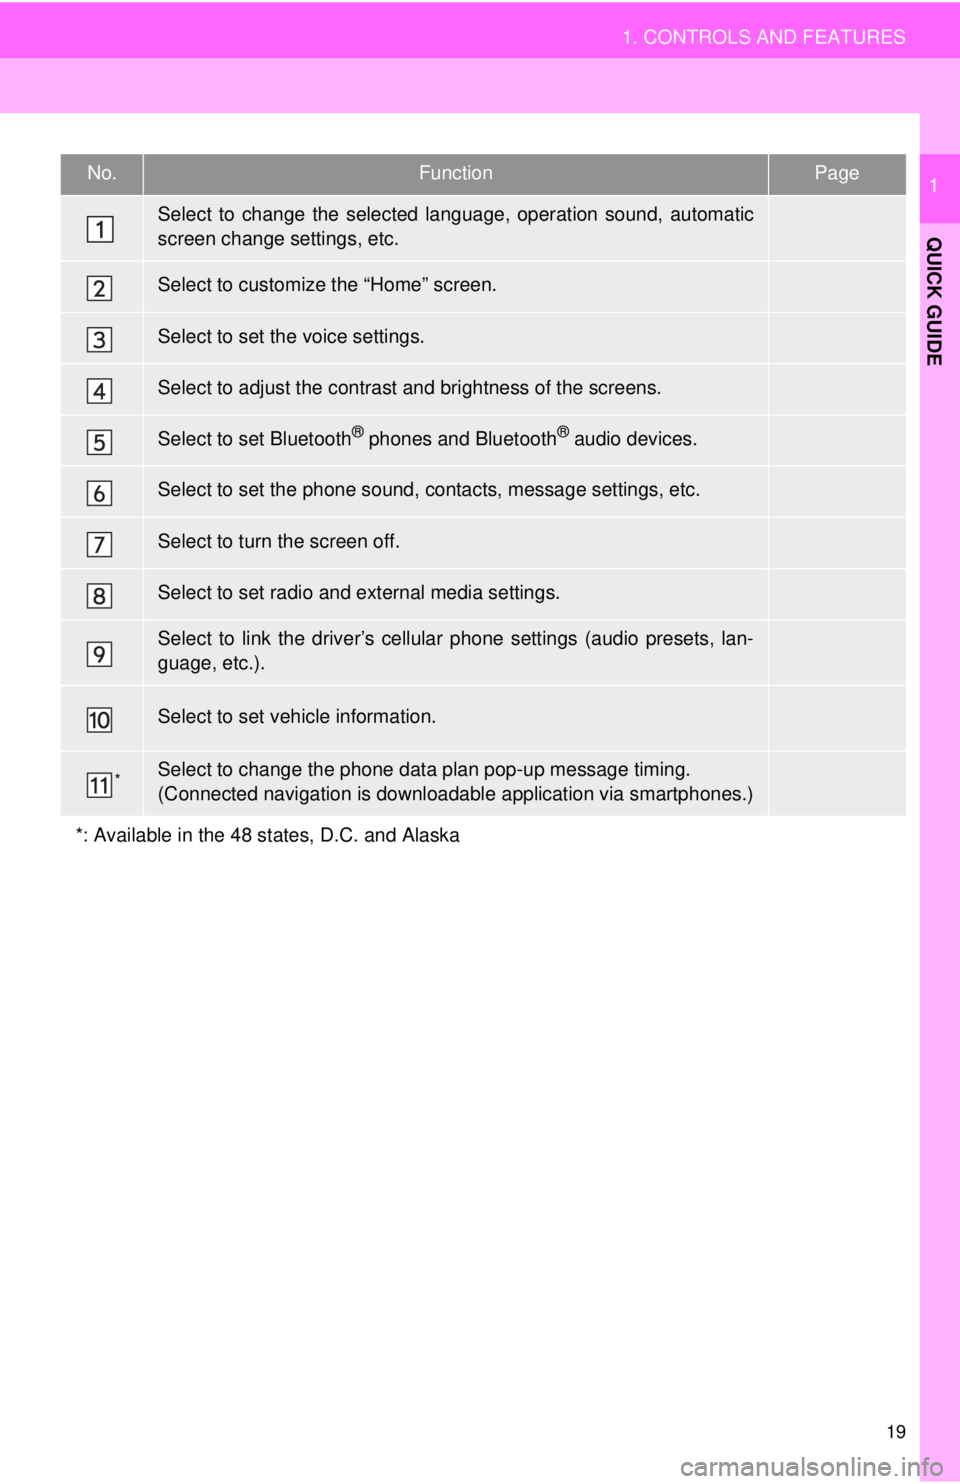
Select to change the selected language, operation sound, automatic
screen change settings, etc.
Select to customize the “Home” screen.
Select to set the voice settings.
Select to adjust the contrast and brightness of the screens.
Select to set Bluetooth® phones and Bluetooth® audio devices.
Select to set the phone sound, contacts, message settings, etc.
Select to turn the screen off.
Select to set radio and external media settings.
Select to link the driver’s cellular phone settings (audio presets, lan-
guage, etc.).
Select to set vehicle information.
Select to change the phone data plan pop-up message timing.
(Connected navigation is downloadabl e application via smartphones.)
*: Available in the 48 states, D.C. and Alaska
Page 38 of 164
EDITING THE Bluetooth®
DEVICE INFORMATION
38
2. Bluetooth® SETTINGS
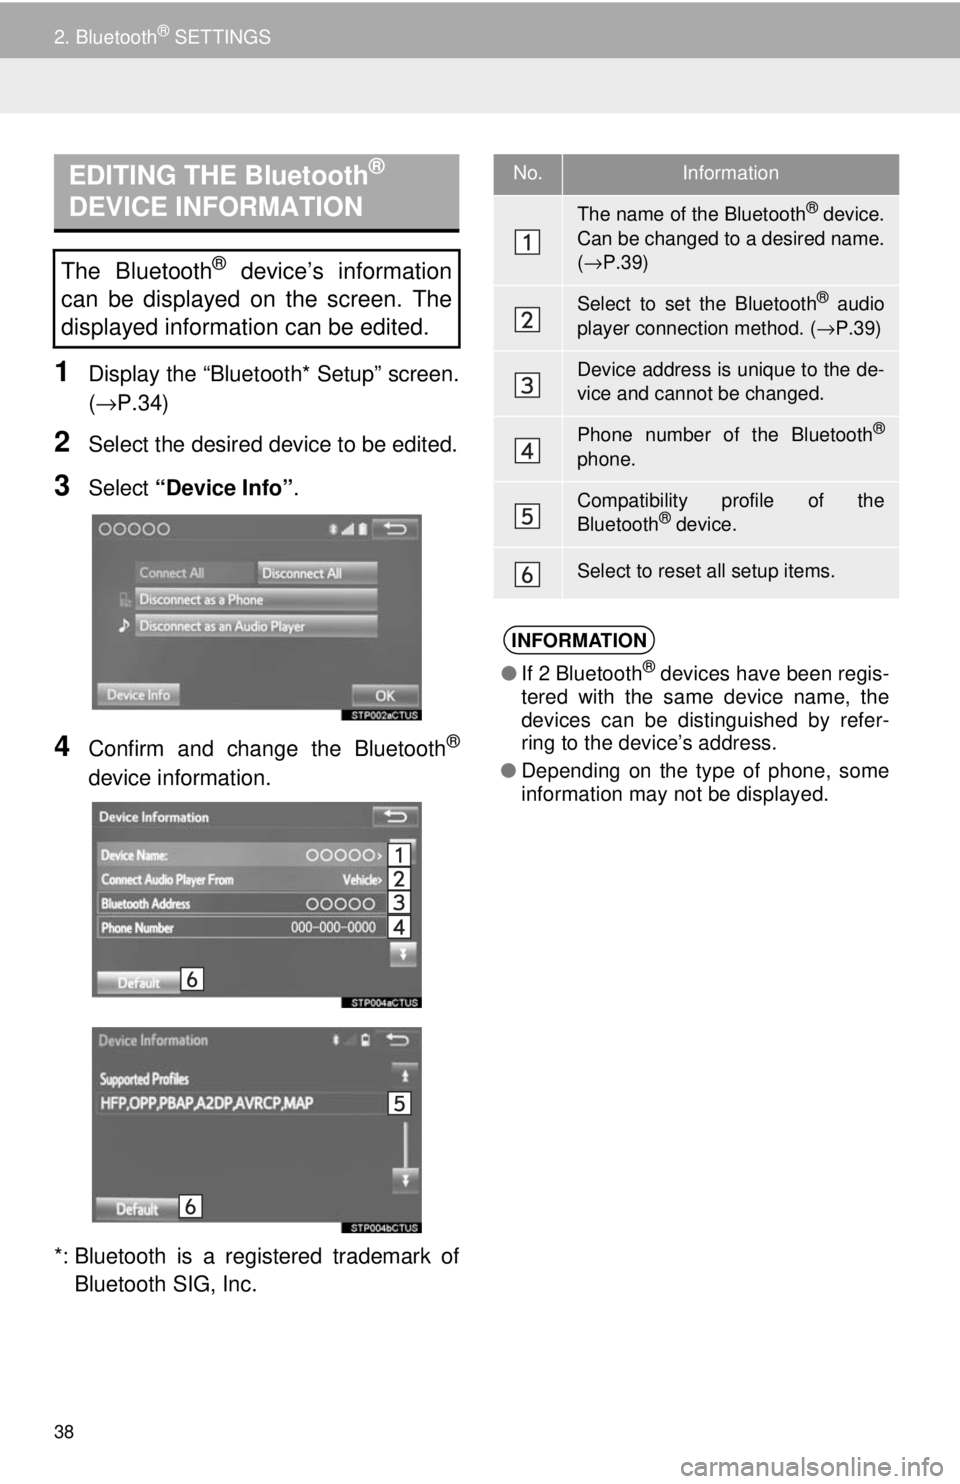
1Display the “Bluetooth* Setup” screen.
(→P.34 )
2Select the desired device to be edited.
3Select “Device Info” .
4Confirm and change the Bluetooth®
device information.
*: Bluetooth is a regi stered trademark of
Bluetooth SIG, Inc.
The Bluetooth® device’s information
can be displayed on the screen. The
displayed information can be edited.
No.Information
The name of the Bluetooth® device.
Can be changed to a desired name.
( → P.39)
Select to set the Bluetooth® audio
player connection method. ( →P.39)
Device address is unique to the de-
vice and cannot be changed.
Phone number of the Bluetooth®
phone.
Compatibility profile of the
Bluetooth® device.
Select to reset all setup items.
INFORMATION
● If 2 Bluetooth® devices have been regis-
tered with the same device name, the
devices can be distinguished by refer-
ring to the device’s address.
● Depending on the type of phone, some
information may not be displayed.
Page 39 of 164
39
2. Bluetooth® SETTINGS
BASIC FUNCTION
2
1Select “Device Name” .
2Enter the name and select “OK”.
1Select “Connect Audio Player
From”.
2Select the desired connection method.
“Vehicle” : Select to co
nnect the audio
system to the audio player.
“Device” : Select to connect the audio
player to the audio system.
Depending on the audio player, the “Vehi -
cle” or “Device” connection method may
b e b
est. As such, refer to the manual that
comes with the audio player.
To reset the connection method, select
“Defaul
t”.
“System Settings” SCREEN
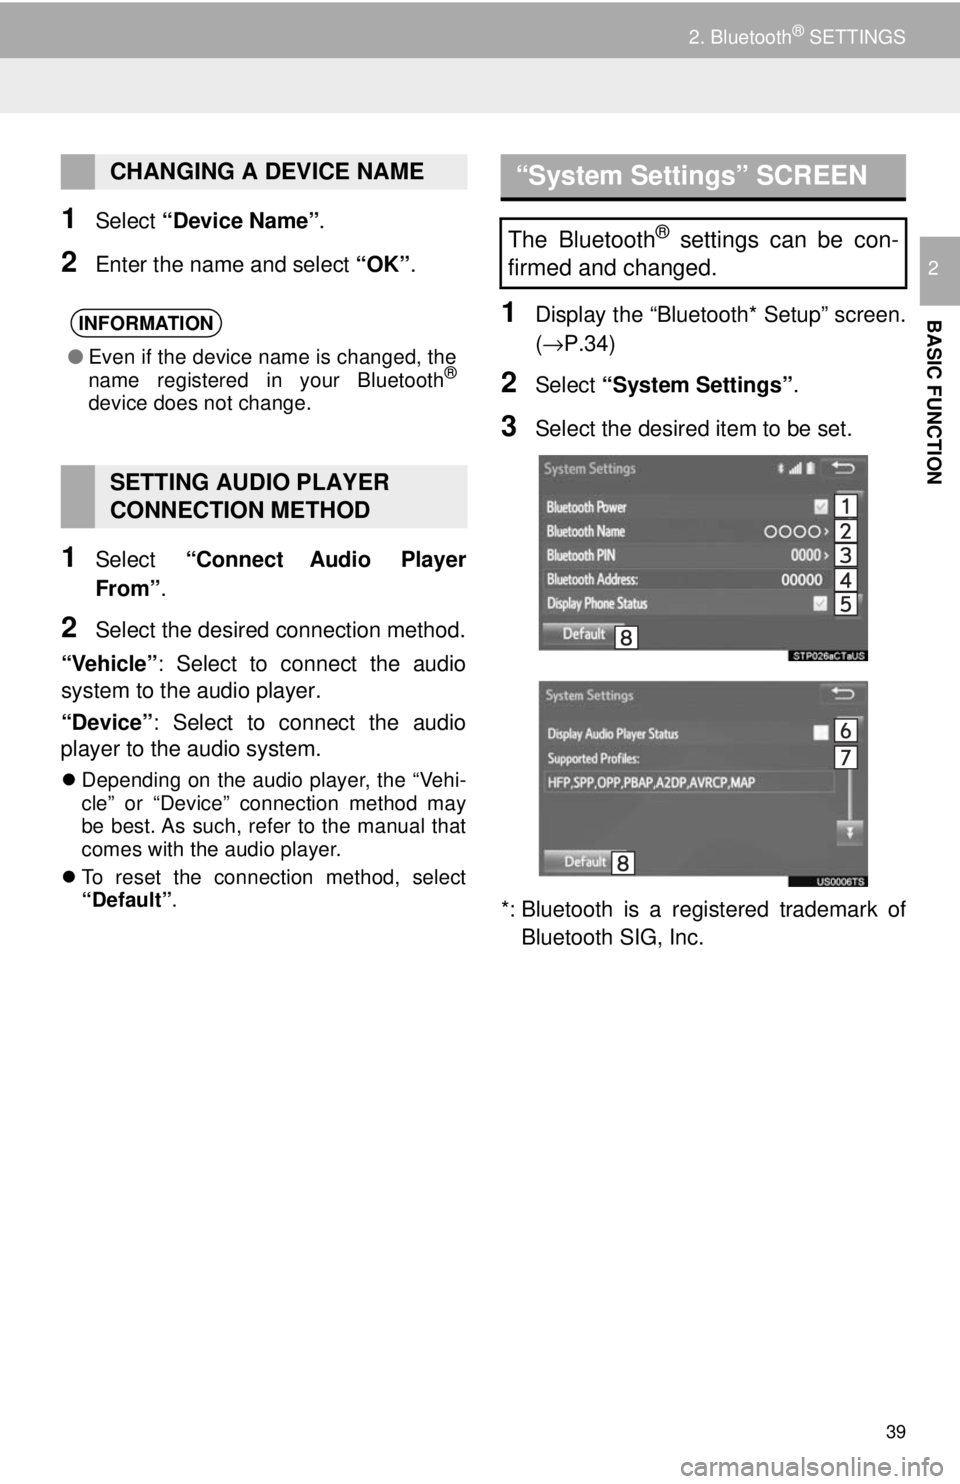
1Display the “Bluetooth* Setup” screen.
(→P.34 )
2Select “System Settings” .
3Select the desired item to be set.
*: Bluetooth is a regi stered trademark of
Bluetooth SIG, Inc.
CHANGING A DEVICE NAME
INFORMATION
● Even if the device name is changed, the
name registered in your Bluetooth®
device does not change.
SETTING AUDIO PLAYER
CONNECTION METHOD
The Bluetooth® settings can be con-
firmed and changed.
Page 40 of 164
40
2. Bluetooth® SETTINGS
1Select “Bluetooth* Power” .
W
hen “Blueto oth* Power” is on
The Bluetooth
® device is automatically
connected when the engine switch is in the
“ACC” or “ON” position.
W
hen “Blueto oth* Power” is off
The Bluetooth
® device is disconnected,
and the system will not connect to it next
time.
1Select “Bluetooth* Name” .
2Enter a name and select “OK”.
1Select “Bluetooth* PIN” .
2Enter a PIN-code and select “OK”.
*: Bluetooth is a registered trademark of
Bluetooth SIG, Inc.
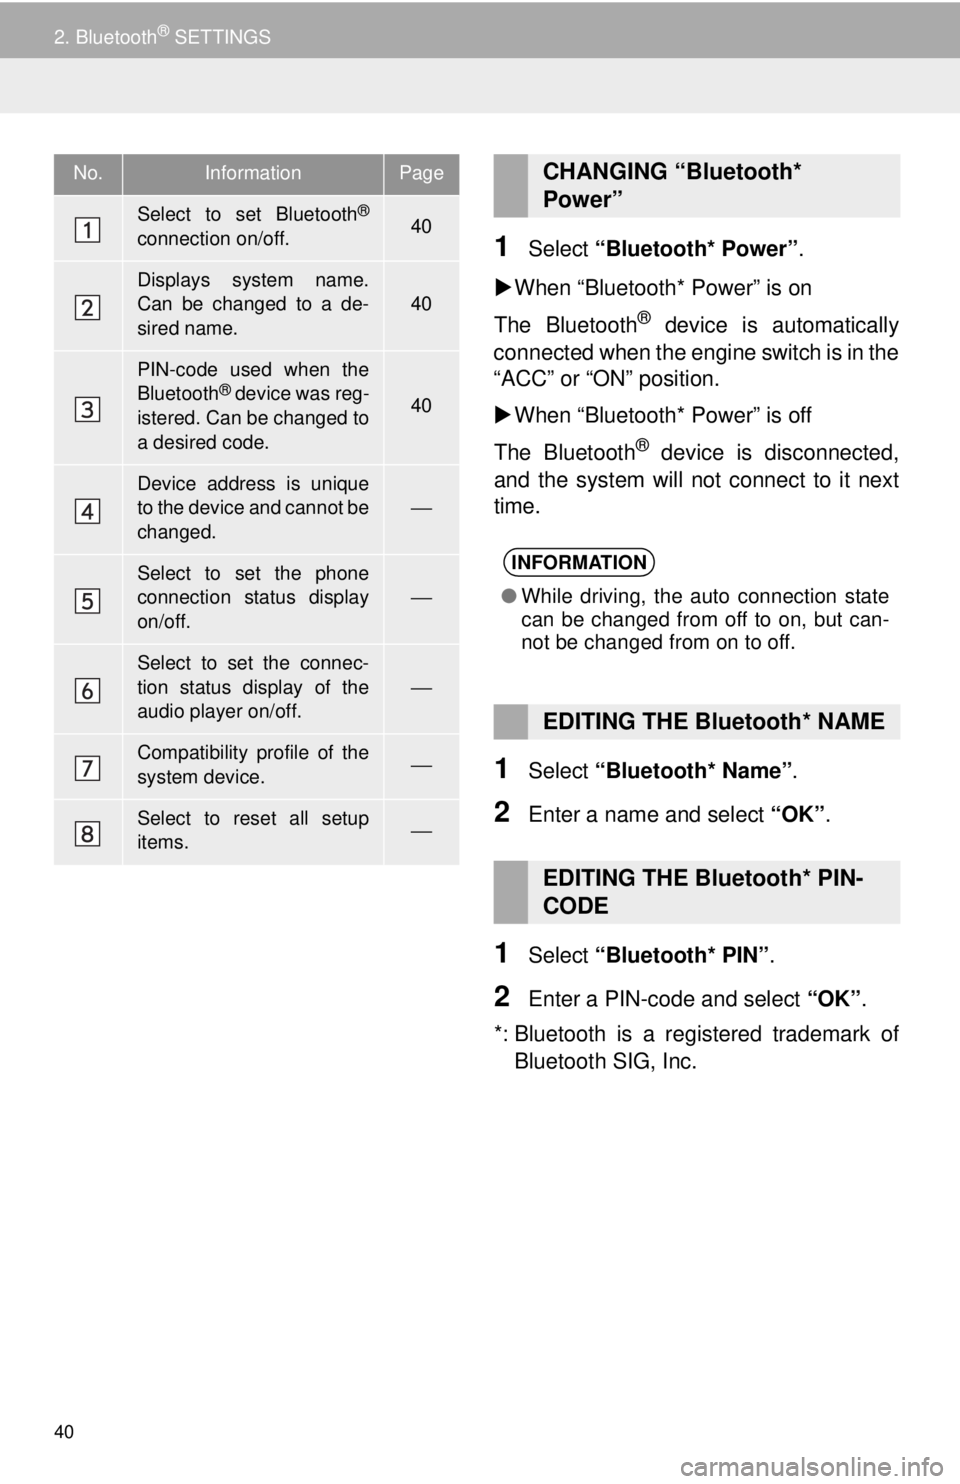
No.InformationPage
Select to set Bluetooth®
connection on/off.40
Displays system name.
Can be changed to a de-
sired name.
40
PIN-code used when the
Bluetooth® device was reg-
istered. Can be changed to
a desired code.40
Device address is unique
to the device and cannot be
changed.
⎯
Select to set the phone
connection status display
on/off.⎯
Select to set the connec-
tion status display of the
audio player on/off.
⎯
Compatibility profile of the
system device.⎯
Select to reset all setup
items.⎯
CHANGING “Bluetooth*
Power”
INFORMATION
● While driving, the auto connection state
can be changed from off to on, but can-
not be changed from on to off.
EDITING THE Bluetooth* NAME
EDITING THE Bluetooth* PIN-
CODE
Page 42 of 164
42
3. OTHER SETTINGS
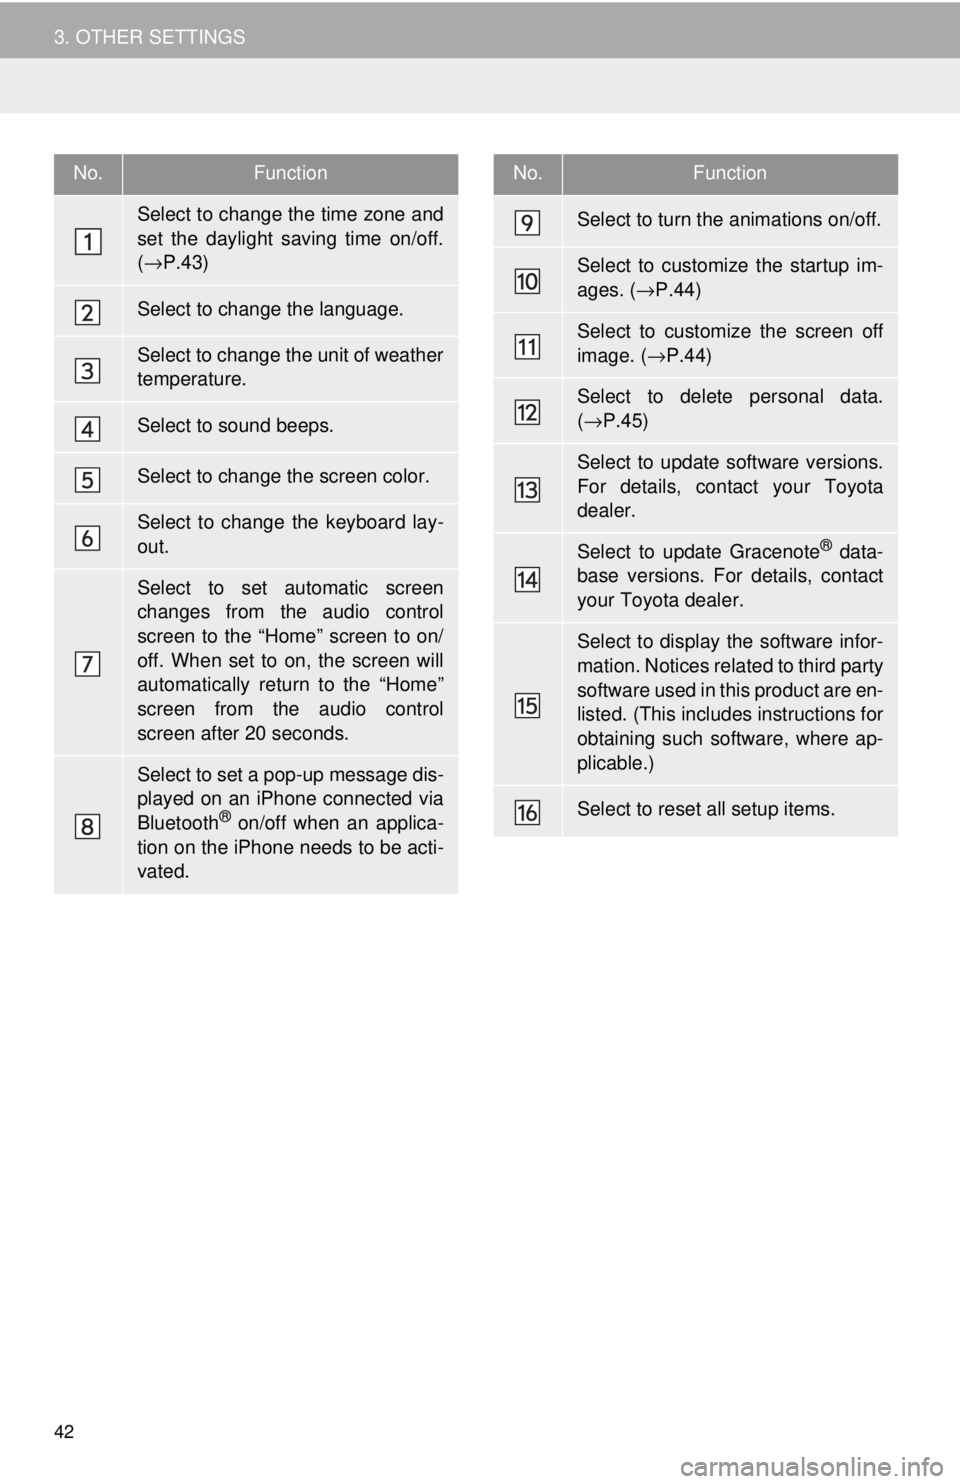
No.Function
Select to change the time zone and
set the daylight saving time on/off.
( → P.43)
Select to change the language.
Select to change the unit of weather
temperature.
Select to sound beeps.
Select to change the screen color.
Select to change the keyboard lay-
out.
Select to set automatic screen
changes from the audio control
screen to the “Home” screen to on/
off. When set to on, the screen will
automatically return to the “Home”
screen from the audio control
screen after 20 seconds.
Select to set a pop-up message dis-
played on an iPhone connected via
Bluetooth
® on/off when an applica-
tion on the iPhone needs to be acti-
vated.
Select to turn the animations on/off.
Select to customize the startup im-
ages. ( →P.44)
Select to customize the screen off
image. ( →P.44)
Select to delete personal data.
( → P.45)
Select to update software versions.
For details, contact your Toyota
dealer.
Select to update Gracenote® data-
base versions. For details, contact
your Toyota dealer.
Select to display the software infor-
mation. Notices related to third party
software used in this product are en-
listed. (This includes instructions for
obtaining such software, where ap-
plicable.)
Select to reset all setup items.
No.Function
Page 46 of 164
46
3. OTHER SETTINGS
2. VOICE SETTINGS
1Press the “APPS” button.
2Select “Setup” .
3Select “Voice” .
4Select the items to be set.
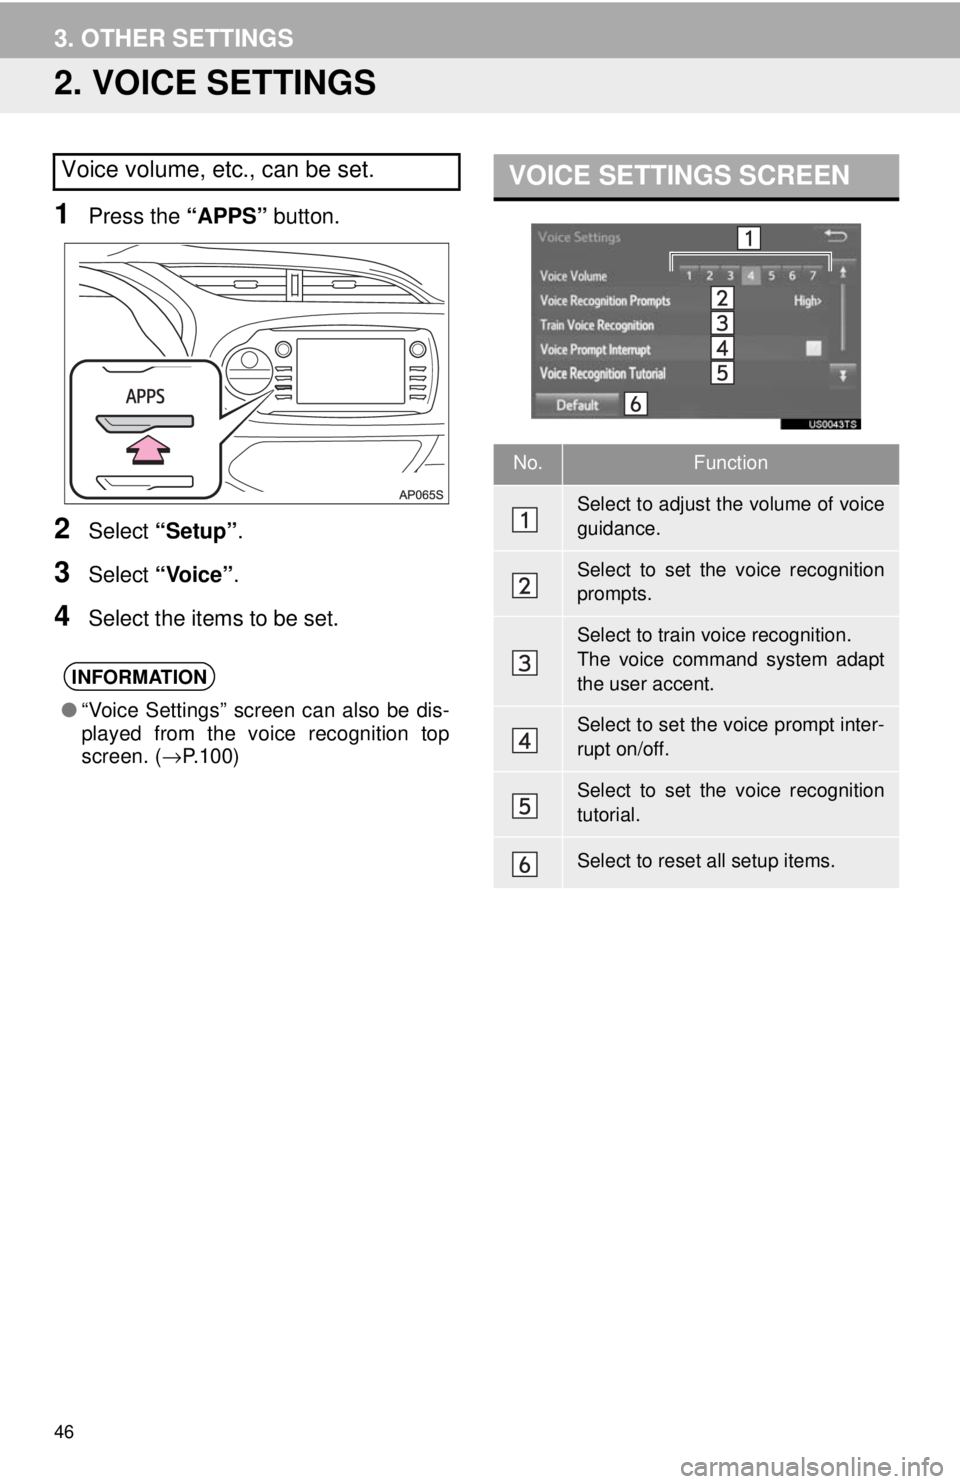
VOICE SETTINGS SCREENVoice volume, etc., can be set.
INFORMATION
●“Voice Settings” screen can also be dis-
played from the voice recognition top
screen. ( →P.100)
No.Function
Select to adjust the volume of voice
guidance.
Select to set the voice recognition
prompts.
Select to train voice recognition.
The voice command system adapt
the user accent.
Select to set the voice prompt inter-
rupt on/off.
Select to set the voice recognition
tutorial.
Select to reset all setup items.
Page 48 of 164
48
3. OTHER SETTINGS
4. DRIVER SETTINGS
1Press the “APPS” button.
2Select “Setup” .
3Select “Driver” .
4Select “Enable this Feature” .
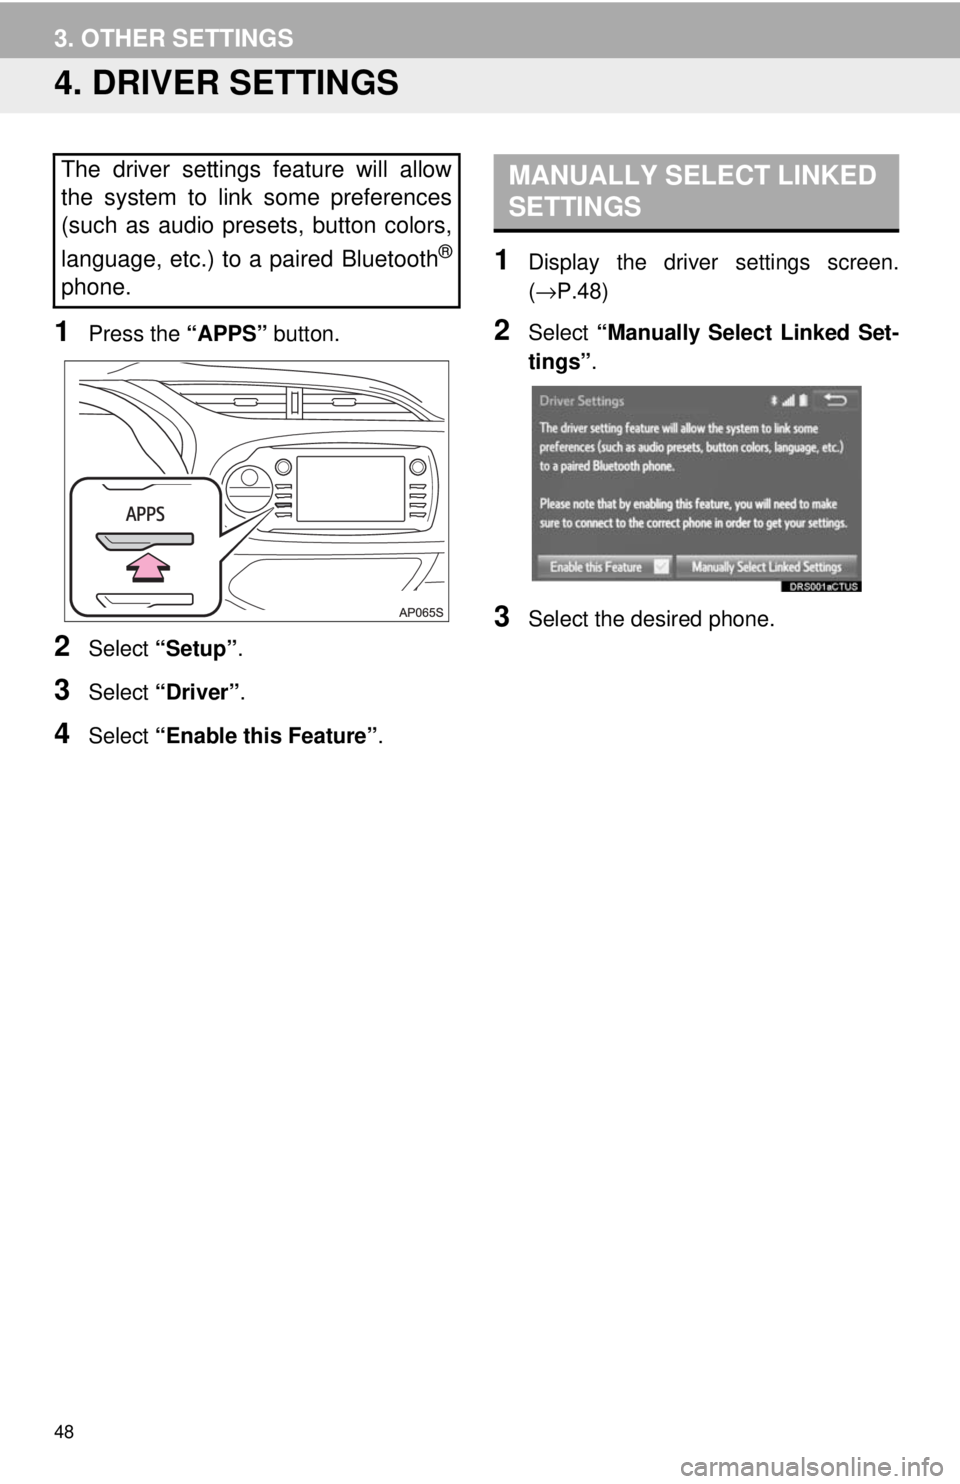
MANUALLY SELECT LINKED
SETTINGS
1Display the driver settings screen.
(→ P.48 )
2Select “Manually Select Linked Set -
tings” .
3Select the desired phone.
The driver settings feature will allow
the system to link some preferences
(such as audio presets, button colors,
language, etc.) to a paired Bluetooth
®
phone.
Page 50 of 164
50
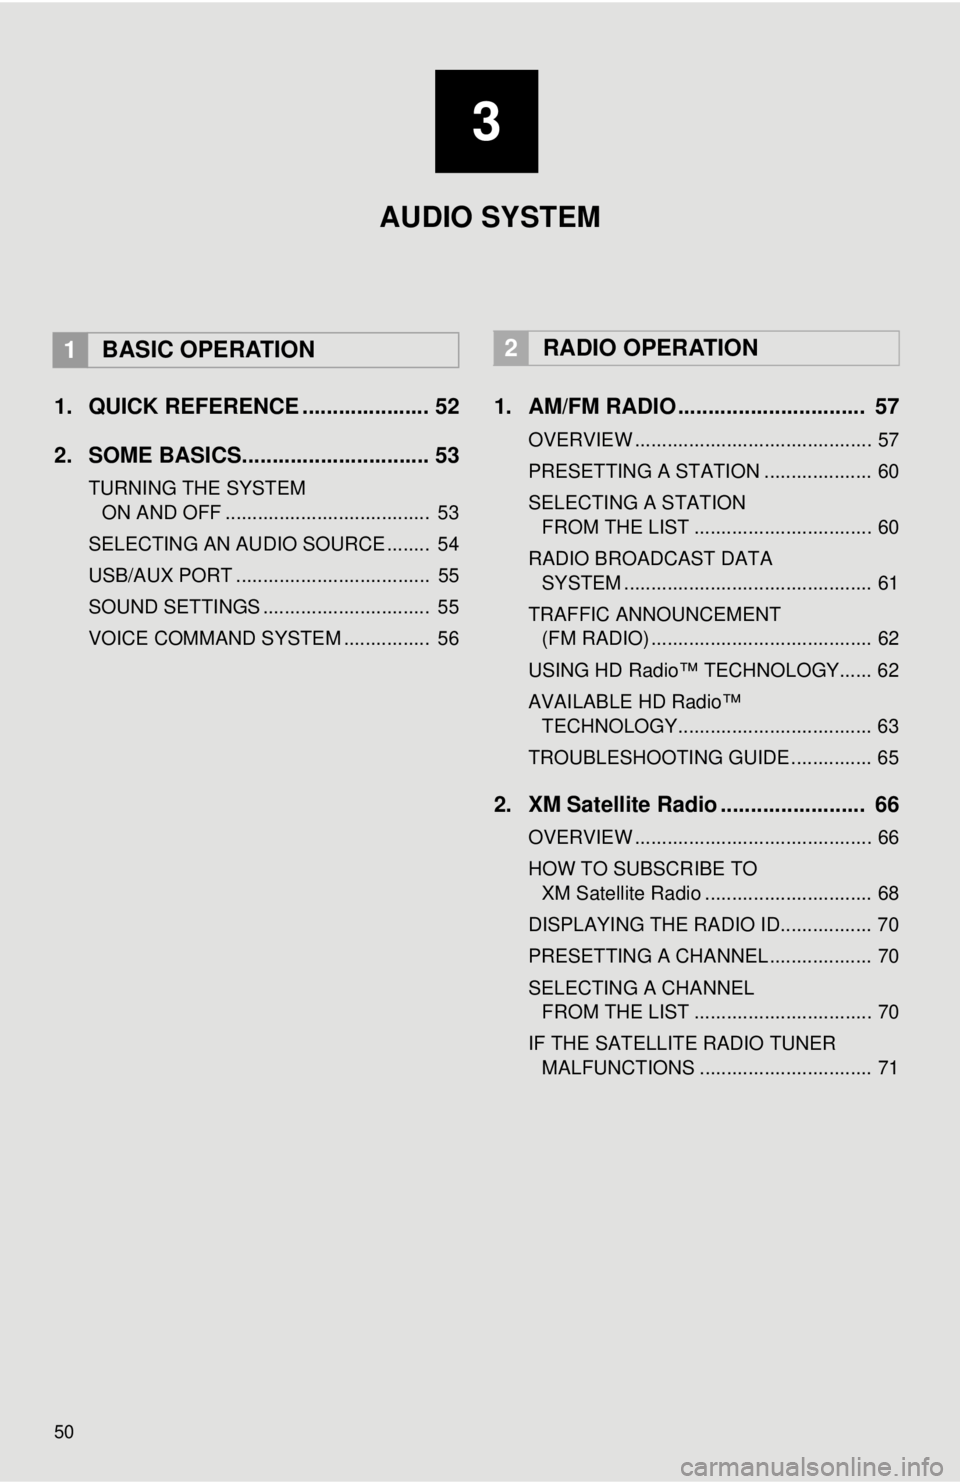
1. QUICK REFERENCE ..................... 52
2. SOME BASICS............................... 53
TURNING THE SYSTEM
ON AND OFF
...................................... 53
SELECTING AN AUDIO SOURCE ........ 54
USB/AUX PORT .................................... 55
SOUND SETTINGS ............................... 55
VOICE COMMAND SYSTEM ................ 56
1. AM/FM RADIO ............................... 57
OVERVIEW ............................................ 57
PRESETTING A STATION .................... 60
SELECTING A STATION
FROM THE LIST
................................. 60
RADIO BROADCAST DATA
SYSTEM ..........................
.................... 61
TRAFFIC ANNOUNCEMENT
(FM RADIO) .........................................
62
USING HD Radio™ TECHNOLOGY...... 62
AVAILABLE HD Radio™
TEC
HNOLOGY.................................... 63
TROUBLESHOOTING GUIDE ............... 65
2. XM Satellite Radio ........................ 66
OVERVIEW ............................................ 66
HOW TO SUBSCRIBE TO
XM Satellite Radio ...........
.................... 68
DISPLAYING THE RADIO ID................. 70
PRESETTING A CHANNEL ................... 70
SELECTING A CHANNEL
FROM THE LIST
................................. 70
IF THE SATELLITE RADIO TUNER MALFUNCTIONS ................................ 71
2RADIO OPERATION
3
AUDIO SYSTEM
1BASIC OPERATION
Page 59 of 164
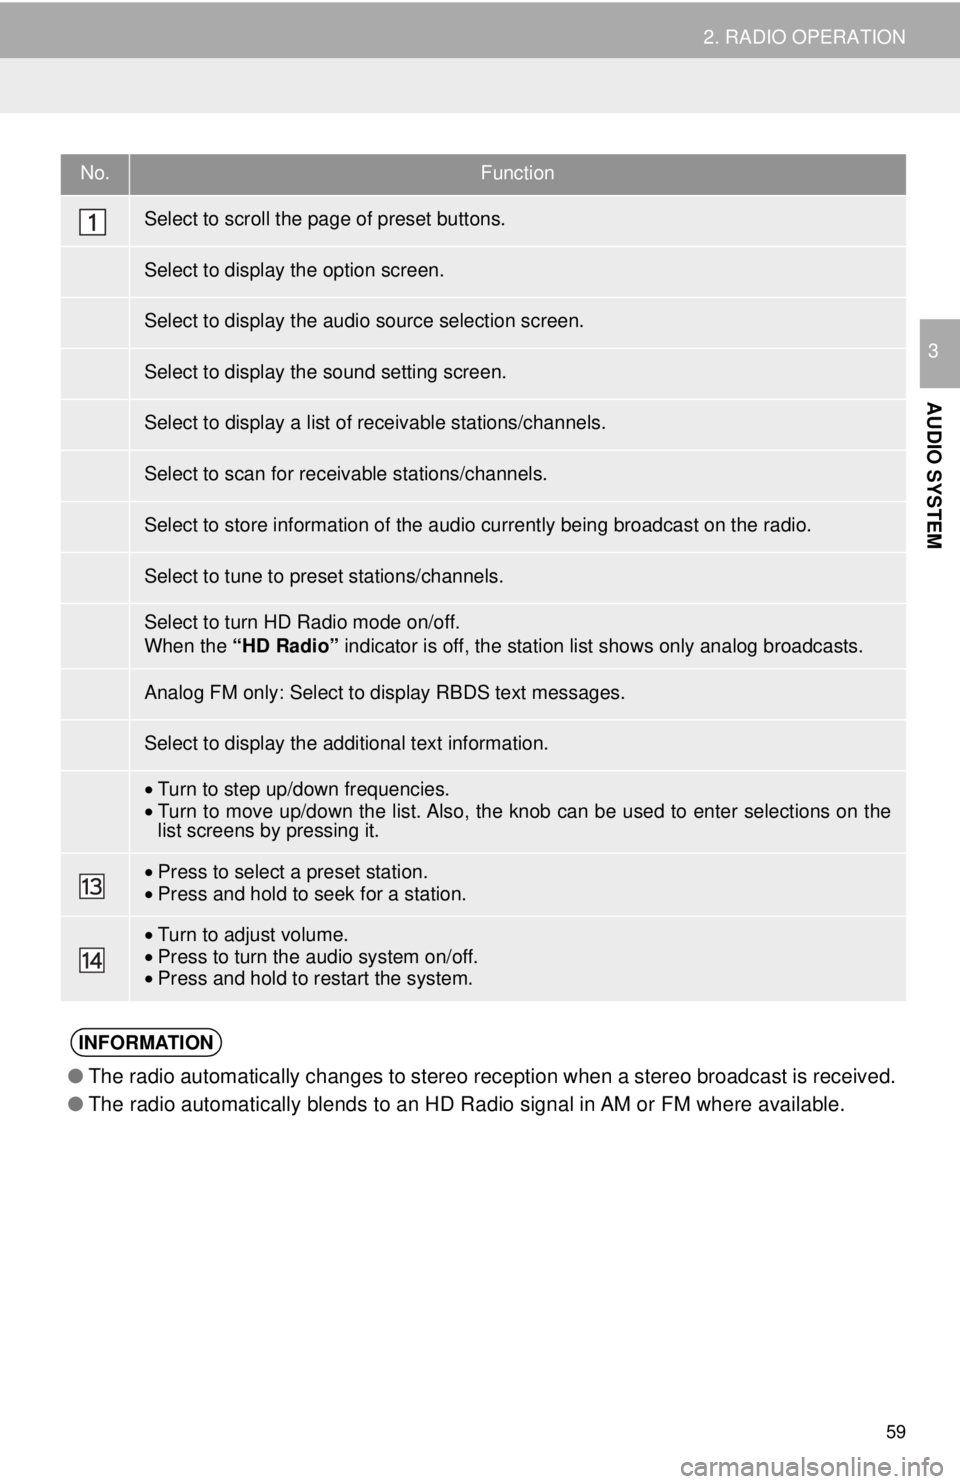
No.Function
•Turn to step up/down frequencies.•Turn to move up/down the list. Also, the knob can be used to enter selections on the
list screens by pressing it.
• Press to select a preset station.•Press and hold to seek for a station.
•Turn to adjust volume.
• Press to turn th e audio system on/of f.
• Press and hold to re star t the system.
●The radio automatically changes to stereo reception when a stereo broadcast is received.
● The radio automatically blends to an HD Radio signal in AM or FM where available.
59
2. RADIO OPERATION
AUDIO SYSTEM
3
Select to scroll the page of preset buttons.
Select to display the option screen.
Select to display the audio source selection screen.
Select to display the sound setting screen.
Select to display a list of receivable stations/channels.
Select to scan for receivable stations/channels.
Select to store information of the audio currently being broadcast on the radio.
Select to tune to preset stations/channels.
Select to turn HD Radio mode on/off.
When the “HD Radio” indicator is off, the station list shows only analog broadcasts.
Analog FM only: Select to display RBDS text messages.
Select to display the additional text information.
INFORMATION
Page 60 of 164
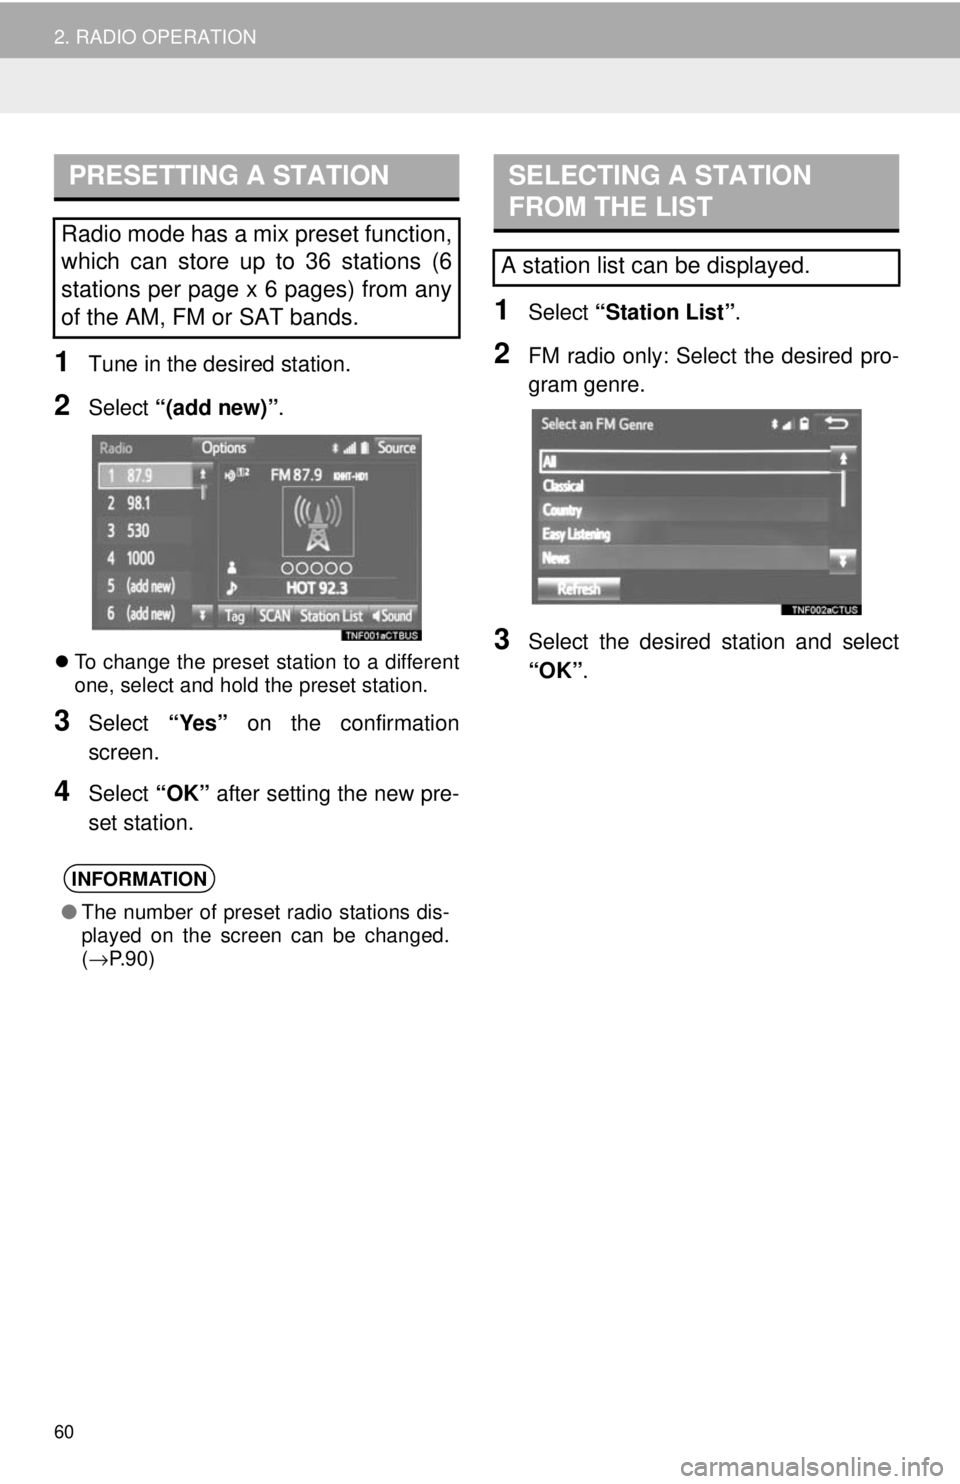
PRESETTING A STATION
60
2. RADIO OPERATION
1Tune in the desired station.
2Select “(add new)” .
To change the preset station to a different
one, select and hold the preset station.
3Select “Yes” on the confirmation
screen.
4Select “OK” after setting the new pre -
set station.
SELECTING A STATION
FROM THE LIST
1Select “Station List” .
2FM radio only: Select the desired pro -
gram genre.
3Select the desired station and select
“OK” .
Radio mode has a mix preset function,
which can store up to 36 stations (6
stations per page x 6 pages) from any
of the AM, FM or SAT bands.
INFORMATION
● The number of preset radio stations dis-
played on the screen can be changed.
(→ P.90)
A station list can be displayed.