light VAUXHALL ADAM 2018.5 Workshop Manual
[x] Cancel search | Manufacturer: VAUXHALL, Model Year: 2018.5, Model line: ADAM, Model: VAUXHALL ADAM 2018.5Pages: 245, PDF Size: 7.4 MB
Page 142 of 245

140Driving and operatingIn the event of a fault, control indicatorg illuminates. Additionally, a
warning message is displayed in the
Driver Information Centre.
Vehicle messages 3 98.
Continued driving is restricted or not
possible, depending on the fault.
Have the cause of the fault remedied
by a workshop.Brakes
The brake system comprises two
independent brake circuits.
If a brake circuit fails, the vehicle can
still be braked using the other brake
circuit. However, braking effect is
achieved only when the brake pedal
is depressed firmly. Considerably
more force is needed for this. The braking distance is extended. Seek
the assistance of a workshop before
continuing the journey.
When the engine is not running, the
support of the brake servo unit
disappears once the brake pedal has been depressed once or twice.
Braking effect is not reduced, but
braking requires significantly greater
force. It is especially important to bear this in mind when being towed.
Control indicator R 3 88.
Antilock brake system
Antilock brake system (ABS)
prevents the wheels from locking.ABS starts to regulate brake pressure as soon as a wheel shows a tendency to lock. The vehicle remains
steerable, even during hard braking.
ABS control is made apparent
through a pulse in the brake pedal
and the noise of the regulation
process.
For optimum braking, keep the brake
pedal fully depressed throughout the
braking process, despite the fact that
the pedal is pulsating. Do not reduce
the pressure on the pedal.
After starting off the system performs
a self-test which may be audible.
Control indicator u 3 89.
Adaptive brake light
During full braking, all three brake
lights flash for the duration of ABS
control.
Page 143 of 245
Driving and operating141Fault9Warning
If there is a fault in the ABS, the
wheels may be liable to lock due
to braking that is heavier than
normal. The advantages of ABS are no longer available. During
hard braking, the vehicle can no longer be steered and may
swerve.
Have the cause of the fault remedied
by a workshop.
Parking brake
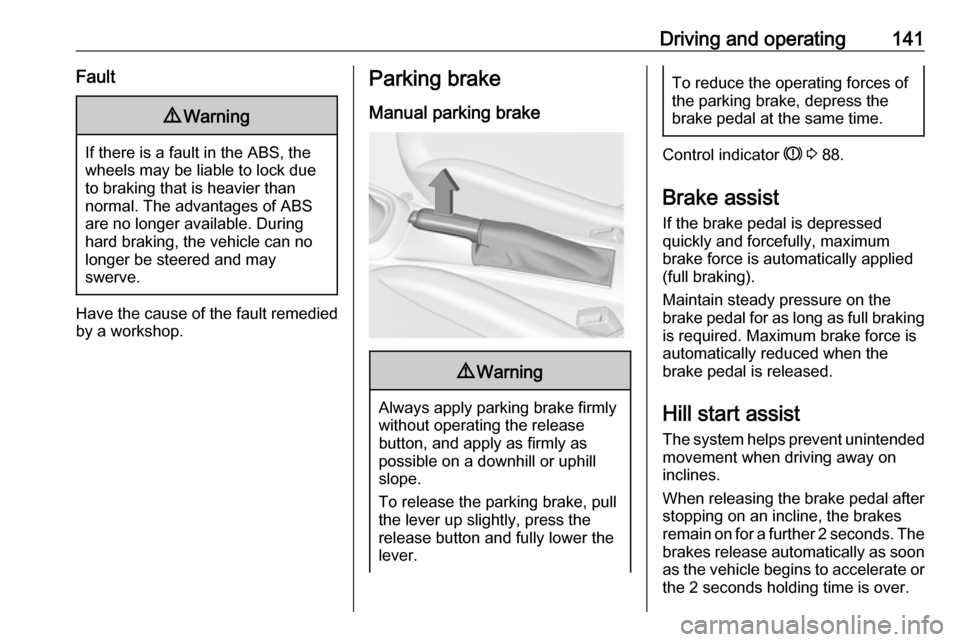
Manual parking brake9 Warning
Always apply parking brake firmly
without operating the release
button, and apply as firmly as
possible on a downhill or uphill
slope.
To release the parking brake, pull
the lever up slightly, press the
release button and fully lower the
lever.
To reduce the operating forces of
the parking brake, depress the
brake pedal at the same time.
Control indicator R 3 88.
Brake assist
If the brake pedal is depressed
quickly and forcefully, maximum
brake force is automatically applied
(full braking).
Maintain steady pressure on the
brake pedal for as long as full braking is required. Maximum brake force is
automatically reduced when the
brake pedal is released.
Hill start assist
The system helps prevent unintended movement when driving away on
inclines.
When releasing the brake pedal after
stopping on an incline, the brakes
remain on for a further 2 seconds. The brakes release automatically as soon
as the vehicle begins to accelerate or the 2 seconds holding time is over.
Page 157 of 245

Driving and operating155
Select parallel or perpendicular
parking slot in Driver Information
Centre by pressing SET/CLR.
The system is configured to detect parking slots by default on the
passenger side. To detect parking
slots on the driver side, switch on turn
light indicator on the driver side.When a slot is detected, visual
feedback in the Driver Information
Centre and an acoustic signal are
given.
Indication in the Colour Info Display
Select parallel or perpendicular
parking slot by tapping the respective icon on the display.
Select parking side by tapping the
respective icon on the display.
When a slot is detected, visual
feedback on the Colour Info Display
and an acoustic signal are given.
If the driver does not stop the vehicle
after a parking slot is proposed, the
system starts to search for another
suitable parking slot.
Park guiding mode
The parking slot suggestion of the system is accepted when the vehicle
is stopped by the driver within 10 m
Page 160 of 245
158Driving and operatinggateway, a courtyard or even a
crossing as a parking slot. After selecting reverse gear the system
will start a parking manoeuvre. Take care regarding the availability of the
suggested parking slot.
Surface irregularities, e.g. on construction zones, are not detected
by the system. The driver accepts
responsibility.
Notice
If engaging a forward gear and
exceeding a certain speed, the
parking assist will be deactivated
when the rear carrier system is
extended.
If engaging reverse for the first time,
the parking assist will detect the rear carrier system and provide an
acoustic signal. Press r or D
briefly to deactivate the parking assist.
Notice
After production, the system
requires a calibration. For optimal
parking guidance, a driving distance
of at least 6 miles, including a
number of bends, is required.Side blind spot alert
The Side blind spot alert system
detects and reports objects on either
side of the vehicle, within a specified
"blind spot" zone. The system
displays a visual alert in each exterior
mirror, when detecting objects that
may not be visible in the interior and
exterior mirrors.
Side blind spot alert uses some of the advanced parking assist sensors
which are located in the front and rear
bumper on both sides of the vehicle.9 Warning
Side blind spot alert does not
replace driver vision.
The system does not detect:
● vehicles outside the side blind zones which may be rapidly
approaching
● pedestrians, cyclists or animals
Before changing a lane, always
check all mirrors, look over the
shoulder and use the turn light.
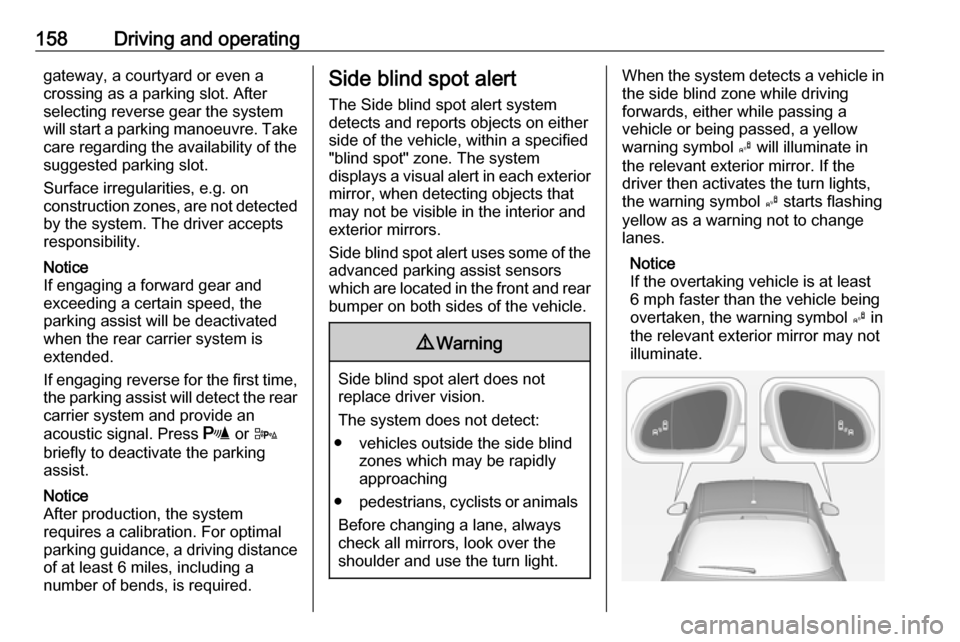
When the system detects a vehicle in the side blind zone while driving
forwards, either while passing a
vehicle or being passed, a yellow
warning symbol B will illuminate in
the relevant exterior mirror. If the
driver then activates the turn lights,
the warning symbol B starts flashing
yellow as a warning not to change
lanes.
Notice
If the overtaking vehicle is at least
6 mph faster than the vehicle being
overtaken, the warning symbol B in
the relevant exterior mirror may not
illuminate.
Page 161 of 245

Driving and operating159Side blind spot alert is active from
speeds of 6 mph up to 87 mph.
Driving faster than 87 mph
deactivates the system, indicated by
low lighting warning symbols B in
both exterior mirrors. Reducing the
speed again will extinguish the
warning symbols. If a vehicle is then
detected in the blind zone, the
warning symbols B will illuminate as
normal on the relevant side.
When the vehicle is started, both
exterior mirror displays will briefly
illuminate to indicate that the system
is operating.
The system can be activated or
deactivated in the Info Display.
Vehicle personalisation 3 101.
Deactivation is indicated by a
message in the Driver Information
Centre.
Detection zones The detection zones start at the rearbumper and extend approx. 3 m
rearwards and to the sides. The
height of the zone is between approx. 0.5 m and 2 m off the ground.The system is deactivated if the
vehicle is towing a trailer.
Side blind spot alert is designed to
ignore stationary objects, e.g.
guardrails, posts, curbs, walls and
beams. Parked vehicles or oncoming
vehicles are not detected.
Fault
Occasional missed alerts can occur
under normal circumstances and will
increase in wet conditions.
Side blind spot alert does not operate when the left or right corners of the
rear bumper are covered with mud,
dirt, snow, ice, slush, or in heavy
rainstorms.
Cleaning instructions 3 209.
In the event of a fault in the system or if the system does not work due to
temporary conditions, a message is
displayed in the Driver Information
Centre. Seek the assistance of a
workshop.Fuel
Fuel for petrol engines
Only use unleaded fuel that complies
with European standard EN 228 or
equivalent.
The engine is capable of running with
fuel that contains up to 10% ethanol
(e.g. named E10).
Use fuel with the recommended
octane rating. A lower octane rating can reduce engine power and torque
and slightly increases fuel
consumption.
Page 162 of 245

160Driving and operatingCaution
Do not use fuel or fuel additives
that contain metallic compounds
such as manganese-based
additives. This may cause engine
damage.
Caution
Use of fuel that does not comply to EN 228 or equivalent can lead todeposits or engine damage.
Caution
Use of fuel with a lower octane
rating than the lowest possible
rating could lead to uncontrolled combustion and engine damage.
The engine-specific requirements
regarding octane rating are given in
the engine data overview 3 221. A
country-specific label at the fuel filler
flap can supersede the requirement.
Fuel additive
Fuel should contain detergent
additives that help prevent engine
and fuel system deposits from
forming. Clean fuel injectors and
intake valves will allow the emission
control system to work properly. In
certain countries fuel does not
contain sufficient quantities of
additive to keep fuel injectors and
intake valves clean. In these
countries a fuel additive is required for
some engines to make up for this lack
of detergency. Only use fuel additive
approved for the vehicle.
Adding fuel additive to the filled fuel
tank is required at least every 10,000 miles or after one year, whichever
occurs first. For further information,
contact your workshop.
Prohibited fuels
Fuels containing oxygenates such as
ethers and ethanol, as well as
reformulated fuel, are available in
some cities. If these fuels comply with the previously described
specification, then they are
acceptable to use. However, E85(85% ethanol) and other fuels
containing more than 15% ethanol
must be used only in FlexFuel
vehicles.Caution
Do not use fuel containing
methanol. It can corrode metal
parts in the fuel system and also
damage plastic and rubber parts.
This damage would not be
covered by the vehicle warranty.
Some fuels, mainly high octane
racing fuels, can contain an octane
enhancing additive called
methylcyclopentadienyl manganese
tricarbonyl (MMT). Do not use fuels or fuel additives with MMT as they can
reduce spark plug life and affect
emission control system
performance. The malfunction
indicator light Z may illuminate 3 88.
If this occurs, seek the assistance of
a workshop.
Page 164 of 245
162Driving and operatingPush the flap to engage. Then open
the flap.
Petrol refuelling
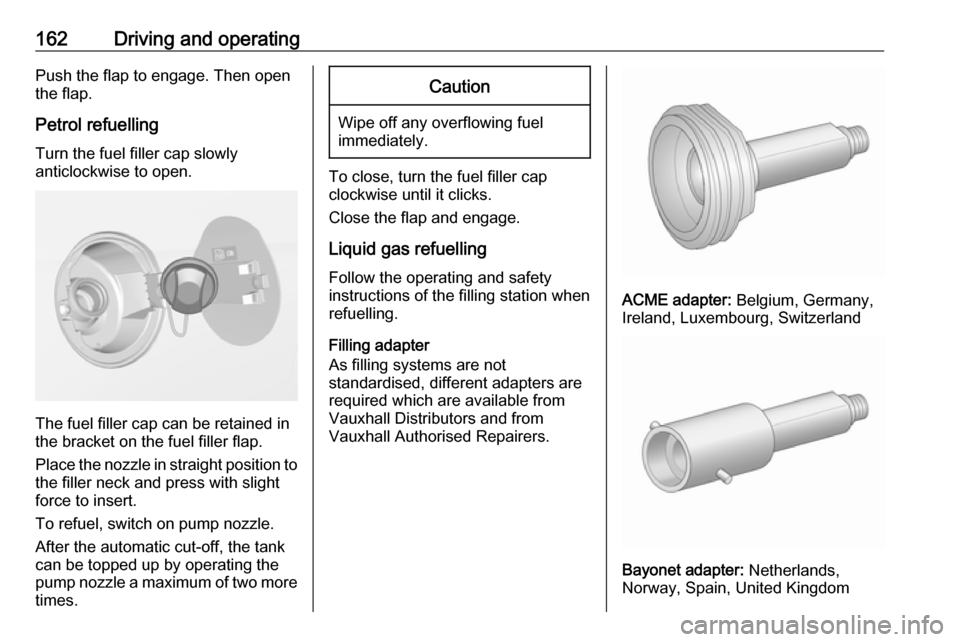
Turn the fuel filler cap slowly
anticlockwise to open.
The fuel filler cap can be retained in
the bracket on the fuel filler flap.
Place the nozzle in straight position to the filler neck and press with slight
force to insert.
To refuel, switch on pump nozzle.
After the automatic cut-off, the tank can be topped up by operating the
pump nozzle a maximum of two more
times.
Caution
Wipe off any overflowing fuel
immediately.
To close, turn the fuel filler cap
clockwise until it clicks.
Close the flap and engage.
Liquid gas refuelling Follow the operating and safety
instructions of the filling station when
refuelling.
Filling adapter
As filling systems are not
standardised, different adapters are
required which are available from
Vauxhall Distributors and from
Vauxhall Authorised Repairers.
ACME adapter: Belgium, Germany,
Ireland, Luxembourg, Switzerland
Bayonet adapter: Netherlands,
Norway, Spain, United Kingdom
Page 167 of 245

Vehicle care165Vehicle careGeneral Information...................165
Accessories and vehicle modifications .......................... 165
Vehicle storage ........................166
End-of-life vehicle recovery .....166
Vehicle checks ........................... 167
Performing work ......................167
Bonnet ..................................... 167
Engine oil ................................. 168
Engine coolant ......................... 169
Washer fluid ............................ 169
Brakes ..................................... 170
Brake fluid ............................... 170
Vehicle battery ......................... 170
Wiper blade replacement ........172
Bulb replacement .......................172
Halogen headlights ..................172
Front turn lights .......................175
Tail lights ................................. 176
Side turn lights ......................... 179
Number plate light ...................180
Interior lights ............................ 181
Electrical system ........................181
Fuses ....................................... 181Engine compartment fuse box . 182
Instrument panel fuse box .......184
Vehicle tools .............................. 186
Tools ........................................ 186
Wheels and tyres .......................187
Winter tyres ............................. 187
Tyre designations ....................188
Tyre pressure .......................... 188
Tyre pressure monitoring system .................................... 189
Tread depth ............................. 192
Changing tyre and wheel size . 193
Wheel covers ........................... 193
Tyre chains .............................. 194
Tyre repair kit .......................... 194
Wheel changing .......................198
Spare wheel ............................ 201
Jump starting ............................. 205
Towing ....................................... 206
Towing the vehicle ...................206
Towing another vehicle ...........208
Appearance care .......................209
Exterior care ............................ 209
Interior care ............................. 212General Information
Accessories and vehicle modifications
We recommend the use of genuine
parts and accessories and factory approved parts specific for your
vehicle type. We cannot assess or guarantee reliability of other products
- even if they have a regulatory or
otherwise granted approval.
Any modification, conversion or other changes made to standard vehicle
specifications (including, without
limitation, software modifications,
modifications of the electronic control
units) may invalidate the warranty
offered by Vauxhall. Furthermore,
such changes may affect driver
assistance systems, fuel
consumption, CO 2 emissions and
other emissions of the vehicle. They
may also invalidate the vehicle
operating permit.
Page 174 of 245
172Vehicle careWiper blade replacementWindscreen
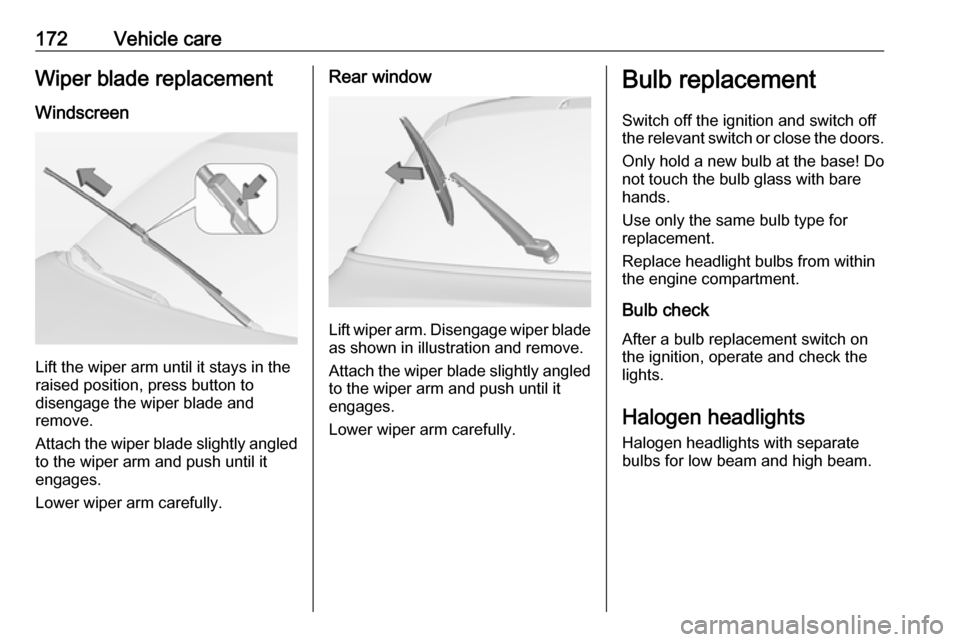
Lift the wiper arm until it stays in the
raised position, press button to
disengage the wiper blade and
remove.
Attach the wiper blade slightly angled
to the wiper arm and push until it
engages.
Lower wiper arm carefully.
Rear window
Lift wiper arm. Disengage wiper blade as shown in illustration and remove.
Attach the wiper blade slightly angled
to the wiper arm and push until it
engages.
Lower wiper arm carefully.
Bulb replacement
Switch off the ignition and switch off
the relevant switch or close the doors.
Only hold a new bulb at the base! Do not touch the bulb glass with bare
hands.
Use only the same bulb type for
replacement.
Replace headlight bulbs from within
the engine compartment.
Bulb check
After a bulb replacement switch on
the ignition, operate and check the
lights.
Halogen headlights Halogen headlights with separate
bulbs for low beam and high beam.
Page 176 of 245
174Vehicle care
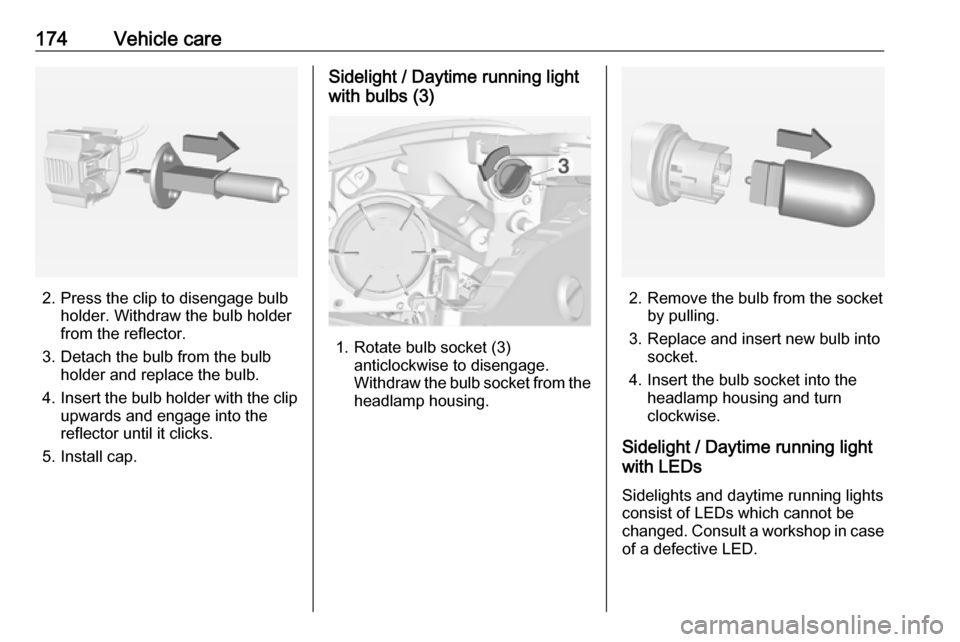
2. Press the clip to disengage bulbholder. Withdraw the bulb holder
from the reflector.
3. Detach the bulb from the bulb holder and replace the bulb.
4. Insert the bulb holder with the clip
upwards and engage into the
reflector until it clicks.
5. Install cap.
Sidelight / Daytime running light
with bulbs (3)
1. Rotate bulb socket (3) anticlockwise to disengage.
Withdraw the bulb socket from the
headlamp housing.
2. Remove the bulb from the socket by pulling.
3. Replace and insert new bulb into socket.
4. Insert the bulb socket into the headlamp housing and turn
clockwise.
Sidelight / Daytime running light
with LEDs
Sidelights and daytime running lights
consist of LEDs which cannot be
changed. Consult a workshop in case
of a defective LED.