light VAUXHALL ADAM 2018.5 Manual PDF
[x] Cancel search | Manufacturer: VAUXHALL, Model Year: 2018.5, Model line: ADAM, Model: VAUXHALL ADAM 2018.5Pages: 245, PDF Size: 7.4 MB
Page 198 of 245
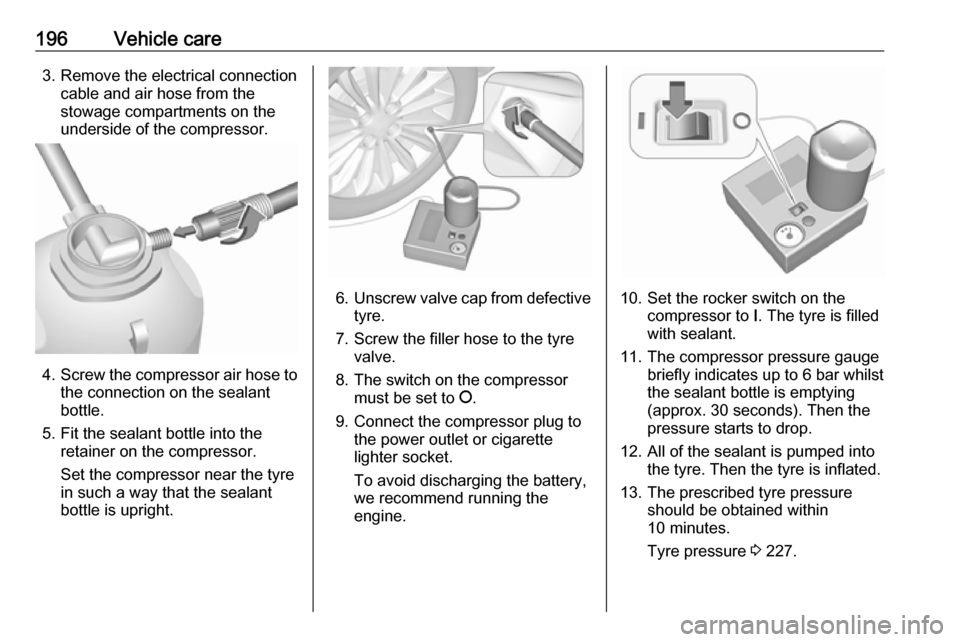
196Vehicle care3. Remove the electrical connectioncable and air hose from the
stowage compartments on the
underside of the compressor.
4. Screw the compressor air hose to
the connection on the sealant
bottle.
5. Fit the sealant bottle into the retainer on the compressor.
Set the compressor near the tyre
in such a way that the sealant
bottle is upright.
6. Unscrew valve cap from defective
tyre.
7. Screw the filler hose to the tyre valve.
8. The switch on the compressor must be set to J.
9. Connect the compressor plug to the power outlet or cigarette
lighter socket.
To avoid discharging the battery, we recommend running the
engine.10. Set the rocker switch on the compressor to I. The tyre is filled
with sealant.
11. The compressor pressure gauge briefly indicates up to 6 bar whilstthe sealant bottle is emptying
(approx. 30 seconds). Then the
pressure starts to drop.
12. All of the sealant is pumped into the tyre. Then the tyre is inflated.
13. The prescribed tyre pressure should be obtained within
10 minutes.
Tyre pressure 3 227.
Page 200 of 245

198Vehicle careNotice
The driving characteristics of the repaired tyre are severely affected,therefore have this tyre replaced.
If unusual noise is heard or the
compressor becomes hot, turn
compressor off for at least
30 minutes.
The built-in safety valve opens at a
pressure of 7 bar (102 psi).
Note the expiry date of the kit. After
this date its sealing capability is no
longer guaranteed. Pay attention to
storage information on sealant
bottle.
Replace the used sealant bottle. Dispose of the bottle as prescribed
by applicable laws.
The compressor and sealant can be used from approx. -30 °C.
The adapters supplied can be used
to pump up other items e.g.
footballs, air mattresses, inflatable
dinghies etc. They are located on the underside of the compressor. To
remove, screw on compressor air hose and withdraw adapter.Wheel changing
Make the following preparations and
observe the following information:
● Park the vehicle on a level, firm and non-skid surface. The front
wheels must be in the straight- ahead position.
● Apply the parking brake and engage first gear or reverse gear.
● Never change more than one wheel at once.
● Use the jack only to change wheels in case of puncture, not
for seasonal winter or summer
tyre change.
● The jack is maintenance-free.
● If the ground on which the vehicle
is standing is soft, a solid board
(max. 1 cm thick) should be
placed under the jack.
● Take heavy objects out of the vehicle before jacking up.
● No people or animals may be in the vehicle when it is jacked-up.
● Never crawl under a jacked-up vehicle.●Do not start the vehicle when it is
raised on the jack.
● Before screwing in the wheel bolts, clean them and lightly coatthe taper of each wheel bolt with
commercially available grease.9 Warning
Do not grease the thread of the
wheel bolt.
1. Steel wheels:
Pull off the wheel cover.
Alloy wheels with bolt caps Disengage wheel bolt caps with a
screwdriver and remove. To
protect the wheel, place a soft
cloth between the screwdriver
and the alloy wheel.
Alloy wheels with centre cap
Page 203 of 245
Vehicle care201Front arm position of the lifting
platform at the underbody.
Spare wheel
The spare wheel can be classified as
a temporary spare wheel depending
on the size compared to the other
mounted wheels and country
regulations. In this case a permissible maximum speed applies, even
though no label at the spare wheel
indicates this.
The spare wheel has a steel rim.Caution
The use of a spare wheel that is smaller than the other wheels or in combination with winter tyres
could affect driveability. Have the defective tyre replaced as soon as
possible.
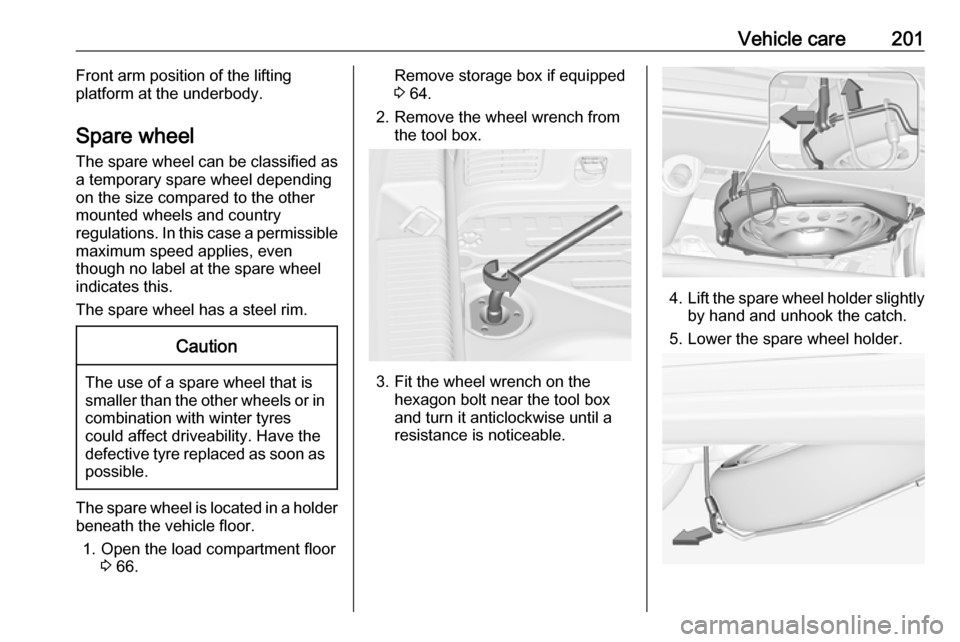
The spare wheel is located in a holder
beneath the vehicle floor.
1. Open the load compartment floor 3 66.
Remove storage box if equipped
3 64.
2. Remove the wheel wrench from the tool box.
3. Fit the wheel wrench on the hexagon bolt near the tool box
and turn it anticlockwise until a
resistance is noticeable.
4. Lift the spare wheel holder slightly
by hand and unhook the catch.
5. Lower the spare wheel holder.
Page 204 of 245
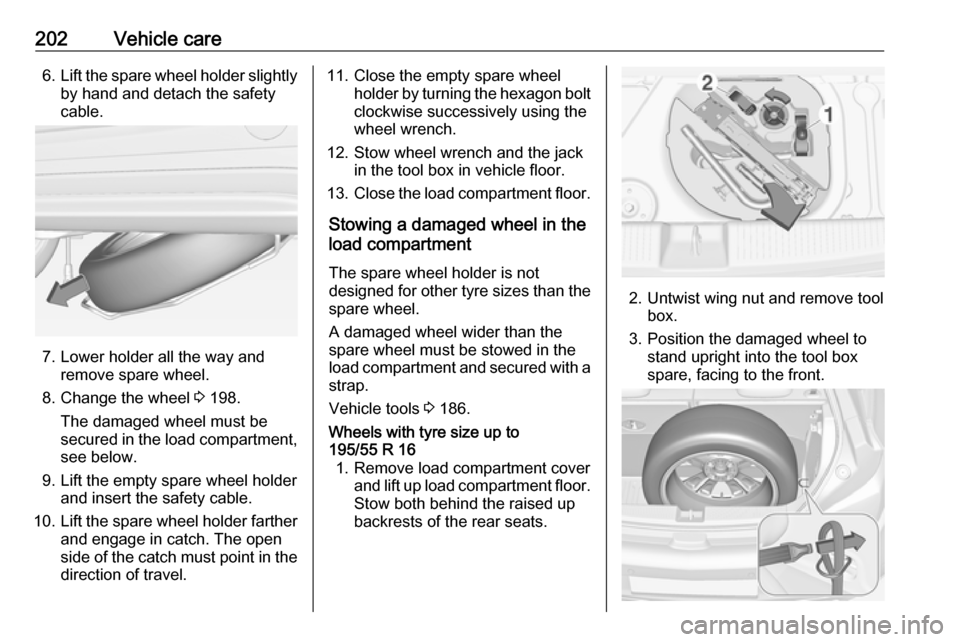
202Vehicle care6.Lift the spare wheel holder slightly
by hand and detach the safety
cable.
7. Lower holder all the way and remove spare wheel.
8. Change the wheel 3 198.
The damaged wheel must be
secured in the load compartment,
see below.
9. Lift the empty spare wheel holder and insert the safety cable.
10. Lift the spare wheel holder farther
and engage in catch. The open
side of the catch must point in the direction of travel.
11. Close the empty spare wheel holder by turning the hexagon boltclockwise successively using the
wheel wrench.
12. Stow wheel wrench and the jack in the tool box in vehicle floor.
13. Close the load compartment floor.
Stowing a damaged wheel in the
load compartment
The spare wheel holder is not
designed for other tyre sizes than the
spare wheel.
A damaged wheel wider than the
spare wheel must be stowed in the
load compartment and secured with a strap.
Vehicle tools 3 186.Wheels with tyre size up to
195/55 R 16 1. Remove load compartment cover and lift up load compartment floor.
Stow both behind the raised up
backrests of the rear seats.
2. Untwist wing nut and remove tool box.
3. Position the damaged wheel to stand upright into the tool box
spare, facing to the front.
Page 208 of 245
206Vehicle care3. Connect the black lead to thenegative terminal of the booster
battery.
4. Connect the other end of the black
lead to a vehicle grounding point,
such as the engine block or an
engine mounting bolt. Connect as far away from the discharged
vehicle battery as possible,
however at least 60 cm.
Route the leads so that they cannot
catch on rotating parts in the engine
compartment.
To start the engine: 1. Start the engine of the vehicle providing the jump.
2. After 5 minutes, start the other engine. Start attempts should be
made for no longer than
15 seconds at an interval of 1 minute.
3. Allow both engines to idle for approx. 3 minutes with the leads
connected.4. Switch on electrical consumers (e.g. headlights, heated rear
window) of the vehicle receiving
the jump start.
5. Reverse above sequence exactly when removing leads.Towing
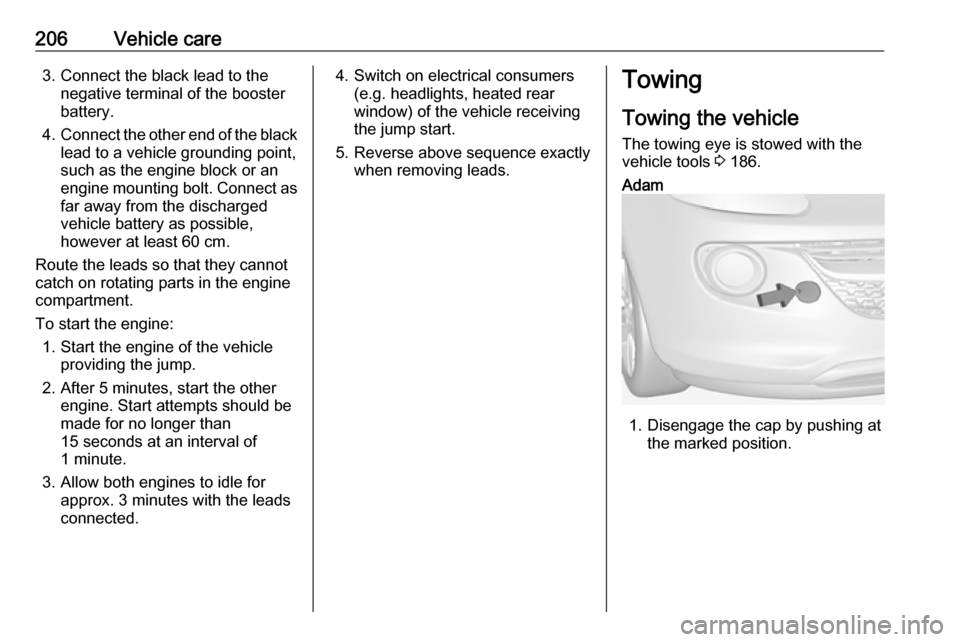
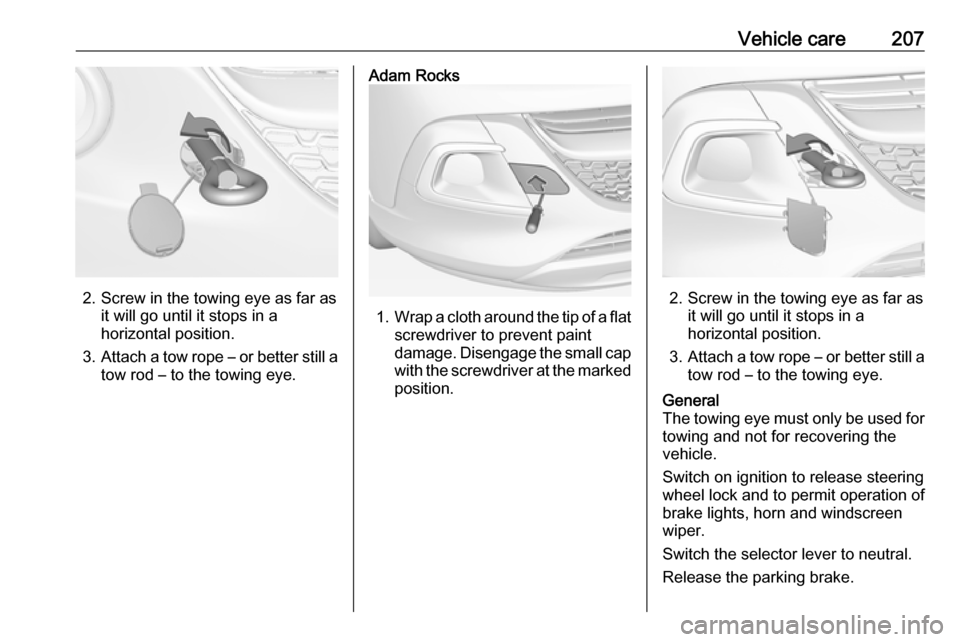
Towing the vehicle The towing eye is stowed with the
vehicle tools 3 186.Adam
1. Disengage the cap by pushing at
the marked position.
Page 209 of 245
Vehicle care207
2. Screw in the towing eye as far asit will go until it stops in a
horizontal position.
3. Attach a tow rope – or better still a
tow rod – to the towing eye.
Adam Rocks
1. Wrap a cloth around the tip of a flat
screwdriver to prevent paint
damage. Disengage the small cap
with the screwdriver at the marked position.
2. Screw in the towing eye as far as it will go until it stops in a
horizontal position.
3. Attach a tow rope – or better still a
tow rod – to the towing eye.
General
The towing eye must only be used for towing and not for recovering the
vehicle.
Switch on ignition to release steering
wheel lock and to permit operation of
brake lights, horn and windscreen
wiper.
Switch the selector lever to neutral.
Release the parking brake.
Page 212 of 245

210Vehicle carea longer time, it would be
damaged by water spotting and
mould growth.All variants:
Bird droppings, dead insects, resin,
pollen and the like should be cleaned
off immediately, as they contain
aggressive constituents which can cause paint damage.
If using a car wash, comply with the
car wash manufacturer's instructions. The windscreen wiper and rear
window wiper must be switched off.
Remove antenna and external
accessories such as roof racks etc.
If you wash your vehicle by hand,
make sure that the insides of the
wheel housings are also thoroughly
rinsed out.
Clean edges and folds on opened
doors and the bonnet as well as the
areas they cover.
Clean bright metal mouldings with a
cleaning solution approved for
aluminium to avoid damages.Caution
Always use a cleaning agent with
a pH value of 4 to 9.
Do not use cleaning agents on hot surfaces.
Have the door hinges of all doors
greased by a workshop.
Do not clean the engine compartment with a steam-jet or high-pressure jet
cleaner.
On vehicles with emblem touchpad:
when cleaning with a high-pressure
jet cleaner ensure a minimum
distance of 30 cm when working
around the tailgate to prevent
unintended unlocking.
Thoroughly rinse and leather-off the
vehicle. Rinse leather frequently. Use
separate leathers for painted and
glass surfaces: remnants of wax on
the windows will impair vision.
Exterior lights
Headlight and other light covers are
made of plastic. Do not use any
abrasive or caustic agents, do not use
an ice scraper, and do not clean them
dry.
Polishing and waxing
Wax painted parts of the vehicle
regularly (at the latest when water no longer beads). Otherwise, the
paintwork will dry out.
The foldable sunroof must not be
polished or waxed. When using
automatic car washes, select a
programme without wax additives.
Polishing is necessary only if the paint
has become dull or if solid deposits
have become attached to it.
Paintwork polish with silicone forms a
protective film, making waxing
unnecessary.
Unpainted plastic body parts must not be treated with wax or polishing
agents.
Matt filmed body parts or decor tapes must not be polished, to avoid
gleaming. Do not use hot wax
Page 214 of 245

212Vehicle careRear carrier systemClean the rear carrier system with a
steam-jet or high-pressure jet cleaner
at least once a year.
Operate the rear carrier system
periodically if not in regular use, in
particular during winter.
Interior care
Interior and upholstery
Only clean the vehicle interior,
including the instrument panel fascia
and panelling, with a dry cloth or
interior cleaner.
Clean the leather upholstery with
clear water and a soft cloth. In case of heavy soiling, use leather care.
The instrument cluster and the
displays should only be cleaned using
a soft damp cloth. If necessary use a
weak soap solution.
Clean fabric upholstery with a
vacuum cleaner and brush. Remove
stains with an upholstery cleaner.Clothing fabrics may not be
colourfast. This could cause visible
discolourations, especially on light- coloured upholstery. Removable
stains and discolourations should be
cleaned as soon as possible.
Clean seat belts with lukewarm water or interior cleaner.Caution
Close Velcro fasteners as open
Velcro fasteners on clothing could damage seat upholstery.
The same applies to clothing with
sharp-edged objects, like zips or
belts or studded jeans.
Plastic and rubber parts
Plastic and rubber parts can be
cleaned with the same cleaner as
used to clean the body. Use interior cleaner if necessary. Do not use any
other agent. Avoid solvents and petrol
in particular. Do not use high-
pressure jet cleaners.
Page 237 of 245

Customer information235This data includes, for example:● Vehicle status information (e.g. wheel rotation rate, speed,
movement delay, lateral
acceleration, "seatbelts
fastened" display),
● Ambient conditions (e.g. temperature, rain sensor,
distance sensor).
Most of this data is volatile and is processed only in the vehicle itself,and not beyond the operating time.
Moreover, many control units include
data storage device (amongst others the vehicle key). This is used to allow
information to be documented
temporarily or permanently on vehicle
condition, component stress,
maintenance requirements and
technical events and errors.
The following information, for
example, is stored:
● System component operating states (e.g. fill level, tyre
pressure, battery status),
● State of charge of the high voltage battery, estimated range
(in the case of electric vehicles),● Faults and defects in important system components (e.g. lights,
brakes),
● System reactions in special driving situations (e.g. triggeringof an airbag, actuation of the
stability control systems),
● Information on events damaging the vehicle.
In special cases (e.g. if the vehicle
has detected a malfunction), it may be
necessary to save data that would
otherwise just be volatile.
When you use services, the operating data saved can be read together withthe vehicle identification number andused if necessary. Staff working for
the service net-work (e.g. garages,
manufacturers) or third parties (e.g.
breakdown services) can read the
data from the vehicle. Services
include repair services, maintenance
processes, warranty cases and
quality assurance measures.
Data is generally read via the OBD
(On-Board Diagnostics) port
prescribed by law in the vehicle. The operating data which has been read
out documents the technical conditionof the vehicle or individual
components and assists with fault
diagnosis, compliance with warranty
obligations and quality improvement.
This data, in particular information on
component stress, technical events,
operator errors and other faults, is
transmitted to the manufacturer
where appropriate, together with the vehicle identification number. The
manufacturer is also subject to
product liability. The manufacturer
potentially also needs operating data
from vehicles for product recalls.
Fault memories in the vehicle can be
reset by a service company when
carrying out servicing or repairs.
Comfort and infotainment
functions
Comfort settings and custom settings can be stored in the vehicle and
changed at any time.
Page 238 of 245

236Customer informationDepending on the equipment level in
question, these include
● Seat and steering wheel position settings,
● Chassis and air conditioning settings,
● Custom settings such as interior lighting.
You can input your own data in the
infotainment functions for your
vehicle as part of the selected
features.
Depending on the equipment level in
question, these include
● Multimedia data such as music, videos or photos for playback in
an integrated multimedia system,
● Address book data for use with an integrated hands-free system
or an integrated navigation
system,
● Input destinations,
● Data on the use of online services.
This data for comfort and
infotainment functions can be stored
locally in the vehicle or be kept on adevice that you have connected to the
vehicle ( e.g. a smartphone, USB stick
or MP3 player). Data that you have
input yourself can be deleted at any
time.
This data can only be transmitted out
of the vehicle at your request,
particularly when using online
services in accordance with the
settings selected by you.
Smartphone integration, e.g.
Android Auto or Apple CarPlay
If your vehicle is equipped
accordingly, you can connect your
smartphone or another mobile device to the vehicle so that you can control
it via the controls integrated in the
vehicle. The smartphone image and
sound can be output via the
multimedia system in this case. At the
same time, specific information is
transmitted to your smartphone.
Depending on the type of integration,
this includes data such as position
data, day / night mode and other
general vehicle information. For moreinformation, please see the operating instructions for the vehicle /
infotainment system.
Integration allows selected
smartphone apps to be used, such as
navigation or music playback. No
further integration is possible
between smartphone and vehicle, in
particular active access to vehicle
data. The nature of further data
processing is determined by the
provider of the app used. Whether
you can define settings, and if so
which ones, is dependent on the app
in question and your smartphone's
operating system.