tow VAUXHALL ANTARA 2015 User Guide
[x] Cancel search | Manufacturer: VAUXHALL, Model Year: 2015, Model line: ANTARA, Model: VAUXHALL ANTARA 2015Pages: 223, PDF Size: 6.07 MB
Page 73 of 223

Storage71Roof rack system
Roof rack For safety reasons and to avoiddamage to the roof, the vehicle
approved roof rack system is
recommended. For further
information contact a workshop.
Fasten the roof rack to the roof rails following the instructions that
accompany the system, ensuring that
the roof load is evenly distributed over the side or cross rails.
Loads must not be placed on the roof
surface. To prevent damage or loss,
check frequently that roof loads are
securely fastened.
Driving with a roof load affects the
vehicle centre of gravity; drive
carefully in crosswinds and do not
drive at high speeds.
Remove the roof rack when not in use.Loading information
■ Heavy objects in the load compartment should be evenly
distributed and placed as far
forward as possible. Ensure the
backrests are securely engaged. If
objects can be stacked, the heavier
objects should be placed at the bottom.
With rear seats in the folded
position, objects must not be
stacked higher than the seat
backrests.
■ Secure objects with lashing straps attached to lashing eyes 3 70.
■ Secure loose objects in the load compartment, e.g. with a luggage
floor net, to prevent sliding.
■ When transporting objects in the load compartment, the backrests ofthe rear seats must not be angled
forward.
■ Do not allow the load to protrude above the upper edge of the
backrests.■ Do not place any objects on the load compartment cover or the
instrument panel, and do not cover
the sensor on top of the instrument
panel.
■ The load must not obstruct the operation of the pedals, electrical
parking brake and gear selector, or hinder the freedom of movement ofthe driver. Do not place any
unsecured objects in the interior.
■ Do not drive with an open load compartment.9 Warning
Always make sure that the load in
the vehicle is securely stowed.
Otherwise objects can be thrown
around inside the vehicle and
cause personal injury or damage
to the load or vehicle.
■ The payload is the difference between the permitted gross
vehicle weight (see identification
plate 3 201) and the EC kerb
weight.
Page 87 of 223

Instruments and controls85
Interrupt your journey immediately.Remove key and check drive belt
condition and tensioning before
seeking the assistance of a
workshop.
Malfunction indicator light Z illuminates or flashes yellow.
Illuminates when the ignition is
switched on and extinguishes shortly
after the engine starts. If it does not
illuminate, seek the assistance of a
workshop.
Can illuminate briefly when driving;
this is normal and does not indicate a
system fault.
Illuminates when the engine is
running
Fault in the emission control system.
The permitted emission limits may be exceeded. Fuel economy and vehicle
driveability may be impaired. Seek
the assistance of a workshop
immediately.Control indicator Z also illuminates if
there is a fault in the diesel particle
filter 3 128 or with the automatic
transmission 3 133. Seek the
assistance of a workshop as soon as
possible.
Ensure the fuel filler cap is screwed in completely 3 146.
Flashes when the engine is
running
Fault that could lead to catalytic
converter damage 3 129 . Ease up on
the accelerator until the flashing
stops. Seek the assistance of a
workshop immediately.
Service vehicle soon g illuminates yellow.
Illuminates when the engine is
running to indicate a fault in the
engine or transmission electronics. The electronics switch to an
emergency running programme, fuel
consumption may be increased and
vehicle handling may be impaired.In some cases, the fault can be
eliminated by switching the engine off
and back on again. If g illuminates
again after restarting the engine, the vehicle may need a service.
Have the cause of the fault eliminated by a workshop.
Brake system
R illuminates red.
Illuminates when the ignition is
switched on and extinguishes shortly
after the engine starts. If it does not
illuminate, stop and seek the
assistance of a workshop.
If it stays lit while the engine is
running, the brakes do not operate as normal, or leaks are found in the
brake system, do not attempt to drive
the vehicle. Have the vehicle towed to a workshop for inspection and repair.9 Warning
Stop. Do not continue your
journey. Consult a workshop.
Page 112 of 223

110LightingRear fog lights
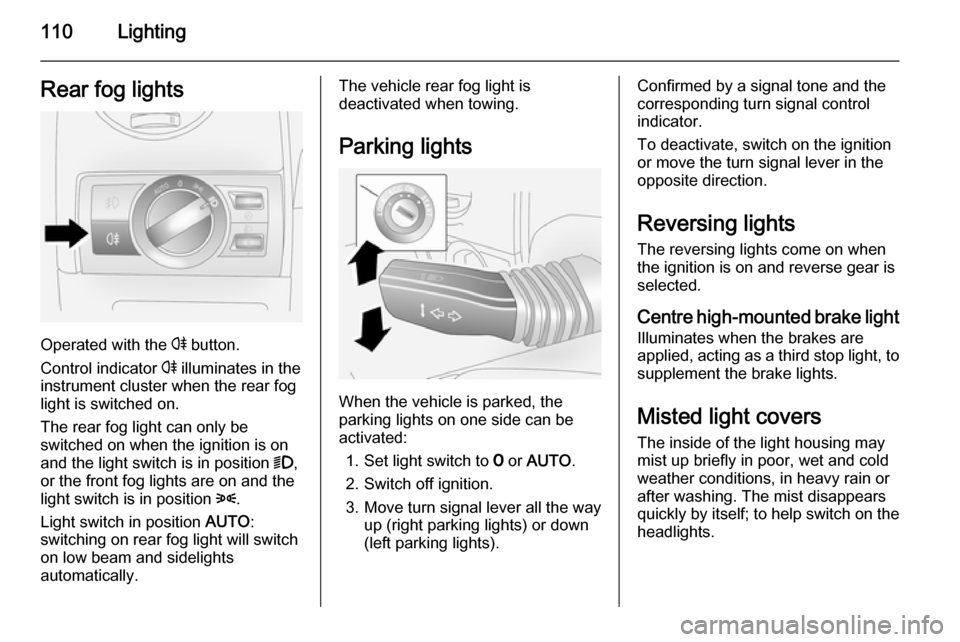
Operated with the r button.
Control indicator r illuminates in the
instrument cluster when the rear fog light is switched on.
The rear fog light can only be
switched on when the ignition is on
and the light switch is in position 9,
or the front fog lights are on and the
light switch is in position 8.
Light switch in position AUTO:
switching on rear fog light will switch
on low beam and sidelights
automatically.
The vehicle rear fog light is
deactivated when towing.
Parking lights
When the vehicle is parked, the
parking lights on one side can be
activated:
1. Set light switch to 7 or AUTO .
2. Switch off ignition.
3. Move turn signal lever all the way up (right parking lights) or down
(left parking lights).
Confirmed by a signal tone and the
corresponding turn signal control
indicator.
To deactivate, switch on the ignition or move the turn signal lever in the
opposite direction.
Reversing lights The reversing lights come on when
the ignition is on and reverse gear is
selected.
Centre high-mounted brake light
Illuminates when the brakes are
applied, acting as a third stop light, to supplement the brake lights.
Misted light covers The inside of the light housing may
mist up briefly in poor, wet and cold weather conditions, in heavy rain or
after washing. The mist disappears
quickly by itself; to help switch on the
headlights.
Page 118 of 223

116Climate control
Demisting and defrosting■ Set the air distribution switch to l
or J
■ Set temperature control to warmest
level
■ Set fan to highest level
■ Close centre air vents
■ Open side air vents and direct them
towards the door windows
Heated rear window Ü 3 32.
Air conditioning system In addition to the heating and
ventilation system, the air
conditioning system has controls for:n=cooling4=air recirculationÜ=demisting and defrosting
Heated seats ß 3 39.
Cooling n
Press button
n to switch on cooling.
Activation is indicated by the LED in
the button. Cooling is only functional
when the engine is running and
climate control fan is switched on.
Press button n again to switch off
cooling.
The air conditioning system cools and
dehumidifies (dries) as soon as the
outside temperature is slightly above
freezing point. Therefore
condensation may form and drip from under the vehicle.
If no cooling or drying is required,
switch the cooling system off to save
fuel. Activated cooling might inhibit
autostops.
Air recirculation system 4
Press button 4 to activate air
recirculation mode. Activation is
indicated by the LED in the button.
Press button 4 again to deactivate
recirculation mode.9 Warning
The exchange of fresh air is
reduced in air recirculation mode.
In operation without cooling the air humidity increases, so the
windows may mist up from inside.
The quality of the passenger
compartment air deteriorates,
which may cause the vehicle
occupants to feel drowsy.
In warm and very humid ambient air conditions, the windscreen might mist
up from outside, when cold air is
Page 119 of 223

Climate control117
directed to it. If windscreen mists up
from outside, activate windscreen
wiper and deactivate l.
Maximum cooling Briefly open the windows and sunroof
so that hot air can disperse quickly.
■ Press button n to activate air
conditioning.
■ Press button 4 to activate air
recirculation.
■ Set air distribution switch to M.
■ Set temperature control to coldest level.
■ Set fan to highest level.
■ Open all vents.Demisting and defrosting
■ Set the air distribution switch to l
or J.
■ Set temperature control to warmest
level.
■ Set fan to highest level.
■ Close centre air vents.
■ Open side air vents and direct them
towards the door windows.
■ Switch on heated rear window Ü
3 32.
Air conditioning n and air
recirculation 4 are switched on
automatically to improve defrosting
efficiency when position l or J is
selected.
Electronic climate control system The dual zone climate control allows
different climatisation temperatures
for driver and front passenger side.
Controls for:
■ Temperature on driver side
■ Air distribution
Page 130 of 223

128Driving and operating■ Switch off the engine and turnthe ignition key to position
LOCK , push key into ignition
switch and remove.
Turn the steering wheel until the steering wheel lock is felt to
engage.
For vehicles with automatic
transmission, depress foot
brake and shift into P before
pushing key into ignition switch
and removing.
■ If the vehicle is on a level surface or uphill slope, engage
first gear or move the selector
lever to P before switching off
the ignition. On an uphill slope,
turn the front wheels away from
the kerb.
If the vehicle is on a downhill
slope, engage reverse gear or
move the selector lever to P
before switching off the ignition.
Turn the front wheels towards
the kerb.■ Close windows and sunroof.
■ Lock the vehicle with button p on
the radio remote control 3 21.
Activate the anti-theft alarm system
3 25.Engine exhaust9 Danger
Engine exhaust gases contain
poisonous carbon monoxide,
which is colourless and odourless and could be fatal if inhaled.
If exhaust gases enter the interior
of the vehicle, open the windows.
Have the cause of the fault
rectified by a workshop.
Avoid driving with an open load
compartment, otherwise exhaust
gases could enter the vehicle.
Malfunction indicator light 3 85.
Diesel particle filter
The diesel particle filter system filters
harmful soot particles out of the
exhaust gases. The system includes
a self-cleaning function that runs
automatically during driving without
any notification.
Page 132 of 223

130Driving and operatingCaution
Fuel grades other than those listedon pages 3 144, 3 205 could
damage the catalytic converter or
electronic components.
Unburnt petrol will overheat and
damage the catalytic converter.
Therefore avoid excessive use of the starter, running the fuel tank
dry and starting the engine by
pushing or towing.
In the event of misfiring, uneven
engine running, a reduction in engine performance or other unusual
problems, have the cause of the fault
rectified by a workshop as soon as
possible. In an emergency, driving
can be continued for a short period,
keeping vehicle speed and engine
speed low.
Malfunction indicator light 3 85.
Automatic transmission
The automatic transmission permits
automatic gearshifting (automatic
mode) or manual gearshifting
(manual mode).
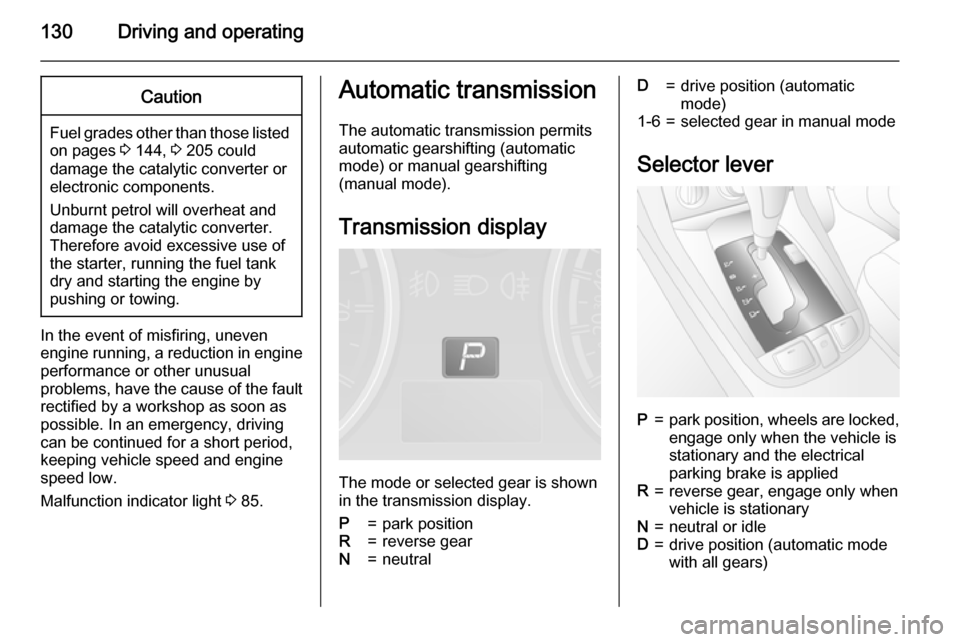
Transmission display
The mode or selected gear is shown
in the transmission display.
P=park positionR=reverse gearN=neutralD=drive position (automatic
mode)1-6=selected gear in manual mode
Selector lever
P=park position, wheels are locked, engage only when the vehicle is
stationary and the electrical
parking brake is appliedR=reverse gear, engage only when
vehicle is stationaryN=neutral or idleD=drive position (automatic mode
with all gears)
Page 133 of 223

Driving and operating131
The selector lever is locked in position
P and N and can only be moved when
the ignition is on and the foot brake is applied.
To engage P or R, push the release
button.
Never shift to P or R while the vehicle
is moving.
The engine can only be started with
lever in position P or N. Depress foot
brake or apply electrical parking
brake before starting.
Do not accelerate while engaging a
gear. Never depress the accelerator
pedal and brake pedal at the same
time.
When a gear is engaged, the vehicle
slowly begins to creep when the foot
brake is released.
Engine braking To utilise the engine braking effect,
select a lower gear in good time when
driving downhill - see Manual mode.
Use of the engine braking effect, as
opposed to the use of the foot brake
when driving downhill, can extend the
life of the brakes.Rocking the vehicle
Rocking the vehicle is only
permissible if the vehicle is stuck in
water, ice, sand, mud, snow or a dip.
Move the selector lever between D
and R in a repeat pattern while
applying light pressure to the
accelerator pedal when the vehicle is in gear. Do not race the engine and
avoid sudden acceleration.
If the vehicle cannot be released after
rocking the vehicle several times,
your vehicle may need to be towed
3 192.
Parking
Apply the electrical parking brake and engage P.
The ignition key can only be removed
when the selector lever is in position
P .Manual mode
Move selector lever out of position D
towards the left and then forwards or backwards.
<=Shift to a higher gear.]=Shift to a lower gear.
Tip selector lever in the appropriate
direction. It then returns to the centre
position.
Gearshifting in manual mode can be
achieved whilst accelerating. If the
engine speed is too low, the
Page 134 of 223

132Driving and operating
transmission will automatically shift toa lower gear, even in manual mode,
to prevent the engine from stalling.
If a higher gear is selected when
vehicle speed is too low, or a lower
gear when vehicle speed is too high,
the shift is not executed.
In manual mode, no automatic
shifting to a higher gear takes place
at high engine revolutions.
Gears can be skipped by moving the
selector lever repeatedly at short
intervals.
After stopping, 1st gear is
automatically selected. When starting
on slippery surfaces, tip selector lever forwards to engage 2nd gear.
To move back to position D, move
selector lever back to the right.
Electronic driving
programmes ■ Following a cold start, the operating
temperature programme increasesengine speed to quickly bring the
catalytic converter to the required
temperature.Kickdown
In both automatic and manual modes, if the accelerator pedal is pressed
down completely the transmission
shifts to a lower gear depending on
engine speed. Full engine power is
available for acceleration.
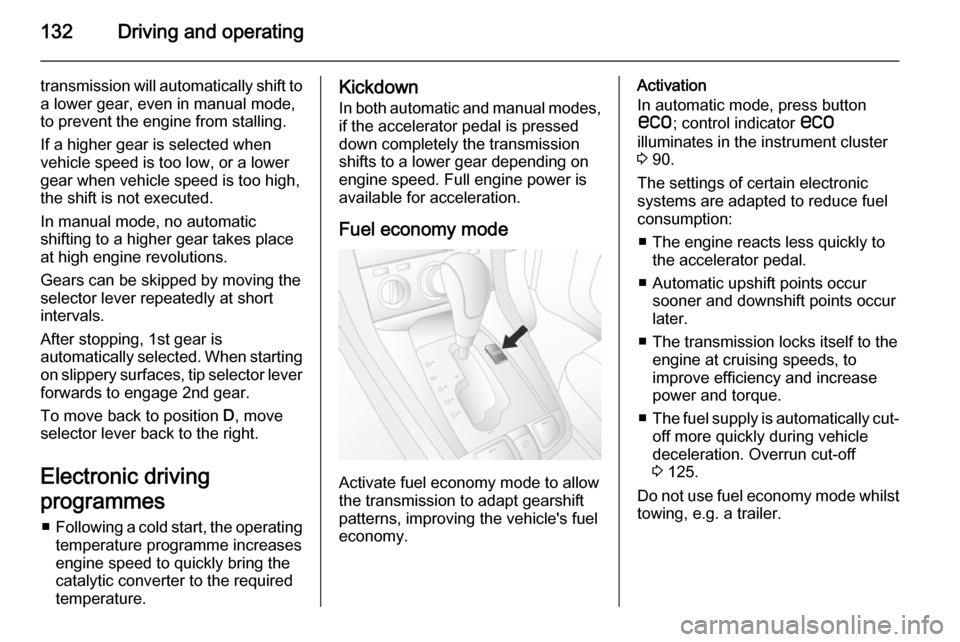
Fuel economy mode
Activate fuel economy mode to allow
the transmission to adapt gearshift
patterns, improving the vehicle's fuel
economy.
Activation
In automatic mode, press button
s ; control indicator s
illuminates in the instrument cluster 3 90.
The settings of certain electronic
systems are adapted to reduce fuel
consumption:
■ The engine reacts less quickly to the accelerator pedal.
■ Automatic upshift points occur sooner and downshift points occur
later.
■ The transmission locks itself to the engine at cruising speeds, to
improve efficiency and increase
power and torque.
■ The fuel supply is automatically cut-
off more quickly during vehicle
deceleration. Overrun cut-off
3 125.
Do not use fuel economy mode whilst towing, e.g. a trailer.
Page 137 of 223

Driving and operating135
Ensure tyres (including the spare) areinflated to the correct pressure
3 210 and are suitable for the
prevailing road conditions. For
optimum system performance, the
vehicle's tyres should not have
varying degrees of wear.
If control indicator B flashes in the
instrument cluster during driving, All-
wheel drive is temporarily disabled. If
B flashes continuously, there is a fault
in the system; seek the assistance of
a workshop.
All-wheel drive control indicator B
3 86.
On-road driving
The increased traction of All-wheel
drive vehicles offers greater driving
control in adverse road conditions,
particularly heavy snow and ice.
However, All-wheel drive vehicles are not "skid-proof" and do not decrease
stopping distances.
All-wheel drive vehicles have a higher
centre of gravity than conventional vehicles. Always approach curves at
an appropriate driving speed. Do notattempt to go as fast through turns as
you might in a conventional vehicle.
Strong crosswinds can affect the normal steering of the vehicle. Drive
slower under strong crosswind
conditions.
Off-road driving ■ Avoid protruding objects (such as rocks or tree stumps) that may
damage the underbody and tyres of your vehicle.
■ Test the brakes after operating in mud, to clear excess mud from the
braking surfaces.
■ Grip the steering wheel when travelling over rough terrain.
Terrain conditions can cause rapid
and unexpected movement in the
steering.
The ground clearance, ramp angle,
angle of approach and departure and
wading depth need to be considered, especially in hilly conditions and
when wading, to prevent the vehicle
becoming stuck and possibly
damaged.
Vehicle dimensions 3 207.Towing the vehicle 3 192.
Driving through water
Do not exceed the maximum wading
depth 3 207.
Check the depth of water: choose the
lowest entry and departure angles
before entering. Maintain a steady
engine speed, to help prevent water
from entering the exhaust system, but
do not exceed 3 mph, to avoid
splashing the water.
Drive with the flow wherever possible,
not against it. If you have to drive
against the flow, try to drive at an
angle to it, so that the leading corner
of the vehicle will help deflect water
from the engine compartment. Avoid
splashing the water - if the ignition
system becomes wet, the engine may
stall.
Avoid water entering the air intake
system. If water enters the air intake
system, engine seizure with severe
costly damage may result.
Test the brakes after leaving the
water - wet brakes are less effective
than dry ones. Perform the service