ignition VAUXHALL ANTARA 2015 Manual PDF
[x] Cancel search | Manufacturer: VAUXHALL, Model Year: 2015, Model line: ANTARA, Model: VAUXHALL ANTARA 2015Pages: 223, PDF Size: 6.07 MB
Page 182 of 223

180Vehicle care
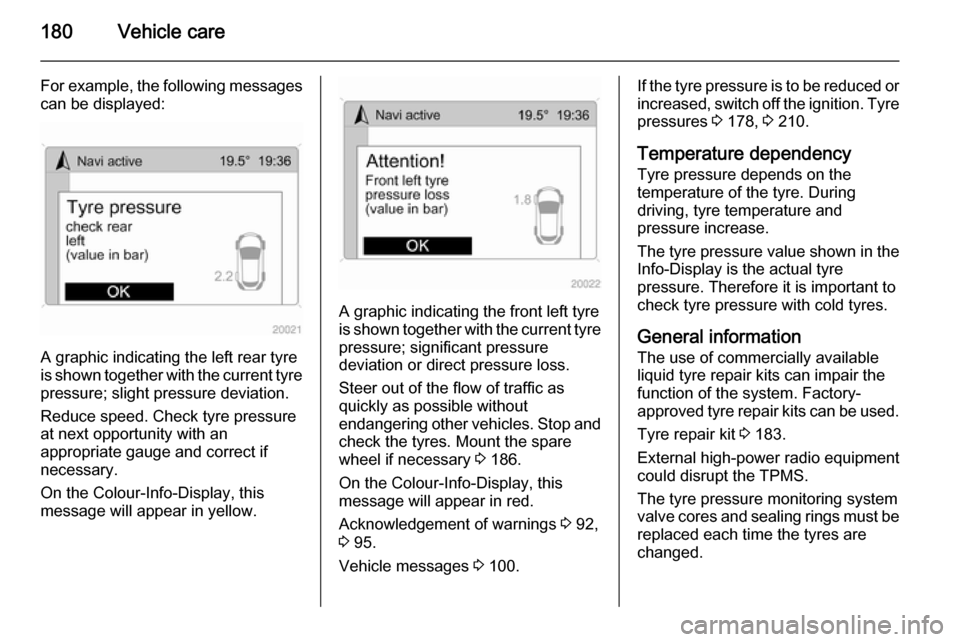
For example, the following messagescan be displayed:
A graphic indicating the left rear tyre
is shown together with the current tyre
pressure; slight pressure deviation.
Reduce speed. Check tyre pressure
at next opportunity with an
appropriate gauge and correct if
necessary.
On the Colour-Info-Display, this
message will appear in yellow.
A graphic indicating the front left tyre is shown together with the current tyre
pressure; significant pressure
deviation or direct pressure loss.
Steer out of the flow of traffic as
quickly as possible without
endangering other vehicles. Stop and check the tyres. Mount the spare
wheel if necessary 3 186.
On the Colour-Info-Display, this
message will appear in red.
Acknowledgement of warnings 3 92,
3 95.
Vehicle messages 3 100.
If the tyre pressure is to be reduced or
increased, switch off the ignition. Tyre
pressures 3 178, 3 210.
Temperature dependency Tyre pressure depends on the
temperature of the tyre. During
driving, tyre temperature and
pressure increase.
The tyre pressure value shown in the Info-Display is the actual tyre
pressure. Therefore it is important to
check tyre pressure with cold tyres.
General information
The use of commercially available
liquid tyre repair kits can impair the
function of the system. Factory-
approved tyre repair kits can be used.
Tyre repair kit 3 183.
External high-power radio equipment
could disrupt the TPMS.
The tyre pressure monitoring system
valve cores and sealing rings must be
replaced each time the tyres are
changed.
Page 183 of 223

Vehicle care181
TPMS sensor matching process
Each TPMS sensor has a unique
identification code. The identification
code must be matched to a new tyre/ wheel position after rotating the tyres
or replacing one or more of the TPMS
sensors.
The TPMS sensor matching process
should also be performed after
replacing a spare tyre with a road tyre containing a TPMS sensor. The
control indicator w and the warning
message should extinguish at the
next ignition cycle.
The sensors are matched to the tyre/
wheel positions, using a TPMS
relearn tool, in the following order:
■ left front tyre
■ right front tyre
■ right rear tyre
■ left rear tyre
Consult your workshop for service or
to purchase a relearn tool.
There are two minutes to match the
first tyre/wheel position, and
five minutes overall to match all fourtyre/wheel positions. If it takes longer,
the matching process stops and must be restarted.
The TPMS sensor matching process
is as follows:
1. Apply the electrical parking brake 3 137 ; on vehicles with automatic
transmission move the selector
lever to position P.
2. Turn the ignition on 3 124.
3. Initiate the TPMS Learn Mode by simultaneously pressing buttons
p and q on the radio remote
control,
- or -
Press the INFO button on the
Infotainment system until a tyre
learn message appears on the
Info-display. Press and hold the
OK button.
The horn sounds twice and the left front turn signal also illuminates
as confirmation that Learn Mode
has been enabled.
4. Start with the left front tyre.5. Place the relearn tool against the tyre sidewall, near the valve stem.Then press the button to activatethe TPMS sensor. A horn chirp
confirms that the sensor
identification code has been
matched to this tyre and wheel
position. The next relevant turn
signal illuminates.
6. Proceed to the right front tyre, and
repeat the procedure in Step 5.
7. Proceed to the right rear tyre, and
repeat the procedure in Step 5.
8. Proceed to the left rear tyre, and repeat the procedure in Step 5.
The horn sounds twice to indicate
the sensor identification code has been matched, and the TPMS
sensor matching process is no
longer active.
9. Turn off the ignition.
10. Set all four tyres to the recommended inflation pressure
3 210.
Page 186 of 223

184Vehicle care
Pull the floor cover handle upwards
3 69.
Vehicle tools 3 175.Caution
Do not allow objects to protrude
above the top of the rear floor
storage compartment, to avoid
damage to the storage area and
the load compartment floor.
1. Release the sealant filler hose 1
and the power plug 2.
2. Unscrew valve cap from defective
tyre.
Screw the sealant filler hose onto
the tyre valve.
3. Connect the power plug to the power outlet. Unplug all items
from other power outlets.
4. Switch on ignition. To avoid discharging the battery, werecommend running the engine.
5. Turn the selector switch anticlockwise to the sealant +
air position.
6. Press the on/off button to turn the
tyre repair kit on. The tyre is filled
with sealant.
The pressure gauge briefly shows a high pressure while the sealant
canister is emptying. Then the
pressure starts to drop.
All of the sealant is pumped into
the tyre. Then the tyre is inflated.
7. Inflate the tyre to the recommended inflation pressure
using the pressure gauge. The
prescribed tyre pressure should
be obtained within 10 minutes
3 210 . When the correct pressure
Page 194 of 223

192Vehicle care
4. Switch on electrical consumers(e.g. headlights, heated rear
window) of the vehicle receiving
the jump start.
5. Operate discharged vehicle for approx. 20 minutes to allow for
adequate battery recharging.
6. Reverse above sequence exactly when removing leads.Towing
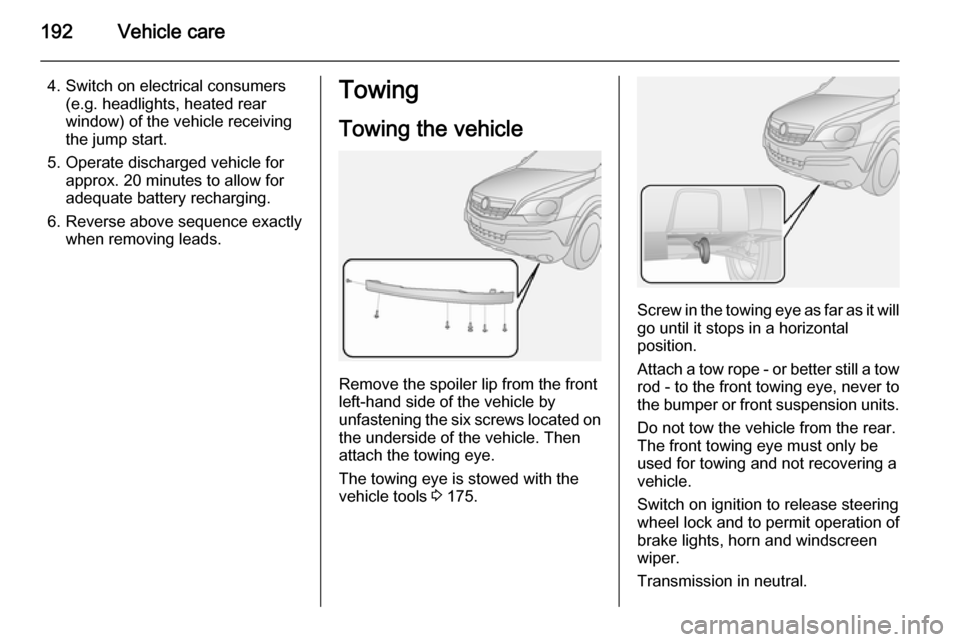
Towing the vehicle
Remove the spoiler lip from the front
left-hand side of the vehicle by
unfastening the six screws located on the underside of the vehicle. Then
attach the towing eye.
The towing eye is stowed with the
vehicle tools 3 175.
Screw in the towing eye as far as it will
go until it stops in a horizontal
position.
Attach a tow rope - or better still a tow
rod - to the front towing eye, never to
the bumper or front suspension units.
Do not tow the vehicle from the rear.
The front towing eye must only be
used for towing and not recovering a
vehicle.
Switch on ignition to release steering wheel lock and to permit operation of
brake lights, horn and windscreen
wiper.
Transmission in neutral.
Page 195 of 223

Vehicle care193
Turn key to ignition switch position
ACC and release the electrical
parking brake before towing the
vehicle.Caution
Drive slowly. Do not drive jerkily.
Excessive tractive force can
damage the vehicle.
When the engine is not running,
considerably more force is needed to
brake and steer.
Keep tow rope clear of front bumper, and ensure it is securely fixed to the
towing eye at both ends. Pull on the tow rope to check.
To prevent the entry of exhaust gases from the towing vehicle, switch on the
air recirculation system 3 116 and
close the windows.
Vehicles with manual transmission:
The vehicle must be towed facing
forwards. The maximum speed is
55 mph. In all other cases, and when
the transmission is defective, the front axle must be raised off the ground.
Vehicles with automatic transmission:
Do not tow the vehicle using the
towing eye. Towing with a tow rope
could cause severe damage to the
transmission. When towing a vehicle
with automatic transmission, use flat
bed or wheel lift equipment.
Seek the assistance of a workshop.
After towing, unscrew the towing eye
and replace the spoiler lip. Store
towing eye in the storage
compartment below the floor cover in the load compartment.
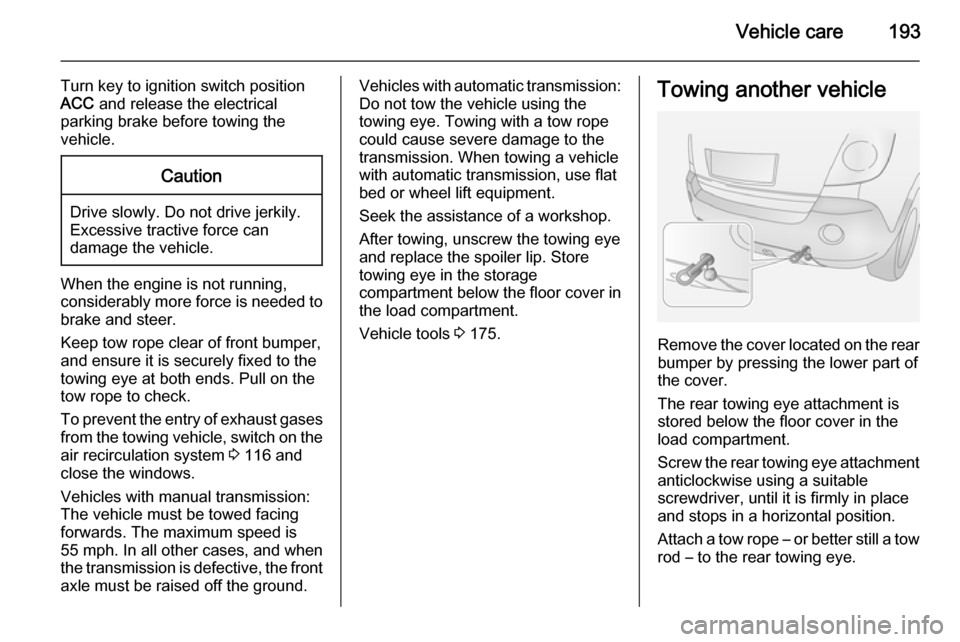
Vehicle tools 3 175.Towing another vehicle
Remove the cover located on the rear
bumper by pressing the lower part of
the cover.
The rear towing eye attachment is
stored below the floor cover in the
load compartment.
Screw the rear towing eye attachment
anticlockwise using a suitable
screwdriver, until it is firmly in place
and stops in a horizontal position.
Attach a tow rope – or better still a tow
rod – to the rear towing eye.
Page 216 of 223

214Customer informationRadio Frequency
Identification (RFID)
RFID technology is used in some vehicles for functions such as tyre
pressure monitoring and ignition
system security. It is also used in
connection with conveniences such
as radio remote controls for door
locking/unlocking and starting, and in- vehicle transmitters for garage door
openers. RFID technology in
Vauxhall vehicles does not use or
record personal information or link
with any other Vauxhall system
containing personal information.
Page 220 of 223

218
Fuel consumption - CO2-
Emissions ............................... 147
Fuel economy mode ....................90
Fuel filler cap ................................ 85
Fuel for diesel engines ..............145
Fuel for petrol engines ...............144
Fuel gauge ................................... 81
Fuses ......................................... 167
G
Gauges ......................................... 80
General information ...................147
Glovebox ..................................... 57
Graphic-Info-Display, Colour- Info-Display .............................. 95
H Halogen headlights ....................162
Hand brake ................................. 137
Hazard warning flashers ............108
Headlight flash ........................... 107
Headlight range adjustment ......107
Headlights .................. 106, 107, 161
Headlights when driving abroad 108
Headlight washer ..........................74
Head restraint adjustment .............8
Head restraints ............................ 34
Heated mirrors ............................. 29
Heated rear window ..................... 32
Heating ........................................ 39Heating and ventilation system . 115
High beam ........................... 91, 107
Hill start assist ........................... 139
Horn ....................................... 13, 74
I
Identification plate .....................201
Ignition switch positions .............124
Immobiliser ............................ 27, 90
Indicators ...................................... 80
Information displays...................... 92
Initial drive information.................... 6 Instrument cluster ........................80
Instrument panel fuse box .........172
Instrument panel illumination .....167
Instrument panel illumination control .................................... 111
Instrument panel overview ........... 10
Instrument panel storage ..............56
Interior care ............................... 196
Interior lighting ............................ 111
Interior lights ...................... 111, 166
Interior mirrors .............................. 29
Interruption of power supply ......133
Introduction .................................... 3
ISOFIX child restraint systems ....55
J
Jump starting ............................. 190K
Kerb weight........................... 71, 207
Keys ............................................. 19
Keys, locks ................................... 19
Kickdown .................................... 132
L Lashing eyes ............................... 70
Light covers, misted.................... 110
Lighting ....................................... 106
Lighting features .........................113
Light switch ................................ 106
Load compartment ................23, 68
Load compartment cover .............68
Load compartment lighting ........112
Load compartment storage ..........68
Loading information .....................71
Low engine oil level .....................90
Low fuel ....................................... 90
M
Malfunction indicator light ............85
Manual anti-dazzle ......................29
Manual mode ............................. 131
Manual transmission .................. 134
Mirror adjustment ........................... 9
Mirrors .................................... 28, 29
Misted light covers .....................110