CD player VAUXHALL COMBO 2014 Infotainment system
[x] Cancel search | Manufacturer: VAUXHALL, Model Year: 2014, Model line: COMBO, Model: VAUXHALL COMBO 2014Pages: 65, PDF Size: 1.11 MB
Page 27 of 65

Radio27
Manual station storing
To store an individual station, select
the waveband ( AM or FM) and
station, then press the desired button
1...6 on the Infotainment system until
an audible signal sounds, confirming
that the station has been stored to the appropriate button.
A total of 6 stations per waveband can
be stored individually.
Recalling a station
Select the waveband ( AM or FM),
then briefly press the desired station
button 1...6 to recall a stored station.
Radio data system (RDS) Advantages of RDS
RDS is an FM station service that
helps you find the desired station and ensures its fault-free reception. The
RDS encodes digital information
which is transmitted in addition to the FM radio broadcasts, providing
information such as station name,
traffic information and radio text.With the RDS activated:
■ the programme name of the chosen
station appears on the display
instead of its frequency
■ during an automatic station search,
the Infotainment system tunes into RDS stations only
■ the Infotainment system always tunes into the best receivable
broadcasting frequency of the
chosen station, by means of an
Alternative Frequency (AF ).
RDS functions
Incorporated within the RDS are the
following information fields:
■ AF : Alternative Frequencies
■ TA : Traffic Announcements
■ TP : Traffic Programmes
■ REG : Regional programmes
■ EON : Enhanced Other Network
Also, integrated into the RDS is an
Emergency Alarm Reception
function. This function is activated
automatically and cannot be
deactivated.Switching RDS on and off
Radio with CD player:
To activate the RDS function, use the
following buttons on the Infotainment
system:
1. MENU : Press repeatedly until AF
is shown on the display
2. _ / 6: Press to select the AF ON
or AF OFF option
When RDS is activated, AF will be
shown on the display.
Radio with CD / MP3 player:
To activate the RDS function, use the
following buttons on the Infotainment
system:
1. MENU : Press
2. R / S : Press until AF Switching is
shown on the display
3. _ / 6: Press to select the AF
Switching ON or AF Switching
OFF option
When RDS is activated, AF will be
shown on the display.
Page 28 of 65

28Radio
Alternative Frequency (AF)
mode
With the AF function activated, the
radio automatically tunes into the station with the strongest signal
broadcasting the same programme.
While driving, you can continue to
listen to the same station without
having to change the frequency when
you change zones.
If the AF Switching function has been
activated and the radio is not able to
receive the tuned station, the radio will activate an automatic search,during which FM Search will be
shown on the display.
The AF Switching function can only
be activated on the FM waveband.
Traffic Announcements (TA) mode Certain stations within the FM
waveband are enabled to broadcast
information about traffic conditions.To activate the TA function on the
Radio with CD player audio system,
use the following buttons on the
Infotainment system:
1. MENU : Press repeatedly until AF
is shown on the display
2. _ / 6: Press to select the TA ON
or TA OFF option
When RDS is activated, TA will be
shown on the display.
To activate the TA function on the
Radio with CD / MP3 player audio
system, use the following buttons on
the Infotainment system:
1. MENU : Press
2. R / S : Press until Traffic
information is shown on the
display
3. _ / 6: Press to select the Traffic
information ON or Traffic
information OFF option
When RDS is activated, TA will be
shown on the display.With the TA function activated it is
possible to:
■ search only RDS stations that
transmit in the FM waveband,
enabled to broadcast traffic
information
■ receive traffic information although the CD / Media player is being used
■ receive traffic information at a predefined minimum volume, even
with the radio volume off
With the TA function active and with
the CD / Media player mute/pause
mode, the mute/pause function will be
overridden, and automatic tuning to a
station enabled to broadcast traffic
information will commence.
The mute/pause function will be
resumed at the end of the traffic
announcement.
When a traffic announcement occurs,
the volume may be higher than
normal. Normal volume will be
resumed at the end of the traffic
announcement.
Page 29 of 65

Radio29
Traffic Programmes (TP) mode
The TP function enables the user to
find only those stations that regularly
broadcast traffic announcements 1)
.
When this function is active, TP will be
shown on the display.
In some countries there are radio
stations that do not broadcast traffic
information even with the TP function
active.
Regional (REG) mode
At certain times, some RDS stations
broadcast different programmes
regionally on different frequencies.
To activate the REG function on the
Radio with CD player audio system,
use the following buttons on the
Infotainment system:
1. MENU : Press repeatedly until
REG is shown on the display
2. _ / 6: Press to select the REG
ON or REG OFF optionTo activate the Regional function on
the Radio with CD / MP3 player audio
system, use the following buttons on
the Infotainment system:
1. MENU : Press
2. R / S : Press until Regional is
shown on the display
3. _ / 6 : Press to select the Regional
ON or Regional OFF option
When the REG mode is activated,
only frequencies of the currently
received RDS station with the same
regional programme are considered.
If the REG mode is deactivated, only
frequencies of the currently received
RDS station with different regional
programmes are considered.
Enhanced Other Network (EON)
mode
The EON function allows the receiver
to monitor other networks or stations
for traffic programmes automatically,
and temporarily tune into that station.
This function is only operational with
the TA function active.Emergency Alarm Reception
In the RDS mode the radio is set to
receive emergency announcements
in the case of exceptional
circumstances or events that may cause general danger (earthquakes,
floods, etc.), if they are broadcast by
the station tuned.
During an emergency
announcement the display Alarm will
be shown on the display. When an
emergency announcement occurs,
the volume may be higher than
normal. Normal volume will be
resumed at the end of the emergency
announcement .
This function is activated
automatically and cannot be
deactivated.1) Only Radio with CD / MP3 player .
Page 30 of 65

30CD PlayerCD PlayerGeneral information.....................30
Usage .......................................... 31General information
The Infotainment system's CD player
can playback audio CDs.
Radio with CD / MP3 player only: The
CD player can also playback MP3
CDs.
Important information about
audio CDs and MP3 CDsCaution
Under no circumstances place
DVDs, single-CDs with a diameter of 8 cm or shaped CDs in the audio
player.
You must not put any stickers on
CDs. These discs can get jammed
in the CD drive and ruin the drive.
An expensive replacement of the
device will then be necessary.
The following CD formats can be
used:
■ CD-ROM ( Radio with CD player ).
■ CD-ROM, CD-R and CD-RW (Radio with CD / MP3 player ).
The following sampling frequencies
for MP3 CDs can be played
( Radio with CD / MP3 player only):
■ 44.1 kHz, stereo (96 - 320 kbps) ■ 22.05 kHz, mono or stereo (32 - 80 kbps)
■ Variable bit-rates ( VBR)
CD-Rs and CD-RWs used must be
burned in compliance with the
specification ISO9660.
■ Audio CDs with copy protection, which are not in compliance withthe audio CD standard, may not
play correctly or not at all.
■ On mixed mode CDs (combinations
of audio and data, e.g. MP3), only
the MP3 audio tracks will be
detected and played.
■ Self-recorded CD-Rs and CD-RWs
are more vulnerable to mishandling than prerecorded CDs. Correct
handling, especially in the case of
self-recorded CD-Rs and CD-RWs,
must be ensured; see below.
■ Avoid leaving fingerprints when you
change CDs.
Page 31 of 65

CD Player31
■ Put CDs back in their sleevesimmediately after removing them
from the CD player, in order to
protect them from dirt and damage.
■ Dirt and liquids on CDs can smear the lens of the audio player inside
the device and cause faults.
■ Protect CDs from heat and direct sunlight.
The following restrictions apply for
MP3 CDs
( Radio with CD / MP3 player only):
■ Only MP3 files can be read. Other compressed audio file formats
cannot be played.
■ If the MP3 files on a CD-R or CD- RW are structured in sub-folders,
their structure is compressed to a
single level structure where the
sub-folders are taken to the level of the main folders.Usage
Starting CD playback
Radio with CD player:
Switch on the Infotainment system
and push the CD with the printed side up into the CD slot until it is pulled in: CD playback starts automatically.
If there is already a CD in the unit,
press the SRC button: CD playback is
started, and the CD track is resumed
from same location as it was when it
was stopped.
Pressing the SRC button when no CD
is loaded, No CD will be shown on the
display. While this message is
displayed, the mute function is
activated automatically. The sound
system will then resume
automatically to the radio mode.
Skipping to the next track or previous
track
Briefly press button _ or 6 once or
several times.Fast forward or rewind
Press and hold button _ or 6 to fast
forward or rewind the current audio
track.
Pause
Briefly press the ON/OFF rotary knob
to interrupt CD playback. Pause will
be shown on the display.
Notice
The audio source cannot be
changed while the current audio
source is on mute / pause.
Press the ON/OFF rotary knob to
deactivate.
The pause function can also be
deactivated by changing the audio
source.
CD display
When a CD is playing, the following
information will be shown on the
display:
■ T1 (Track 01): shows the number of
the track on the CD
■ 0:42 : shows the time elapsed since
the start of the track
Page 32 of 65

32CD Player
Removing a CD
Press the d button: The CD is
pushed out of the CD slot.
If the CD is not removed after
ejection, it will be drawn back in again
automatically after a brief period. The
sound system will then resume
automatically to the radio mode.
Radio with CD / MP3 player:
Switch on the Infotainment system
and push the CD with the printed side up into the CD slot until it is pulled in.
When the CD is loaded, CD Reading
will be shown on the display. When the CD information has been read,
CD playback will start automatically.
If there is already a CD in the
Infotainment system, press the
MEDIA button on the Infotainment
system or the SRC/OK on the
steering wheel: CD playback is
resumed from same location as it was
when it was stopped.Notice
Depending on the data stored on the audio CD or MP3 CD, differing
information about the CD and the
current music track will be shown on the display.
Skipping to the next track or previous
track
Briefly press button k or l once or
several times.
Selecting an album or track - MP3 CD
Press button R or S to select albums/
folders etc.
Press button k or l to select a track
from the albums/folders etc.
Fast forward or rewind
Press and hold button k or l to fast
forward or rewind the current audio track.
Mute / Pause
Briefly press the MUTE button to
interrupt CD playback. Pause will be
shown on the display.
Press the MUTE button again to
deactivate.CD display
When a CD is playing, the following
information will be shown on the
display when the appropriate menu
function is selected:
■ CD Track 5 (Track 05): shows the
number of the track on the CD
■ 0:42 : shows the time elapsed since
the start of the track
MP3-CD text information (ID3 tag)
The MP3 (ID3-TAG) information
(e.g. song title, artist name, album
name etc.) on the CD, can be shown
on the display. If there is no
ID3-TAG information is present, the
display will show the file name only.
To display the ID3-TAG information
using the buttons on the Infotainment system, select the following:
1. MENU : Press
2. R / S : Press until MP3 display is
shown on the display
3. _ / 6: Press to select one of the 5
following options:
■ Folder name
■ File name
Page 33 of 65

CD Player33
■Title
■ Author
■ Album
Removing a CD
Press the d button: The CD is
pushed out of the CD slot.
If the CD is not removed after
ejection, it will be drawn back in again automatically after a brief period.
Page 34 of 65

34AUX inputAUX inputGeneral information.....................34
Usage .......................................... 34General information
Radio with CD / MP3 player
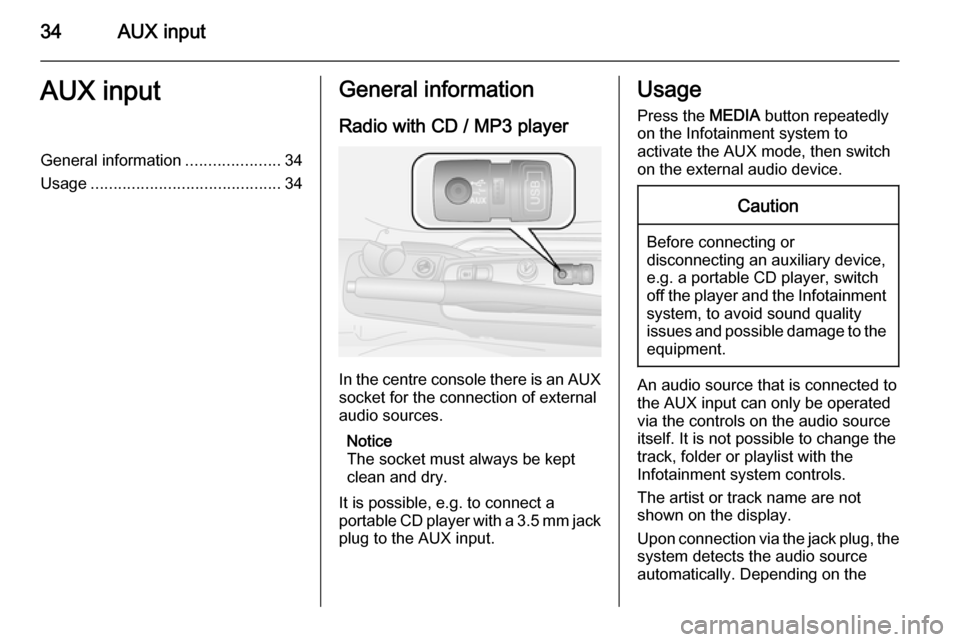
In the centre console there is an AUX
socket for the connection of external
audio sources.
Notice
The socket must always be kept
clean and dry.
It is possible, e.g. to connect a
portable CD player with a 3.5 mm jack plug to the AUX input.
Usage
Press the MEDIA button repeatedly
on the Infotainment system to
activate the AUX mode, then switch
on the external audio device.Caution
Before connecting or
disconnecting an auxiliary device,
e.g. a portable CD player, switch off the player and the Infotainment
system, to avoid sound quality
issues and possible damage to the equipment.
An audio source that is connected to
the AUX input can only be operated
via the controls on the audio source
itself. It is not possible to change the
track, folder or playlist with the
Infotainment system controls.
The artist or track name are not
shown on the display.
Upon connection via the jack plug, the system detects the audio source
automatically. Depending on the
Page 36 of 65

36USB portUSB portGeneral information.....................36
Playing saved audio files .............38General information
Radio with CD / MP3 player
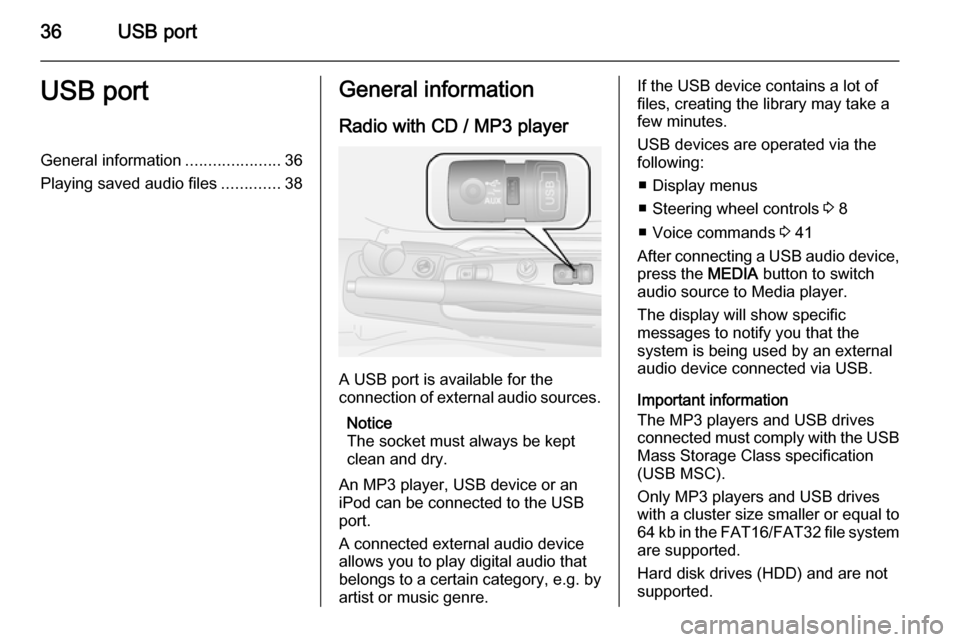
A USB port is available for the
connection of external audio sources.
Notice
The socket must always be kept
clean and dry.
An MP3 player, USB device or an
iPod can be connected to the USB
port.
A connected external audio device
allows you to play digital audio that
belongs to a certain category, e.g. by
artist or music genre.
If the USB device contains a lot of
files, creating the library may take a
few minutes.
USB devices are operated via the
following:
■ Display menus
■ Steering wheel controls 3 8
■ Voice commands 3 41
After connecting a USB audio device,
press the MEDIA button to switch
audio source to Media player.
The display will show specific
messages to notify you that the
system is being used by an external
audio device connected via USB.
Important information
The MP3 players and USB drives
connected must comply with the USB
Mass Storage Class specification
(USB MSC).
Only MP3 players and USB drives
with a cluster size smaller or equal to 64 kb in the FAT16/FAT32 file system
are supported.
Hard disk drives (HDD) and are not
supported.
Page 37 of 65

USB port37
External audio devices and USB
drives
The USB port supports the following
audio formats:
■ WMA: Supports WMA version 1 and WMA version 2 standards.
■ MP3: MPEG-1 Layer 3 - sampling frequencies 32 kHz, 44.1 kHz and
48 kHz.
MPEG-2 layer 3 - sampling
frequencies 16 kHz, 22.05 kHz and
24 kHz.
Supported bit rates: 16 kbps,
32 kbps, 64 kbps, 96 kbps,
128 kbps and 192 kbps.
MP2.5 extension (sampling
frequencies 8 kHz, 11.025 kHz and 12 kHz) is also supported.
■ WAV: Digital audio format without compression.
■ AAC / MP4 / M4A: Sampling
frequencies between 22.05 kHz
and 48 kHz.
Supported bit rates: 8 kbps to
529 kbps.MP3, WMA, MP4, M4A and AAC
formats include multimedia
information, whilst WAV files do not.
Among the recognised formats, it may be the case that multimedia
information has not been entered in
an audio file that allows it. In these
cases, you can only scroll through
audio files by folder.
USB devices with a password
function are not recommended. If
your USB device has this function, always check that it has been
deactivated.
The Media player only supports the
specified formats and does not
support DRM (Digital Rights
Management) protected audio files. If
there are unsupported audio files on
the USB device, they will be ignored.
The media payer is compatible with most USB 1.0, 1.1 or 2.0 data storage
devices.
The Media player supports playlist extensions, .m3u and .wpl. The
Media player does not support nestedor connected playlists. Both relative
and absolute paths to songs in the
playlists are supported.
Playlists generated by an iPod are not
supported.
iPod optimization
To optimise the connection of your iPod with the Infotainment system
you should carry out the following
simple operations on your iPod:
■ Configure the iPod for use as an external disc. Refer to the iPod user
manual
■ If the configuration has been made on an Apple computer, configure it
on a Windows personal computer
■ Save the music tracks as audio files
compatible with the Infotainment
system
These operations will not
compromise the sound quality or
usability of the iPod tracks.