Call VAUXHALL CORSA 2014.5 Infotainment system
[x] Cancel search | Manufacturer: VAUXHALL, Model Year: 2014.5, Model line: CORSA, Model: VAUXHALL CORSA 2014.5Pages: 177, PDF Size: 2.97 MB
Page 43 of 177

Navigation43
In the 2D map view, you can toggle
between the "north orientation",
and the "driving direction
orientation" mode, see Map
orientation below.
In the 3D map view, only the
"driving direction orientation" mode
is available.
■ Map orientation : toggles the 2D
map view between the "north
orientation" ( north-up) mode and
the "driving direction orientation"
( head -up) mode.
In the head-up mode, the map
rotates depending on the driving
direction of the vehicle.
■ Auto Zoom : if set to On, the map
scale will be adjusted (zoom in/out) automatically by the navigationsystem to ensure reliable route
guidance.■ Show POIs In Map : if set to On,
points of interest, e.g. fuel stations,
parking areas, or restaurants, are
indicated by corresponding
symbols on the map.
■ Map Data Information : displays the
name and version of the map data
stored on the inserted SD card.
Setting up the navigation
system
To open the NAVIGATION SETUP
menu: press the SETUP button, and
then select the Navigation menu item.The following settings/options are
available:
■ Map Setup : displays the MAP
SETUP menu, see "Setting up the
map display" above.
■ Voice Guidance : if set to On, voice
commands (e.g. remaining
distance to next turning, turning
direction) are announced during
route guidance.
■ Voice Vol. : if voice guidance is
activated (see above), change this
setting to adjust the volume of voice commands. After each change an
audible feedback is given.
■ Position Information : displays the
address/GPS coordinates of the current position.
To store the displayed address/
GPS coordinates in the address
book: select the Save screen
button.
Page 45 of 177

Navigation45
system, see "User defined points ofinterest" below.
Select the menu item to remove all
user defined POI data from the Infotainment system.
■ Demo Mode : the demo mode
enables you to plan your trip, and
provides an overview of the route.
The demo mode requires a start
position, that may be different from
your current position, and a
destination.
To set a start position: see Set Start
Location For Demo below.
To set a destination: use one of the usual options for destination input
3 48.
To activate the demo mode: set the
menu option to On. Route guidance
is now simulated.
Please note, that in demo mode the
displayed estimated arrival time or
remaining travel time, see
"Information on the map display"
above, is not realistic. In demo
mode the simulated vehicle speed
is unrealistically high, toaccomplish a short execution time
for a simulated trip.
To return to normal route guidance: set the menu option to Off.
■ Set Start Location For Demo :
displays a menu for the manual
input of a start position.
Enter the address of the desired
start position 3 48.
Enabling or disabling the display of
TMC (traffic) messages
You can enable the display of TMC
messages even if no route guidance
is active.
Notice
Detailed descriptions on TMC, see
chapter "Dynamic guidance" 3 70.
Press the SETUP button, and then
select the Traffic Messages menu
item.Enabling the display of TMC
messages
Set Dynamic navigation to Prompt . In
the event of a traffic jam or other traffic
incidents a corresponding TMC
message will be shown on the
display.Disabling the display of TMC
messages
Set Dynamic navigation to Off or
Automatic . No TMC messages will be
shown on the display.
Page 49 of 177

Navigation49
as new destination, see "Entering
and selecting the home address"
below.
The menu options Options, Route ,
and Cancel Route are described in
the "Guidance" chapter 3 65.
Using menus with keypads for address input When using the various options for
address input, you often need to enter
address data using menus with
keypads.
The keypads use an intelligent
spelling function, which excludes
nonexistent letter or number
combinations.
The use of menus with keypads will
be described below by the example of
entering a city name:
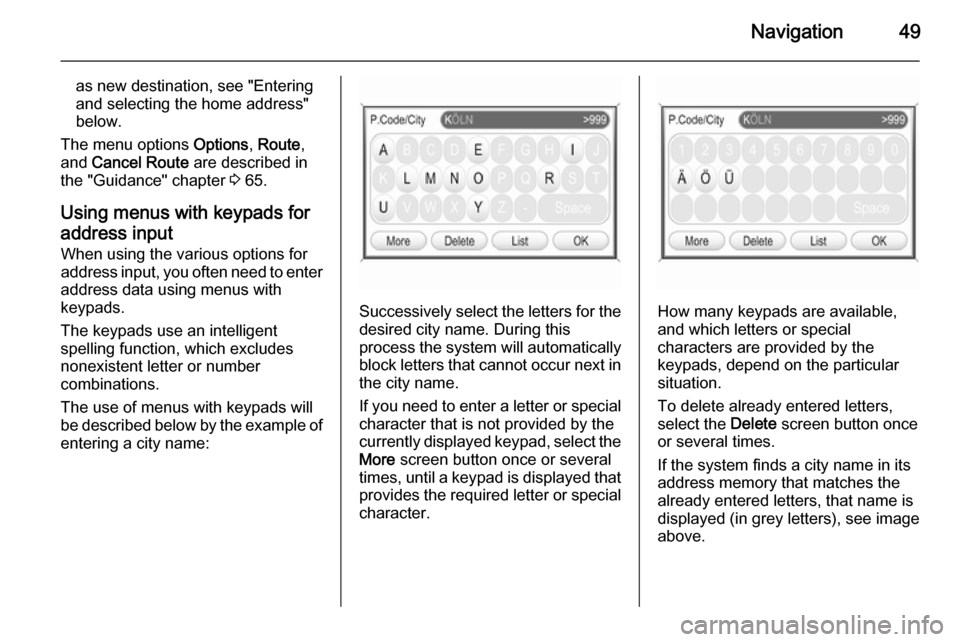
Successively select the letters for the desired city name. During this
process the system will automatically
block letters that cannot occur next in the city name.
If you need to enter a letter or special character that is not provided by the
currently displayed keypad, select the More screen button once or several
times, until a keypad is displayed that
provides the required letter or special character.How many keypads are available,
and which letters or special
characters are provided by the
keypads, depend on the particular situation.
To delete already entered letters,
select the Delete screen button once
or several times.
If the system finds a city name in its
address memory that matches the
already entered letters, that name is
displayed (in grey letters), see image
above.
Page 50 of 177

50Navigation
In case the displayed city name is the
one you are searching for, you can
select the OK screen button to directly
add that city name to your destination
address.
The number in the menu's top right
corner shows, how many city names
starting with the entered letters were
found in the system's address
memory. If that number exceeds 999, "> 999" is displayed, see image
above.
With entering further letters, the
number of city names matching the
entered letters will decrease.
As soon as the number of matching
city names is equal or less than 5, a
list with the matching city names is automatically displayed.
Alternatively, you can select the List
screen button at any time to force the
system to display a list with all city
names that match the already
entered letters.
In both cases you can then select a
list entry to add the related city name
to your destination address.
Notice
If the system only finds a single city name in its address memory that
matches the entered letters, it will
display no list, but directly add the
relating city name to the destination address.
Entering an address directly
Press the NAV button, and then
select the Destination menu item to
open the ENTER DESTINATION
menu.
Select the Enter address menu item.
The ENTER ADDRESS menu is
displayed.
Page 52 of 177

52Navigation
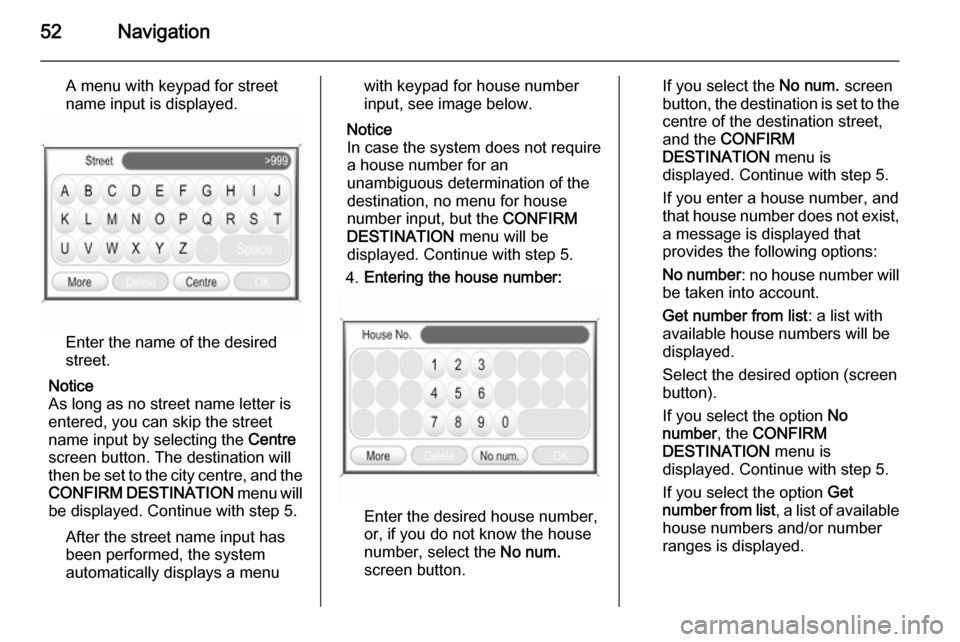
A menu with keypad for street
name input is displayed.
Enter the name of the desired
street.
Notice
As long as no street name letter is
entered, you can skip the street
name input by selecting the Centre
screen button. The destination will
then be set to the city centre, and the
CONFIRM DESTINATION menu will
be displayed. Continue with step 5.
After the street name input has
been performed, the system
automatically displays a menu
with keypad for house number
input, see image below.
Notice
In case the system does not require
a house number for an
unambiguous determination of the
destination, no menu for house
number input, but the CONFIRM
DESTINATION menu will be
displayed. Continue with step 5.
4. Entering the house number:
Enter the desired house number,
or, if you do not know the house
number, select the No num.
screen button.
If you select the No num. screen
button, the destination is set to the
centre of the destination street,
and the CONFIRM
DESTINATION menu is
displayed. Continue with step 5.
If you enter a house number, and
that house number does not exist, a message is displayed that
provides the following options:
No number : no house number will
be taken into account.
Get number from list : a list with
available house numbers will be
displayed.
Select the desired option (screen
button).
If you select the option No
number , the CONFIRM
DESTINATION menu is
displayed. Continue with step 5.
If you select the option Get
number from list , a list of available
house numbers and/or number
ranges is displayed.
Page 63 of 177

Navigation63
Select the Intersection as
destination menu item.
Perform operating steps 1 to 3 of
"Entering an address directly", see
above.
After entering a street name:
If there is only a single street that
crosses the previously specified
street, the CONFIRM
DESTINATION menu is displayed.
Continue with operating step 5 of
"Entering an address directly", see
above.
If there are 5 or less crossing streets,
a list of all crossing streets is
displayed. Select the desired
crossing street, and continue with
operating step 5 of "Entering an
address directly", see above.
If there are more than 5 crossing streets, a menu with keypad for name input is displayed.
Enter the name of a street that
crosses the previously specified
street, or select the List screen button
to directly display a list of all crossing streets.
Select the desired crossing street,
and continue with operating step 5 of
"Entering an address directly", see
above.
Selecting a previous destination
Press the NAV button, and then
select the Previous Destinations
menu item.
A list is displayed, with destinations
previously used for route guidance.
Up to 50 previous destinations will be
stored automatically. When the
number of previous destinations
Page 66 of 177

66Navigation
Controlling route guidance via
the NAVIGATION menu Press the NAV button to open the
NAVIGATION menu.
The NAVIGATION menu provides
three options that you can use for controlling route guidance:
■ Options : opens the ROUTE
OPTIONS menu that provides
several settings for route
calculation/recalculation and route
guidance, see "Settings for route
calculation and guidance" below.
■ Route : opens the ROUTE LIST
menu that shows all streets on the
current route, see "Displaying the
route list" below.
■ Cancel Route : cancels the currently
active route guidance.
If an additional waypoint
(intermediate destination) is
currently set for route guidance, a
message prompts you to decide:
if route guidance to both the
waypoint and the final destination should be cancelled, or,
if route guidance only to the
waypoint should be cancelled.
If you cancel route guidance only to a waypoint: the navigation system
automatically recalculates the route to guide you to the final destination.
Settings for route calculation and
guidance
Before starting route guidance, but also when route guidance is already
active, you can set several criteria for route calculation/recalculation and
route guidance.Press the NAV button, and then
select the Options menu item to open
the ROUTE OPTIONS menu.
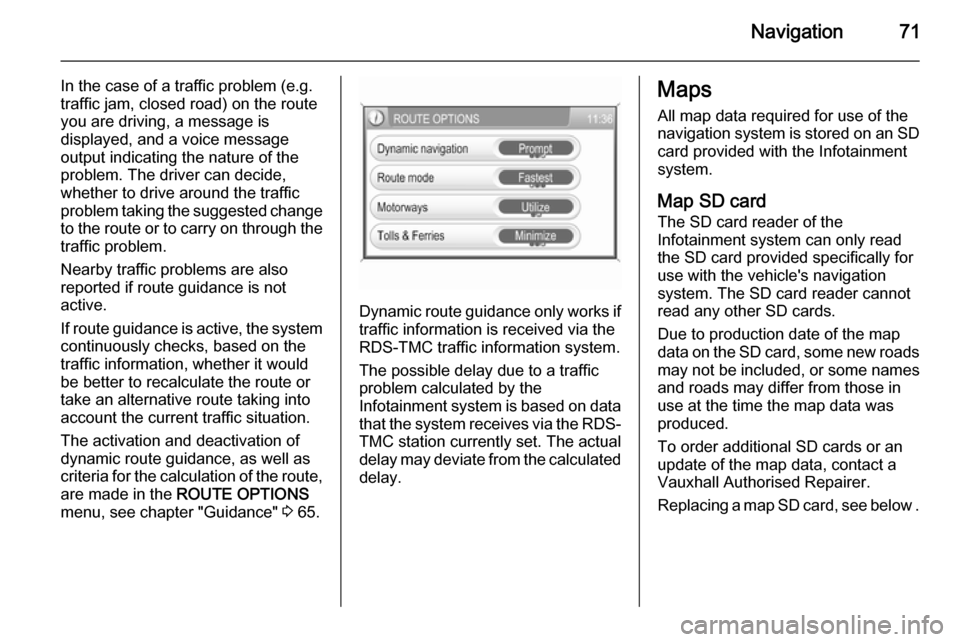
The following menu options are
available:
■ Dynamic navigation : select, if the
navigation system should take
TMC (traffic) messages into
account for route calculation/
recalculation, see chapter
"Dynamic guidance" 3 70.
Available settings:
Off : no TMC messages are taken
into account for route calculation.
Page 67 of 177

Navigation67
Automatic: all TMC messages are
automatically taken into account for
route calculation/recalculation.
Prompt : in the event of a traffic jam
or other traffic incidents, for which
the navigation system receives a
TMC message, you will be
prompted by a message:
if an alternative route to the
destination should be calculated
or
if the previously calculated route
should remain unchanged.
The messages will be shown on the display even if an audio mode (e.g.
AM/FM or CD) or the telephone
mode are currently active.
■ Route mode : select, if the fastest,
the most economical, or the
shortest route should be calculated for route guidance.
■ Motorways : select, if motorways
should be avoided or utilised for
route guidance.
■ Tolls & Ferries : select, if toll roads
and ferries should be avoided or
utilised, or, if the use of toll roadsand ferries should be minimized,
when calculating the route to the
destination.
Displaying the route list
Press the NAV button, and then
select the Route menu item to open
the ROUTE LIST .
The route list shows all streets on the
calculated route, starting with the
current location.
Each list entry may show the following
information:
■ Name of street, motorway, or motorway junction.
■ Direction arrow or motorwaysymbol.
Notice
An additional small red triangle in a
direction arrow or motorway symbol
indicates a pending traffic event in
the course of the related street or
motorway.
■ Distance to the next street on the route, or
■ estimated time required to reach the next street on the route, or
■ estimated arrival time when reaching the next street on the
route.
The displayed time information
depend on, whether display of the
estimated remaining travel time or the estimated arrival time was previously
selected on the map display.
To change the mode of time display:
press the MAP button, and then tap
on the time information, shown below the direction arrow, on the left side of
the map display.
Page 70 of 177

70Navigation
Notice
You can only define one single
exclusion street or one exclusion
section at a time in the route list.
To perform the street exclusion:select the Recalculate Route menu
item (first entry in route list).
The route will be recalculated, and
the excluded streets will be
indicated by a black line and a
"Closed road" symbol (see chapter
"Symbols overview" 3 73) on the
map display.
■ Use Road Ahead : cancels the
street exclusion previously
performed via Avoid Road Ahead .
■ Use Road In Route List : cancels the
street exclusion previously
performed via Avoid Road In Route
List .
Adding a waypoint (intermediate destination) to the routeAt any time during active route
guidance you can add a waypoint to
your route.Press the NAV button, and then
select the Destination menu item or
the Previous Destinations menu item.
In the message that is displayed now, select the Add waypoint screen
button.
Enter or select a destination for the
waypoint, see chapter "Destination
input" 3 48.
After adding the desired waypoint, the
navigation system will calculate the
route from the current position to that new intermediate destination, and the
route from the intermediate
destination to the final destination.
The waypoint will be indicated on the
map by a red chequered flag.
After reaching the waypoint, the route
guidance will automatically proceed
with guidance to the final destination.
Notice
For every trip you can set only one
waypoint at a time. If there is a
waypoint already active when
setting a new waypoint, route
guidance to the old waypoint will be
cancelled.Enabling user defined POI
warnings
You can define "POI warnings" for
POIs that you want to be warned of
(e.g. very sharp turns on a road),
before reaching the corresponding
location.
Defining your personal POI warnings,
and downloading them to the
Infotainment system, see chapter
"Usage" 3 37.
Enabling POI warnings:
Press the SETUP button, select the
Navigation menu item, and then set
POI Warning to On.
Dynamic guidance If dynamic route guidance is active,
the entire current traffic situation that the Infotainment system receives via
TMC is included in the calculation of
the route. The route is suggested
taking into account all traffic problems
or restrictions as per preset criteria
(e.g. „shortest route“, „avoid
motorways“ etc.).
Page 71 of 177

Navigation71
In the case of a traffic problem (e.g.
traffic jam, closed road) on the route
you are driving, a message is
displayed, and a voice message
output indicating the nature of the
problem. The driver can decide,
whether to drive around the traffic
problem taking the suggested change
to the route or to carry on through the traffic problem.
Nearby traffic problems are also
reported if route guidance is not
active.
If route guidance is active, the system
continuously checks, based on the
traffic information, whether it would
be better to recalculate the route or
take an alternative route taking into
account the current traffic situation.
The activation and deactivation of
dynamic route guidance, as well as
criteria for the calculation of the route,
are made in the ROUTE OPTIONS
menu, see chapter "Guidance" 3 65.
Dynamic route guidance only works if
traffic information is received via the
RDS-TMC traffic information system.
The possible delay due to a traffic
problem calculated by the
Infotainment system is based on data
that the system receives via the RDS- TMC station currently set. The actual
delay may deviate from the calculated delay.
Maps
All map data required for use of the
navigation system is stored on an SD
card provided with the Infotainment
system.
Map SD card The SD card reader of the
Infotainment system can only read
the SD card provided specifically for
use with the vehicle's navigation
system. The SD card reader cannot
read any other SD cards.
Due to production date of the map
data on the SD card, some new roads
may not be included, or some names and roads may differ from those in
use at the time the map data was produced.
To order additional SD cards or an
update of the map data, contact a
Vauxhall Authorised Repairer.
Replacing a map SD card, see below .