battery VAUXHALL ZAFIRA 2014 User Guide
[x] Cancel search | Manufacturer: VAUXHALL, Model Year: 2014, Model line: ZAFIRA, Model: VAUXHALL ZAFIRA 2014Pages: 217, PDF Size: 7.85 MB
Page 117 of 217

Lighting115
The lighting is switched off
immediately if the turn signal lever is pulled while the driver's door is open.
Battery discharge
protection To prevent the battery from becomingdischarged, all the interior lighting is
switched off automatically after
10 minutes, when the ignition is
switched off.
Page 128 of 217

126Driving and operating
To repeat the starting procedure or to
switch off the engine, press the button again.
Starting the vehicle at low
temperatures
The start of the engine without
additional heaters is possible down to -25 °С for diesel engines and -30 °C
for petrol engines. Required is an engine oil with the correct viscosity,
the correct fuel, performed services
and a sufficiently charged battery.
With temperatures below -30 °C the
automatic transmission and the
manual transmission automated
need a warming phase of approx. 5
minutes. The selector lever must be
in position P respectively N.
Overrun cut-off The fuel supply is automatically cut off
during overrun, i.e. when the vehicle
is driven with a gear engaged but
accelerator is released.Parking
■ Do not park the vehicle on an easily
ignitable surface. The high
temperature of the exhaust system
could ignite the surface.
■ Always apply parking brake without
pressing release button. Apply as
firmly as possible on downhill or
uphill slopes. Depress the foot
brake at same time to reduce
operating force.
■ Switch off the engine and ignition. Turn the steering wheel until the
steering wheel lock engages.
■ If the vehicle is on a level surface or
uphill slope, engage first gear or set
the selector lever to P before
switching off the ignition. On an
uphill slope, turn the front wheels
away from the kerb.
If the vehicle is on a downhill slope, engage reverse gear or set theselector lever to P before switchingoff the ignition. Turn the front
wheels towards the kerb.
■ Lock the vehicle and activate the anti-theft locking system and the
anti-theft alarm system.
Page 134 of 217

132Driving and operating
Kickdown
If the accelerator pedal is pressed
past the pressure point, the
transmission shifts to a lower gear depending on engine speed.
Fault
In the event of a fault, A illuminates.
The transmission no longer shifts
automatically. Continued travel is
possible with manual shifting.
Have the cause of the fault remedied
by a workshop.
Version without manual mode
2nd gear is not available. Manual
shifting:1=1st gear2=3rd gear3, D=4th gear
Version with manual mode
Only the highest gear is available.
Depending on the fault, 2nd gear may also be available in manual mode.
Interruption of power
supply
In the event of an interruption of
power supply, the selector lever
cannot be moved out of the P or N
position.
If the battery is discharged, start the
vehicle using jump leads 3 184.
If the battery is not the cause of the fault, release selector lever:
1. Apply parking brake.
2. Remove ashtray insert 3 82.
Slacken the screw on the metal
cover and remove the two pieces.
Vehicle tools 3 171.
3. Unclip ashtray holder or cover: reach into the opening at the top
edge, unclip the ashtray holder or
cover and remove.
Page 139 of 217

Driving and operating137
If F appears in the transmission
display, continued driving is not
possible.
Have the cause of the fault remedied
by a workshop.
Interruption of power
supply
The clutch is not disengaged if there
is an interruption of the power supply
when a gear is engaged. The vehicle
cannot move.
If the battery is discharged, start the
vehicle using jump leads 3 184.
If the cause of the fault is not a
discharged battery, seek the
assistance of a workshop.
If the vehicle must be moved out of the flow of traffic, disengage the
clutch as follows:
1. Apply parking brake and switch off
ignition.
2. Open the bonnet 3 153.
3. Clean the transmission around the cap so that no dirt can get intothe opening when the cap is
removed.
4. Rotate cap to slacken and remove
by lifting upwards.
5. Using a flat-head screwdriver, turn the adjusting screw under the
cap clockwise until clear
resistance can be felt. The clutch
has now been disengaged.
6. Refit cleaned cap. The cap must be in full contact with the housing.Caution
Do not turn beyond the resistancesince this could damage the
transmission.
Caution
Towing the vehicle and starting
the engine is not permitted when
the clutch has been disengaged in this way, although the vehicle can
be moved a short distance.
Seek the immediate assistance of a
workshop.
Page 154 of 217
152Vehicle care
■ Open bonnet, close all doors andlock the vehicle.
■ Disconnect the clamp from the negative terminal of the vehicle
battery. Beware that all systems are not functional, e.g. anti-theft alarm
system.
Putting back into operation Following must be done if the vehicle
is putting back into operation:
■ Connect the clamp to the negative terminal of the vehicle battery.
Activate the electronics of the
power windows.
■ Check tyre pressure.
■ Fill up the washer fluid reservoir.
■ Check the engine oil level.
■ Check the coolant level.
■ Fit the number plate if necessary.End-of-life vehicle
recovery
Information on end-of-life vehicle
recovery centres and the recycling of
end-of-life vehicles is available on our website. Only entrust this work to an
authorised recycling centre.Vehicle checks
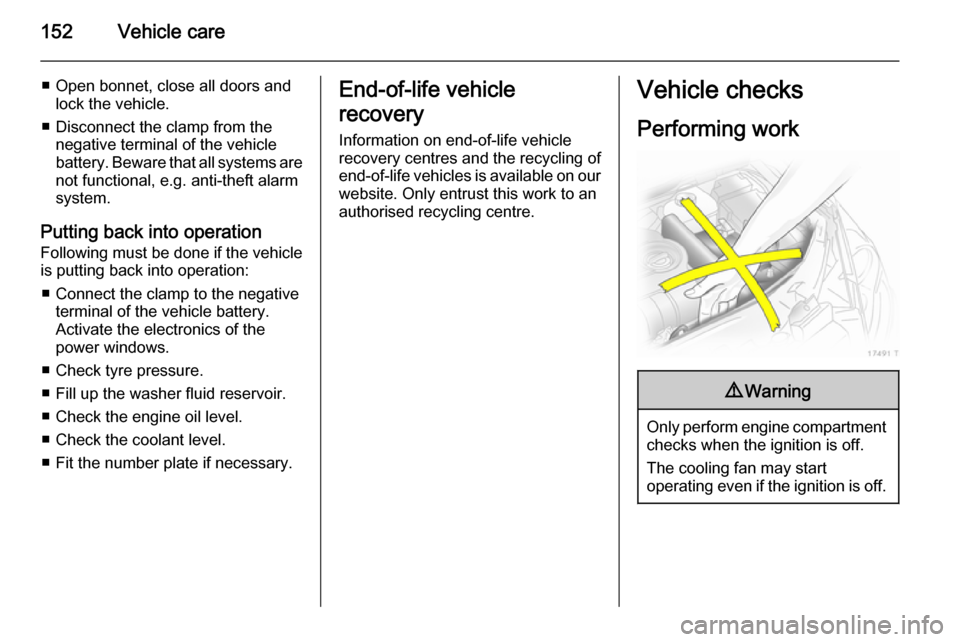
Performing work9 Warning
Only perform engine compartment
checks when the ignition is off.
The cooling fan may start
operating even if the ignition is off.
Page 158 of 217
156Vehicle care
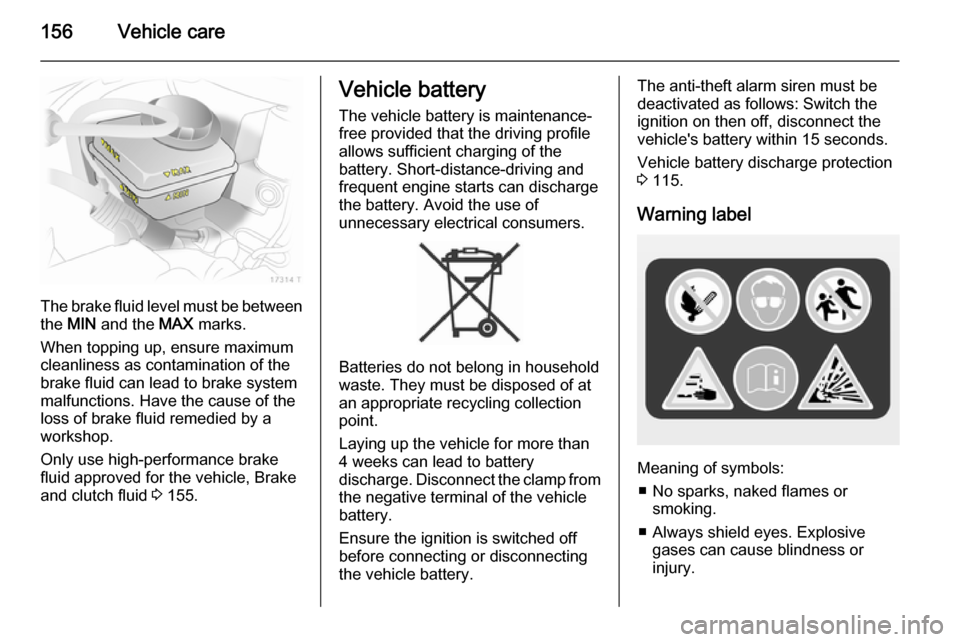
The brake fluid level must be betweenthe MIN and the MAX marks.
When topping up, ensure maximum cleanliness as contamination of the
brake fluid can lead to brake system
malfunctions. Have the cause of the
loss of brake fluid remedied by a
workshop.
Only use high-performance brake
fluid approved for the vehicle, Brake
and clutch fluid 3 155.
Vehicle battery
The vehicle battery is maintenance-
free provided that the driving profile
allows sufficient charging of the
battery. Short-distance-driving and
frequent engine starts can discharge
the battery. Avoid the use of
unnecessary electrical consumers.
Batteries do not belong in household
waste. They must be disposed of at
an appropriate recycling collection
point.
Laying up the vehicle for more than
4 weeks can lead to battery
discharge. Disconnect the clamp from the negative terminal of the vehicle
battery.
Ensure the ignition is switched off
before connecting or disconnecting
the vehicle battery.
The anti-theft alarm siren must be
deactivated as follows: Switch the ignition on then off, disconnect the
vehicle's battery within 15 seconds.
Vehicle battery discharge protection
3 115.
Warning label
Meaning of symbols: ■ No sparks, naked flames or smoking.
■ Always shield eyes. Explosive gases can cause blindness or
injury.
Page 159 of 217

Vehicle care157
■ Keep the vehicle battery out of thereach of children.
■ The vehicle battery contains sulphuric acid which could cause
blindness or serious burn injuries.
■ See the Owner's Manual for further
information.
■ Explosive gas may be present in the vicinity of the vehicle battery.
Diesel fuel system
bleeding
If the tank has been run dry, the diesel
fuel system must be bled. Switch on
the ignition three times for
15 seconds at a time. Then crank the
engine for a maximum of 40 seconds. Repeat this process after
no less than 5 seconds. If the engine
fails to start, seek the assistance of a
workshop.Wiper blade replacement
Service setting for front
windscreen wipers
Switch off the ignition but do not
remove ignition key or open driver's
door.
Within 4 seconds, push the wiper
lever down and release as soon as
the wipers are vertical.
Wiper blades on the windscreen
Lift the wiper arm, press the two
catches on the arm, disengage the
wiper blade and remove.
Page 181 of 217
Vehicle care179
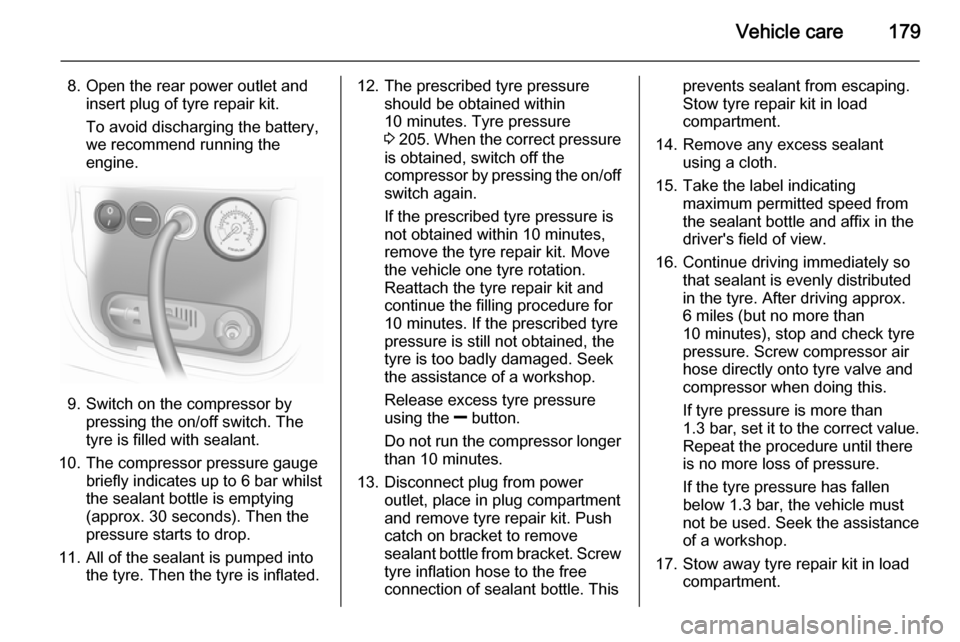
8. Open the rear power outlet andinsert plug of tyre repair kit.
To avoid discharging the battery,
we recommend running the
engine.
9. Switch on the compressor by pressing the on/off switch. The
tyre is filled with sealant.
10. The compressor pressure gauge briefly indicates up to 6 bar whilstthe sealant bottle is emptying
(approx. 30 seconds). Then the
pressure starts to drop.
11. All of the sealant is pumped into the tyre. Then the tyre is inflated.
12. The prescribed tyre pressureshould be obtained within
10 minutes. Tyre pressure
3 205 . When the correct pressure
is obtained, switch off the
compressor by pressing the on/off switch again.
If the prescribed tyre pressure is
not obtained within 10 minutes,
remove the tyre repair kit. Move
the vehicle one tyre rotation.
Reattach the tyre repair kit and
continue the filling procedure for 10 minutes. If the prescribed tyre
pressure is still not obtained, the
tyre is too badly damaged. Seek
the assistance of a workshop.
Release excess tyre pressure
using the ] button.
Do not run the compressor longer than 10 minutes.
13. Disconnect plug from power outlet, place in plug compartment
and remove tyre repair kit. Push
catch on bracket to remove
sealant bottle from bracket. Screw
tyre inflation hose to the free
connection of sealant bottle. Thisprevents sealant from escaping.
Stow tyre repair kit in load
compartment.
14. Remove any excess sealant using a cloth.
15. Take the label indicating maximum permitted speed from
the sealant bottle and affix in the
driver's field of view.
16. Continue driving immediately so that sealant is evenly distributed
in the tyre. After driving approx.
6 miles (but no more than 10 minutes), stop and check tyre
pressure. Screw compressor air
hose directly onto tyre valve and
compressor when doing this.
If tyre pressure is more than
1.3 bar , set it to the correct value.
Repeat the procedure until there
is no more loss of pressure.
If the tyre pressure has fallen
below 1.3 bar, the vehicle must
not be used. Seek the assistance
of a workshop.
17. Stow away tyre repair kit in load compartment.
Page 186 of 217
184Vehicle careJump startingDo not start with quick charger.
A vehicle with a discharged battery
can be started using jump leads and the battery of another vehicle.9 Warning
Be extremely careful when starting
with jump leads. Any deviation
from the following instructions can
lead to injuries or damage caused
by battery explosion or damage to the electrical systems of both
vehicles.
9 Warning
Avoid contact of the battery with
eyes, skin, fabrics and painted
surfaces. The fluid contains
sulphuric acid which can cause
injuries and damage in the event
of direct contact.
■ Never expose the battery to naked flames or sparks.
■ A discharged battery can already freeze at temperatures of 0 °C.
Defrost the frozen battery before
connecting jump leads.
■ Wear eye protection and protective
clothing when handling a battery.
■ Use a booster battery with the same voltage (12 Volts). Its
capacity (Ah) must not be much less than that of the discharged
battery.
■ Use jump leads with insulated terminals and a cross section of at
least 16 mm 2
(25 mm 2
for diesel
engines).
■ Do not disconnect the discharged battery from the vehicle.
■ Switch off all unnecessary electrical
consumers.
■ Do not lean over the battery during jump starting.
■ Do not allow the terminals of one lead to touch those of the other
lead.■ The vehicles must not come into contact with each other during the
jump starting process.
■ Apply the parking brake, transmission in neutral, automatictransmission in P.
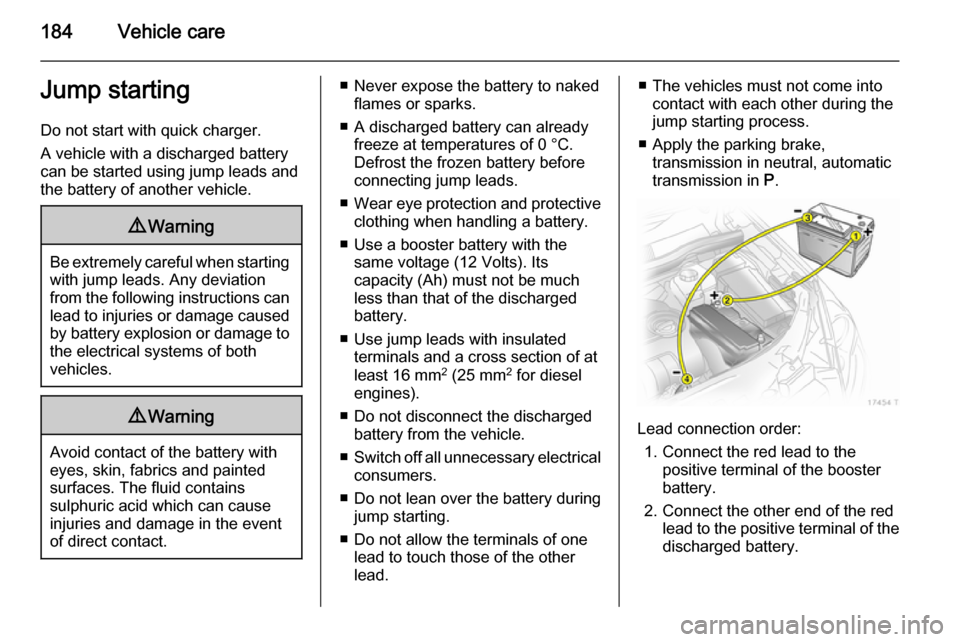
Lead connection order:
1. Connect the red lead to the positive terminal of the booster
battery.
2. Connect the other end of the red lead to the positive terminal of the
discharged battery.
Page 187 of 217
Vehicle care185
3. Connect the black lead to thenegative terminal of the booster
battery.
4. Connect the other end of the black
lead to a vehicle grounding point,
such as the engine block or an
engine mounting bolt. Connect as far away from the discharged
battery as possible, however at
least 60 cm.
Route the leads so that they cannot
catch on rotating parts in the engine
compartment.
To start the engine: 1. Start the engine of the vehicle providing the jump.
2. After 5 minutes, start the other engine. Start attempts should be
made for no longer than
15 seconds at an interval of
1 minute.
3. Allow both engines to idle for approx. 3 minutes with the leads
connected.4. Switch on electrical consumers (e.g. headlights, heated rear
window) of the vehicle receiving
the jump start.
5. Reverse above sequence exactly when removing leads.Towing
Towing the vehicle
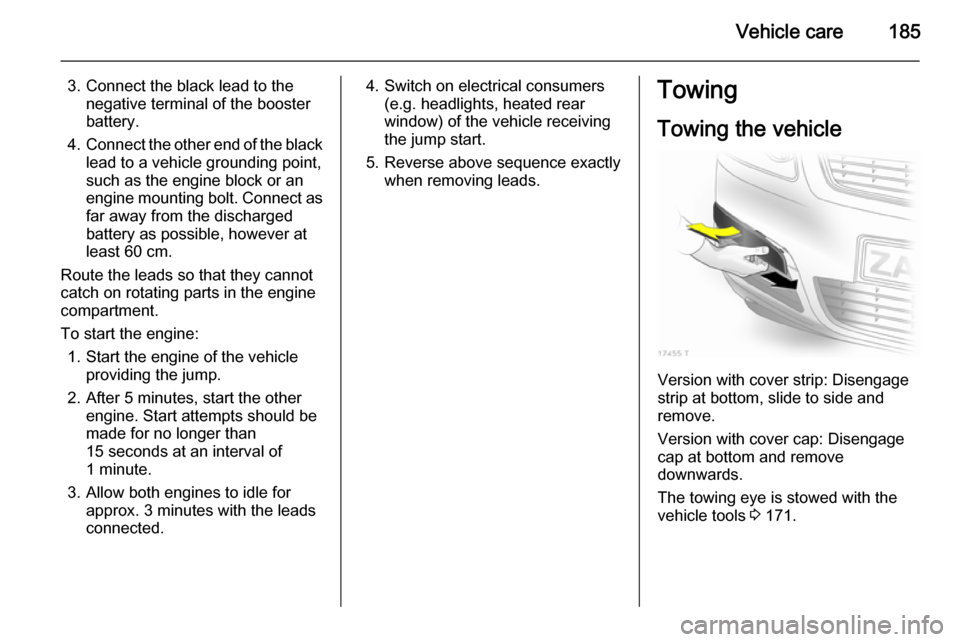
Version with cover strip: Disengage
strip at bottom, slide to side and
remove.
Version with cover cap: Disengage
cap at bottom and remove
downwards.
The towing eye is stowed with the vehicle tools 3 171.