wheel VOLKSWAGEN CORRADO 1990 Service Manual
[x] Cancel search | Manufacturer: VOLKSWAGEN, Model Year: 1990, Model line: CORRADO, Model: VOLKSWAGEN CORRADO 1990Pages: 906, PDF Size: 6.56 MB
Page 275 of 906

* SUSPENSION UNIFORM INSPECTION GUIDELINES *
Article Text (p. 64)
1990 Volkswagen Corrado
For Volkswagen Technical Site: http://vw.belcom.ru
Copyright © 1998 Mitchell Repair Information Company, LLC
Thursday, March 23, 2000 09:39PMÄÄÄÄÄÄÄÄÄÄÄÄÄÄÄÄÄÄÄÄÄÄÄÄÄÄÄÄÄÄÄÄÄÄÅÄÄÄÄÄÄÅÄÄÄÄÄÄÄÄÄÄÄÄÄÄÄÄÄÄÄÄÄÄÄÄÄÄÄÄMissing
³ C ³ Require replacement.
ÄÄÄÄÄÄÄÄÄÄÄÄÄÄÄÄÄÄÄÄÄÄÄÄÄÄÄÄÄÄÄÄÄÄÅÄÄÄÄÄÄÅÄÄÄÄÄÄÄÄÄÄÄÄÄÄÄÄÄÄÄÄÄÄÄÄÄÄÄÄThreads damaged
³ A ³ Require repair/replacement.
ÄÄÄÄÄÄÄÄÄÄÄÄÄÄÄÄÄÄÄÄÄÄÄÄÄÄÄÄÄÄÄÄÄÄÅÄÄÄÄÄÄÅÄÄÄÄÄÄÄÄÄÄÄÄÄÄÄÄÄÄÄÄÄÄÄÄÄÄÄÄThreads stripped (threads missing)
³ A ³ Require replacement.
ÄÄÄÄÄÄÄÄÄÄÄÄÄÄÄÄÄÄÄÄÄÄÄÄÄÄÄÄÄÄÄÄÄÄÅÄÄÄÄÄÄÅÄÄÄÄÄÄÄÄÄÄÄÄÄÄÄÄÄÄÄÄÄÄÄÄÄÄÄÄValve cap missing
³ C ³ Require replacement of cap.
ÄÄÄÄÄÄÄÄÄÄÄÄÄÄÄÄÄÄÄÄÄÄÄÄÄÄÄÄÄÄÄÄÄÄÅÄÄÄÄÄÄÅÄÄÄÄÄÄÄÄÄÄÄÄÄÄÄÄÄÄÄÄÄÄÄÄÄÄÄÄWeather-checking
³ A,1 ³ Suggest replacement.
ÄÄÄÄÄÄÄÄÄÄÄÄÄÄÄÄÄÄÄÄÄÄÄÄÄÄÄÄÄÄÄÄÄÄÅÄÄÄÄÄÄÅÄÄÄÄÄÄÄÄÄÄÄÄÄÄÄÄÄÄÄÄÄÄÄÄÄÄÄÄWon't take air
³ A ³ Require repair/replacement.
ÄÄÄÄÄÄÄÄÄÄÄÄÄÄÄÄÄÄÄÄÄÄÄÄÄÄÄÄÄÄÄÄÄÄÁÄÄÄÄÄÄÁÄÄÄÄÄÄÄÄÄÄÄÄÄÄÄÄÄÄÄÄÄÄÄÄÄÄÄÄ WHEEL ATTACHMENT HARDWARE
For conditions noted below, also check conditions of wheel
stud holes.
CAUTION: Proper lug nut torque is essential. Follow manufacturer's
torque specifications and tightening sequence. DO NOT
lubricate threads unless specified by the vehicle
manufacturer.
WHEEL ATTACHMENT HARDWARE
ÄÄÄÄÄÄÄÄÄÄÄÄÄÄÄÄÄÄÄÄÄÄÄÄÄÄÄÄÄÂÄÄÄÄÄÄÂÄÄÄÄÄÄÄÄÄÄÄÄÄÄÄÄÄÄÄÄÄÄÄÄÄÄÄÄÄÄÄÄÄCondition
³ Code ³ Procedure
ÄÄÄÄÄÄÄÄÄÄÄÄÄÄÄÄÄÄÄÄÄÄÄÄÄÄÄÄÄÅÄÄÄÄÄÄÅÄÄÄÄÄÄÄÄÄÄÄÄÄÄÄÄÄÄÄÄÄÄÄÄÄÄÄÄÄÄÄÄÄBent
³ A ³ Require replacement.
ÄÄÄÄÄÄÄÄÄÄÄÄÄÄÄÄÄÄÄÄÄÄÄÄÄÄÄÄÄÅÄÄÄÄÄÄÅÄÄÄÄÄÄÄÄÄÄÄÄÄÄÄÄÄÄÄÄÄÄÄÄÄÄÄÄÄÄÄÄÄBroken
³ A ³ Require replacement.
³ ³ See note (1) below.
ÄÄÄÄÄÄÄÄÄÄÄÄÄÄÄÄÄÄÄÄÄÄÄÄÄÄÄÄÄÅÄÄÄÄÄÄÅÄÄÄÄÄÄÄÄÄÄÄÄÄÄÄÄÄÄÄÄÄÄÄÄÄÄÄÄÄÄÄÄÄLoose
³ B ³ Require repair or replacement
³ ³ of affected component.
ÄÄÄÄÄÄÄÄÄÄÄÄÄÄÄÄÄÄÄÄÄÄÄÄÄÄÄÄÄÅÄÄÄÄÄÄÅÄÄÄÄÄÄÄÄÄÄÄÄÄÄÄÄÄÄÄÄÄÄÄÄÄÄÄÄÄÄÄÄÄLug nut installed backward
³ B ³ Require repair.
ÄÄÄÄÄÄÄÄÄÄÄÄÄÄÄÄÄÄÄÄÄÄÄÄÄÄÄÄÄÅÄÄÄÄÄÄÅÄÄÄÄÄÄÄÄÄÄÄÄÄÄÄÄÄÄÄÄÄÄÄÄÄÄÄÄÄÄÄÄÄLug nut mating type incorrect
³ B ³ Require replacement of nut.
ÄÄÄÄÄÄÄÄÄÄÄÄÄÄÄÄÄÄÄÄÄÄÄÄÄÄÄÄÄÅÄÄÄÄÄÄÅÄÄÄÄÄÄÄÄÄÄÄÄÄÄÄÄÄÄÄÄÄÄÄÄÄÄÄÄÄÄÄÄÄLug nut mating surface dished
³ A ³ Require replacement of nut.
ÄÄÄÄÄÄÄÄÄÄÄÄÄÄÄÄÄÄÄÄÄÄÄÄÄÄÄÄÄÅÄÄÄÄÄÄÅÄÄÄÄÄÄÄÄÄÄÄÄÄÄÄÄÄÄÄÄÄÄÄÄÄÄÄÄÄÄÄÄÄLug nut flats rounded
³ A ³ Require replacement of nut.
³ ³ See note (2) below.
ÄÄÄÄÄÄÄÄÄÄÄÄÄÄÄÄÄÄÄÄÄÄÄÄÄÄÄÄÄÅÄÄÄÄÄÄÅÄÄÄÄÄÄÄÄÄÄÄÄÄÄÄÄÄÄÄÄÄÄÄÄÄÄÄÄÄÄÄÄÄLug nut seized
³ A ³ Require replacement of nut
³ ³ and/or stud. See note (2) below.
ÄÄÄÄÄÄÄÄÄÄÄÄÄÄÄÄÄÄÄÄÄÄÄÄÄÄÄÄÄÅÄÄÄÄÄÄÅÄÄÄÄÄÄÄÄÄÄÄÄÄÄÄÄÄÄÄÄÄÄÄÄÄÄÄÄÄÄÄÄÄStud incorrect
³ B ³ Require replacement of stud.
ÄÄÄÄÄÄÄÄÄÄÄÄÄÄÄÄÄÄÄÄÄÄÄÄÄÄÄÄÄÅÄÄÄÄÄÄÅÄÄÄÄÄÄÄÄÄÄÄÄÄÄÄÄÄÄÄÄÄÄÄÄÄÄÄÄÄÄÄÄÄThreads damaged
³ A ³ Require repair or replacement of
³ ³ component with damaged threads.
Page 276 of 906

* SUSPENSION UNIFORM INSPECTION GUIDELINES *
Article Text (p. 65)
1990 Volkswagen Corrado
For Volkswagen Technical Site: http://vw.belcom.ru
Copyright © 1998 Mitchell Repair Information Company, LLC
Thursday, March 23, 2000 09:39PMÄÄÄÄÄÄÄÄÄÄÄÄÄÄÄÄÄÄÄÄÄÄÄÄÄÄÄÄÄÅÄÄÄÄÄÄÅÄÄÄÄÄÄÄÄÄÄÄÄÄÄÄÄÄÄÄÄÄÄÄÄÄÄÄÄÄÄÄÄÄThreads stripped (threads
³ A ³ Require replacement of
missing)
³ ³ component with stripped threads.
ÄÄÄÄÄÄÄÄÄÄÄÄÄÄÄÄÄÄÄÄÄÄÄÄÄÄÄÄÄÁÄÄÄÄÄÄÁÄÄÄÄÄÄÄÄÄÄÄÄÄÄÄÄÄÄÄÄÄÄÄÄÄÄÄÄÄÄÄÄÄNOTE: (1) Some manufacturers require replacement of all studs on that
wheel if two or more studs or nuts on the same wheel are
broken or missing.
(2) Only required if removing wheel.
ÄÄÄÄÄÄÄÄÄÄÄÄÄÄÄÄÄÄÄÄÄÄÄÄÄÄÄÄÄÄÄÄÄÄÄÄÄÄÄÄÄÄÄÄÄÄÄÄÄÄÄÄÄÄÄÄÄÄÄÄÄÄÄÄÄÄÄÄÄÄ WHEELS
WARNING: Mounting a regular tire on a high-pressure compact spare
wheel is not permitted. Attempting to mount a tire of one
diameter on a wheel of a different diameter or flange type
may result in serious injury or death. If the wheel
identification stamp is not legible, or cannot be found,
DO NOT use the wheel until the size and type have been
properly identified. Wheels of different diameter, offset,
or width cannot be mixed on the same axle. Bead seat tapers
cannot be interchanged.
WHEELS
ÄÄÄÄÄÄÄÄÄÄÄÄÄÄÄÄÄÄÄÄÄÄÄÄÄÄÄÂÄÄÄÄÄÄÂÄÄÄÄÄÄÄÄÄÄÄÄÄÄÄÄÄÄÄÄÄÄÄÄÄÄÄÄÄÄÄÄÄÄÄCondition
³ Code ³ Procedure
ÄÄÄÄÄÄÄÄÄÄÄÄÄÄÄÄÄÄÄÄÄÄÄÄÄÄÄÅÄÄÄÄÄÄÅÄÄÄÄÄÄÄÄÄÄÄÄÄÄÄÄÄÄÄÄÄÄÄÄÄÄÄÄÄÄÄÄÄÄÄBead leaking, caused by
³ A ³ Require repair or replacement.
wheel rim flange
³ ³ See caution below.
ÄÄÄÄÄÄÄÄÄÄÄÄÄÄÄÄÄÄÄÄÄÄÄÄÄÄÄÁÄÄÄÄÄÄÁÄÄÄÄÄÄÄÄÄÄÄÄÄÄÄÄÄÄÄÄÄÄÄÄÄÄÄÄÄÄÄÄÄÄÄCAUTION: DO NOT attempt to correct a bent wheel rim.
ÄÄÄÄÄÄÄÄÄÄÄÄÄÄÄÄÄÄÄÄÄÄÄÄÄÄÄÂÄÄÄÄÄÄÂÄÄÄÄÄÄÄÄÄÄÄÄÄÄÄÄÄÄÄÄÄÄÄÄÄÄÄÄÄÄÄÄÄÄÄBent wheel hub mounting
³ A ³ Require replacement.
surface
³ ³
ÄÄÄÄÄÄÄÄÄÄÄÄÄÄÄÄÄÄÄÄÄÄÄÄÄÄÄÅÄÄÄÄÄÄÅÄÄÄÄÄÄÄÄÄÄÄÄÄÄÄÄÄÄÄÄÄÄÄÄÄÄÄÄÄÄÄÄÄÄÄBent wheel rim, causing
³ B,2 ³ Suggest replacement.
vibration
³ ³ See caution above.
ÄÄÄÄÄÄÄÄÄÄÄÄÄÄÄÄÄÄÄÄÄÄÄÄÄÄÄÅÄÄÄÄÄÄÅÄÄÄÄÄÄÄÄÄÄÄÄÄÄÄÄÄÄÄÄÄÄÄÄÄÄÄÄÄÄÄÄÄÄÄBroken
³ A ³ Require replacement.
ÄÄÄÄÄÄÄÄÄÄÄÄÄÄÄÄÄÄÄÄÄÄÄÄÄÄÄÅÄÄÄÄÄÄÅÄÄÄÄÄÄÄÄÄÄÄÄÄÄÄÄÄÄÄÄÄÄÄÄÄÄÄÄÄÄÄÄÄÄÄCast wheel porous, causing
³ A ³ Require repair or replacement.
a leak
³ ³
ÄÄÄÄÄÄÄÄÄÄÄÄÄÄÄÄÄÄÄÄÄÄÄÄÄÄÄÅÄÄÄÄÄÄÅÄÄÄÄÄÄÄÄÄÄÄÄÄÄÄÄÄÄÄÄÄÄÄÄÄÄÄÄÄÄÄÄÄÄÄClip-on balance weight is
³ B,2 ³ Suggest replacement.
incorrect type for wheel
³ ³ rim flange
³ ³
ÄÄÄÄÄÄÄÄÄÄÄÄÄÄÄÄÄÄÄÄÄÄÄÄÄÄÄÅÄÄÄÄÄÄÅÄÄÄÄÄÄÄÄÄÄÄÄÄÄÄÄÄÄÄÄÄÄÄÄÄÄÄÄÄÄÄÄÄÄÄCorrosion, affecting
³ A ³ Require replacement.
structural integrity
³ ³
ÄÄÄÄÄÄÄÄÄÄÄÄÄÄÄÄÄÄÄÄÄÄÄÄÄÄÄÅÄÄÄÄÄÄÅÄÄÄÄÄÄÄÄÄÄÄÄÄÄÄÄÄÄÄÄÄÄÄÄÄÄÄÄÄÄÄÄÄÄÄCorrosion build-up on wheel
³ A ³ Require repair.
hub mounting surface
³ ³
ÄÄÄÄÄÄÄÄÄÄÄÄÄÄÄÄÄÄÄÄÄÄÄÄÄÄÄÅÄÄÄÄÄÄÅÄÄÄÄÄÄÄÄÄÄÄÄÄÄÄÄÄÄÄÄÄÄÄÄÄÄÄÄÄÄÄÄÄÄÄ
Page 277 of 906
* SUSPENSION UNIFORM INSPECTION GUIDELINES *
Article Text (p. 66)
1990 Volkswagen Corrado
For Volkswagen Technical Site: http://vw.belcom.ru
Copyright © 1998 Mitchell Repair Information Company, LLC
Thursday, March 23, 2000 09:39PM
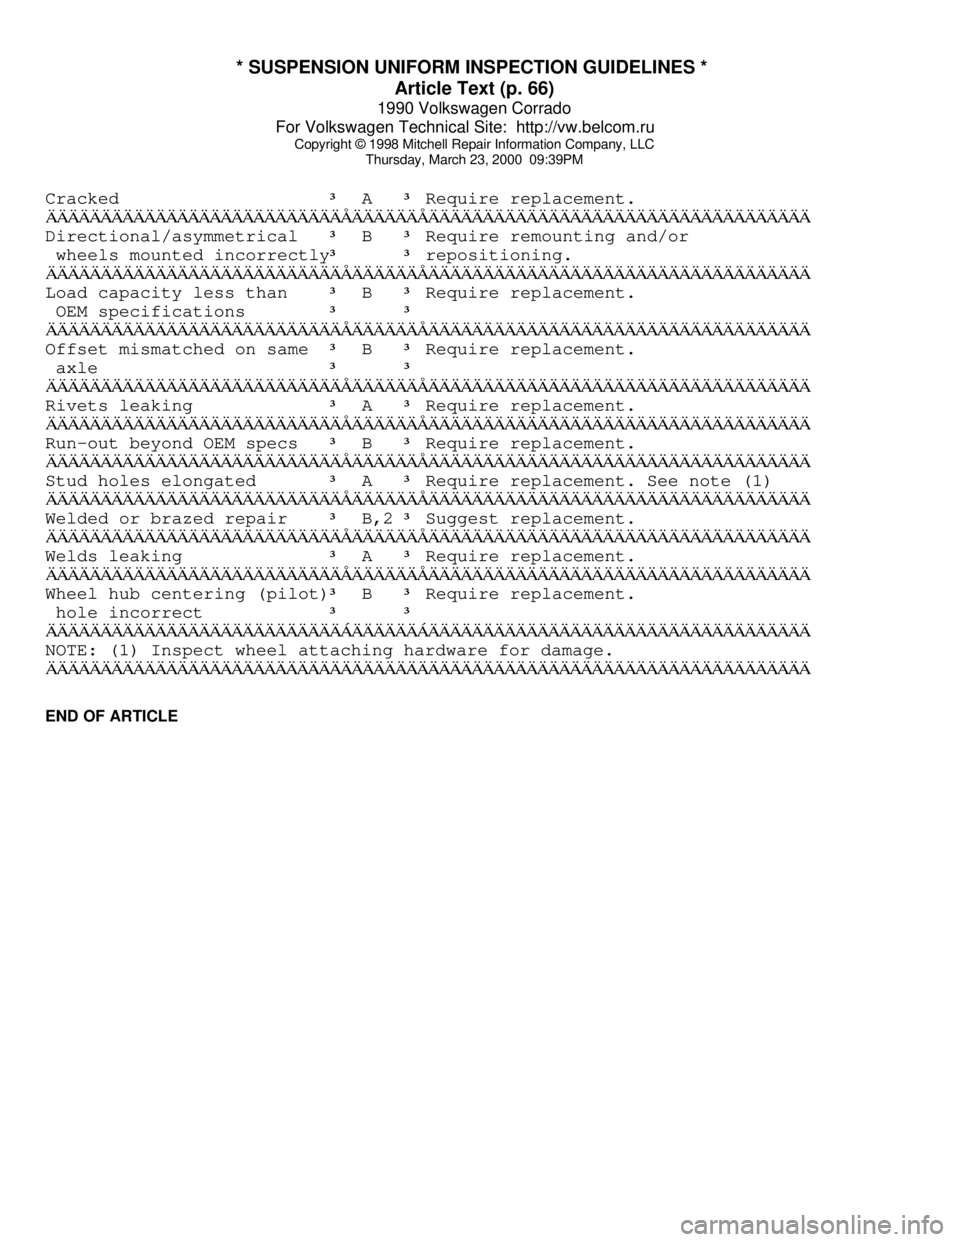
Cracked ³ A ³ Require replacement.
ÄÄÄÄÄÄÄÄÄÄÄÄÄÄÄÄÄÄÄÄÄÄÄÄÄÄÄÅÄÄÄÄÄÄÅÄÄÄÄÄÄÄÄÄÄÄÄÄÄÄÄÄÄÄÄÄÄÄÄÄÄÄÄÄÄÄÄÄÄÄDirectional/asymmetrical
³ B ³ Require remounting and/or
wheels mounted incorrectly
³ ³ repositioning.
ÄÄÄÄÄÄÄÄÄÄÄÄÄÄÄÄÄÄÄÄÄÄÄÄÄÄÄÅÄÄÄÄÄÄÅÄÄÄÄÄÄÄÄÄÄÄÄÄÄÄÄÄÄÄÄÄÄÄÄÄÄÄÄÄÄÄÄÄÄÄLoad capacity less than
³ B ³ Require replacement.
OEM specifications
³ ³
ÄÄÄÄÄÄÄÄÄÄÄÄÄÄÄÄÄÄÄÄÄÄÄÄÄÄÄÅÄÄÄÄÄÄÅÄÄÄÄÄÄÄÄÄÄÄÄÄÄÄÄÄÄÄÄÄÄÄÄÄÄÄÄÄÄÄÄÄÄÄOffset mismatched on same
³ B ³ Require replacement.
axle
³ ³
ÄÄÄÄÄÄÄÄÄÄÄÄÄÄÄÄÄÄÄÄÄÄÄÄÄÄÄÅÄÄÄÄÄÄÅÄÄÄÄÄÄÄÄÄÄÄÄÄÄÄÄÄÄÄÄÄÄÄÄÄÄÄÄÄÄÄÄÄÄÄRivets leaking
³ A ³ Require replacement.
ÄÄÄÄÄÄÄÄÄÄÄÄÄÄÄÄÄÄÄÄÄÄÄÄÄÄÄÅÄÄÄÄÄÄÅÄÄÄÄÄÄÄÄÄÄÄÄÄÄÄÄÄÄÄÄÄÄÄÄÄÄÄÄÄÄÄÄÄÄÄRun-out beyond OEM specs
³ B ³ Require replacement.
ÄÄÄÄÄÄÄÄÄÄÄÄÄÄÄÄÄÄÄÄÄÄÄÄÄÄÄÅÄÄÄÄÄÄÅÄÄÄÄÄÄÄÄÄÄÄÄÄÄÄÄÄÄÄÄÄÄÄÄÄÄÄÄÄÄÄÄÄÄÄStud holes elongated
³ A ³ Require replacement. See note (1)
ÄÄÄÄÄÄÄÄÄÄÄÄÄÄÄÄÄÄÄÄÄÄÄÄÄÄÄÅÄÄÄÄÄÄÅÄÄÄÄÄÄÄÄÄÄÄÄÄÄÄÄÄÄÄÄÄÄÄÄÄÄÄÄÄÄÄÄÄÄÄWelded or brazed repair
³ B,2 ³ Suggest replacement.
ÄÄÄÄÄÄÄÄÄÄÄÄÄÄÄÄÄÄÄÄÄÄÄÄÄÄÄÅÄÄÄÄÄÄÅÄÄÄÄÄÄÄÄÄÄÄÄÄÄÄÄÄÄÄÄÄÄÄÄÄÄÄÄÄÄÄÄÄÄÄWelds leaking
³ A ³ Require replacement.
ÄÄÄÄÄÄÄÄÄÄÄÄÄÄÄÄÄÄÄÄÄÄÄÄÄÄÄÅÄÄÄÄÄÄÅÄÄÄÄÄÄÄÄÄÄÄÄÄÄÄÄÄÄÄÄÄÄÄÄÄÄÄÄÄÄÄÄÄÄÄWheel hub centering (pilot)
³ B ³ Require replacement.
hole incorrect
³ ³
ÄÄÄÄÄÄÄÄÄÄÄÄÄÄÄÄÄÄÄÄÄÄÄÄÄÄÄÁÄÄÄÄÄÄÁÄÄÄÄÄÄÄÄÄÄÄÄÄÄÄÄÄÄÄÄÄÄÄÄÄÄÄÄÄÄÄÄÄÄÄNOTE: (1) Inspect wheel attaching hardware for damage.
ÄÄÄÄÄÄÄÄÄÄÄÄÄÄÄÄÄÄÄÄÄÄÄÄÄÄÄÄÄÄÄÄÄÄÄÄÄÄÄÄÄÄÄÄÄÄÄÄÄÄÄÄÄÄÄÄÄÄÄÄÄÄÄÄÄÄÄÄÄÄEND OF ARTICLE
Page 299 of 906
1.8L 4-CYL 8-VALVE & 1.8L 4-CYL 16-VALVE
Article Text (p. 8)
1990 Volkswagen Corrado
For Volkswagen Technical Site: http://vw.belcom.ru
Copyright © 1998 Mitchell Repair Information Company, LLC
Thursday, March 23, 2000 09:40PM
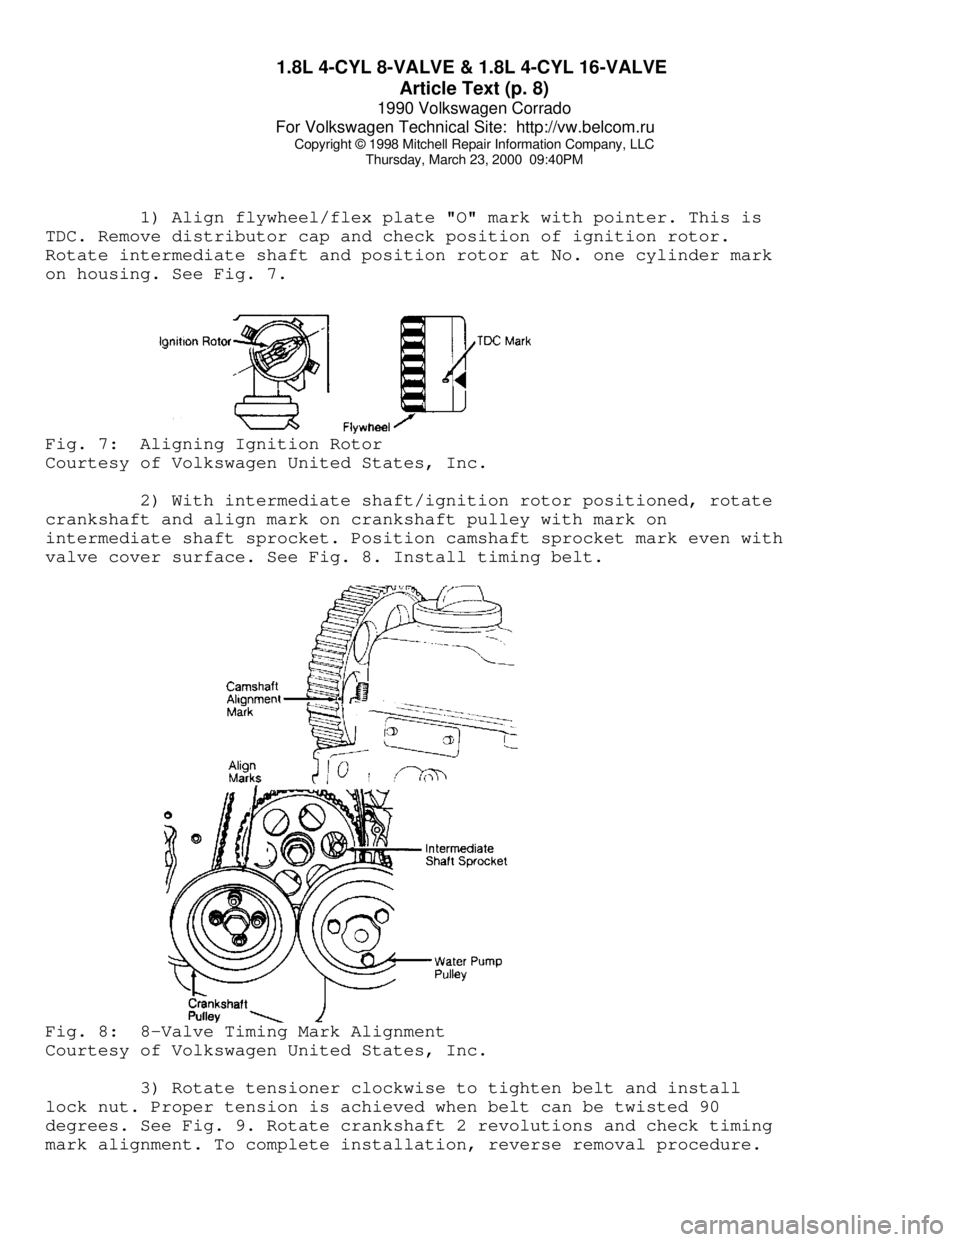
1) Align flywheel/flex plate "O" mark with pointer. This is
TDC. Remove distributor cap and check position of ignition rotor.
Rotate intermediate shaft and position rotor at No. one cylinder mark
on housing. See Fig. 7.Fig. 7: Aligning Ignition Rotor
Courtesy of Volkswagen United States, Inc.
2) With intermediate shaft/ignition rotor positioned, rotate
crankshaft and align mark on crankshaft pulley with mark on
intermediate shaft sprocket. Position camshaft sprocket mark even with
valve cover surface. See Fig. 8. Install timing belt.Fig. 8: 8-Valve Timing Mark Alignment
Courtesy of Volkswagen United States, Inc.
3) Rotate tensioner clockwise to tighten belt and install
lock nut. Proper tension is achieved when belt can be twisted 90
degrees. See Fig. 9. Rotate crankshaft 2 revolutions and check timing
mark alignment. To complete installation, reverse removal procedure.
Page 308 of 906
1.8L 4-CYL 8-VALVE & 1.8L 4-CYL 16-VALVE
Article Text (p. 17)
1990 Volkswagen Corrado
For Volkswagen Technical Site: http://vw.belcom.ru
Copyright © 1998 Mitchell Repair Information Company, LLC
Thursday, March 23, 2000 09:40PM
PISTON PIN REPLACEMENT R & I
Ensure piston and rod are properly marked. Remove both
circlips from pin bore groove. Use Piston Pin Replacer (VW 207C) to
remove and install the piston pin. If pin is too tight, heat piston to
140øF (60øC). To install, reverse removal procedure. Ensure rod is
properly positioned with piston. See Fig. 15.
CRANKSHAFT R & I
1) Using flywheel Holder (10-201), remove flywheel bolts.
Remove flywheel. Remove front and rear oil seals and covers. Remove
connecting rod bearing caps.
2) Measure crankshaft end play. See CRANKSHAFT END PLAY CHECK
in this article. Remove main bearing cap bolts. Remove main bearing
caps. Remove crankshaft. To install, reverse removal procedure.
MAIN BEARING INSTALLATION
Main bearing caps are marked with matching journal and must
be installed to original position. See Fig. 16. Thrust bearing is
located at No. 3 main bearing cap. Use Plastigage method to check
clearance. Machine or replace as necessary. See ENGINE SPECIFICATIONS
at end of this article. Tighten evenly to specifications in several
steps.
CONNECTING ROD BEARING INSTALLATION
Ensure rod caps are marked to ensure installation to original
position and location. Use Plastigage to measure bearing clearances.
Measure connecting rod side play. Replace or machine as necessary. See
ENGINE SPECIFICATIONS at end of this article. Tighten evenly to
specifications in several steps.
CRANKSHAFT END PLAY CHECK
Insert feeler gauge between No. 3 main bearing and crankshaft
thrust face to measure end play. See Fig. 16. Replace thrust bearing
as necessary. See ENGINE SPECIFICATIONS at end of this article.
Original thrust bearing uses plain shell with 4 separate washers and
replacements have attached collar.
REAR MAIN BEARING OIL SEAL R & I
Remove flywheel/flex plate and discard retaining bolts. Oil
seal may removed without removing retaining flange by prying seal out.
Remove retaining flange if gasket is leaking. See Fig. 16. If
installing without removing retaining flange, use Centering Tool
(2003/2A) to center seal and Installer (2003/1) to install seal.
Page 309 of 906
1.8L 4-CYL 8-VALVE & 1.8L 4-CYL 16-VALVE
Article Text (p. 18)
1990 Volkswagen Corrado
For Volkswagen Technical Site: http://vw.belcom.ru
Copyright © 1998 Mitchell Repair Information Company, LLC
Thursday, March 23, 2000 09:40PM
Install new flywheel bolts.
FRONT COVER OIL SEAL R & I
REMOVAL
Remove timing belt. See REMOVAL under TIMING BELT R & I in
this article. Rotate inner part of Oil Seal Extractor (2085) outward 2
turns and tighten set screw. See Fig. 11. Lubricate threaded area of
extractor and push in as far as possible. Loosen set screw and turn
inner part of extractor until oil seal is removed.
INSTALLATION
Lubricate outer edge and lip of new seal. Place guide sleeve
from Seal Installer (3083) onto crankshaft. Push oil seal over guide
sleeve. Press seal completely into position. To complete installation,
reverse removal procedure.
INTERMEDIATE SHAFT ASSEMBLY
Remove timing belt. See REMOVAL under TIMING BELT in this
article. Mark distributor assembly for installation reference and
remove distributor assembly. Check intermediate shaft end play. See
INTERMEDIATE SHAFT END PLAY SPECIFICATION table following this
paragraph. Remove intermediate shaft sprocket. Remove intermediate
shaft seal flange. Replace seal (if necessary). To install, reverse
removal procedure. See ENGINE SPECIFICATIONS at end of this article.
INTERMEDIATE SHAFT END PLAY SPECIFICATIONÄÄÄÄÄÄÄÄÄÄÄÄÄÄÄÄÄÄÄÄÄÄÄÄÄÄÄÄÄÄÄÄÄÄÄÄÄÄÄÄÄÄÄÄÄApplication In. (mm)
1.8L ........................... .010 (.25)
ÄÄÄÄÄÄÄÄÄÄÄÄÄÄÄÄÄÄÄÄÄÄÄÄÄÄÄÄÄÄÄÄÄÄÄÄÄÄÄÄÄÄÄÄÄ CYLINDER BLOCK INSPECTION
DO NOT measure cylinder block while mounted on an engine
stand. Inaccurate measurements may be achieved. Check cylinder bore
for wear, out-of-round and taper. Pistons are available in oversize.
Cylinder block bore may be machined. Check cylinder block for warpage.
See ENGINE SPECIFICATIONS at end of this article.
ENGINE OILING SYSTEM SPECIFICATIONS
CRANKCASE CAPACITY
CRANKCASE CAPACITY TABLE
ÄÄÄÄÄÄÄÄÄÄÄÄÄÄÄÄÄÄÄÄÄÄÄÄÄÄÄÄÄÄÄÄÄÄÄÄÄÄÄÄÄÄÄÄÄÄÄÄÄÄÄÄÄÄÄ With Filter Without Filter
Page 312 of 906
1.8L 4-CYL 8-VALVE & 1.8L 4-CYL 16-VALVE
Article Text (p. 21)
1990 Volkswagen Corrado
For Volkswagen Technical Site: http://vw.belcom.ru
Copyright © 1998 Mitchell Repair Information Company, LLC
Thursday, March 23, 2000 09:40PM
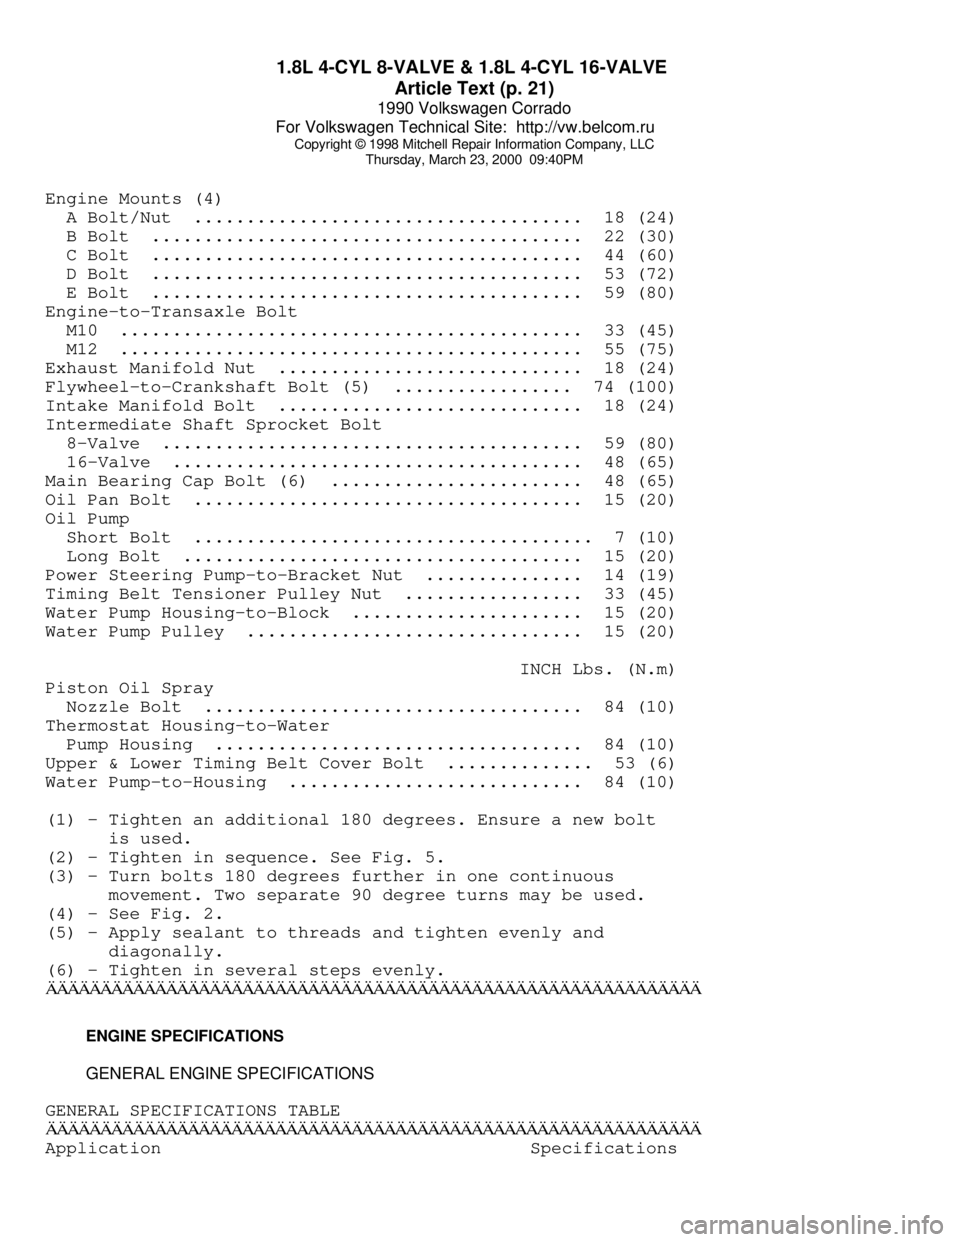
Engine Mounts (4)
A Bolt/Nut ..................................... 18 (24)
B Bolt ......................................... 22 (30)
C Bolt ......................................... 44 (60)
D Bolt ......................................... 53 (72)
E Bolt ......................................... 59 (80)
Engine-to-Transaxle Bolt
M10 ............................................ 33 (45)
M12 ............................................ 55 (75)
Exhaust Manifold Nut ............................. 18 (24)
Flywheel-to-Crankshaft Bolt (5) ................. 74 (100)
Intake Manifold Bolt ............................. 18 (24)
Intermediate Shaft Sprocket Bolt
8-Valve ........................................ 59 (80)
16-Valve ....................................... 48 (65)
Main Bearing Cap Bolt (6) ........................ 48 (65)
Oil Pan Bolt ..................................... 15 (20)
Oil Pump
Short Bolt ...................................... 7 (10)
Long Bolt ...................................... 15 (20)
Power Steering Pump-to-Bracket Nut ............... 14 (19)
Timing Belt Tensioner Pulley Nut ................. 33 (45)
Water Pump Housing-to-Block ...................... 15 (20)
Water Pump Pulley ................................ 15 (20)
INCH Lbs. (N.m)
Piston Oil Spray
Nozzle Bolt .................................... 84 (10)
Thermostat Housing-to-Water
Pump Housing ................................... 84 (10)
Upper & Lower Timing Belt Cover Bolt .............. 53 (6)
Water Pump-to-Housing ............................ 84 (10)
(1) - Tighten an additional 180 degrees. Ensure a new bolt
is used.
(2) - Tighten in sequence. See Fig. 5.
(3) - Turn bolts 180 degrees further in one continuous
movement. Two separate 90 degree turns may be used.
(4) - See Fig. 2.
(5) - Apply sealant to threads and tighten evenly and
diagonally.
(6) - Tighten in several steps evenly.ÄÄÄÄÄÄÄÄÄÄÄÄÄÄÄÄÄÄÄÄÄÄÄÄÄÄÄÄÄÄÄÄÄÄÄÄÄÄÄÄÄÄÄÄÄÄÄÄÄÄÄÄÄÄÄÄÄÄÄÄ ENGINE SPECIFICATIONS
GENERAL ENGINE SPECIFICATIONS
GENERAL SPECIFICATIONS TABLE
ÄÄÄÄÄÄÄÄÄÄÄÄÄÄÄÄÄÄÄÄÄÄÄÄÄÄÄÄÄÄÄÄÄÄÄÄÄÄÄÄÄÄÄÄÄÄÄÄÄÄÄÄÄÄÄÄÄÄÄÄApplication Specifications
Page 331 of 906

A/C COMPRESSOR SERVICING
Article Text (p. 5)
1990 Volkswagen Corrado
For Volkswagen Technical Site: http://vw.belcom.ru
Copyright © 1998 Mitchell Repair Information Company, LLC
Thursday, March 23, 2000 09:41PM
Install and tighten coil mounting screws to 35-52 INCH lbs. (4-6 N.m).
2) Press pulley assembly onto neck of coil assembly using
Pulley Installer (KV99234160). Wipe oil thoroughly off clutch surface.
Select adjusting shims which give correct clearance between pulley and
clutch disc.
3) Using a plastic mallet, tap clutch disc in place on drive
shaft. Do not use excessive force with plastic mallet or press. Place
spring washer and center bolt onto drive shaft. Tighten center bolt to
drive clutch wheel onto drive shaft. Tighten center bolt to 11-13 ft.
lbs. (15-18 N.m).
4) Hold clutch with Clutch Holder (KV99231010). Check
clearance around entire outer edge of clutch disc. Clearance should be
.012-.024" (.3-.6 mm). If specified clearance is not obtained, replace
adjusting shims as required.
5) When replacing compressor clutch assembly, break-in
procedure must be performed. This is accomplished by engaging and
disengaging clutch 30 times.
DIESEL KIKI 6-CYL CLUTCH COIL R & I
Removal & Installation
Using clutch holder to prevent clutch disc rotation, remove
bolt. Using clutch holder and puller, remove clutch disc. Remove shims
from compressor drive shaft or clutch disc. Remove snap ring with
external snap ring pliers and then remove pulley. Using a gear puller,
remove pulley. Remove coil lead wire and 6 screws. Remove coil. To
install, reverse removal procedure. Adjust clutch disc-to-pulley
clearance to .010-.020" (.3-.6 mm). See Fig. 4.Fig. 3: Diesel Kiki Rotary Vane Compressor
Courtesy of Nissan Motor Co., U.S.A.
Page 361 of 906

A/C-HEATER SYSTEM - MANUAL
Article Text (p. 4)
1990 Volkswagen Corrado
For Volkswagen Technical Site: http://vw.belcom.ru
Copyright © 1998 Mitchell Repair Information Company, LLC
Thursday, March 23, 2000 09:41PMFig. 3: Exploded View of Manual A/C-Heater System Components (Fox
& Fox Wagon)
Courtesy of Volkswagen United States, Inc.
SERVICING PRECAUTIONS
WARNING: Cabriolet is equipped with a driver's side air bag. Air bag
equipped vehicles have AIRBAG stamped on the steering wheel
horn pad. The air bag system capacitor maintains a voltage
charge sufficient to cause air bag deployment for up to 20
MINUTES after ignition switch is turned off and battery is
disconnected.
AIR BAG DEACTIVATION - CABRIOLET
Disabling System
Ensure ignition switch is OFF. Disconnect negative battery
cable and insulate terminal. Wait at least 20 MINUTES before servicing
vehicle.
System Functional Check
When all service work is completed, reconnect negative
battery cable. Turn ignition on. Ensure LEFT air bag indicator light
(above air bag symbol) comes on for about 5 seconds and then goes out.
If left air bag indicator light does not operate as indicated, air bag
system needs to be serviced.
ADJUSTMENTS
Page 382 of 906
ABBREVIATIONS
Article Text (p. 5)
1990 Volkswagen Corrado
For Volkswagen Technical Site: http://vw.belcom.ru
Copyright © 1998 Mitchell Repair Information Company, LLC
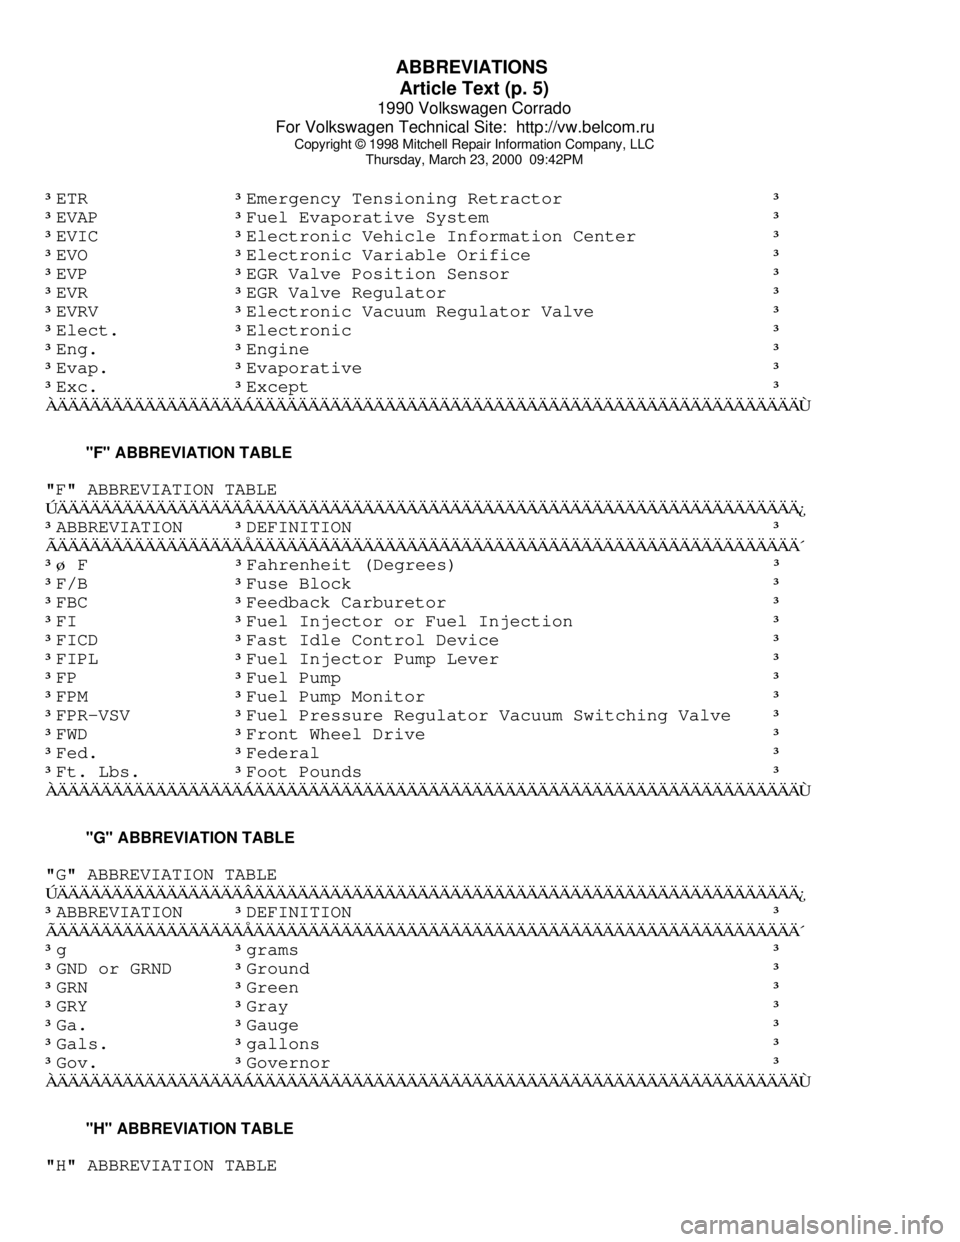
Thursday, March 23, 2000 09:42PM³ETR ³Emergency Tensioning Retractor ³
³EVAP
³Fuel Evaporative System ³
³EVIC
³Electronic Vehicle Information Center ³
³EVO
³Electronic Variable Orifice ³
³EVP
³EGR Valve Position Sensor ³
³EVR
³EGR Valve Regulator ³
³EVRV
³Electronic Vacuum Regulator Valve ³
³Elect.
³Electronic ³
³Eng.
³Engine ³
³Evap.
³Evaporative ³
³Exc.
³Except ³
ÀÄÄÄÄÄÄÄÄÄÄÄÄÄÄÄÄÄÁÄÄÄÄÄÄÄÄÄÄÄÄÄÄÄÄÄÄÄÄÄÄÄÄÄÄÄÄÄÄÄÄÄÄÄÄÄÄÄÄÄÄÄÄÄÄÄÄÄÄÙ "F" ABBREVIATION TABLE
"F" ABBREVIATION TABLE
ÚÄÄÄÄÄÄÄÄÄÄÄÄÄÄÄÄÄÂÄÄÄÄÄÄÄÄÄÄÄÄÄÄÄÄÄÄÄÄÄÄÄÄÄÄÄÄÄÄÄÄÄÄÄÄÄÄÄÄÄÄÄÄÄÄÄÄÄÄ¿
³ABBREVIATION
³DEFINITION ³
ÃÄÄÄÄÄÄÄÄÄÄÄÄÄÄÄÄÄÅÄÄÄÄÄÄÄÄÄÄÄÄÄÄÄÄÄÄÄÄÄÄÄÄÄÄÄÄÄÄÄÄÄÄÄÄÄÄÄÄÄÄÄÄÄÄÄÄÄÄ´
³ø F
³Fahrenheit (Degrees) ³
³F/B
³Fuse Block ³
³FBC
³Feedback Carburetor ³
³FI
³Fuel Injector or Fuel Injection ³
³FICD
³Fast Idle Control Device ³
³FIPL
³Fuel Injector Pump Lever ³
³FP
³Fuel Pump ³
³FPM
³Fuel Pump Monitor ³
³FPR-VSV
³Fuel Pressure Regulator Vacuum Switching Valve ³
³FWD
³Front Wheel Drive ³
³Fed.
³Federal ³
³Ft. Lbs.
³Foot Pounds ³
ÀÄÄÄÄÄÄÄÄÄÄÄÄÄÄÄÄÄÁÄÄÄÄÄÄÄÄÄÄÄÄÄÄÄÄÄÄÄÄÄÄÄÄÄÄÄÄÄÄÄÄÄÄÄÄÄÄÄÄÄÄÄÄÄÄÄÄÄÄÙ "G" ABBREVIATION TABLE
"G" ABBREVIATION TABLE
ÚÄÄÄÄÄÄÄÄÄÄÄÄÄÄÄÄÄÂÄÄÄÄÄÄÄÄÄÄÄÄÄÄÄÄÄÄÄÄÄÄÄÄÄÄÄÄÄÄÄÄÄÄÄÄÄÄÄÄÄÄÄÄÄÄÄÄÄÄ¿
³ABBREVIATION
³DEFINITION ³
ÃÄÄÄÄÄÄÄÄÄÄÄÄÄÄÄÄÄÅÄÄÄÄÄÄÄÄÄÄÄÄÄÄÄÄÄÄÄÄÄÄÄÄÄÄÄÄÄÄÄÄÄÄÄÄÄÄÄÄÄÄÄÄÄÄÄÄÄÄ´
³g
³grams ³
³GND or GRND
³Ground ³
³GRN
³Green ³
³GRY
³Gray ³
³Ga.
³Gauge ³
³Gals.
³gallons ³
³Gov.
³Governor ³
ÀÄÄÄÄÄÄÄÄÄÄÄÄÄÄÄÄÄÁÄÄÄÄÄÄÄÄÄÄÄÄÄÄÄÄÄÄÄÄÄÄÄÄÄÄÄÄÄÄÄÄÄÄÄÄÄÄÄÄÄÄÄÄÄÄÄÄÄÄÙ "H" ABBREVIATION TABLE
"H" ABBREVIATION TABLE