VOLKSWAGEN JETTA 2009 Owners Manual
Manufacturer: VOLKSWAGEN, Model Year: 2009, Model line: JETTA, Model: VOLKSWAGEN JETTA 2009Pages: 477, PDF Size: 77.6 MB
Page 431 of 477
Booklet 3.3 Technical Data
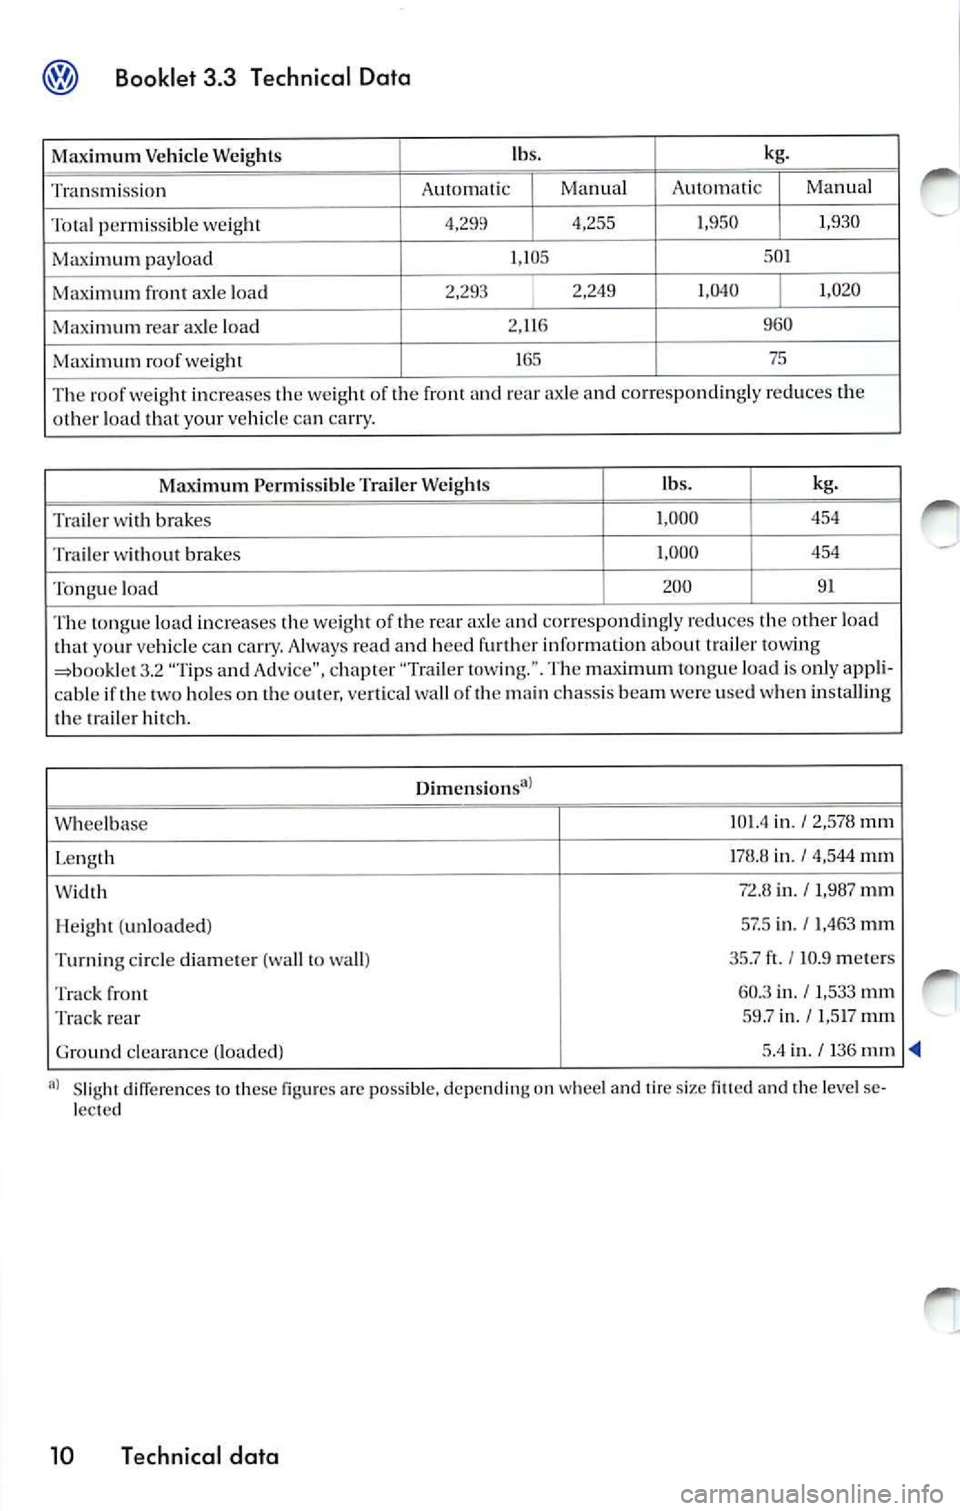
Maximum Vehicl e Weight s lb
s. kg.
Tra nsm iss ion A
utomatic
I Ma nua l A
utom atic I Manua l
Tota l p ermi ssibl e weig ht
I 4,255 1
,950 I 1 ,930
Maxim um payload 1,105
50
1
Maximum front axle load 2,293
2,249
1,040
I 1,020
Maxi mum re a r ax le load 2,
116 960
Maximum roof weight 1
65 75
Th e roof weig ht in creases the we igh t of t he front and
axle and correspo ndingly red uces th e
ot her th at yo ur veh icle can car ry.
Maxim um Permissible Trailer Weig hts lb
s. kg.
Trailer with brakes 1,0
00 454
Tra iler w itho ut brakes 1.
000 454
Tongu e load 200
91
Th e tong ue load increa ses the we ight of th e rear axle and correspon dingly reduces the ot her load
th at yo ur vehicl e can carry. Always rea d and heed fu rther information about trailer towing
3.2 " Tips and Adv ice", chapter "Trai le r tow ing.". The maxi mum tongue loa d is o nly app li-
cab le if th e two holes o n th e out er, ve rtical wall of the mai n ch assis beam were use d when in sta lling
th e tra iler hi tc h.
W hee lbase 1
0 1.4 in ./ 2,578111111
Le ngt h 1
78 .8 in .
I 4,544 mm
W idth
in . / !,9 87 mm
H eig ht (unloaded ) 57.5
in.
I 1.463 mm
T urni ng ci rcle diame te r (wall to wall ) 35.7 ft.
I 10.9 me
te rs
Tra ck front 60.3
in./ I,533111111
Track re ar 59.7
in.
I 1,517 111111
Grou nd clearance (loaded) 5.4
in.
I 136 111111
Slight diff erences th ese arc possible , depending on whee l and tire size and the leve l se
lect ed
10 Technical data
Page 432 of 477
Afterword
Volkswage n works con tinuou sly to de velop and
improve its products. We must therefo re reserve
the right to change any part of the vehicle, it s
equipment or technica l s p ecificat ions at any
t im e. No lega l co mmitm ent can therefore be de
rived from th e information , illu stratio ns or de
sc riptions in thi s manual.
The t exts, illustrations an d s ta nd ards in thi s
m an ual a re based on the informat ion availab le
at the tim e of p ublication.
No part of thi s manua l may be reprin ted , repro
duced or tran slated withou t th e wr itten p ermi s
s ion o f Vo lkswage n de Mexico . A
ll right s under the copyr ig ht la ws are expre ssly
reserved by Volksw agen de Mexico. Sub ject to
al te ra-tion and amendment .
Pri nted in Mexico
© Volkswagen de Mexico, SA. de C.V.
For the sake of environment
This paper was ble ached without the use of chl o
rin e.
Page 433 of 477

3.3 Technical Data I Jetta
Print status: 04.2005
Art.-Nr.: 261.551.JK T.21
I englisch Nordamerika 05.2005
Page 434 of 477
Premium Sound
System
J e tta
Page 435 of 477
About this booklet
This booklet contains important informati on,
tip s, sugges tions and warning s o n using your ve
hicle . Th e other booklets in th e Owner's Litera
tur e contain more informati on that you should
be aware of for your own safety and for th e safe ty
of your passenger s.
Make sure that you alwa ys kee p the compl ete
Owner 's Literature in the vehicle. Thi s is espe
ciall y important when you lend or sell the ve
hicle.
This manual describes the vehicle equipment at
the time of publicat ion. The content s of this
booklet correspond to the equi pment options
on your vehicle.
Illustratio ns ma y vary from your vehicle. For
this r ea so n you sh ou ld regard illustration s as a
gene ral guide.
At the beginning of
bookle t, you will find a
tab le of con tents sho win g all the item s de
sc ribed in thi s manua l in the ord er th ey appear.
An alphabetical index is at the end of the
bookl et.
Directions and posit ions (for example ri ght , le ft,
front, rear) ar e always relative
10 the direction of
tra vel of the vehicle unl ess stated otherw ise .
So me section s of thi s book let do not appl y
to all
vehicles. If this is the case, a texl at the b eginnin g
of the section indicates which vehicle s it appli es
to , for examp le "Applies to
Models onl y".
Th e section is cont inued on th e nex t p age.
Indicat es the end of a sect ion .
® Reg is tered trad emar ks are mark ed or®.
H owever, t he ab senc e of thi s symbol does
1101 con stitute a waiver of the right s co n
cern ing any te rm.
Cross- re fere nce to a "WARN IN G" within
or ou ts id e of a sec tion.
Cross-refe re nce to a within or side of a sec tion.
W AR NIN G
Tex ts with this symbo l contain impo rtant in
formation on safety and how to reduce t he risk
of persona l injury or death.
No te
Tex ts w ith this sy mbol draw yo ur attent ion to
po tent ial source s of dam age to your vehicl e.
Fo r th e sake of environ men t
with this symbol contain informa tion env ironm ent and how you can he lp
prot ect it.
Tip s
symbol special tips and
o th er inform ation abo ut getting the most out of
your veh icle and its fe ature s.
Page 436 of 477
Booklet 3.4 Premium Sound System
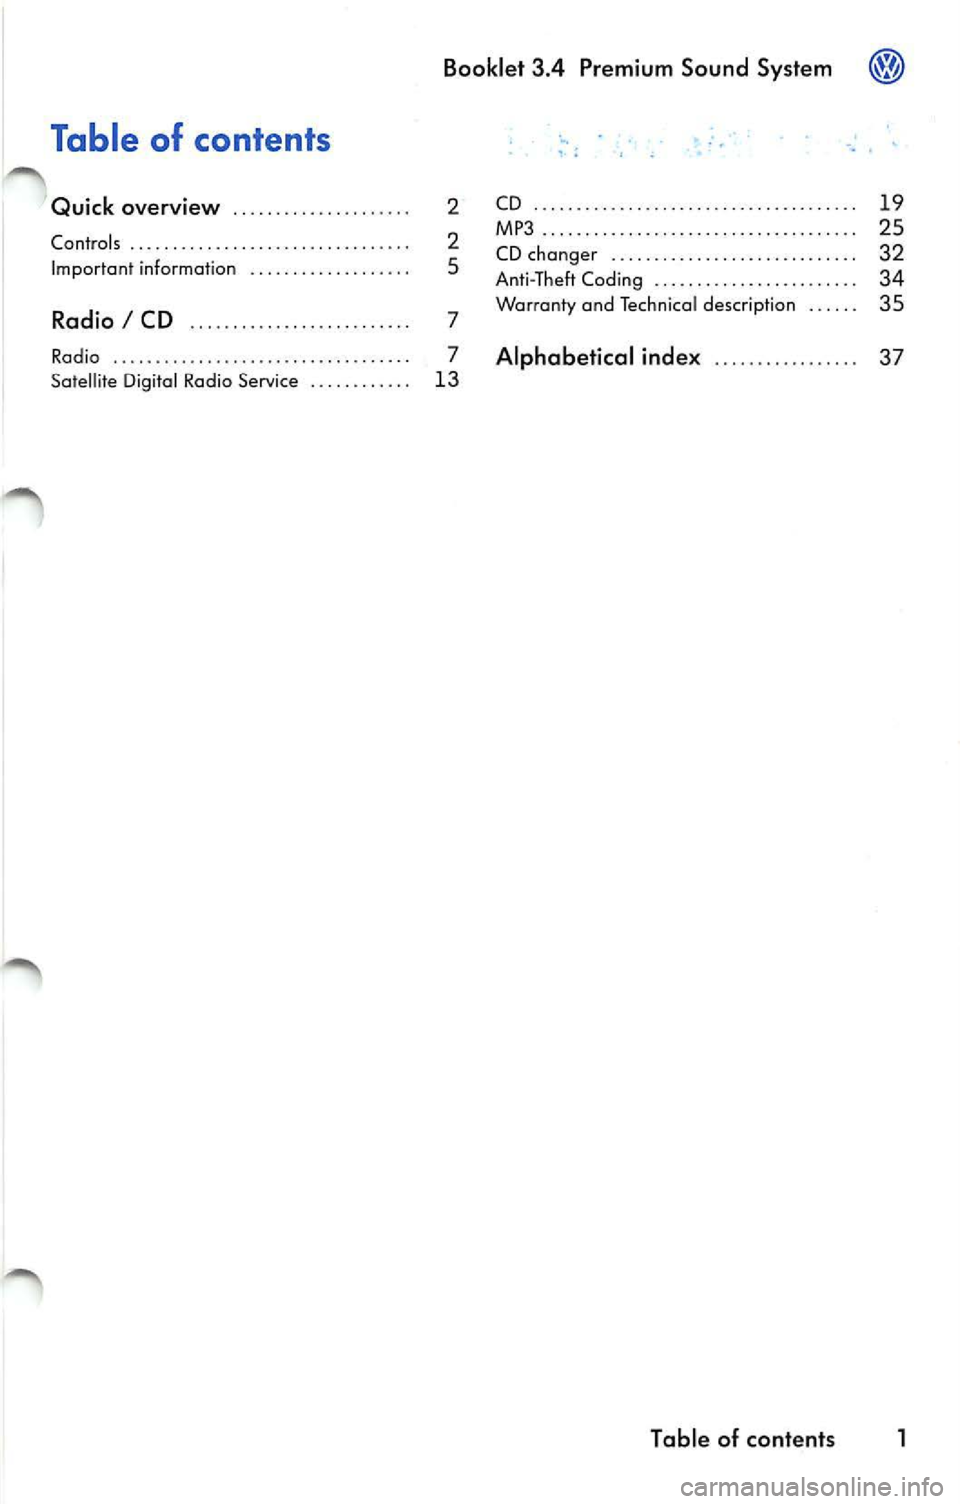
Table of contents
Quick overview . . . . . . . . . . . . . . . .. . . . . 2
Contro ls .. . . . .. . . . .. . . .. .. . . . .. . . . . . . . . .. 2
Imp ort an t information . . . . . . . . . . . . . . . . . . . 5
Radio I CD ...... .......... ... .. ... .. 7
Radio .. . .. .. . . . . .. . . .. . .. .. .. .. .. . . . . . .. 7
Satell ite Digita l Rad io Serv ice . . . . . . . . . . . . 13 CD
.. .... .. .. .... .... .. ... .... ... .. .. ... . 1 9
MP3......... ....... .. .... ..... ..... .. ... 25
CD ch anger . . . . . . . . . . . . . . . . . . . . . . . . . . . . . 32
A nti- T heft Codi ng . . . . . . . . . . . . . . . . . . . . . . . . 34
Warranty and Te ch nical des crip tion . . . . . . 35
Alphabetical inde x .. . . . . . . . . . . . .. .. 37
Tabl e of cont ents 1
Page 437 of 477
Booklet 3.4 Premium Sound System
Quick overview
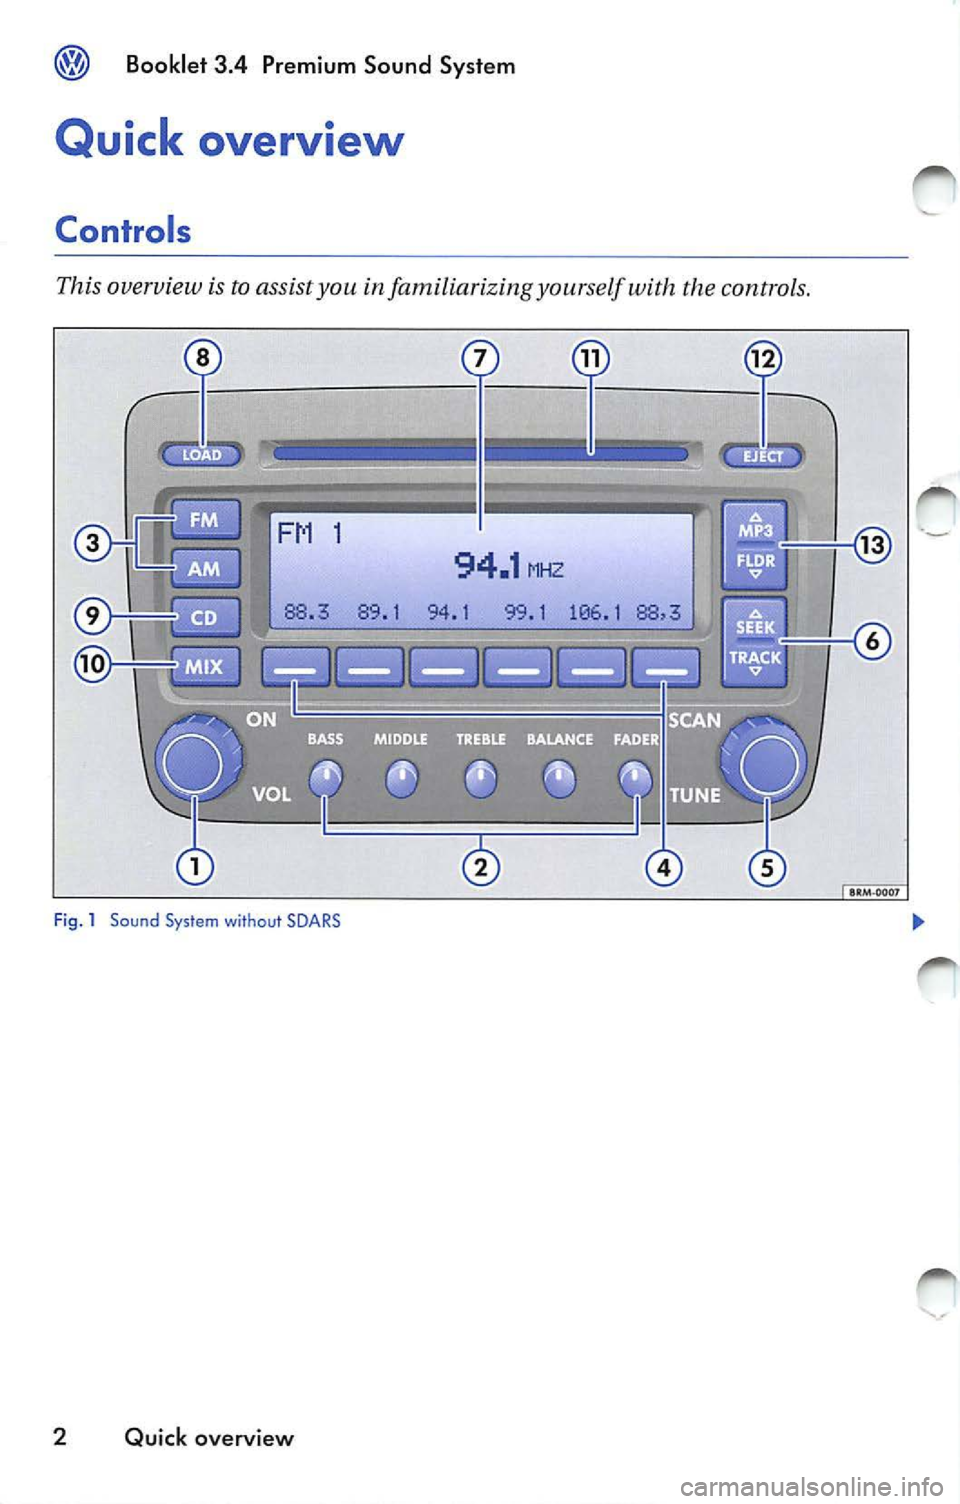
Controls
This overview is to assist you in familiarizing yourself with the controls.
·-
94.1 MHZ
94.1 99.1 106 .1
Fig . 1 Sound Sys tem without SOARS
2 Quick overview
Page 438 of 477
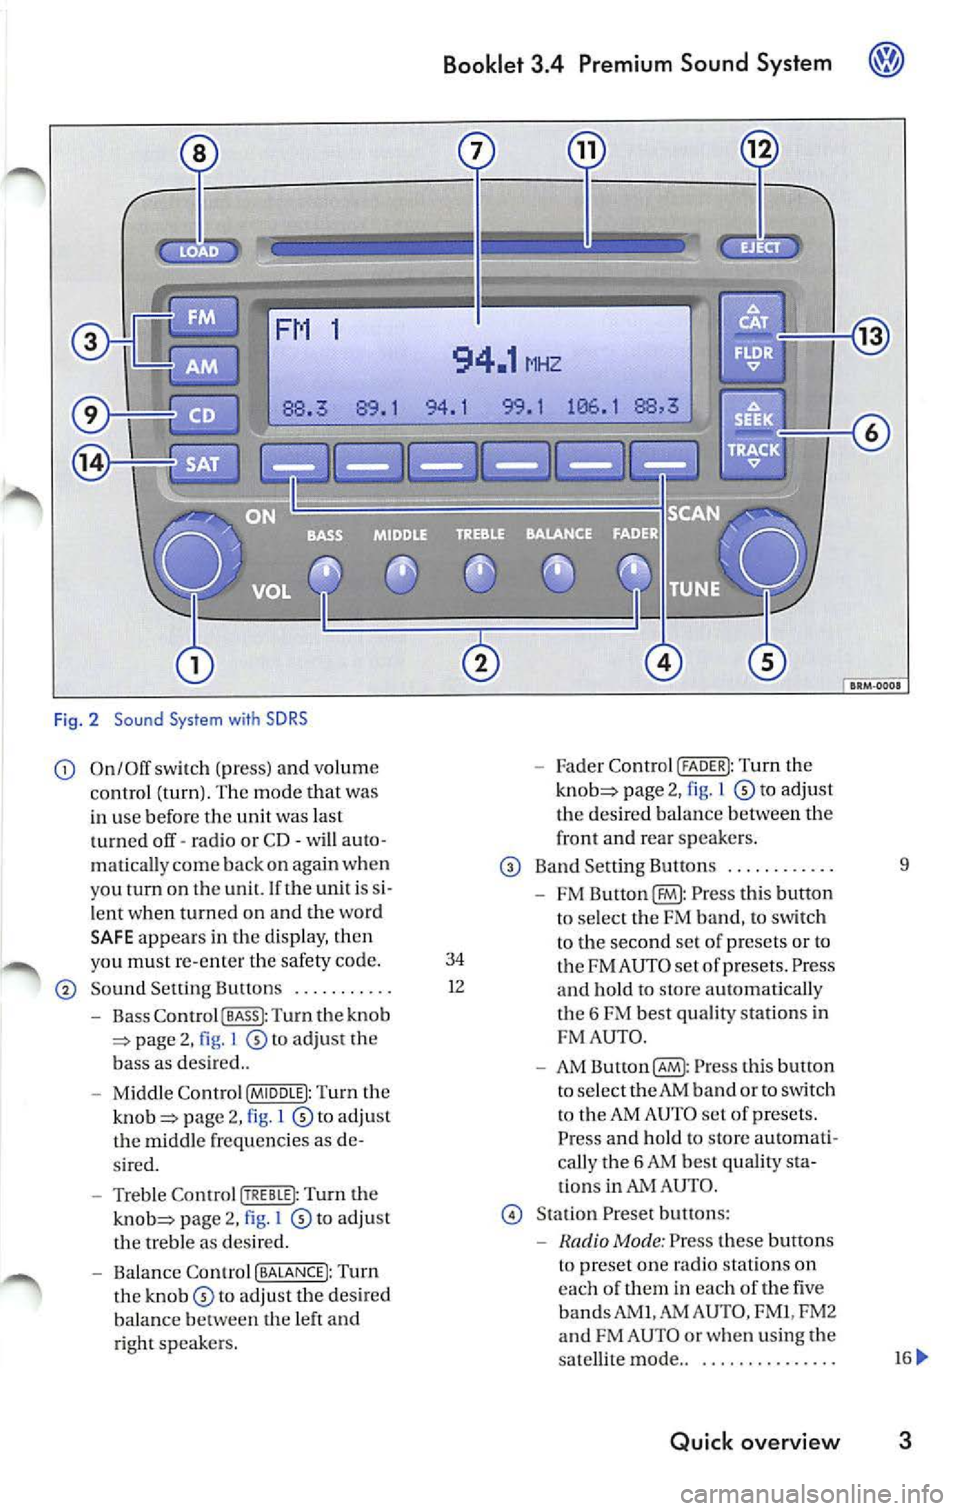
Fig . 2 Sound System with SDRS
On/Off switch (pr ess) and volume Fader Control (FADER I: Tu rn the
c ontrol (turn ). The mode that was page 2, 1 to adjust
in use befor e the unit was last th
e des ired balan ce betwee n the
t urned off· ra dio or CD· will auto · front and
rear sp eake rs .
matica lly c om e back on aga in when
Band Sett ing Button s .... ..... ... 9
you tu rn on th e un it. If th e unit i s
FM Press thi s butto n
l e nt when turn ed on and the wo rd
to se lec t the FM band, to sw itch
SA FE appear s in the d is pla y, th en
to the second set of p rese ts or to
yo u must re-en ter the safety code. 34 FM AU TO set of prese ts . Press So und Setting Bultons ........... 1
2
and hold to sLOre automati cal ly
Bass Co ntro l I BASS I: Turn the knob t
h e 6 FM best quality station s in page 2, I to adjust the FM
AUT O.
b ass as des ired ..
AM Button(§ : Pr ess this bulton
Mi ddle Contr ol (MIDDLE I: Turn the to
select the AM band or to switch page 2, l to adju st t
o the AM AUTO set of presets.
t h e m id dle frequ enci es as Press and hold to store automati-
s ir ed . call
y the 6 AM bes t quality
Treble Control Turn the ti
ons in AUTO .
page 2, I to adj ust Stat ion Preset butt ons:
th e treble as des ired.
Mode : Press these buttons
Balance Contro l (BALANCE!: Turn t
o pre set on e radio statio ns on
th e to adjust the desired eac
h of th em in eac h of the five
balance th e left and bands AM
I.AM AUTO , FM I, FM2
ri ght sp eake rs. and
FM AUTO or whe n using the
sa tellit e mode ..
............. ..
Quick overview 3
Page 439 of 477
Booklet 3.4 Premium Sound System
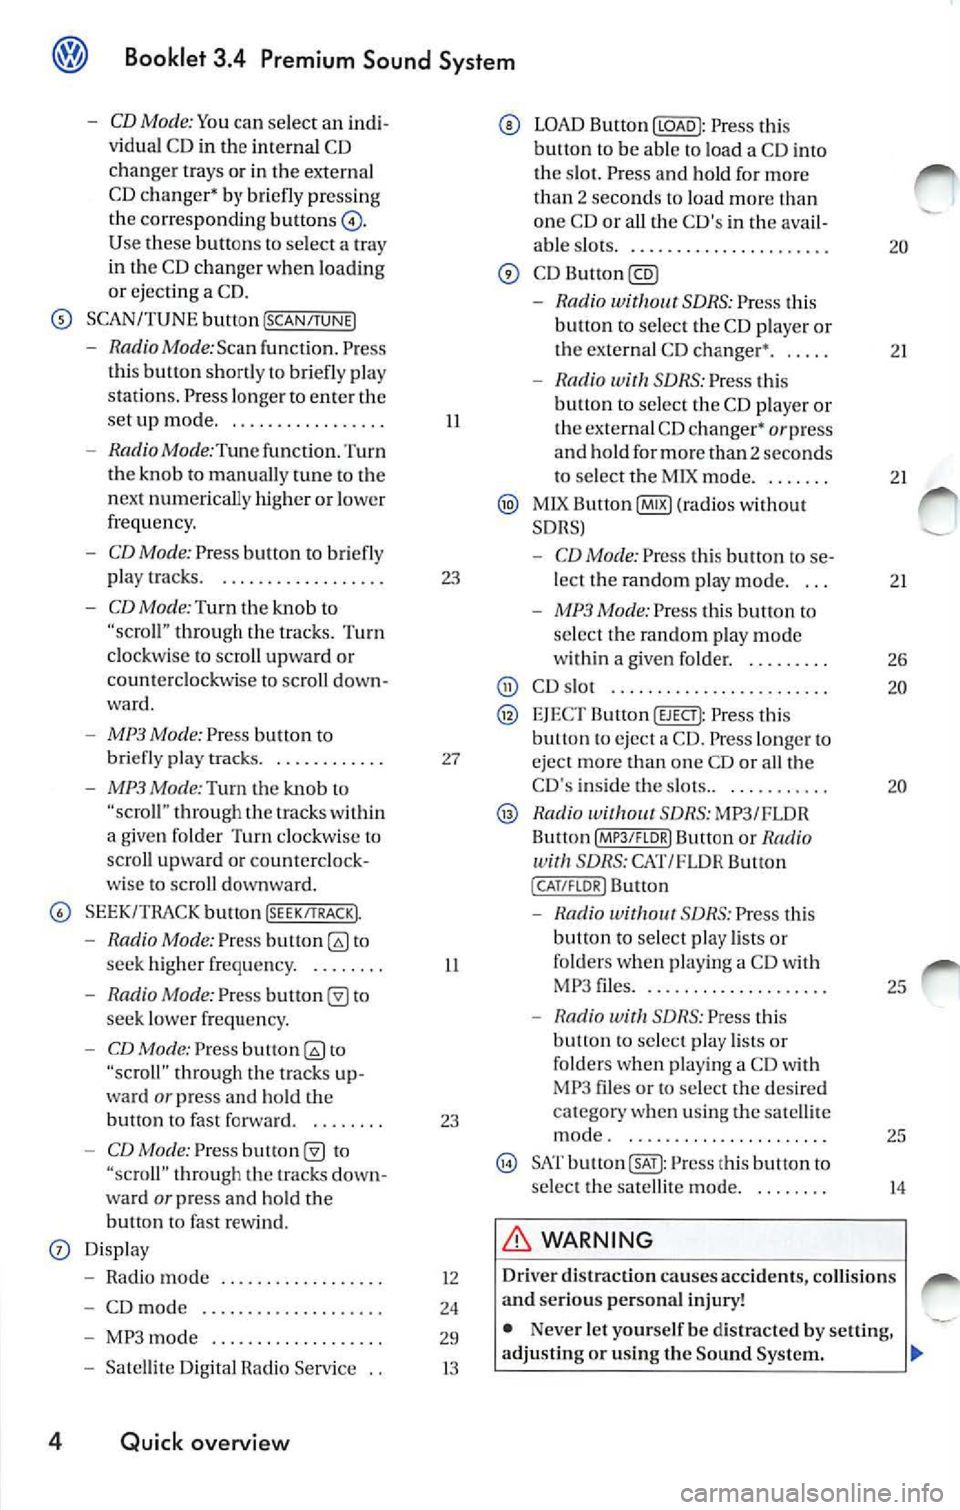
-CD Mode: Yo u can select an indi
v idu al C D in the internal CD
chan ger trays or in the externa l
CD c hang er•
briefl y pre ssing
the corre spondin g button s
Use buttons to select a tray
in th e C D chan ger when loading
or ejecting a CD.
SCAN/TUNE button [SCAN/TUNEJ
- RadioMode:Scan func tion. Press
th is button shortly to briefly pla y
st ations . Pre ss longe r to ent er the
se tup mode ...... ... ... ..... .
- Radio Mode :Tune function. Turn
the knob to manually tune to the
n ex t numerically higher or lowe r
frequency.
- CD Mode: Press button to briefly
play tracks. . .... ...... ...... .
-CD Mode: Turn th e kno b to through the trac ks. Turn
clockwise to scro ll upward or
coun te rclockwise to sc roll down
ward .
-MP3 Mode: Press button to
briefly pla y tra cks. . .......... .
- MP3 Mode:Turn the knob "scro ll" thro ugh the within
a give n folder Turn clockw ise lo
scro ll upwa rd or counterclock
wise to scroll downward.
SEEK/TRACK bu tton !SEEK/TRACK).
-Radio Mode: Press to
seek high er freque ncy. . ...... .
- Radio Mode: Pres s to
seek lower frequ en cy.
- CD Mode: Press to
"scroll" through the tracks up
ward
or press and hold the
bullon fast forward. . ...... .
-CD Mode: Press "scroll" t hrough tracks down
wa rd or press and ho ld the
button fast rew ind.
Displ ay
- Radio mode ..... ..... ..... .. .
- CD mod e .. ....... .......... .
- MP3 mode .......... ........ .
- Satelli te Di git al Radio Service ..
4 Quick overview
II
23
27
II
23
12
24
29
13
LOAD Button Press this
button to be able load a CD i nto
tl1 e s lot. Press a nd hold fo r mo re
th an
2 sec ond s to load more one CD or all the C D's in th e ava il-
able s lots .. ......... ....... .... .
-Rad io SDRS : Press t his
button to select the CD playe r or
the externa l CD changer •. . ....
- Radio SDRS : Press this
b utt on to selec t th e CD playe r o r
the external CD changer•
or press
and hold for more than 2 seconds
to select tl1e M IX mode ...... . .
MlX Button@IB) (ra dios wi thout
SDRS)
- CD Mode: Pres s thi s butt on to se
lect the random p lay mode. . ..
- MP3 Mode: Press this button to
se lec t the random play mode
w ith in a given folder. . ...... . .
CD s lot .... ............... ... ..
EJEC T Button (EJECT): Press this eject a CD . Press lo nger eject more than one CD or all th e
CD 's inside the slots.. . .. ....... .
Radio SDRS: MP3/FLOR
Bu llon Butt on or Radio SDRS: CAT/FL OR Button
( CAT /FLOR I Button
-S DRS : Press thi s
button to select play lists or
folde rs w hen p lay ing a CD wit h
MP 3 files .... ..... ........... .
- Radio with SDRS: Press this
button to select play lists o r
fo lders w hen pl aying a CD with
MP3 files or to select the de sir ed
c at egory when using the satell ite
mode . ... ... ..... .......... .
SAT Press this button to
s elect the satellit e mode.
WARNING
20
21
2 1
2 1
26
20
20
25
25
14
Driv er di straction causes accidents , collision s
a nd serious personal injury!
• Nev er let yourse lf be distra cted by setting,
adjusting or using the Sound System .
Page 440 of 477
Booklet 3.4 P remi um Sound System
.0, WARNING (conti nued )
• Us e the Sound System only if road , traffic
an d weath er cond itions permit and you will
not be distracted from your driving.
Important information
Operating the Sound System while driving
D rivi ng on today 's road s demands th e full atten
ti o n of the driver.
The w ide range of sophisti cate d eq uipm ent de
tail s of modern car radio s offer not onl y a vas t
so urce of entertainmen t, but also import ant in
form ation reg arding t raffic updates, road condi
t ions, wea ther repo rts. etc.
Bu t re mem ber, you should onl y operate the
ra di o system wit h its num erous fe atures when
th e traffic situ atio n rea lly
in "Con
tro ls" on page 2.
For examp le, c hangin g CDs o r re ading song t i
tl es on a CD case or in th e rad io display when
drivi ng is o ften the ca use of aut o acc idents .
You s hould also set th e vo lume of your radio
sys tem so that yo u ca n h ear s ig n als from other
dr iv ers at a ny tim e.
Convenience radio coding For tec hn ical reason s. the conve nience radio
c oding is not ava ila bl e for all vehicle models.
In the past, it used to be tha t yo u had to manu
a lly recode t he radio wheneve r th e uni t was re
m oved from the ve hicle (for example, if th e unit
was removed to be repaired). or whenever the
veh icle battery was disco nnected (for examp le,
if yo u brou ght yo ur v ehicl e in to t he deale rship
for service a nd it was necessary to dis con nect
t he bauery). In eith er case , the power sup ply to
th e unit was cut off.
T hat has all ch anged w ith the new conven ie n ce
radio cod ing f un cti on: Once t he co de number
ha s bee n ent ered. it
will th en sy nchro nize itse lf
w ith "its" vehicl e!
.0, WARNING (co ntinu ed)
• Always set volume leve ls so that you can
clearly hear horns , si rens and oth er warning
sounds outside the vehicle .
If the power supp ly has been interrupted , the
radio will automa tically c hec k to see if it i s s till in
vehicle after the ignition has been switched
on . If this hap pen, th e radio will be ready for use
af ter just a few seconds.
It is th erefo re no longer necessary to d isengage
th e e lect ronic lock manuall y!
If t11e rad io ha s been in s ra ile d in anot her ve hicl e,
how ever, the electronic lock ha ve to be dis
engaged manually.
If
SAFE ap pea rs i n the disp lay a fter switchin g the
rad io on , it can then only be operated aga in afte r
entering tJ1e co rrect code
=> pa ge 34.
External CD changer1l
You also have the option of installin g a Ge nuine
Vo lkswagen CD Changer. Ask your authoriz ed
Vo lkswagen dealer about thi s optio n.
The CD change r is in stalle d in the front armres t
co mp artment. It is "re mote controlled" by th e
radio unit.
It allow s you ro load up to 6 CDs. See => page 32 for furt her information.
Vo lkswage n dea ler s have a ll the informa tion
conce rning in stallin g th e CD c hange r.
Tip s
• Please note tha t it em s marked with an as
t e ri sk(*) may be standard on ce rtain m odels , op
tional on otJ1 ers or no t ava ilabl e on yo ur model.
Always ch eck with your authorized Volkswage n
deale r to see if the feat ure or item ap plies to your
mod el.
• The radio code numb er and the radio seria l
numb er ca n be found on th e "Radio Card" at the
beg inning of the
Lit erature . ._
I) Availa ble as a fa cto ry install ed opt ion, or your author ized Volkswagen dealer can install the oplional C D
c h anger for you. A lways chec k with yo ur a utho rize d Vol kswage n deale r if th is op tio n i s ava ilab le fo r yo ur
model.
Quick overview 5