VOLKSWAGEN JETTA 2009 Owners Manual
Manufacturer: VOLKSWAGEN, Model Year: 2009, Model line: JETTA, Model: VOLKSWAGEN JETTA 2009Pages: 477, PDF Size: 77.6 MB
Page 461 of 477
Booklet 3.4 Premium Sound System
Mix Mode button
The MIX mode causes the tracks the disc to b e played random order .
1
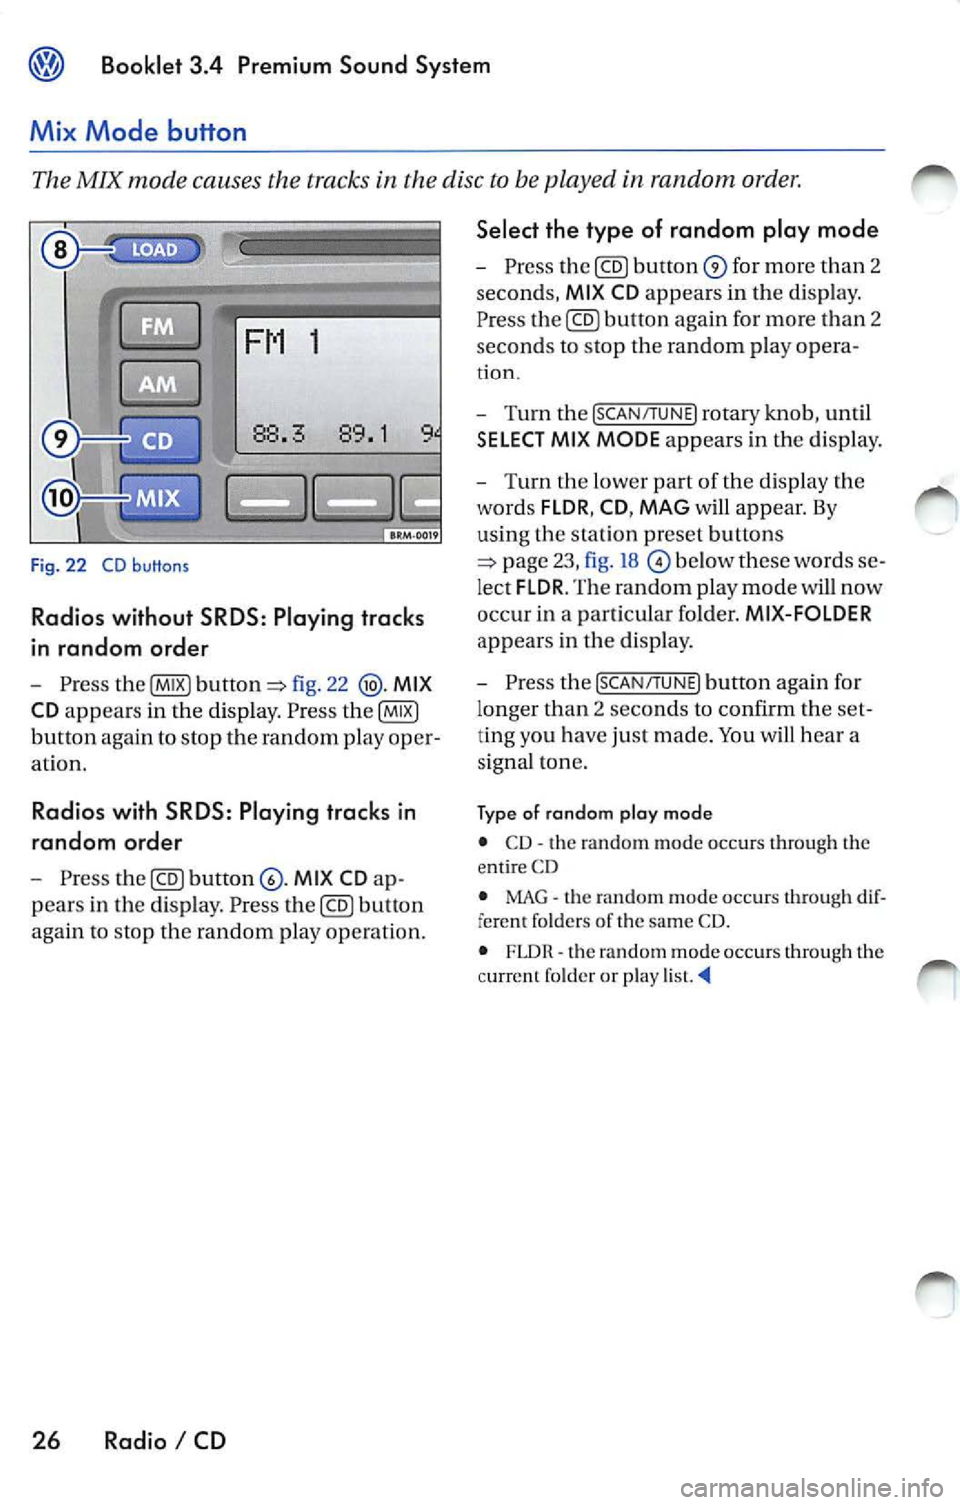
Fig. 22 CD buttons
Radios without SRDS: Play ing tracks
in random order
Pre ss fig. 22 MIX
CD
appears in the dis pl ay . P ress
button again to stop th e random play oper
at io n .
Radio s with SRDS : Playing tracks in
random ord er
Press MI X CD
pears in the disp lay . Pre ss button
again to stop the random play op eration.
26 Radio I CD Select the type of random play mode
-
Press for mor e than 2
seconds,
MI X CD appears in th e d is p lay.
P re ss
again for more than 2
sec ond s to stop th e random play opera -
tion.
- Turn the [SCAN/TUNE] rotary knob , u ntil
SELECT MI X MODE appears in the dis play.
- T urn the lower part of th e dis p la y the
words
FLDR , CD , MAG w ill appear. By
us in g th e s ta tion pr eset buttons
below th ese words
lec t FLDR . The random play mode will now
occ ur in a part ic u la r fo lder.
MIX-FOLDER
appears in the disp lay .
- Pres s the
[SCAN/TUNE] button aga in for
l onger than 2 se conds to confirm the
ting you h ave just made. You hea r a
s igna l ton e.
Ty p e of rando m plo y mod e
• CD· th e random mode oc cur s through th e
e ntir e CD
• MAG
the random mode oc cur s through fere nt folder s of the sa me CD.
• FLDR th e rando m mode occurs throug h the
c urrent f older or play
Page 462 of 477
Booklet 3.4 Premium Sound System
Track selecting
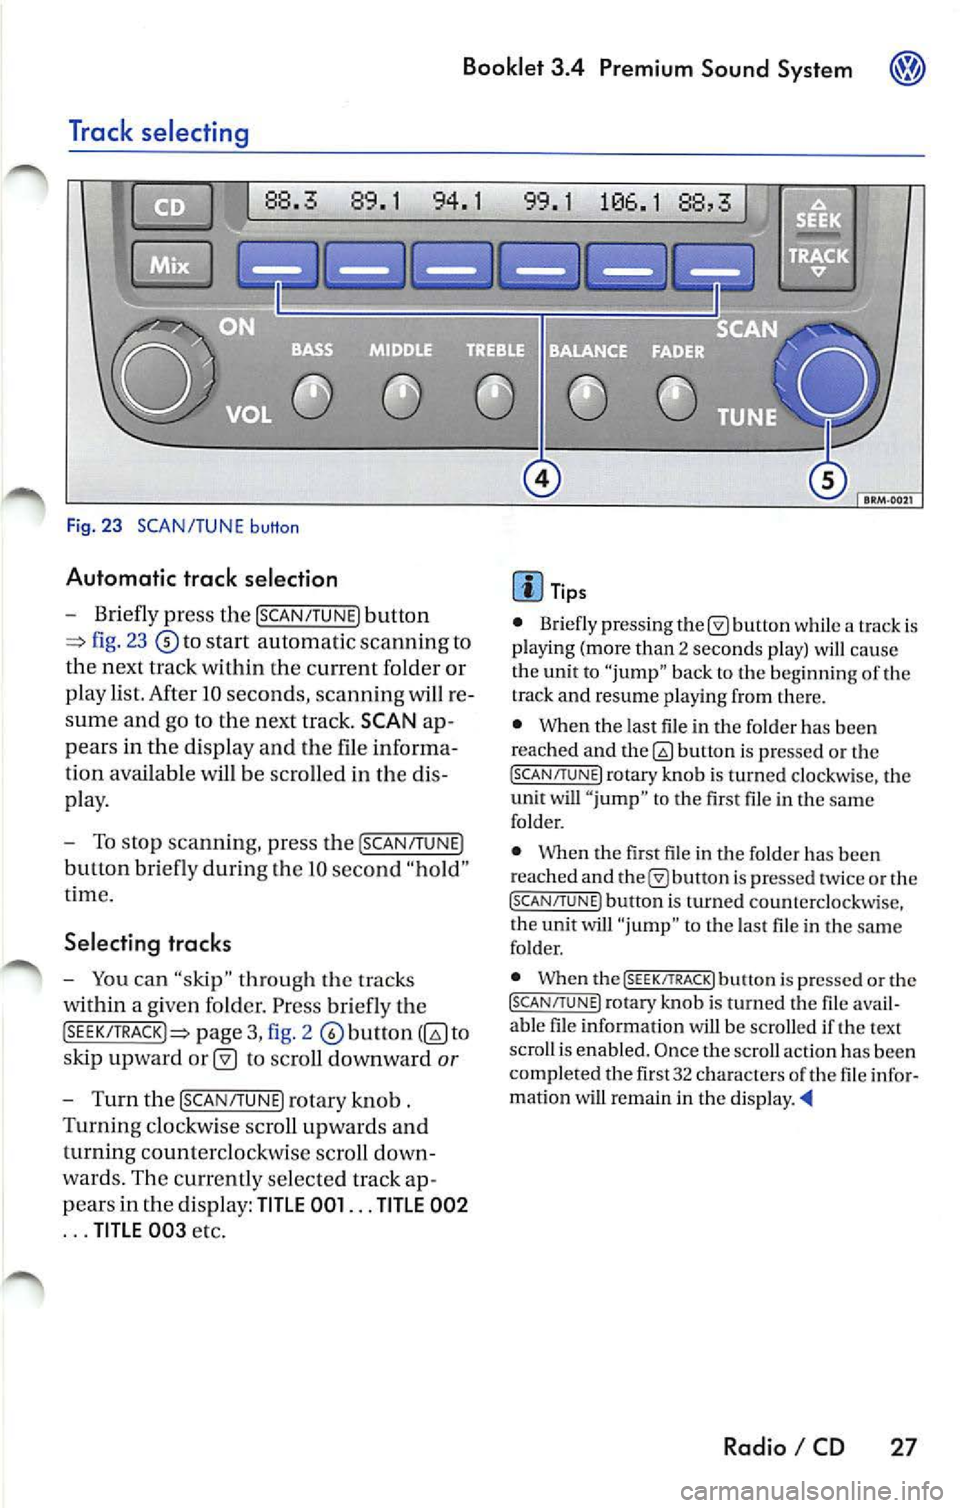
Fig. 23 SCAN/TUNE button
Automatic trac k selection
-Briefly press the !SCAN/TUNE) button
fig. 23 to sta rt automatic scannin g to
the next track within the curre nt folder or
p lay list. After 10 seconds , scannin g will re
sume and go to the next track. SCAN ap
pears in the display and the file informa
tion available
be scro lled in the dis
pla y.
- To stop scannin g, pre ss the [SCAN/T UNE)
button bri efly during Lhe IO seco nd "hold "
t ime.
Selecting tracks
-You can "skip" through th e trac ks
within a given fo lder. Pr ess briefly th e
pag e 3, fig. 2 to
s kip upward
to scroll downward or
- Turn th e !SCAN/TUNE) rotary knob .
Turnin g clo ckw ise sc roll up wards and
turning counterclockwi se scroll down
wa rds. Th e curr en tly se lected track ap
p ears in the di spl ay:
TITLE 001 ... TITLE 002
... TITLE 00 3 etc.
Tip s
• Briefly press ing butt on while a track is
pla ying (mo re than 2 seco nds play) cau se
the unit to "jump" bac k to the beginning of th e
track and resume pla yin g from there.
• When the last file in the fo lder has been
reached and
bu non is pre ssed or th e (SC AN/TUNE! rotary knob is turned clockwi se, the
unit will " jump " to th e first file in th e same
folder.
• Whe n the first fil e in t he folder has been
r eached and
is pr essed tw ice or the (SCAN/TUNE ) button is turned counterclockwise,
t he unit will "ju mp " to t he last file in the sa me
fo lder.
• When the
(SEEK/TRACK! butt on i s pre ssed or the (SCAN/TUNE) rotary kno b is turn ed the fil e avail
a bl e fil e in formation will be scro lled if th e text
scro ll is enabl ed. Once the scroll actio n ha s be en
comp le ted the fir st 32 characters
th e fil e infor
matio n wi U remain in the di sp la y. •
Radio I CD 27
Page 463 of 477
![VOLKSWAGEN JETTA 2009 Owners Manual Booklet 3.4 Premium Sound System
Track search Buttons
"Scroll" through the same track (Fast
Forward /Fast R ev ie w)
- Press and hold the !SEEK/TRACK ] button
page fig . 2 to scro ll VOLKSWAGEN JETTA 2009 Owners Manual Booklet 3.4 Premium Sound System
Track search Buttons
"Scroll" through the same track (Fast
Forward /Fast R ev ie w)
- Press and hold the !SEEK/TRACK ] button
page fig . 2 to scro ll](/img/18/55687/w960_55687-462.png)
Booklet 3.4 Premium Sound System
Track search Buttons
"Scroll" through the same track (Fast
Forward /Fast R ev ie w)
- Press and hold the !SEEK/TRACK ] button
page fig . 2 to scro ll upwards or
downwards
trough the same track.
The track elapsed time appears in the
upper left corne r of the d isp lay.
Information displayed
Fig. 24 SCAN/ TUNE button
MP3 display selection
It is possible to select betwee n a basic MP3 dis
play and a more detailed one. If th e bas ic MP3
display is selec ted the file informat ion (such as
s ong and artist name) w ill not be displayed.
• Press and ho ld down
(SCAN/TUNE) butt on fig. 24 for longer than 2 seconds to ent er
the set up mode. You will hear a sig nal tone.
• Turn the
(SCAN/TUNE) rotary knob, un til SELEC T MP3 DISPLAY appears i n the display.
• In
low er part of the display words BASIC and DETAIL will appear. By usi ng th e s ta
tion pr eset bu tto ns © select eith er the bas ic o r
deta il di splay.
• Press the
SCAN/TUNE buu on again fo r
long er th an 2 second s to confirm the setting
you've just made . Yo u will hear a signa l tone.
28 Radio I CD
-Release t he button to stop skipp ing
through the track.
Text sc roll select ion
You can decide whether the available informa
tion in the MP3 file is scrolled or not in the di s
play.
• Press and hold down the
(SCAN/TUNE) button
for longer than 2 seconds to enter the set u p
mode. You w ill hear a signal tone.
• Turn the
(SCAN/T UNE) rotary knob,
station preset buttons © select eith er ON or OFF.
• Press the (SCAN/TUNE) button again for longer
th an 2 seco nds to confirm the settin g yo u've just
made. You'll hear a signal to ne.
• If yo u decide to scroll the fil e information
follow ing warn ing will appear in the d isplay: CAUTION! THIS MAY CAUSE DRIVER
DISTRACTION.
Page 464 of 477
Booklet 3.4 Premium Sound System
• By using the stati on preset buttons© select
eit her ACCEPT t o scroll the file information or
DECLINE not to scro ll th e ava ilabl e file inform a
tion.
File information
T he file informat ion which is available, will be
scro lled or will appear in the displa y if the detail
display has been selected. The type of informa
tion displayed depends on the follow ing:
• lflD3 tag data is ava ila bl e in an MP3 file this
unit can display the title (t rack title) and art is t name. If
no ID3 tag is av ailable, th e name of the
fold er an d the name of the file w ill appear in the
di sp lay.
• The fo lder and
names can be displa yed
like titles. Capital letters and/ or numerals and
(und erscores) are scro lled.
• A maximum o f32 characte rs can be dis
p layed .
• Folder a nd file nam es usin g other symbo ls
will not b e disp layed properly.
What you see in the display when listening to a MP3 CD
03
TITLE 001
AYER ON AYERONAUTS ON •••
CD3
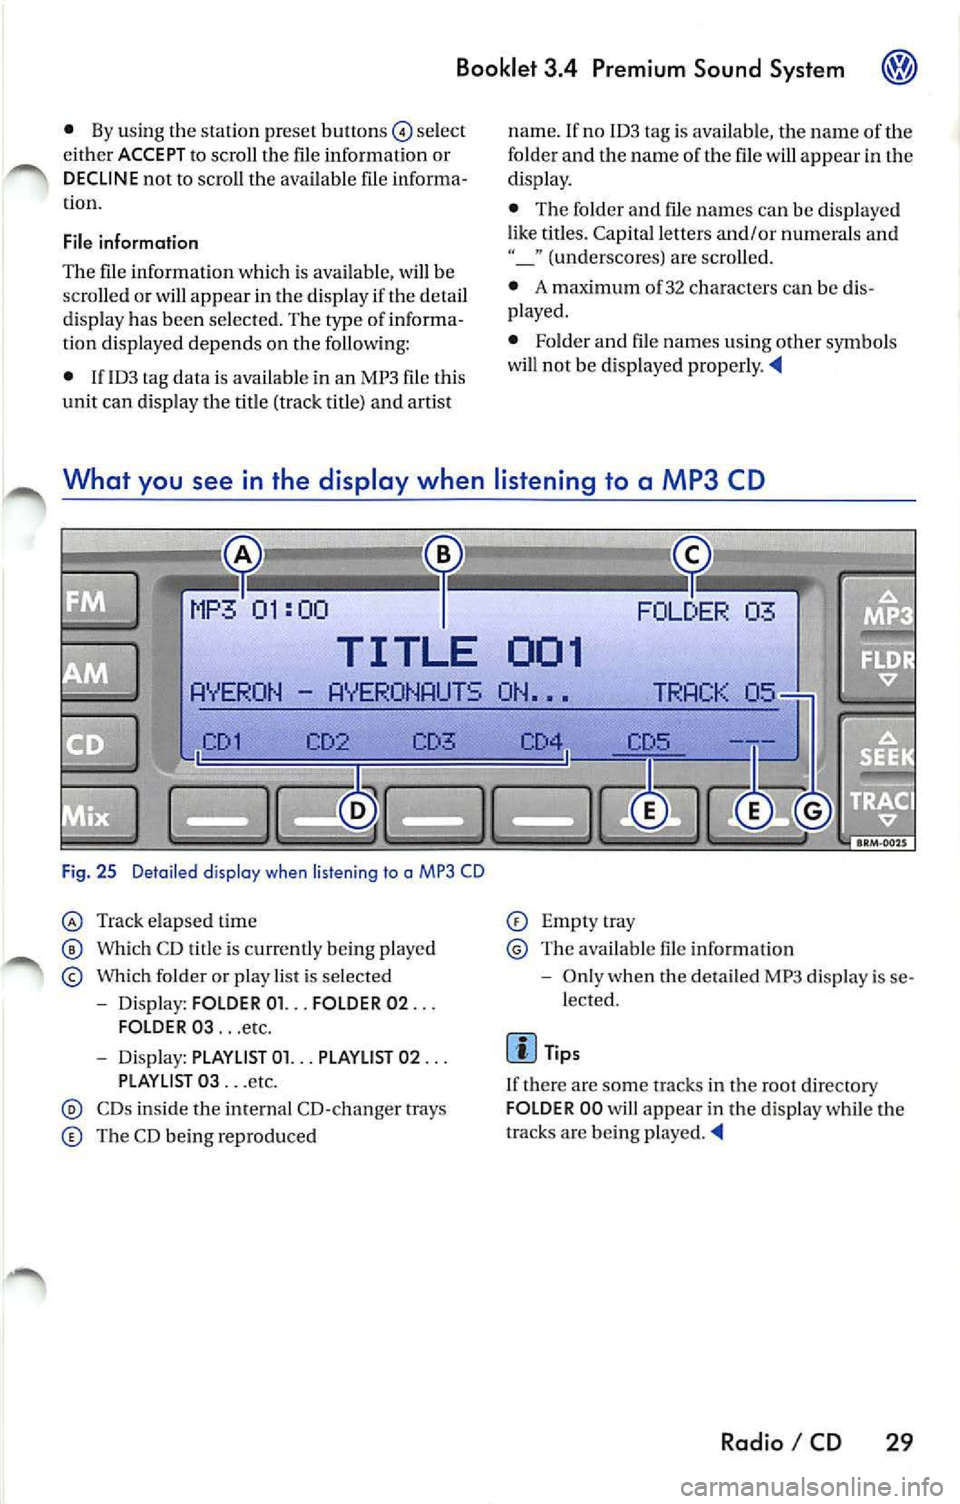
Fi g. 25 Deta iled display when listen ing to a MP3 CD
Tra ck elapsed time
Which CD t itle is cu rrentl y being playe d
Which folder o r play list is se lected
- Dis play: FOLD ER 01. .. FOLDER 02 ...
FOLDER 03 ... etc.
- Dis pl ay: PLAYLlST 01. .. PLAYLIST 02 ...
PLAYLI ST 03 ... etc.
CDs ins ide tl1e internal CD- cha nger trays
The CD bein g repro duced
Empt ytray
Th e available file informat io n
- Onl y when the detail ed MP3 di spl ay is se
lected.
Tip s
I f there a re some tracks in the root directory
FOLD ER 00 will appear in the disp lay while the
tracks are being played.
Radio I CD 29
Page 465 of 477
Booklet 3.4 Premium Sound System
Error displays when playing MP3 music with the CD player
The following err or messages can b e displayed:
NOCD
No disc in the CD ch an ge r.
PLEASE CHECK CD
There is a problem with the in serted CD. The CD
i s automatica lly ejec te d .
ROM
A CD ROM has bee n in serte d into the ch anger.
The CD is automatic ally ejected.
About MP3
Except for personal enjoyment, duplicati ng
data or distributing, transferring or copying it, whether for free or for a fee , withou t the permis
sion of the copyright holder i s strict ly prohib
i t ed by the Copyright Act and by internationa l
treaty.
What is
MP3
MP3 (MPEG audio layer 3) is a compress ion
stan dard prescribed by the ISO and MEG.
MP3 files contain compressed audio data. MP3
encoding is capable of compress ing the audio
da ta at extremely hi gh ratios , shrinki ng mu sic
file s by as mu ch as one-tent h their original size.
The MP3 forma t rea lizes su ch high compre ssion
ratios by elimi nating th e sounds that are either
in audible to t he hum an ear or ma sked b y other
sounds.
How to create
MP3 files
The soft wa re use d to create MP3 files is wide ly
so ld from var ious sourc es. For d etail s on cre
atin g MP3 files, re fer to the owner's manual for
t hat so ftwa re.
The MP 3 files that can be played by this device
ha ve the file extension "MP3". Files wit h no ex
tension can not be played back .
Cor respon ding File Syste ms
T hi s unit support s discs formatted
ISO
9660. It a lso can p lay back d iscs in Jolie t standard
30 Radio I CD
FAIL
Th e CD is dirty, scratc hed or inserted upside
down. T he CD is auto mati cally ejected. If the
p roblem pers ist s after reload ing the CD the next
CD avai lable will be reproduced and error mes
s age FAIL will appea r in the correspo nding CD
s lo t in
display.
HARDWARE ERROR
The CD chan ger mechanism is malfunctioning.
Tips
If the unit still malfunctions, contact your au
thori zed Vo lkswagen dealer for assistance.
which conforms to ISO 9660. However , some
time s the file names, fo lder nam es, etc. are not
displayed correct ly.
P lease
in to account the follow ing points:
• When creati ng a CD the burner software
mu st be set up to burn a Mode
1 CD ROM type
disc. Mode 2 CD ROM XA can not b e pla yed
back.
• Multi-session discs can not be played back
by this unit.
• Remembe r tha t th e audio quality depends
o n th e
rate" used to create the MP3
file .
• Make sure the crea ted disc is finalized. Your
CD burner softwar e has an option to fina lize the
disc.
• Whe n nam ing you r MP3 file s, use short file
nam es (no more than 64 char acters).
• We recommend th at you use onl y one word
to name t he folde rs (i.e. Fold er_A) and t hat yo u
do not repeat the same fold er name throughout
the CD. This cou ld cause t he rad io un it not
to recognize the file path .
• When creat ing an MP3 disc, use no more
than 99 fo lder s. Altho ugh thi s unit can support
up
to 255 folders , finding the files yo u wa nt t o
p lay w ill be mor e difficult if you have used man y
Page 466 of 477
Booklet 3.4 Premium Sound System
• A maxi mum n umber of 998 files (plus l file
containing the data t rack ) can be hand led by the
cha nger. If
sum is higher t han 998 files, then
p laylis t files a re ski pped. If p laylis t have to be
skipped, the n the p lay list files with the oldest
t imestamp
be skipped.
• When creat ing play li st fil es, use a program
lhat a utomatica lly creates a play list with
extens io n. Th is un it will n ot play play
lists with a no th er ex tensions or that contain
path info rmation in Un icode.
• A m aximu m of
15 play lists can be su pported.
• Using th e d rag-and-drop me thod prov ided
by W INDOWS XP to move MP3 files to a CD for
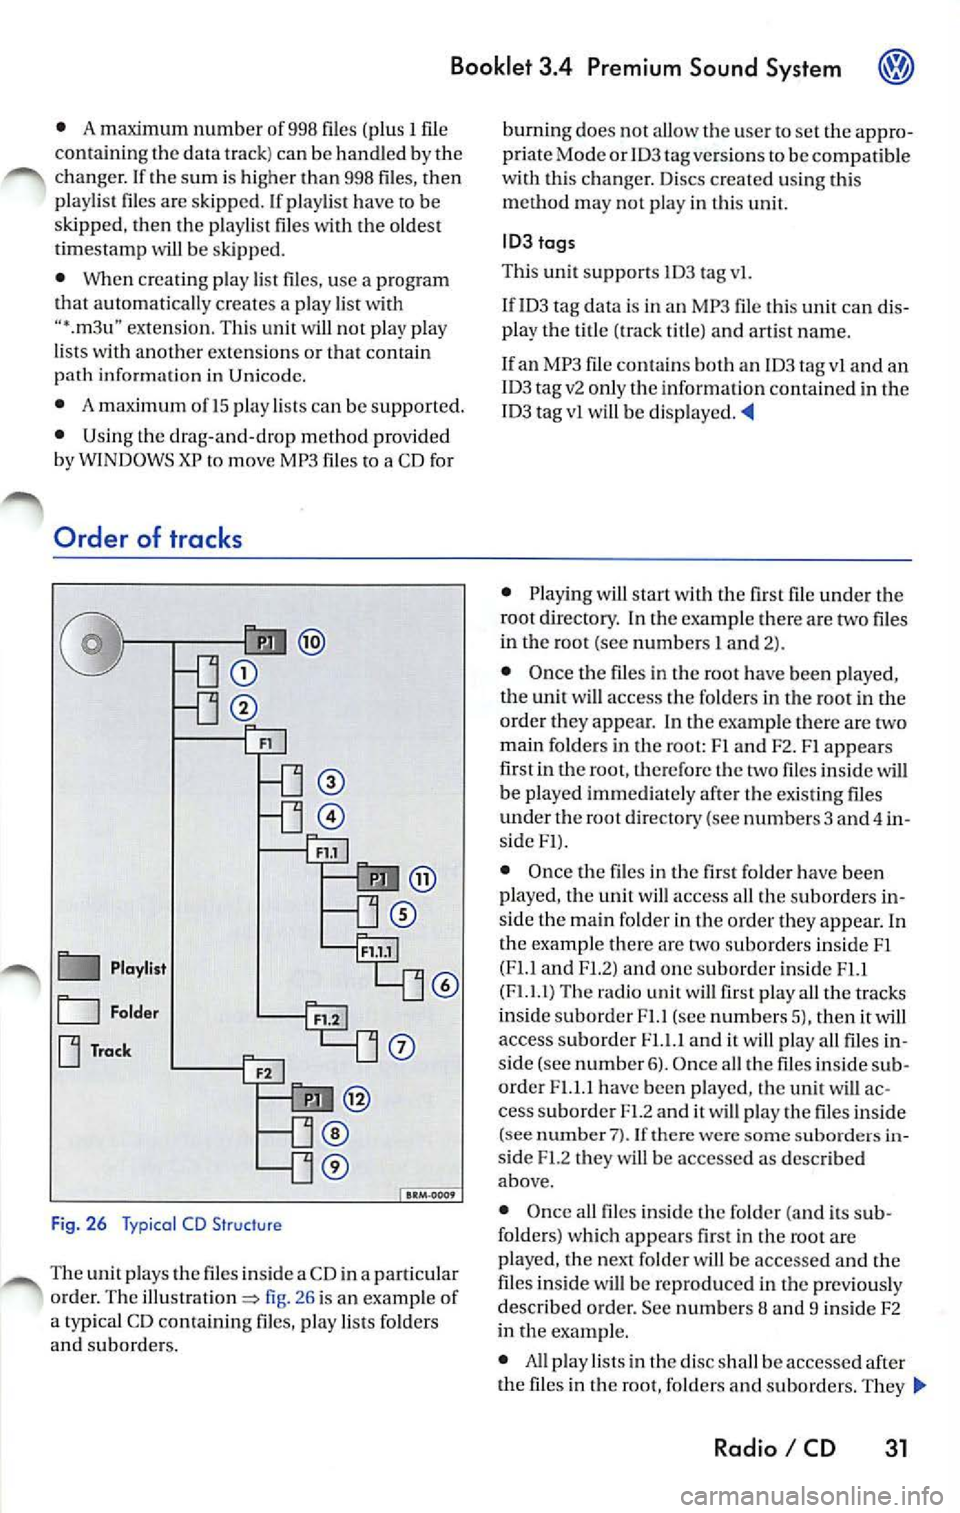
Order of tracks
L=:I Playli st
Tra ck
Fi g. 26 Typical CD Structure
The un it plays the files inside a CD in a particu lar
o rder. The fig. 26 is an examp le of
a typ ical C D co ntaini ng file s, p lay lists folders
and s ubor der s. burn
ing doe s no t aJJow the use r to set the appro
pri ate Mode or ID3
versio ns to be compati ble
w ith thi s ch anger. Discs c reated usin g this
method may not pla y in l his unit.
ID 3 togs
Th is uni t supports ID3 tag vi.
If ID3 tag data is in an MP3 file th is unit can d is
play t he t itle (t rack title) and artist name.
If an MP3 fi le contai ns bot h an ID3 tag vl and an
ID3 tagv2 o nly th e in forma tion conta ined in t he
ID3 tag vi will be
• Playing will sta rt with the fi rs t fil e under the
root directory. In the example t here a re two files
i n the root (see number s l and 2).
• Once t he files in the root have bee n played,
the un it w ill access the folde rs in the roo t in the
orde r they appear. In the examp le th ere are two
m ain fo lders in t he root : Fl and F2. Fl appears
firs t in the root, tJ1erefore the two files inside
will be p layed immediately th e ex isting files
u nder th e root dire ctory (see numbers 3 and 4
side Fl).
• Once the files in the firs t fo lder have been
p layed, the u nit wi ll access all th e sub orders
side th e ma in fo lder in the orde r they appea r. In
the example t here are two suborders ins ide Fl
(Fl.I and Fl .2) and one su border ins ide Fl.l
(Fl.1.1) The rad io un it will first p lay all the tracks
i n side suborder Fl.I (see numbers 5). then
access suborder Fl.l.l and it w ill play a ll files side (see number 6). Once a ll the file s in side su b
order Fl.1.1 have bee n played , the un it wi ll
ces s sub order and it will p lay the file s in side
(see numb er 7). If th ere were some s uborder s side Fl.2 they be accessed as describ ed
abo ve.
• Once all files in side t he folder (and its
folde rs) which appears first in the root are
pla yed, the nex t folder w ill be accessed and the
fil es in side will be reprod uced in the pre vio usly
d esc ribed order. See nu mb ers 8 and 9 in side F2
i n the examp le.
• All play lis ts in the di sc s hall be accessed after
the files in the root, folde rs and subo rders . T hey
Radio I CD 31
Page 467 of 477
Booklet 3.4 Premium Sound System
will be played in the order th ey appear. In th e ex
ample there are three p lay lists (see numbers 10,
11 and 12).
• The number of each folder and subfo lderwill
appear in the disp lay as they a re accessed.
CD changer
Applies to vehicles: with external CD chonger
• Fo r root directo ry or folder s or play lists
w ith out any fil es in th em, the rad io unit shall ig
nor e th e folder or play list
automat ically a d
va nce to th e nex t folde r in th e
External CD changer in the front armrest
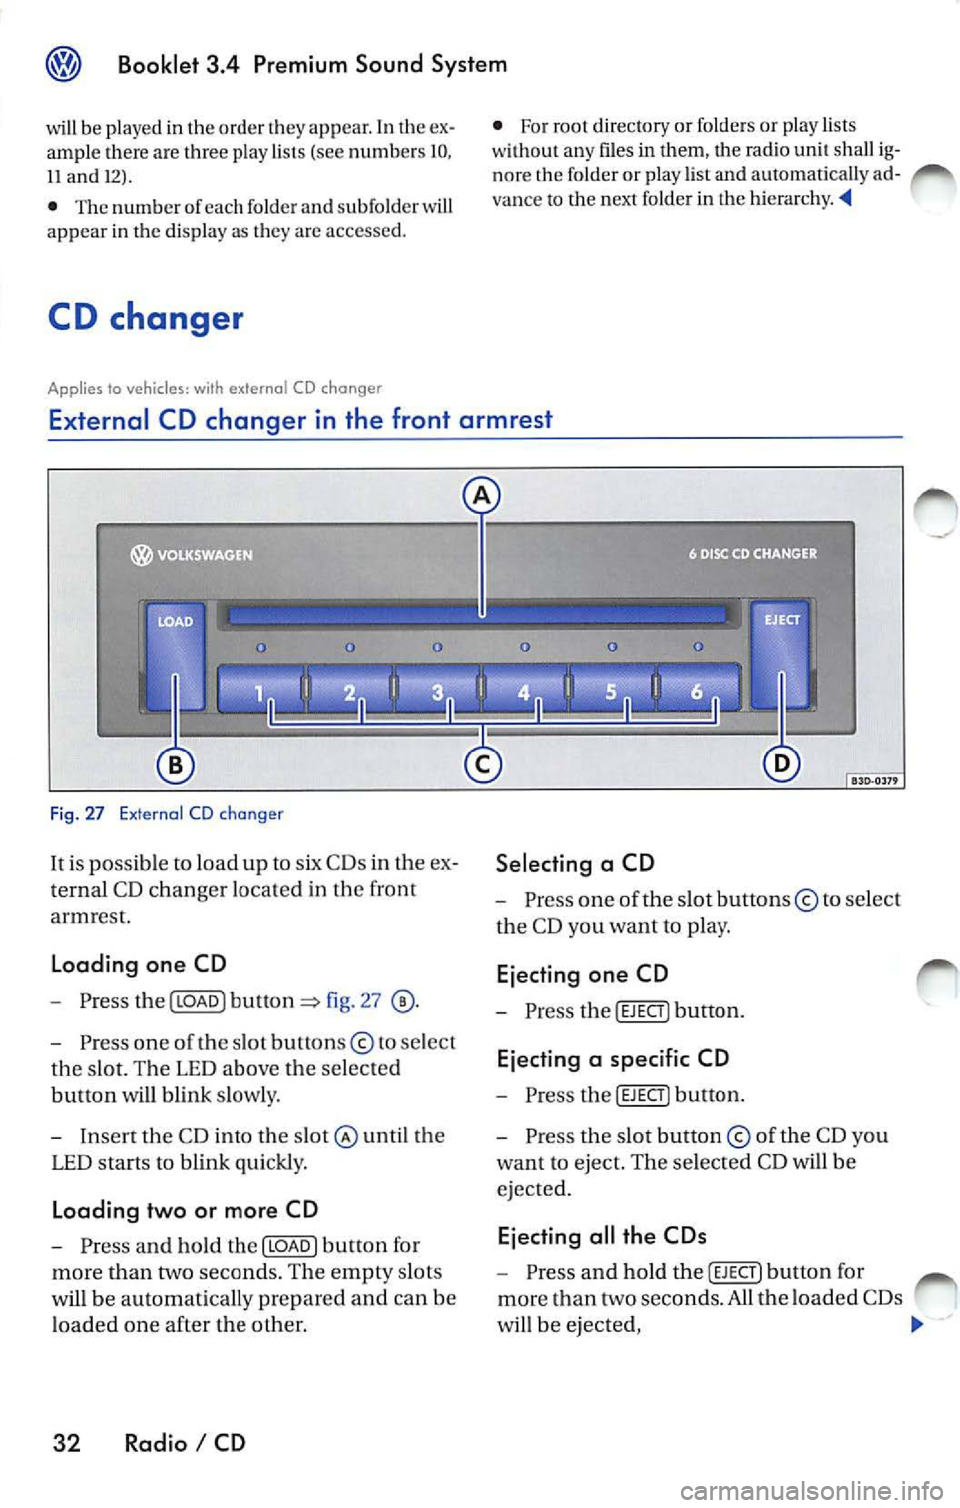
Fig. 27 External CD cha ng er
It is po ssible to loa d up to six C Ds in th e ex
ternal CD chan ger lo ca te d in the front
armrest.
Loading one CD
- Press the I LO AD I button 27
- Pre ss on e of the s lot button s© to se lect
th e s lot. The LED abo ve the se lec te d
button will blink slowly.
- Insert the CD in to the
until the
LED sta rt s to blin k qui ckly .
Loading two or more CD
- Press and hold th e I LOAD J button for
mo re than two seconds. The e mpt y slo ts
will be a utomatically pre p ared a nd can be
load ed one after the other.
32 Radio I CD Selecting a CD
-
Press one of the slot buttons © to selec t
th e CD yo u want t o pla y.
Ejecting one CD
- Press the I EJECT] button .
Ejecting a specific CD
- Pres s the I EJECT] bu tton .
- Pre ss the s lot button © of th e CD yo u
wa nt to e ject. T he se lected CD will be
e jec te d.
Ejecting all the CDs
- Press a nd hold the I EJE CT] butt on for
mor e than two seconds. All the load ed CD s
w ill b e ejec ted ,
Page 468 of 477
Booklet 3.4 Premium Sound System ®
Tips
• Whe n
external CD changer is selected
EXT will appear in the radio display.
• The LED s above the slot buttons I to 6 will
stay on
to indi cate that there is a CD inside the
s lo t.
• It is po ssible to reproduce Howeve r the reproduction depends on th e terial quality of the CD .
• Always inser t the CD with the prin ted s ide
fac ing up . •
Make sure the CDs are prop erly install ed in
the CD changer. Also, make su re the CDs are
moved from the slot before you close the rest, otherwise you cou ld damage th e CDs.
• Only use standard
12 cm (4.72 inch) CDs. T he
s h ap ed CDs or 8 cm (3.15 in ch) CDs can not be
played.
• If no CD slot is se lected after pressing the
LOAD button, the radio unit will automatically
select the next empty tray .
• I f the ejected CD is not removed from the slot
in t he next
15 secon ds, it will be pulled back tomat ically into the CD slot to prevent damage
and the eject mod e will be
Tips for operating your internal CD-Changer and external CD
Changer
To assu re a sound reproduction of the highest
quality, u se on ly CDs which are clean and free of
sc ratch es or any other type of damage.
Do not u se tran sparent
Wa re availabl e in the
market. Use of these CDs w ill cause th e changer
improp erl y load.
If yo u are going
to make your own CDs, do not
s tick an adhesive labe l on the CD itself. The heat
Preventive measures for laser units.
Laser devices are divided into safety classes I 4.
Your VOLKSWAGEN CD ch an ger conforms to
safety class I.
The laser used in cla ss l is so low a nd so we ll
s hield ed, that no danger exi sts wi th proper
usage . generated
by the CD play er ca n loosen t he
sive label, which then coud come off and and
jam up the unit. This could result in a costly
pair. Use a marker labe l your CDs in stead.
Always sto re CDs in tl1eir cases whe n you are not
li stening to th em.
Neve r leave CDs in direct
Note
Never remove the cover from the uni t. The unit
doc s not contain any parts that can b e serviced
b y the use r.
Radio I CD 33
Page 469 of 477
Booklet 3.4 Premium Sound System
Anti-Theft Coding
Convenience radio coding
For techni cal reason s, the convenience radio
coding is not a vailable for all vehicle models .
In the past , it u sed to be that you h ad to manu
ally reco de th e rad io whe neve r the unit was re
moved from the veh icle (fo r examp le, if the unit
wa s removed to be repa ired), or whenever the
vehicle battery was disconnected (for example ,
if you brought yo ur vehicle in to the dealership
for service and it was necessary to disconnect
the banery ). In either case , th e power supply to
t he unit was cut off.
That ha s all ch anged with th e new conve nien ce
radio coding function: Once the code number
has been inplll in the rad io, i t w ill then synchro
nise itself wi th "it s" veh icle!
I f th e curr ent supply has been interrupted the
radio will automaticall y ch eck to see if it is still in
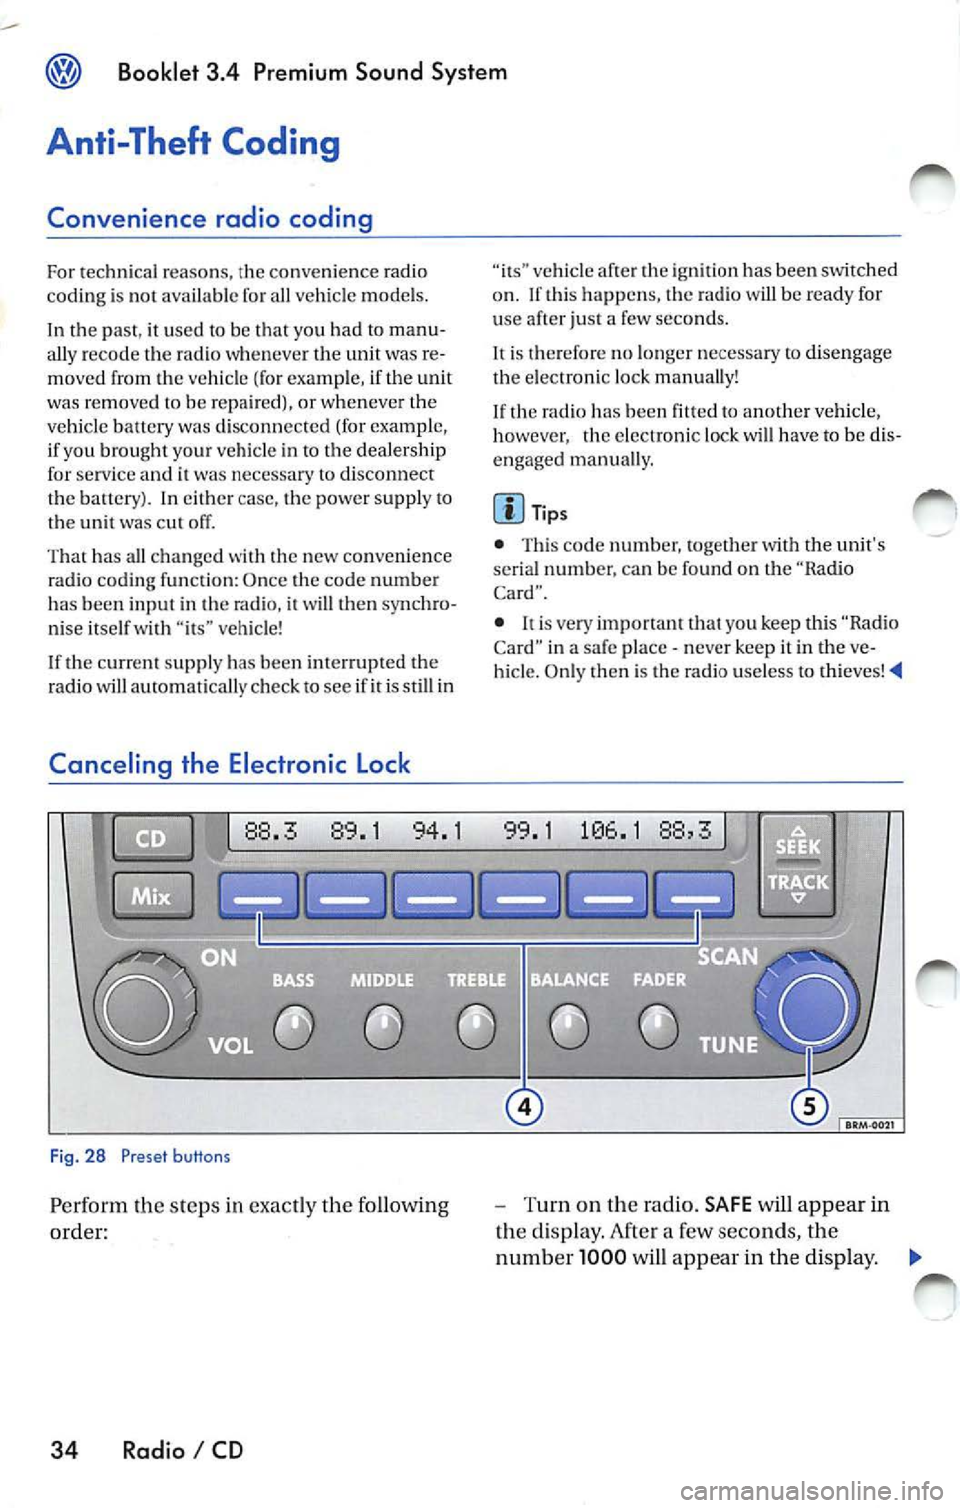
Canceling the Electronic Lock
Fig. 28 Preset buttons
Pe rform th e steps in exact ly the fo llowing
order:
34 Radio I CD
vehicle af te r th e ig niti on has been switched
o n . If thi s happ ens, the radio will be read y for
u se after just a few seco nds.
It is therefore no longe r n ecess ary to disengag e
the e lectro nic lock manua lly!
If the radio has been
to another vehicle,
however , the electronic lock will have to be dis
engaged manua lly.
Tip s
• This code number, togeth er w ith the unit's
se rial numb er. ca n be found on the "Ra dio
Card".
• never keep it in the ve
hicle. Only then is th e radio use less to thieves!
-Turn on the radio. SAFE will appear in
the disp lay. After a few seconds, the
numb er 1000 will appear in the display. ._
Page 470 of 477
Booklet 3.4 Premium Sound System ®
-Use the radio stat io n pr ese t button s 1 to
4
page 34, fig. 28 to ent er the code
numb er fo un d on your R adio Card. Use
pre set button
l to ent er t he fir st digit in the
code numb er. U se button 2 to en te r the
seco nd digit , e tc. Th e valu e range for each
of the 4 di git s is O ... 9. T he digit will in
c rease by l eac h tim e you tap the pr ese t
bu tton. The number r etu rns to O afte r 9.
- After you finish ent ering th e code, press
the sta tion p reset button below
word
OK in th e di spl ay. It usual ly is th e las t sta
tion pre set button. You w ill hear a n au
dibl e signa l.
-If you have en te red t he co de number
c orr ect ly, a radio frequency will app ear in
th e d isp lay.
Wrong Code Number
lfyou have accide ntally ent ered a wrong code
number , SAFE will ap pear in th e di spl ay and
th en the number 1000 will app ear.
Yo u can re p ea t the procedu re agai n on e time .
T he num ber of attempt s will app ear in the dis
p lay. lf you acci dent all y ent er a wrong code
number a seco nd tim e
SAFE will appea r in the
d isp lay.
lfth e wrong cod e number i s enter ed aga in, th e
uni t w ill be di sab le d for about I hour. Lea ve th e
unit O N for this hour . After th e hour has
e la p se d, the numb er of att em pts will stop bei ng
displayed and you can cancel th e elec tronic lock
once again.
Remembe r, the cycle i s ...
• 2 attempt s
• one hour lo cked.
Tips
If y ou loose your Rad io Card, contact yo ur au
t ho riz ed VO LKSWAGEN
ered by a re pl ace ment pa rts warra nty. This re
pl acement serv ice w ill not b e availab le, how
eve r, it th e unit h ousing is damaged or if un au- th
oriz ed per sons have att empt ed to make re
pair s.
Antenna Care
Th e an tenna i s des ig n ed to achieve optim al per
fo rmance with the radio and is located at a pos i
tion where reception is good and su sce pti bili ty
to int erfer ence is low.
Ve hicle s equ ipped wi th antenna s emb edd ed in
t he winds hield o r backlights offer the furth er ad
vantages o f being completely pro tec te d f rom
damage and wear.
No antenna car e is r equir ed for vehicles
e quipped with roof moun te d
Radio I CD 35