VOLKSWAGEN JETTA 2009 Owners Manual
Manufacturer: VOLKSWAGEN, Model Year: 2009, Model line: JETTA, Model: VOLKSWAGEN JETTA 2009Pages: 477, PDF Size: 77.6 MB
Page 441 of 477
Booklet 3.4 Premium Sound System
• It is very important that you keep this "Radio
Card" in safe place neve r keep it in the ve
hicle . On ly then the ra dio is use less to
6 Quick overview
Page 442 of 477
Booklet 3.4 Premium Sound System
Radio I CD
Radio
ON /OFF Button
88.3 89.1 94.1
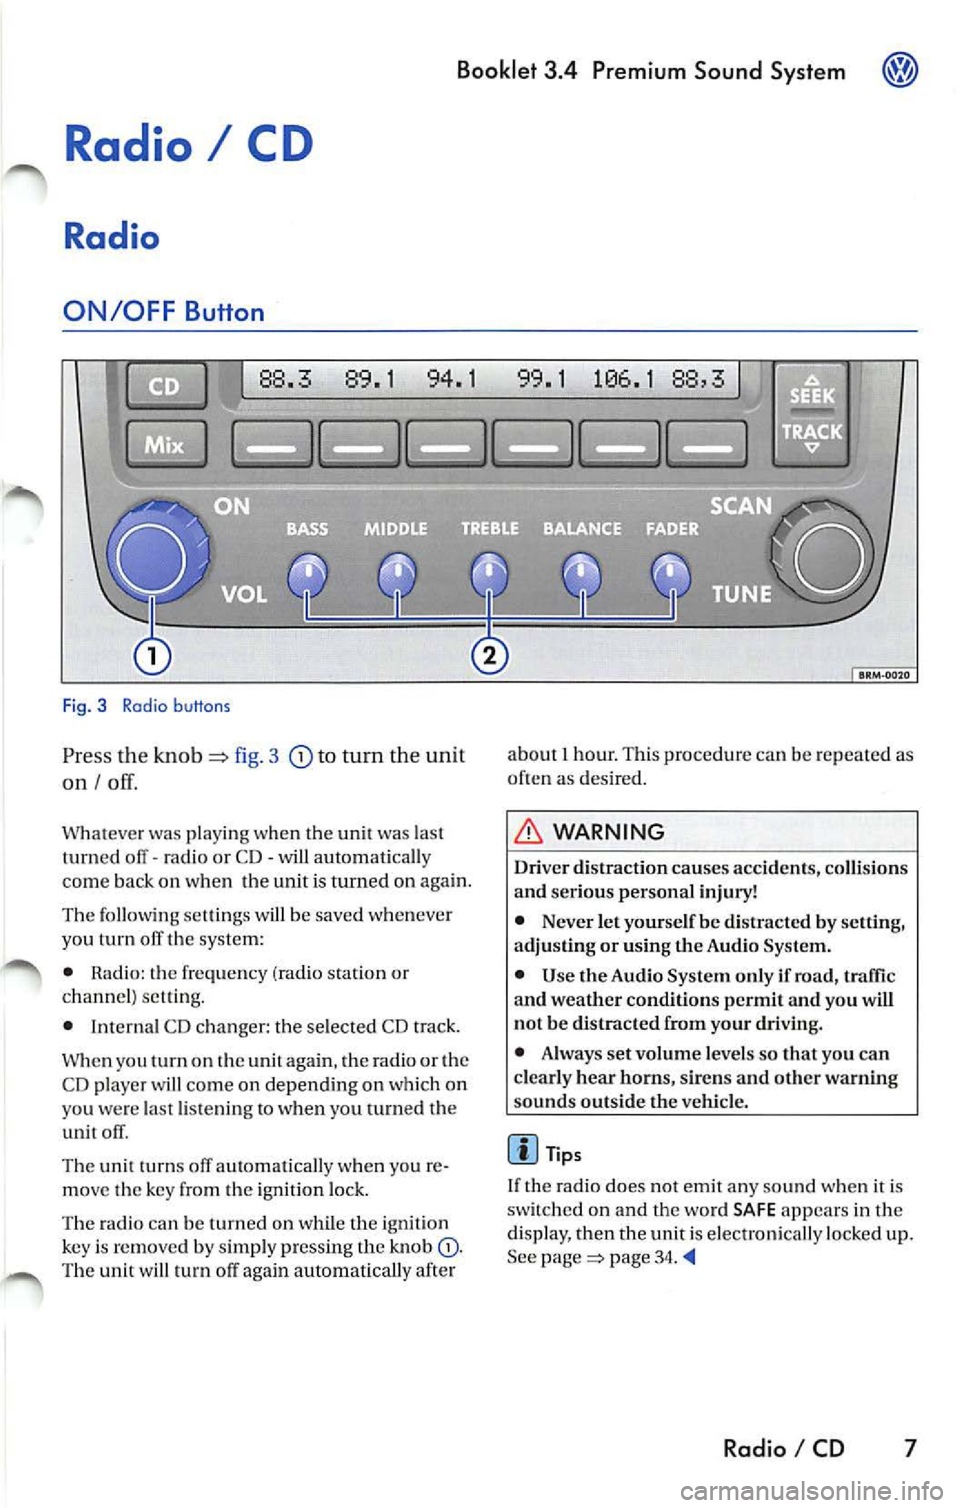
Fig. 3 Radio b uttons
Pr ess the knob fig. 3 to turn the unit
on I
Whatever was playing when the uni! was las!
turned off -radio or CD -will automaticall y
come back on when the unit is turned on again.
The foll owing se lling s will b e saved whenever
yo u tu m off the system:
• Rad io: the frequen cy (ra dio s tat ion or
c h an nel) se ttin g.
• Interna l CD c han ger : the se lected CD track.
W hen you
on the again , th e ra di o or the
CD player w ill co me on depend ing on which on
yo u wer e la st li ste nin g
when you turn ed the
unit off .
The uni! turn s off au!Omati ca lly w hen you re
m ove the key fro m the ign ition lock.
The radio can be turn ed on wh ile th e ignition
key is rem oved b y simpl y pressing the kn ob
88,3
about 1 hour. This procedure can be re p eate d as
o ften as des ired .
WARNING
Dri ver distraction causes accid ents, collision s
and ser ious personal injury!
• Never let yourse lf be distr acted by setting,
a djusting or using the Audio System.
• Use the Audio System only if road, traffic
and weather conditions p ermit and you will
not b e distracted from your driving .
• Alwa ys set vo lum e le vel s so that you can
clearly hear horns, sir ens and other warning
s ounds outside the vehicl e.
Tips
If th e radio does not emit any so un d w hen it is
sw itched on and the word SAFE appears in the
display, then the unit i s electronica lly lock ed u p.
See
page 34.
Radio I CD 7
Page 443 of 477
Booklet 3.4 Pre mium Sound System
Volume Knob
Volume Control
Turn the rotary page 7, fig. 3
to adjust the vo lum e.
Setting Custom Turn-On Volume Level
Press and hold the [SCAN/TUNE) button©
for longer than 2 seconds to enter the set
up mod e. You will hear a signal tone .
Turn the [SCAN/TUNE) button until
SELECT ON VOLUME appears in the dis
pla y.
Use the knob to set the desired turn
on volume.
Press the [SCAN /TUNE) button again for
lon ger than 2 seconds to confirm the set
ting you have just made. You will hear a
s ignal ton e.
Setting the Speed Volume Control
(SVC)
Press and hold down the [SCAN/TUNE)
button for longer than 2 seconds to ent er
th e set up mod e. You wi ll hear a sign al
ton e.
Turn the [SCA N/TUNE) button until SPEED
DEP. VOLUME
appears in the di sp lay.
8 Radio I CD
In the lower part of the display the
words OFF and the number s 1, 2 and 3
appear. By using the station preset buttons
below these words select the volume
l eve l you want. 1 for a minimum volum e
ad justme nt in accordance to spee d.2 for a
m ed ium volume adjustemtn in accor
dance to speed.3 for a maximum volum e
a djustment in accordance to spe ed.
Pre ss the [SCA N/TUNE) b utton again for
longer than 2 seconds to confirm the set
ting you ha ve just mad e. You will h ear a
s ignal tone.
Cu stom Turn-On Volume L evel
The volum e setting when the unit is tu rned on is
the same it was when the unit was turned off
(or ig inal factor y setting). However, yo u can pro-
g ram the unit for your own per sonal turn -on
vo lume level.
Speed Volume Control (SVC)
The Speed Volume Contro l automatica lly ad
justs the vol um e in accordance wit h road sp ee d.
Tips
• If you do not confirm the sellin g yo u ha ve
j u st made , th e unit automati cally return to
th e norma l operat io n m ode af te r about LS sec
onds . Your c usto m turn -on volume will no t b e
s tor ed.
• If
c u sto m turn-on volume th at you stored
is lo ud er than the t urn -off volum e leve l, the unit
wi ll use the turn-off volume th e nex t tim e it is
turn ed on.
• If the audio volume leve l is loud er than the
turn-on vo lume that you stor ed and
unit is
turn ed off, the unit will use the stor ed leve l the
next t im e it is turned on.
Page 444 of 477
Booklet 3.4 Premium Sound Sys tem
1
88. 89.1
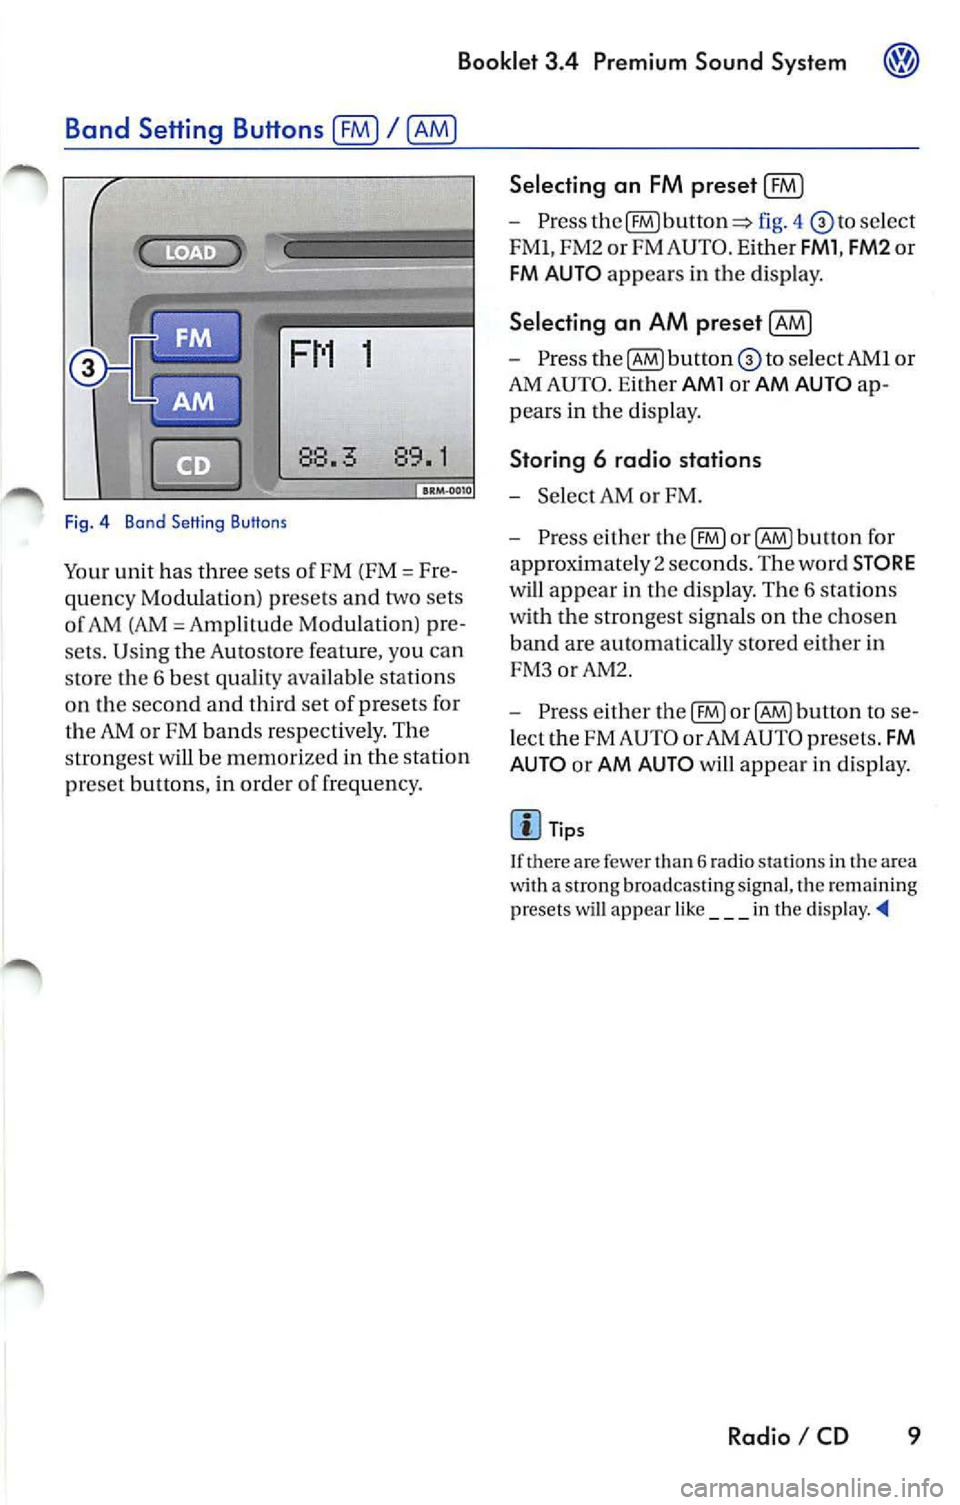
Fig . 4 Bond Setting Buttons
Your unit has three sets of FM (FM= Fre
quency Modulation) presets and two sets
o f AM (AM
Amp lilude Modula lion) pre
sets. Using the Autostore feature, you can
sto re the 6 best quality available stations
on the second and third set of presets for
the
or FM bands res pectively. The
strongest will be memor ized in the station
pr eset button s, in order o f frequency.
Selecting an FM preset (£0
-Press fig. 4 select
FMl, FM2 or FM AUTO . E ither
FMl , FM2 or
FM AU TO appears in the disp lay.
Selecting an AM preset [AM)
- Press to select AMI or
AM AUTO . Ei ther
AMl or AM AUTO ap
pears in the di sp lay.
Storing 6 radio stations
-Selec t AM or FM.
- Press either the
button fo r
approximate ly 2 seco nds. The word
STORE
will appear in the display. The 6 stations
with the strongest sig nals on the cho sen
band are automatically stored either in
FM 3orAM2.
- Press either
button to se
l ect the FM AUTO or AM AUTO presets .
FM
AUTO
or AM AUTO will appear in d isplay.
Tip s
I f there are few er than 6 radio stations in th e a rea
w ith a strong broadcasting signal, tl1e remaining
pr esets will ap pear like ___ in the
Radio I CD 9
Page 445 of 477
Booklet 3.4 Premium Sound System
Station Preset Buttons
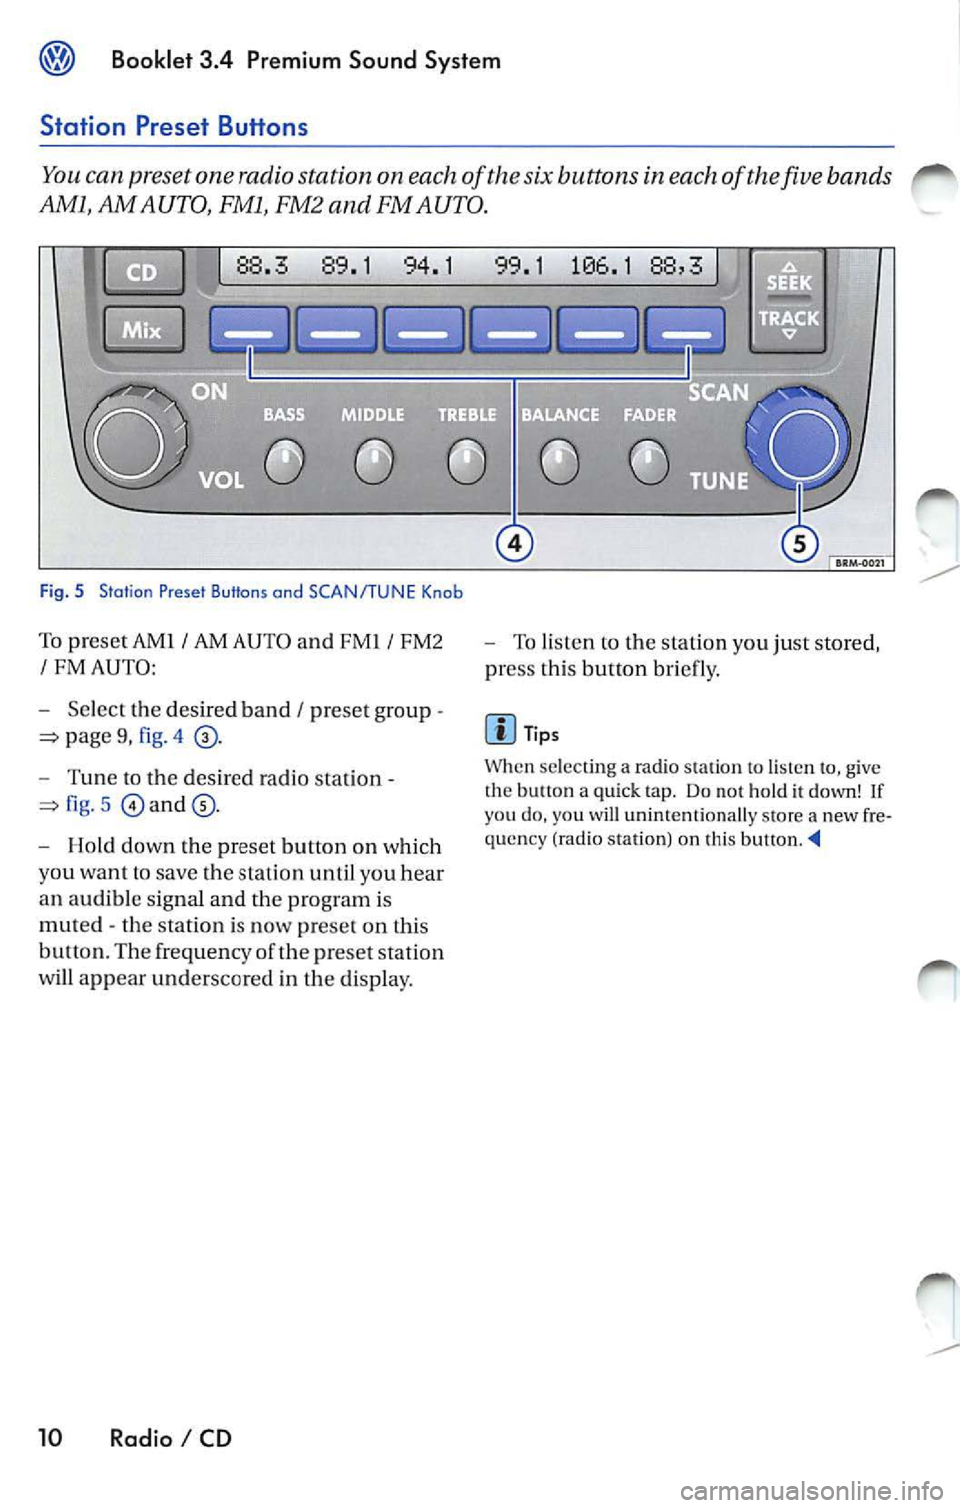
You can preset one radio station on each of the six buttons in each of the five bands
AMl, AM AUTO, FMl, FM2 and FM AUTO.
Fig. 5 Station Preset Buttons ond SCAN/TUNE Knob
To pr eset AMJ I AM AUTO and FMI I FMZ
I FM AUTO:
- Select the de sir ed band
I pr ese t group -
pag e 9, fig . 4
- Tun e to the desired radio station -
fig. 5 and
- Hold down the preset button on which
you wa nt lo save the stat io n until you hear
an aud ible sig nal and the program is
mut ed - t he station is now prese t on this
b utt on. Th e frequen cy of th e pr ese t station
w ill appear underscore d in the display.
10 Radio I CD
-To li sten to the s tation you ju st stored,
pr ess thi s button bri efl y.
Tip s
When sclec iin g a ra dio slal ion to, give
t he button a qui ck t ap . Do not h old it down! If yo u do , you will uninten tio nally store a new fre
qu en cy (radi o station ) on this button. --4
Page 446 of 477
Booklet 3.4 Pre mium Sou nd Sy stem
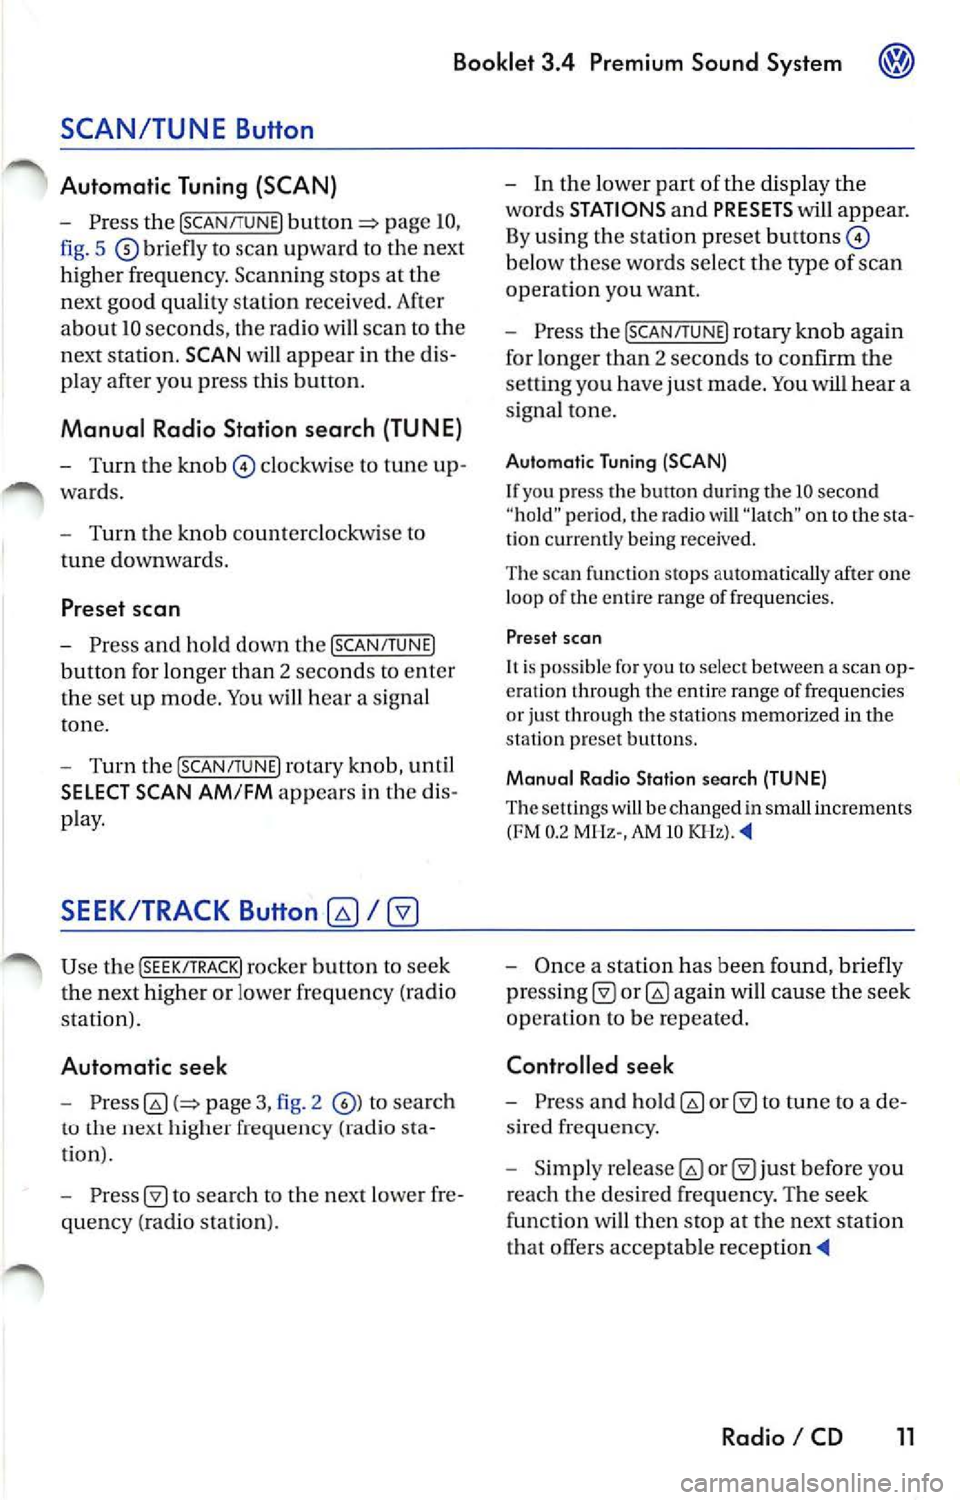
pag e 10,
fig. 5
briefl y to sca n upw ard to the next
high er frequency . Scanning stop s at th e
ne xt good quality station rece ive d. After
a bout 10 seconds, the radio wi ll sca n to th e
ne xt station.
SCA N will app ear in the dis
pla y afte r you pr ess this button .
Manual Radio Station searc h (TUNE)
- Turn the knob © clockwi se to tune up
wa rds.
- Turn the knob counterclo ckwise to
tu ne downward s.
Preset scan
-Pre ss a nd ho ld down d1 e ISCAN/T UNEJ
button for longer t han 2 sec onds to enter
the set up mod e. You will hea r a s igna l
t on e.
- Turn the
ISCAN/lUNEJ rotary kn ob, until
SELECT SCAN AM /FM ap pears in the dis
p lay.
SEEK /TRACK
Use th e (S EEK /TRA CK! rock er bu tton to seek
the next h ighe r or lo wer frequen cy (radio
s tat ion) .
Automat ic se ek
-pag e 3, fig. 2 to sea rch
LO next hig h er frequenc y (rad io sta
tion ).
-
to sea rch to th e nex t low er fr e
que ncy (radio stat ion ). -
In t he lower part of the display the
words
ST ATIONS and PRESETS will appear.
B y using t he s tation p rese t
below these w ords sele ct th e type of scan
operat ion you want.
- Press the
IS CAN /TUN EJ rotary knob again
fo r lon ger than 2 seconds to confirm the
se ttin g you have just made . You will hear a
s ig n al ton e.
Automatic T uning (SCA N)
If you press the button during the 10 sec ond
" h old " p erio d, th e rad io will on lo the sta
t ion curr entl y bei ng rece ive d.
Th e sca n fun ction slop s autom aticall y after one
l oop of the e ntir e rang e of frequ en cie s.
Pr ese t sc an
ll is p oss ible fo r you to selec t betwee n a sca n op
era lion through th e entir e range of frequenci es
or just th rough the s tat ions memor ize d in th e
pr ese t buuon s.
Ma nual Radio S tation search (TUNE)
The setting s will be changed in small inc rem ents
(FM 0.2 MHz-, AM 10
-On ce a sta tion has been fo und, briefly
again w ill cause th e se ek
operat ion to b e re p eated .
Controlled seek
-Press and to tun e to a desir e d frequency.
- Simply befor e you
r eac h th e des ired fr equ enc y. T he seek
funct ion will then stop at the n ext station
that offers acceptab le
Radio I CD 11
Page 447 of 477
@ Booklet 3.4 Premium Sound System
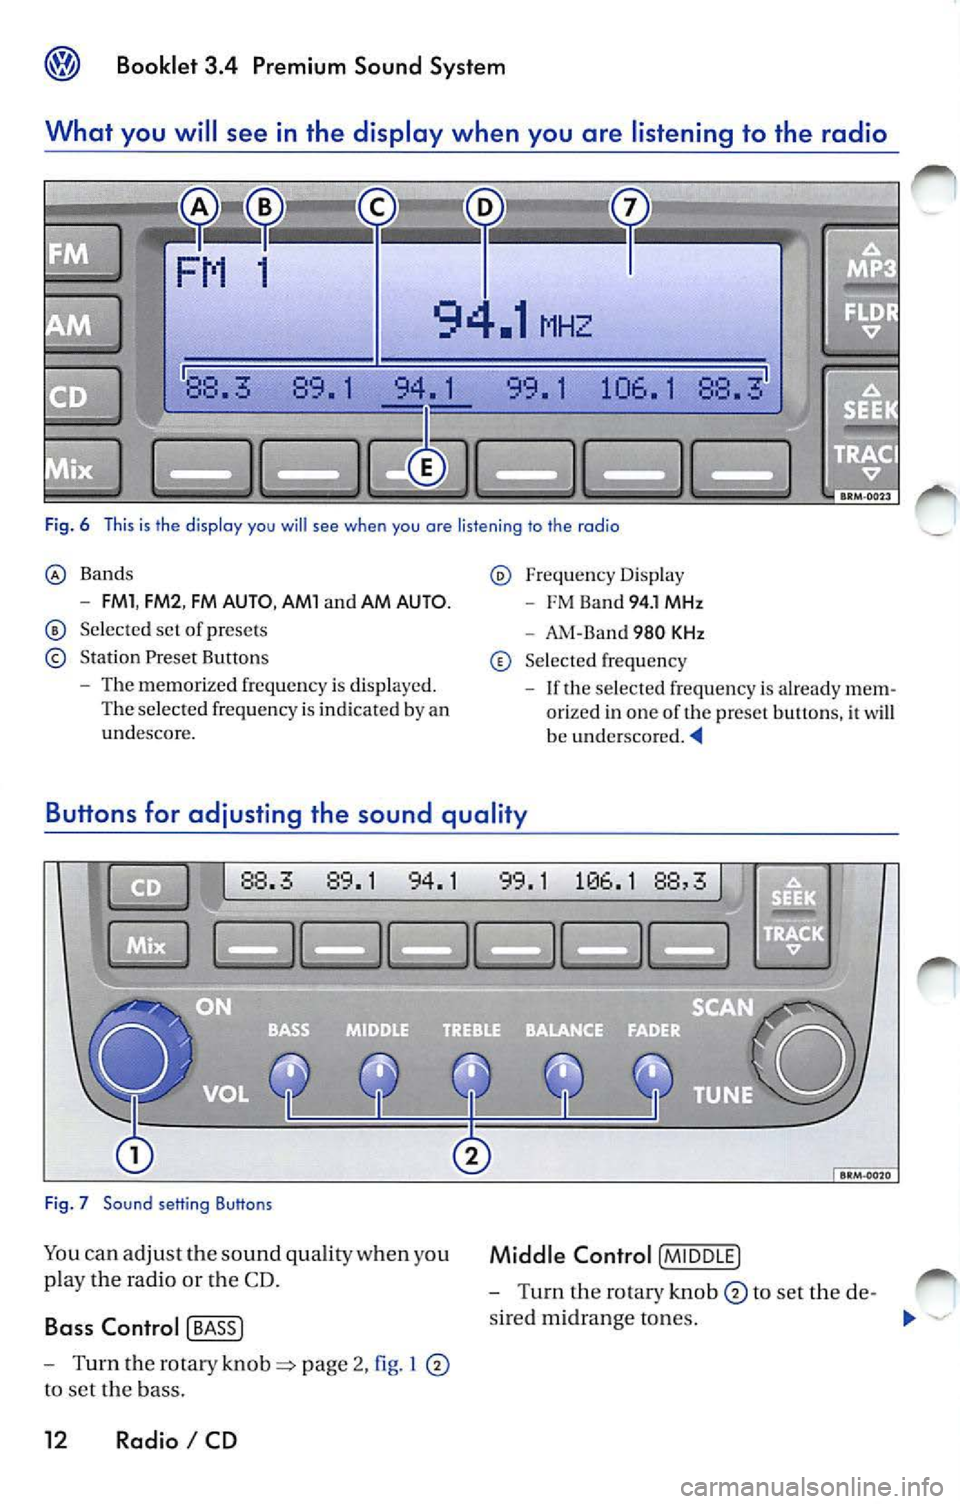
What you will se e in the di splay when you are listening to the rad io
88. 89. 1 94. 1 99. 1 106. 1 88.
Fig. 6 This is th e display you will see when you are listening to the radio
Bands
- FMl , FM2 , FM AUTO , AMl and AM AUTO.
Se lected set of presets
Station Preset Buttons
- The memorized frequ ency is displayed.
The selected frequency is indicated by an
undescore.
Freq uency Displa y
- FM Ba nd 94. 1 MHz
- AM-Ba nd 980 KHz
Selec ted frequency
- If the selec ted frequency is alrea dy m em
orized in one of the preset buttons, it
w ill be underscored.
Bu tton s for adju sting the sound qualit y
88.3 89.1 94.1
Fig . 7 Sound setting Buttons
Yo u ca n adju st th e so und quality when you
p lay the radio or the CD.
Ba ss Control [ BASS J
- Turn the rotary page 2, I
to se t the bass.
12 Radio I CD
1 1 88,
Middle Control [M IDD LE]
- Turn the rotary knob to set the de-
s ire d m idrange to nes.
"'
Page 448 of 477
![VOLKSWAGEN JETTA 2009 Owners Manual Booklet 3.4 Premium Sound System ®
Treble Control [TR EBLE]
- Turn the ro tary knob to set th e de
s ired treb le .
Balance Control (B ALA N CE]
- Turn the rotary knob to set th VOLKSWAGEN JETTA 2009 Owners Manual Booklet 3.4 Premium Sound System ®
Treble Control [TR EBLE]
- Turn the ro tary knob to set th e de
s ired treb le .
Balance Control (B ALA N CE]
- Turn the rotary knob to set th](/img/18/55687/w960_55687-447.png)
Booklet 3.4 Premium Sound System ®
Treble Control [TR EBLE]
- Turn the ro tary knob to set th e de
s ired treb le .
Balance Control (B ALA N CE]
- Turn the rotary knob to set the de
sired bala n ce between t he left and right
speakers.
Fade r Control !FADER !
-Turn the rotary knob to set the de
s ire d balance between the front and rear
the rad io unit.
Sat ellit e ra di o pr ovi ders
Volkswagen offers two satellite radio provider s:
• XM Satellite Radio
• Sirius Satellite Radio
Ask your authorized Volkswagen dea ler for more
information about the service each provider
Radio I CD 13
Page 449 of 477
Booklet 3.4 Premium Sound System
Activate your Satellite Radio Service
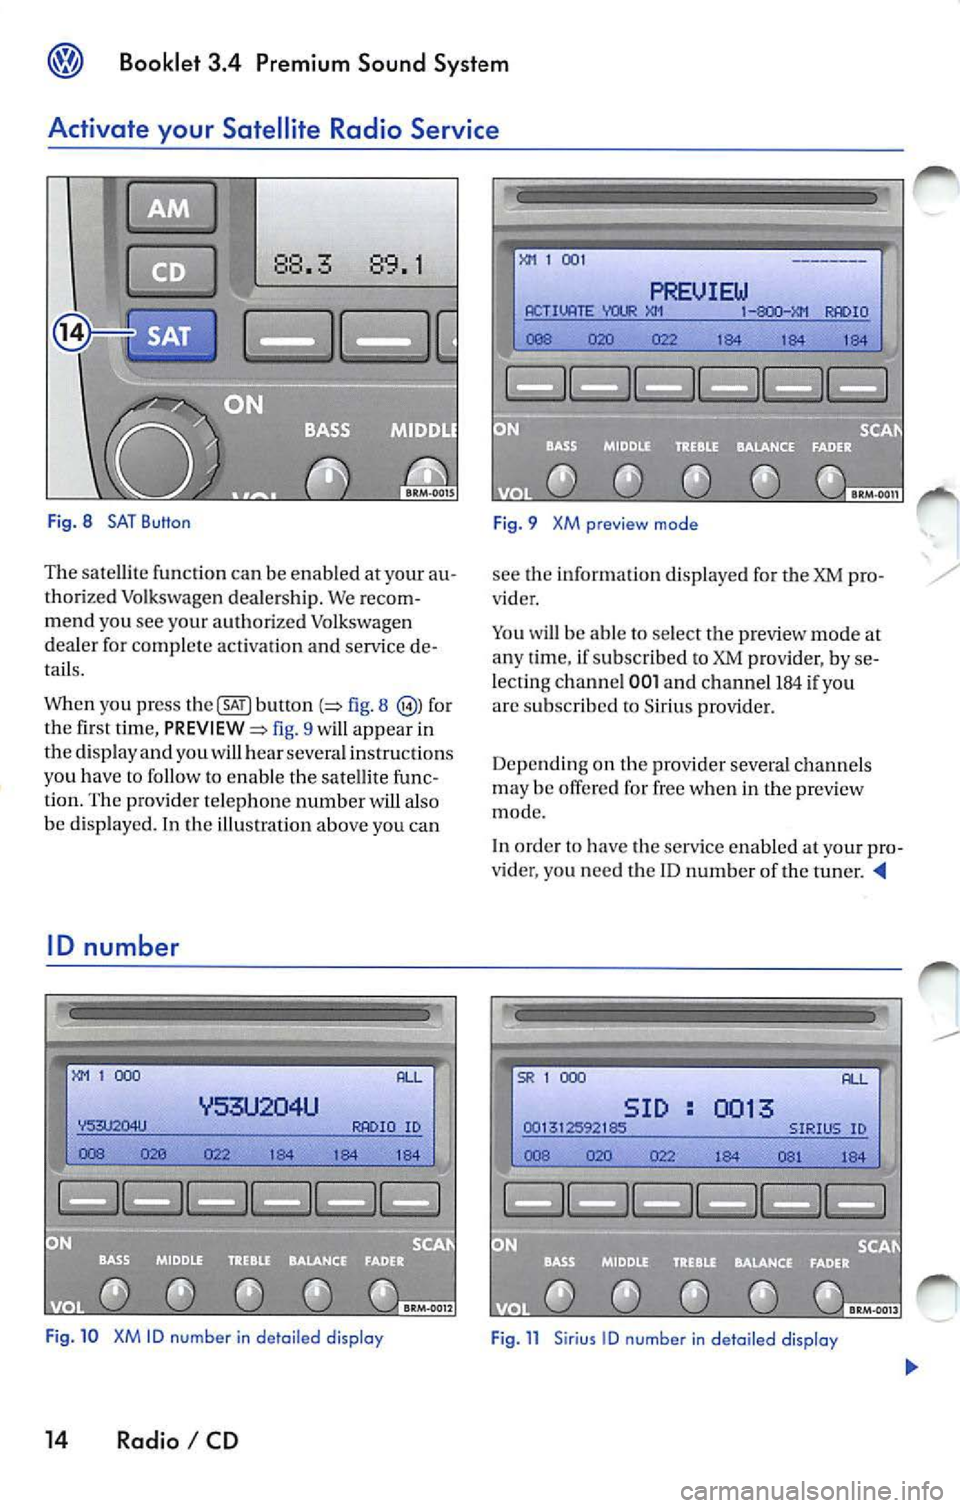
Fig. 8 SAT Button
The sate llite functio n ca n be en abled at your au
tho rized Volkswagen deale rs h ip. We recom
me nd you see your aut horized Volkswage n
de aler for complete activatio n an d service de
tails.
When you press
b utl on fig. 8 for
the fi rst tim e, fig. 9 will app ear in
the disp lay a nd you wi ll hear sever al ins truc tions
yo u h ave
to fo llow to enab le t he sa te lli te fu nc
tion. The prov ide r telep hone number w ill also
be d isp layed. In the illu stratio n above you can
ID number
1 000
ID
Fig . 10 XM ID number in de tail ed display
14 Radio I CD
1 00 1
PREUIEW ACTIVATE IO
184 1 84 184
F ig. 9 XM preview mode
see the informat io n d isplaye d for the XM pro
vider .
Yo u will be able to select t he p review mode at
a n y ti me , if su bscribed to XM prov ider, by se
lecting channel
001 a nd ch an ne l 184 if yo u
arc s ubscribed to Sirius provide r.
Depe nd in g on th e provi der sever al ch an ne ls
m ay be offe red for free w hen i n th e preview
mode.
In order
have the serv ice enable d your pro
v ider, you nee d t he ID n um ber of the t uner.
SR 1 000
SID 0013
Page 450 of 477
Booklet 3.4 Premium Sound System
To show the ID number in the display
-Before en ab lin g, press button
pa ge 14, fig. 8 The ID number wi ll
appear in the di spla y.
- After enabling, turn the
!SCAN/TUNE !
button page 10, fig. 5 until channel
000 is di sp layed
XM ID
Thi s number i s an eight character a lphanumeri c
numb er. Firs t, th e m essage RADIO ID will appear
in the di spl ay, then the eight-c haracter
ID number. Th edis pl aywi ll alt ernat e automatically
aft er a few seco nds.
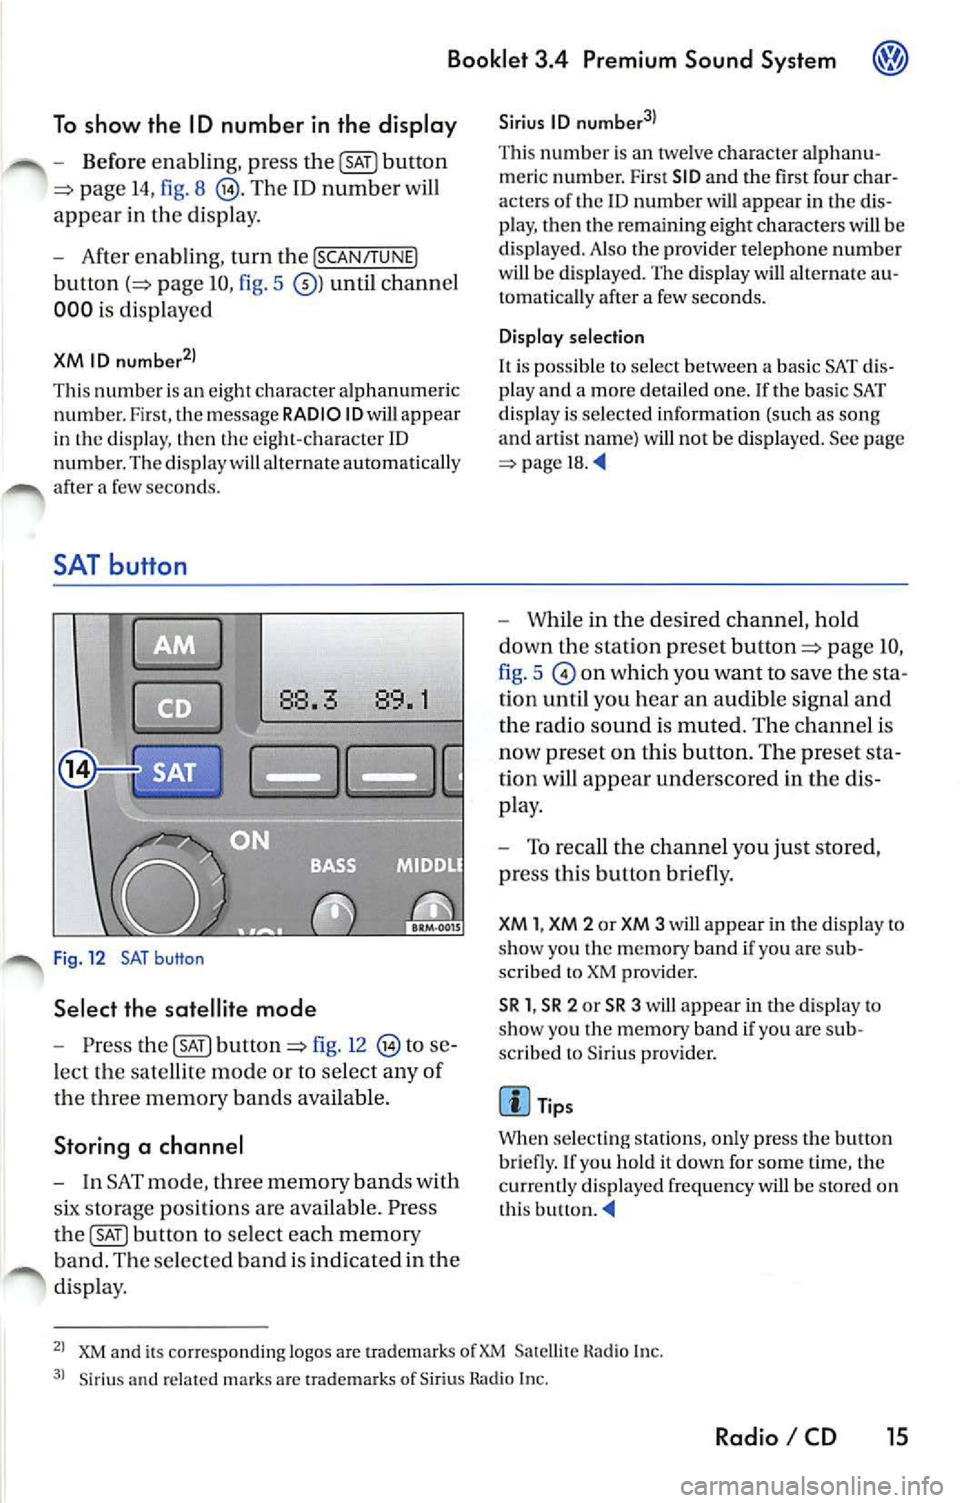
SAT button
88.3 89.1
Fig. 12 SAT button
Select the satellite mode
- Press button fig. 12 to se
l ect the sate llite mode or to se lec t any o f
d 1e thr ee memory b and s ava ilab le.
Storing a channel
- In SAT mode , memo ry band s w ith
storage position s are availabl e. Pre ss
button to select each memory
b an d. Th e se lec te d b and is in dic ated in the
di spla y.
Sirius ID
Thi s numb er is an twe lve character alphanu
m er ic numb er. First SID and the fir st four char
acter s of the
ID number will app ear in the dis
p lay, then the re m ainin g eight characte rs will be
di splaye d. Also the pro vider t elephon e numb er
w ill be displ aye d. The displa y will alternate au
tomati cally af te r a few second s.
Display selection
It is po ssibl e to select betwe en a ba sic SAT dis
pl ay a nd a mor e deta il ed one. If the basi c SAT
di spla y is se lec te d information (such as song
and artis t nam e) will not be displa yed. See page
=> page 18.
- While in the desired channel , h old
down the stat ion pre set
page IO,
fig . 5
on which you want to save the sta
tion until you hear an audible sign al and
th e radio sound is muted. Th e ch annel i s
now preset on this button. The pre set sta
tion will appear underscored in the di s
p lay.
- To reca ll th e c hannel you ju st sto re d,
pr ess this button briefly.
XM 1, XM 2 or XM 3 will appear in the d isplay to
s h ow you Lhc m emo ry band if you arc sub
sc rib ed to XM provider.
SR 1 , SR 2 or SR 3 will a ppear in the disp lay to
s ho w yo u the memory band if you arc s ub
sc rib ed to Sir iu s prov ider.
Tip s
Wh en se lec ting station s, onl y press the butt on
bri efly. If yo u h old it down for some tim e, the
c ur re ntly displ ayed frequ en cy will b e stor ed on
t h is butlon.
XM and its co rr es pon ding logos are uademark s Satellite Hadi o In c.
Siriu s an d related ma rk s ar c tra dem ark s of Sir iu s Rad io In c.
Radio I CD 15