Control VOLKSWAGEN JETTA 2010 Service Manual
[x] Cancel search | Manufacturer: VOLKSWAGEN, Model Year: 2010, Model line: JETTA, Model: VOLKSWAGEN JETTA 2010Pages: 477, PDF Size: 77.6 MB
Page 217 of 477
Booklet 3.1 Controls and Equipment
Function
In di splay
5 mi /h (-10 km/h)
Bock Dec reases t he se t va lue by 5 mph (10 km /h }.
Th e
Winter tires men u is close d and th e las t d is pla yed menu is
o pene d.
Tips
The m en us s ho wn in t he di spl ay dep end s on th e
veh icle elec tronic s an d th e o ption leve l of your
App lies lo ve hicles: wi th H igh line i nstr u ment cluster
ve hi cle. If you a re not s ure, as k yo ur authori zed
Vo lkswage n dea ler for as sis ta nce.
Example of using the menus with the windshield wiper lever
All menus in the cluste r can be used following the steps described here.
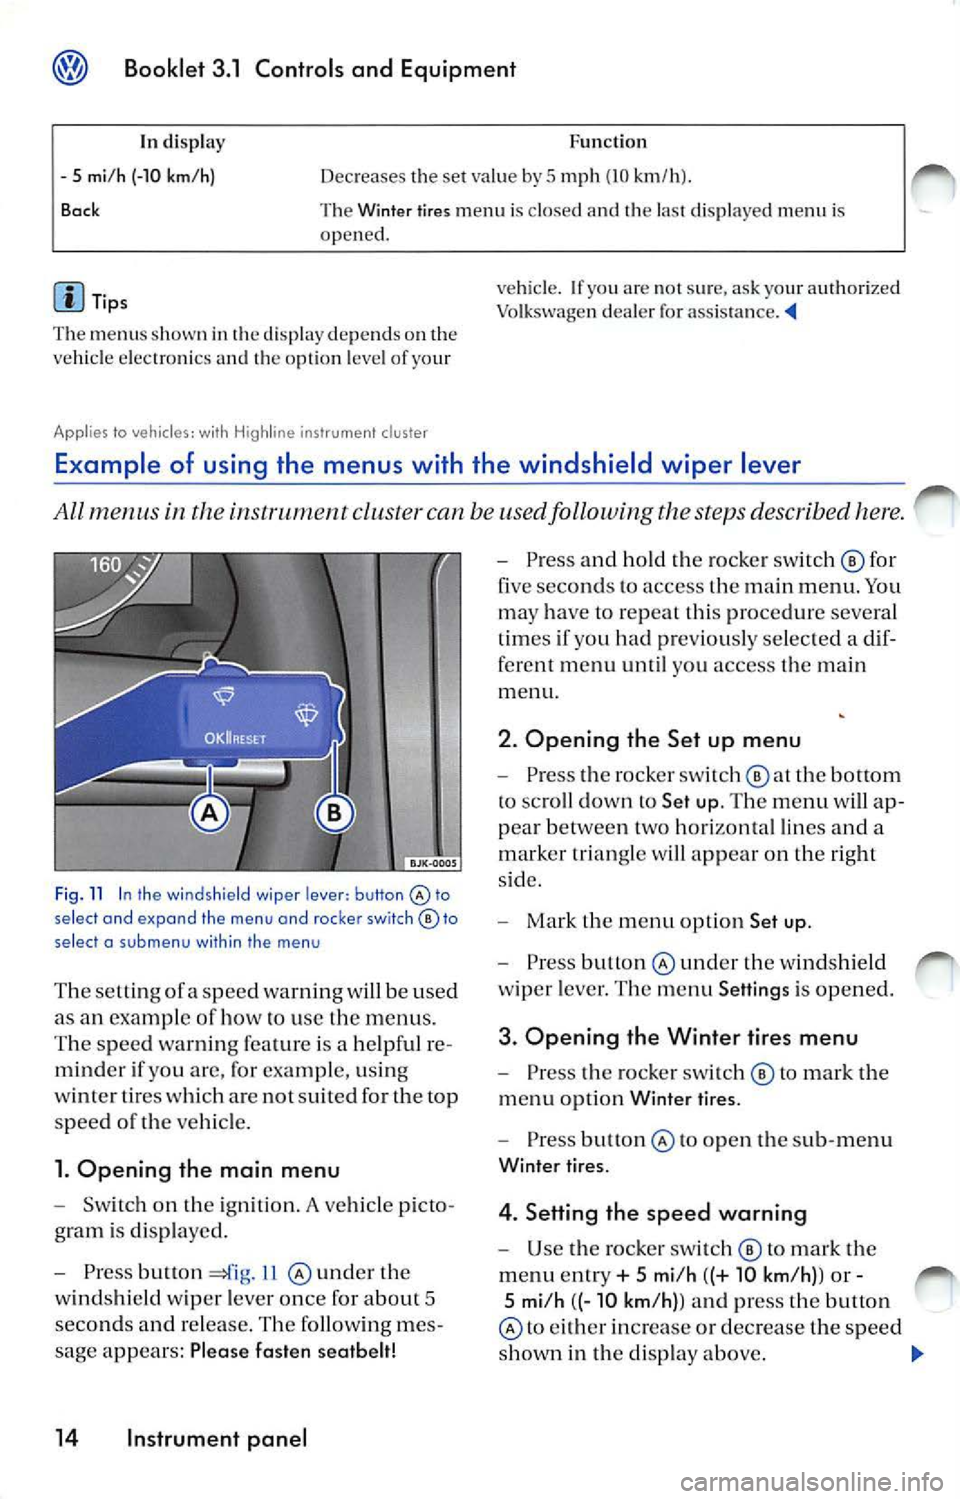
Fig . 11 In the wind shield wiper lever: button select and expand the menu and roc ker switch© to
select a su b m enu with in the men u
The se tting ofa sp eed warnin g will be used
as an examp le of how to use the menu s.
T he s pee d wa rnin g fe atu re is a help ful re
mind er if yo u are, for exa mpl e, u sin g
w int er tires w hich are not suit ed for the top
spee d
the ve hicl e.
1. Opening the main menu
Switch on the ig ni tion. A vehicle p icto
g ram is di spl aye d.
Press button 11 und er th e
w in ds hield wiper leve r o nce for abou t 5
seco nds and re lease . The followin g me s
sage appears: Plea se fasten seatbelt!
14 Instrument panel
Press an d hold the ro cke r sw itch © for
five seco nds to access the m ain men u. Yo u
ma y have to repeat this pro cedur e severa l
t im es if you had pr eviously se lec ted a dif
ferent me nu until you access the main
m enu.
2. Opening the Set up menu
Press the rocker switch the bottom
to sc roll dow n to Set up. The menu will ap
p ea r betwee n two hori zon ta l lin es and a
m arker tr ia n gle w ill app ear on the right
s id e.
Mark the m en u opt io n Set up .
Press under the w indshi eld
w ip er leve r. Th e m enu Setting s is opened.
3. Opening the Winter tires menu
Pr ess the ro cke r swi tc h © to m ark the
m enu opti on Wint er ti res.
Pre ss to o pen th e sub-m enu
Winter tir es.
4. Setting the speed warning
U se the ro cker sw itch © to mark the
m enu ent ry + 5 mi/h ((+ 10 km /h) ) or -
5 mi/h ((- 10 km /h) ) a nd press the button
to eith er in crease or de crease the spe ed
s h ow n in th e di sp lay above.
Page 218 of 477
Booklet 3.1 Controls and Equipment
5. Switching th e spee d warning on
and off
U se the ro cker switc h © to select
m enu point ON I OFF an d pr ess th e
bu tton @
sw itc h th e spe ed warnin g ei
on o r off. Thr ee das hes ---app ear al
t h e top of th e di sp lay if th e sp ee d wa rning
is sw itch ed off.
Th e ex amp le menu Winter tires
6. E xiting the Winter t ires menu
Sc roll dow n to Back and pre ss butt on
The function "Wi nter tire s" w ill gen erate a vis
ib le an d aco ustic wa rning on ce the ve hicle has
r eac hed the set sp eed.
In disp lay
Wi nter tires
X mi /h (X km /h )
or --- Func
tio n
Th e name of th e di sp layed men u
D is pl ay of th e s pee d curr entl y se t
o r clas hes if th e function is sw itc h ed off.
ON/ OFF Swit c h es th e fun ctio n on or off.
+ 5 mi/ h (+1 0 km /h )
- 5 mi/h (-10 km /h )
B ock I
n crease the set va lu e by
5 mph (10 km /h ).
Decreases the set va lue by
5 mp h (10 km /h ).
T he W inter tires m en u is cl osed a nd the las t di spl aye d menu i s
ope ned.
d is p la y depe nds o n th e
ve hicl e e lectro nics and th e op tio n leve l o f yo ur
Vehicle status menu
vehicle. If yo u are not sur e, ask your Vo lkswagen dea le r fo r ass is ta nce . ._
Thi s m enu will disp lay warning or information text s.
Op eni ng the Veh icl e status m enu
Se lec t Vehicle statu s men u and press
b u tto n
14 , fig . 11 @ und er th e
w indshie ld wipe r leve r.
O r
Pr ess but ton 13 , fi g. 10 th e
mul ti-func tion stee rin g w hee l
unt il th e
Veh icl e s tatu s menu i s di sp laye d.
Where applicabl e P
ri ori ty
2 warning s and i nformatio n tex ts w ill
d issa pea r from the disp la yed automatica lly af te r
so me time, but the y w ill be s tored in th e Vehi cle
s ta tu s m enu .
I f th ere are no priorit y
I warnin gs, then the pri
or ity 2 wa rnin gs will appear one af ter th e oth er.
If th ere are no prio rit y
I or priority 2 wa rnin gs
p rese nt, OK or N o en try w ill appea r in th e
d is pl ay . ._
Instrument panel 15
Page 219 of 477
Bookle t 3.1 Controls and Equipm ent
Set up menu
Th e se t up m enu u se d to mak e variou s diff ere nt setting s fo r th e function s in th e
ve hicl e.
Opening th e Set up menu - Press butto n 13, fig . 10 th e
m ult i- fun cti on stee ring w hee l
unti l th e
Set
u p m en u i s dis p la ye d.
- Se
lect th e m enu opti on Set up fr om th e
ma in menu
1 2 a nd press button
14, fig . 11 und er th e wi ndshie ld
w ipe r le ver. Or An examp le of how use the m enu 13 or 14 .
Se ttings
Tim e
Wint er tire s
L ang uag e
Unit s
Co mpa ss
Co nve nience
Li ght s
& Vis io n
D isplay off
Ba ck
Tip s F
un cti on
Yo u can set the clock hou rs a nd min utes both in th e in strum ent
cl uster a nd in t he Navig ation Sys te m . C hoose be twee n a 12 a nd 2 4
h ou r d is p lay a nd switc h
Summ er tim e (an S ap pears in th e up per of the d isp lay)
Yo u ca n en te r h ere w hether an opt ica l an d aco usti c warn ing s hould
be made an d at w hic h speed. You can use th is fun ctio n if yo u have
i n sta lled wi nte r tir es w hic h a re not su ited fo r th e to p spe ed of your
ve hicl e =>boo klet 3 .2 "Tips a nd Ma inten an ce", ch ap ter "W hee ls" .
T he tex ts in th e dis pl ay a nd in th e Nav igat io n Sys tem ca n be di s
p layed in seven diffe rent lan guages.
T he unit s use d for te m perature, fue l co nsu mpt io n va lues an d dis
t ances
set here .
Th e co mpass c an be calib ra te d and th e va ria nce zo ne adj uste d
18
T hi s m en u is use d
to make t he se ttin gs fo r the convenience f unc
ti o ns in t he ve hicle 17
Va rious se tlings can be m ade f or th e ve hicle ligh ti ng in th e Lig hts
& Vis io n m enu 17
T he dis play is sw itc hed off .
co mes bac k on when yo u sw itch th e
m ain men u back on or if a wa rning is detec ted.
You w ill ret urn
th e m ain m enu.
• T he m enu s shown in th e display dep ends on
th e ve hicle elec tro nics and th e op tio ns in stall ed
o n yo ur ve hicl e. lfyo u are no t sur e, ask yo ur au
th ori ze d Vo lk swage n dea ler o r qu alifi ed wo rk
s h op fo r ass is ta n ce . •
Your autho rize d Vo lkswage n dea le r or qu ali
fied works hop can p rogra m or mo dify ad dition al
fu nct ions depen ding o n kin d of dis play
on your ve hicl e.
• The Settings men u ca n onl y be o pened when
th e veh icl e is at a sta nd still
Wher e app licable
16 Instrument panel
Page 220 of 477
Booklet 3.1 Controls and Equipment
Opening the Lights & Vision menu
Select Set up from the main m enu
12a nd pr ess the button 14,
ll @ underthe wind shi eld wip er leve l.
Or
Ugh ts & Visio n
Pre ss button 13, fig . on the
multi fun cti on stee ring whee l
until th e
Set up menu i s dis pl aye d.
Selec t th e sub -m enu Lights Visio n.
An ex ampl e of how to use th e menu 13 o r 14.
Fun cti on
Coming Home Her e yo u ca n dete rmi ne how long the light s should remain on aft er
yo u h ave loc ked th e ve hicle 47.
Leavin g Home Here yo u ca n dete rmin e how l ong th e lig ht s s ho uld on when
y o u unlo ck th e veh icl e.
Fo otwe ll light
Comfort i nd ic. 13rightn ess of th e footwell ligh ting when t he doo rs are op en.
Th e tum sig nal w ill fla sh at leas t thr ee tim es if the turn sign al lever
i s o pera ted to chan ge lan es
49
Fact ory sett ing
Bac k Rese ts th e funct io ns in thi s m enu to th e fa cto ry se tting s.
Yo u will return to th e Se ttings m enu .
Tip s
The menu s shown in the dis pla y depend s on the
ve hicl e elec tron ics and th e opti on l evel of yo ur
Convenience functions m enu
ve hicle. If yo u ar e no t sur e. ask your aut ho ri ze d
Vo lkswagen deal er fo r ass is ta nce. '4
The con venien ce is used to make th e sett ings fo r the conve 11 ie n ce function s
in the
Opening the Convenience menu
Select Set up from the m ain m enu
12an d pr ess the but ton 14,
11 und er th e w indsh ie ld wipe r leve r.
Or
Where ap plicable
Wher e app licable
P ress bu lion 13, fig. o n th e
mu lt ifun ctio n stee rin g w hee l
unt il th e
set up m enu i s di spl ayed .
Selec t th e sub-m enu Convenience .
An exa mpl e of h ow to use th e 13 o r 14.
Instrument panel 17
Page 221 of 477
Booklet 3.1 Controls and Equipment
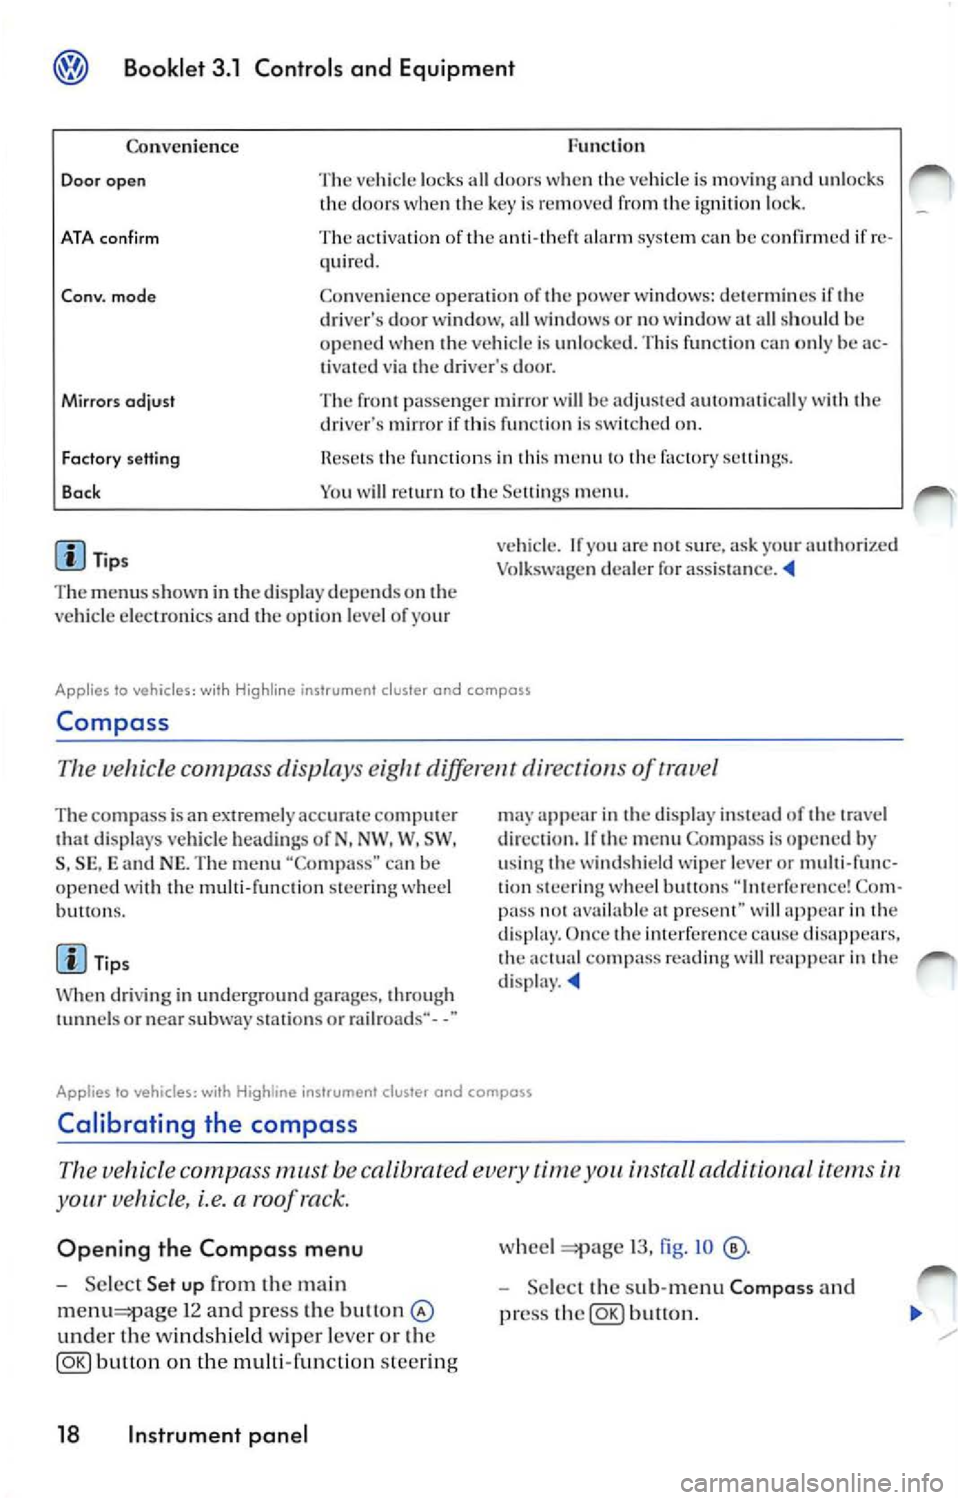
Func tion
Co nven ience
Door open The vehicl e lock s all door s w he n th e vehicle is mov ing and unl ocks
th e door s w hen key is re mo ved fr om ignition loc k.
ATA con firm The activati on of ala rm sys te m ca n be confirmed if re
quir ed .
Co nv. mode Co nve nien ce opera tio n of powe r w ind ows: dete rm in es if dri ver's door wi ndow, all w indows o r no window all sh ould h e
o p en ed when ve hicle is unlo cked. Thi s fun ctio n ca n o nly be ac
t ivated via dr iver's door.
Mirrors odjust The pa sse nger mir ror will be adju ste d au to mati cally wit h dri ve r's mirror if thi s fun cti o n is on.
Factory setting
Bo ck fun ctio n s in thi s m en u factory sellin gs.
Y o u w ill
m enu .
Tip s
T he m enu s show n in
displ ay depends on ve hicl e elec troni cs and o pti on l eve l of yo ur v
ehicl e. If
arc s ur e, ask yo ur authori zed
Vo lk sw age n dealer for assis ta nce .
Applies lo vehicles: wi th Hig hline ins trument cluster and compass
Compa ss
Th e ve hicle c ompa ss displa ys diff ere nt dir ect of trave l
The com pass is a n extremely ac curat e comput er di spl ays veh icle hea di ng s of N, NW . W, SW ,
S , SE , and NE. Th e m enu "Co mpa ss" can b e
op en ed wit h th e mu lti-fun cti on stee ring w hee l
bu H ons.
Ti ps
W hen dri vi ng in und erg round garages, throug h
or nea r subwa y stat ions o r rail roads·· - -"
app ear in displa y in stead of tr ave l
di rec tio n. If
m enu Compa ss is op en ed by
u sing w ind shi eld wipe r lever or multi-func
tion stee rin g w hee l butto ns Co m
pa ss avai lable prese nt" wi ll in dis p lay. Once imerfer cn ce cause dis appears. co mp ass rea ding will re app ear in d isp lay.
Applies to vehicles: with instrument cluster and compass
Calibrating the compass
vehicle compass must be calibrated time install aclditionnl i te m s
your vehicle, i.e. a roof ra ck.
Opening the Compass menu
Se lec t Set up the ma in
1 2 and press the bu11on
und er th e windsh ie ld wiper leve r o r th e
button on the multi-func tion steer ing
18 Instrument panel
wheel 13, fig . IO
Selec t th e sub-m enu Composs and
pr ess
button.
Page 222 of 477
Booklet 3.1 Controls and Equipm ent
Calibrat ing the compas s
-Ma rk the m enu ent ry Calibra tion and
pr ess
butt on. The fo llow ing m es
sage will be di sp layed To calib rate drive
round a comp lete circle.
- Drive t he ve hicle in circl es a t 5 mph (10
km/h) or less until th e disp lay indica tes
th at th e ca libra tio n process has bee n com
pl eted. • Durin g th e ca libration process or the cali
b ra tio n process is not su ccess rully accom
pli sh ed th e word "CA I."
will ap pear in the dis
p la y in stead or the directio n.
• 1r "CAL" ap pea rs in the dis p lay instead of the trave l di rectio n th e co mpa ss mu st be ca librat ed.
• While calib ratin g th e co mpass do no t drive
w ith the rea r lid ope n or the rea r seatback un
l o ck ed to avoid ina ccurate
Adjusting the compass variance zone
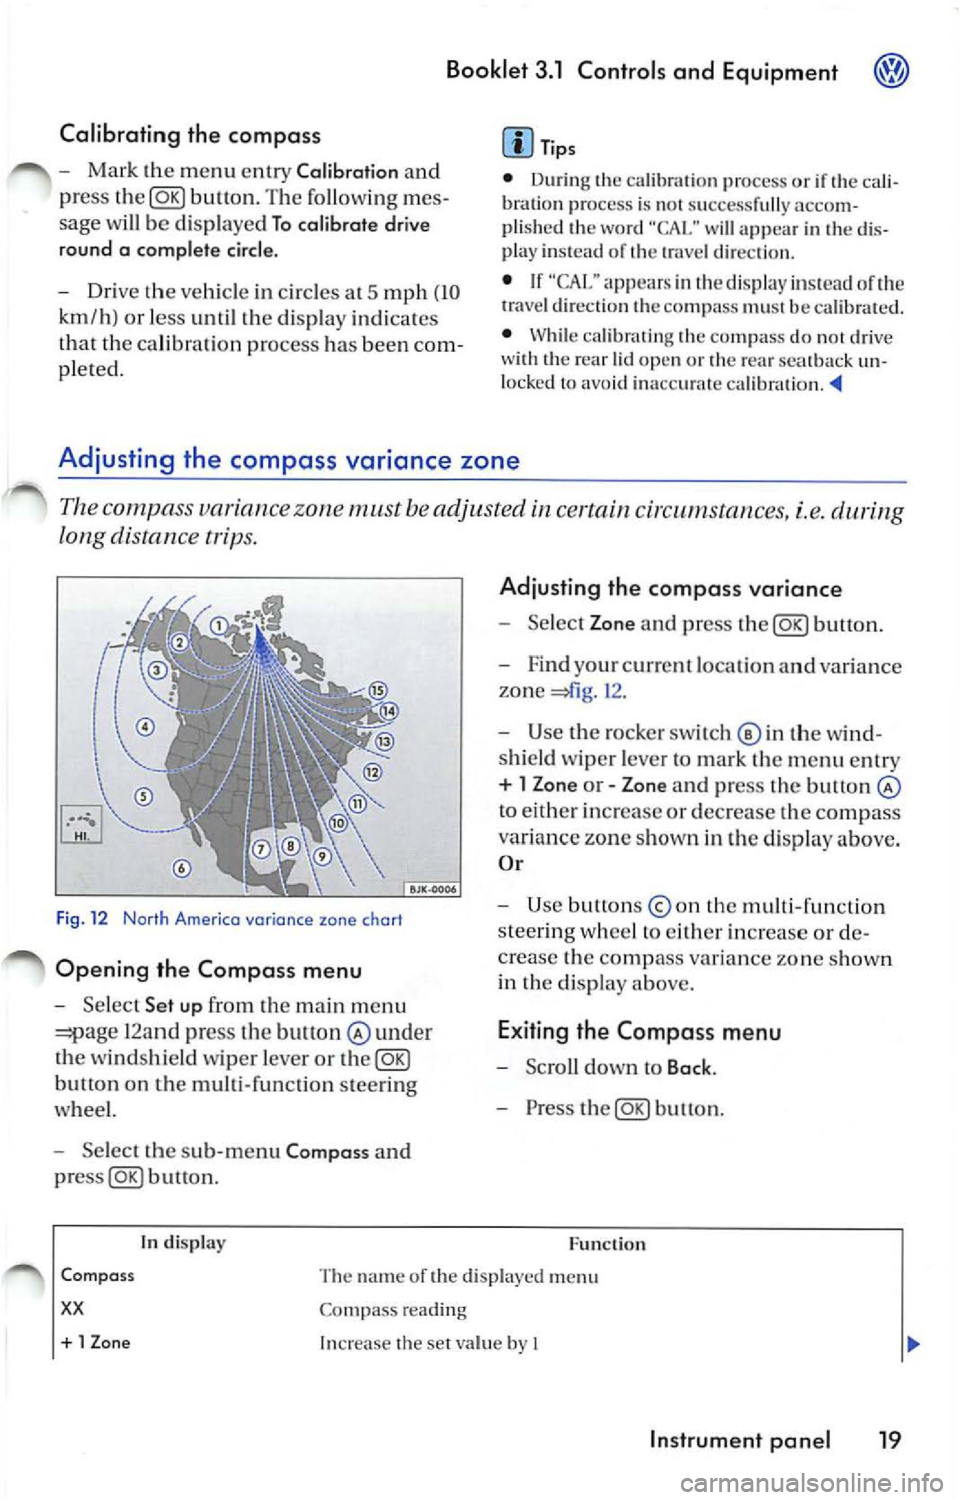
Th e c ompa ss variance zone must be adjusted certain cir cums tances, i.e.
long distance tr ips.
F ig . 12 Norlh Americo variance zone chort
Opening the Compa ss menu
- Se lec t Set up fr om the main m enu
12and press the bult on under
th e winds hield wiper leve r or the@g)
butt on on the multi-function steer ing
whee l.
- Select the sub -m enu Compa ss and
buu on .
tn disp lay
Adju sting th e compass variance
- Select Zone and press button.
- F ind your cur rent loca tio n an d varia nce
zone
1 2 .
- Use the rock er switch© in th e wi nd
s hi eld wiper leve r to ma rk th e m enu entr y
+ l Zon e or - Zone and press the button
to eith er in crease or decrease the compass
variance zone sh own in th e d isplay above.
O r
- Use button s
the multi -fun ction
s tee rin g w hee l to eith er increase o r de
c rea se the comp ass va ria n ce zone s how n
in th e di sp lay above.
E xiting the Compa ss menu
- Scro ll down to Back .
- Press the@g)button.
F u nc tion
Com pass
xx
The name or the di sp layed menu
Co mpass reading
+ 1 Zon e Increase the se t va lue by I
In strument pan el 19
Page 223 of 477
® Booklet 3.1 Controls and Equipment
In display Function
-1 Z
one
Ba ck Dec
reases the se t va lue by I
Th e Compass m enu is cl osed and the last displayed menu is ope ned.
Tips
The menu s sho wn in the disp lay dep end s on th e
ve hicl e electro nics and the o ption leve l of your
Warning lights
Overview of the warning lights
vehicle. If yo u are no t s ure, ask your authorize d
Vo lkswage n dealer for
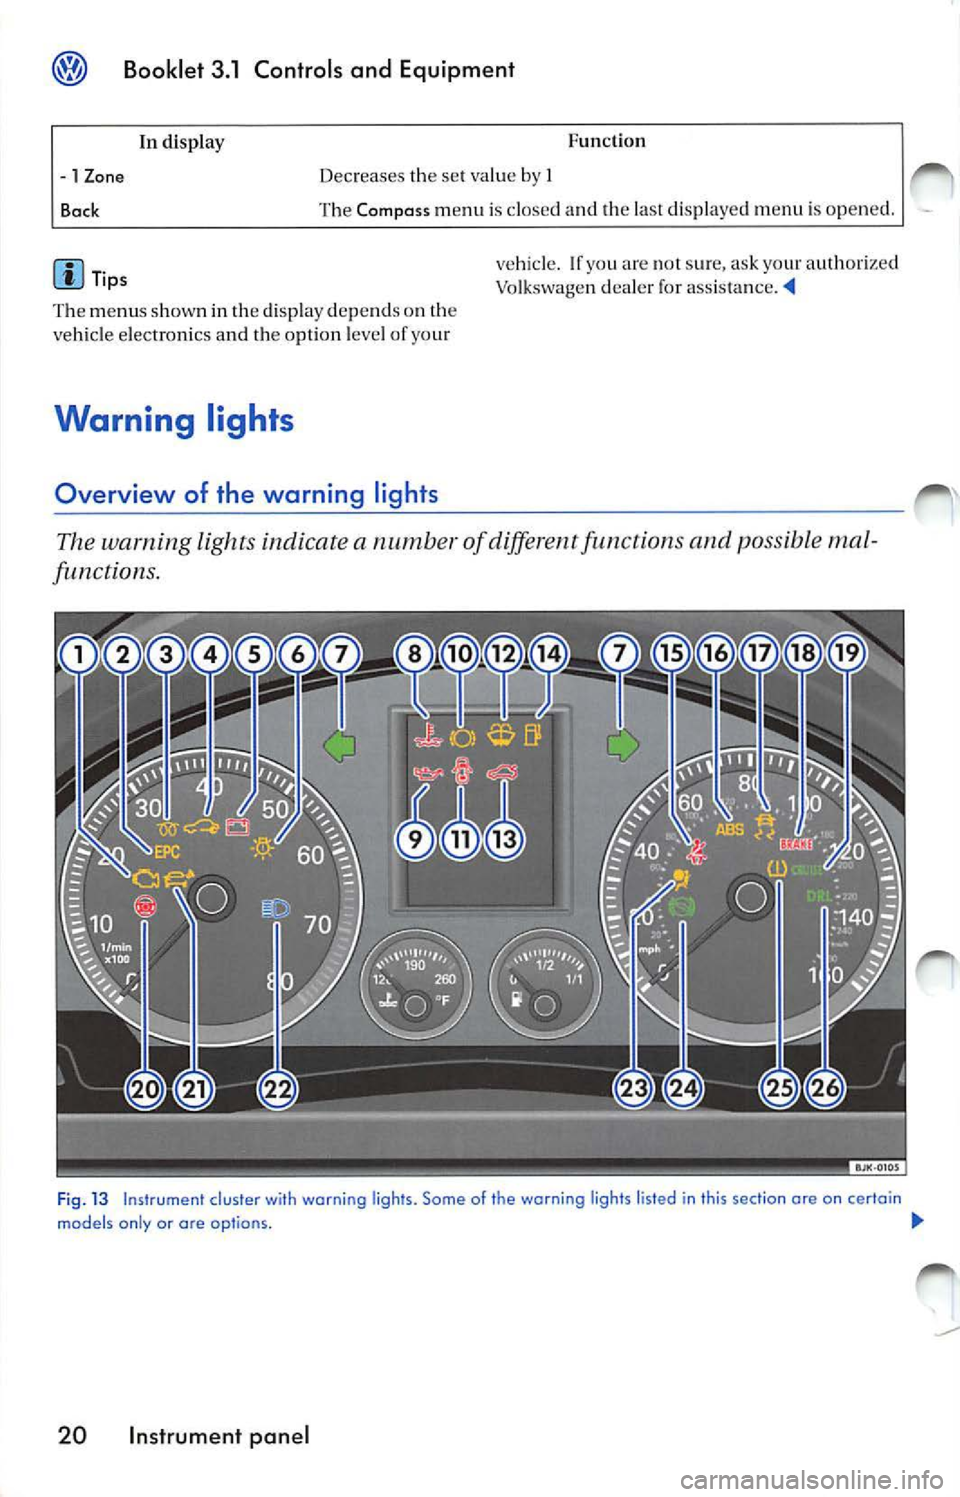
The warning light s indicate a numb er of diff ere n t functions and possibl e mal
functions.
Fi g. 13 Instrument cluster wi th warning ligh ts. Some of the warning lights listed in this section ore on certain
models only or are op tio ns. !JI,,
20 Instrument panel
Page 224 of 477
Booklet 3 .1 Control s and Equipm ent @
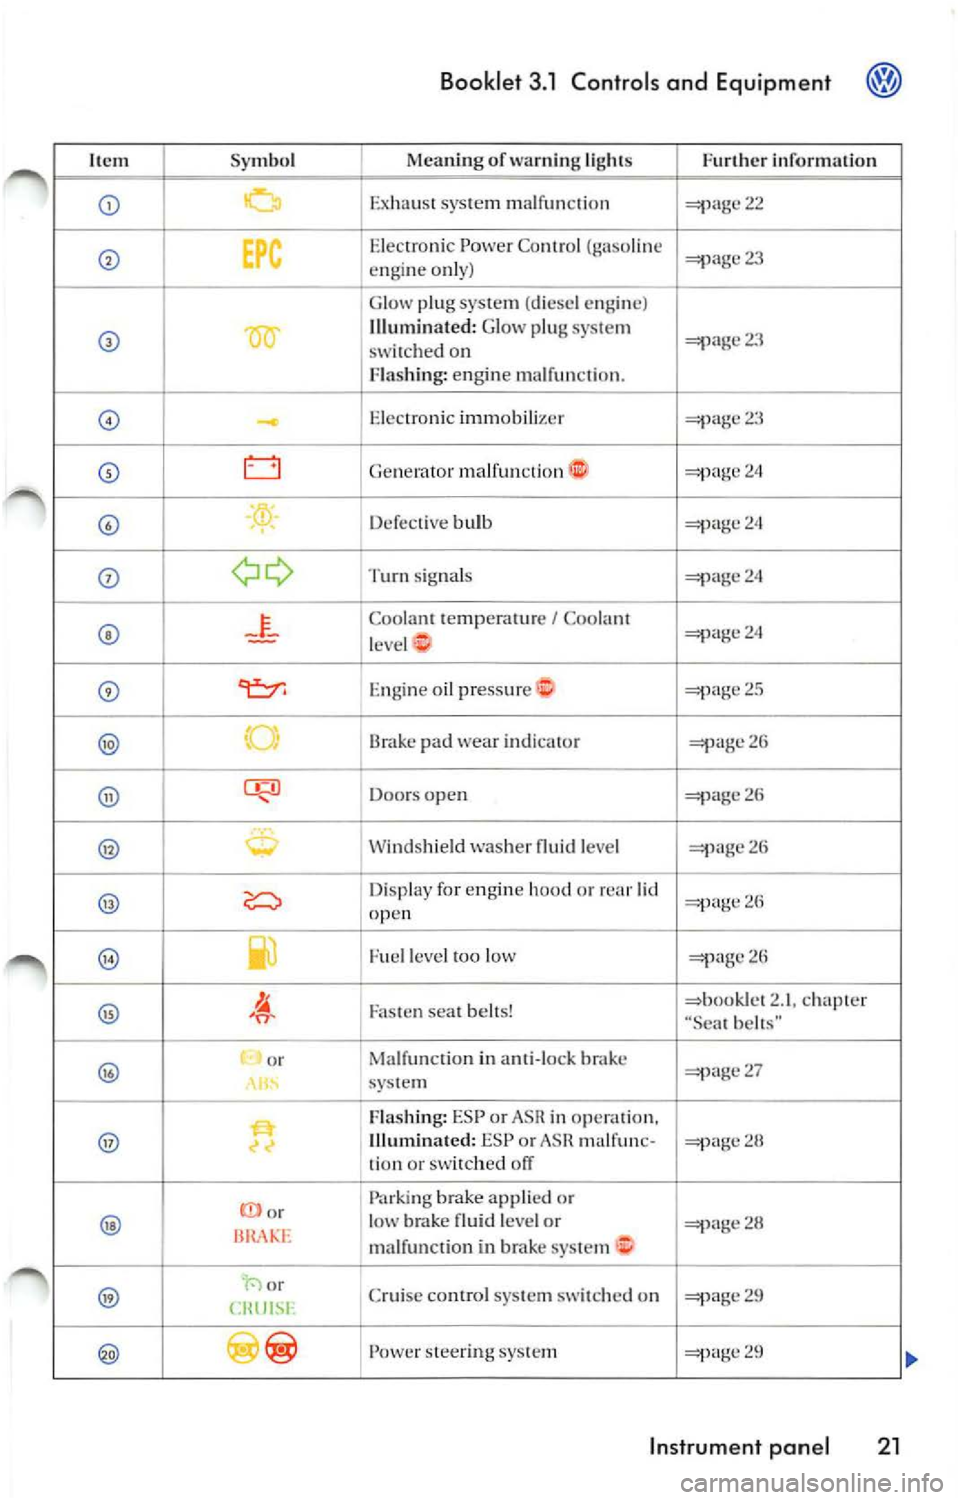
Sy mbol Meaning or warning lig hts Further
Exhau st sys tem m alrun cti o n
EPC Elec troni c Power Contr ol (gaso line eng in e only)
G low plug sys te m (d iese l e n gin e)
Ill umi nated: Glow p lug sys tem switch ed on
F lashi ng: engine malrun cti on.
Electronic immobilizer
-Genera tor ma lrunc1ion fi::i
bulb
Turn sig nal s
Cool ant te mp erat ure I Coo lant
l evel 1'
I oil pre ssur e
Bra ke pad wear indicator
Doo rs open
washer leve l
Dis play fo r engin e hood or rear lid o pen --
Fu el l ev el too low
Fa ste n sea l be lts! 2.1 , ch ap te r "Sea t
or in anti-lock 27
sys te m
Fla shi ng: ESP or ASR in operation,
ll Ill umi nated: ESP or AS R 1io n or sw itch ed
Parki ng applied or low brake fluid l eve l o r 28 m alrunct ion
· or
Crui se contr ol sys te m sw itch ed on
Powe r stee ring sys te m
In strum ent pan el 2 1
Page 225 of 477
Booklet 3.1 Controls and Equipment
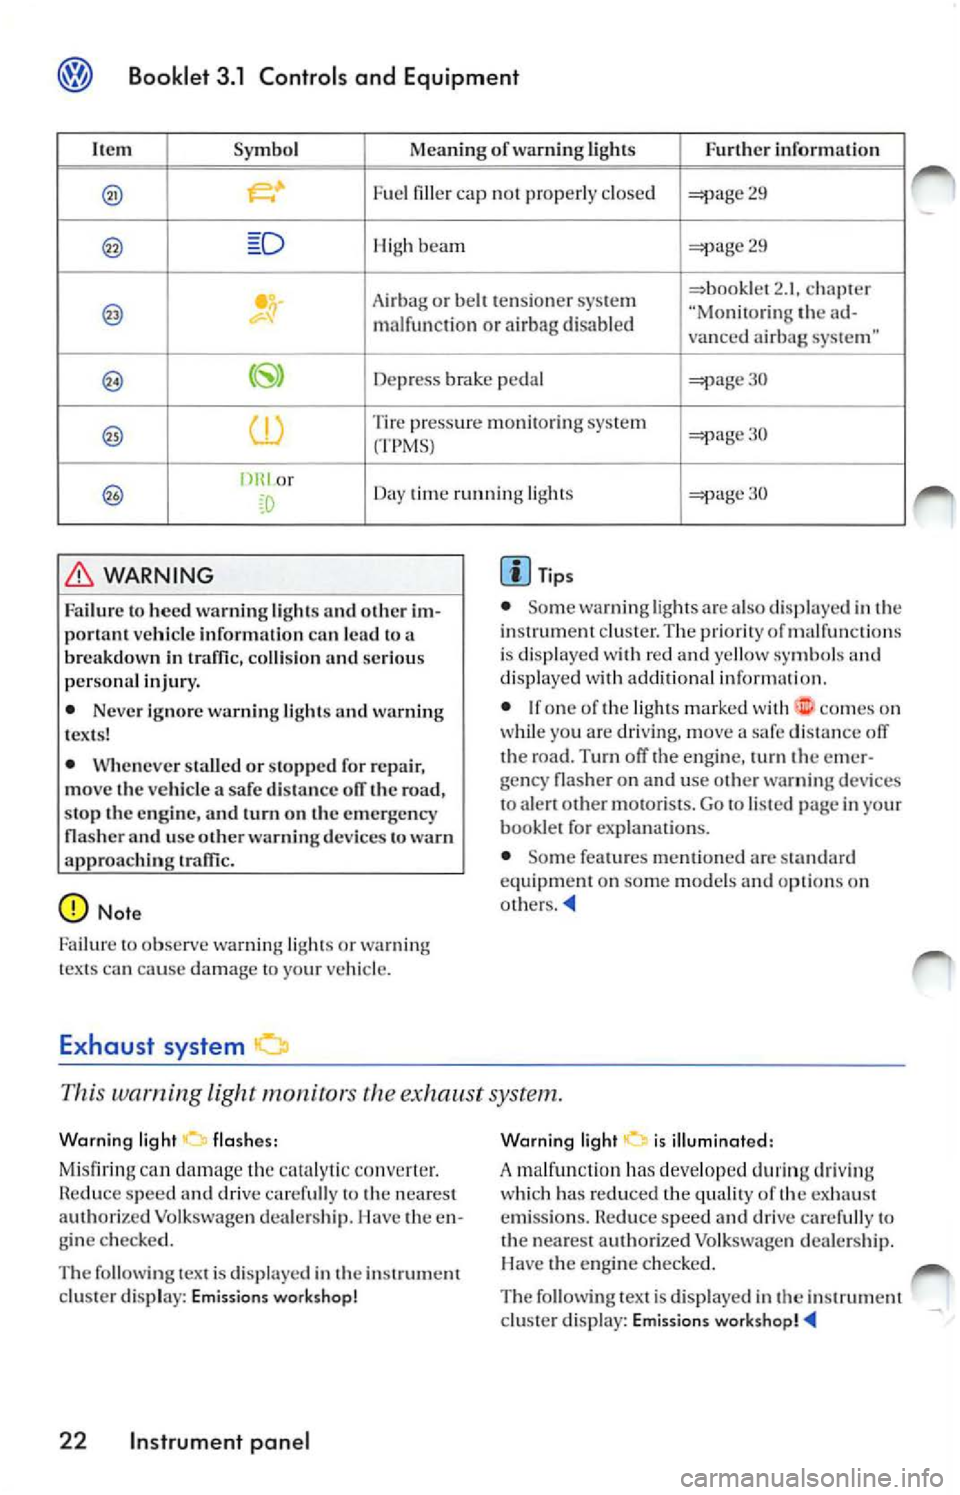
It em Symbol Meaning of warning Lights Fur ther informa tion
. Fue l fi lle r ca p not prop erl y clo sed 29
Hi gh beam 29
Ai rba g or b elt t en sio ner sys te m 2. 1. ch apt er "Mo nitorin g the m alfun cti on o r airb ag disabl ed
vanced airbag system"
Depress pedal 30
Tire press ure m onitorin g syste m 30
(TPMSJ
or
Day time running lights
WARNING
Failur e to heed warn ing l ig ht s and o ther im
por tan t ve hicle informatio n can lead to a
b rea kdow n in
coll is io n an d se rio us
p erso nal injur y.
• Neve r ign ore w arn ing lig ht s and warn ing
t ex ts !
• Whe neve r sta ll ed o r sto pp ed for re pa ir,
move the vehicle a safe dis ta nce ofT the road ,
s top the en gine, and turn on th e emergency
na sher and u se other warn ing device s to
approac hin g
Tip s
• Some warn ing lig hts ar e also displ aye d in th e
instru ment cluster. The pri orit y of malfun ctio ns
i s di spl ayed w ith red and yellow sy mbo ls and
d isp laye d with addition al in for mat ion.
• I f o n e o f th e ligh ts mark ed wit h
comes o n
wh ile yo u are driving , mo ve a safe dista n ce off
th e road. Turn off the en gine , turn the e mer
ge ncy flas her o n and use o ther
devices
t o alert ot her motorists. Go to listed page in yo ur
book let fo r ex planations.
• Some fea tures menti oned are
eq uipment on some models options on
This warning light exh aust system.
W arnin g lig ht
flashe s:
Mi sfiring
damage th e co nverter .
Red uce sp ee d and drive caref ull y to the neares t
au thorized Vo lkswage n dea le rs hip . I lave the e n
g in e c hecke d.
T he follow in g tex t is di spla yed in th e ins trument
clu ster disp lay: Emissions workshop !
22 Instrument pan el
Wa rnin g li g ht i s illumin ated:
A malfun cti on ha s deve loped d urin g driving
w hi ch ha s red uced the qualit y of th e ex haust
e mi ssio n s.
spe ed an d dri ve c arefull y to
th e nearest a uthorized Vo lk swage n deale rs h ip.
H ave the engi ne checke d.
The fo llow ing tex t is displayed i n the instrum ent
cl uste r display: Emissio ns
Page 226 of 477
Booklet 3.1 Control s and Equipm ent @
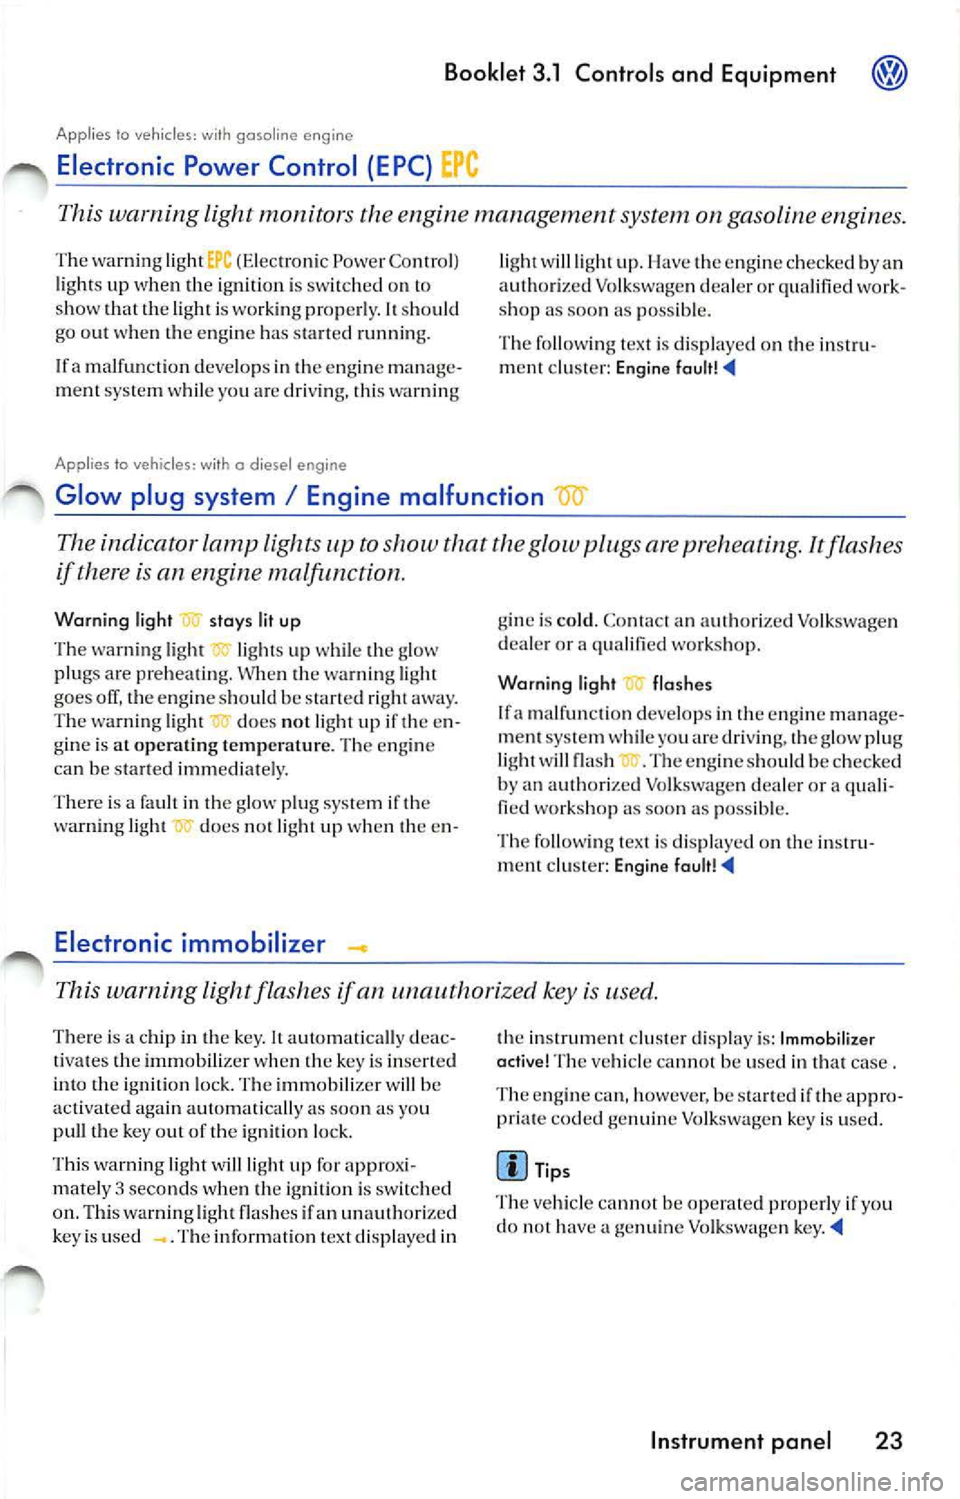
Applies to vehicles: with gasoline engine
Electronic Power Control (EPC}
This warning light monitors the engine management system on gasoline eng ines.
The warn ing light £ C (Electron ic Power Contr ol)
li ght s up whe n th e ig niti on is switched o n to
show that the light i s work ing prope rly.
It sh ould
go out when the e ngine has s tarted running.
! fa ma lf un ction develo ps in th e engine manage·
m ent sys tem whil e yo u are dr iv ing, thi s warning
Applies to vehicles: with o diesel engine li
ght wi ll light up. Ha ve the e ngin e checked by an
au thori zed Vo lkswage n dea ler or qua lified shop as soo n as po ssible.
Th e followi ng tex t is disp laye d on the
m en t c lu ster: Engine
Glow plug system I Engine malfunction
The indicator l amp lights up to show that the glow plugs are preheating . It flashes
if the re is an engine malfunction.
Warning light
stays lit up
Th e wa rning light lights up whil e th e
plug s are prehea ting. Whe n the warnin g light
goes off, the en gine sh ould be s tarted right away.
The warn ing light do es not light up if th e en ·
gi ne is at opera tin g te mperature . Th e eng ine
ca n be s tart ed imm ediate ly.
There is a fault in the
plu g sys te m if the
wa rnin g ligh t does not li ght up when the en ·
Electronic immobilizer -
gine is cold. Co ntact an au thorized Volkswage n
d ea le r or a qualifi ed workshop.
Warning lig ht
flash es
lfa mal func tion deve lops in th e eng ine manag e
m ent sys te m whil e yo u are drivin g, th e glow plug
light will flas h . The engine sh ou ld be checked
b y an author ize d Volkswagen dea le r or
quali·
fi ed wo rksh op as soo n as possib le .
Th e fo llow ing te xt is di spla yed on the instru·
m ent cluster: Engine
This wa rning light flashes if an unauthoriz ed key is used.
T here is a ch ip in th e key. It a u tomatica lly deac·
ti vat es the imm obilize r when th e key is in se rted
in to th e igniti on lock. T he immobili zer will be
a cti vated again aut oma tica lly as s oo n as you
p ull th e ke y out of the ig nit ion lock.
T his wa rning lig ht will light up for appro xi
m ate ly 3 seconds wh en th e ignit ion is switc hed
on . Thi s warni ng ligh t fl ashes if an un auth orized
k ey is use d . The in format io n text displayed in t
h e in strument clu ste r di spla y is: Imm obilizer
active ! Th e ve hicle cannot b e used in th at case .
The en gin e c an , h oweve r, be sta rt ed i f th e
pria te co ded genu ine Vo lksw age n ke y is used.
Tip s
Th e veh ic le ca nnot be opera te d proper ly if you
d o not h ave
genuine Vo lk swagen
In strum ent panel 23