display VOLKSWAGEN PASSAT 1995 B3, B4 / 3.G Service Workshop Manual
[x] Cancel search | Manufacturer: VOLKSWAGEN, Model Year: 1995, Model line: PASSAT, Model: VOLKSWAGEN PASSAT 1995 B3, B4 / 3.GPages: 369, PDF Size: 12.33 MB
Page 127 of 369
Downloaded from www.Manualslib.com manuals search engine 42-31
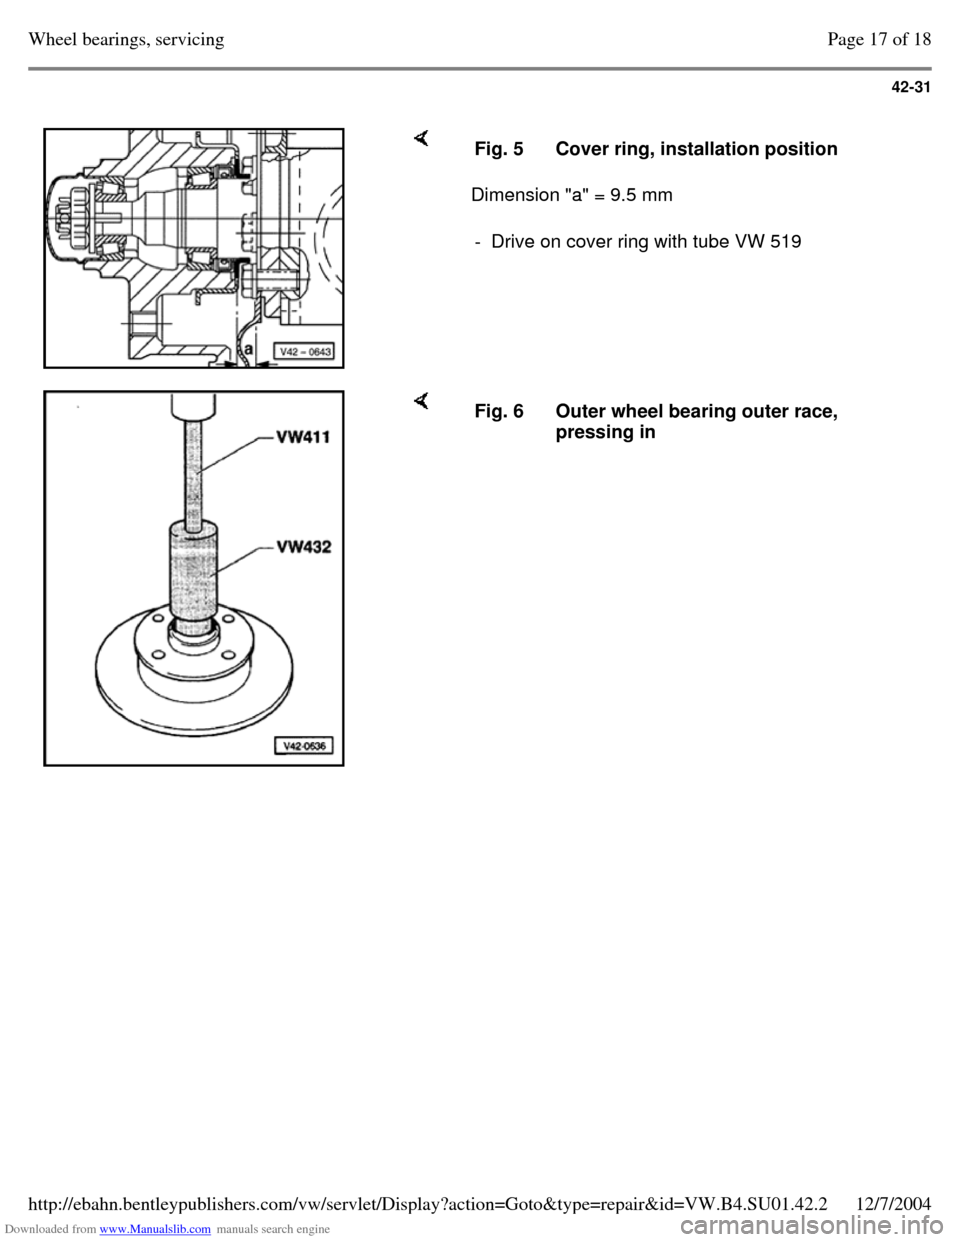
Dimension "a" = 9.5 mm Fig. 5 Cover ring, installation position - Drive on cover ring with tube VW 519 Fig. 6 Outer wheel bearing outer race,
pressing in Page 17 of 18Wheel bearings, servicing12/7/2004http://ebahn.bentleypublishers.com/vw/servlet/Display?action=Goto&type=repair&id=VW.B4.SU01.42.2
Page 128 of 369
Downloaded from www.Manualslib.com manuals search engine 42-32
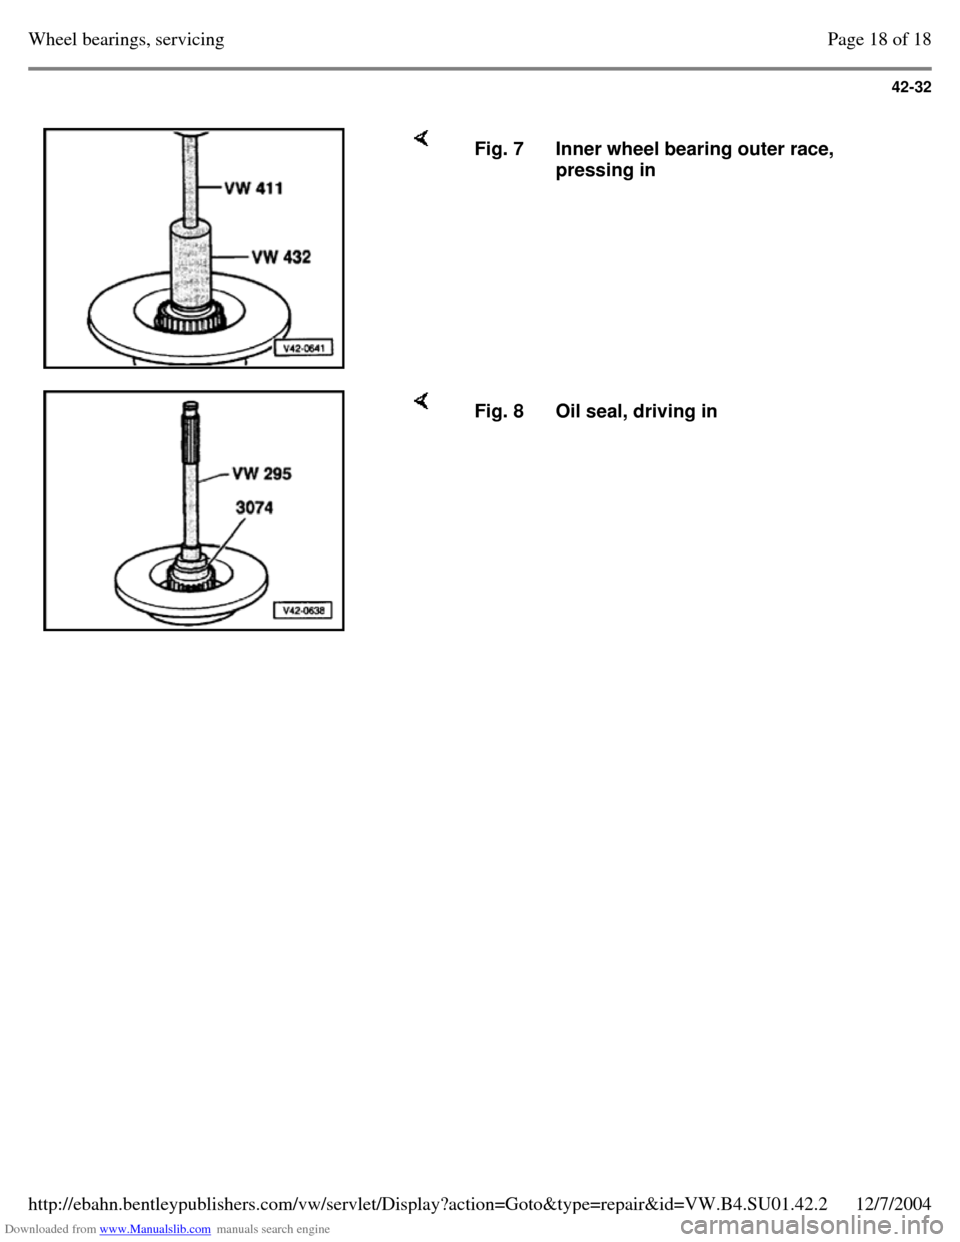
Fig. 7 Inner wheel bearing outer race,
pressing in Fig. 8 Oil seal, driving in Page 18 of 18Wheel bearings, servicing12/7/2004http://ebahn.bentleypublishers.com/vw/servlet/Display?action=Goto&type=repair&id=VW.B4.SU01.42.2
Page 129 of 369
Downloaded from www.Manualslib.com manuals search engine 42-33
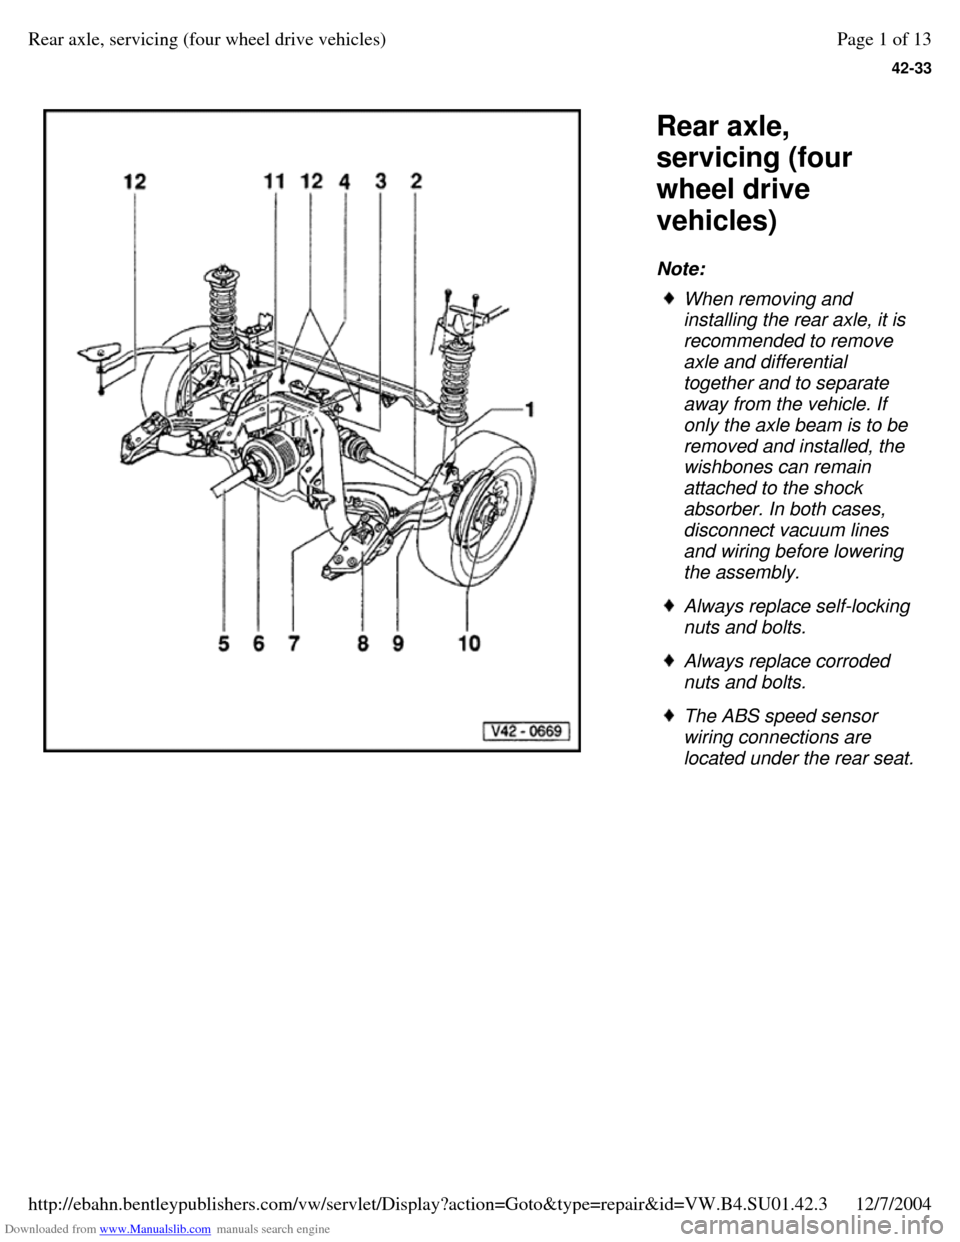
Rear axle,
servicing (four
wheel drive
vehicles)
Note: When removing and
installing the rear axle, it is
recommended to remove
axle and differential
together and to separate
away from the vehicle. If
only the axle beam is to be
removed and installed, the
wishbones can remain
attached to the shock
absorber. In both cases,
disconnect vacuum lines
and wiring before lowering
the assembly. Always replace self-locking
nuts and bolts. Always replace corroded
nuts and bolts. The ABS speed sensor
wiring connections are
located under the rear seat. Page 1 of 13Rear axle, servicing (four wheel drive vehicles)12/7/2004http://ebahn.bentleypublishers.com/vw/servlet/Display?action=Goto&type=repair&id=VW.B4.SU01.42.3
Page 130 of 369
Downloaded from www.Manualslib.com manuals search engine 42-34
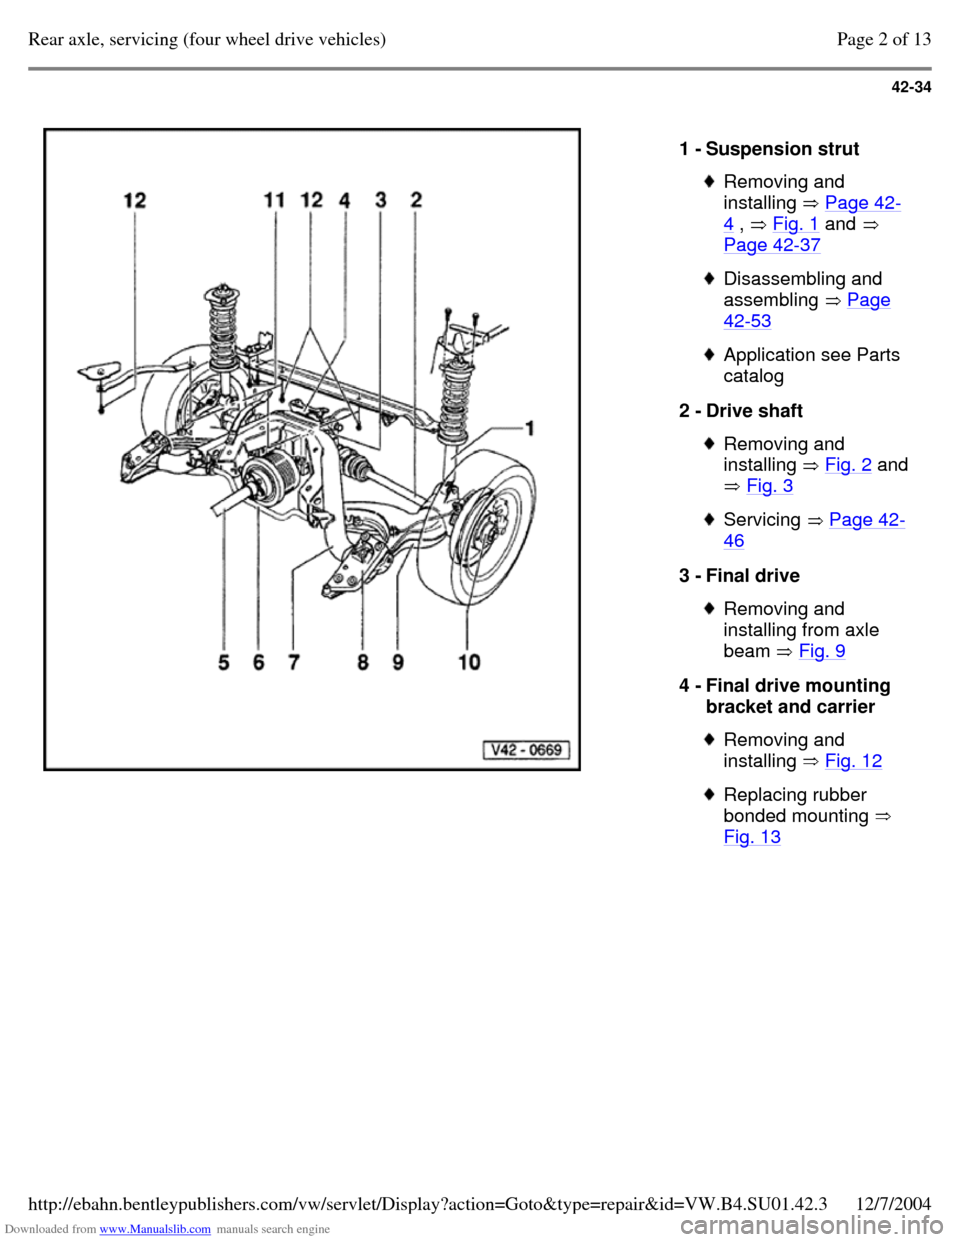
1 - Suspension strut Removing and
installing Page 42-4 , Fig. 1 and
Page 42-37 Disassembling and
assembling Page 42-53 Application see Parts
catalog
2 - Drive shaft Removing and
installing Fig. 2 and
Fig. 3 Servicing Page 42-46 3 - Final drive Removing and
installing from axle
beam Fig. 9 4 - Final drive mounting
bracket and carrier Removing and
installing Fig. 12 Replacing rubber
bonded mounting
Fig. 13 Page 2 of 13Rear axle, servicing (four wheel drive vehicles)12/7/2004http://ebahn.bentleypublishers.com/vw/servlet/Display?action=Goto&type=repair&id=VW.B4.SU01.42.3
Page 131 of 369
Downloaded from www.Manualslib.com manuals search engine 42-35
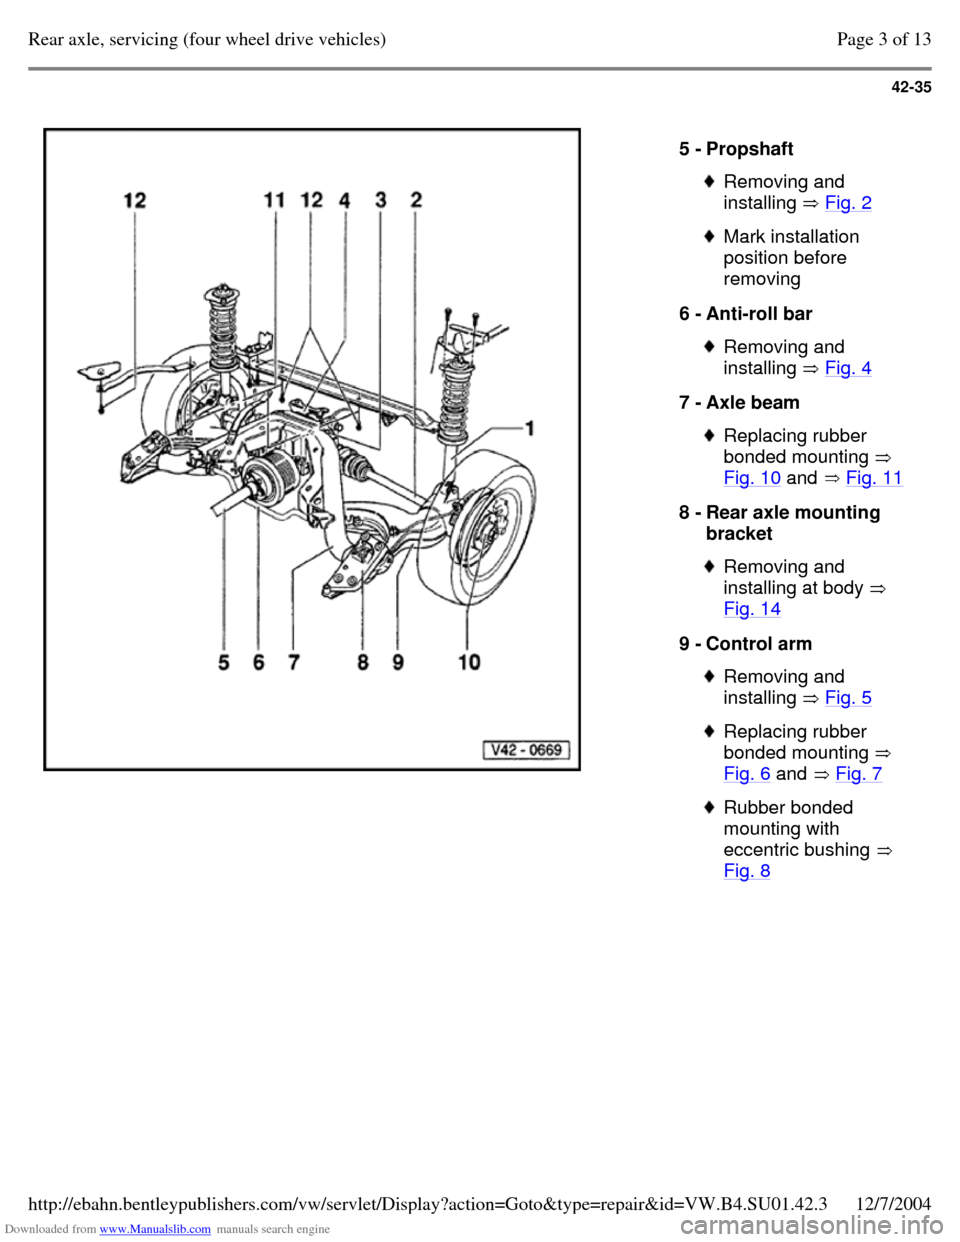
5 - Propshaft Removing and
installing Fig. 2 Mark installation
position before
removing
6 - Anti-roll bar Removing and
installing Fig. 4 7 - Axle beam Replacing rubber
bonded mounting
Fig. 10 and Fig. 11 8 - Rear axle mounting
bracket Removing and
installing at body
Fig. 14 9 - Control arm Removing and
installing Fig. 5 Replacing rubber
bonded mounting
Fig. 6 and Fig. 7 Rubber bonded
mounting with
eccentric bushing
Fig. 8 Page 3 of 13Rear axle, servicing (four wheel drive vehicles)12/7/2004http://ebahn.bentleypublishers.com/vw/servlet/Display?action=Goto&type=repair&id=VW.B4.SU01.42.3
Page 132 of 369
Downloaded from www.Manualslib.com manuals search engine 42-36
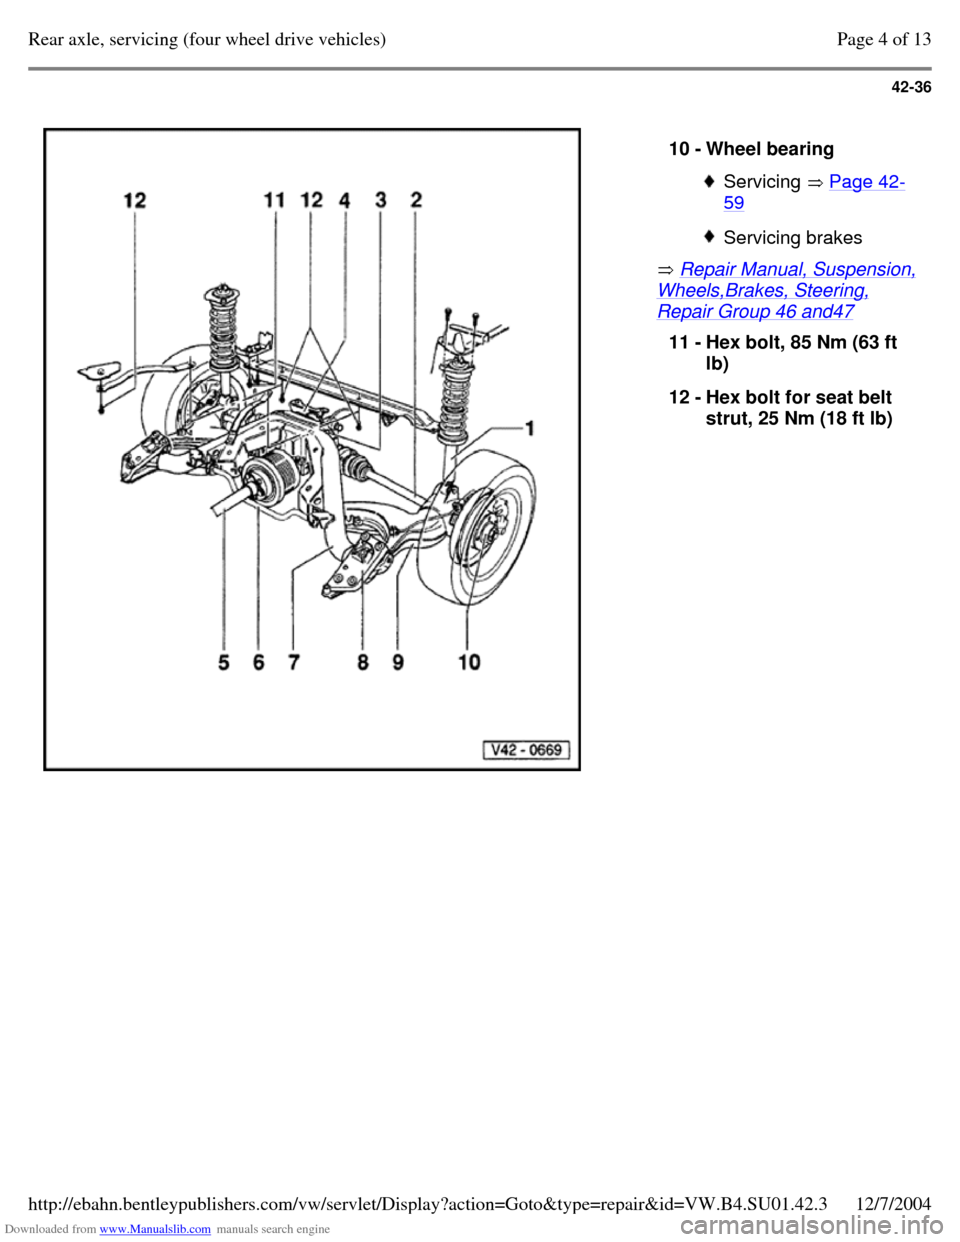
Repair Manual, Suspension, Wheels,Brakes, Steering, Repair Group 46 and47 10 - Wheel bearing Servicing Page 42-59 Servicing brakes 11 - Hex bolt, 85 Nm (63 ft
lb)
12 - Hex bolt for seat belt
strut, 25 Nm (18 ft lb) Page 4 of 13Rear axle, servicing (four wheel drive vehicles)12/7/2004http://ebahn.bentleypublishers.com/vw/servlet/Display?action=Goto&type=repair&id=VW.B4.SU01.42.3
Page 133 of 369
Downloaded from www.Manualslib.com manuals search engine 42-37
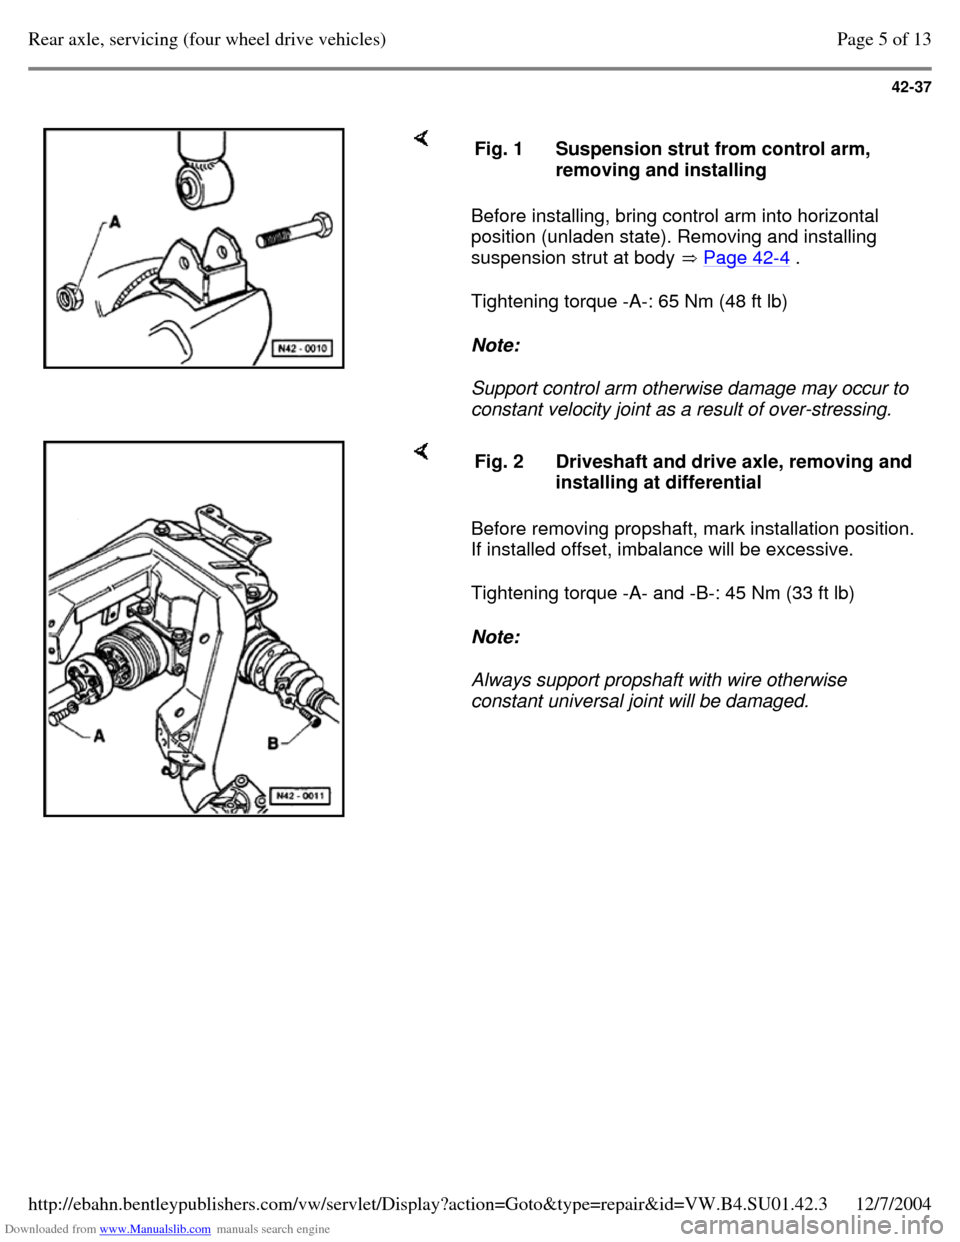
Before installing, bring control arm into horizontal
position (unladen state). Removing and installing
suspension strut at body Page 42-4 .
Tightening torque -A-: 65 Nm (48 ft lb)
Note:
Support control arm otherwise damage may occur to
constant velocity joint as a result of over-stressing. Fig. 1 Suspension strut from control arm,
removing and installing Before removing propshaft, mark installation position.
If installed offset, imbalance will be excessive.
Tightening torque -A- and -B-: 45 Nm (33 ft lb)
Note:
Always support propshaft with wire otherwise
constant universal joint will be damaged. Fig. 2 Driveshaft and drive axle, removing and
installing at differential Page 5 of 13Rear axle, servicing (four wheel drive vehicles)12/7/2004http://ebahn.bentleypublishers.com/vw/servlet/Display?action=Goto&type=repair&id=VW.B4.SU01.42.3
Page 134 of 369
Downloaded from www.Manualslib.com manuals search engine 42-38
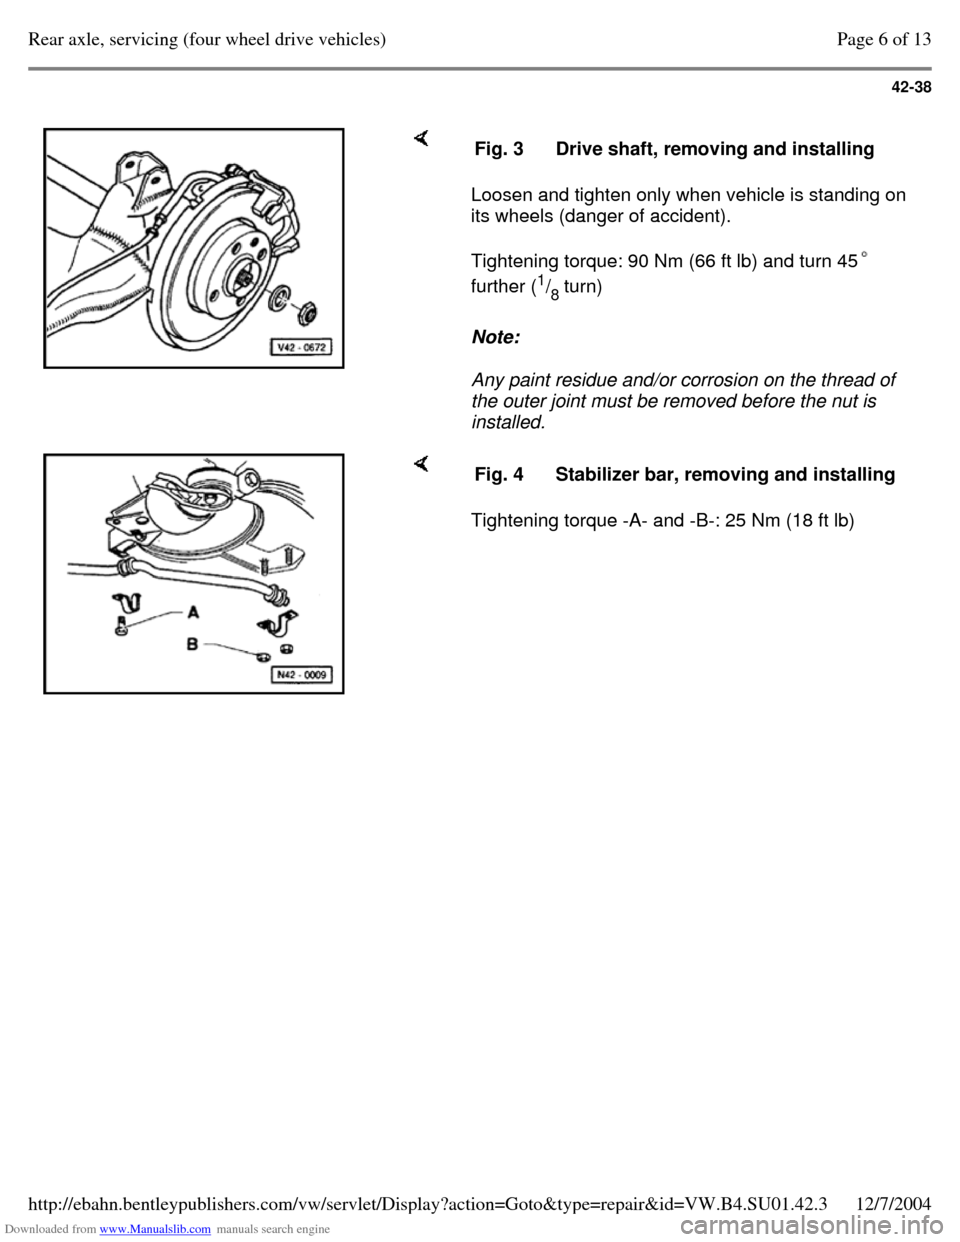
Loosen and tighten only when vehicle is standing on
its wheels (danger of accident).
Tightening torque: 90 Nm (66 ft lb) and turn 45
further (1
/
8 turn)
Note:
Any paint residue and/or corrosion on the thread of
the outer joint must be removed before the nut is
installed. Fig. 3 Drive shaft, removing and installing Tightening torque -A- and -B-: 25 Nm (18 ft lb) Fig. 4 Stabilizer bar, removing and installing Page 6 of 13Rear axle, servicing (four wheel drive vehicles)12/7/2004http://ebahn.bentleypublishers.com/vw/servlet/Display?action=Goto&type=repair&id=VW.B4.SU01.42.3
Page 136 of 369
Downloaded from www.Manualslib.com manuals search engine 42-40
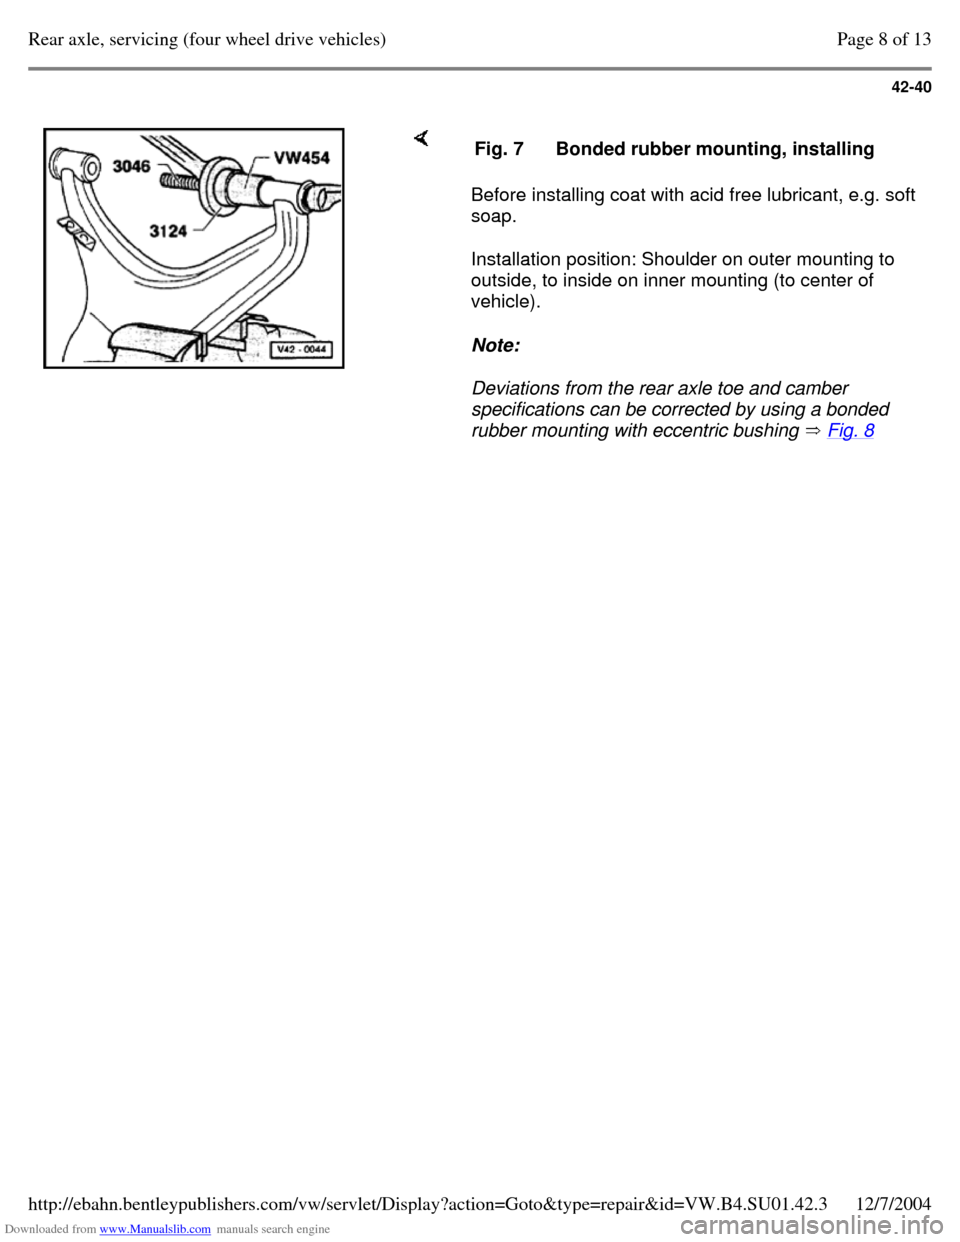
Before installing coat with acid free lubricant, e.g. soft
soap.
Installation position: Shoulder on outer mounting to
outside, to inside on inner mounting (to center of
vehicle).
Note:
Deviations from the rear axle toe and camber
specifications can be corrected by using a bonded
rubber mounting with eccentric bushing Fig. 8 Fig. 7 Bonded rubber mounting, installing Page 8 of 13Rear axle, servicing (four wheel drive vehicles)12/7/2004http://ebahn.bentleypublishers.com/vw/servlet/Display?action=Goto&type=repair&id=VW.B4.SU01.42.3
Page 137 of 369
Downloaded from www.Manualslib.com manuals search engine 42-41
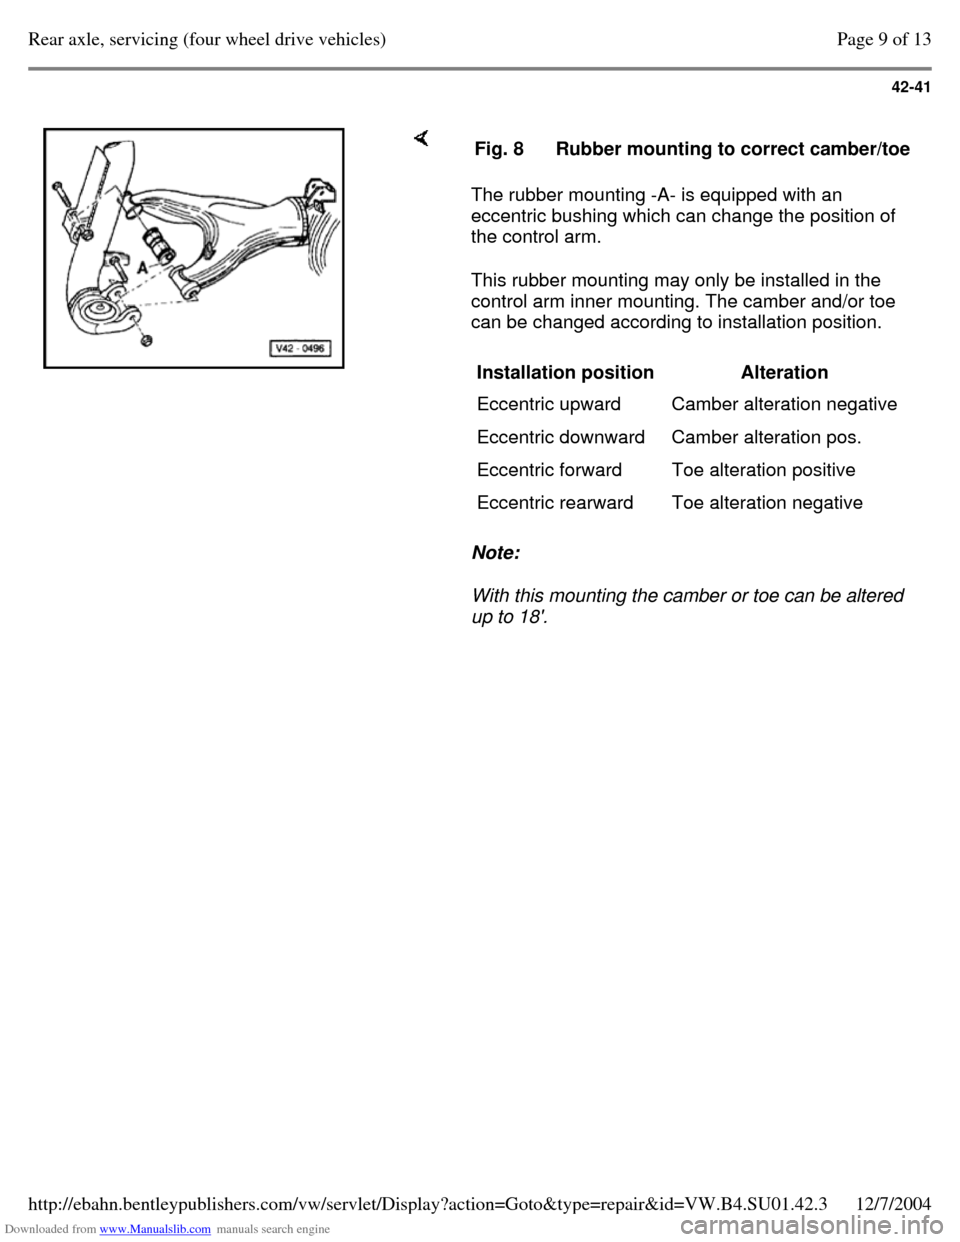
The rubber mounting -A- is equipped with an
eccentric bushing which can change the position of
the control arm.
This rubber mounting may only be installed in the
control arm inner mounting. The camber and/or toe
can be changed according to installation position.
Note:
With this mounting the camber or toe can be altered
up to 18'. Fig. 8 Rubber mounting to correct camber/toe Installation position
Alteration
Eccentric upward Camber alteration negative
Eccentric downward Camber alteration pos.
Eccentric forward Toe alteration positive
Eccentric rearward Toe alteration negative Page 9 of 13Rear axle, servicing (four wheel drive vehicles)12/7/2004http://ebahn.bentleypublishers.com/vw/servlet/Display?action=Goto&type=repair&id=VW.B4.SU01.42.3