display VOLKSWAGEN PASSAT 1995 B3, B4 / 3.G Service Workshop Manual
[x] Cancel search | Manufacturer: VOLKSWAGEN, Model Year: 1995, Model line: PASSAT, Model: VOLKSWAGEN PASSAT 1995 B3, B4 / 3.GPages: 369, PDF Size: 12.33 MB
Page 268 of 369
Downloaded from www.Manualslib.com manuals search engine 47-27
Brake system, bleeding
Brake system, bleeding (vehicles with
and without ABS, ABS/EDL)
Changing brake fluid
Repair Manual, Maintenance
Note:
Bleeding the brake system on vehicles with
ABS, ABS/EDL is performed as for vehicles
with conventional braking systems.
Only use new brake fluid conforming to US
standard FMVSS 116 DOT 4.
Genuine VW/Audi brake fluid conforms to this
specification.
Brake fluid is poisonous. Also due to its
corrosive effect brake fluid must not come into
contact with paintwork.
Brake fluid is hygroscopic, which means it
absorbs moisture from the ambient air and
should always be stored in air tight containers.
Rinse off spillages using plenty of water. Repair Manual, Brake System On Board Diagnostic (OBD), Repair Group 01 Page 1 of 3Brake system, bleeding12/7/2004http://ebahn.bentleypublishers.com/vw/servlet/Display?action=Goto&type=repair&id=VW.B4.SU01.47.6
Page 269 of 369

Downloaded from www.Manualslib.com manuals search engine 47-28
Brake system, bleeding (with pressure
bleeder VAS 5234)
Opening the hydraulic unit bleed screws on
vehicles with ABS, ABS/EDL is not permitted! Bleeding sequence
Note: - Connect VAS 5234 Brake filler and bleeder unit. - Open bleeder screws in the specified order and
bleed brake calipers and wheel cylinders.
1 - Right rear wheel cylinder/brake caliper 2 - Left rear wheel cylinder/brake caliper 3 - Right front brake caliper 4 - Left front brake caliper On vehicles with brake pressure regulator move
the regulator lever when bleeding rear brakes. Depress the brake pedal several times during
bleeding. Page 2 of 3Brake system, bleeding12/7/2004http://ebahn.bentleypublishers.com/vw/servlet/Display?action=Goto&type=repair&id=VW.B4.SU01.47.6
Page 270 of 369
Downloaded from www.Manualslib.com manuals search engine 47-29
Brake system, bleeding (without
pressure bleeder)
Opening the hydraulic unit bleed screws on
vehicles with ABS, ABS/EDL is not permitted!
- Build-up brake pressure in brake system by
pumping the brake pedal.
- Attach bleeder bottle hose and open bleeder
screw.
- With brake pedal held down, close bleeder
screw.
- Repeat operation until no air is present. Bleeding sequence Page 47-28 Changing brake fluid
Repair Manual, Maintenance Page 3 of 3Brake system, bleeding12/7/2004http://ebahn.bentleypublishers.com/vw/servlet/Display?action=Goto&type=repair&id=VW.B4.SU01.47.6
Page 271 of 369
Downloaded from www.Manualslib.com manuals search engine 48-1
Steering
Assembly overview: steering column,
column tube, steering wheel and airbag
steering wheel
Airbag system functional check and
interrogating Diagnostic Trouble Code (DTC)
Memory.
Repair Manual, Body Exterior, Interior, Repair Group 68; General body repairs
Safety precautions when working on airbag
Repair Manual, Body Exterior, Interior, Repair Group 68, General body repairs
Note:
All parts marked with a "1)
" can be pre-
assembled outside of the vehicle
Pre-assembling steering column Page 48-6 Always replace self-locking nuts and bolts. Welding and straightening work on steering
components is not permitted. Page 1 of 99Steering12/7/2004http://ebahn.bentleypublishers.com/vw/servlet/Display?action=Goto&type=repair&id=VW.B4.SU01.48.1
Page 272 of 369
Downloaded from www.Manualslib.com manuals search engine 48-2
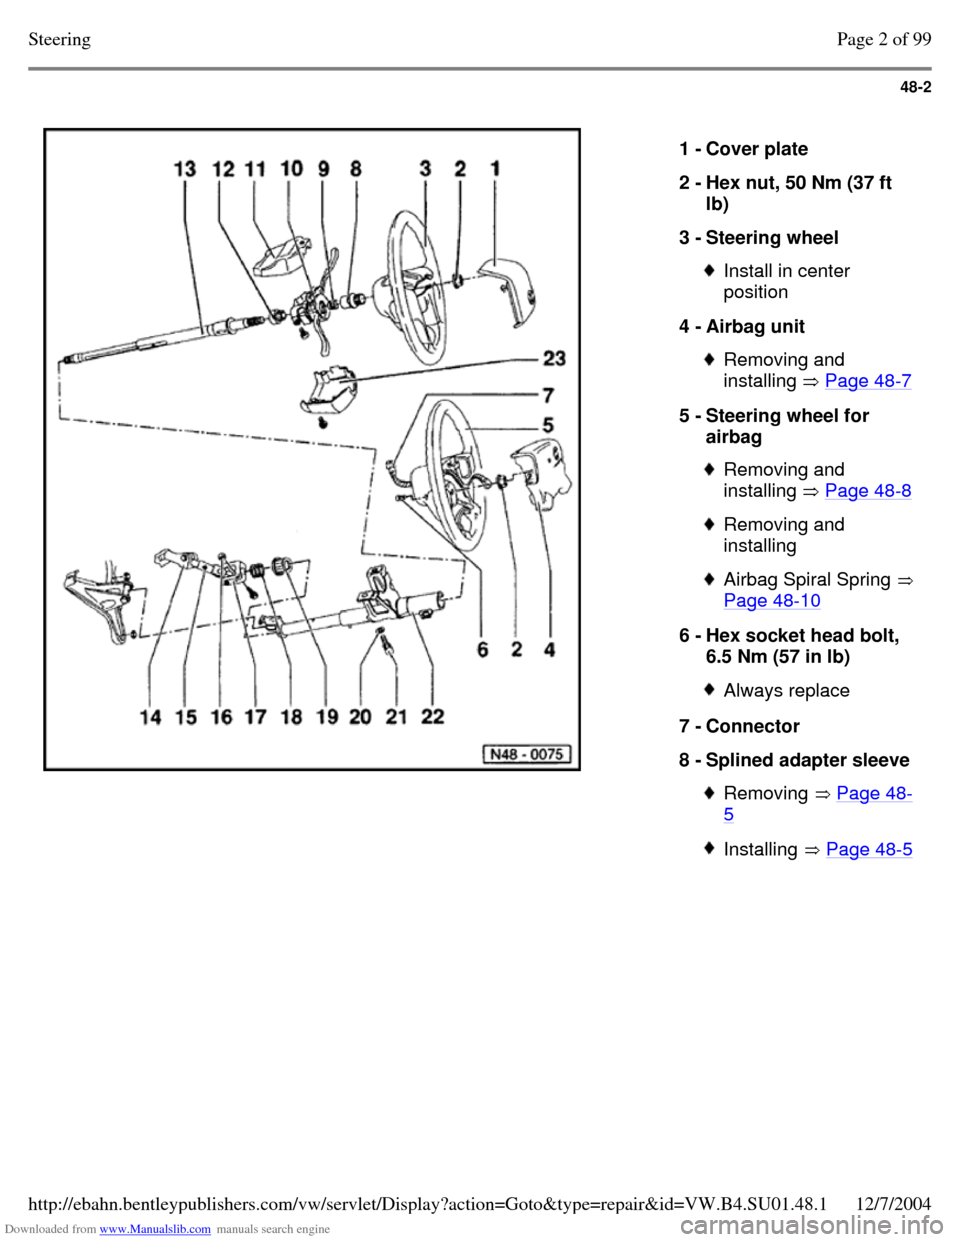
1 - Cover plate
2 - Hex nut, 50 Nm (37 ft
lb)
3 - Steering wheel Install in center
position
4 - Airbag unit Removing and
installing Page 48-7 5 - Steering wheel for
airbag Removing and
installing Page 48-8 Removing and
installing Airbag Spiral Spring Page 48-10 6 - Hex socket head bolt,
6.5 Nm (57 in lb) Always replace 7 - Connector
8 - Splined adapter sleeve Removing Page 48-5 Installing Page 48-5 Page 2 of 99Steering12/7/2004http://ebahn.bentleypublishers.com/vw/servlet/Display?action=Goto&type=repair&id=VW.B4.SU01.48.1
Page 273 of 369
Downloaded from www.Manualslib.com manuals search engine 48-3
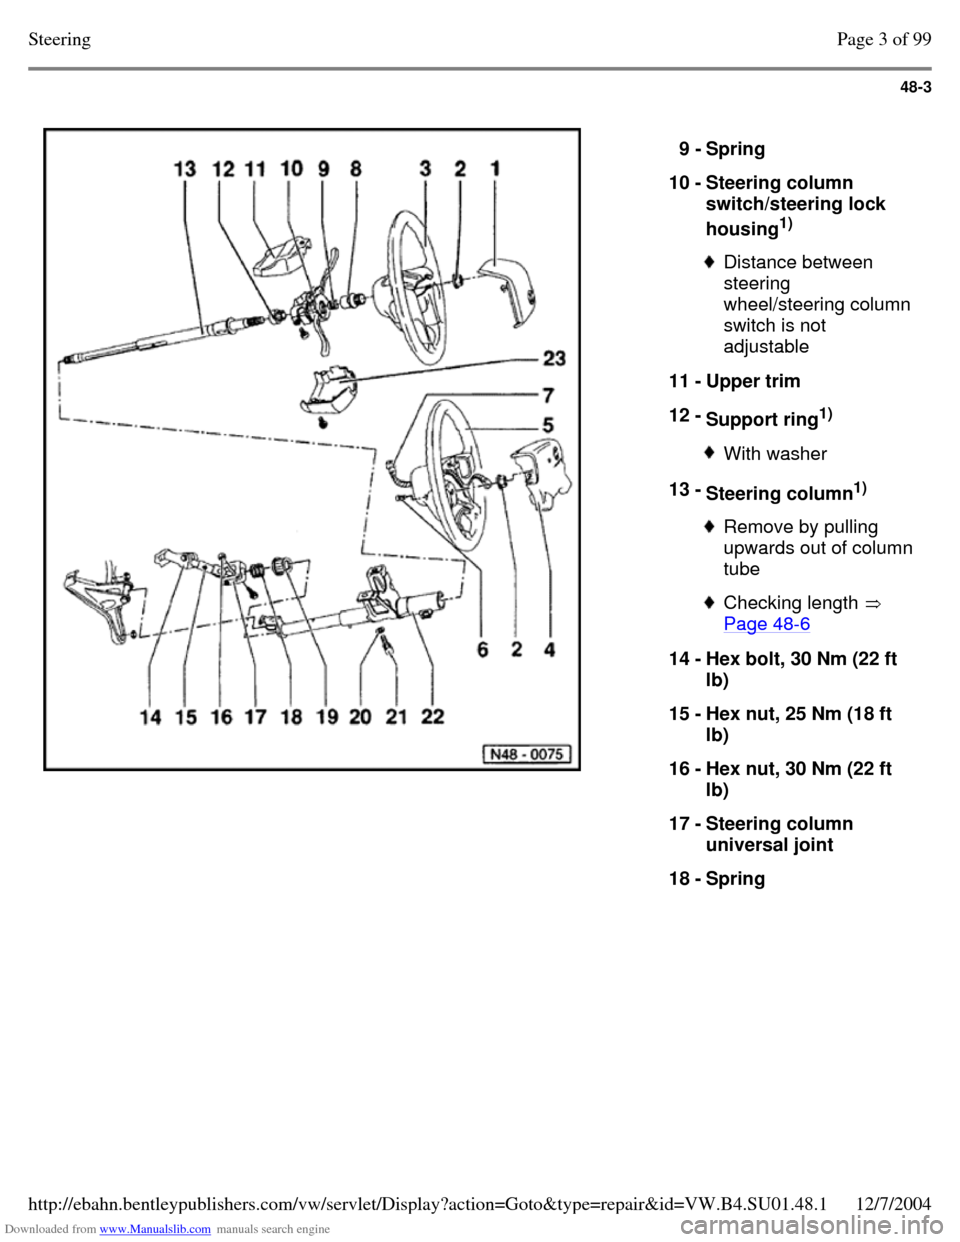
9 - Spring
10 - Steering column
switch/steering lock
housing1)
Distance between
steering
wheel/steering column
switch is not
adjustable
11 - Upper trim
12 - Support ring1)
With washer 13 - Steering column1)
Remove by pulling upwards out of column tube Checking length
Page 48-6 14 - Hex bolt, 30 Nm (22 ft
lb)
15 - Hex nut, 25 Nm (18 ft
lb)
16 - Hex nut, 30 Nm (22 ft
lb)
17 - Steering column
universal joint
18 - Spring Page 3 of 99Steering12/7/2004http://ebahn.bentleypublishers.com/vw/servlet/Display?action=Goto&type=repair&id=VW.B4.SU01.48.1
Page 274 of 369

Downloaded from www.Manualslib.com manuals search engine 48-4
19 - Lower steering column
bearing Pull in with VW 771
and large washer Drive out downward
with a tube
20 - Washer Tighten until head
shears off Drill out to remove 21 - Shear bolt
22 - Column tube
23 - Lower trim Page 4 of 99Steering12/7/2004http://ebahn.bentleypublishers.com/vw/servlet/Display?action=Goto&type=repair&id=VW.B4.SU01.48.1
Page 275 of 369

Downloaded from www.Manualslib.com manuals search engine 48-5
Only use puller with leg clamp (e.g. Kukko 204/2
commercial type). Fig. 1 Splined adapter sleeve, removing Fig. 2 Splined adapter sleeve, installing - Place sleeve on steering column and press on with hex nut.
- Remove nut, place on washer and press sleeve
fully on with nut until sleeve is firmly seated. Page 5 of 99Steering12/7/2004http://ebahn.bentleypublishers.com/vw/servlet/Display?action=Goto&type=repair&id=VW.B4.SU01.48.1
Page 276 of 369
Downloaded from www.Manualslib.com manuals search engine 48-6
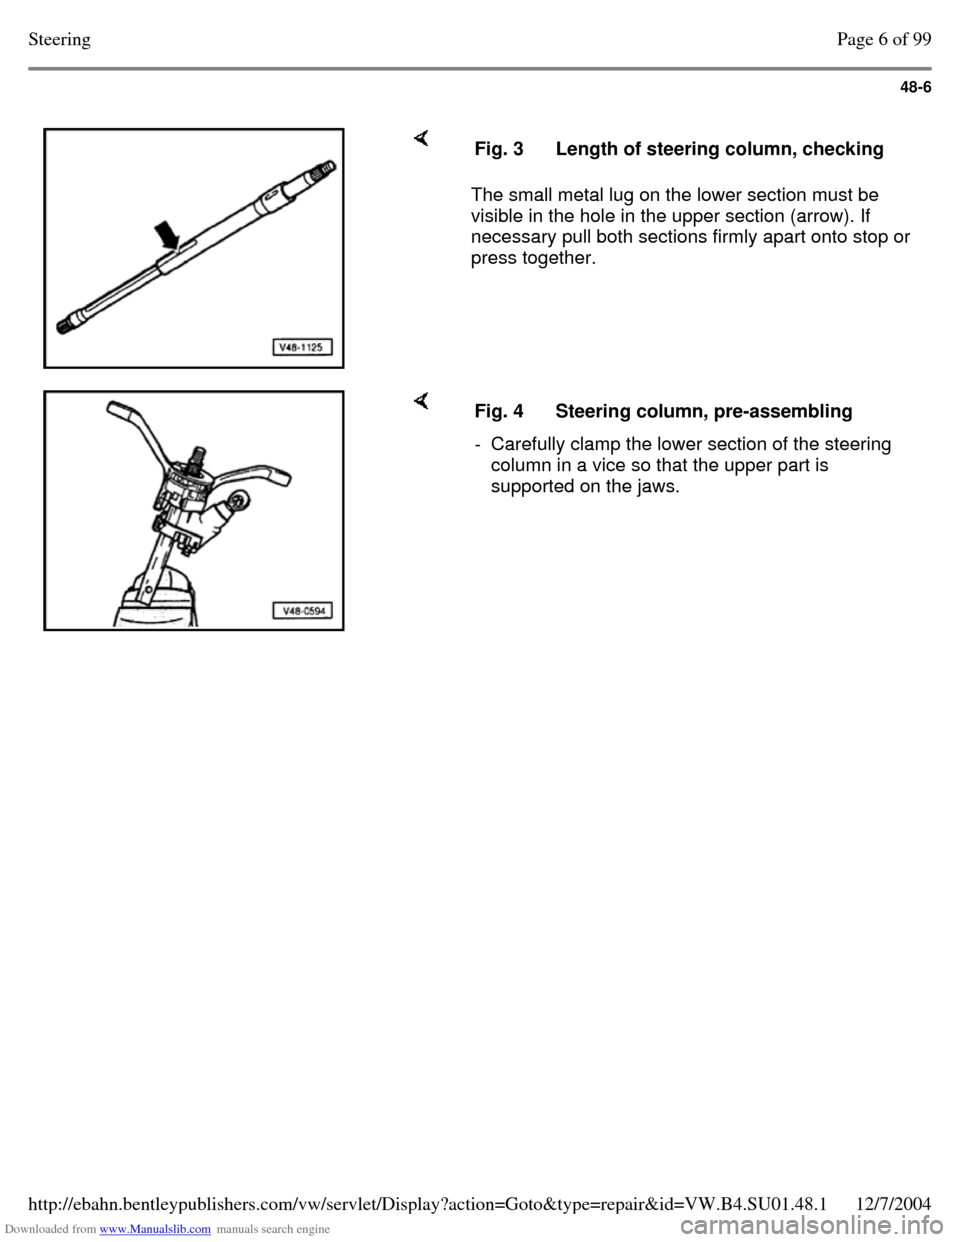
The small metal lug on the lower section must be
visible in the hole in the upper section (arrow). If
necessary pull both sections firmly apart onto stop or
press together. Fig. 3 Length of steering column, checking Fig. 4 Steering column, pre-assembling - Carefully clamp the lower section of the steering
column in a vice so that the upper part is
supported on the jaws. Page 6 of 99Steering12/7/2004http://ebahn.bentleypublishers.com/vw/servlet/Display?action=Goto&type=repair&id=VW.B4.SU01.48.1
Page 277 of 369
Downloaded from www.Manualslib.com manuals search engine 48-7
Airbag unit, removing and installing
Removing
- Disconnect battery Ground strap.
- Center steering wheel (wheels straight-
ahead). Installing
Install in reverse order
Note:
Only use new hex socket head bolts for airbag unit.
Tightening torque: 6.5 Nm (57 in. Ib).
CAUTION!
Make sure that no one is in the vehicle when
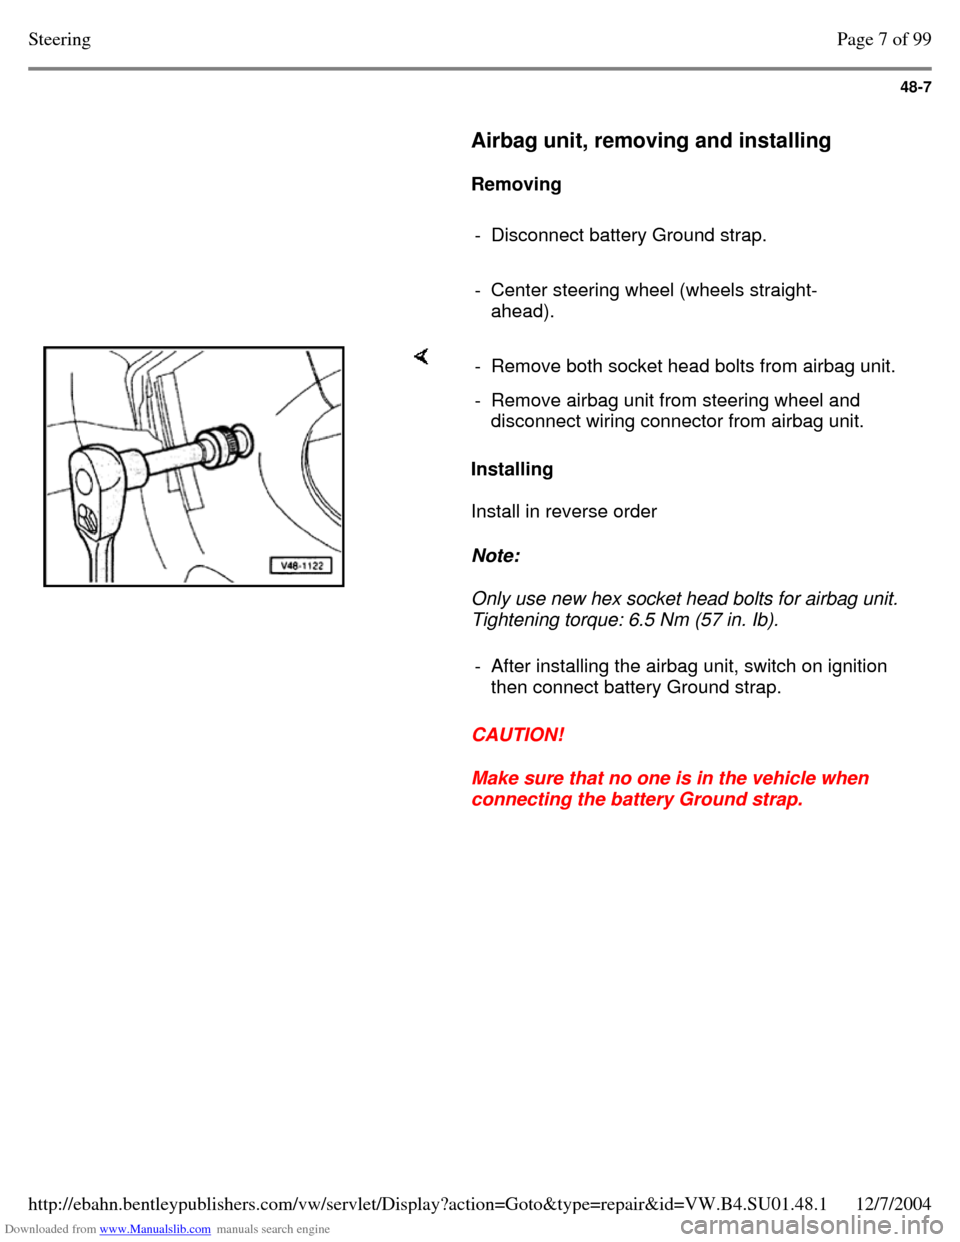
connecting the battery Ground strap. - Remove both socket head bolts from airbag unit. - Remove airbag unit from steering wheel and
disconnect wiring connector from airbag unit.
- After installing the airbag unit, switch on ignition
then connect battery Ground strap. Page 7 of 99Steering12/7/2004http://ebahn.bentleypublishers.com/vw/servlet/Display?action=Goto&type=repair&id=VW.B4.SU01.48.1