check engine VOLKSWAGEN PASSAT 1995 B3, B4 / 3.G Service Service Manual
[x] Cancel search | Manufacturer: VOLKSWAGEN, Model Year: 1995, Model line: PASSAT, Model: VOLKSWAGEN PASSAT 1995 B3, B4 / 3.GPages: 369, PDF Size: 12.33 MB
Page 217 of 369
Downloaded from www.Manualslib.com manuals search engine 46-21
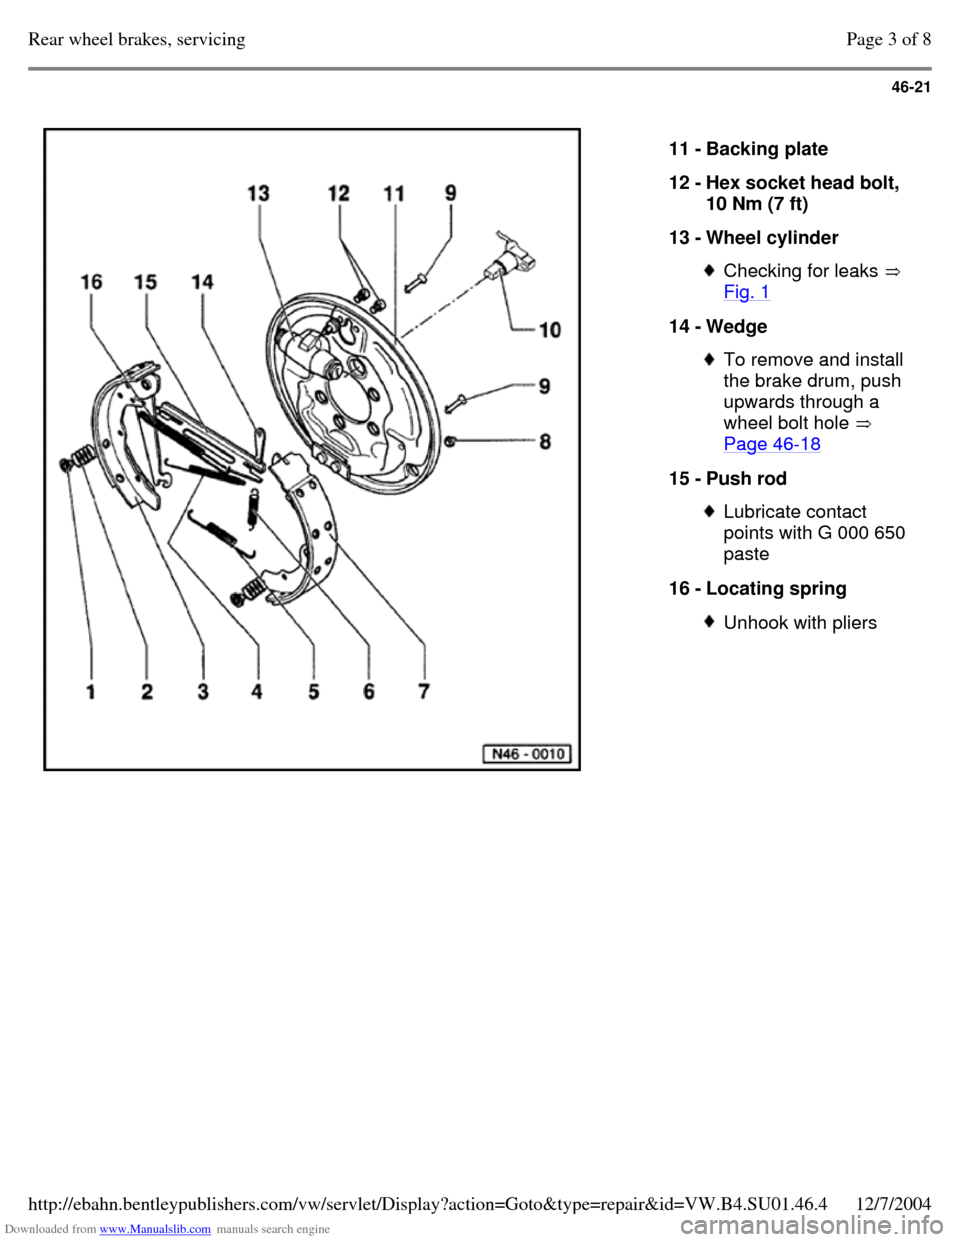
11 - Backing plate
12 - Hex socket head bolt,
10 Nm (7 ft)
13 - Wheel cylinder Checking for leaks
Fig. 1 14 - Wedge To remove and install
the brake drum, push
upwards through a
wheel bolt hole
Page 46-18 15 - Push rod Lubricate contact
points with G 000 650
paste
16 - Locating spring Unhook with pliers Page 3 of 8Rear wheel brakes, servicing12/7/2004http://ebahn.bentleypublishers.com/vw/servlet/Display?action=Goto&type=repair&id=VW.B4.SU01.46.4
Page 218 of 369
Downloaded from www.Manualslib.com manuals search engine 46-22
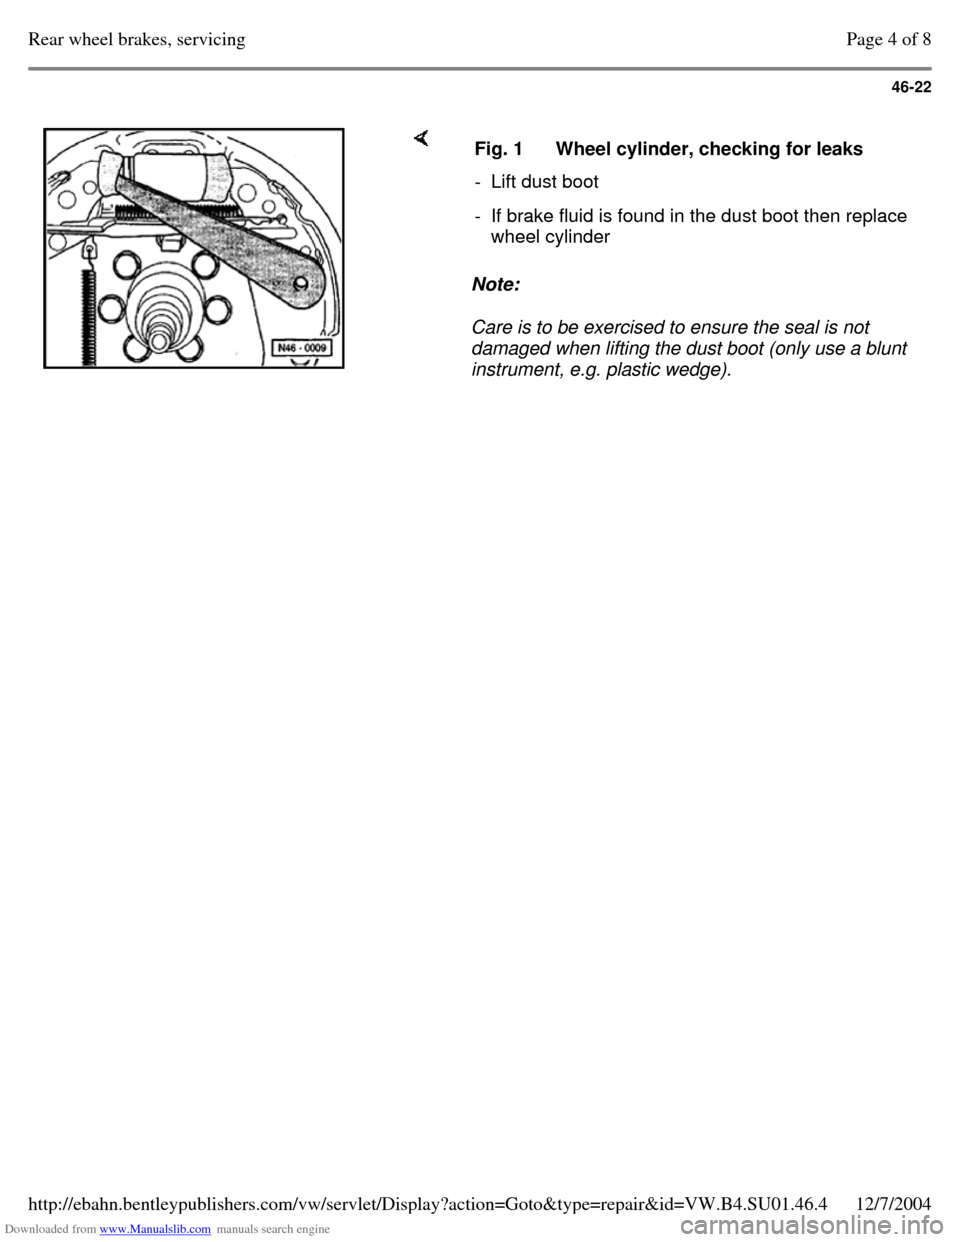
Note:
Care is to be exercised to ensure the seal is not
damaged when lifting the dust boot (only use a blunt
instrument, e.g. plastic wedge). Fig. 1 Wheel cylinder, checking for leaks - Lift dust boot - If brake fluid is found in the dust boot then replace
wheel cylinder Page 4 of 8Rear wheel brakes, servicing12/7/2004http://ebahn.bentleypublishers.com/vw/servlet/Display?action=Goto&type=repair&id=VW.B4.SU01.46.4
Page 222 of 369
Downloaded from www.Manualslib.com manuals search engine 46-26
Parking brake, adjusting (drum brakes)
Note:
Due to the automatic rear wheel brake
adjustment there is no requirement to adjust the
parking brake. Adjustment is only necessary after
replacing parking brake cables, backing plate or
brake linings
- Release parking brake.
- Firmly depress brake pedal once.
- Pull parking brake lever up four notches.
Note:
The hand grip and center console must be
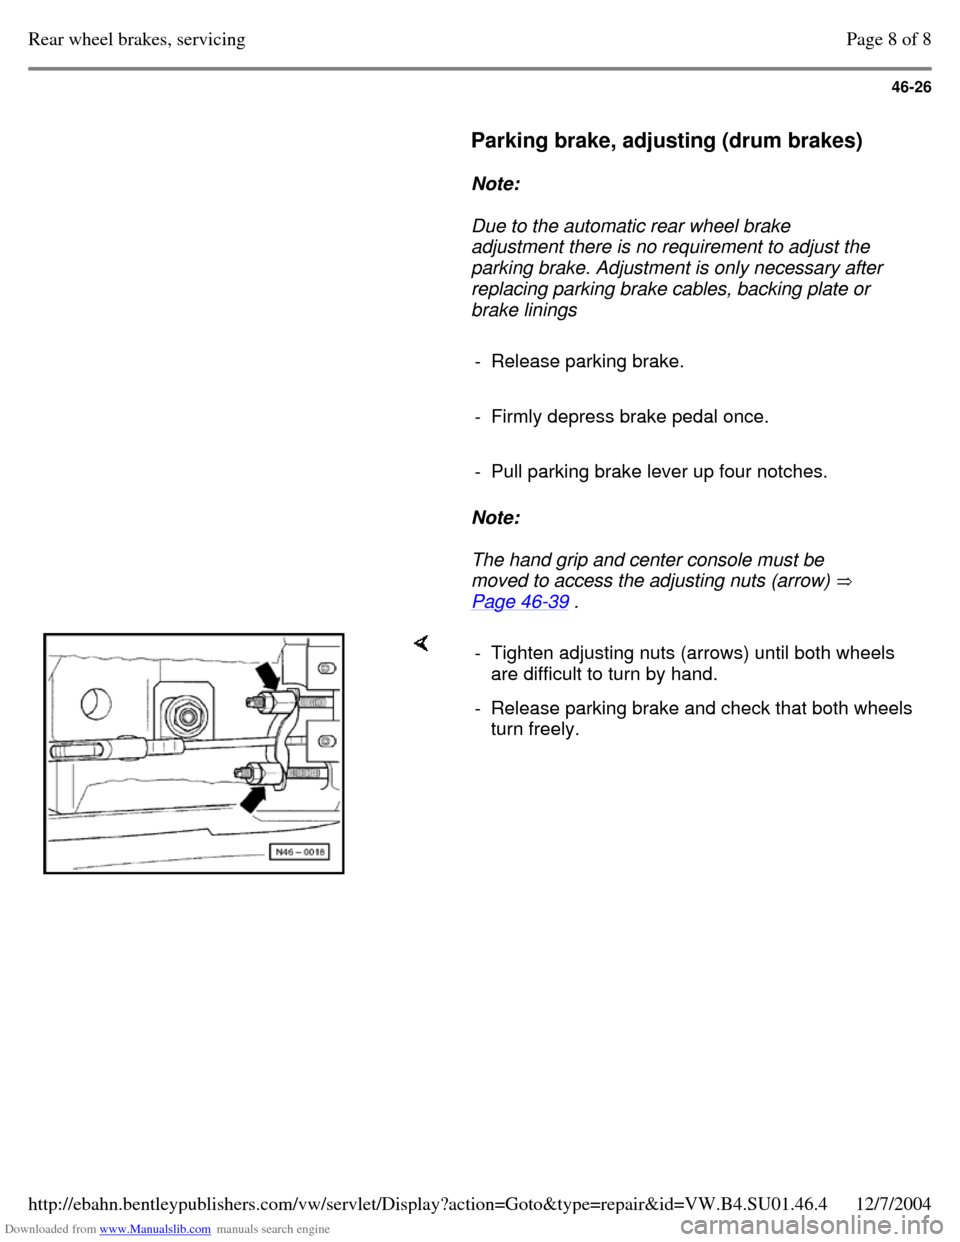
moved to access the adjusting nuts (arrow)
Page 46-39 . - Tighten adjusting nuts (arrows) until both wheels
are difficult to turn by hand.
- Release parking brake and check that both wheels turn freely. Page 8 of 8Rear wheel brakes, servicing12/7/2004http://ebahn.bentleypublishers.com/vw/servlet/Display?action=Goto&type=repair&id=VW.B4.SU01.46.4
Page 225 of 369
Downloaded from www.Manualslib.com manuals search engine 46-29
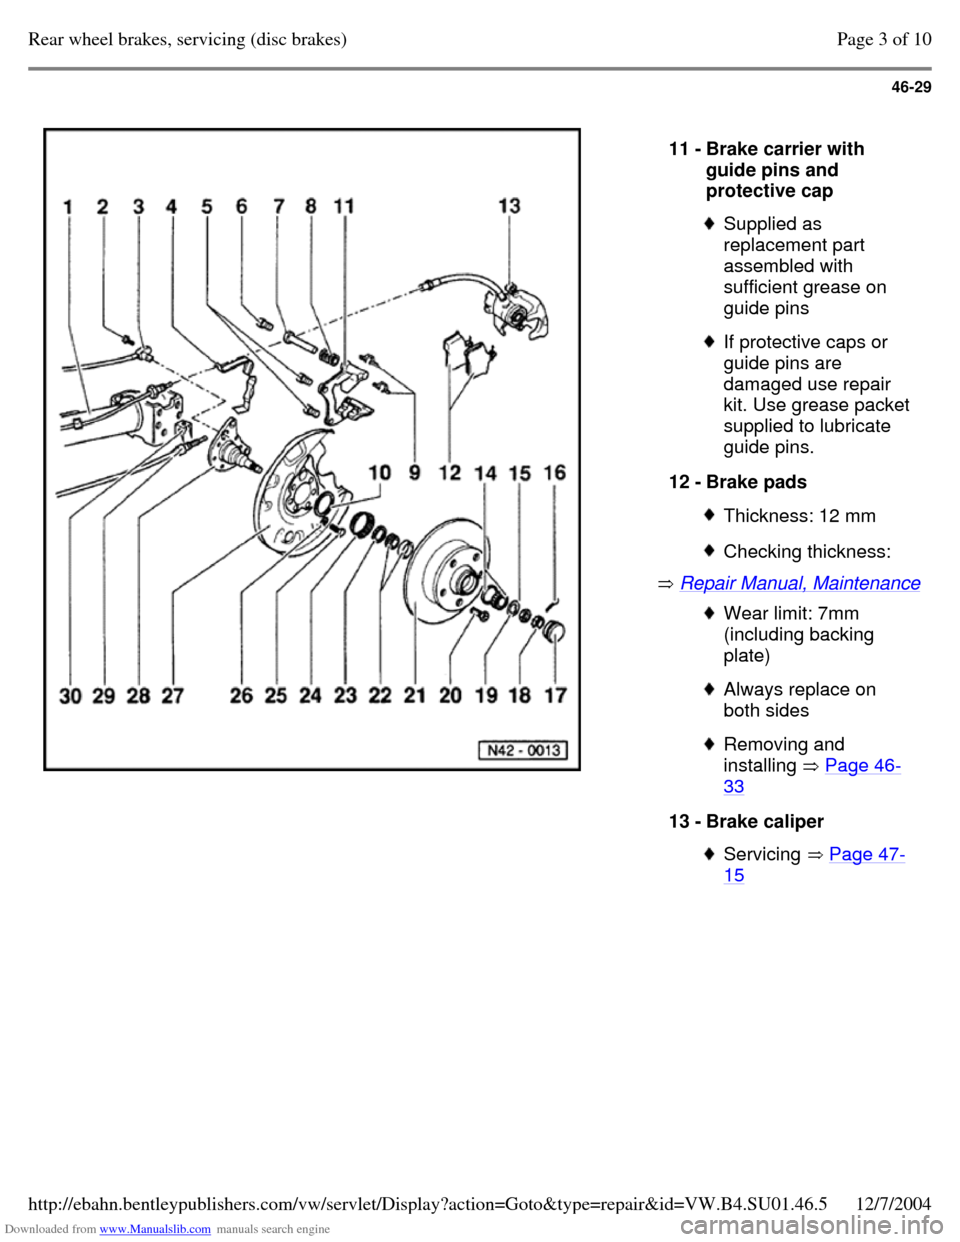
Repair Manual, Maintenance 11 - Brake carrier with
guide pins and
protective cap Supplied as
replacement part
assembled with
sufficient grease on
guide pins If protective caps or
guide pins are
damaged use repair
kit. Use grease packet
supplied to lubricate
guide pins.
12 - Brake pads Thickness: 12 mm Checking thickness: Wear limit: 7mm
(including backing
plate) Always replace on
both sides Removing and
installing Page 46-33 13 - Brake caliper Servicing Page 47-15 Page 3 of 10Rear wheel brakes, servicing (disc brakes)12/7/2004http://ebahn.bentleypublishers.com/vw/servlet/Display?action=Goto&type=repair&id=VW.B4.SU01.46.5
Page 231 of 369
Downloaded from www.Manualslib.com manuals search engine 46-35
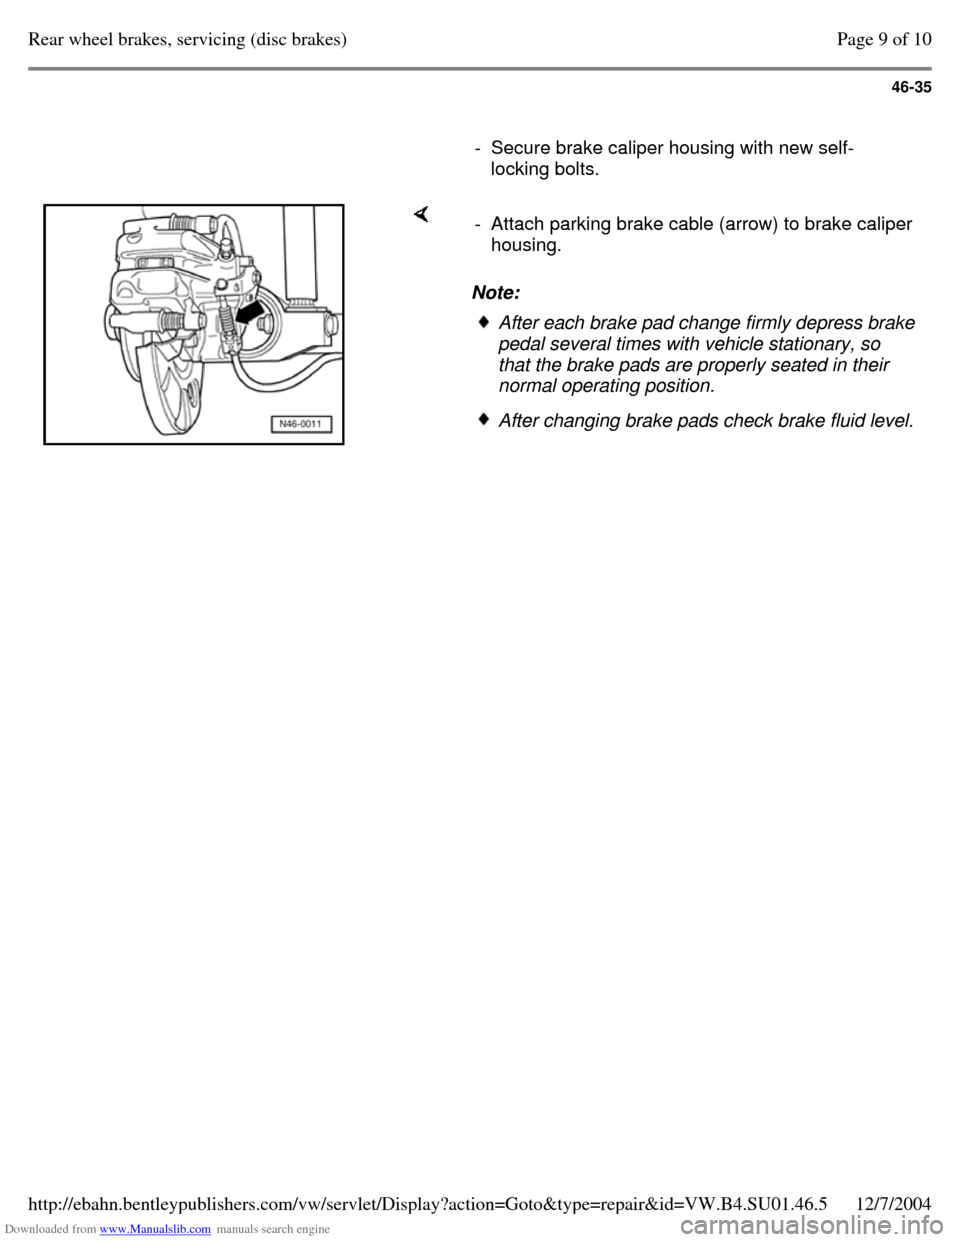
- Secure brake caliper housing with new self-
locking bolts. Note: - Attach parking brake cable (arrow) to brake caliper housing. After each brake pad change firmly depress brake
pedal several times with vehicle stationary, so
that the brake pads are properly seated in their
normal operating position. After changing brake pads check brake fluid level. Page 9 of 10Rear wheel brakes, servicing (disc brakes)12/7/2004http://ebahn.bentleypublishers.com/vw/servlet/Display?action=Goto&type=repair&id=VW.B4.SU01.46.5
Page 232 of 369
Downloaded from www.Manualslib.com manuals search engine 46-36
Parking brake, adjusting (disc brakes)
Note:
Due to the self-adjusting rear brakes there is no
requirement to adjust the parking brake.
Adjustment is only necessary after replacing
parking brake cables, brake calipers, brake
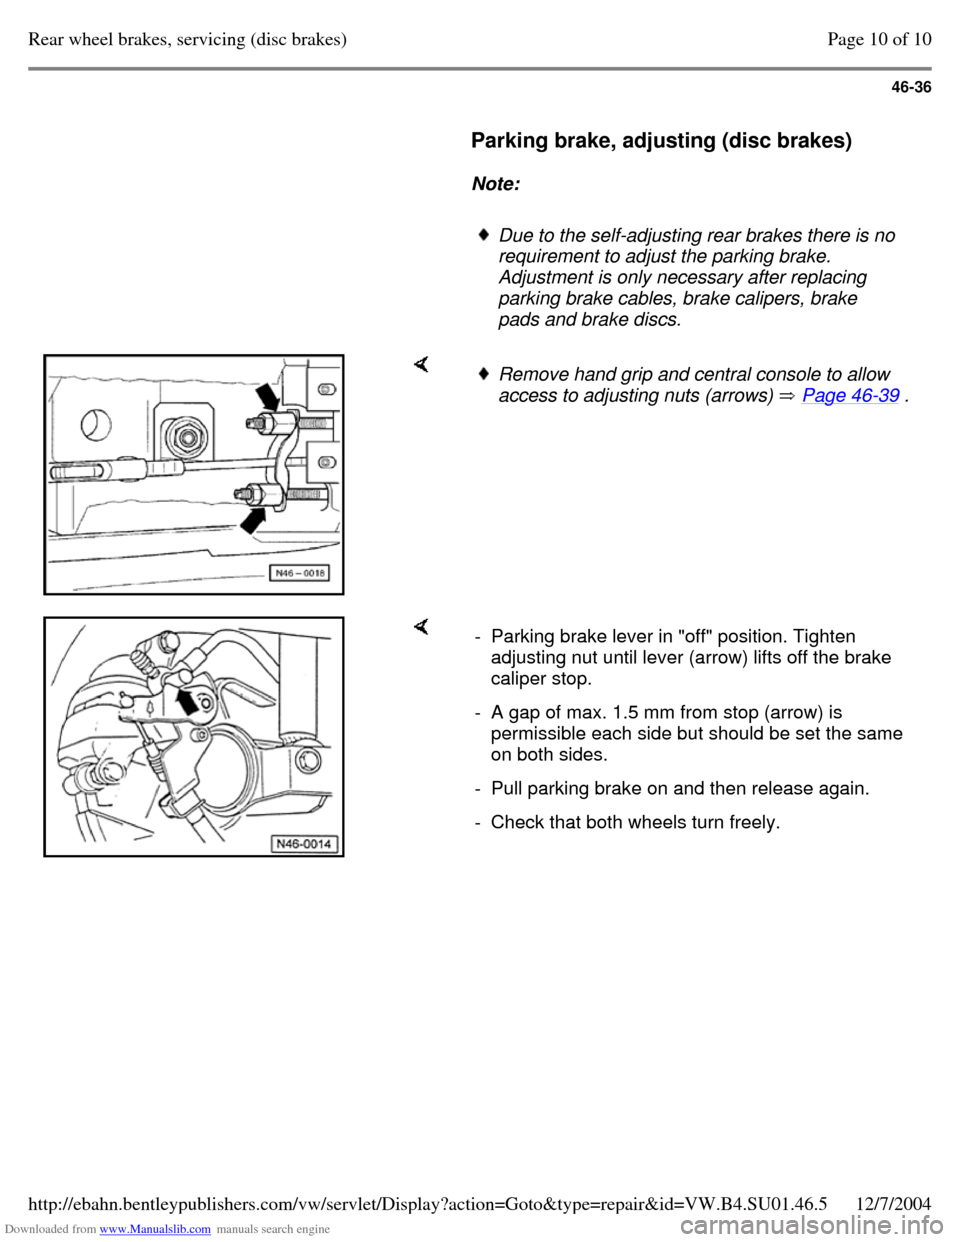
pads and brake discs. Remove hand grip and central console to allow
access to adjusting nuts (arrows) Page 46-39 . - Parking brake lever in "off" position. Tighten
adjusting nut until lever (arrow) lifts off the brake
caliper stop.
- A gap of max. 1.5 mm from stop (arrow) is
permissible each side but should be set the same
on both sides.
- Pull parking brake on and then release again. - Check that both wheels turn freely. Page 10 of 10Rear wheel brakes, servicing (disc brakes)12/7/2004http://ebahn.bentleypublishers.com/vw/servlet/Display?action=Goto&type=repair&id=VW.B4.SU01.46.5
Page 241 of 369

Downloaded from www.Manualslib.com manuals search engine 46-45
Brake Light Switch, adjusting
Note:
The Brake Light Switch must be removed for
adjusting.
- Remove trim under instrument panel.
- Disconnect harness connector for Brake Light
Switch.
- Remove Brake Light Switch by turning to right
through 90.
- Pull Brake Light Switch plunger fully out.
- Depress brake pedal as far as possible by hand,
guide Brake Light Switch through the locating
hole and secure by turning through 90to left.
- Pull brake pedal back up by hand to stop (Brake
Light Switch is pushed back by one notch).
- Connect harness connector for Brake Light
Switch
- Check function of Brake Light Switch.
- Install instrument panel trim. Page 9 of 9Parking brake lever assembly overview12/7/2004http://ebahn.bentleypublishers.com/vw/servlet/Display?action=Goto&type=repair&id=VW.B4.SU01.46.6
Page 243 of 369
Downloaded from www.Manualslib.com manuals search engine 47-2
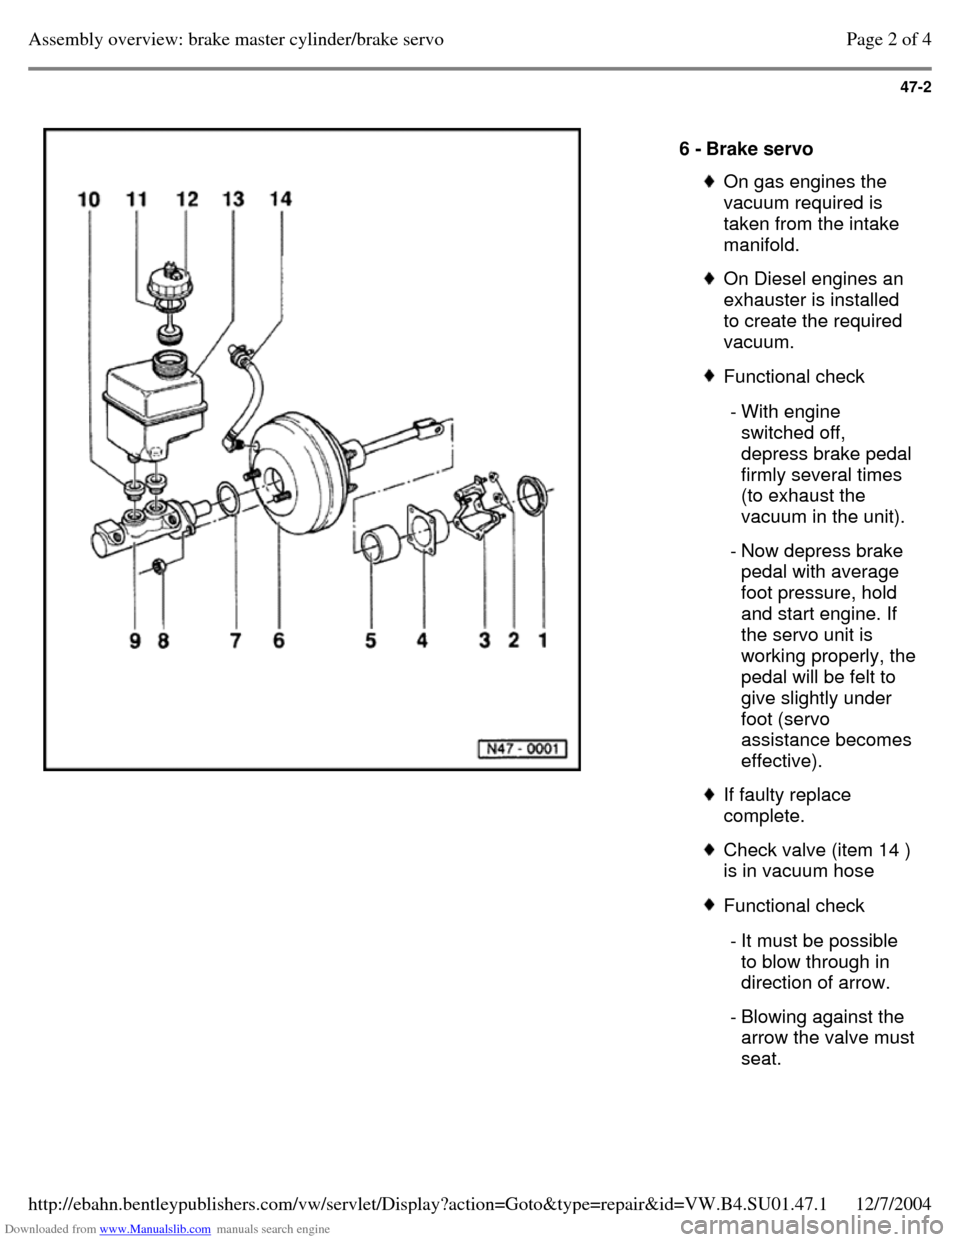
6 - Brake servo On gas engines the
vacuum required is
taken from the intake
manifold. On Diesel engines an
exhauster is installed
to create the required
vacuum. Functional check - With engine
switched off,
depress brake pedal
firmly several times
(to exhaust the
vacuum in the unit).
- Now depress brake
pedal with average
foot pressure, hold
and start engine. If
the servo unit is working properly, the pedal will be felt to
give slightly under
foot (servo
assistance becomes
effective). If faulty replace
complete. Check valve (item 14 )
is in vacuum hose Functional check - It must be possible
to blow through in
direction of arrow.
- Blowing against the arrow the valve must seat. Page 2 of 4Assembly overview: brake master cylinder/brake servo12/7/2004http://ebahn.bentleypublishers.com/vw/servlet/Display?action=Goto&type=repair&id=VW.B4.SU01.47.1
Page 264 of 369
Downloaded from www.Manualslib.com manuals search engine 47-23
Brake pressure regulator,
checking and adjusting
Vehicles without ABS, vehicles with
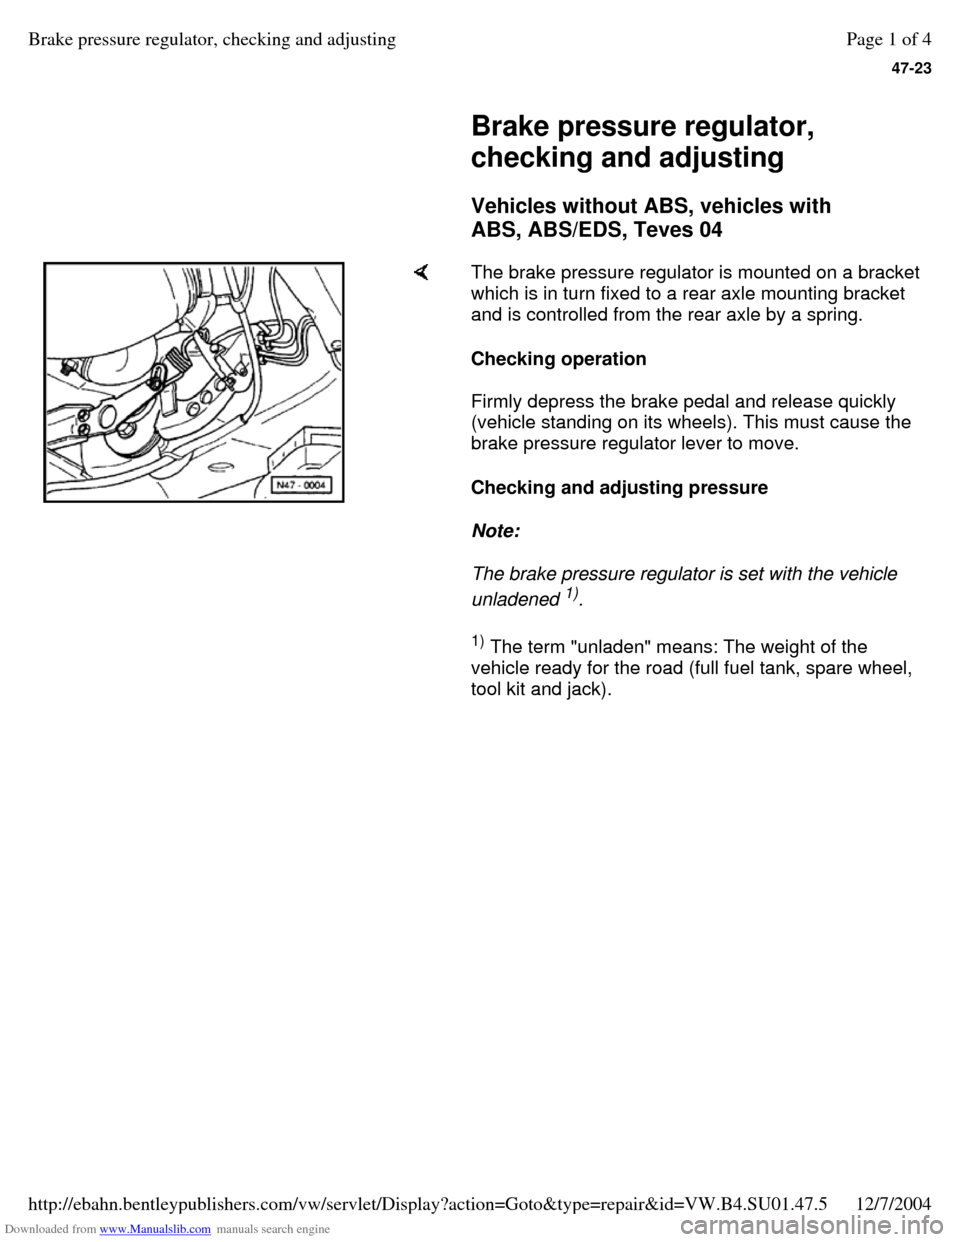
ABS, ABS/EDS, Teves 04 The brake pressure regulator is mounted on a bracket
which is in turn fixed to a rear axle mounting bracket
and is controlled from the rear axle by a spring.
Checking operation
Firmly depress the brake pedal and release quickly
(vehicle standing on its wheels). This must cause the
brake pressure regulator lever to move.
Checking and adjusting pressure
Note:
The brake pressure regulator is set with the vehicle
unladened 1)
.
1)
The term "unladen" means: The weight of the
vehicle ready for the road (full fuel tank, spare wheel,
tool kit and jack). Page 1 of 4Brake pressure regulator, checking and adjusting12/7/2004http://ebahn.bentleypublishers.com/vw/servlet/Display?action=Goto&type=repair&id=VW.B4.SU01.47.5
Page 265 of 369
Downloaded from www.Manualslib.com manuals search engine 47-24
Note:
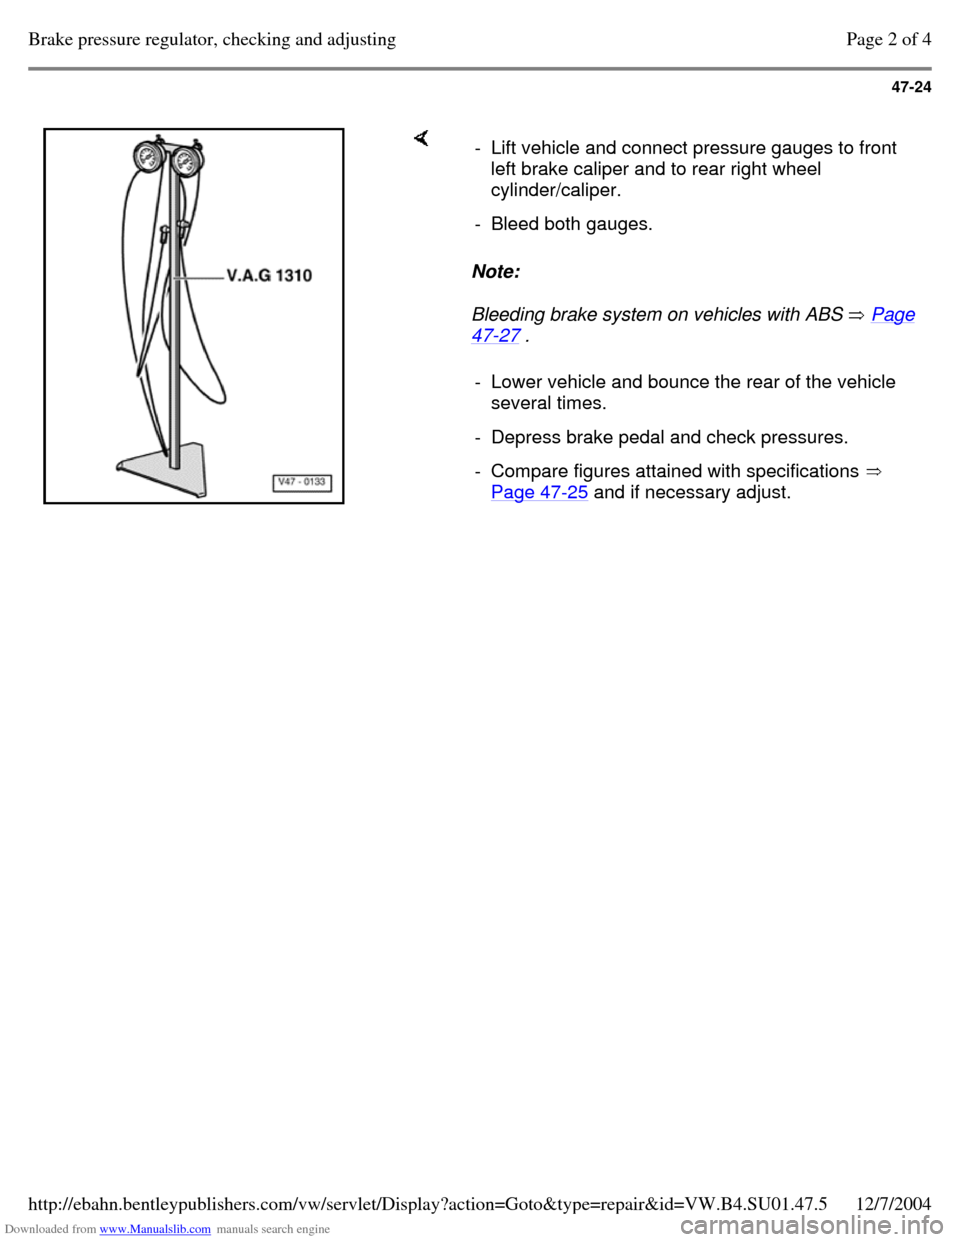
Bleeding brake system on vehicles with ABS Page 47-27 . - Lift vehicle and connect pressure gauges to front
left brake caliper and to rear right wheel
cylinder/caliper.
- Bleed both gauges. - Lower vehicle and bounce the rear of the vehicle
several times.
- Depress brake pedal and check pressures. - Compare figures attained with specifications
Page 47-25 and if necessary adjust. Page 2 of 4Brake pressure regulator, checking and adjusting12/7/2004http://ebahn.bentleypublishers.com/vw/servlet/Display?action=Goto&type=repair&id=VW.B4.SU01.47.5