check engine VOLKSWAGEN PASSAT 1995 B3, B4 / 3.G Service Repair Manual
[x] Cancel search | Manufacturer: VOLKSWAGEN, Model Year: 1995, Model line: PASSAT, Model: VOLKSWAGEN PASSAT 1995 B3, B4 / 3.GPages: 369, PDF Size: 12.33 MB
Page 266 of 369
Downloaded from www.Manualslib.com manuals search engine 47-25
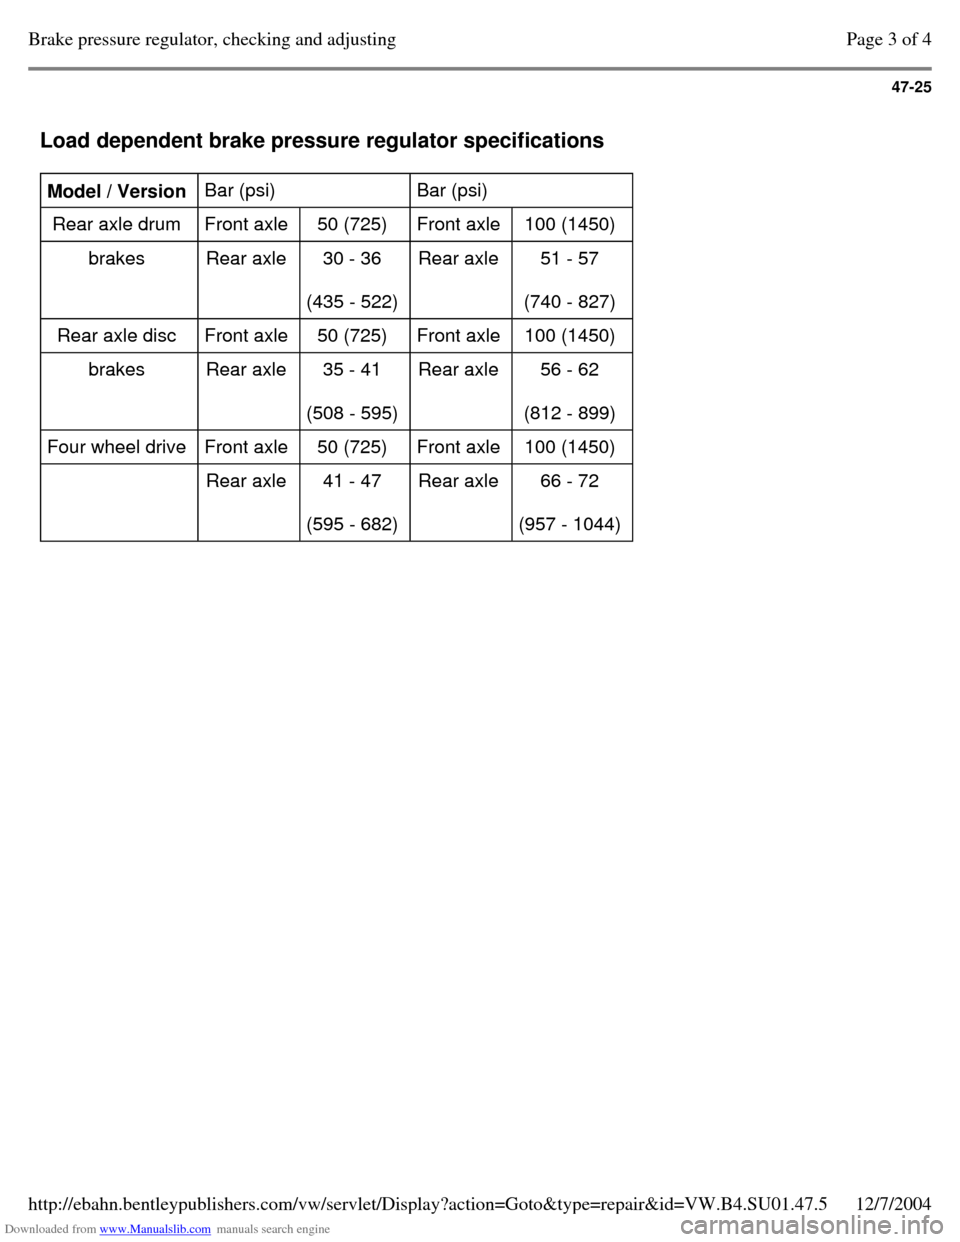
Load dependent brake pressure regulator specifications Model / Version Bar (psi) Bar (psi)
Rear axle drum Front axle 50 (725) Front axle 100 (1450)
brakes Rear axle 30 - 36
(435 - 522) Rear axle 51 - 57
(740 - 827)
Rear axle disc Front axle 50 (725) Front axle 100 (1450)
brakes Rear axle 35 - 41
(508 - 595) Rear axle 56 - 62
(812 - 899)
Four wheel drive Front axle 50 (725) Front axle 100 (1450)
Rear axle 41 - 47
(595 - 682) Rear axle 66 - 72
(957 - 1044) Page 3 of 4Brake pressure regulator, checking and adjusting12/7/2004http://ebahn.bentleypublishers.com/vw/servlet/Display?action=Goto&type=repair&id=VW.B4.SU01.47.5
Page 267 of 369
Downloaded from www.Manualslib.com manuals search engine 47-26
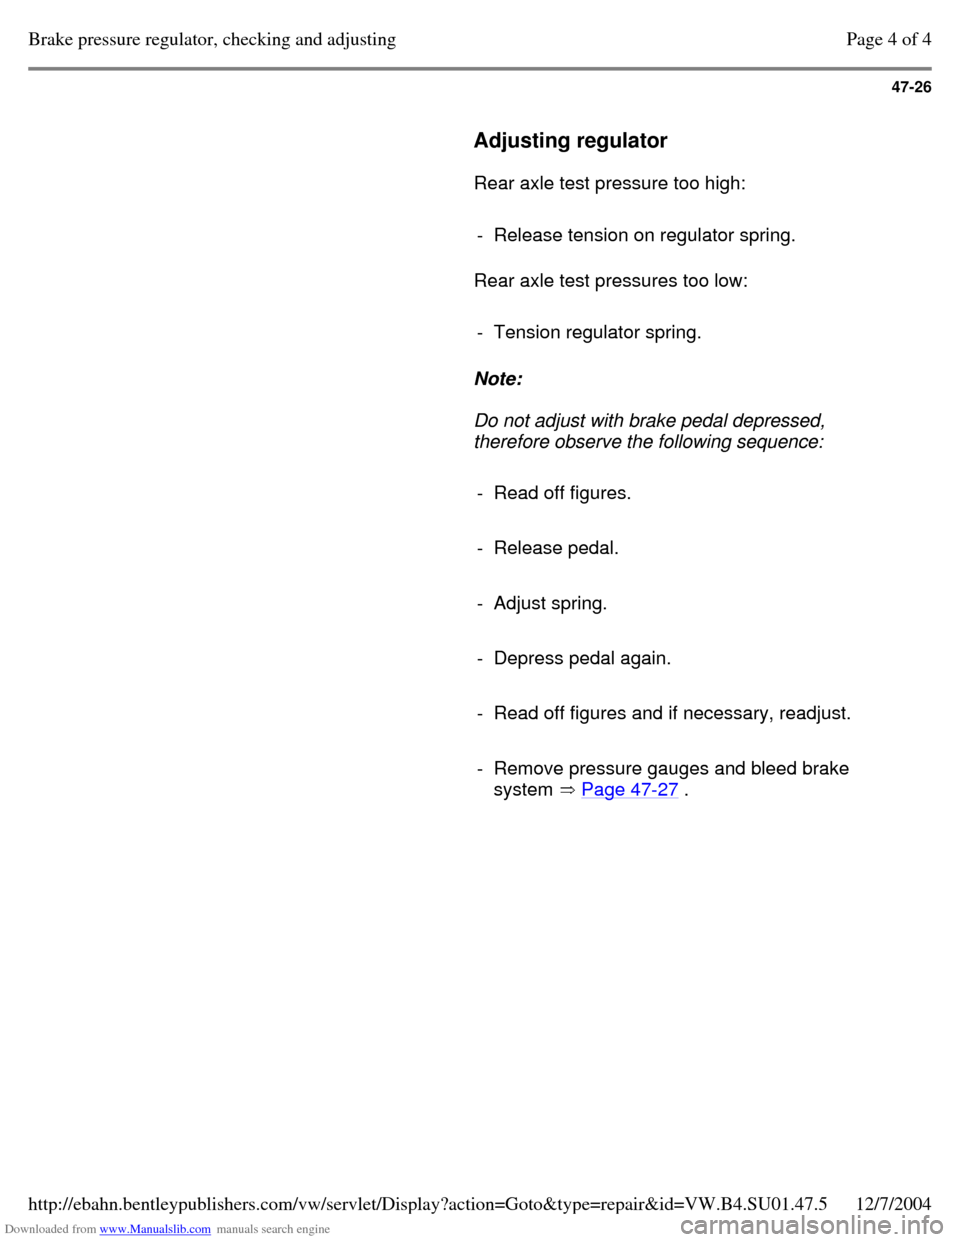
Adjusting regulator
Rear axle test pressure too high:
- Release tension on regulator spring. Rear axle test pressures too low:
- Tension regulator spring.
Note:
Do not adjust with brake pedal depressed,
therefore observe the following sequence:
- Read off figures.
- Release pedal.
- Adjust spring.
- Depress pedal again.
- Read off figures and if necessary, readjust.
- Remove pressure gauges and bleed brake
system Page 47-27 . Page 4 of 4Brake pressure regulator, checking and adjusting12/7/2004http://ebahn.bentleypublishers.com/vw/servlet/Display?action=Goto&type=repair&id=VW.B4.SU01.47.5
Page 271 of 369
Downloaded from www.Manualslib.com manuals search engine 48-1
Steering
Assembly overview: steering column,
column tube, steering wheel and airbag
steering wheel
Airbag system functional check and
interrogating Diagnostic Trouble Code (DTC)
Memory.
Repair Manual, Body Exterior, Interior, Repair Group 68; General body repairs
Safety precautions when working on airbag
Repair Manual, Body Exterior, Interior, Repair Group 68, General body repairs
Note:
All parts marked with a "1)
" can be pre-
assembled outside of the vehicle
Pre-assembling steering column Page 48-6 Always replace self-locking nuts and bolts. Welding and straightening work on steering
components is not permitted. Page 1 of 99Steering12/7/2004http://ebahn.bentleypublishers.com/vw/servlet/Display?action=Goto&type=repair&id=VW.B4.SU01.48.1
Page 273 of 369
Downloaded from www.Manualslib.com manuals search engine 48-3
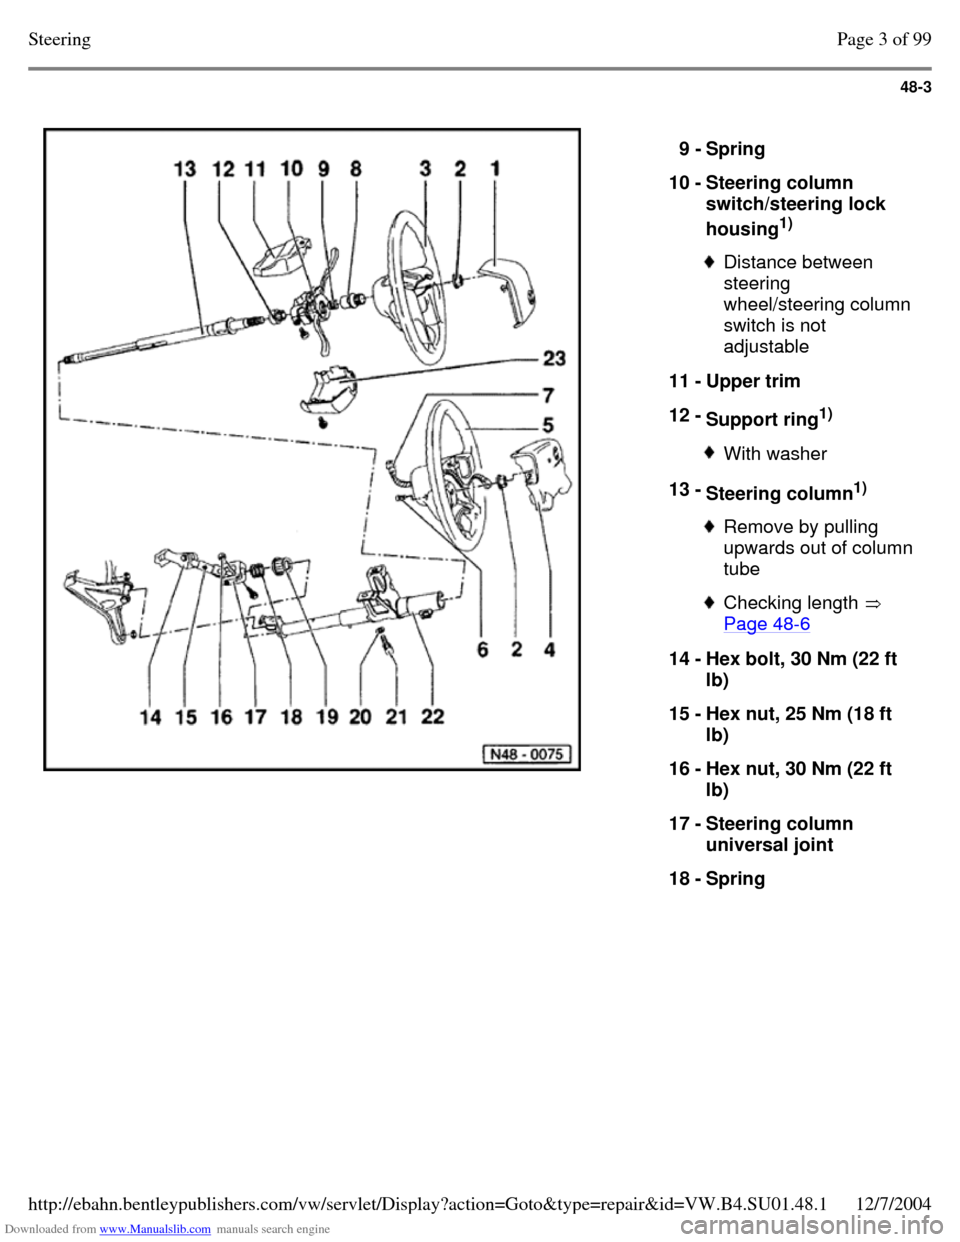
9 - Spring
10 - Steering column
switch/steering lock
housing1)
Distance between
steering
wheel/steering column
switch is not
adjustable
11 - Upper trim
12 - Support ring1)
With washer 13 - Steering column1)
Remove by pulling upwards out of column tube Checking length
Page 48-6 14 - Hex bolt, 30 Nm (22 ft
lb)
15 - Hex nut, 25 Nm (18 ft
lb)
16 - Hex nut, 30 Nm (22 ft
lb)
17 - Steering column
universal joint
18 - Spring Page 3 of 99Steering12/7/2004http://ebahn.bentleypublishers.com/vw/servlet/Display?action=Goto&type=repair&id=VW.B4.SU01.48.1
Page 276 of 369
Downloaded from www.Manualslib.com manuals search engine 48-6
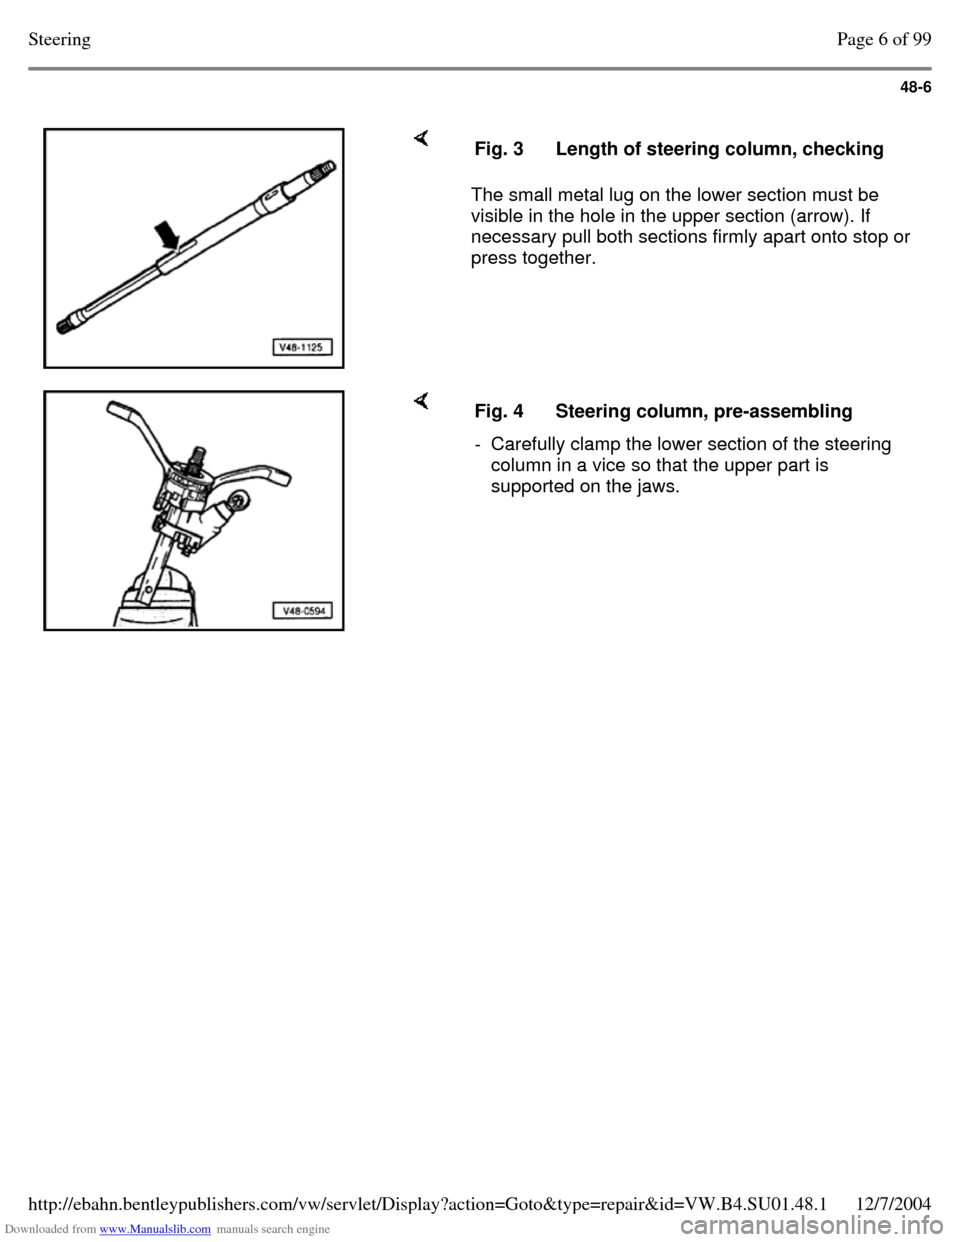
The small metal lug on the lower section must be
visible in the hole in the upper section (arrow). If
necessary pull both sections firmly apart onto stop or
press together. Fig. 3 Length of steering column, checking Fig. 4 Steering column, pre-assembling - Carefully clamp the lower section of the steering
column in a vice so that the upper part is
supported on the jaws. Page 6 of 99Steering12/7/2004http://ebahn.bentleypublishers.com/vw/servlet/Display?action=Goto&type=repair&id=VW.B4.SU01.48.1
Page 283 of 369
Downloaded from www.Manualslib.com manuals search engine 48-13
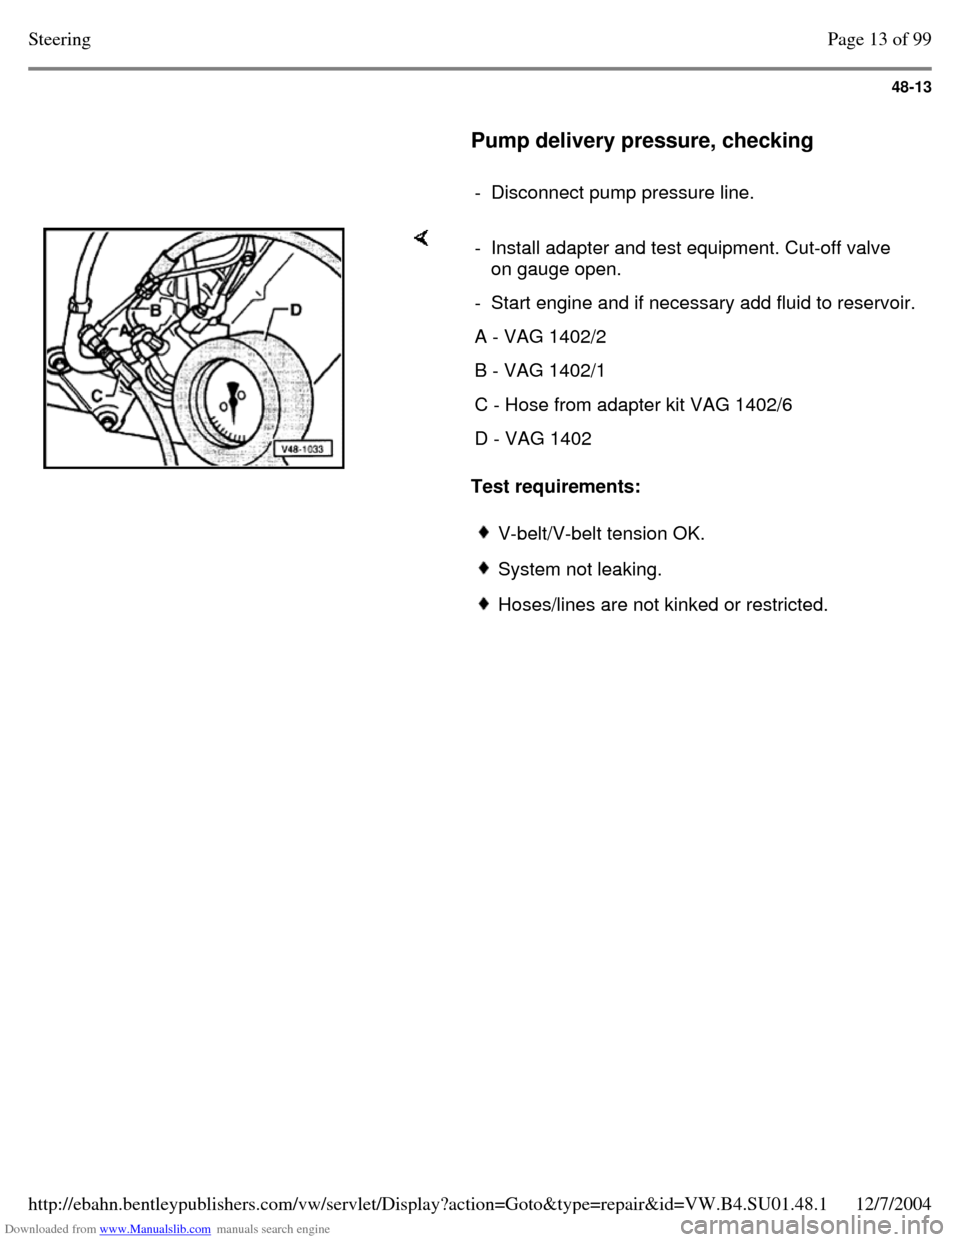
Pump delivery pressure, checking
- Disconnect pump pressure line. Test requirements: - Install adapter and test equipment. Cut-off valve
on gauge open.
- Start engine and if necessary add fluid to reservoir. A - VAG 1402/2 B - VAG 1402/1 C - Hose from adapter kit VAG 1402/6 D - VAG 1402 V-belt/V-belt tension OK. System not leaking. Hoses/lines are not kinked or restricted. Page 13 of 99Steering12/7/2004http://ebahn.bentleypublishers.com/vw/servlet/Display?action=Goto&type=repair&id=VW.B4.SU01.48.1
Page 284 of 369
Downloaded from www.Manualslib.com manuals search engine 48-14
- With engine running at idling speed. Close cut-
off valve (not longer than 5 seconds) and read
off pressure.
Specification: 85 - 95 bar (1232 - 1377
psi)
Note:
If the reading is higher or lower than specified
replace pump.
Vehicles with up to 110 kW engine Page 48-90 . Vehicles with 128 kW engine Page 48-97 . If reservoir fluid level is low then check steering
system for leaks.
For leaks at the pinion first check the lines/line
connections for leaks and if necessary tighten
and wipe dry.
If the pinion seal or the rack seals in steering
box housing are leaking then replace steering
gear.
To check the rack seals loosen the clamp on
the boot and push to one side. Page 14 of 99Steering12/7/2004http://ebahn.bentleypublishers.com/vw/servlet/Display?action=Goto&type=repair&id=VW.B4.SU01.48.1
Page 288 of 369
Downloaded from www.Manualslib.com manuals search engine 48-18
Installing
Install in reverse order.
- Check position of steering wheel and, if
necessary, align front end.
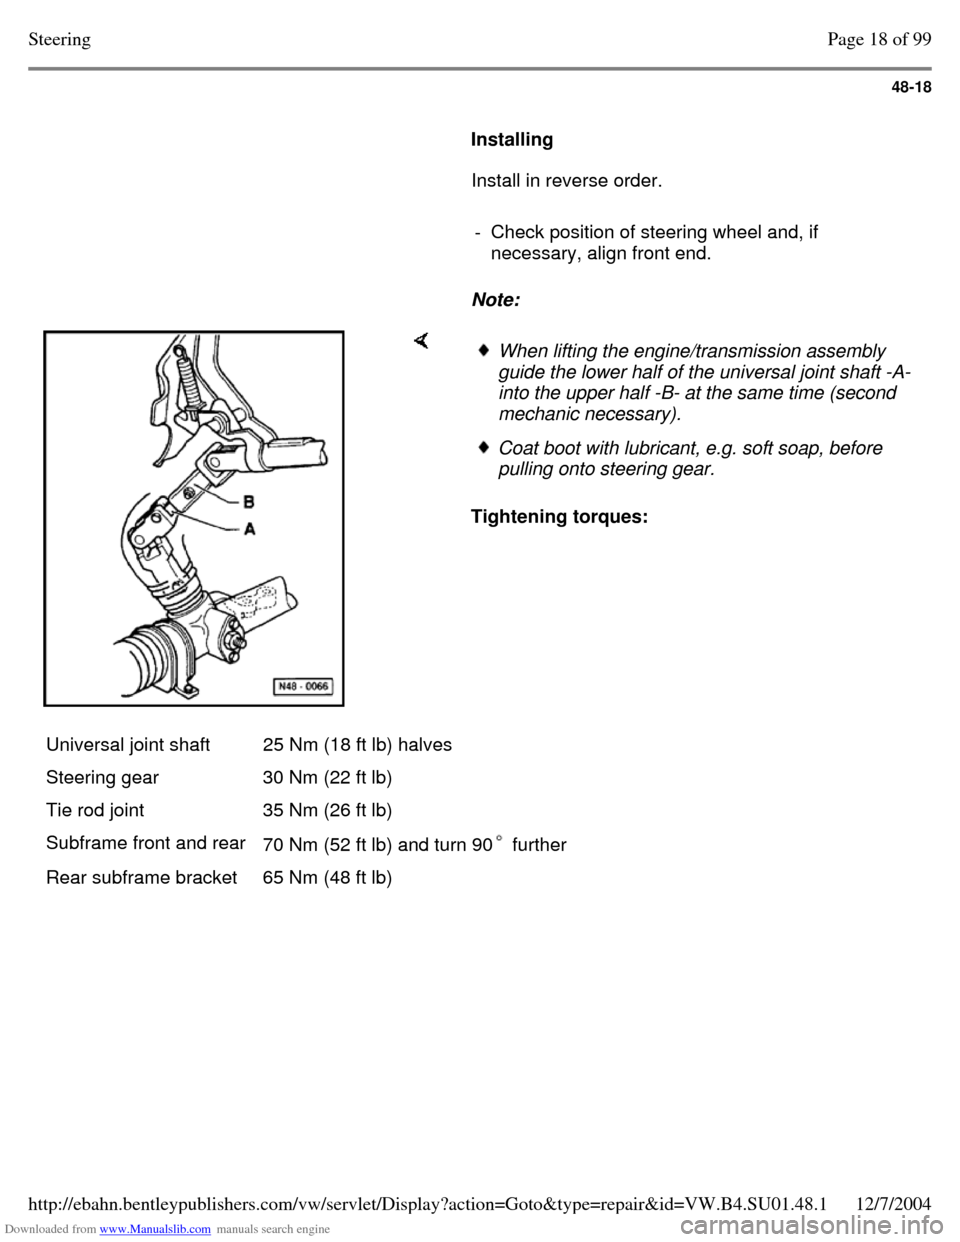
Note: Tightening torques: When lifting the engine/transmission assembly
guide the lower half of the universal joint shaft -A-
into the upper half -B- at the same time (second
mechanic necessary). Coat boot with lubricant, e.g. soft soap, before
pulling onto steering gear.
Universal joint shaft 25 Nm (18 ft lb) halves
Steering gear 30 Nm (22 ft lb)
Tie rod joint 35 Nm (26 ft lb)
Subframe front and rear
70 Nm (52 ft lb) and turn 90 further Rear subframe bracket 65 Nm (48 ft lb) Page 18 of 99Steering12/7/2004http://ebahn.bentleypublishers.com/vw/servlet/Display?action=Goto&type=repair&id=VW.B4.SU01.48.1
Page 292 of 369
Downloaded from www.Manualslib.com manuals search engine 48-22
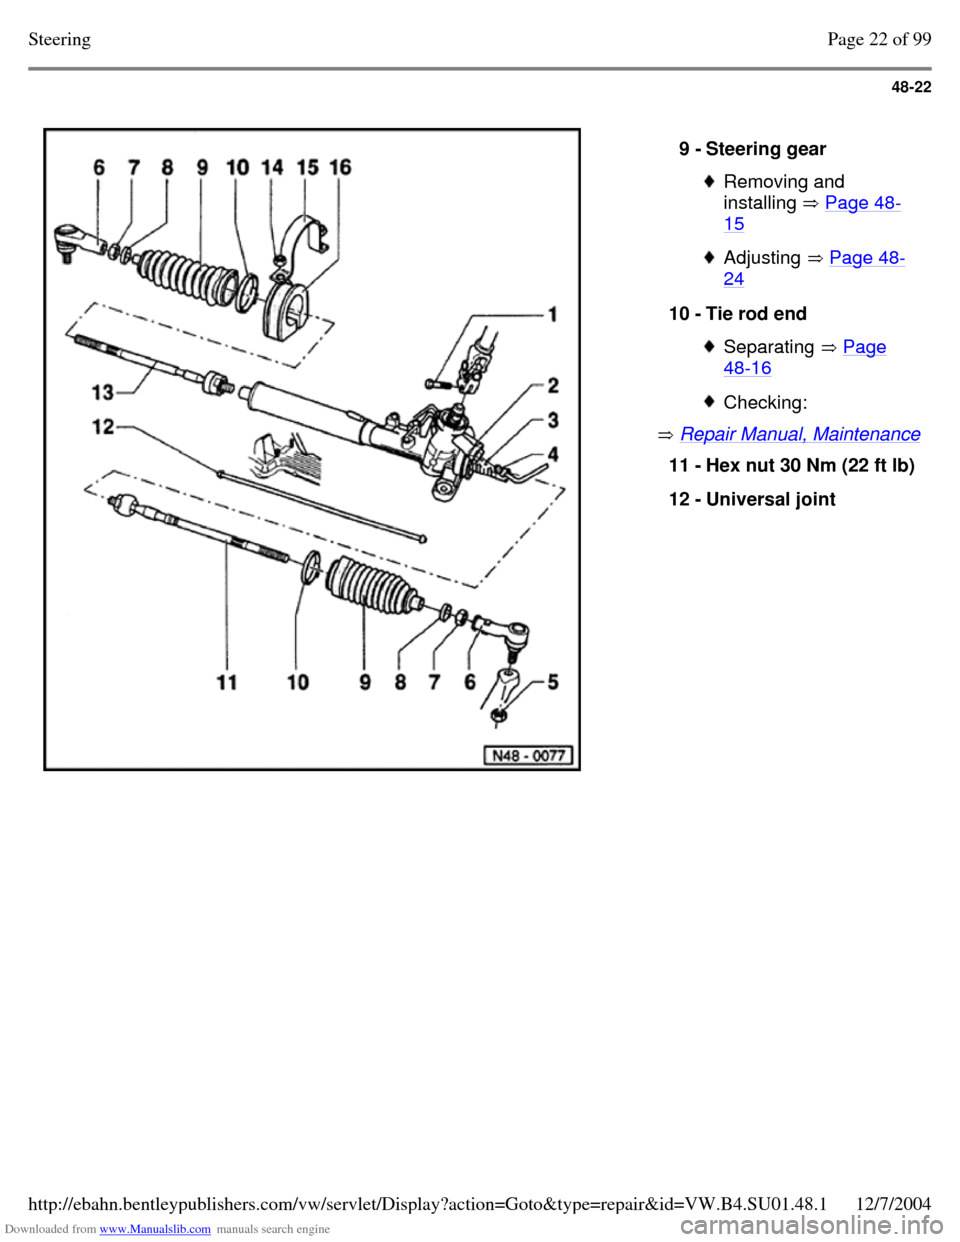
Repair Manual, Maintenance 9 - Steering gear Removing and
installing Page 48-15 Adjusting Page 48-24 10 - Tie rod end Separating Page 48-16 Checking: 11 - Hex nut 30 Nm (22 ft lb) 12 - Universal joint Page 22 of 99Steering12/7/2004http://ebahn.bentleypublishers.com/vw/servlet/Display?action=Goto&type=repair&id=VW.B4.SU01.48.1
Page 297 of 369
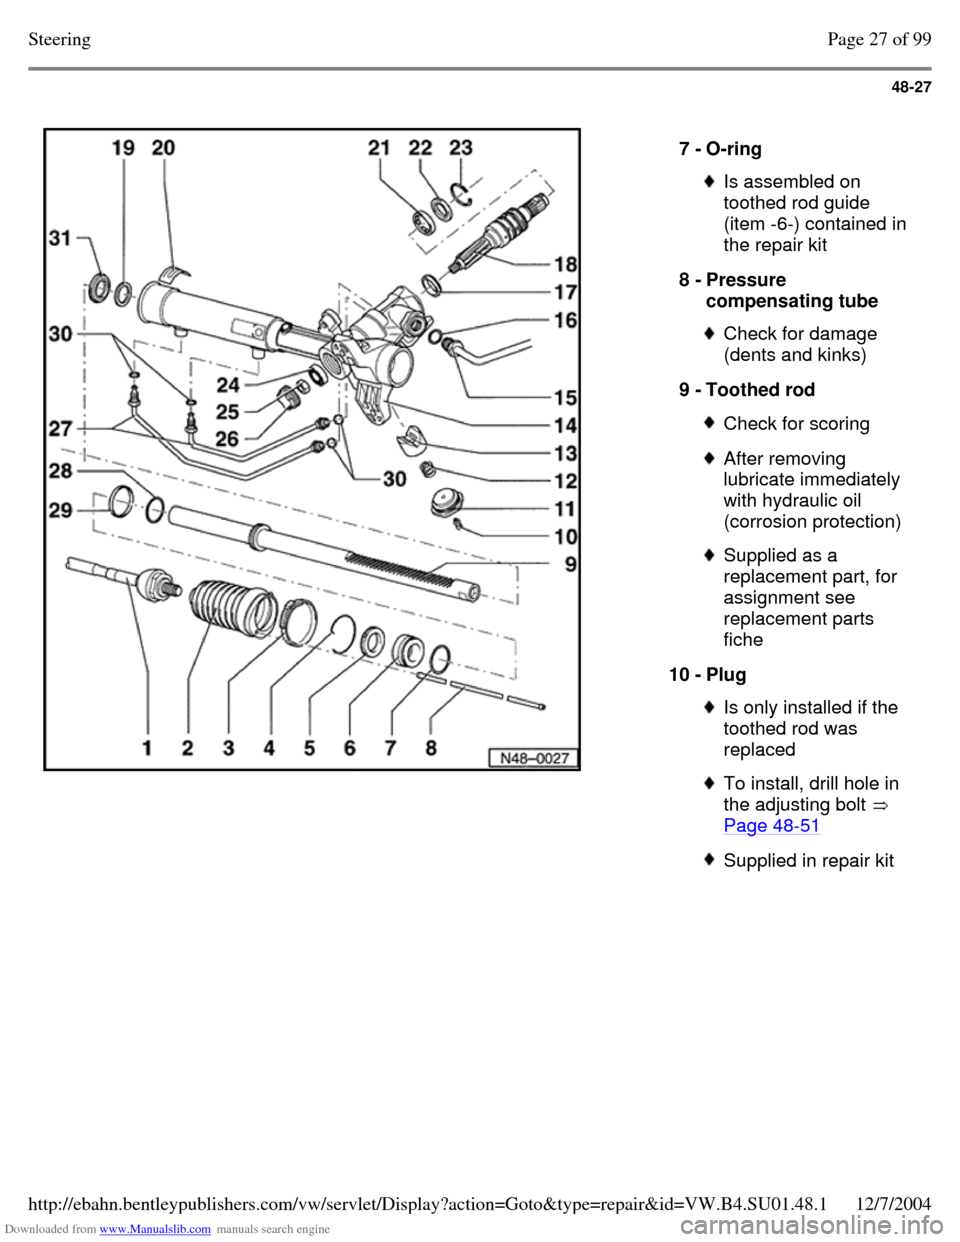
Downloaded from www.Manualslib.com manuals search engine 48-27
7 - O-ring Is assembled on
toothed rod guide
(item -6-) contained in
the repair kit
8 - Pressure
compensating tube Check for damage
(dents and kinks)
9 - Toothed rod Check for scoring After removing
lubricate immediately
with hydraulic oil
(corrosion protection) Supplied as a
replacement part, for
assignment see
replacement parts
fiche
10 - Plug Is only installed if the
toothed rod was
replaced To install, drill hole in
the adjusting bolt
Page 48-51 Supplied in repair kit Page 27 of 99Steering12/7/2004http://ebahn.bentleypublishers.com/vw/servlet/Display?action=Goto&type=repair&id=VW.B4.SU01.48.1