boot VOLKSWAGEN PASSAT 1996 B3, B4 / 3.G Service Workshop Manual
[x] Cancel search | Manufacturer: VOLKSWAGEN, Model Year: 1996, Model line: PASSAT, Model: VOLKSWAGEN PASSAT 1996 B3, B4 / 3.GPages: 369, PDF Size: 12.33 MB
Page 17 of 369
Downloaded from www.Manualslib.com manuals search engine 40-3
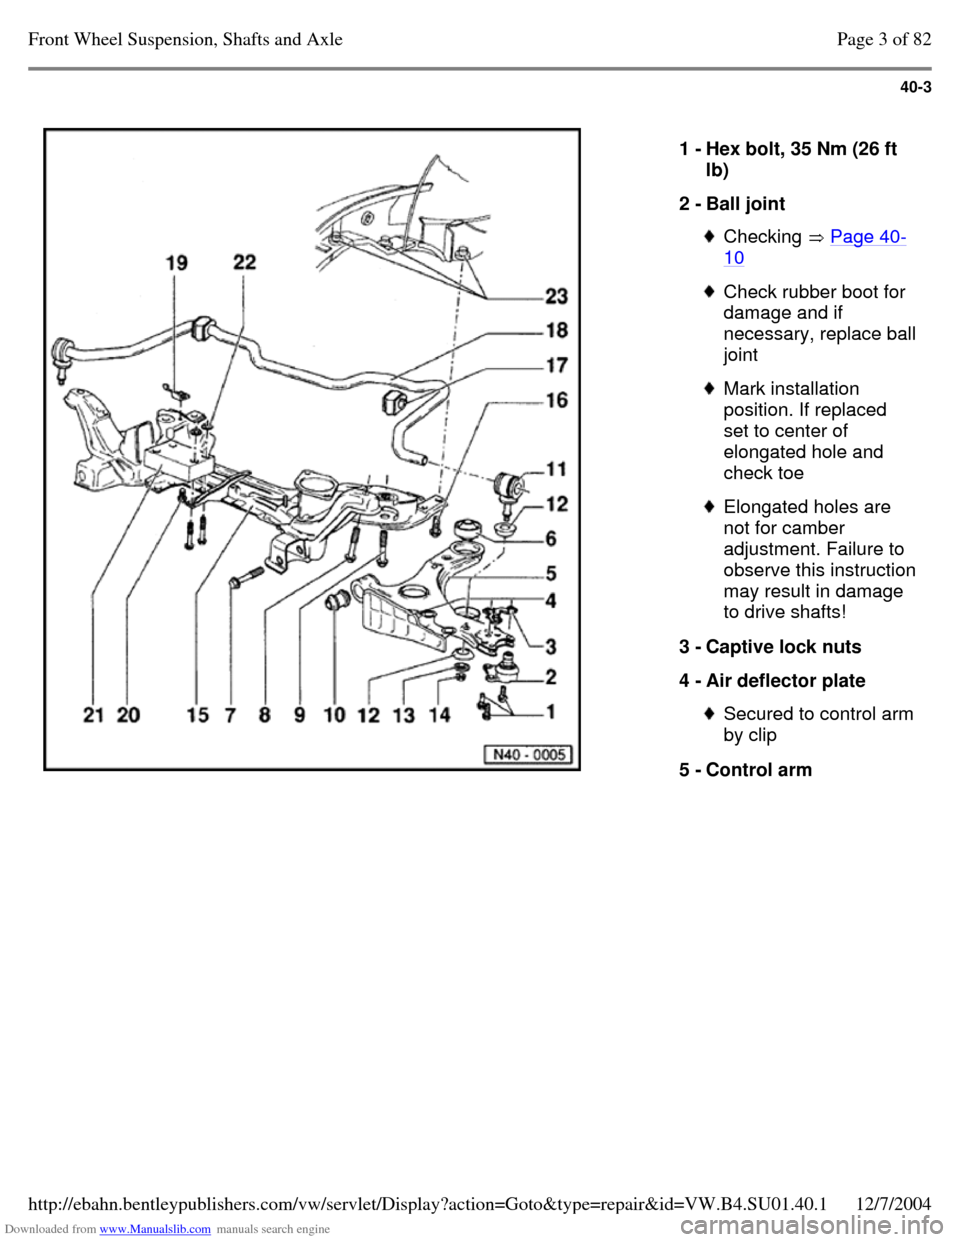
1 - Hex bolt, 35 Nm (26 ft
lb)
2 - Ball joint Checking Page 40-10 Check rubber boot for
damage and if necessary, replace ball joint Mark installation
position. If replaced
set to center of
elongated hole and
check toe Elongated holes are
not for camber
adjustment. Failure to observe this instruction may result in damage
to drive shafts!
3 - Captive lock nuts
4 - Air deflector plate Secured to control arm by clip
5 - Control arm Page 3 of 82Front Wheel Suspension, Shafts and Axle12/7/2004http://ebahn.bentleypublishers.com/vw/servlet/Display?action=Goto&type=repair&id=VW.B4.SU01.40.1
Page 41 of 369
Downloaded from www.Manualslib.com manuals search engine 40-27
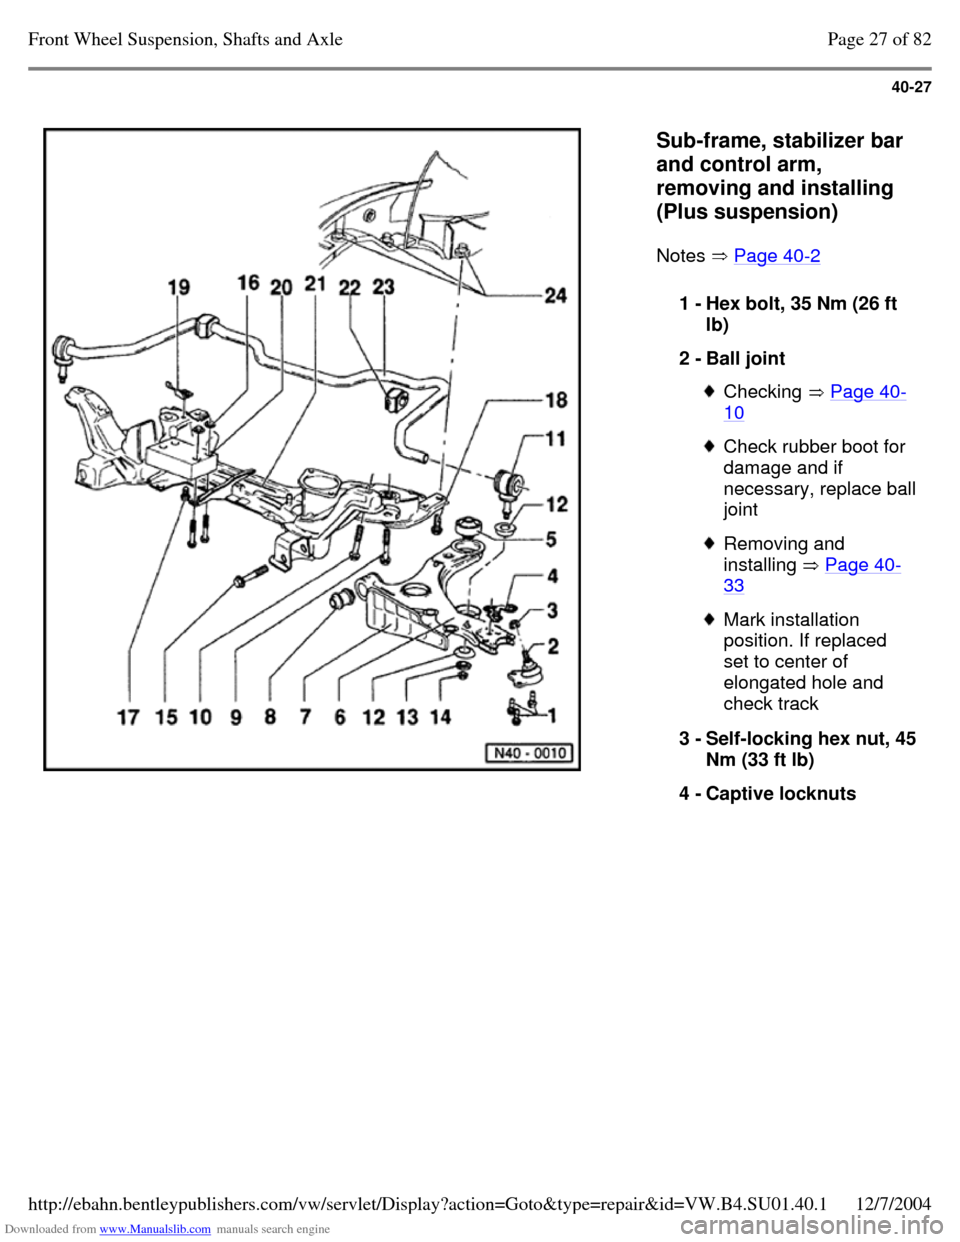
Sub-frame, stabilizer bar
and control arm,
removing and installing
(Plus suspension)
Notes Page 40-2 1 - Hex bolt, 35 Nm (26 ft
lb)
2 - Ball joint Checking Page 40-10 Check rubber boot for
damage and if necessary, replace ball joint Removing and
installing Page 40-33 Mark installation
position. If replaced
set to center of
elongated hole and
check track
3 - Self-locking hex nut, 45 Nm (33 ft lb)
4 - Captive locknuts Page 27 of 82Front Wheel Suspension, Shafts and Axle12/7/2004http://ebahn.bentleypublishers.com/vw/servlet/Display?action=Goto&type=repair&id=VW.B4.SU01.40.1
Page 49 of 369
Downloaded from www.Manualslib.com manuals search engine 40-35
Note:
Make sure that the boot is not damaged or
twisted.
Tightening torques
Ball joint to wheel bearing housing: 45 Nm (33 ft
lb)
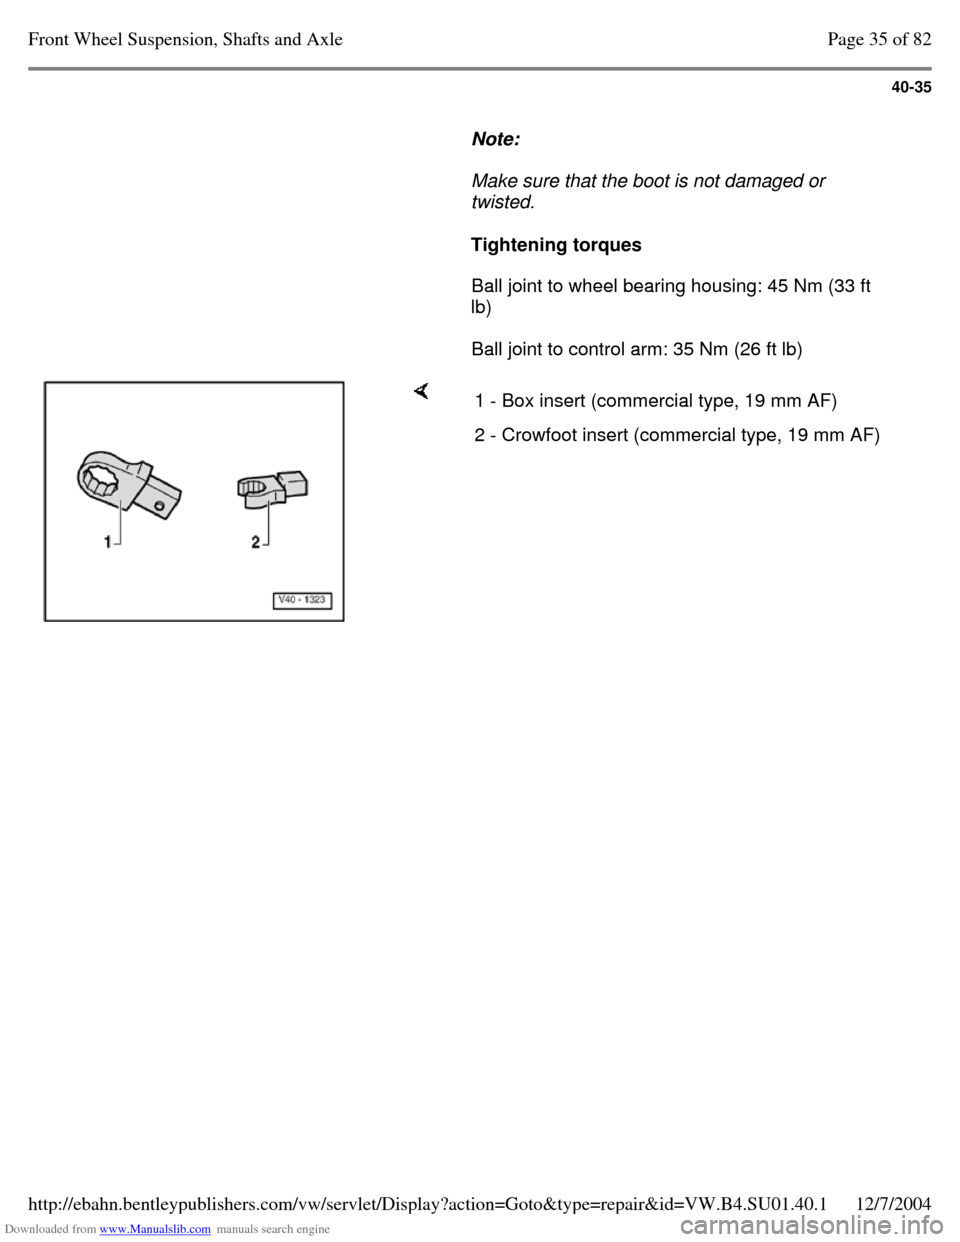
Ball joint to control arm: 35 Nm (26 ft lb) 1 - Box insert (commercial type, 19 mm AF) 2 - Crowfoot insert (commercial type, 19 mm AF) Page 35 of 82Front Wheel Suspension, Shafts and Axle12/7/2004http://ebahn.bentleypublishers.com/vw/servlet/Display?action=Goto&type=repair&id=VW.B4.SU01.40.1
Page 60 of 369
Downloaded from www.Manualslib.com manuals search engine 40-46
Drive shaft, repairing
Drive shafts on vehicles with Plus suspension
have shorter and finer splines on the outer joint.
The wheel bearing is secured by a 12-point nut.
The splines of the outer joint and the hub on Plus
suspensions are secured with locking fluid D 185
400 A2.
Drive shaft, removing and installing
Vehicles with Base suspension Page 40-14 Vehicles with Plus suspension Page 40-43
Note:
Grease quantity:
- - Outer constant velocity joint 100 g of G-6.3
grease
- - Inner constant velocity joint 110 g of G-6.3
grease
Greasing outer joint: press half of the grease
into the joint, and the other half evenly into the
boot.
Greasing inner joint: press half of the grease
into the inner joint from both sides, the other
half evenly into the boot.
When replacing the boot grease joint as
required. Page 46 of 82Front Wheel Suspension, Shafts and Axle12/7/2004http://ebahn.bentleypublishers.com/vw/servlet/Display?action=Goto&type=repair&id=VW.B4.SU01.40.1
Page 62 of 369
Downloaded from www.Manualslib.com manuals search engine 40-48
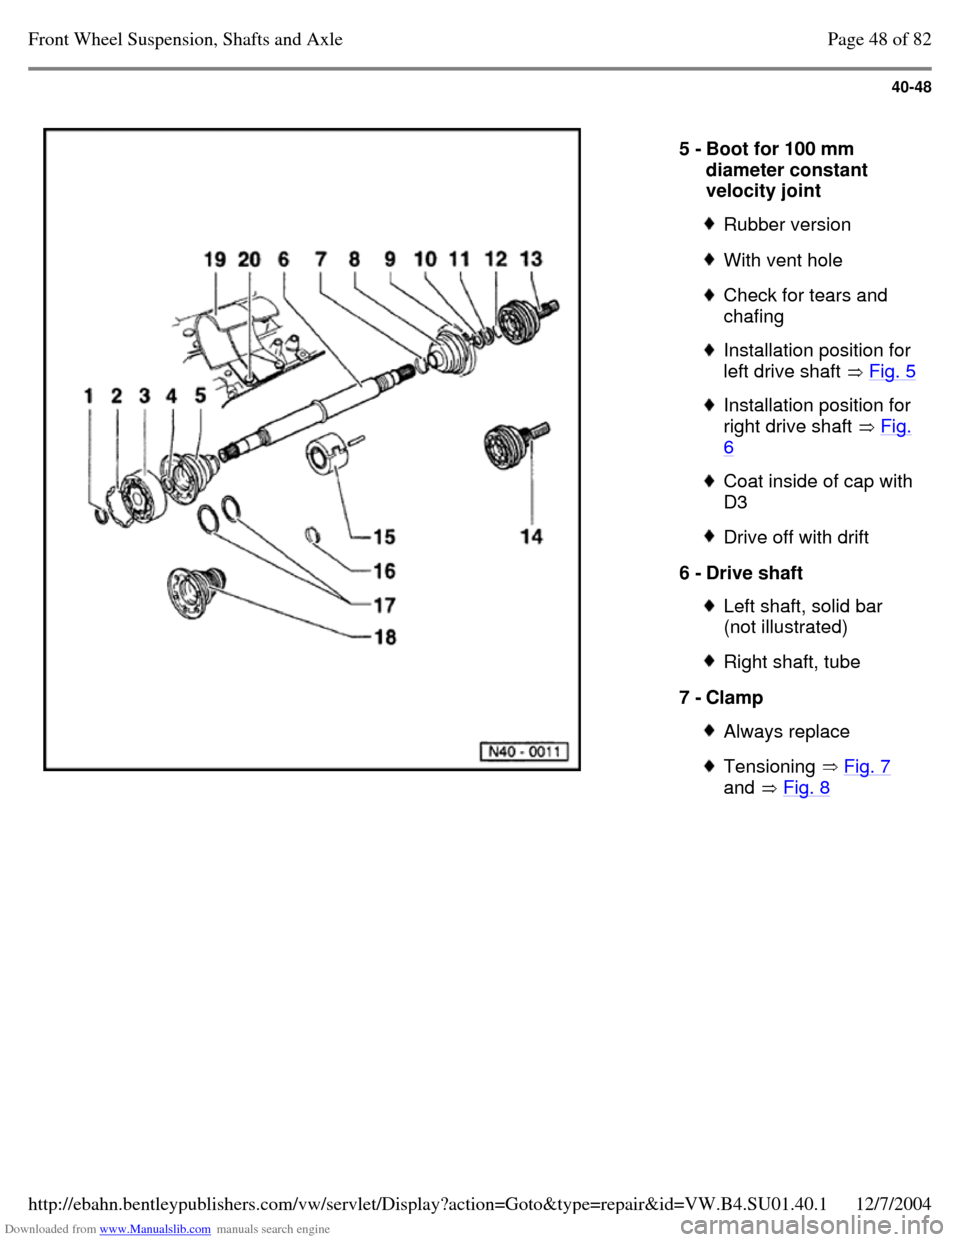
5 - Boot for 100 mm
diameter constant
velocity joint Rubber version With vent hole Check for tears and
chafing Installation position for
left drive shaft Fig. 5 Installation position for
right drive shaft Fig. 6 Coat inside of cap with D3 Drive off with drift 6 - Drive shaft Left shaft, solid bar
(not illustrated) Right shaft, tube 7 - Clamp Always replace Tensioning Fig. 7
and Fig. 8 Page 48 of 82Front Wheel Suspension, Shafts and Axle12/7/2004http://ebahn.bentleypublishers.com/vw/servlet/Display?action=Goto&type=repair&id=VW.B4.SU01.40.1
Page 63 of 369
Downloaded from www.Manualslib.com manuals search engine 40-49
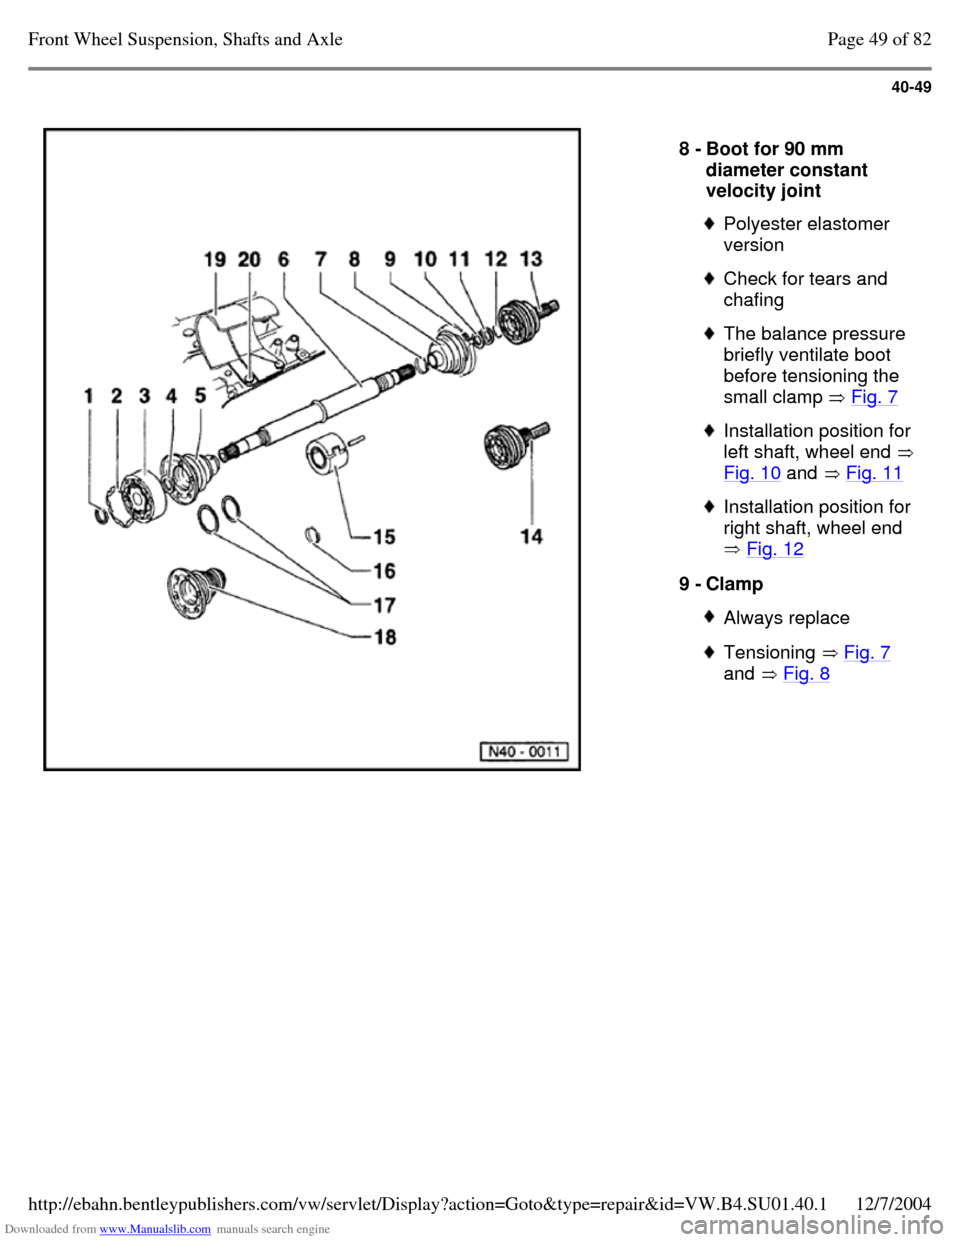
8 - Boot for 90 mm
diameter constant
velocity joint Polyester elastomer
version Check for tears and
chafing The balance pressure
briefly ventilate boot
before tensioning the
small clamp Fig. 7 Installation position for
left shaft, wheel end Fig. 10 and Fig. 11 Installation position for
right shaft, wheel end
Fig. 12 9 - Clamp Always replace Tensioning Fig. 7
and Fig. 8 Page 49 of 82Front Wheel Suspension, Shafts and Axle12/7/2004http://ebahn.bentleypublishers.com/vw/servlet/Display?action=Goto&type=repair&id=VW.B4.SU01.40.1
Page 66 of 369
Downloaded from www.Manualslib.com manuals search engine 40-52
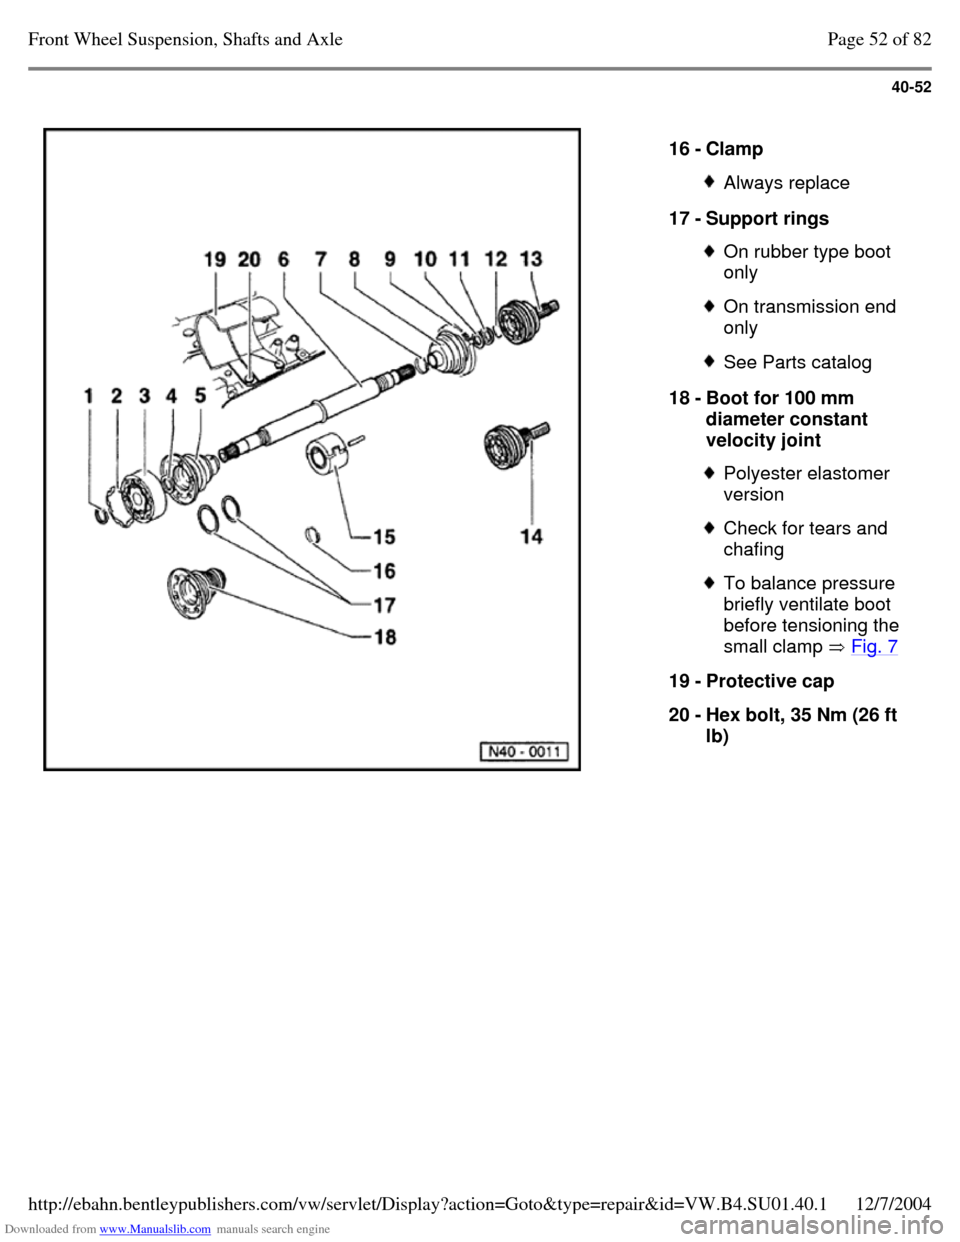
16 - Clamp Always replace 17 - Support rings On rubber type boot
only On transmission end
only See Parts catalog 18 - Boot for 100 mm
diameter constant
velocity joint Polyester elastomer
version Check for tears and
chafing To balance pressure
briefly ventilate boot
before tensioning the
small clamp Fig. 7 19 - Protective cap
20 - Hex bolt, 35 Nm (26 ft
lb) Page 52 of 82Front Wheel Suspension, Shafts and Axle12/7/2004http://ebahn.bentleypublishers.com/vw/servlet/Display?action=Goto&type=repair&id=VW.B4.SU01.40.1
Page 68 of 369
Downloaded from www.Manualslib.com manuals search engine 40-54
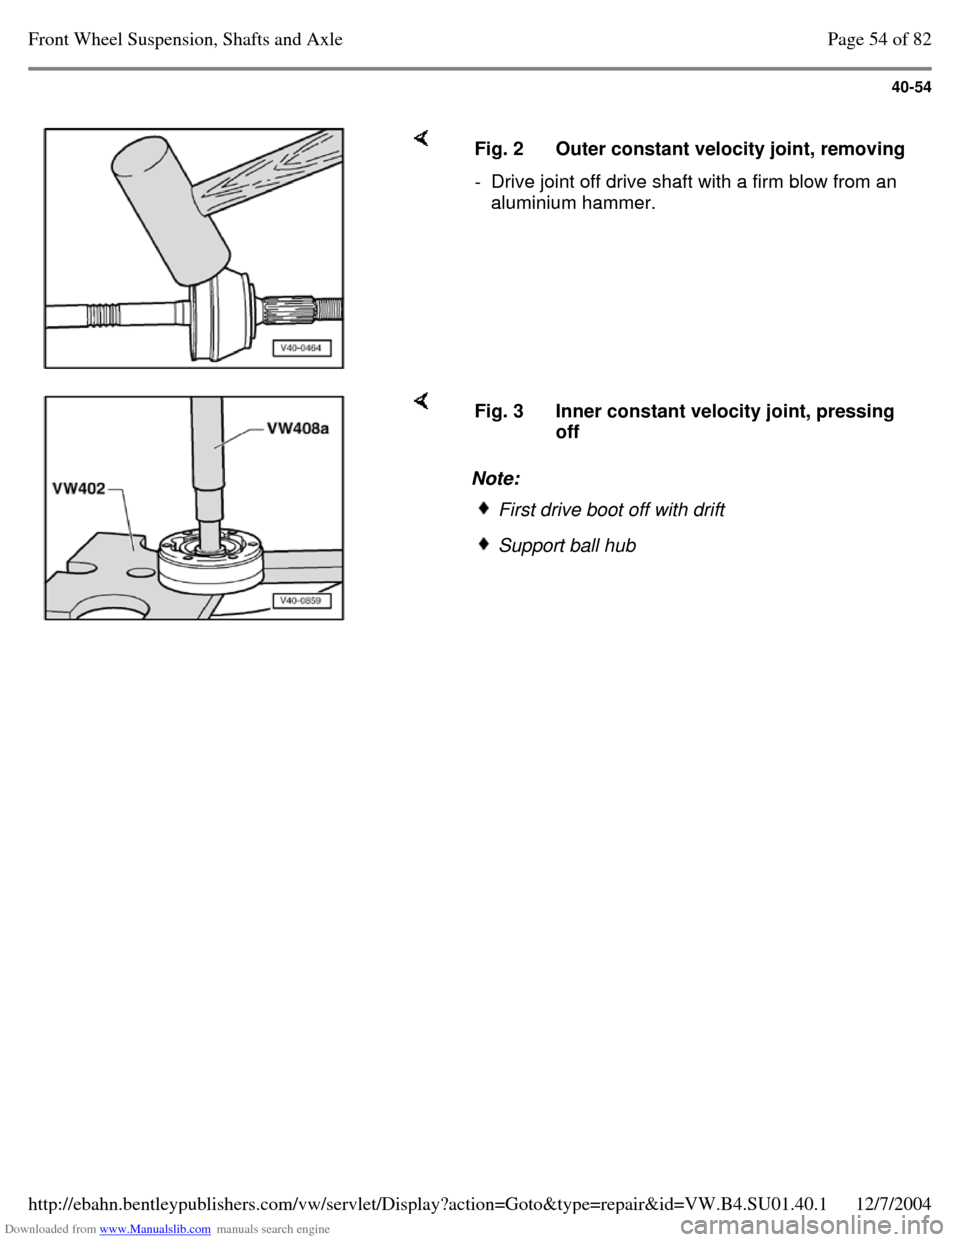
Fig. 2 Outer constant velocity joint, removing - Drive joint off drive shaft with a firm blow from an
aluminium hammer. Note: Fig. 3 Inner constant velocity joint, pressing
off First drive boot off with drift Support ball hub Page 54 of 82Front Wheel Suspension, Shafts and Axle12/7/2004http://ebahn.bentleypublishers.com/vw/servlet/Display?action=Goto&type=repair&id=VW.B4.SU01.40.1
Page 69 of 369
Downloaded from www.Manualslib.com manuals search engine 40-55
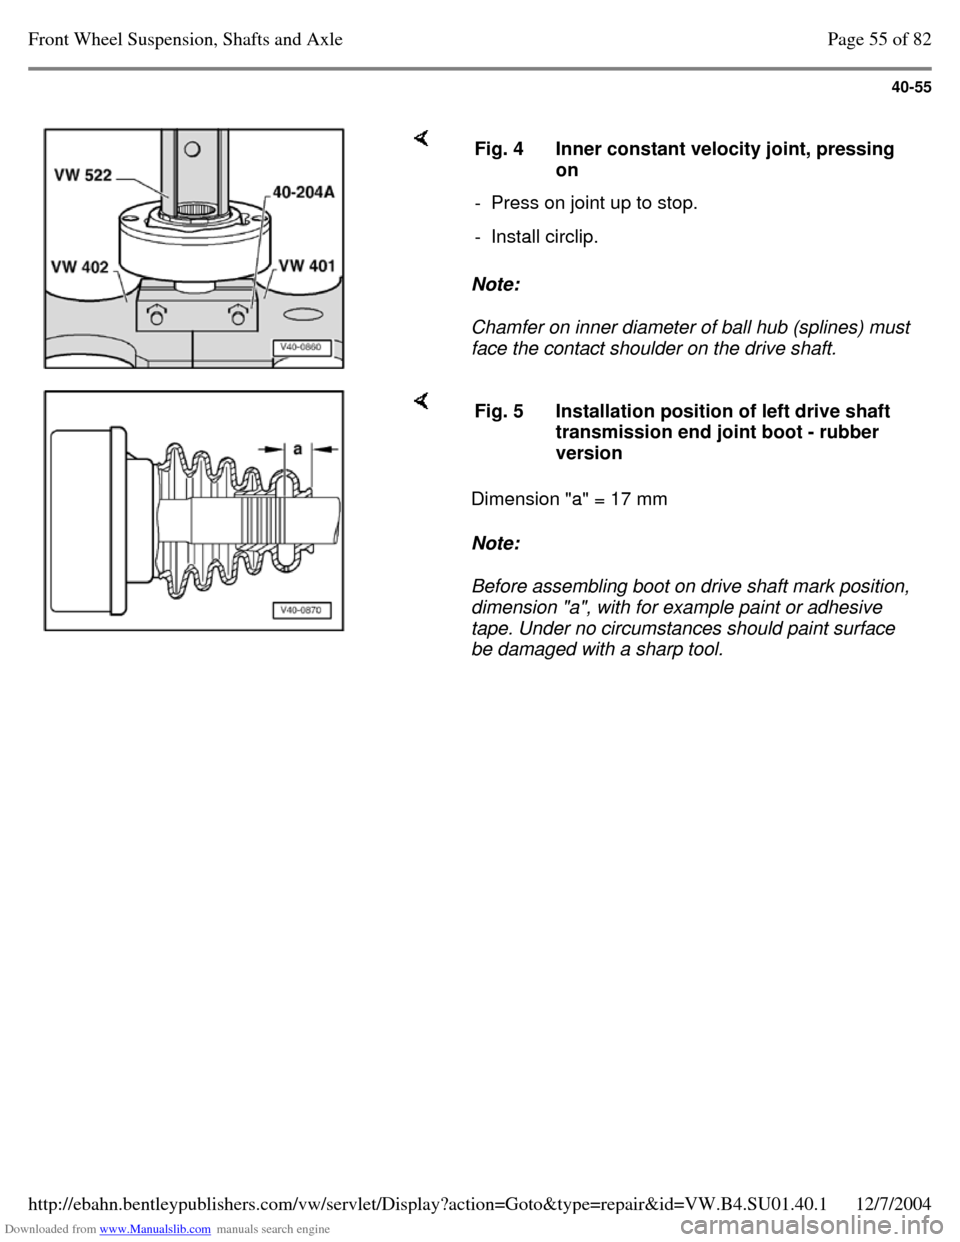
Note:
Chamfer on inner diameter of ball hub (splines) must
face the contact shoulder on the drive shaft. Fig. 4 Inner constant velocity joint, pressing
on
- Press on joint up to stop. - Install circlip. Dimension "a" = 17 mm
Note:
Before assembling boot on drive shaft mark position,
dimension "a", with for example paint or adhesive
tape. Under no circumstances should paint surface
be damaged with a sharp tool. Fig. 5 Installation position of left drive shaft
transmission end joint boot - rubber
version Page 55 of 82Front Wheel Suspension, Shafts and Axle12/7/2004http://ebahn.bentleypublishers.com/vw/servlet/Display?action=Goto&type=repair&id=VW.B4.SU01.40.1
Page 70 of 369
Downloaded from www.Manualslib.com manuals search engine 40-56
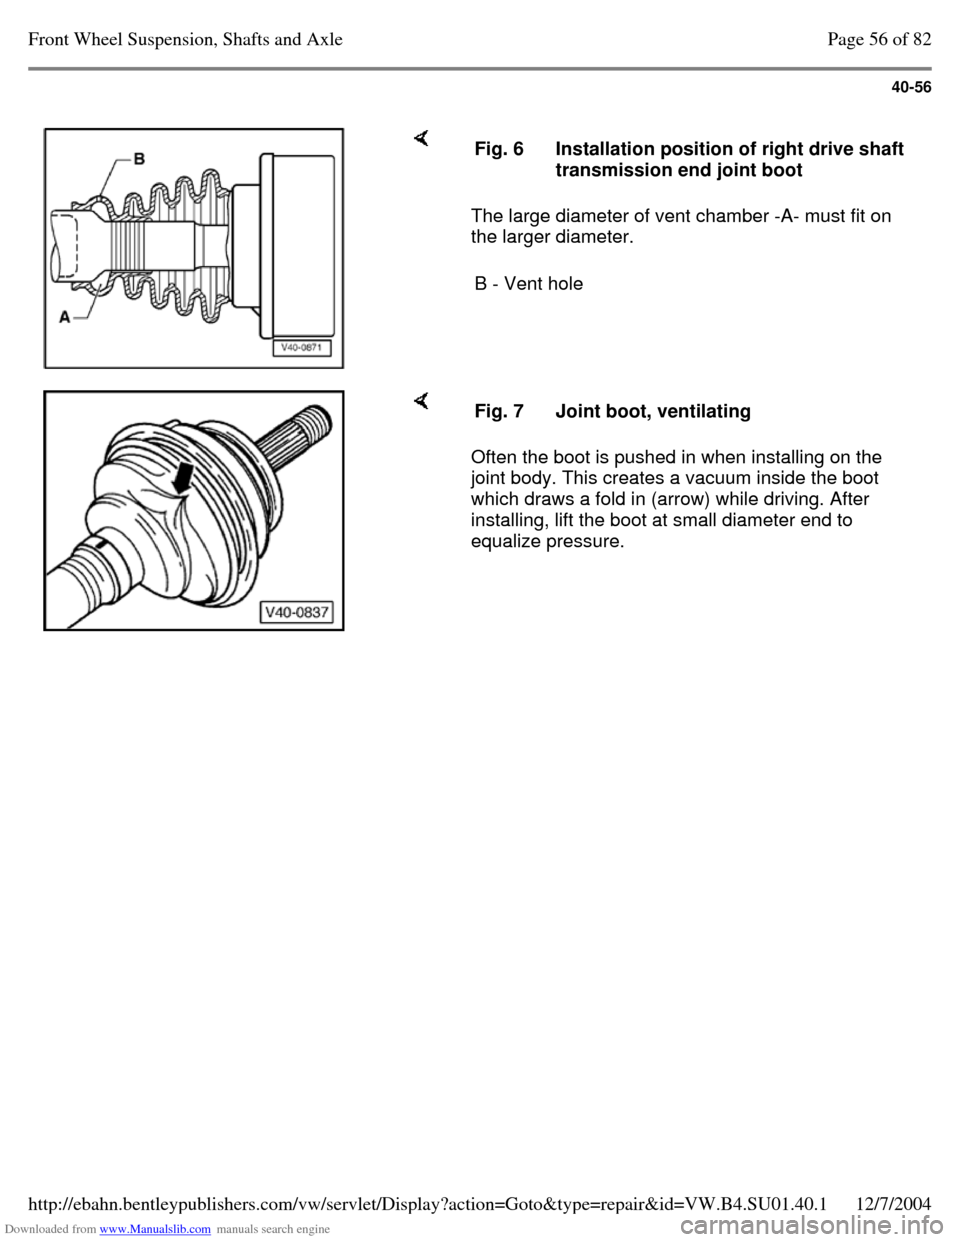
The large diameter of vent chamber -A- must fit on
the larger diameter. Fig. 6 Installation position of right drive shaft
transmission end joint boot
B - Vent hole Often the boot is pushed in when installing on the
joint body. This creates a vacuum inside the boot
which draws a fold in (arrow) while driving. After
installing, lift the boot at small diameter end to
equalize pressure. Fig. 7 Joint boot, ventilating Page 56 of 82Front Wheel Suspension, Shafts and Axle12/7/2004http://ebahn.bentleypublishers.com/vw/servlet/Display?action=Goto&type=repair&id=VW.B4.SU01.40.1