heating VOLKSWAGEN T-ROC 2021 Owner´s Manual
[x] Cancel search | Manufacturer: VOLKSWAGEN, Model Year: 2021, Model line: T-ROC, Model: VOLKSWAGEN T-ROC 2021Pages: 502, PDF Size: 9.42 MB
Page 3 of 502
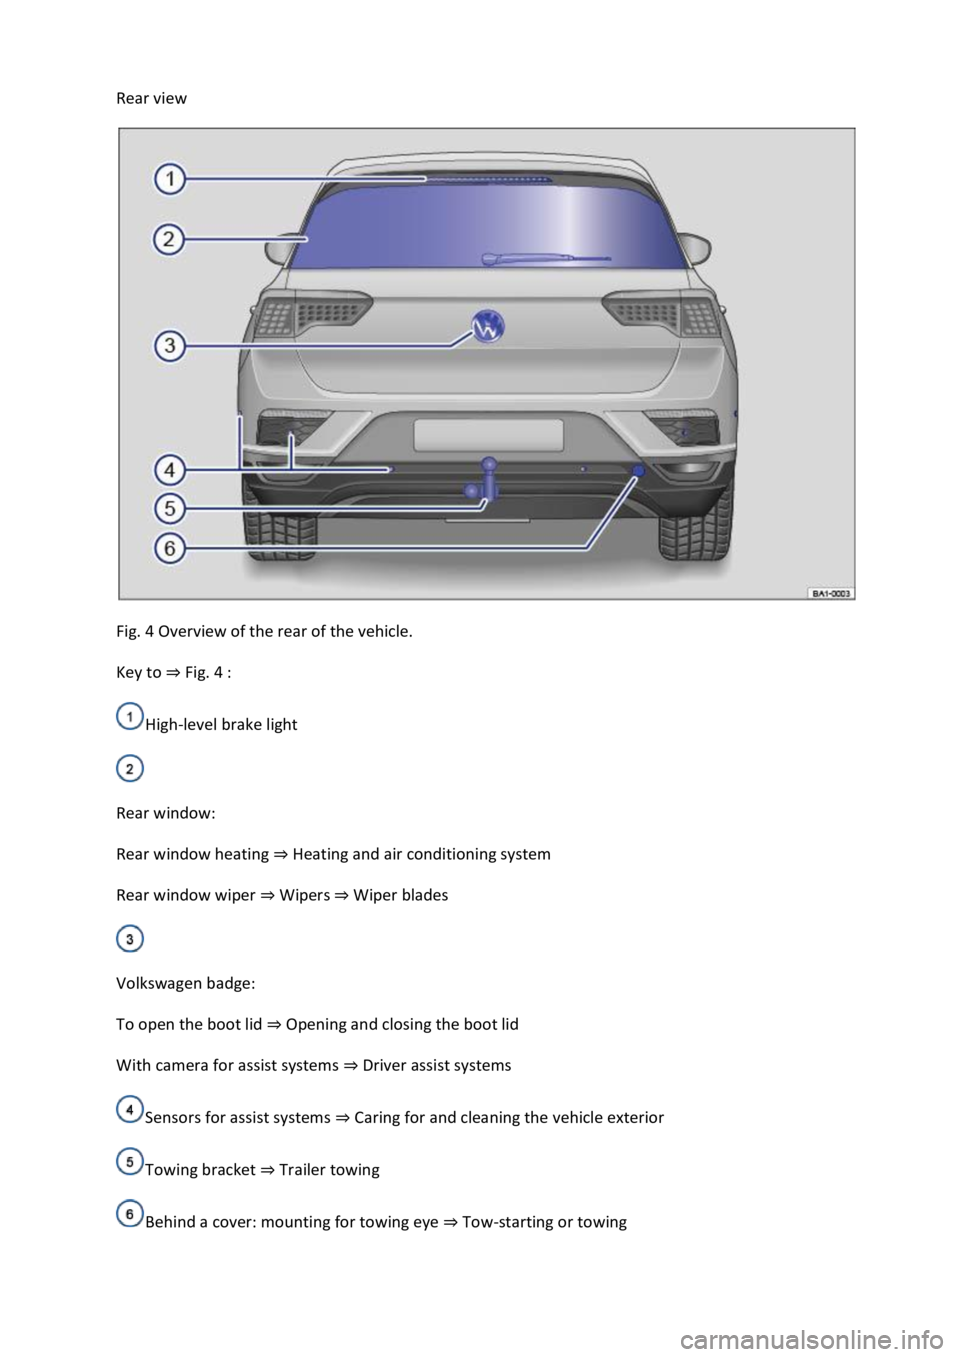
Rear view
Fig. 4 Overview of the rear of the vehicle.
Key to ⇒ Fig. 4 :
High-level brake light
Rear window:
Rear window heating ⇒ Heating and air conditioning system
Rear window wiper ⇒ Wipers ⇒ Wiper blades
Volkswagen badge:
To open the boot lid ⇒ Opening and closing the boot lid
With camera for assist systems ⇒ Driver assist systems
Sensors for assist systems ⇒ Caring for and cleaning the vehicle exterior
Towing bracket ⇒ Trailer towing
Behind a cover: mounting for towing eye ⇒ Tow-starting or towing
Page 4 of 502
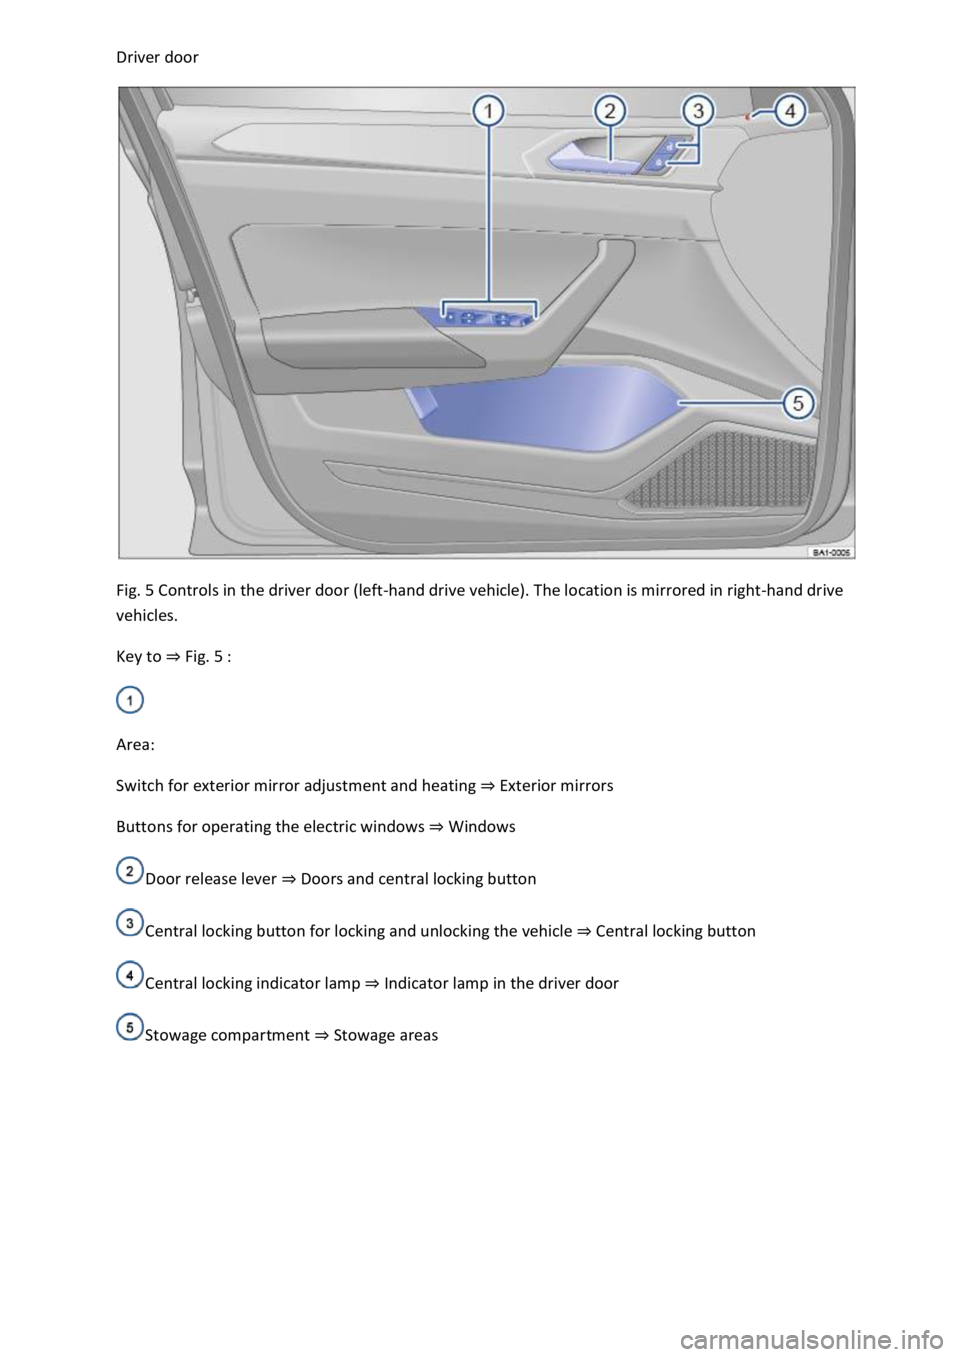
Driver door
Fig. 5 Controls in the driver door (left-hand drive vehicle). The location is mirrored in right-hand drive
vehicles.
Key to ⇒ Fig. 5 :
Area:
Switch for exterior mirror adjustment and heating ⇒ Exterior mirrors
Buttons for operating the electric windows ⇒ Windows
Door release lever ⇒ Doors and central locking button
Central locking button for locking and unlocking the vehicle ⇒ Central locking button
Central locking indicator lamp ⇒ Indicator lamp in the driver door
Stowage compartment ⇒ Stowage areas
Page 6 of 502

Bonnet release lever ⇒ In the engine compartment
Fuse box cover ⇒ Changing fuses
Lever for adjusting the steering column position ⇒ Steering wheel
Light switch ⇒ Vehicle lighting
Turn signal and main beam lever ⇒ Vehicle lighting
With switches and buttons for the driver assist systems ⇒ Button for driver assist systems ⇒ Driver
assist systems
Vents ⇒ Heating and air conditioning system
Instrument cluster ⇒ Instrument cluster
With warning and indicator lamps ⇒ Symbols in instrument cluster
Lever for wipers and washers ⇒ Wipers
With buttons for operating the menus ⇒ Instrument cluster
Controls on the multifunction steering wheel:
Operating driver assist systems ⇒ Operating using the multifunction steering wheel ⇒ Driver assist
systems
Audio, navigation
Opening the telephone menu or accepting telephone calls
Volume adjustment
Activating voice control (no function in some models)
Horn
Location of the driver front airbag ⇒ Airbag system
Ignition lock ⇒ Starting and stopping the engine
Pedals ⇒ Pedals
Page 7 of 502
Centre console
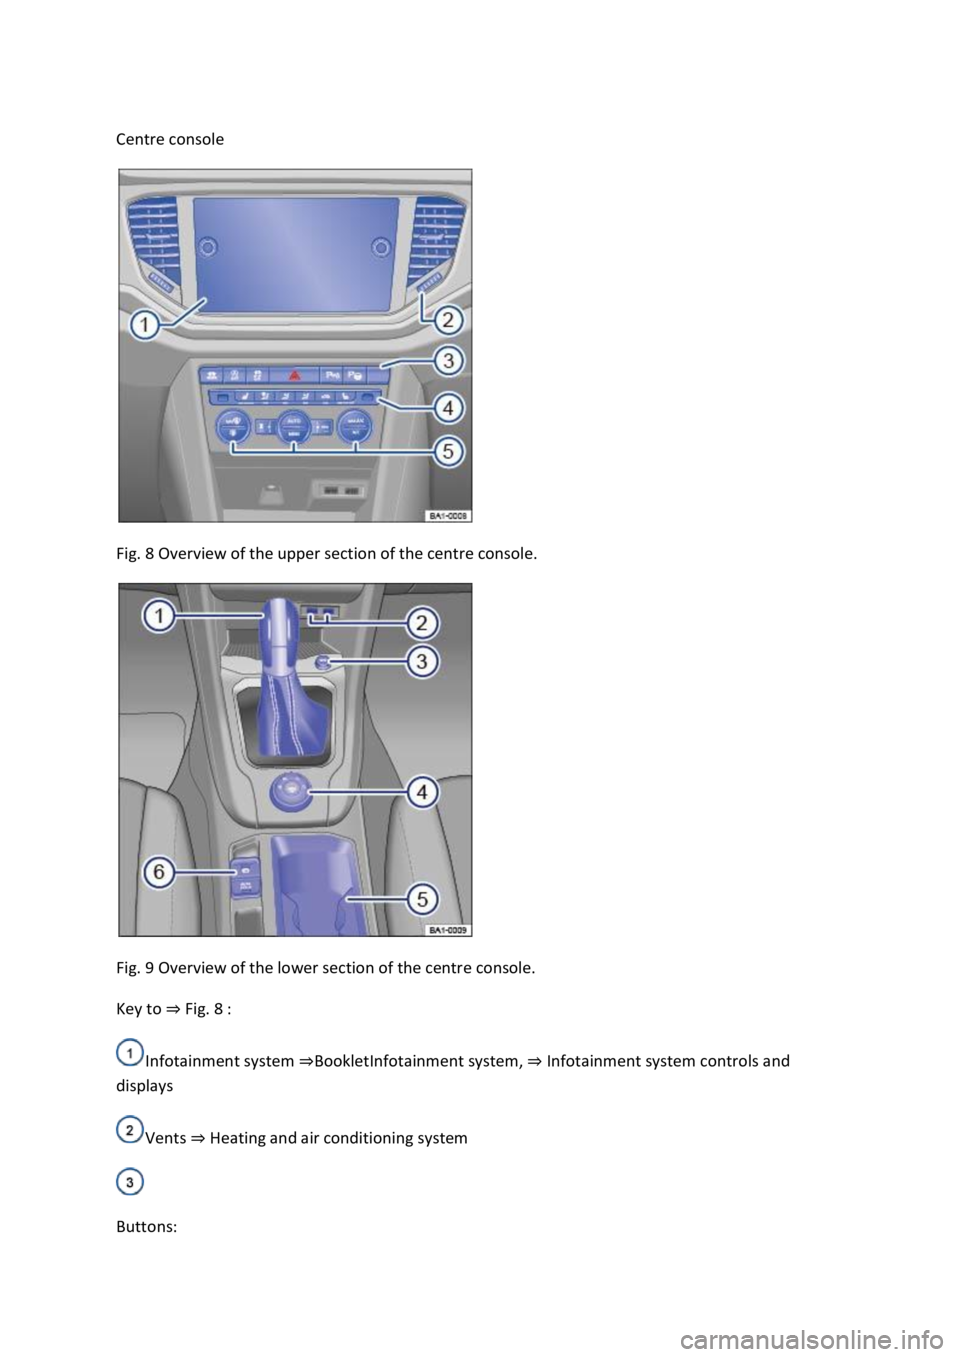
Fig. 8 Overview of the upper section of the centre console.
Fig. 9 Overview of the lower section of the centre console.
Key to ⇒ Fig. 8 :
Infotainment system ⇒BookletInfotainment system, ⇒ Infotainment system controls and
displays
Vents ⇒ Heating and air conditioning system
Buttons:
Page 8 of 502

Hazard warning lights ⇒ In an emergency
Indicator lamp for the front passenger front airbag switch-off function ⇒ Airbag system
Driver assist systems ⇒ Driver assist systems
Controls for the air conditioning system, heating and fresh air system ⇒ Heating, ventilating,
cooling
Controls for the air conditioning system, heating and fresh air system ⇒ Heating, ventilating,
cooling
Key to ⇒ Fig. 9 :
Lever:
DSG® dual clutch gearbox ⇒ DSG® dual clutch gearbox
Manual gearbox ⇒ Manual gearbox: selecting a gear
Multimedia connections ⇒BookletInfotainment system,.
Cigarette lighter or 12-volt socket ⇒ Ashtray and cigarette lighter ⇒ Electrical sockets
Control for the 4MOTION Active Control ⇒ Driving profile selection and 4MOTION Active
Control
Stowage compartment with drink holder ⇒ Stowage areas
Buttons:
Electronic parking brake ⇒ Electronic parking brake
Auto Hold function ⇒ Auto Hold function
Page 9 of 502
Front passenger side
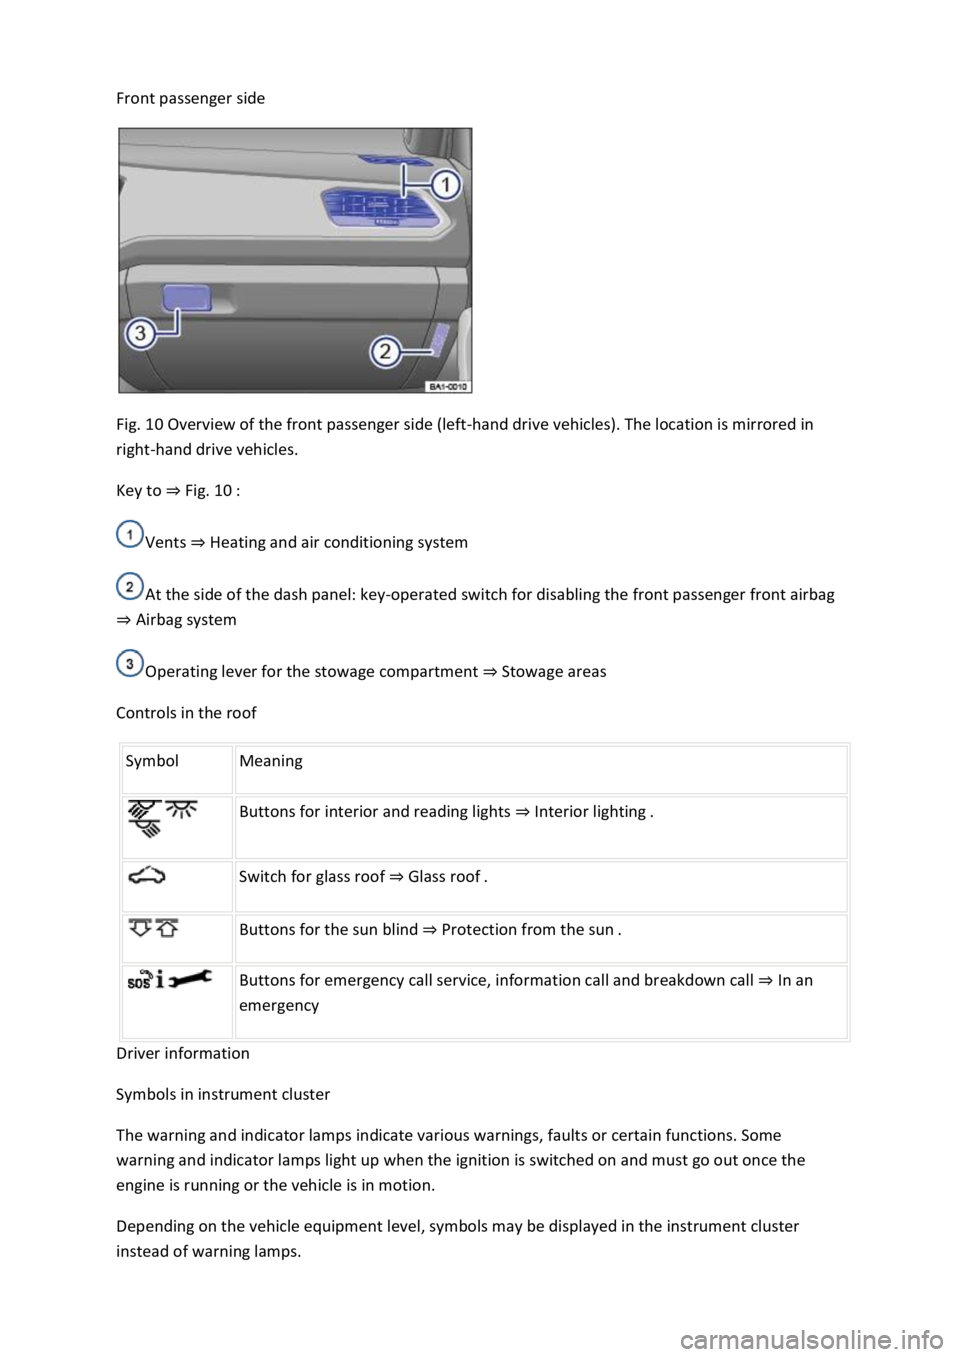
Fig. 10 Overview of the front passenger side (left-hand drive vehicles). The location is mirrored in
right-hand drive vehicles.
Key to ⇒ Fig. 10 :
Vents ⇒ Heating and air conditioning system
At the side of the dash panel: key-operated switch for disabling the front passenger front airbag
⇒ Airbag system
Operating lever for the stowage compartment ⇒ Stowage areas
Controls in the roof
Symbol Meaning
Buttons for interior and reading lights ⇒ Interior lighting .
Switch for glass roof ⇒ Glass roof .
Buttons for the sun blind ⇒ Protection from the sun .
Buttons for emergency call service, information call and breakdown call ⇒ In an
emergency
Driver information
Symbols in instrument cluster
The warning and indicator lamps indicate various warnings, faults or certain functions. Some
warning and indicator lamps light up when the ignition is switched on and must go out once the
engine is running or the vehicle is in motion.
Depending on the vehicle equipment level, symbols may be displayed in the instrument cluster
instead of warning lamps.
Page 110 of 502
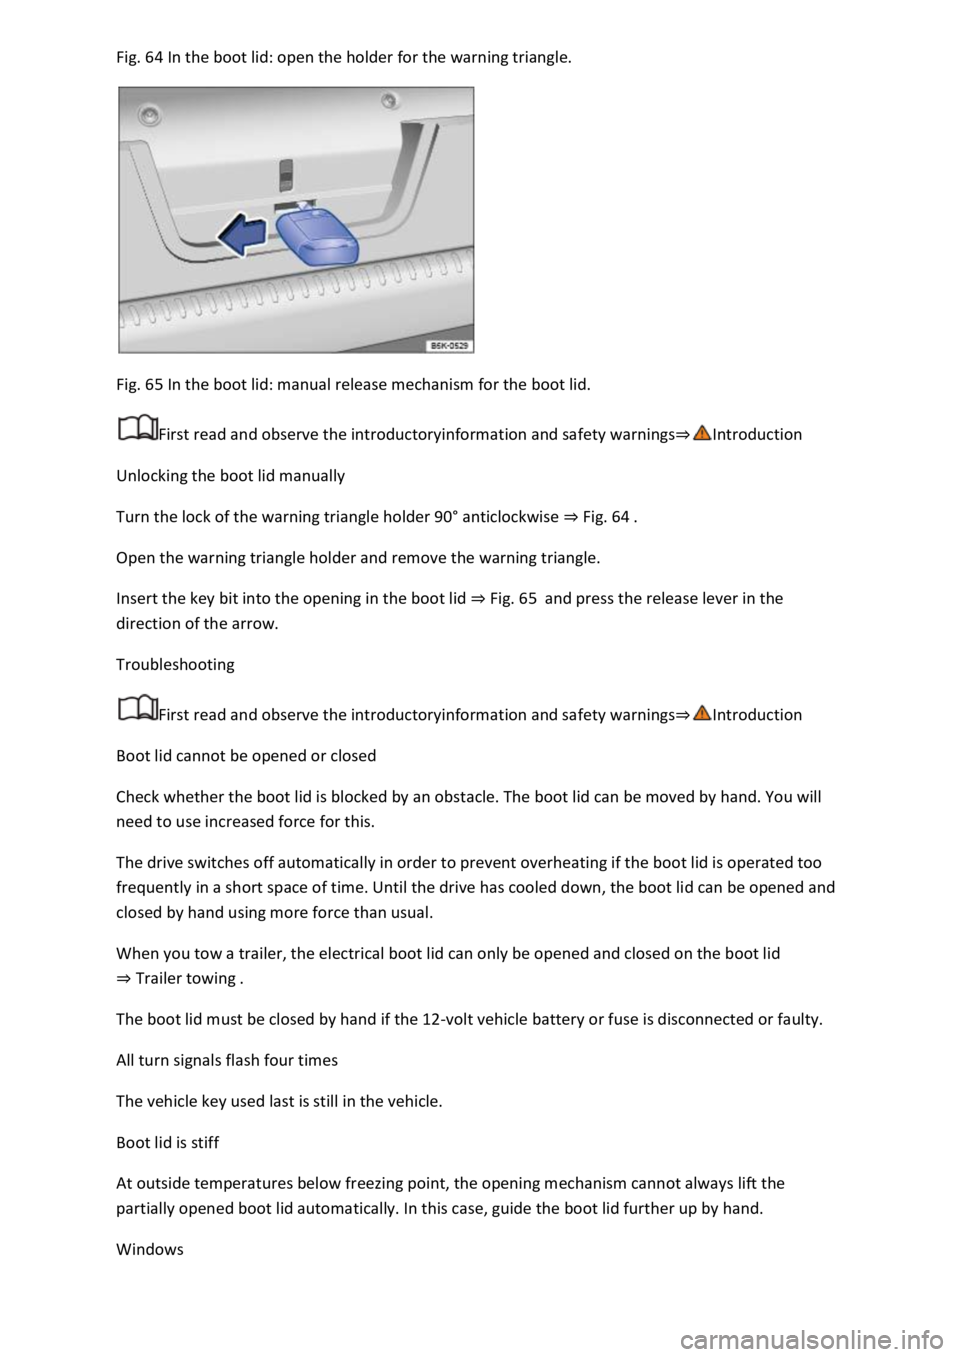
Fig. 64 In the boot lid: open the holder for the warning triangle.
Fig. 65 In the boot lid: manual release mechanism for the boot lid.
First read and observe the introductoryinformation and safety warnings⇒Introduction
Unlocking the boot lid manually
Turn the lock of the warning triangle holder 90° anticlockwise ⇒ Fig. 64 .
Open the warning triangle holder and remove the warning triangle.
Insert the key bit into the opening in the boot lid ⇒ Fig. 65 and press the release lever in the
direction of the arrow.
Troubleshooting
First read and observe the introductoryinformation and safety warnings⇒Introduction
Boot lid cannot be opened or closed
Check whether the boot lid is blocked by an obstacle. The boot lid can be moved by hand. You will
need to use increased force for this.
The drive switches off automatically in order to prevent overheating if the boot lid is operated too
frequently in a short space of time. Until the drive has cooled down, the boot lid can be opened and
closed by hand using more force than usual.
When you tow a trailer, the electrical boot lid can only be opened and closed on the boot lid
⇒ Trailer towing .
The boot lid must be closed by hand if the 12-volt vehicle battery or fuse is disconnected or faulty.
All turn signals flash four times
The vehicle key used last is still in the vehicle.
Boot lid is stiff
At outside temperatures below freezing point, the opening mechanism cannot always lift the
partially opened boot lid automatically. In this case, guide the boot lid further up by hand.
Windows
Page 143 of 502
Before setting off and before switching on the ignition, always check the following to avoid damage
to the windscreen, the wiper blades and the wiper motor:
The wiper lever is located in the basic position.
Snow and ice have been removed from the wiper blades and door windows.
Wiper blades that have become frozen onto the glass have been carefully loosened. Volkswagen
recommends using a de-icer spray for this.
NOTICE
Do not switch on the wipers when the window is dry. Using the wipers when the window is dry can
damage the glass.
When switched on, the wipers will temporarily be switched to the next setting down when the
vehicle is stationary.
When parking the vehicle in cold weather, it may be helpful to leave the front windscreen wipers in
the service position to make it easier to loosen the wiper blades ⇒ Wiper blades .
Wiper function
Automatic activation of the rear window wiper
The rear window wiper is switched on automatically if the windscreen wipers are switched on and
reverse gear is engaged. Automatic switch-on when reverse gear is selected can be activated and
deactivated in the Infotainment system in the Vehicle settings menu ⇒ Infotainment system controls
and displays .
Heated washer jets
The heating defrosts frozen washer jets. The heating output is automatically regulated depending on
the ambient temperature when the ignition is switched on. Only the jets are heated, not the hoses
that the washer fluid flows through.
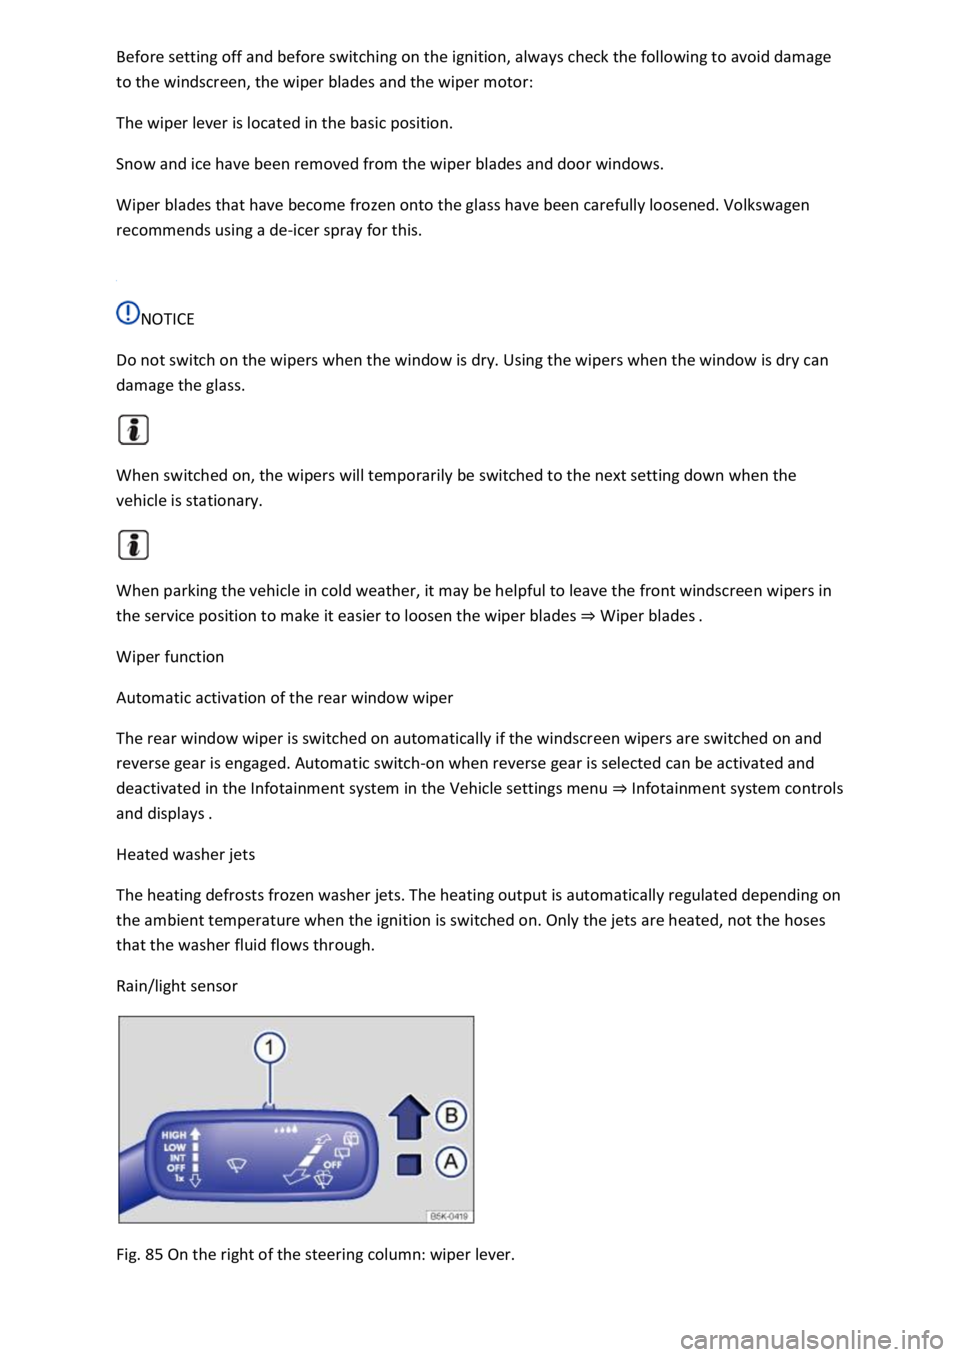
Rain/light sensor
Fig. 85 On the right of the steering column: wiper lever.
Page 149 of 502

Swivel the rotary knob forwards, backwards, right or left in the direction of the arrow in order to
adjust the exterior mirror.
Electrically fold in the exterior mirrors ⇒ .Switch on the exterior mirror heating. The
exterior mirror heating heats only at ambient temperatures below +20°C (+68°F) and initially with
the highest setting. Heating takes place dependent on the ambient temperature after around
two minutes.Adjust the left-hand exterior mirror.Adjust the right-hand exterior mirror.Zero
position. The exterior mirror cannot be adjusted and all functions are switched off.
Activating the exterior mirror functions
The following exterior mirror functions must be activated once in the Infotainment system in
the Vehicle settings menu ⇒ Infotainment system controls and displays :
Synchronous mirror adjustment
Synchronous mirror adjustment means that the right-hand exterior mirror is also adjusted at the
same time when you adjust the left-hand exterior mirror.
Turn the rotary knob to position .
Adjust the left-hand exterior mirror. The right-hand exterior mirror will be adjusted at the same time
(synchronously).
Correct the settings for the right-hand exterior mirror if necessary: swivel the rotary knob to
position and adjust the right-hand exterior mirror.
Folding in the exterior mirrors while parking
When the vehicle is locked or unlocked from the outside, the exterior mirrors fold in or out
automatically. For this, the rotary knob must be in position , , or .
If the rotary knob for the electrically adjustable exterior mirrors is in position , the exterior
mirrors stay folded in.
Saving and recalling the front passenger exterior mirror settings for reversing
Unlock the vehicle with the vehicle key to which the settings should be assigned.
Switch on the electronic parking brake.
Switch on the ignition.
Put the gearbox into neutral.
Select reverse gear.
Adjust the front passenger exterior mirror so that you have a good view of the kerb area, for
example.
The set mirror position will be saved and assigned to the vehicle key.
Turn the rotary knob for the exterior mirrors to position .
Page 150 of 502

Select reverse gear while the ignition is switched on. The right-hand exterior mirror moves to the
saved position.
The front passenger exterior mirror will move out of the position saved for reversing when the
vehicle is driven forwards faster than approximately 15 km/h (9 mph) or when the rotary knob is
moved out of position into another position.
WARNING
Injuries can be sustained if you do not take care when folding the exterior mirrors in and out.
Fold the exterior mirrors in or out only when there is no obstruction in the path of the mirror.
Always ensure that no fingers are caught between the exterior mirror and the mirror base when the
exterior mirrors are moved.
NOTICE
Always fold in exterior mirrors before using an automatic car wash.
Do not fold electrically folding exterior mirrors in or out manually as this can damage the electric
drive.
The exterior mirror heating should be switched off when it is no longer needed. If the heating is left
on, this will result in unnecessary fuel consumption.
If there is a fault, the electric exterior mirrors can be adjusted by hand by pressing on the outside of
the mirror.
Some settings can be stored in the user accounts of the personalisation function and therefore
change automatically when the user account changes ⇒ Personalisation .
Protection from the sun
Sun visors