light VOLKSWAGEN TIGUAN 2017 Owner´s Manual
[x] Cancel search | Manufacturer: VOLKSWAGEN, Model Year: 2017, Model line: TIGUAN, Model: VOLKSWAGEN TIGUAN 2017Pages: 341, PDF Size: 9.14 MB
Page 112 of 341
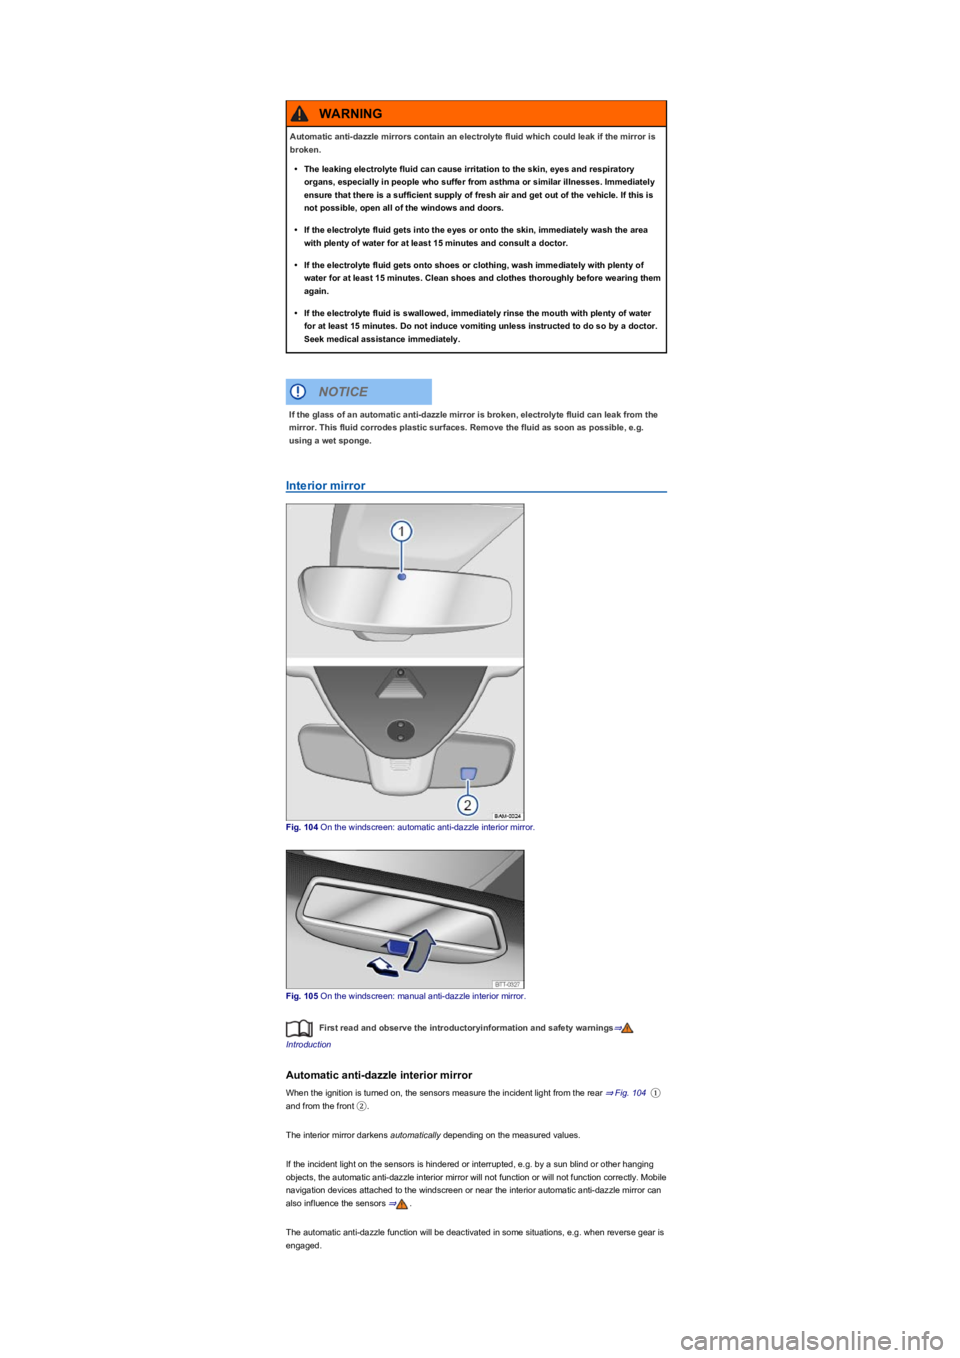
Interior mirror
Fig. 104 On the windscreen: automatic anti-dazzle interior mirror.
Fig. 105 On the windscreen: manual anti-dazzle interior mirror.
First read and observe the introductoryinformation and safety warnings⇒
Introduction
Automatic anti-dazzle interior mirror
When the ignition is turned on, the sensors measure the incident light from the rear ⇒ Fig. 104①
and from the front ②.
The interior mirror darkens automatically depending on the measured values.
If the incident light on the sensors is hindered or interrupted, e.g. by a sun blind or other hanging
objects, the automatic anti-dazzle interior mirror will not function or will not function correctly. Mobile
navigation devices attached to the windscreen or near the interior automatic anti-dazzle mirror can
also influence the sensors ⇒.
The automatic anti-dazzle function will be deactivated in some situations, e.g. when reverse gear is
engaged.
Automatic anti-dazzle mirrors contain an electrolyte fluid which could leak if the mirror is
broken.
•The leaking electrolyte fluid can cause irritation to the skin, eyes and respiratory
organs, especially in people who suffer from asthma or similar illnesses. Immediately
ensure that there is a sufficient supply of fresh air and get out of the vehicle. If this is
not possible, open all of the windows and doors.
•If the electrolyte fluid gets into the eyes or onto the skin, immediately wash the area
with plenty of water for at least 15 minutes and consult a doctor.
•If the electrolyte fluid gets onto shoes or clothing, wash immediately with plenty of
water for at least 15 minutes. Clean shoes and clothes thoroughly before wearing them
again.
•If the electrolyte fluid is swallowed, immediately rinse the mouth with plenty of water
for at least 15 minutes. Do not induce vomiting unless instructed to do so by a doctor.
Seek medical assistance immediately.
WARNING
If the glass of an automatic anti-dazzle mirror is broken, electrolyte fluid can leak from the
mirror. This fluid corrodes plastic surfaces. Remove the fluid as soon as possible, e.g.
using a wet sponge.
NOTICE
Page 114 of 341
•Select reverse gear while the ignition is switched on. The right exterior mirror will now adjust
itself to the stored position.
The front passenger exterior mirror will move out of the position saved for reversing when the
vehicle is driven forwards faster than approximately 15 km/h (9 mph) or when the rotary knob is
moved out of position into another position.
The exterior mirror heating should be switched off when it is no longer needed. Fuel is
otherwise wasted.
In the event of a fault, the electric exterior mirrors can be adjusted by hand by pressing on
the outer edge of the mirror.
Some settings can be stored in the user accounts of the personalisation function and
therefore change automatically when the user account changes ⇒ Personalisation.
Protection from the sun
Sun visors
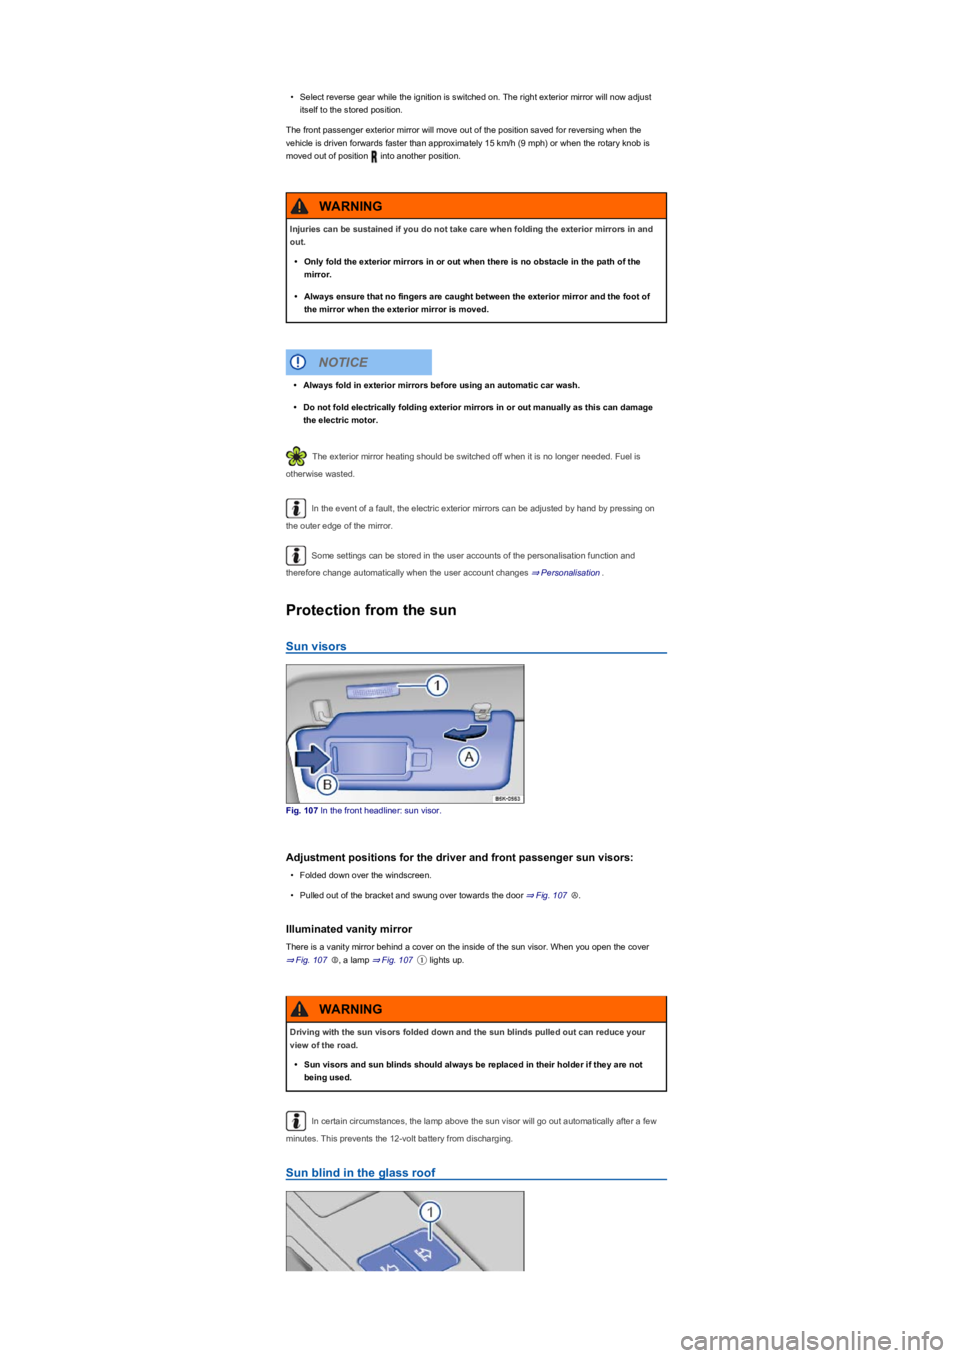
Fig. 107 In the front headliner: sun visor.
Adjustment positions for the driver and front passenger sun visors:
•Folded down over the windscreen.
•Pulled out of the bracket and swung over towards the door ⇒ Fig. 107Ⓐ.
Illuminated vanity mirror
There is a vanity mirror behind a cover on the inside of the sun visor. When you open the cover
⇒ Fig. 107Ⓑ, a lamp ⇒ Fig. 107① lights up.
In certain circumstances, the lamp above the sun visor will go out automatically after a few
minutes. This prevents the 12-volt battery from discharging.
Sun blind in the glass roof
Injuries can be sustained if you do not take care when folding the exterior mirrors in and
out.
•Only fold the exterior mirrors in or out when there is no obstacle in the path of the
mirror.
•Always ensure that no fingers are caught between the exterior mirror and the foot of
the mirror when the exterior mirror is moved.
WARNING
•Always fold in exterior mirrors before using an automatic car wash.
•Do not fold electrically folding exterior mirrors in or out manually as this can damage
the electric motor.
NOTICE
Driving with the sun visors folded down and the sun blinds pulled out can reduce your
view of the road.
•Sun visors and sun blinds should always be replaced in their holder if they are not
being used.
WARNING
Page 118 of 341
No blower speed is displayed in the rotary control when Climatronic is in automatic mode.
– Air recirculation mode
•Press the button.
Air distribution
– air distribution to the upper body via the vents in the dash panel.
– air distribution to footwell.
– air distribution to the upper body and the footwell.
– air distribution to the windscreen and the footwell.
– air distribution to the windscreen.
| – Defrost function
•m/k/a995MK Manual air conditioning system: turn the right rotary control to position
⇒ Fig. 109.
•m/k/a995MK Climatronic: press the button ⇒ Fig. 110.
m/k/a995MKManual air conditioning system: in the defrost function, the air recirculation
mode switches off and the air conditioning compressor for the cooling system switches on in order
to dehumidify the air. When the defrost function is switched on, it is not possible to switch the air
recirculation mode on or the air conditioning compressor off.
m/k/a995MK Climatronic: the air is dehumidified and the blower is set to a high speed.
– Windscreen heating
•Press the button.
•Touch the function button in the air conditioning menu to switch the windscreen heating
on and off when the engine is running ⇒ Windscreen heating.
The windscreen heating will switch off after a few minutes.
– Rear window heating
•Press the button to switch the rear window heating on or off while the engine is running.
The rear window heating will switch off after a maximum of 10 minutes.
In some countries, the air conditioner compressor can be switched off.
Operating the Climatronic system via the Infotainment system
First read and observe the introductoryinformation and safety warnings⇒
Introduction
Opening the Air conditioning menu
•Press the button on the control panel.
Display of air conditioning settings
The upper area of the screen shows the current air conditioning settings.
The air conditioning system operating conditions are highlighted in colour:
•Blue: cooling.
•Red: heating.
Adjusting settings
– Switches Climatronic on and off.
– Applies temperature settings of driver's seat to all seats.
1)
To prevent damage to the rear window heating system, do not put stickers over the heating
elements on the inside of the window.
NOTICE
1)
Page 124 of 341
The auxiliary heater and ventilation
system allows the vehicle interior to be
heated in winter and ventilated in
summer. Operation of the system
allows ice, condensation and a thin
covering of snow to be cleared from the
windscreen. The auxiliary heater is
supplied with fuel from the vehicle fuel
tank and can be operated when the
vehicle is stationary with the ignition
switched off. The auxiliary ventilation
system is supplied with power by the
12-volt vehicle battery.
Auxiliary heater exhaust system
The emissions produced by the auxiliary heater are removed via an exhaust pipe fitted underneath
the vehicle. The exhaust pipe must not be blocked by snow, mud or other objects.
Switching the auxiliary heater and auxiliary ventilation on and off
First read and observe the introductoryinformation and safety warnings⇒
Introduction
The auxiliary heating can be operated only when the ignition is switched off. If the ignition is
switched on while the auxiliary heater is working, the auxiliary heater continues to run to provide
additional heat.
Switching on the auxiliary heater
•Press the immediate heat button on the control panel ⇒ Front controls.
•Press the button on the remote control ⇒ Remote control.
•Program a departure time ⇒ Programming the auxiliary heater and auxiliary ventilation.
The auxiliary heater heats up the vehicle interior to a temperature of at least 22°C.
The auxiliary heater will not switch on if the 12-volt vehicle battery has a low charge level or the fuel
tank is empty.
Switching off the auxiliary heater manually
•Press the immediate heat button on the control panel ⇒ Front controls.
•Press the button on the remote control ⇒ Remote control.
•Touch the function button in the Infotainment system ⇒ Programming the auxiliary heater
and auxiliary ventilation.
Auxiliary heater switches off automatically
•When the programmed departure time is reached, or after the programmed operating period
has elapsed ⇒ Programming the auxiliary heater and auxiliary ventilation.
•If the indicator lamp or lights up (fuel gauge) ⇒ Fuel gauge.
•If the charge level of the 12-volt vehicle battery is too low ⇒ 12-volt vehicle battery.
The fumes from the auxiliary heater contain among other things carbon monoxide, which
is an odourless and colourless poisonous gas. Carbon monoxide can cause people to
lose consciousness. It can also cause death.
•Never start or run the auxiliary heater in unventilated or closed rooms.
•Never programme the auxiliary heater so that it is switched on and run in unventilated
or enclosed spaces.
WARNING
Parts of the auxiliary heater exhaust system become very hot. This can cause fires.
•Park the vehicle so that no part of the exhaust system can come into contact with any
inflammable material underneath the vehicle, e.g. dry grass.
WARNING
Do not place any food, medicine or any other temperature-sensitive items in front of the
vents. Heat-sensitive food, medicine and other items could be either damaged or rendered
useless.
NOTICE
Page 126 of 341
Programming check
If a departure time has been activated, the LED in the immediate heat button will light up on
the Climatronic control panel for approximately ten seconds after the ignition is switched off.
Remote control
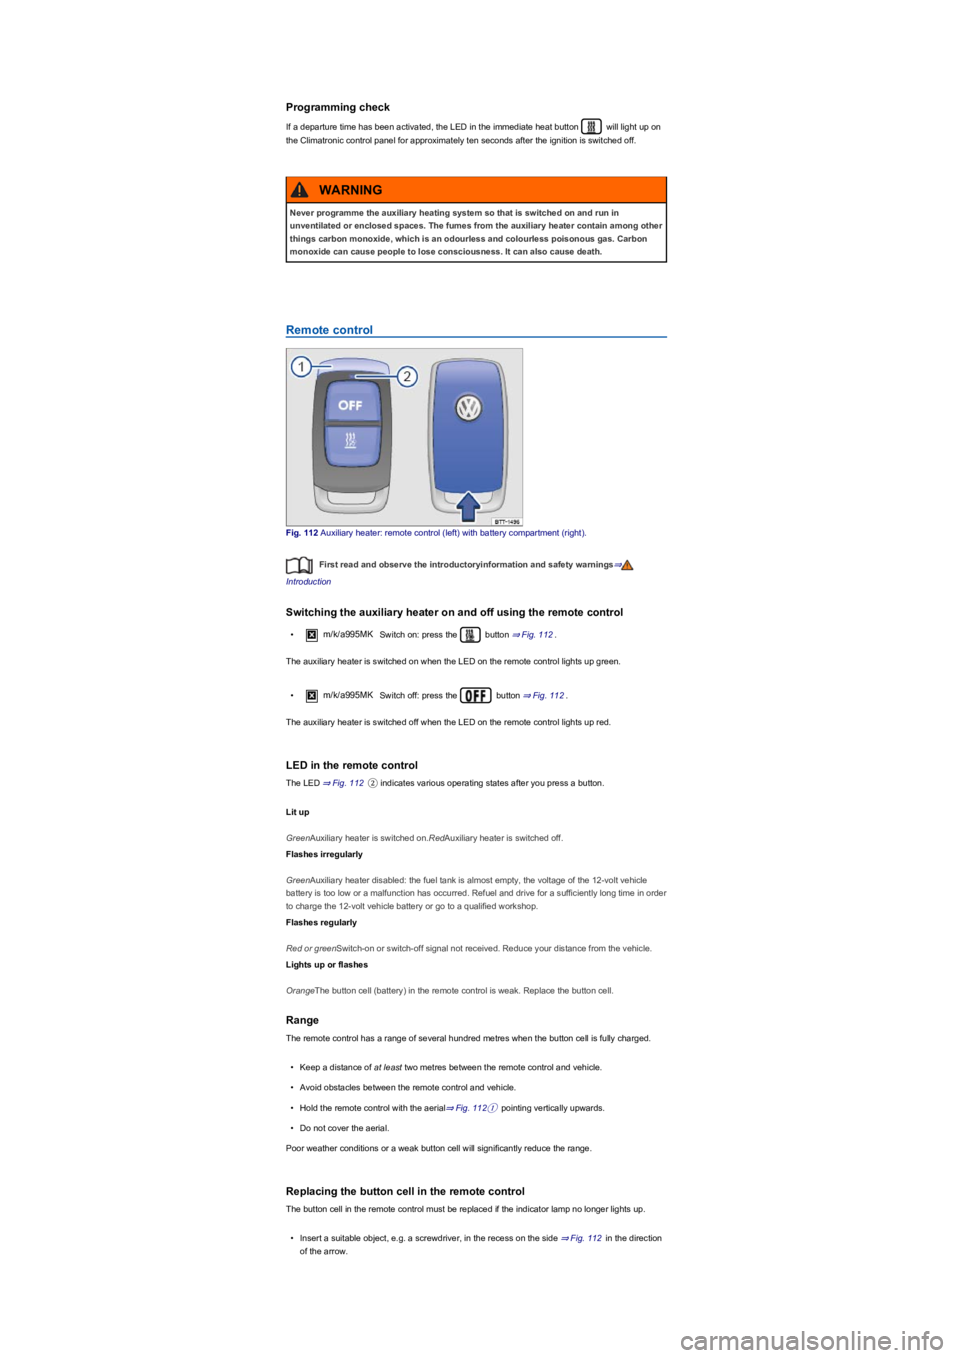
Fig. 112 Auxiliary heater: remote control (left) with battery compartment (right).
First read and observe the introductoryinformation and safety warnings⇒
Introduction
Switching the auxiliary heater on and off using the remote control
•m/k/a995MK Switch on: press the button ⇒ Fig. 112.
The auxiliary heater is switched on when the LED on the remote control lights up green.
•m/k/a995MKSwitch off: press the button ⇒ Fig. 112.
The auxiliary heater is switched off when the LED on the remote control lights up red.
LED in the remote control
The LED ⇒ Fig. 112② indicates various operating states after you press a button.
Lit up
GreenAuxiliary heater is switched on.RedAuxiliary heater is switched off.
Flashes irregularly
GreenAuxiliary heater disabled: the fuel tank is almost empty, the voltage of the 12-volt vehicle
battery is too low or a malfunction has occurred. Refuel and drive for a sufficiently long time in order
to charge the 12-volt vehicle battery or go to a qualified workshop.
Flashes regularly
Red or greenSwitch-on or switch-off signal not received. Reduce your distance from the vehicle.
Lights up or flashes
OrangeThe button cell (battery) in the remote control is weak. Replace the button cell.
Range
The remote control has a range of several hundred metres when the button cell is fully charged.
•Keep a distance of at least two metres between the remote control and vehicle.
•Avoid obstacles between the remote control and vehicle.
•Hold the remote control with the aerial⇒ Fig. 112① pointing vertically upwards.
•Do not cover the aerial.
Poor weather conditions or a weak button cell will significantly reduce the range.
Replacing the button cell in the remote control
The button cell in the remote control must be replaced if the indicator lamp no longer lights up.
•Insert a suitable object, e.g. a screwdriver, in the recess on the side ⇒ Fig. 112 in the direction
of the arrow.
Never programme the auxiliary heating system so that is switched on and run in
unventilated or enclosed spaces. The fumes from the auxiliary heater contain among other
things carbon monoxide, which is an odourless and colourless poisonous gas. Carbon
monoxide can cause people to lose consciousness. It can also cause death.
WARNING
Page 127 of 341
•Lever open the battery cover in upward direction using the object.
•Push the battery cover slightly in the direction of the arrow.
•Remove the battery cover.
•Remove the button cell.
•Insert a new button cell of the same type, paying attention to the correct polarity.
•Insert the battery in the housing of the remote control.
•Push the battery cover in the opposite direction to the arrow ⇒ Fig. 112 until it engages.
Dispose of discharged batteries in accordance with regulations governing the protection of
the environment.
The battery in the remote control may contain perchlorate. Please comply with legislation
regarding disposal.
Driving
Notes on driving
Introduction
This chapter contains information on the followingsubjects:
⇒ Pedals
⇒ Gear-change indicator
⇒ Driving economically
⇒ Think Blue. Trainer.
⇒ Information on the brakes
⇒ Driving with a loaded vehicle
⇒ Driving with an open boot lid
⇒ Driving through water on roads
⇒ Running in the engine
⇒ Using the vehicle in other countries and continents
⇒ Troubleshooting
Pedals
Swallowing batteries with a diameter of 20 mm, or other button cells, can result in severe
or even fatal injuries within a very short period of time.
•Always keep the remote control key, key ring with batteries, spare batteries, round
cells and other batteries that are larger than 20 mm out of the reach of children.
•Call for medical help immediately you suspect that someone has swallowed a battery.
DANGER
•The remote control contains electronic components. Protect the remote control from
moisture, excessive vibration and direct sunlight.
•Unsuitable batteries can damage the remote control. Replace discharged batteries only
with new batteries of the same voltage rating, size and specification.
•Ensure that the battery is fitted the right way round.
NOTICE
Driving under the influence of alcohol, drugs, medication or narcotics can cause serious
accidents and fatal injuries.
•Alcohol, drugs, medication and narcotics can severely impair perception, reaction
times and driving safety. This could cause you to lose control of the vehicle.
WARNING
Rapid acceleration can cause loss of traction and skidding, particularly on slippery roads.
This can cause you to lose control of the vehicle, which can lead to accidents and serious
injuries.
•Always adjust your driving style in accordance with the flow of traffic.
•The kickdown function or fast acceleration should only be used if the visibility,
weather, road and traffic conditions permit.
WARNING
Page 129 of 341
m/k/a995MK Vehicles with DSG dual clutch gearbox: the selector lever must be in the
Tiptronic position ⇒ Changing gear using Tiptronic.
No recommended gear is indicated if the most suitable gear is already selected. The currently
selected gear is displayed.
Information on cleaning the particulate filter
The engine management system recognises when the particulate filter is becoming saturated and
supports regeneration of the particulate filter by recommending the most suitable gear when driving.
Compared with normal driving, this may mean driving with an increased engine speed ⇒ Particulate
filter.
Driving in the correct gear can help to reduce fuel consumption.
Gear-change indicator display goes out when the clutch is depressed in vehicles with a
manual gearbox or when Tiptronic position is deselected in vehicles with a DSG dual clutch
gearbox.
Driving economically
First read and observe the introductoryinformation and safety warnings⇒
Introduction
The fuel consumption, pollution and
wear of the engine, brakes and tyres
are reduced by an appropriate driving
style. A few tips are provided below
which will help you protect the
environment and also save money.
Fig. 116 Fuel consumption in litres per 100 km at two different outside temperatures.
Think ahead when driving
The fuel consumption will increase if you do not adopt a steady driving style. Keeping a close eye
on the traffic can help to avoid frequent acceleration and braking. Keeping a sufficient distance from
the vehicle in front will help you anticipate the driving situation.
Use the cruise control system where possible ⇒ Cruise control system (CCS).
With a gear engaged, allow the vehicle to come to a halt by itself to make use of the engine braking
effect, e.g. when approaching traffic lights.
Using freewheeling
m/k/a995MKVehicles with a DSG dual clutch gearbox: When the selector lever is in
position D/S and neither the accelerator nor the brake pedal is depressed, the vehicle will roll
(coast) with practically no energy being consumed.
With the engine-off coasting function, the engine is not just disengaged, but is also switched off.
Driving with DSG dual clutch gearbox ⇒ Driving with DSG dual clutch gearbox.
Change gears in an energy-saving way
Shifting up early at an engine speed of 2,000 rpm will save energy. Do not drive gears to the limit
and avoid high revs.
The gear-change indicator is only designed to assist the driver and cannot replace the
driver's own judgement.
•The driver has full responsibility for selecting the correct gear in all situations (e.g.
when overtaking, driving up and down hills ⇒ Trailer towingand when towing a trailer).
CAUTION
®
®®
Page 131 of 341
Inform yourself about other ways of protecting the environment. Think Blue. is the global
Volkswagen brand for sustainability and environmental friendliness.
Your Volkswagen dealership will gladly provide you with further information on correct
maintenance and replacement parts that are particularly energy-efficient, e.g. new tyres.
On vehicles with active cylinder management (ACT), individual engine cylinders can be
deactivated in driving situations with a low power requirement. When a cylinder is deactivated, no
fuel is injected into that cylinder, which leads to an overall reduction in fuel consumption.
Think Blue. Trainer.
First read and observe the introductoryinformation and safety warnings⇒
Introduction
The Think Blue. Trainer analyses and
visualises your driving style and helps
you to drive more economically.
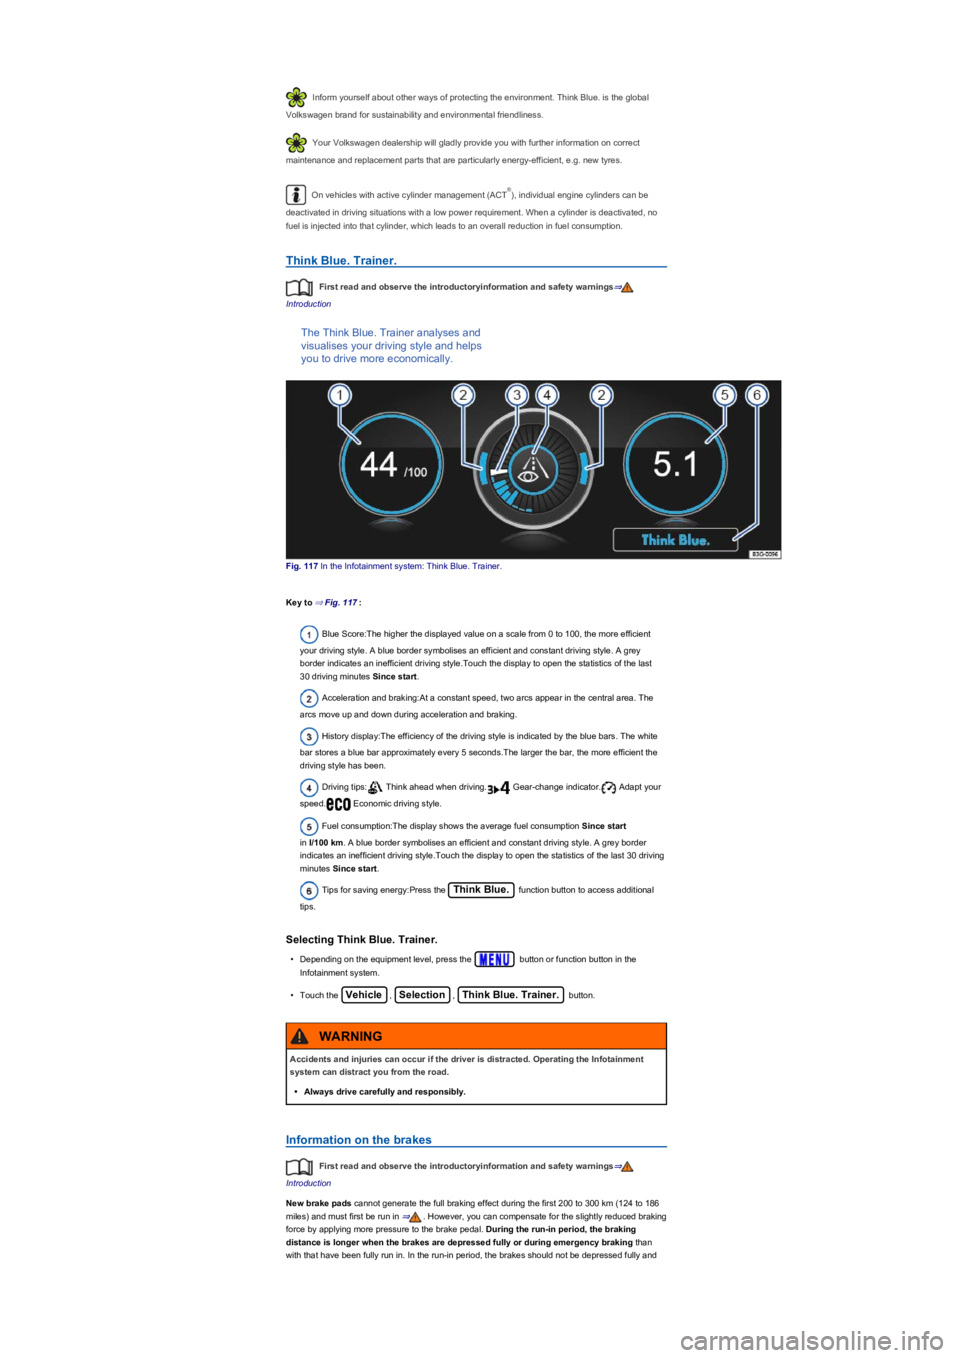
Fig. 117 In the Infotainment system: Think Blue. Trainer.
Key to ⇒ Fig. 117:
Blue Score:The higher the displayed value on a scale from 0 to 100, the more efficient
your driving style. A blue border symbolises an efficient and constant driving style. A grey
border indicates an inefficient driving style.Touch the display to open the statistics of the last
30 driving minutes Since start.
Acceleration and braking:At a constant speed, two arcs appear in the central area. The
arcs move up and down during acceleration and braking.
History display:The efficiency of the driving style is indicated by the blue bars. The white
bar stores a blue bar approximately every 5 seconds.The larger the bar, the more efficient the
driving style has been.
Driving tips: Think ahead when driving. Gear-change indicator. Adapt your
speed. Economic driving style.
Fuel consumption:The display shows the average fuel consumption Since start
in l/100 km. A blue border symbolises an efficient and constant driving style. A grey border
indicates an inefficient driving style.Touch the display to open the statistics of the last 30 driving
minutes Since start.
Tips for saving energy:Press the Think Blue. function button to access additional
tips.
Selecting Think Blue. Trainer.
•Depending on the equipment level, press the button or function button in the
Infotainment system.
•Touch the Vehicle, Selection, Think Blue. Trainer. button.
Information on the brakes
First read and observe the introductoryinformation and safety warnings⇒
Introduction
New brake pads cannot generate the full braking effect during the first 200 to 300 km (124 to 186
miles) and must first be run in ⇒. However, you can compensate for the slightly reduced braking
force by applying more pressure to the brake pedal. During the run-in period, the braking
distance is longer when the brakes are depressed fully or during emergency braking than
with that have been fully run in. In the run-in period, the brakes should not be depressed fully and
®
Accidents and injuries can occur if the driver is distracted. Operating the Infotainment
system can distract you from the road.
•Always drive carefully and responsibly.
WARNING
Page 132 of 341
situations should be avoided that create a heavy load on the brakes, e.g. when driving up close to
the vehicle ahead.
The rate of wear of the brake pads depends to a great extent on the conditions under which the
vehicle is operated and the way in which the vehicle is driven. If the vehicle is used for regular
urban trips, short journeys, and is driven with a sporty driving style, the brake pads must be
regularly checked by a qualified workshop.
When driving with wet brakes, for example after driving through water, after heavy rainfall or after
washing the vehicle, the braking effect may be delayed as the brake discs will be wet, or possibly
iced up (in winter). The brakes must be dried as quickly as possible by careful braking at higher
speed. Please ensure that no following vehicle and no other road user is put at risk as a result of
this action ⇒.
Any salt layer accumulating on the discs and pads will delay the braking effect and increase the
braking distance. If the brakes on the vehicle have not been applied for a long time on roads that
have been gritted with salt, the layer of salt must be reduced through careful braking ⇒.
Corrosion on the brake discs and dirt in the brake pads are facilitated through long periods of
inactivity, low mileage and low load levels. If the brake pads have been hardly used, or if they are at
all corroded, Volkswagen recommends that the brake discs and brake pads be cleaned by braking
strongly several times from high speed. Please ensure that no following vehicle and no other road
user is put at risk as a result of this action ⇒.
Brake servo
The brake servo will only function when the engine is running and reinforces the pressure applied
by the driver on the brake pedal.
If the brake servo is not functioning or the vehicle is being towed, the brake pedal will have to be
depressed more forcefully as the braking distance will be increased due to the lack of assistance for
the brake system ⇒.
Driving with worn brake pads or with a faulty brake system can cause accidents and
serious injuries.
•If the warning lamp lights up either alone or together with a text message in the
instrument cluster display, go to a qualified workshop immediately to have the brake
pads checked and the worn brake pads replaced.
WARNING
New brake pads will not have the optimal braking effect when first fitted.
•New brake pads cannot generate the full braking effect during the first 300 km (186
miles) and must first be run in. A reduced braking effect can be increased by applying
more pressure to the brake pedal.
•You must drive particularly carefully when driving with new brake pads in order to
reduce the risk of accidents, serious injuries and loss of control of the vehicle.
•Never drive too close to other vehicles when running in new brake pads, and never
create a driving situation that will place a heavy load on the brakes.
WARNING
Overheated brakes reduce the braking effect and considerably increase the braking
distance.
•When driving downhill the brakes are placed under particular strain and become hot
very quickly.
•Before driving down a long, steep gradient, reduce speed and change to a lower gear
(with manual gearboxes or in Tiptronic mode with the DSG dual clutch gearbox). This
will make use of the engine braking effect and relieve the load on the brakes.
•Non-standard or damaged front spoilers could restrict the airflow to the brakes and
cause them to overheat.
WARNING
Page 136 of 341
Warning lights and text messages are shown on the instrument cluster display. These warnings
may be accompanied by acoustic signals.
Front brake pads worn. Go to a qualified workshop immediately. All brake pads should be
checked and renewed as necessary.
Malfunction in the brake system
A brake circuit may have failed if you have to reduce speed and the vehicle does not brake as
normal (sudden increase in braking distance). This is indicated by the warning lamp and in
some cases by a text message. Go to the nearest qualified workshop immediately to have the fault
corrected. Drive at low speed when doing this and anticipate much longer braking distances and an
increase in the pressure required on the pedal.
Starting and stopping the engine
Introduction
This chapter contains information on the followingsubjects:
⇒ Ignition lock
⇒ Starter button
⇒ Starting the engine
⇒ Stopping the engine
⇒ Electronic immobiliser
⇒ Troubleshooting
Push-starting or tow-starting
For technical reasons, your vehicle must not be push-started or tow-started. Use jump leads to
start the engine instead ⇒ Jump starting.
Ignition lock
Switching the engine off while the vehicle is moving makes it more difficult to stop the
vehicle. This can lead to loss of control of the vehicle and to accidents and severe injuries.
•Braking and steering support systems, the airbag system, the belt tensioners and other
items of safety equipment in the vehicle are only active when the engine is running.
•Never switch the engine or ignition off while the vehicle is in motion.
WARNING
The risk of serious injury can be reduced with the engine running or when starting the
engine.
•Never start or run the engine in unventilated or closed rooms. The exhaust fumes
contain carbon monoxide, an odourless and colourless toxic gas. Carbon monoxide
can cause people to lose consciousness. It can also cause death.
•Never start or run the engine if oil, fuel or any other highly flammable fluids are under
or near the vehicle, or are leaking out of the vehicle, e.g. as the result of damage.
•Never leave the vehicle unattended with the engine running, particularly if a gear or
position has been selected. The vehicle could move suddenly or something
unexpected may happen that may cause damage, fire and serious injuries.
•Never use a start booster. Start boosters may explode and cause the engine to
suddenly run at high revs.
WARNING
The components of the exhaust system become very hot. This can cause fires and serious
injuries.
•Never park the vehicle where parts of the exhaust system can come into contact with
inflammable material underneath the vehicle, e.g. undergrowth, leaves, dry grass, spilt
fuel.
•Never apply additional underseal or anti-corrosion coatings to the exhaust pipes,
catalytic converters, heat shields or particulate filter.
WARNING