brake VOLKSWAGEN TRANSPORTER 2011 User Guide
[x] Cancel search | Manufacturer: VOLKSWAGEN, Model Year: 2011, Model line: TRANSPORTER, Model: VOLKSWAGEN TRANSPORTER 2011Pages: 486, PDF Size: 69.28 MB
Page 75 of 486
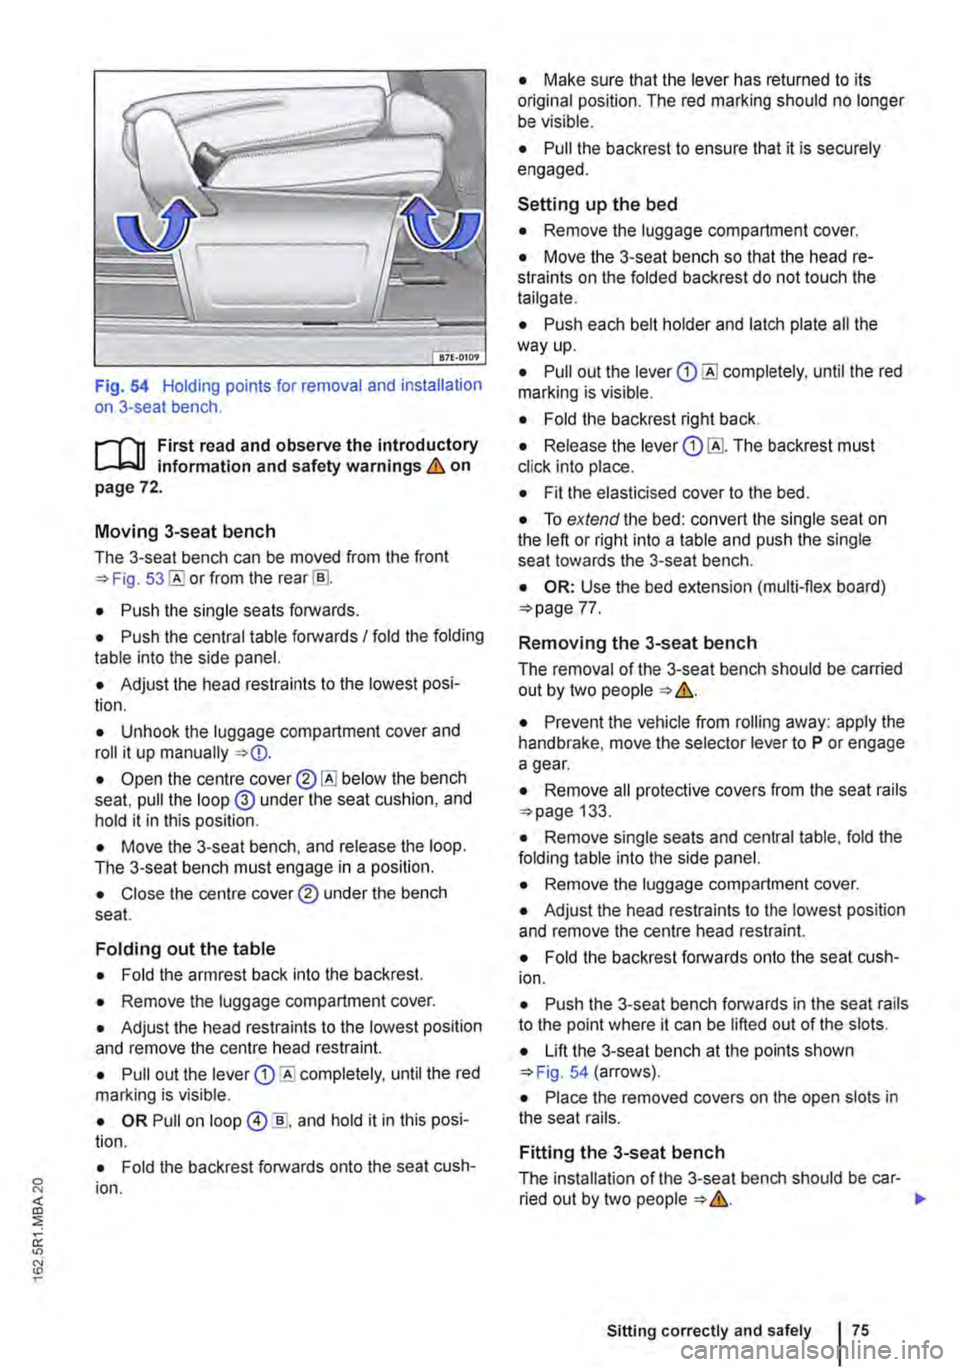
Fig. 54 Holding points for removal and installation on 3-seat bench.
,....-m First read and observe the introductory L-W.I information and safety warnings & on page 72.
Moving 3-seat bench
The 3-seat bench can be moved from the front =>Fig. or from the rear [ru.
• Push the single seats forwards.
• Push the central table forwards I fold the folding table into the side panel.
• Adjust the head restraints to the lowest posi-tion.
• Unhook the luggage compartment cover and roll it up manually =>
• Move the 3-seat bench, and release the loop. The 3-seat bench must engage in a position.
• Close the centre cover® under the bench seat.
Folding out the table
• Fold the armrest back into the backrest.
• Remove the luggage compartment cover.
• Adjust the head restraints to the lowest position and remove the centre head restraint.
• Pull out the lever Q) completely, until the red marking is visible.
• OR Pull on loop @ ]], and hold it in this posi· lion.
• Fold the backrest forwards onto the seat cush· ion.
• Make sure that the lever has returned to its original position. The red marking should no longer be visible.
• Pull the backrest to ensure that it is securely engaged.
Setting up the bed
• Remove the luggage compartment cover.
• Move the 3-seat bench so that the head re· straints on the folded backrest do not touch the tailgate.
• Push each belt holder and latch plate all the way up.
• Pull out the lever Q) until the red marking is visible.
• Fold the backrest right back.
• Release the lever Q) The backrest must click into place.
• Fit the elasticised cover to the bed.
• To extend the bed: convert the single seat on the left or right into a table and push the single seat towards the 3-seat bench.
• OR: Use the bed extension (multi-flex board) =>page 77.
Removing the 3-seat bench
The removal of the 3-seat bench should be carried out by two people => &.
• Prevent the vehicle from rolling away: apply the handbrake, move the selector lever to P or engage a gear.
• Remove all protective covers from the seat rails =>page 133.
• Remove single seats and central table, fold the folding table into the side panel.
• Remove the luggage compartment cover.
• Adjust the head restraints to the lowest position and remove the centre head restraint.
• Fold the backrest forwards onto the seat cush-ion.
• Push the 3-seat bench forwards in the seat rails to the point where it can be lifted out of the slots.
• Lift the 3-seat bench at the points shown =>Fig. 54 (arrows).
• Place the removed covers on the open slots in the seat rails.
Fitting the 3-seat bench
The installation of the 3-seat bench should be car-ried out by two people => &. .,.
Sitting correctly and safely
Page 126 of 486
A WARNING (Continued)
• Transporting heavy objects changes the vehicle's handling and the centre of gravity.
• The load should be distributed as evenly and low as possible In the vehicle.
• Always secure heavy objects in the lug-gage compartment as far in front of the rear axle as possible.
A WARNING
The vehicle handling and braking effect may alter significantly If large or heavy objects are being transported.
• Always adapt your speed and driving style to suit visibility, weather, road and traffic con-ditions.
• Accelerate carefully and gently .
• Avoid sudden braking and driving ma-noeuvres.
• Brake earlier than in normal driving.
A WARNING
Unsuitable or damaged securing straps could rip In the event of a braking manoeuvre or ac-cident. This could cause objects to be flung through the interior and lead to severe or fa-tal injuries.
• Always use suitable and undamaged se-curing straps.
• Attach securing straps securely to the fas-tening rings.
• Never load the securing straps in excess of the load rating.
A wARNING
Securing straps, if used incorrectly, may get detached in the event of a sudden braking manoeuvre or accident. This could cause ob-jects to be flung through the interior and lead to severe or fatal injuries.
Stowing items of luggage
1'"'1'11 First read and observe the introductory L-.lr::.U information and safety warnings & on page 125. .,..
1261 Before the journey
A WARNING (Continued)
• Never fix securing straps between the fas-tening rings In the side panel and the fasten-ing rings in the vehicle floor.
• Never fix securing straps between oppo-site side walls.
• Observe the Information on the side trim panels.
A WARNING
Incorrect use of fastening rings can cause se-vere or fatal accidents.
• Always use suitable and undamaged se-curing straps.
• Attach securing straps securely to the fas-tening rings.
• loose objects in the vehicle can suddenly slide and change the way the vehicle han-dles.
• Never exceed the maximum load rating of the fastening rings when securing objects.
• Small and light objects should also be se-cured.
• Never secure a child seat to the fastening rings.
• Rotating single seats must always be turned In the direction of travel If a load is se-cured behind this seat using fastening rings.
• Never use elastic straps or nets to tie down loads.
• Distribute the load on the fastening rings evenly.
• Ensure that the load retains its form and position once it has been secured. Use stable packaging and anti-slip floor surfacing for your load.
m Suitable fastening belts and luggage stowage L!.J systems are available from a qualified work-shop. Volkswagen Commercial Vehicles recom-mends using a Voikswagen Commercial Vehicles dealership for this purpose.
Page 130 of 486
A WARNING (Continued)
• Any objects protruding from the luggage compartment must be marked to ensure that they are visible to other road users. Comply with legal regulations.
• If items protrude out of the luggage com-partment, never use the tail gate or wing doors to "hold them in position".
• If you drive with the tailgate or wing doors open, remove any racks and luggage from the tail gate or a wing door.
A WARNING
Poisonous exhaust fumes can get into the in-terior when the tailgate or wing doors are open. This can result in loss of conscious-ness, carbon monoxide poisoning, serious Injury and accidents.
Driving a loaded vehicle
1"''l1 First read and observe the introductory L--Wl information and safety warnings & on page 125.
For good vehicle handling when driving a loaded vehicle, please observe the following:
• Stow all items of luggage page 127.
• Accelerate carefully and gently.
• Avoid sudden braking and driving manoeuvres.
• Brake earlier than in normal driving.
• If applicable, heed the information about driving with a trailer 139.
• If applicable, observe the information concern-ing the roof carrier 137.
Luggage compartment
CO Introduction
This chapter contains information on the following subjects:
Luggage compartment cover . . . . . . . . . . . . . . 132
130 Before the JOUrney
A WARNING (Continued)
• Always drive with the wing doors or tail-gate closed to prevent poisonous exhaust fumes getting into the vehicle.
• If exceptional circumstances require you to drive with an open tallgate or open wing doors, do the following to reduce the amount of poisonous exhaust fumes that could enter into the vehicle:
CD
-Close all windows and the sliding/tilting roof.
-Switch off air reclrculatlon mode.
-Open all vents In the dash panel.
-Switch the blowers to the highest set-ting.
The vehicle length and height are different when the wing doors or tailgate are open.
A wARNING
Moving loads can severely impair the vehi-cle's stability and driving safety which could cause accidents and severe Injuries.
• Secure objects properly to prevent them from sliding.
• Use suitable straps when securing heavy objects.
• Engage the rear seat backrests securely In
Page 141 of 486
A WARNING (Continued)
• Never try to stop a trailer from snaking by Increasing your speed.
A WARNING
Accidents and severe injuries can occur if the maximum permitted draw bar weight is ex-ceeded.
• Never exceed the specified values.
A WARNING
The start/stop system must always be switch-ed off manually when a trailer Is to be towed with towing brackets that were not retrofitted by Volkswagen Commercial Vehicles. Other-wise faults can occur In the brake system, possibly resulting In accidents and serious Injuries.
Technical requirements
,...-.('n First read and observe the introductory 1--J,:.U information and safety warnings & on page 139.
If the vehicle is supplied with a factory-fitted tow-ing bracket it will already have the necessary tech-nical modifications and meet the statutory require-ments for towing a trailer.
Only use a towing bracket which is approved for the gross weight of the trailer you want to tow as a retrofit solution. The towing bracket must be suit-able for the vehicle and trailer and be securely bol-ted to the vehicle's chassis. Only a towing bracket with a removable ball coupling should be used. Al-ways check and follow the data provided by the towing bracket manufacturer. Never install a weight-distributing or load-balancing towing brack-et on the vehicle.
Towing brackets fitted to the rear bumper
Never fit a towing bracket to the rear bumper or to its fastenings. The towing bracket must not prevent the rear bumper from functioning correctly. Do not
A WARNING (Continued)
• Always switch off the start/stop system manually If a trailer is attached to a towing bracket that was not retrofitted by Volkswa-gen Commercial Vehicles.
m Always switch off the anti-theft alarm when a L!J trailer is being hitched or unhitched 43. The tilt sensor could otherwise trigger an alarm unnecessarily.
m In new vehicles, do not tow a trailer during L!J the first 1,000 km 394.
m Volkswagen Commercial Vehicles recom-L!J mends removing the ball coupling before driving without a trailer. The level of damage sus-tained during a rear-end collision could be greater for vehicles with a fitted ball coupling than for those without.
m By law, the ball coupling must be removed if L!J a trailer is not being towed if it obscures the number plate.
m In some models, the towing bracket is re-L!J qui red for towing vehicles. For this reason, the towing bracket ball coupling should be stored in the vehicle at all times.
Engine cooling system
There is an increased load on the engine and the cooling system when towing a trailer. The cooling system must contain sufficient coolant and be able to cope with the extra load added by the trailer.
Trailer brake
If the trailer is equipped with its own brake system, comply with the relevant regulations. The trailer's brake system must never be connected to the ve-hicle brake system.
Emergency breakaway cable
Always use safety chains between your vehicle and the trailer 144.
Trailer rear lights
The rear lights on the trailer must meet legal re-quirements 144.
Transporting items 1141
Page 142 of 486
Never connect the trailer lights directly to the elec-trical system of your vehicle. If you are uncertain whether the trailer has been connected correctly, please contact a qualified workshop. Volkswagen Commercial Vehicles recommends using a Volks-wagen Commercial Vehicles dealership for this purpose.
Exterior mirrors
If you are unable to see the traffic behind the trailer in the vehicle's standard exterior mirrors, additional exterior mirrors should be fitted in accordance with any country-specific regulations. Before setting off, adjust the mirrors so that you have a sufficient view of the rear.
Maximum power consumption of the trailer
Electrical consumers Maximum output
All brake lights 84 watts
Turn signal per side 42 watts
All side lights 100 watts
All tail lights 42 watts
Rear fog light 42 watts
Never exceed the specified values.
A wARNING
If the towing bracket is unsuitable or is in cor-rectly fitted, the trailer can become detached from the vehicle and cause serious Injury.
Fitting the removable ball coupling
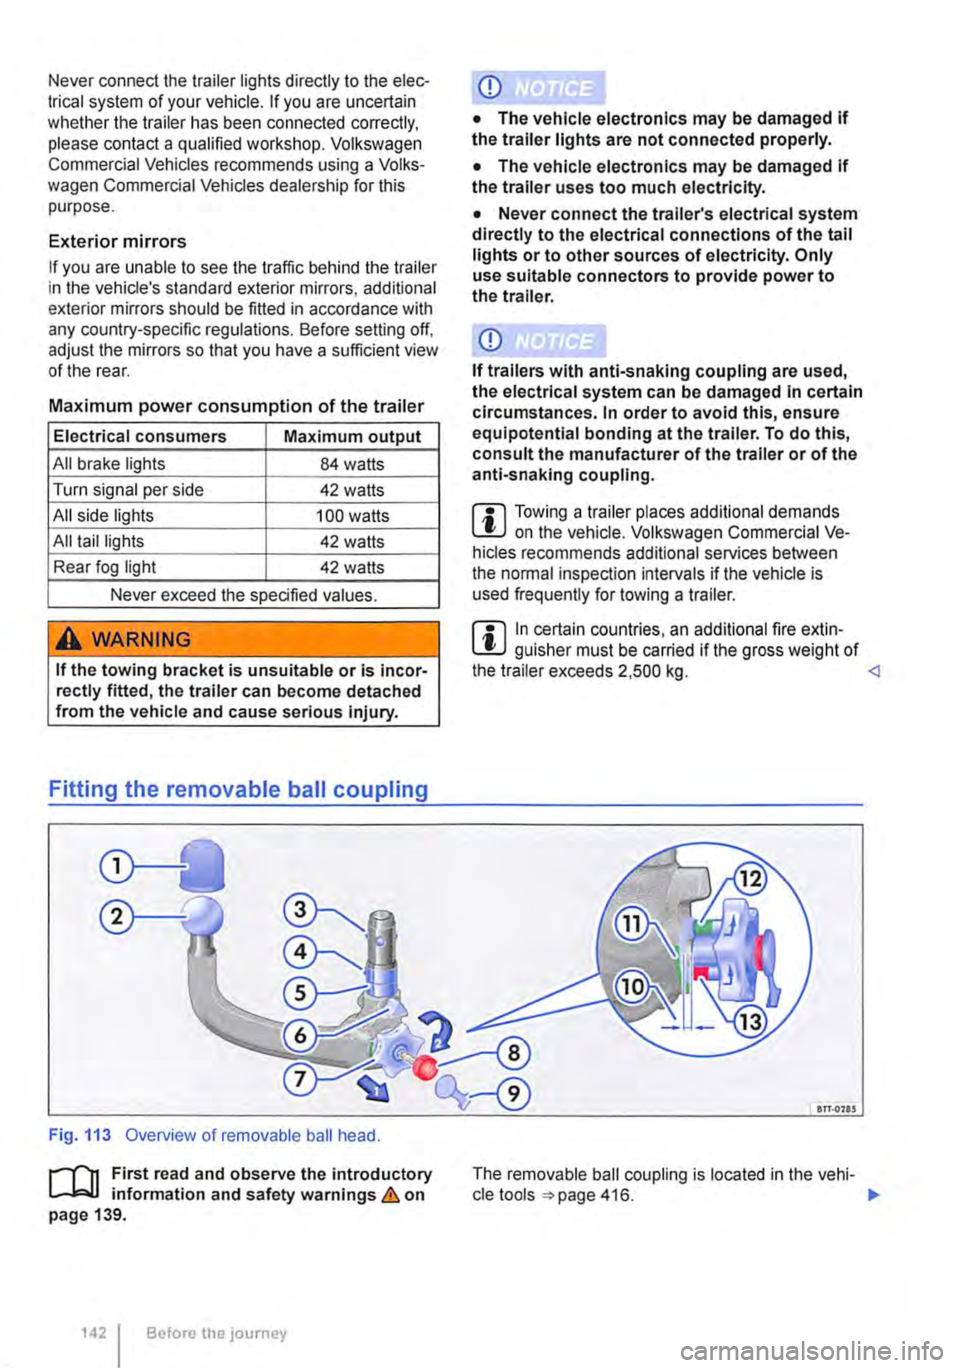
Fig. 113 Overview of removable ball head.
r-f1t First read and observe the introductory L-J,::,JJ information and safety warnings & on page 139.
1421 Before the journey
• The vehicle electronics may be damaged If the trailer uses too much electricity.
• Never connect the trailer's electrical system directly to the electrical connections of the tail lights or to other sources of electricity. Only use suitable connectors to provide power to the trailer.
m Towing a trailer places additional demands L!J on the vehicle. Volkswagen Commercial Ve-hicles recommends additional services between the normal inspection intervals if the vehicle is used frequently for towing a trailer.
m In certain countries, an additional fire extin-L!J guisher must be carried if the gross weight of the trailer exceeds 2,500 kg. <1
an.ons
The removable ball coupling is located in the vehi-cle tools 416. ..,.
Page 144 of 486
A WARNING (Continued)
• If the ball coupling will not fit properly, the towing bracket should be checked by a quali-fied workshop.
• Do not use the towing bracket If the ball coupling does not engage properly or if you are unable to set it to the "ready" position.
• Do not use the towing bracket if you are unable to remove the key from the handwheel once the ball coupling has been mounted. This means that ball coupling Is not locked properly.
Removing the ball coupling
r--T'n First read and observe the Introductory L-J.:.IJ information and safety warnings & on page 139.
• Unhitch the trailer => &.
• Remove the cover =>Fig. 113 ®from the lock on the handwheel.
• Insert the key® into the lock and turn it clock-wise.
• Hold the ball coupling tightly in your left hand =>&.
• Use your right hand to pull out the handwheel 0 in the direction of arrow 1 and keep it in this po-sition.
• Turn the handwheel 0 in the direction of arrow 2 until it engages.
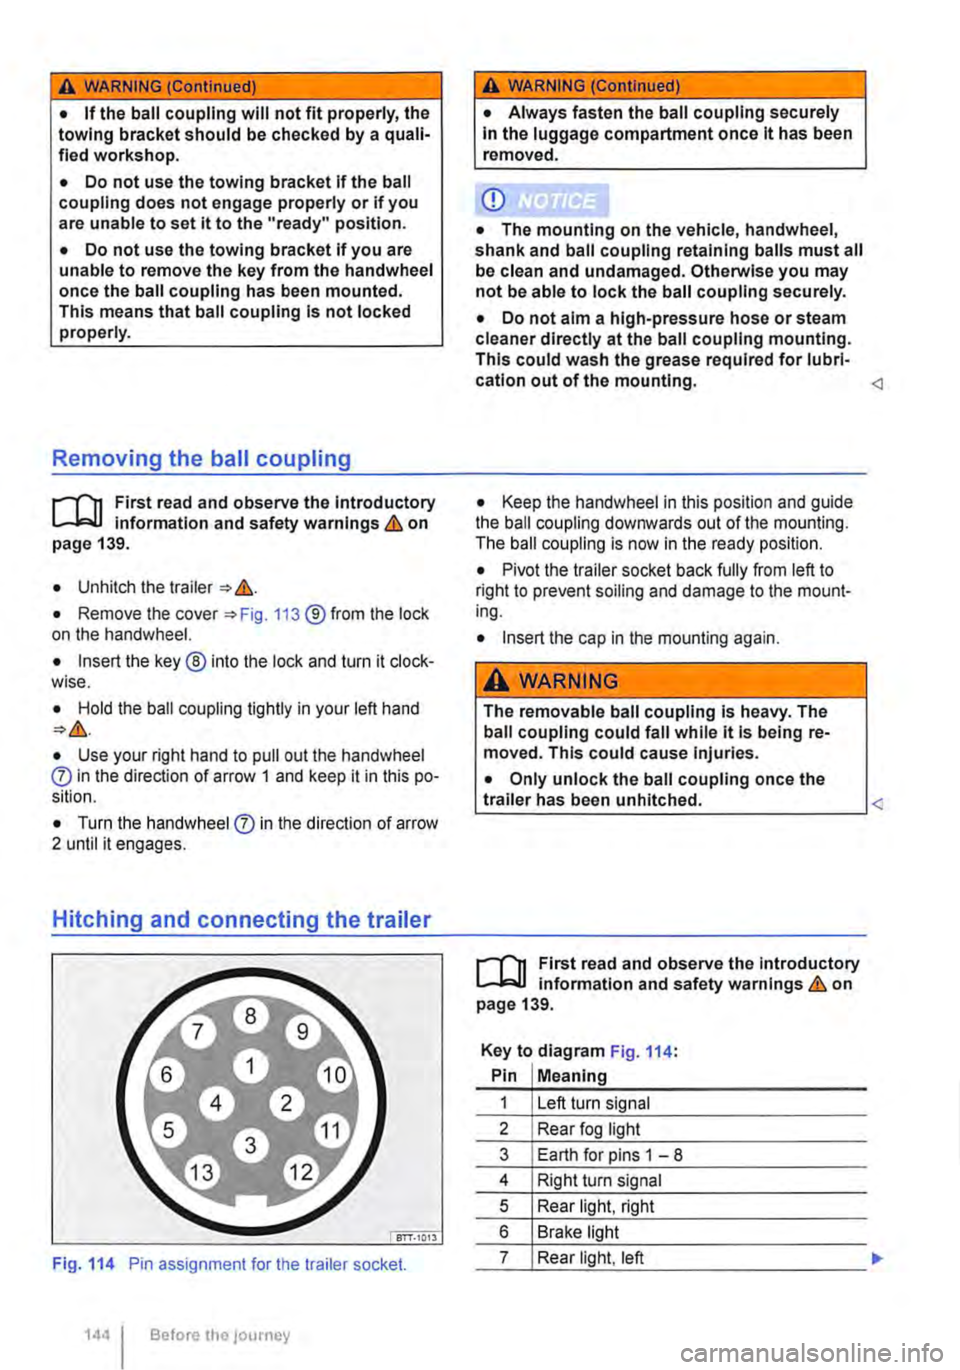
Hitching and connecting the trailer
Fig. 114 Pin assignment for the trailer socket.
1441 Before the journey
A WARNING (Continued)
• Always fasten the ball coupling securely In the luggage compartment once it has been removed.
CD
• The mounting on the vehicle, handwheel, shank and ball coupling retaining balls must all be clean and undamaged. Otherwise you may not be able to lock the ball coupling securely.
• Do not aim a high-pressure hose or steam cleaner directly at the ball coupling mounting. This could wash the grease required for lubri-cation out of the mounting.
• Pivot the trailer socket back fully from left to right to prevent soiling and damage to the mount-ing.
• Insert the cap in the mounting again.
A WARNING
The removable ball coupling Is heavy. The ball coupling could fall while it Is being re-moved. This could cause Injuries.
• Only unlock the ball coupling once the L-tr_a_ile_r_h_a_s __ be_e_n __ u_n_hi_tc_h_e_d_. ____________
r--T'n First read and observe the Introductory L-J.:.IJ information and safety warnings & on page 139.
Key to diagram Fig. 114:
Pin Meaning
1 Left turn signal
2 Rear fog light
3 Earth for pins 1 -8
4 Right turn signal
5 Rear light, right
6 Brake light
7 Rear light, left
Page 147 of 486
Things to note when driving with a trailer
• If the trailer has an overrun brake, apply the brakes gently at first and then firmly. This will pre-vent the jerking that can be caused by the trailer wheels locking.
• The combination weight causes the braking dis-tance to increase.
• Select a low gear before driving down a slope. This enables you to use the engine braking effect to slow down the vehicle. The brake system could otherwise overheat and fail.
• The vehicle's centre of gravity and, in turn, the vehicle's handling, will change because of the trail-er load and the increased combined towing weight of the vehicle and trailer.
• The weight distribution of a loaded trailer with an unladen towing vehicle is very unfavourable. When driving in this situation, drive particularly carefully and slowly.
Tachograph
In most European countries, a tachograph has to be installed in the vehicle and used if the gross combination weight rating of the vehicle and trailer is over 3,500 kg.
• Observe the legal requirements governing the use of tachographs.
Pulling off on slopes when towing a trailer
A vehicle towing a trailer is liable to roll back a short distance when moving off on a slope, de-pending on the angle of the slope and the total weight of the trailer and vehicle.
When towing a trailer, pull off on slopes as follows:
• Depress and hold the brake pedal.
• Manual gearbox: depress the clutch fully.
• Select first gear or D =:o page 260, Changing gears.
Trailer stabilisation
r-('n First read and observe the introductory L-J,:.U information and safety warnings & on page 139.
The trailer stabilisation function can de-
tect if an attached trailer is starting to
lurch from side to side and can provide
countersteer.
• Unlock hand brake and carefully release while holding down lock button. At the same time, gently depress the accelerator and, in a manual vehicle, release the clutch pedal, until you feel the vehicle moving forwards. If necessary, read the notes on the Hill Hold Assist function =:o page 282, Pull-away assist systems.
• Only let go of the handbrake lever when the en-gine has sufficient power to move off.
• Pull away slowly.
A WARNING
Incorrect trailer towing can cause loss of ve-hicle control and serious personal injury.
• Towing a trailer and transporting heavy or bulky items can change the way the vehicle handles and increase the braking distance.
• Always drive carefully and think ahead. Brake earlier than in normal driving.
• Always adapt your speed and driving style to suit visibility, weather, road and traffic con-ditions. Reduce your speed, particularly when going downhill.
• Accelerate carefully and gently. Avoid abrupt and sudden driving and braking ma-noeuvres.
• Take special care when overtaking. Re-duce your speed immediately if the trailer shows even the slightest sign of snaking.
• Never try to stop a trailer from snaking by increasing your speed.
• Always obey speed limits. In some areas speed limits for vehicles towing trailers are lower than for vehicles without trailers.
If, however, the effects of this snaking on the vehi-cle are detected via the ESC control unit, the vehi-cle is braked automatically by the ESC in order to stabilise the trailer. In this case the ABS indicator lamp flashes .,.
Transporting items 1147
Page 148 of 486
Requirements for trailer stabilisation
• The vehicle is a factory-fitted towing bracket or a compatible towing bracket is fitted.
• ESC is active. The indicator lamp in the in-strument cluster is not lit up.
• The trailer is electrically connected to the tow-ing vehicle via the trailer socket.
• The vehicle speed is higher than approximately 60 km/h (37 mph).
• The maximum drawbar load is being carried.
• The trailer must have a rigid drawbar.
• Trailers with brakes must have a mechanical overrun system.
A WARNING
De not let the extra safety afforded by the trailer stabilisation function tempt you into taking any risks when driving-this can cause accidents.
• Always adapt your speed and driving style to suit visibility, weather, road and traffic con-ditions.
1481 Before the JOUrney
A WARNING (Continued)
• Accelerate carefully on slippery surfaces.
• Take your foot off the accelerator if one of the systems is active.
A wARNING
The trailer stabillsation function may not be able to detect all driving situations correctly.
• Light trailers that are snaking will not be recognised by the trailer stabilisation func-tion and stabilised accordingly in all cases.
• A trailer can still jack-knife on slippery roads with little grip, even if the towing vehi-cle is equipped with the trailer stabilisation system.
• Trailers with a high centre of gravity might tip over before snaking starts.
• Sudden braking procedures could occur automatically In extreme driving situations If the trailer socket Is being used without a trail-er (e.g. for a bicycle carrier with lighting).
Page 195 of 486
Bench seat/bed
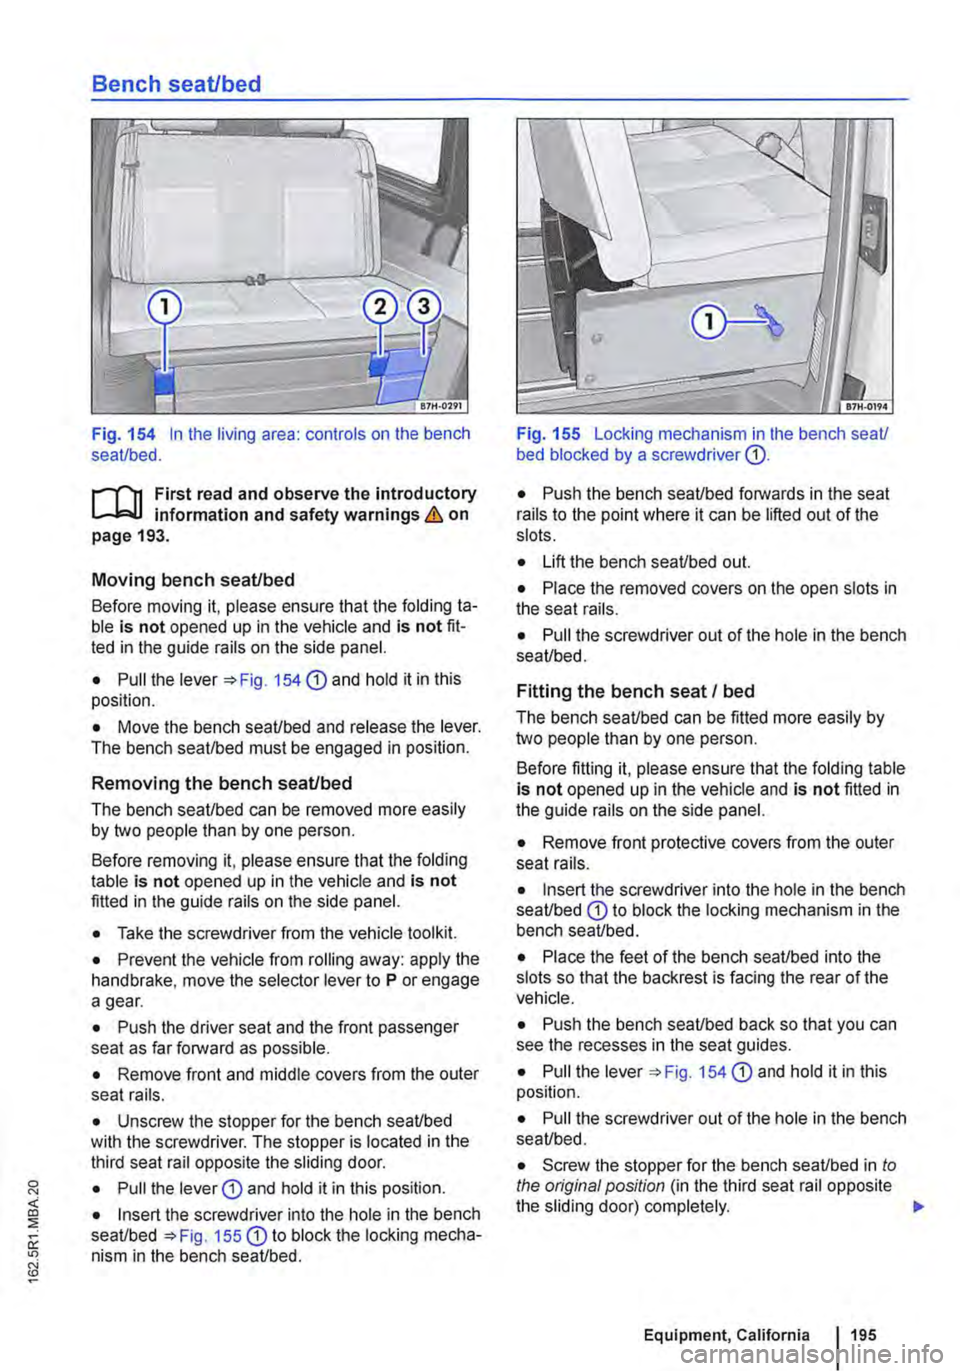
Fig. 154 In the living area: controls on the bench seat/bed.
ill1 First read and observe the introductory l-J::,jJ information and safety warnings & on page 193.
Moving bench seat/bed
Before moving it, please ensure that the folding ta-ble is not opened up in the vehicle and is not fit-ted in the guide rails on the side panel.
• Pull the lever '*Fig. 154 CD and hold it in this position.
• Move the bench seat/bed and release the lever. The bench seat/bed must be engaged in position.
Removing the bench seat/bed
The bench seat/bed can be removed more easily by two people than by one person.
Before removing it, please ensure that the folding table is not opened up in the vehicle and is not fitted in the guide rails on the side panel.
• Take the screwdriver from the vehicle tool kit.
• Prevent the vehicle from rolling away: apply the handbrake, move the selector lever to P or engage a gear.
• Push the driver seat and the front passenger seat as far forward as possible.
• Remove front and middle covers from the outer seat rails.
• Unscrew the stopper for the bench seat/bed with the screwdriver. The stopper is located in the third seat rail opposite the sliding door.
• Pull the lever G) and hold it in this position.
• Insert the screwdriver into the hole in the bench seat/bed =>Fig. 155 G) to block the locking mecha-nism in the bench seat/bed.
Fig. 155 Locking mechanism in lhe bench seat/ bed blocked by a screwdriver G).
• Push the bench seat/bed forwards in the seat rails to the point where it can be lifted out of the slots.
• Lift the bench seat/bed out.
• Place the removed covers on the open slots in the seat rails.
• Pull the screwdriver out of the hole in the bench seat/bed.
Fitting the bench seat I bed
The bench seat/bed can be fitted more easily by two people than by one person.
Before fitting it, please ensure that the folding table is not opened up in the vehicle and is not fitted in the guide rails on the side panel.
• Remove front protective covers from the outer seat rails.
• Insert the screwdriver into the hole in the bench seat/bed G) to block the locking mechanism in the bench seat/bed.
• Place the feet of the bench seat/bed into the slots so that the backrest is facing the rear of the vehicle.
• Push the bench seat/bed back so that you can see the recesses in the seat guides.
• Pull the lever =>Fig. 154 G) and hold it in this position.
• Pull the screwdriver out of the hole in the bench seat/bed.
• Screw the stopper for the bench seat/bed in to the original position (in the third seat rail opposite the sliding door) completely. .,.
Equipment, California 195
Page 253 of 486
Checklist (Continued)
-Insurance documents
-Camping and travel guides
./ Inform yourself about the peculiarities of any foreign country you plan to visit, such as driving speed limits and required papers .
./ Check the cooking gas supply and change the bottle if necessary.
Actions to take during thunderstorms
ro First read and observe the introductory information given on page 252.
Checklist
Take the following actions before an impending storm:
./ Close the pop-up roof .
./ Retract the awning completely.
Winter conditions
r-f"'n First read and observe the introductory information given on page 252.
When parked at a camping site
• Engage a gear and place chocks against the wheels to prevent the vehicle rolling away.
• Release the handbrake so that it does not freeze.
• Do not lay power cables on the ground as they could freeze to the ground.
• Keep the ground under the vehicle free of ob-structions so that the exhaust from the supplemen-tary heating system can escape.
Ventilation
High humidity levels in the vehicle can be reduced by using a commercially available fan.
Cleaning cupboards, cooker and sink
r-f"'n First read and observe the Introductory L-la.U Information given on page 252.
Cleaning the cupboards
Clean the surfaces of the kitchen unit and cup-boards with commercially available non-abrasive cleaning agents =>
./ Drain the waste water tank.
./ Check the vehicle toolkit.
./ Take a mains cable and cable reel on board so you can use the 230-volt electrical feed.
./ Disconnect the 230-volt electrical feed.
./ Wait out the storm while remaining inside the vehicle.
Additional information:
• Read and observe the information under the in-dex keyword "Winter conditions".
CD
In very cold weather the fresh and waste water systems should be emptied to prevent them from becoming damaged If the vehicle Is not to be kept heated continuously or Is only to be