VOLKSWAGEN TRANSPORTER 2012 Owners Manual
Manufacturer: VOLKSWAGEN, Model Year: 2012, Model line: TRANSPORTER, Model: VOLKSWAGEN TRANSPORTER 2012Pages: 486, PDF Size: 69.28 MB
Page 441 of 486

Changing the bulbs in the tail light cluster on vehicles with wing doors
Fig. 314 Changing the tail light bulbs.
ru First read and observe the Introductory Information and safety warnings&, on page 432.
The actions should only be carried out In the specified order:
'*Fig. 314 Tall light bulb 1 Brake light bulb I Turn signal bulb
1. Observe and follow the instructions on the checklist =:-page 433.
2. Unscrew the two securing bolts G).
3. Push the tail light cluster towards the outside out of the mounting, release the connec-tor, and pull it off the bulb holder.
4. Unscrew the four securing bolts®. and pull the bulb holder@ out of the tail light cl us-ter.
5. Pull the bulb @ straight out I Pull the bulb ® straight out I Pull the bulb ® straight out of the bulb holder. of the bulb holder. of the bulb holder.
6. Replace the defective bulb with a new bulb of the same type (see the last line in the table "Bulbs").
7. Insert the bulb holder into the tail light cluster and tighten the bolts.
8. Carefully insert the tail light cluster into the body so that it is flush with the vehicle body-work, and tighten the bolts.
Bulb wsw I W16W I W16W
The actions should only be carried out In the specified order:
'*Fig. 314 Reversing light bulb Tall light/rear fog light bulb
1. Observe and follow the instructions on the checklist =:-page 433.
2. Unscrew the two securing bolts G).
3. Push the tail light cluster towards the outside out of the mounting, release the connec-tor, and pull it off the bulb holder.
4. Unscrew the four securing bolts ®. and pull the bulb holder out of the tail light cluster.
Pull the bulb 0 straight out of the bulb Push the bulb ®slightly into the bulb hold-5. er, turn it anti-clockwise, and pull it out holder. straight.
6. Replace the defective bulb with a new bulb of the same type (see the last line in the table "Bulbs").
7. Insert the bulb holder into the tail light cluster and tighten the bolts.
Practical tips 441
Page 442 of 486
The actions should only be carried out in the specified order:
=>Fig. 314 Reversing light bulb Tail lighUrear fog light bulb
8.
Bulb
Carefully insert the tail light cluster into the body so that it is flush with the vehicle body-work, and tighten the bolts.
P21W P21/4W
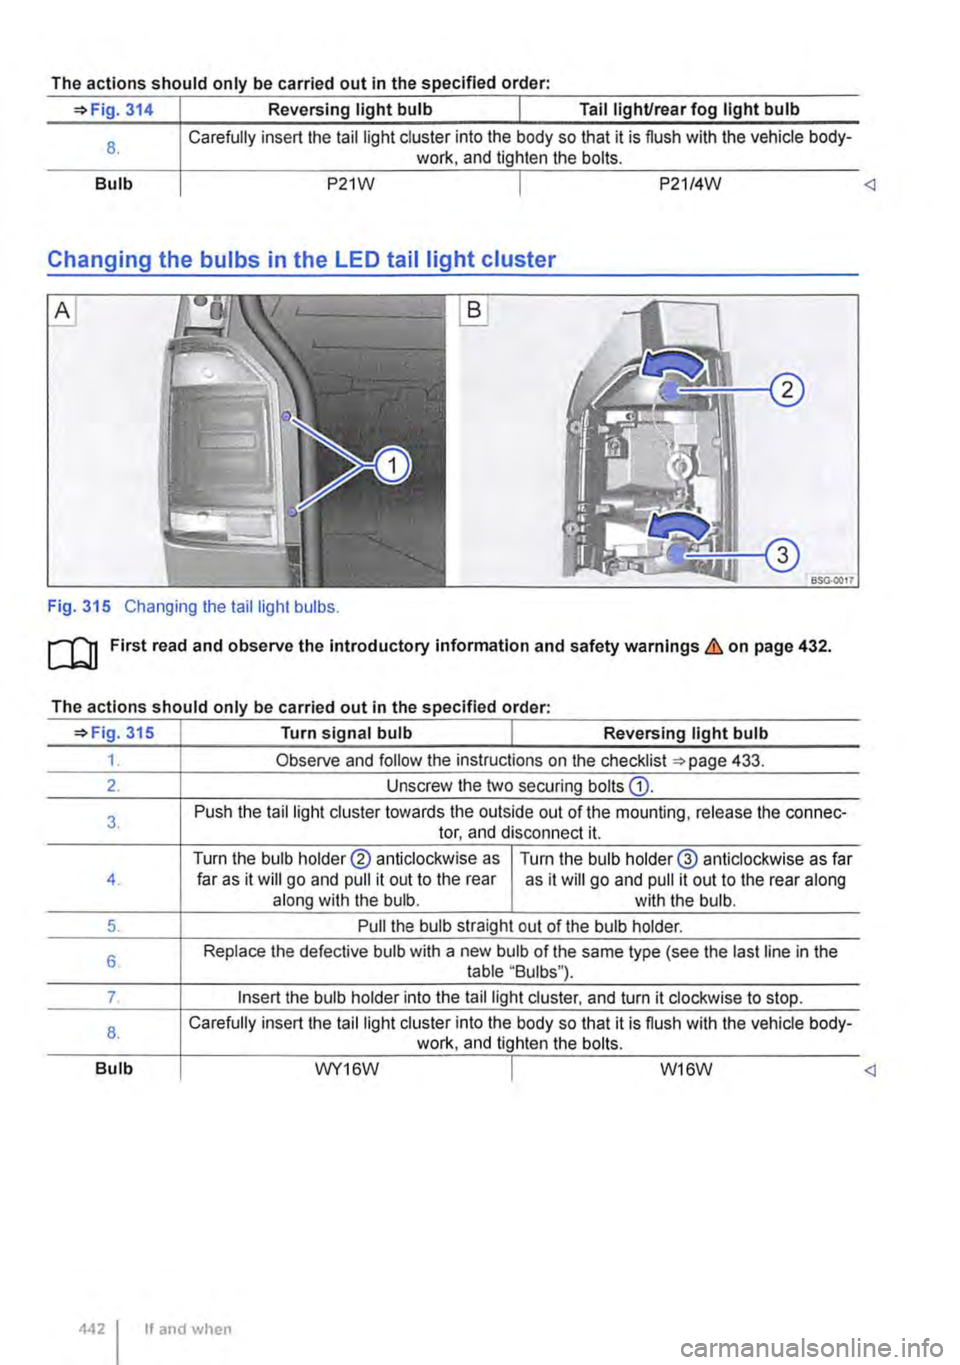
Changing the bulbs in the LED tail light cluster
BSG-0017
Fig. 315 Changing the tail light bulbs.
[Q] First read and observe the introductory information and safety warnings & on page 432.
The actions should only be carried out in the specified order:
=>Fig 315 I Turn signal bulb I Reversing light bulb
1. Observe and follow the instructions on the checklist =>page 433.
2. Unscrew the two securing bolts G).
3. Push the tail light cluster towards the outside out of the mounting, release the connec-tor, and disconnect it.
Turn the bulb holder@ anticlockwise as Tu m the bulb holder@ anticlockwise as far 4. far as it will go and pull it out to the rear as it will go and pull it out to the rear along along with the bulb. with the bulb.
5. Pull the bulb straight out of the bulb holder.
6. Replace the defective bulb with a new bulb of the same type (see the last line in the table "Bulbs").
7. Insert the bulb holder into the tail light cluster, and turn it clockwise to stop.
8. Carefully insert the tail light cluster into the body so that it is flush with the vehicle body-work, and tighten the bolts.
Bulb WY16W I W16W
If and when
Page 443 of 486
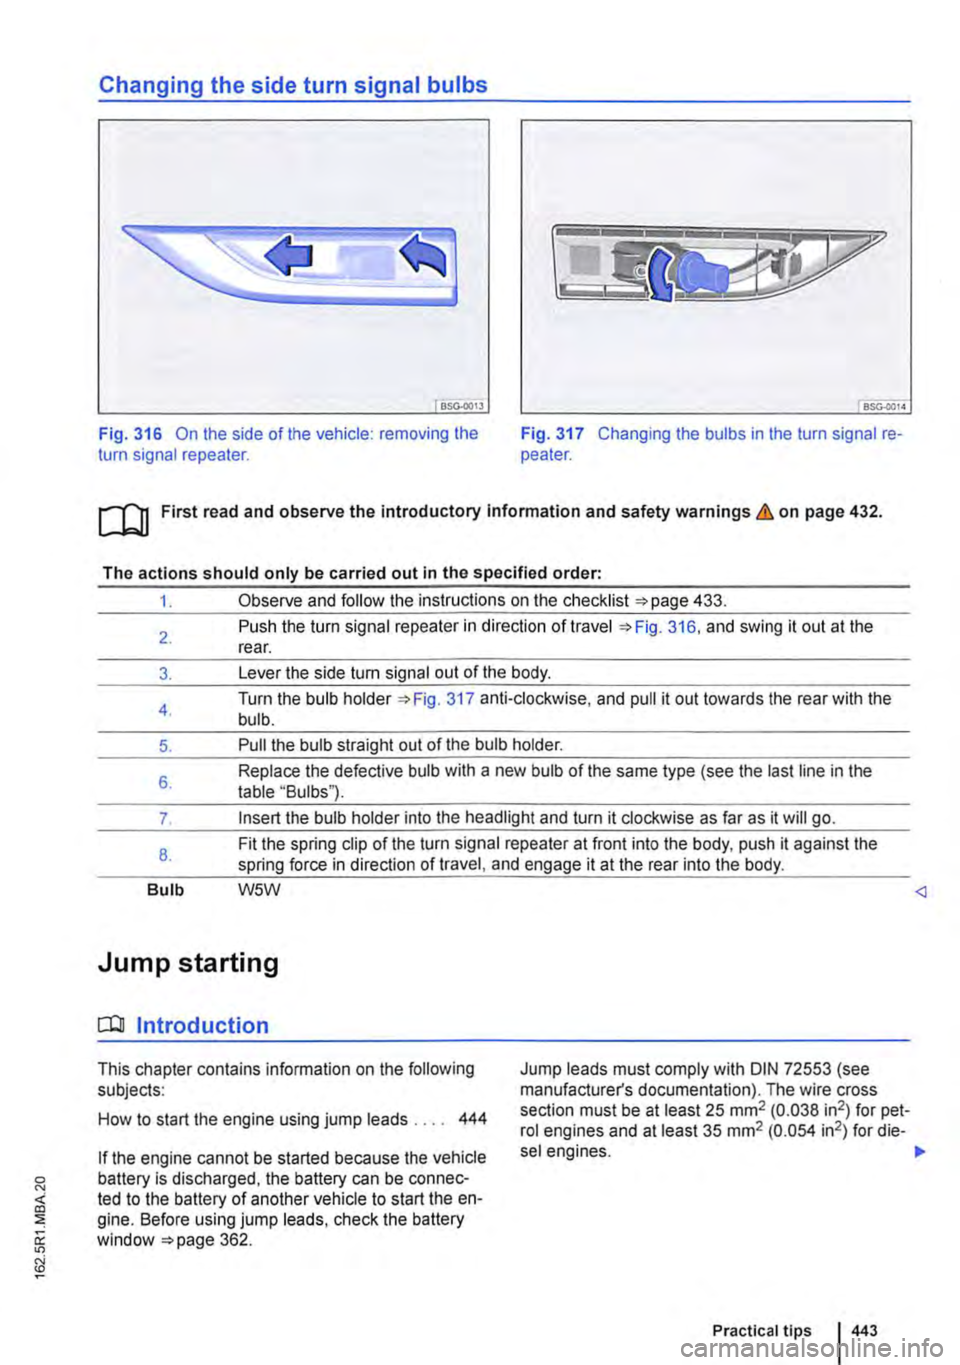
Changing the side turn signal bulbs
BSG-0013
Fig. 316 On the side of the vehicle: removing the turn signal repeater. Fig. 317 Changing the bulbs in the turn signal re-peater.
ro First read and observe the introductory Information and safety warnings & on page 432.
The actions should only be carried out in the specified order:
1. Observe and follow the instructions on the checklist 433.
2.
3.
4.
5.
6.
7.
8.
Bulb
Push the turn signal repeater in direction of travel 316, and swing it out at the rear.
Lever the side turn signal out of the body.
Turn the bulb holder 317 anti-clockwise, and pull it out towards the rear with the bulb.
Pull the bulb straight out of the bulb holder.
Replace the defective bulb with a new bulb of the same type (see the last line in the table "Bulbs").
Insert the bulb holder into the headlight and turn it clockwise as far as it will go.
Fit the spring clip of the turn signal repeater at front into the body, push it against the spring force in direction of travel, and engage it at the rear into the body.
W5W
Jump starting
CQJ Introduction
This chapter contains information on the following subjects:
How to start the engine using jump leads . . . . 444
Jump leads must comply with DIN 72553 (see manufacturer's documentation). The wire cross section must be at least 25 mm2 (0.038 in2) for pet-rol engines and at least 35 mm2 (0.054 in2) for die-
sel engines. ,..
Practical tips 443
Page 444 of 486
Additional information and warnings:
• Pull-away assist systems 282
• Preparation for working in the engine compart-ment 350
• Battery 362
A WARNING
Using the jump leads Incorrectly or complet-ing the jump start procedure incorrectly can cause the battery to explode, which can lead to severe Injuries. Please note the following In order to reduce the risk of the battery ex-ploding:
• All work on the vehicle battery and the electrical system can cause serious chemical burns, fire or electric shocks. Always read the warnings and safety Information before carrying out any kind of work on the vehicle battery 362, Vehicle battery.
• The vehicle battery providing assistance must have approximately the same voltage as the flat vehicle battery (12-volts) and approxi-mately the same capacity (see Imprint on bat-tery).
• Never charge a vehicle battery once it has been frozen. Discharged vehicle batteries can even freeze at temperatures of around o•c (+32"F).
• The battery should be replaced if it is or has ever been frozen.
A WARNING (Continued)
• A highly explosive mixture of gases Is giv-en off when the vehicle battery Is jump star-ted. Always keep fire, sparks, naked flames and lit cigarettes away from the vehicle bat-tery. Never use a mobile telephone when the jump leads are being connected or discon-nected.
• Only charge the battery in a well-ventila-ted space as the battery emits a highly explo-sive mixture of gases when the vehicle Is be-Ing jump started.
• Position the jump leads so that they never come Into contact with any moving parts In the engine compartment.
• Never confuse the negative and positive terminals or connect the jump leads Incor-rectly.
• Observe the jump lead manufacturer's In-structions.
CD
Please note the following In order to avoid con-siderable damage to the vehicle electrical sys-tem:
• A short circuit can be caused If the jump leads are wrongly connected.
• The vehicles must not touch each other, as any contact could mean that electricity could flow as soon as the positive terminals are con-nected.
00®00® :liOIIr 11
D
A + CD -®
fOl
0®®®®®
B + 0 -c 11'"1111
! 8TT.QA37
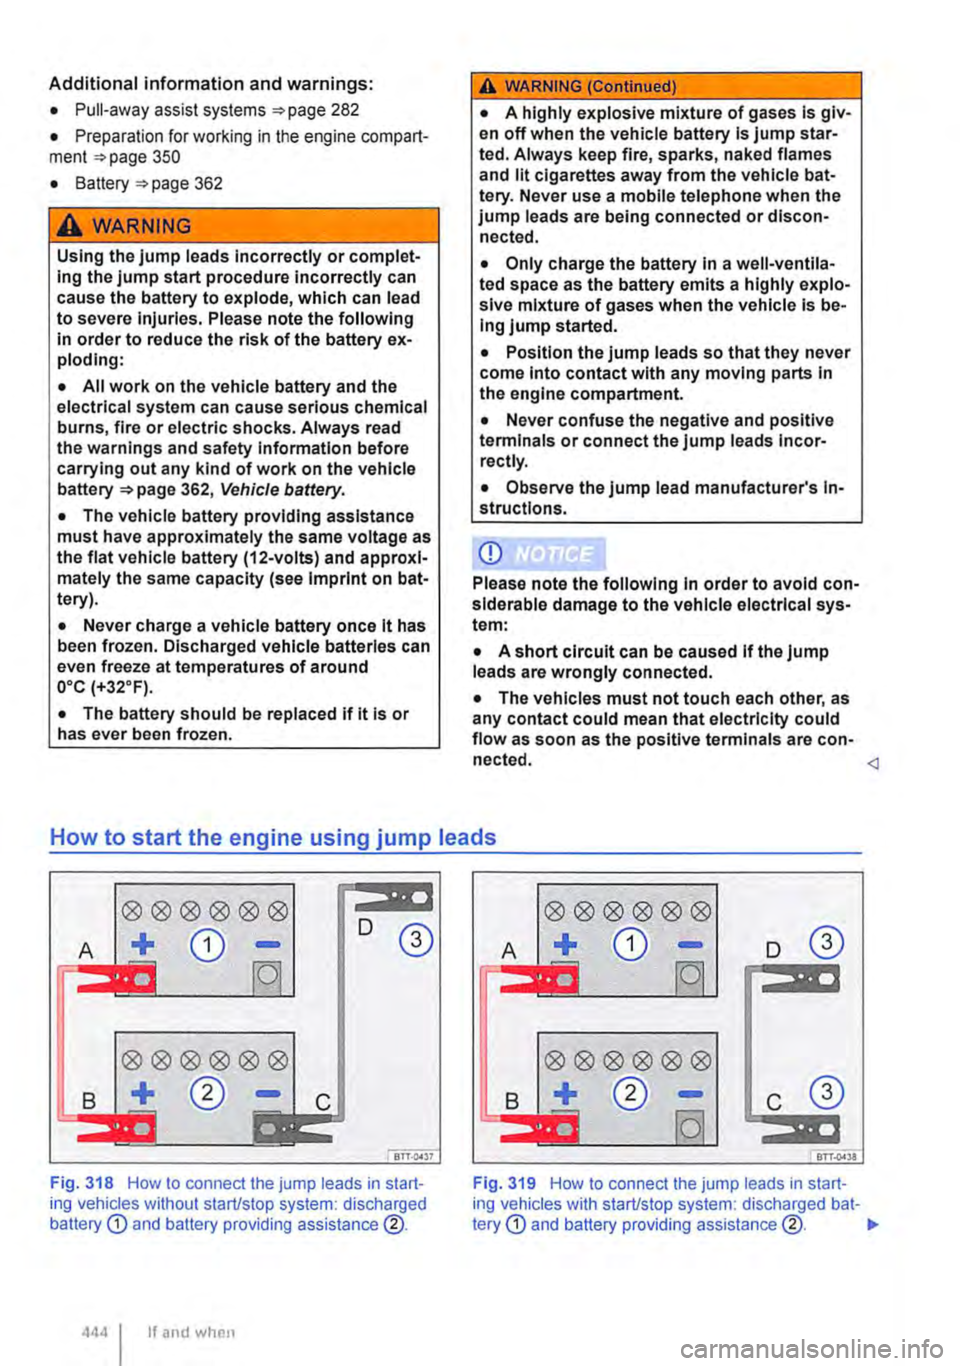
Fig. 318 How to connect the jump leads in start-ing vehicles without start/stop system: discharged battery
B c
Fig. 319 How to connect the jump leads in start-ing vehicles with start/stop system: discharged bat-tery
Page 445 of 486
r'l11 First read and observe the Introductory L-J,:.,U Information and safety warnings & on page 443.
CD Vehicle with discharged battery that is being jump-started.
@ Vehicle with vehicle battery that is supplying power and jump-starting the other vehicle.
@ Suitable earth connection. A solid metal part that is firmly bolted to the engine block, or the engine block itself.
The discharged vehicle battery must be properly connected to the vehicle's electrical system.
The vehicles must not touch. Otherwise electricity could flow as soon as the positive terminals are connected.
Ensure that the battery clamps have good metal-to-metal contact with the battery terminals.
If the engine does not start immediately, switch off the starter after about 10 seconds and try again af-ter about half a minute.
The steps should only be carried out in the speci-fied order.
Attaching the jump leads
• Switch off the ignitions In both vehicles 257.
• If necessary, open the battery cover in the en-gine compartment 362.
• Connect one end of the red jump lead to the positive terminal 318 E) or 319 E) of the vehicle with the discharged battery CD &.
• Connect the other end of the red jump lead to the positive terminal E) In the vehicle providing as-sistance@.
• In vehicles without start/stop system: con-nect one end of the black jump lead to the negative terminal 0 in the vehicle providing assistance @ 318.
• In vehicles with start/stop system: connect one end of the black jump lead @to a suitable earth connection, to a solid metal part which is se-curely bolted onto the cylinder or to the cylinder block itself =:-Fig. 319.
• Connect the other end of the black jump lead @ to a solid metal component that is bolted firmly to the engine block of the vehicle with the flat bat-tery, to the engine block itself or, if necessary, to the screwed-in towing eye at the front. Do not con-nect it to a point near the battery CD &.
• Position the leads in such a way that they can-not come into contact with any moving parts in the engine compartment.
Starting the engine
• Start the engine of the vehicle which is provid-ing assistance and let it run at idle.
• Start the engine of the car with the discharged vehicle battery and wait two or three minutes until the engine is running "smoothly".
Removing the jump leads
• Before disconnecting the jump leads, switch off the dipped beam headlights If they are switched on.
• Turn on the heater blower and rear window heater in the vehicle battery with the discharged battery. This helps minimise the voltage peaks generated when the leads are disconnected.
• With the engines running, disconnect the jump leads in the exact reverse order to the instructions given above.
A WARNING
Jump starting the vehicle Incorrectly can cause the battery to explode, which can lead to serious injuries. Please note the following In order to reduce the risk of the battery ex-ploding:
• All work on the vehicle battery and the electrical system can cause serious chemical burns, fire or electric shocks. Always read the warnings and safety Information before carrying out any kind of work on the vehicle battery 362, Vehicle battery.
• Always wear suitable eye protection and never lean over the vehicle battery.
• Attach the connector cables In the correct order-the positive cable first, followed by the negative.
• Never connect the negative cable to parts of the fuel system or to the brake lines.
• The non-insulated parts of the battery clamps must not be allowed to touch. The jump lead attached to the positive vehicle battery terminal must not touch metal parts of the vehicle.
• Check the battery window using a torch If necessary. If the display Is light yellow or col-ourless, do not jump start the vehicle. Seek expert assistance.
• Avoid electrostatic discharge In the vicini-ty of the vehicle battery. The gas emitted from the vehicle battery could be Ignited by sparks.
• Do not use jump leads to start the engine If the vehicle battery Is damaged or if it is or has ever been frozen.
Page 446 of 486
Tow-starting and towing
0::0 Introduction
This chapter contains information on the following subjects:
Notes on tow-starting . . . . . . . . . . . . . . . . . . . . 446
Notes on towing . . . . . . . . . . . . . . . . . . . . . . . . . 447
Fitting the towing eye at front . . . . . . . . . . . . 448 Notes on driving while towing . . . . . . . . . . . . . . 448
Observe any legal requirements when towing.
For technical reasons, vehicles with a dis-charged battery must not be tow-started.
Towing a vehicle when the engine is switched off and the ignition is switched on discharges the vehi-cle battery. Depending on the vehicle battery charge level, the drop in voltage can be large enough after just a few minutes that electrical con-sumers in the vehicle will no longer function, e.g. the hazard warning lights.
Additional information and warnings:
• Exterior views =>page 5
• Changing gear =>page 257
• Engine management system and exhaust puri-fication system =>page 407
• Jump starting =>page 443
A wARNING
Never tow a vehicle that has no power sup-ply.
• Never remove the key from the ignition. The steering lock may be activated and you will no longer be able to steer the vehicle. This can lead to a loss of control of the vehi-cle, accidents and serious injuries.
Notes on tow-starting
t""""("'n First read and observe the introductory L-.lc:.JJ information and safety warnings & on page 446.
Vehicles should not be tow-started wherever possible. Use jump leads to start the engine in· stead =>page 443.
For technical reasons, the following vehicles can-not be tow-started:
4461 If and when
A WARNING (Continued)
• If the power supply to the towed vehicle is disconnected, stop towing immediately and seek expert assistance.
A WARNING
If a vehicle is being towed, the vehicle han-dling and braking effect will change signifi-cantly. Please note the following in order to reduce the risk of an accident or serious inju-ries:
• Notes for the driver of the towed vehicle:
-You will need to depress the brake ped-al more vigorously than normal as the brake servo is not working. Always be careful not to drive Into the vehicle that is pulling your vehicle.
-You will need to turn the steering wheel more vigorously as the power-assisted steering function Is not working.
• Notes for the driver of the towing vehicle
-Accelerate carefully and gently.
-Avoid sudden braking and driving ma· noeuvres.
-Brake earlier than normal by pressing lightly on the brake pedal.
CD
• Remove and install the cover and the tow-ing eye carefully so as to avoid damage to the vehicle, e.g. the palntwork.
• Unburnt fuel can enter the catalytic convert· er and damage it while the vehicle Is being tow-ed.
• If the vehicle battery has discharged, the en-gine control units will not function properly.
However, if the vehicle still has to be tow-started (manual gearbox):
• Engage second or third gear.
• Keep the clutch pressed down.
Page 447 of 486
• Switch on the ignition and the hazard warning lights.
• Once both vehicles are in motion, release the clutch.
• As soon as the engine starts, press the clutch and put the gear into neutral. This helps to prevent driving into the towing vehicle.
Notes on towing
i"""fl1 First read and observe the introductory L-W! information and safety warnings & on page 446.
Fixed towing eye at rear
On vehicles without a towing bracket there is a fixed towing eye under the bumper at the rear right.
Towing bracket instead of a fixed towing eye
If the vehicle has a factory-fitted towing bracket, it should also be used for towing other vehicles.
Tow rope or tow bar
lt is easier and safer to tow a vehicle with a tow bar. Only use a tow rope if you do not have a tow bar.
The tow rope should be slightly elastic to reduce the strain on both vehicles. lt is advisable to use a tow rope made of synthetic fibre or similarly elastic material.
Only attach the tow rope or tow bar to the specially provided towing eyes or to the towing bracket.
Vehicles with a factory-fitted towing bracket must be towed only with a tow bar that is specially designed for fitting to a ball coupling 139.
When your vehicle has to be towed:
• Switch on the ignition.
• Select the neutral position or move the selector lever to N 257.
• Release the handbrake. if necessary.
CD
When tow-starting, unburnt fuel can enter the catalytic converter and damage it. <1
• Do not allow the vehicle to be towed at speeds faster than 50 km/h (30 mph).
• Do not allow the vehicle to be towed further than 50 km.
• Vehicles with a DSG® dual clutch gearbox may only be towed by the breakdown truck with the front wheels raised.
Towing vehicles with four-wheel drive (4MOTION)
Vehicles with four-wheel drive (4MOTION) may be towed with a tow bar or tow rope. If the vehicle is towed with the rear or front axle raised, the engine must be switched off otherwise the drive train could be damaged.
When should your vehicle not be towed?
• If, due to damage, the vehicle gearbox no lon-ger contains any lubricant.
• If the vehicle battery is discharged.
• If the distance to be towed is further than 50 km -applies only to vehicles with the DSG® dual clutch gearbox.
• If the steering function or the operating clear-ance of the wheels cannot be ensured, e.g. after an accident.
Please comply with the following when towing another vehicle:
• Comply with legal regulations.
• Comply with the information on towing con-tained in the owner's manual for the other vehicle. <1
Practical tips
Page 448 of 486
Fitting the towing eye at front
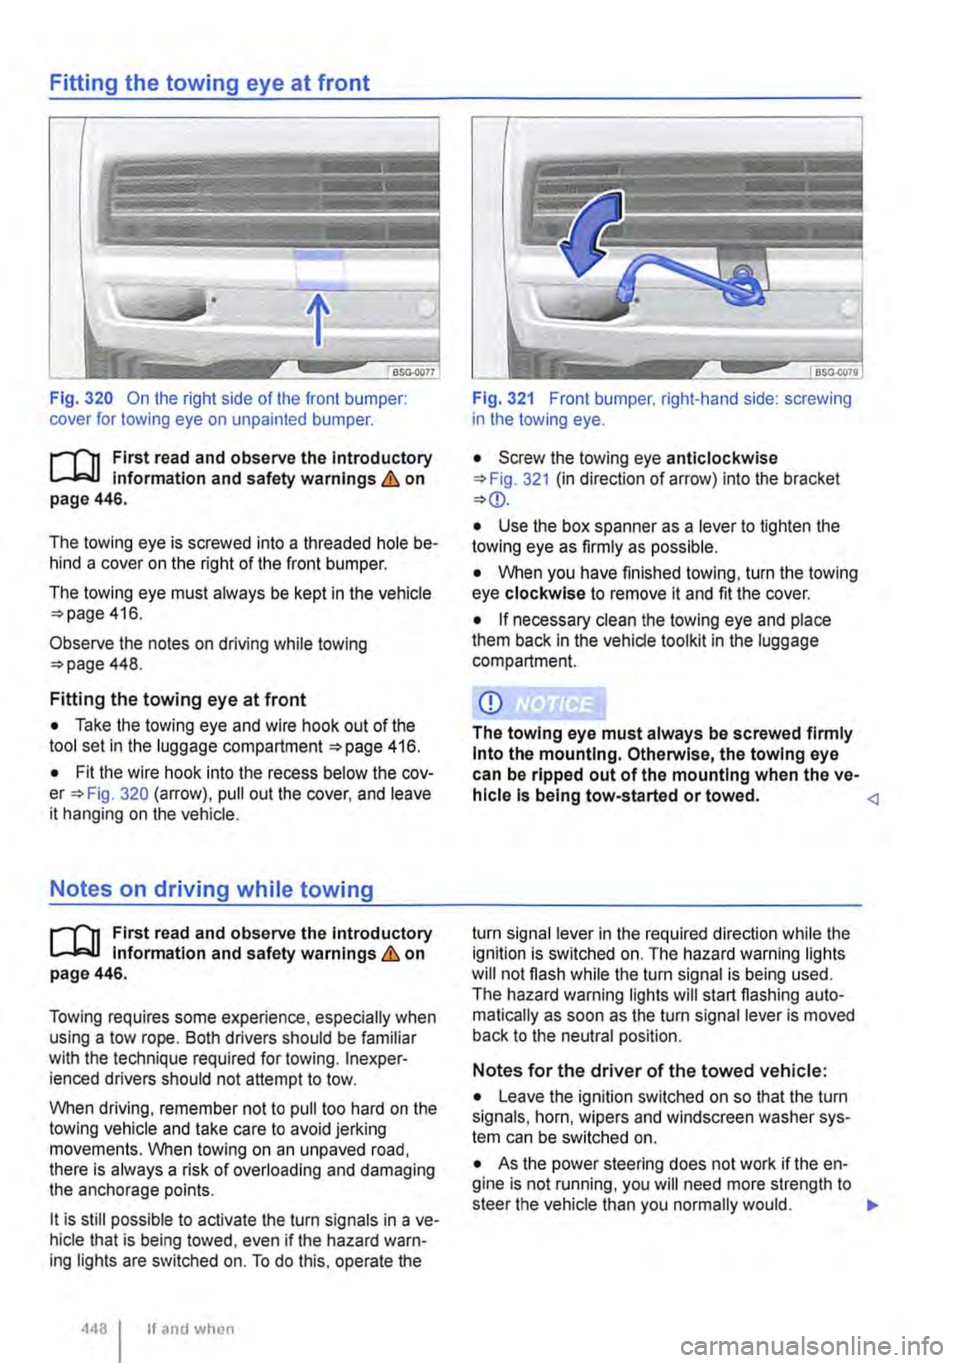
Fig. 320 On the right side of the front bumper: cover for towing eye on unpainted bumper.
l"""('n First read and observe the Introductory L-Jo:.U Information and safety warnings & on page 446.
The towing eye is screwed into a threaded hole be-hind a cover on the right of the front bumper.
The towing eye must always be kept in the vehicle 416.
Observe the notes on driving while towing 448.
Fitting the towing eye at front
• Take the towing eye and wire hook out of the tool set in the luggage compartment 416.
• Fit the wire hook into the recess below the cov-Fig. 320 (arrow). pull out the cover, and leave it hanging on the vehicle.
Notes on driving while towing
l"""('n First read and observe the introductory L-Jo:.U Information and safety warnings & on page 446.
Towing requires some experience, especially when using a tow rope. Both drivers should be familiar with the technique required for towing. lnexper· ienced drivers should not attempt to tow.
When driving, remember not to pull too hard on the towing vehicle and take care to avoid jerking movements. When towing on an unpaved road, there is always a risk of overloading and damaging the anchorage points.
lt is still possible to activate the turn signals in a ve-hicle that is being towed, even if the hazard warn-ing lights are switched on. To do this, operate the
4481 If and when
Fig. 321 Front bumper. right-hand side: screwing in the towing eye.
• Screw the towing eye anticlockwise 321 (in direction of arrow) into the bracket
• Use the box spanner as a lever to tighten the towing eye as firmly as possible.
• When you have finished towing, turn the towing eye clockwise to remove it and fit the cover.
• If necessary clean the towing eye and place them back in the vehide toolkit in the luggage compartment.
CD
The towing eye must always be screwed firmly Into the mounting. Otherwise, the towing eye can be ripped out of the mounting when the ve-hicle Is being tow-started or towed.
Notes for the driver of the towed vehicle:
• Leave the ignition switched on so that the turn signals, horn, wipers and windscreen washer sys-tem can be switched on.
• As the power steering does not work if the en-gine is not running, you will need more strength to steer the vehicle than you normally would. .,.
Page 449 of 486
• You will need to depress the brake pedal more vigorously than normal as the brake servo is not working. Do not drive too close to the towing vehi-cle.
• Read and comply with the Information and notes In the owner's manual of the towing vehicle.
Notes for the driver of the towing vehicle
• Accelerate carefully and gently. Avoid any sud-den driving manoeuvres.
• Brake earlier than normal by pressing lightly on the brake pedal.
• Read and comply with any information and notes in the owner's manual of the towed vehicle.
Page 450 of 486
Technical data
Technical data
Vehicle data
COJ Introduction
This chapter contains information on the following subjects:
Vehicle identification data . . . . . . . . . . . . . . . . . 451
Dimensions ........................... . 452
Unless otherwise specified, the technical data of the basic model apply. The values quoted here may differ if additional equipment is fitted, for differ-ent models, for special vehicles or if country-specif-ic equipment is fitted. All data in the official vehicle documents take precedence over these data.
Engine
The vehicle data sticker and the official vehicle documents show which engine is installed in your vehicle.
Weight
The values for the kerb weight in the following ta-bles apply for the road-ready vehicle with driver (75 kg), service fluids including fuel tank carrying 90% of its capacity and, if applicable, toolkit and spare tyre =>&.Additional equipment and retrofit-ted accessories increase the stated kerb weight and reduce the maximum permitted load accord-ingly.
The load comprises the weights of the following:
• Passengers
• Allluggage
• Roof load including the mounts or roof bars and the load carrier system
• Drawbar load when towing a trailer
Performance figures
The performance figures were measured without equipment which may influence performance, such as a roof carrier or mud flaps.
Gross combination weight rating
The gross combination weight ratings listed are on-ly applicable for altitudes up to 1 ,000 m above sea level. The maximum weight of the car and trailer must be reduced by approximately 10% for every further 1 ,000 m in altitude.
450 I Tcchn1cal data
Descriptions of the tables
Gearbox abbreviations: MG = manual gearbox, DSG® = dual clutch gearbox DSG®.
Additional information and warnings:
• Transporting =:o page 125
• Driving with respect for the environment =:.page 278
• Fuel =:.page 343
• Engine oil =:o page 353
• Engine coolant =:o page 358
• Wheels and tyres =>page 367
• Consumer information =>page 404
,A WARNING
Exceeding the maximum permissible weights, payload, dimensions, vehicle speed and axle weight rating could cause damage to the vehicle, accidents and serious Injuries.
• Do not exceed the permitted weights, loads, dimensions and maximum speeds.
• The actual axle loads must never exceed the maximum permissible axle loads.
• The payload and the distribution of the load In the vehicle have an effect on the driv-ing response and braking distance of the ve-hicle. Adjust your speed accordingly.
,A WARNING
Accidents and severe injuries can occur if the maximum permitted gross combination weight Is exceeded.
• Never exceed the specified gross combi-nation weight rating.