heater VOLKSWAGEN TRANSPORTER 2019 Owner's Manual
[x] Cancel search | Manufacturer: VOLKSWAGEN, Model Year: 2019, Model line: TRANSPORTER, Model: VOLKSWAGEN TRANSPORTER 2019Pages: 486, PDF Size: 69.28 MB
Page 336 of 486
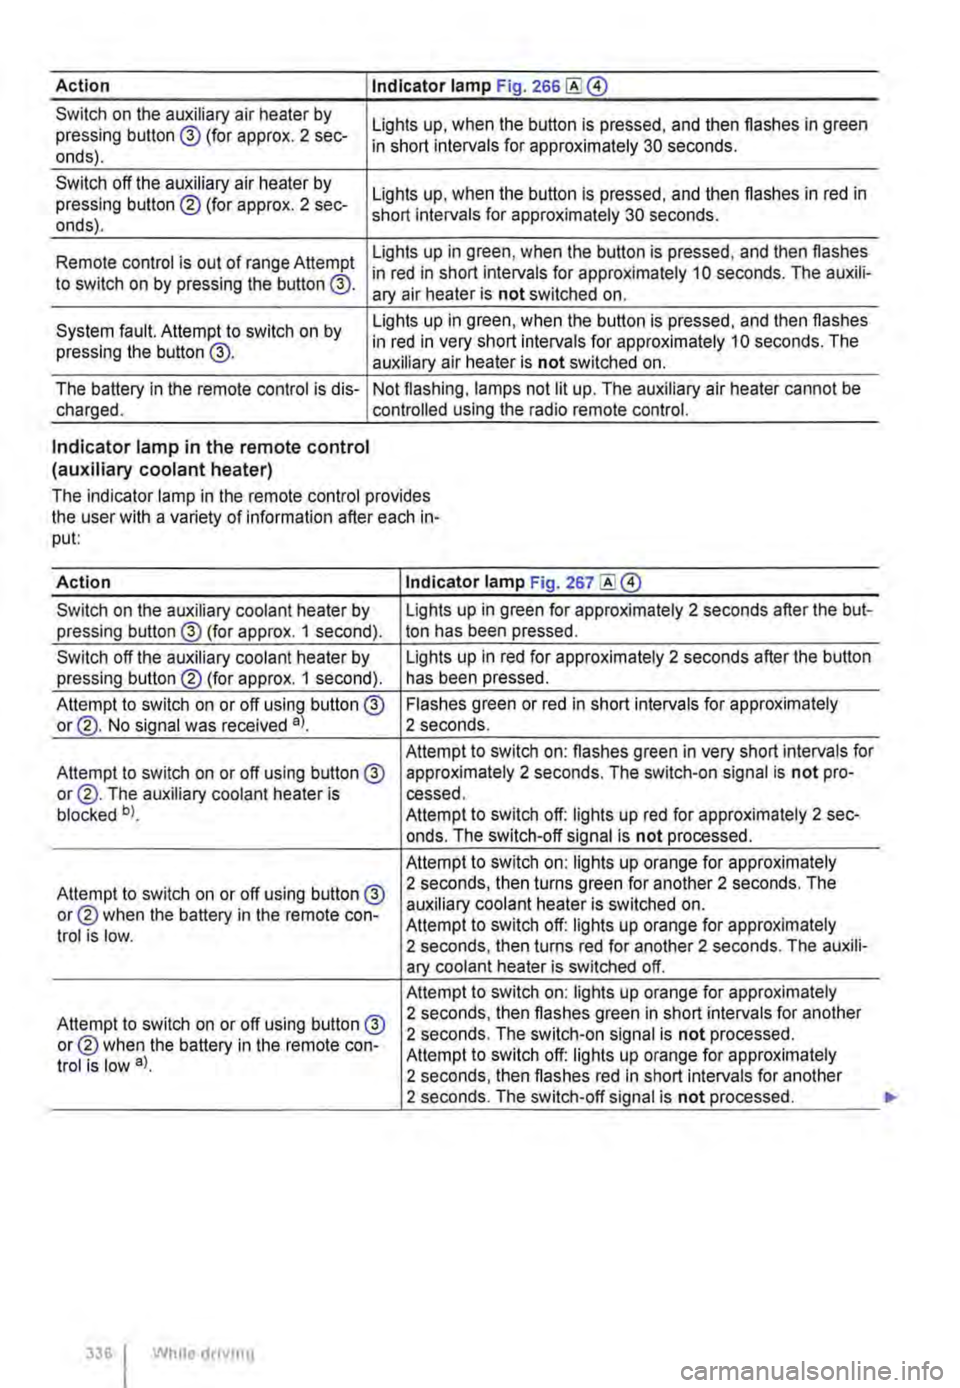
Action I Indicator lamp Fig. 266
Switch on the auxiliary air heater by pressing button @ (for approx. 2 sec-onds).
Switch off the auxiliary air heater by pressing button ® (for approx. 2 sec-onds).
Lights up, when the button is pressed, and then flashes in green in short intervals for approximately 30 seconds.
Lights up, when the button is pressed, and then flashes in red in short intervals for approximately 30 seconds.
Lights up in green, when the button is pressed, and then flashes Remote control is out of range Attempt in red in short intervals for approximately 10 seconds. The auxili-to switch on by pressing the button @. ary air heater is not switched on.
System fault. Attempt to switch on by pressing the button @.
Lights up in green, when the button is pressed, and then flashes in red in very short intervals for approximately 10 seconds. The auxiliary air heater is not switched on.
The battery in the remote control is dis-charged. Not flashing, lamps not lit up. The auxiliary air heater cannot be controlled using the radio remote control.
Indicator lamp in the remote control (auxiliary coolant heater)
The indicator lamp in the remote control provides the user with a variety of information after each in-put:
Action Indicator lamp Fig. 267
Switch on the auxiliary coolant heater by Lights up in green for approximately 2 seconds after the but-pressing button@ (for approx. 1 second). ton has been pressed.
Switch off the auxiliary coolant heater by Lights up in red for approximately 2 seconds after the button pressing button® (for approx. 1 second). has been pressed.
Attempt to switch on or off using button @ Flashes green or red in short intervals for approximately or@. No signal was received a). 2 seconds.
Attempt to switch on: flashes green in very short intervals for Attempt to switch on or off using button@ approximately 2 seconds. The switch-on signal is not pro-or@. The auxiliary coolant heater is cessed. blocked b). Attempt to switch off: lights up red for approximately 2 sec-onds. The switch-off signal is not processed.
Attempt to switch on: lights up orange for approximately
Attempt to switch on or off using button@ 2 seconds, then turns green for another 2 seconds. The
or® when the battery in the remote con-auxiliary coolant heater is switched on. Attempt to switch off: lights up orange for approximately trot is low. 2 seconds, then turns red for another 2 seconds. The auxili-ary coolant heater is switched off.
Attempt to switch on: lights up orange for approximately
Attempt to switch on or off using button @ 2 seconds, then flashes green in short intervals for another
or® when the battery in the remote con-2 seconds. The switch-on signal is not processed.
trot is low a). Attempt to switch off: lights up orange for approximately 2 seconds, then flashes red in short intervals for another 2 seconds. The switch-off signal is not processed.
336 I While droving
Page 337 of 486
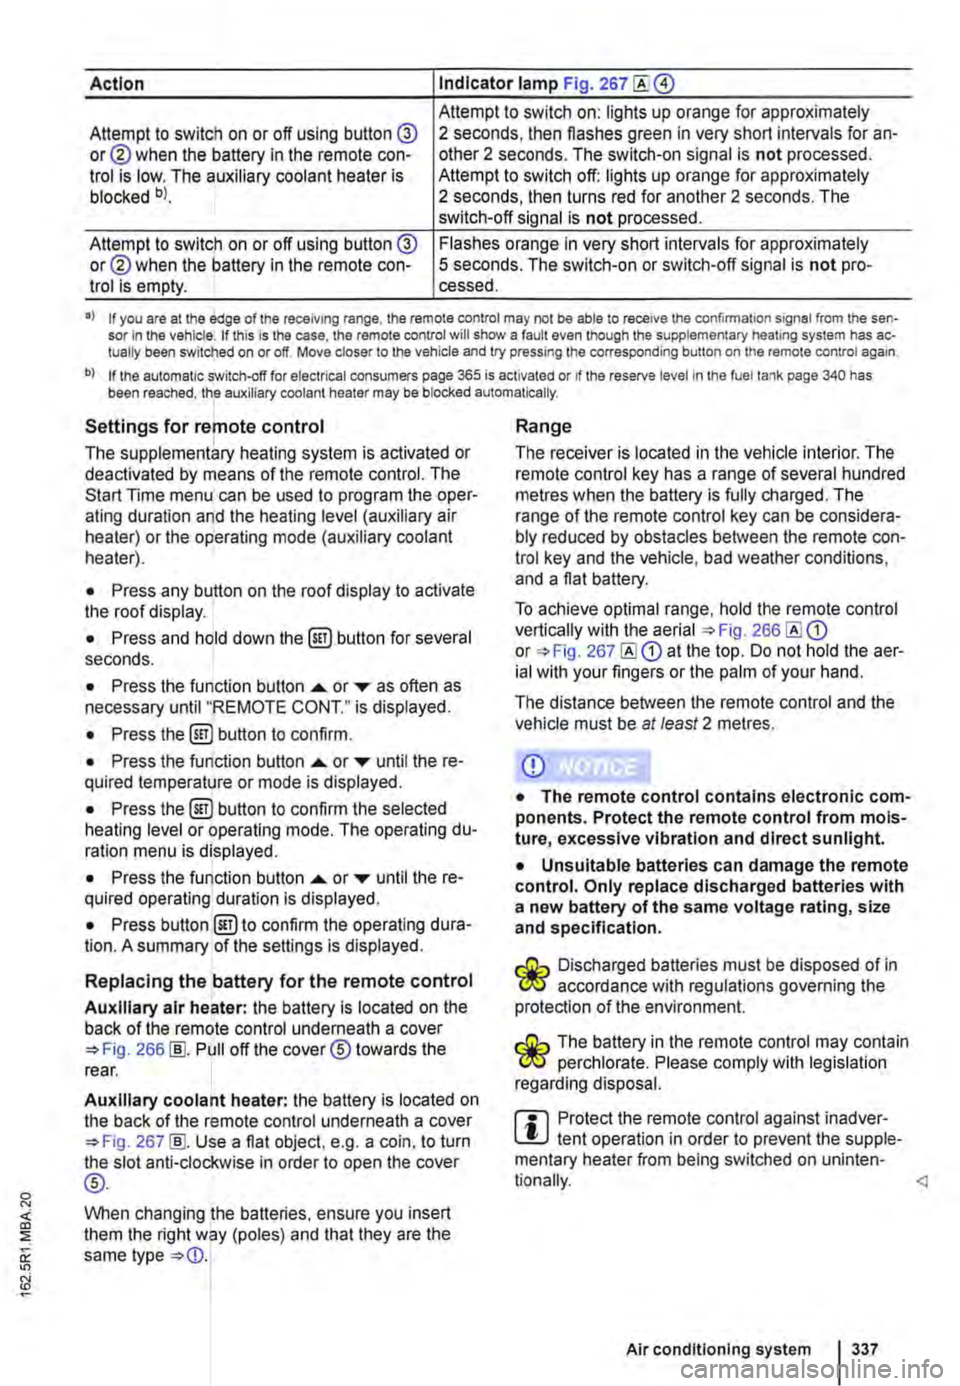
Action Indicator lamp Fig. 267
Attempt to switch on: lights up orange for approximately Attempt to switch on or off using button @ or@ when the battery in the remote con-trol is low. The auxiliary coolant heater is blocked bl.
2 seconds, then flashes green in very short intervals for an-other 2 seconds. The switch-on signal is not processed. Attempt to switch off: lights up orange for approximately 2 seconds, then turns red for another 2 seconds. The switch-off signal is not processed.
Attempt to switch on or off using button @ or@ when the battery in the remote con-trol is empty.
Flashes orange in very short intervals for approximately 5 seconds. The switch-on or switch-off signal is not pro-cessed.
•> If you are at the edge of the receiving range, the remote control may not be able to receive the confirmation signal from the sen-sor in the vehicle. If this is the case, the remote control will show a fault even though the supplementary heating system has ac-tually been switched on or off. Move closer to the vehicle and try pressing the corresponding button on the remote control again.
b) If the automatic switch-off for electrical consumers page 365 is activated or if the reserve level in lhe fuel tank page 340 has been reached, the auxiliary coolant heater may be blocked automatically.
Settings for remote control
The supplementary heating system is activated or deactivated by means of the remote control. The Start Time menu can be used to program the oper-ating duration and the heating level (auxiliary air heater) or the operating mode (auxiliary coolant heater).
• Press any button on the roof display to activate the roof display.
• Press and hold down the (ill) button for several seconds.
• Press the function button ...... or ,... as often as necessary until "REMOTE CONT." is displayed.
• Press the (ill) button to confirm.
• Press the function button ...... or ,... until the re-quired temperature or mode is displayed.
• Press the (ill) button to confirm the selected heating level or operating mode. The operating du-ration menu is displayed.
• Press the function button ...... or ,... until the re-quired operating duration is displayed.
• Press button @)to confirm the operating dura-tion. A summary of the settings is displayed.
Replacing the battery for the remote control
Auxiliary air heater: the battery is located on the back of the remote control underneath a cover 266 [ID. Pull off the cover® towards the rear.
Auxiliary coolant heater: the battery is located on the back of the remote control underneath a cover 267 [ID. Use a flat object, e.g. a coin, to turn the slot anti-clockwise in order to open the cover
®-
When changing the batteries, ensure you insert them the right way (poles) and that they are the same type
Range
The receiver is located in the vehicle interior. The remote control key has a range of several hundred metres when the battery is fully charged. The range of the remote control key can be considera-bly reduced by obstacles between the remote con-trol key and the vehicle, bad weather conditions, and a flat battery.
To achieve optimal range, hold the remote control vertically with the aerial 266 or 267 at the top. Do not hold the aer-ial with your fingers or the palm of your hand.
The distance between the remote control and the vehicle must be at least 2 metres.
CD
• The remote control contains electronic com-ponents. Protect the remote control from mois-ture, excessive vibration and direct sunlight.
• Unsuitable batteries can damage the remote control. Only replace discharged batteries with a new battery of the same voltage rating, size and specification.
Discharged batteries must be disposed of in W accordance with regulations governing the protection of the environment.
The battery in the remote control may contain W perchlorate. Please comply with legislation regarding disposal.
m Protect the remote control against inadver-L!.J tent operation in order to prevent the supple-mentary heater from being switched on uninten-
Air conditioning system I 337
Page 338 of 486
Programming the supplementary heating system
r('n First read and observe the introductory L-Wl Information and safety warnings & on page 332.
In vehicles with camping equipment (California), the supplementary heater is programmed via the central control panel =>page 192.
Setting the date
Before being used for the first time and if the vehi-cle battery has been disconnected and reconnec-ted, the date needs to be set.
• Press any button on the roof display to activate the roof display.
• Press button @!) until the date is displayed.
• Press button @!) again. The day flashes.
• Press the function button .... or T until the re-quired day is displayed.
• Press button @!) again to confirm the day. The month flashes.
• Proceed in the same way for the month and the year.
Time
The time is automatically taken from the instrument cluster.
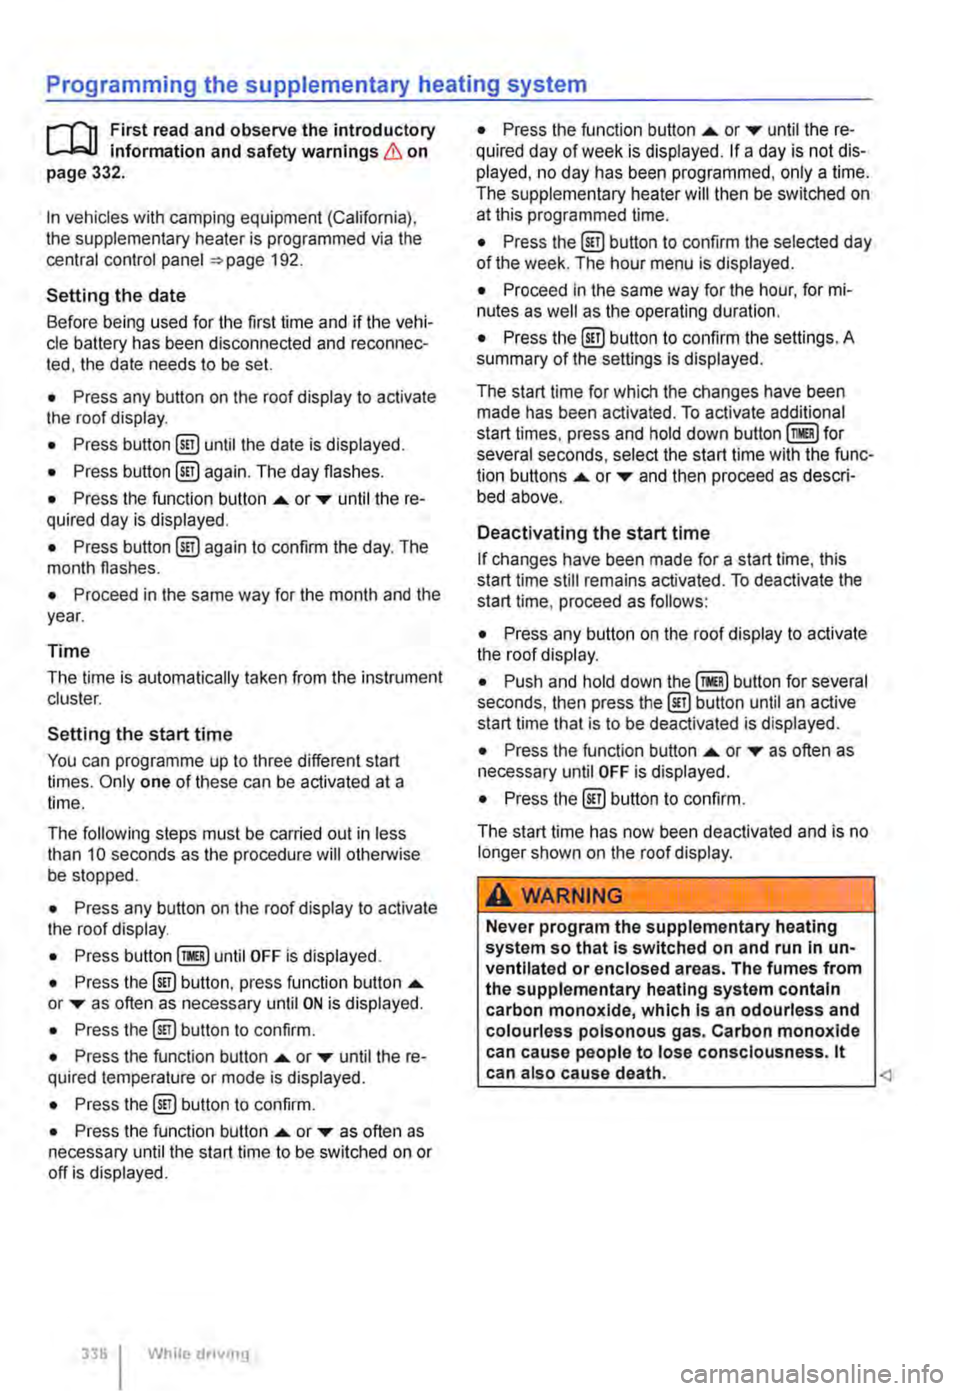
Setting the start time
You can programme up to three different start times. Only one of these can be activated at a time.
The following steps must be carried out in less than 10 seconds as the procedure will otherwise be stopped.
• Press any button on the roof display to activate the roof display.
• Press until OFF is displayed.
• Press the @) button, press function button .... or T as often as necessary until ON is displayed.
• Press the@) button to confirm.
• Press the function button .... or T until the re-quired temperature or mode is displayed.
• Press the @!) button to confirm.
• Press the function button .... or T as often as necessary until the start time to be switched on or off is displayed.
338 I While dnvmg
• Press the function button .... or T until the re-quired day of week is displayed. If a day is not dis-played, no day has been programmed, only a time. The supplementary heater will then be switched on at this programmed time.
• Press the @) button to confirm the selected day of the week. The hour menu is displayed.
• Proceed in the same way for the hour, for mi-nutes as well as the operating duration.
• Press the @) button to confirm the settings. A summary of the settings is displayed.
The start time for which the changes have been made has been activated. To activate additional start times, press and hold down for several seconds, select the start time with the func-tion buttons .... or T and then proceed as descri-bed above.
Deactivating the start time
If changes have been made for a start time, this start time still remains activated. To deactivate the start time, proceed as follows:
• Press any button on the roof display to activate the roof display.
• Push and hold down button for several seconds, then press the@) button until an active start time that is to be deactivated is displayed.
• Press the function button .... or T as often as necessary until OFF is displayed.
• Press the @) button to confirm.
The start time has now been deactivated and is no longer shown on the roof display.
A WARNING
Never program the supplementary heating system so that Is switched on and run In un-ventllated or enclosed areas. The fumes from the supplementary heating system contain carbon monoxide, which Is an odourless and colourless poisonous gas. Carbon monoxide can cause people to lose consciousness. lt can also cause death.
Page 339 of 486
Switching the childproof lock on and off
B7f·0201
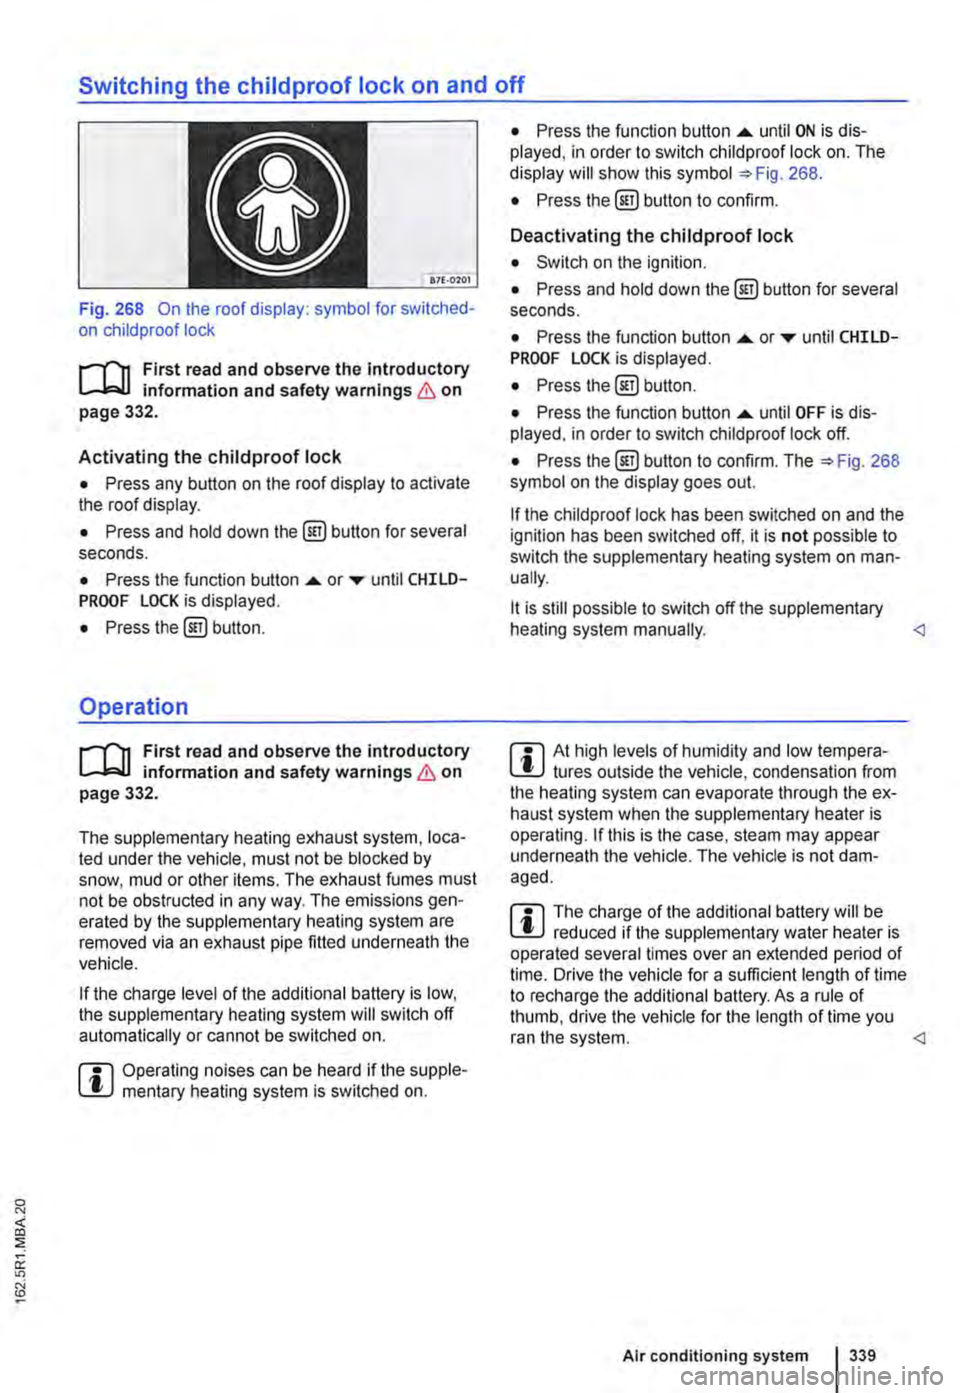
Fig. 268 On the roof display: symbol for switched-on child proof lock
r-T'n First read and observe the introductory L-.bU information and safety warnings & on page 332.
Activating the childproof lock
• Press any button on the roof display to activate the roof display.
• Press and hold down the @) button for several seconds.
• Press the function button .... or ..-until CHILD-PROOF LOCK is displayed.
• Press the@) button.
Operation
r-T'n First read and observe the introductory L-.bU information and safety warnings & on page 332.
The supplementary heating exhaust system, loca-ted under the vehicle, must not be blocked by snow, mud or other items. The exhaust fumes must not be obstructed in any way. The emissions gen-erated by the supplementary heating system are removed via an exhaust pipe fitted underneath the vehicle.
If the charge level of the additional battery is low, the supplementary heating system will switch off automatically or cannot be switched on.
m Operating noises can be heard if the supple-l!J mentary heating system is switched on.
• Press the function button .... until ON is dis-played, in order to switch child proof lock on. The display will show this symbol =>Fig. 268.
• Press the @] button to confirm.
Deactivating the childproof lock
• Switch on the ignition.
• Press and hold down the@] button for several seconds.
• Press the function button....._ or..-until CHILD-PROOF LOCK is displayed.
• Press the@) button.
• Press the function button .... until OFF is dis-played. in order to switch child proof lock off.
• Press the@) button to confirm. The =>Fig. 268 symbol on the display goes out.
If the child proof lock has been switched on and the ignition has been switched off, it is not possible to switch the supplementary heating system on man-ually.
lt is still possible to switch off the supplementary heating system manually.
r::l The charge of the additional battery will be W reduced if the supplementary water heater is operated several times over an extended period of time. Drive the vehicle for a sufficient length of time to recharge the additional battery. As a rule of thumb, drive the vehicle for the length of time you ran the system.
Page 341 of 486
A WARNING (Continued)
CD
-Please ensure that the spare fuel can is· ter corresponds with the Industry stand· ard, for example AN SI or ASTM F852-86.
• Remove split fuel from all vehicle compo· nents as quickly as possible In order to avoid damage to the wheel housing, tyres and vehicle paint.
• • Filling up with petrol in a vehicle fitted with a diesel engine or refilling with diesel in vehicle equipped with a petrol engine can cause seri· ous ands expensive engine damage and dam· age to the fuel system that is not covered by
Indicator lamps and fuel gauge
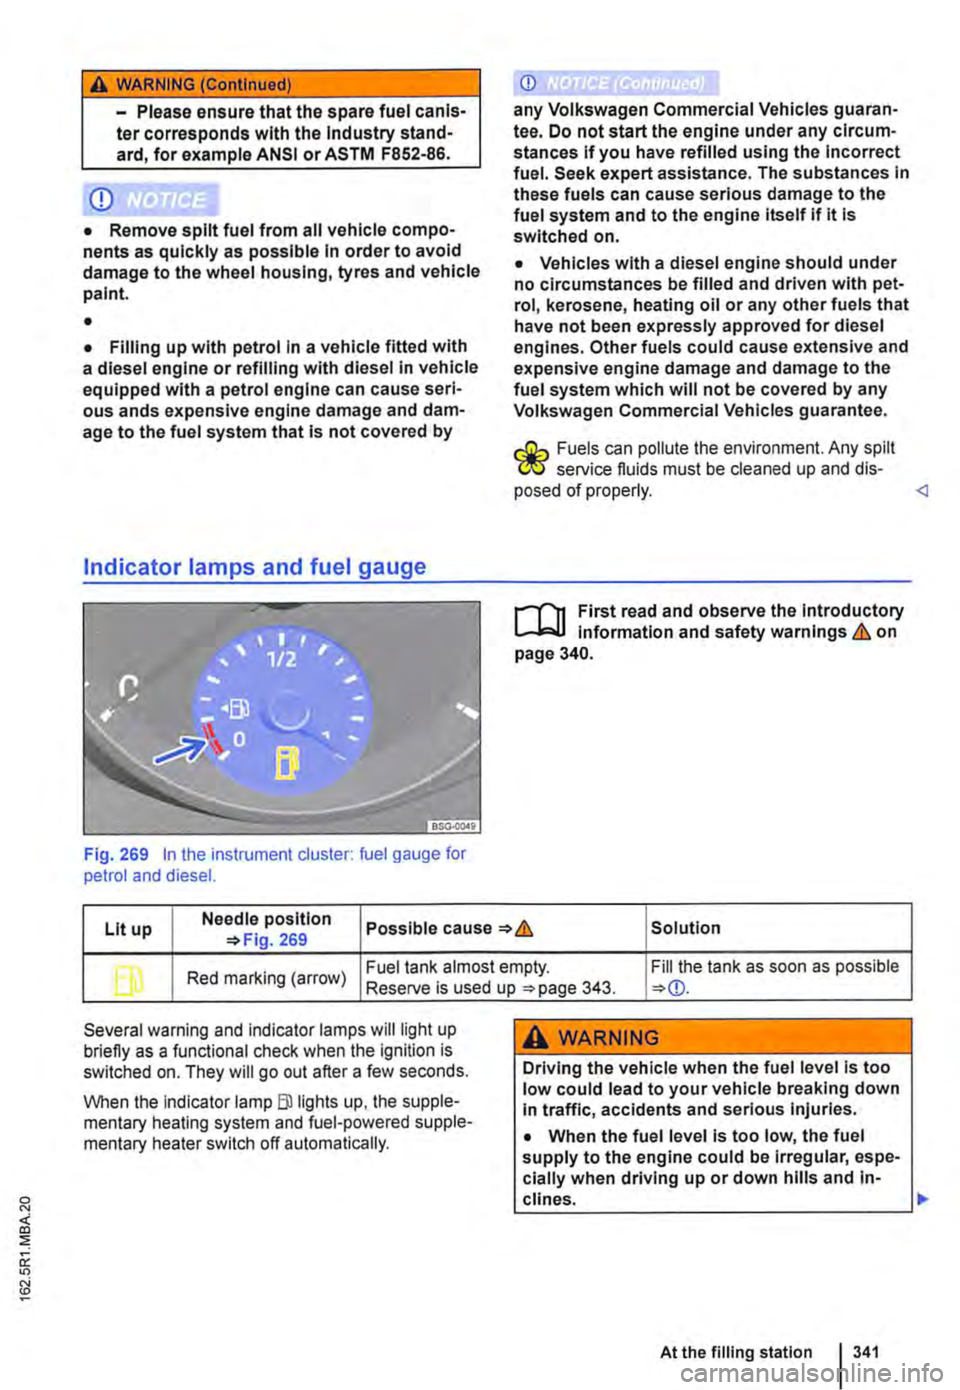
Fig. 269 In the instrument cluster: fuel gauge for petrol and diesel.
CD
any Volkswagen Commercial Vehicles guaran· tee. Do not start the engine under any circum-stances if you have refilled using the Incorrect fuel. Seek expert assistance. The substances In these fuels can cause serious damage to the fuel system and to the engine itself if it Is switched on.
• Vehicles with a diesel engine should under no circumstances be filled and driven with pet· rol, kerosene, heating oil or any other fuels that have not been expressly approved for diesel engines. Other fuels could cause extensive and expensive engine damage and damage to the fuel system which will not be covered by any Volkswagen Commercial Vehicles guarantee.
r.:Gh Fuels can pollute the environment. Any spilt W service fluids must be cleaned up and dis· posed of properly.
Lit up Needle position Possible cause & Solution 269
b Red marking (arrow) Fuel tank almost empty. Fill the tank as soon as possible Reserve is used up 343.
Several warning and indicator lamps will light up briefly as a functional check when the ignition is switched on. They will go out after a few seconds.
When the Indicator lamp Blllghts up, the supple-mentary heating system and fuel-powered supple-mentary heater switch off automatically.
A WARNING
Driving the vehicle when the fuel level is too low could lead to your vehicle breaking down In traffic, accidents and serious injuries.
• When the fuel level is too low, the fuel supply to the engine could be Irregular, espe-cially when driving up or down hills and in-clines. .,..
At the filling station 341
Page 345 of 486
CD
• Fuels that are identified at the fuel pump as containing metallic additives may not be used. LRP fuel (lead replacement petrol) also con-tains high concentrations of metallic additives. Risk of engine damage I
Diesel
r'""'('n First read and observe the Introductory L-J,:.U Information and safety warnings & on page 343.
Diesel
Diesel fuel must comply with the European stand-ard EN 590 (in Germany DIN EN 590).
The service intervals are shorter if you use diesel with a high sulphur content =>Booklet Service schedule =>CD. A Volkswagen Commercial Vehicles dealership will be able to tell you which countries have diesel with a high sulphur content.
Where diesel fuel complying with the EN 590 standard is not available, Volkswagen Commercial Vehicles dealerships and filling stations will have information on which fuels do comply with the EN 590 standard.
Do not mix fuel additives (thinners. or similar addi-tives) with diesel.
Winter diesel
When using summer-grade diesel. difficulties may be experienced at temperatures below o•c (+32.F)
because the fuel thickens due to paraffin separa-tion. For this reason winter-grade diesel which can be used at temperatures below -2o•c (·4°F) is available in countries such as Germany during the cold months.
In countries with different climatic conditions the diesel sold generally has different temperature characteristics. Check with a Volkswagen Com-mercial Vehicles dealer or filling stations in the country concerned regarding the type of diesel fuels available.
it is not unusual for a cold diesel engine to be loud-er in cold temperatures that in warm weather. In addition, exhaust emissions may be tinged with blue while the engine starts and reaches operating temperature. The amount of exhaust fumes de-pends on the outside temperature.
CD
• Just one tankful of leaded fuel, or fuel con-taining other metallic additives, can seriously Impair the efficiency of the catalytic converter and can also cause considerable damage to the catalytic converter and engine.
Diesel vehicles are equipped with a filter pre-heat-er system. This ensures that the fuel system re-mains operational even down to approximately -24•c (-11.F) provided that winter-grade diesel which is safe down to -15•c (+5.F) is used.
However, if the fuel has thickened to such an ex-tent that the engine will not start at temperatures below -24•c (-11.F) simply place the vehicle in a warm garage or workshop for a while.
Supplementary heater
Vehicles fitted with a diesel engine may also be equipped with a fuel-driven supplementary heater. This heater is powered with fuel from the vehicle tank. In this case, odour and water vapour may es-cape from the vehicle, and there may be a greater quantity of smoke. This is quite normal when the system is in use, and does not indicate damage or a fault in the system.
The supplementary heater will be switched off au-tomatically if the level in the fuel tank is low (re-serve level).
A WARNING
Never use a start booster. Start boosters may explode or cause the engine to suddenly run at high revs, which can cause serious Injuries and engine damage.
CD
• Before filling up with diesel, check whether the fuel corresponds to the vehicle's require-ments according to the fuel standard Informa-tion at the pump.
• Only use fuel that complies with the EN 590 standard and has the correct cetane number. Otherwise, the engine and the fuel system can suffer considerable damage. The engine can al-so lose power or fall. ..,.
At the filling station 1345
Page 351 of 486
A WARNING (Continued)
-Remove the vehicle key from the igni-tion lock.
-Always keep children away from the en-gine compartment and never leave the ve-hicle unattended.
• The engine cooling system Is under pres-sure when the engine Is hot. Never open the cap of the coolant expansion tank when the engine Is hot. Coolant may spray out and cause serious burns and other Injuries.
-Turn the cap slowly and very carefully anti-clockwise while exerting gentle down-ward pressure on the cap.
-Always protect the face, hands and arms from hot coolant or steam with a large, thick cloth.
• When refilling, do not spill any service flu-ids on engine components or on the exhaust system. The spilt service fluids can start a fire.
A WARNING
High voltages in the electrical system can cause electric shocks, burns, serious injuries and death!
• Never short circuit the electric system. The vehicle battery could explode.
• Please note the following guidelines to help reduce the risk of an electric shock and serious Injuries while the engine is running or being started:
-Never touch the electrical wiring of the Ignition system.
A WARNING
There are rotating components in the engine compartment that can cause serious injury.
• Never place your hand near these compo-nents or In the radiator fan. Touching the ro-tary blades can result in serious injuries. The fan Is temperature-controlled and can start automatically, even if the engine has been switched off and the vehicle key has been re-moved from the ignition lock.
• If any work has to be performed when the engine Is started or with the engine running, there is an additional, potentially fatal, safety risk from the rotating parts, such as the drive belts, alternator, radiator fan, etc., and from the high-voltage ignition system. Always be particularly careful.
A WARNING (Continued)
-Always ensure that no body parts, jew-ellery, ties, loose items of clothing or long hair can be caught up in rotating engine components. Before starting work, re-move any jewellery and ties, tie up long hair and pull clothes In tightly to avoid them getting caught In the engine com-partment.
-Always depress the accelerator careful-ly and never without due consideration. The vehicle can start to move even if the handbrake is applied.
• Always ensure that you have not left any objects, such as cleaning cloths and tools, in the engine compartment. Any forgotten items can cause malfunctions, engine damage and fires.
A WARNING
Additional insulating materials such as cov-ers in the engine compartment could disrupt the operation of the engine, cause damage and lead to severe Injuries.
• Never cover the engine with any Insulating materials.
A WARNING
Service fluids and some materials In the en-glne compartment are highly flammable and can cause fires and serious Injuries!
• Never smoke while working on the vehl-cl e.
• Never work near naked flames or sparks .
• Never spill fluids onto the engine. They could Ignite on hot engine components and hence cause injuries.
• Please note the following when carrying out any work on the fuel system or the elec-trlcal system:
-Always disconnect the vehicle battery. Ensure that the vehicle Is unlocked when the vehicle battery Is disconnected as oth-erwlse the anti-theft alarm will be activa-ted.
-Never work in the direct proximity of heating systems, water heaters or any oth-er open flames.
• Always have a fully functional and tested fire extinguisher to hand.
In the engine compartment I 351
...
Page 365 of 486
Colour dis-Action play
Light yellow The electrolyte level of the vehicle
or without is too low. The vehicle battery
colour should be checked and replaced by a qualified workshop if necessary.
Black The electrolyte level of the vehicle battery is correct.
A WARNING
Any work on the vehicle battery can cause serious chemical burns, explosions and elec-trlc shocks.
• Always wear eye protection and protective gloves.
A WARNING (Continued)
• Electrolyte is very aggressive. lt can burn the skin and can cause blindness. When working with the battery, ensure that your hands, arms and face in particular are protec-ted from acid spillages.
• Never tilt the vehicle battery. Electrolyte may spill out of the battery vents and cause chemical burns.
• Never open a vehicle battery.
• if acid is spilt in your eye or on your skin, rinse immediately for several minutes with cold water. Then consult a doctor immediate-ly.
• If acid is swallowed, consult a doctor im-mediately.
r-"f'n First read and observe the introductory L-Jo:.l.l information and safety warnings & on page 362.
Charging the battery
The vehicle battery should always be charged by a qualified workshop, as the technology used in fac-tory-fitted batteries requires voltage-limited charg-ing => &. Volkswagen Commercial Vehicles recom-mends using a Volkswagen Commercial Vehicles dealership for this purpose.
If the battery cannot be charged in a qualified workshop, the charging cables of a suitable battery charger must be connected as described in =>page 443, Jump starting for vehicles with a Start/Stop system.
Replacing a vehicle battery
The battery has been developed to suit the condi-tions of its location and has special safety features. If a vehicle battery has to be replaced, discuss the electromagnetic compatibility, size and necessary servicing, output and safety requirements for the new vehicle battery with a Volkswagen Commercial Vehicles dealer before purchase. The vehicle bat-tery should be replaced by a qualified workshop. Volkswagen Commercial Vehicles recommends us-ing a Volkswagen Commercial Vehicles dealership for this purpose.
Only maintenance-free vehicle batteries compliant with the standards TL 825 06 and VVV 7 50 73 should be used. These standards must be dated July 2012 or later.
Vehicles with a Start/Stop system =>page 282 or auxiliary heater =>page 332 are fitted with a special vehicle battery. These vehicle batteries may only be replaced by a vehicle battery with the same specifications.
Disconnecting the vehicle battery
Please note the following if the vehicle battery has to be disconnected from the electrical system in the vehicle:
• Switch off all electrical consumers and the igni-tion.
• Unlock the vehicle before disconnecting the battery in order to avoid triggering the alarm.
• First disconnect the negative cable and then the positive cable => &.
Connecting the vehicle battery
• Switch off all electrical consumers and the igni-tion before reconnecting the vehicle battery.
• First reconnect the positive cable and then the negative cable=>&.
Various indicator lamps may light up after the vehi-cle battery has been connected and the ignition is switched on. They will go out if you drive a short distance at a speed of 15-20 kmlh (10-12 mph). If the indicator lamps remain lit up, the vehicle should be checked by a qualified workshop.
if the vehicle battery was disconnected for long pe-riods, the system may not able to calculate or cor-rectly display the time when the next service is due =>page 19. Comply with the maximum permissible service intervals =>Booklet Service schedule. ""
In the engine compartment 365
Page 366 of 486
Automatic switch-off for electrical consumers
The intelligent vehicle electrical system automati-cally implements a range of measures to prevent the battery from discharging under high loads:
• The idling speed is increased so that the alter-nator provides more electricity.
• The performance of large electrical consumers may be reduced or they may be switched off com-pletely.
• The supply of electricity to the 12-volt sockets and the cigarette lighter is interrupted temporarily while the engine is being started.
The vehicle electrical system cannot always pre-vent the vehicle battery from discharging. For ex-ample, if the ignition is left on for an extended peri-od of time with the engine off, or if the parking light is left on when the vehicle is parked for an exten-ded period.
What can cause the vehicle battery to discharge?
• Long periods at a standstill in which the engine is not running, especially if the ignition is switched on.
• The use of electrical consumers when the en-gine is switched off.
• When the supplementary heater is in operation =>page 332.
A WARNING
Incorrectly attaching the battery and using In-correct vehicle batteries can cause short cir-cuits, fire and serious Injuries.
366 I Cleaning and maintenance
A WARNING (Continued)
• Always use maintenance-free and leak-proof batteries that have the same properties, specifications and dimensions as the factory-fitted vehicle battery.
A WARNING
A highly explosive mixture of gases Is given off when the vehicle battery is being charged.
• Vehicle batteries should only be charged in well-ventilated spaces.
• Never charge a vehicle battery once it has been frozen. Discharged vehicle batteries can even freeze at temperatures of around o•c (+32.FJ.
• The vehicle battery has to be replaced if it has ever been frozen.
• Incorrectly connected cables can cause a short circuit. First connect the positive cable and then the negative cable.
CD
• Never make or break connections between vehicle batteries if the ignition is switched on or the engine is running. Never use a vehicle battery that does not correspond with the vehi-cle's specifications. The vehicle's electrical system or electronic components could be damaged, which could lead to electrical faults, for example In the start/stop system.
• Never connect equipment that provides electricity, such as solar panels or a battery charger, to the 12-volt socket or to the cigarette lighter to charge the vehicle battery. This can damage the vehicle electrical system.
Dispose of the vehicle baltery as required by legislation. Batteries may contain toxic sub-stances such as sulphuric acid and lead.
Electrolyte can pollute the environment. Clean up any service fluid leakages and dis-pose of them property.
Page 383 of 486
Removing wax
Car washes and care products could leave wax deposits on the glass surfaces. Wax residue can only be removed using a special cleaning product or cleaning cloths. Wax deposits on the wind-screen can cause the wiper blades to rub. Volks-wagen Commercial Vehicles recommends that a glass cleaning cloth G 052 522 A1 be used to re-move wax deposits from the windows and exterior mirrors each time the vehicle is washed.
A window cleaning agent specifically for removing wax will stop the blades rubbing if added to the windscreen wash water. Dilute the cleaner as in-structed. Grease-removing cleaners will not re-move wax deposits =-CD.
Special cleaners, glass cleaners and glass clean-ing cloths are available from Volkswagen Commer-cial Vehicles dealerships.
Removing snow
Use a small brush to remove snow from the win-dows and exterior mirrors.
Removing ice
The best method for removing ice is to use a de-icer spray. If you use an ice scraper, do not move it to and fro, but push it in one direction only. Mov-ing the ice scraper backwards can cause dirt to scratch the window.
Cleaning and changing wiper blades
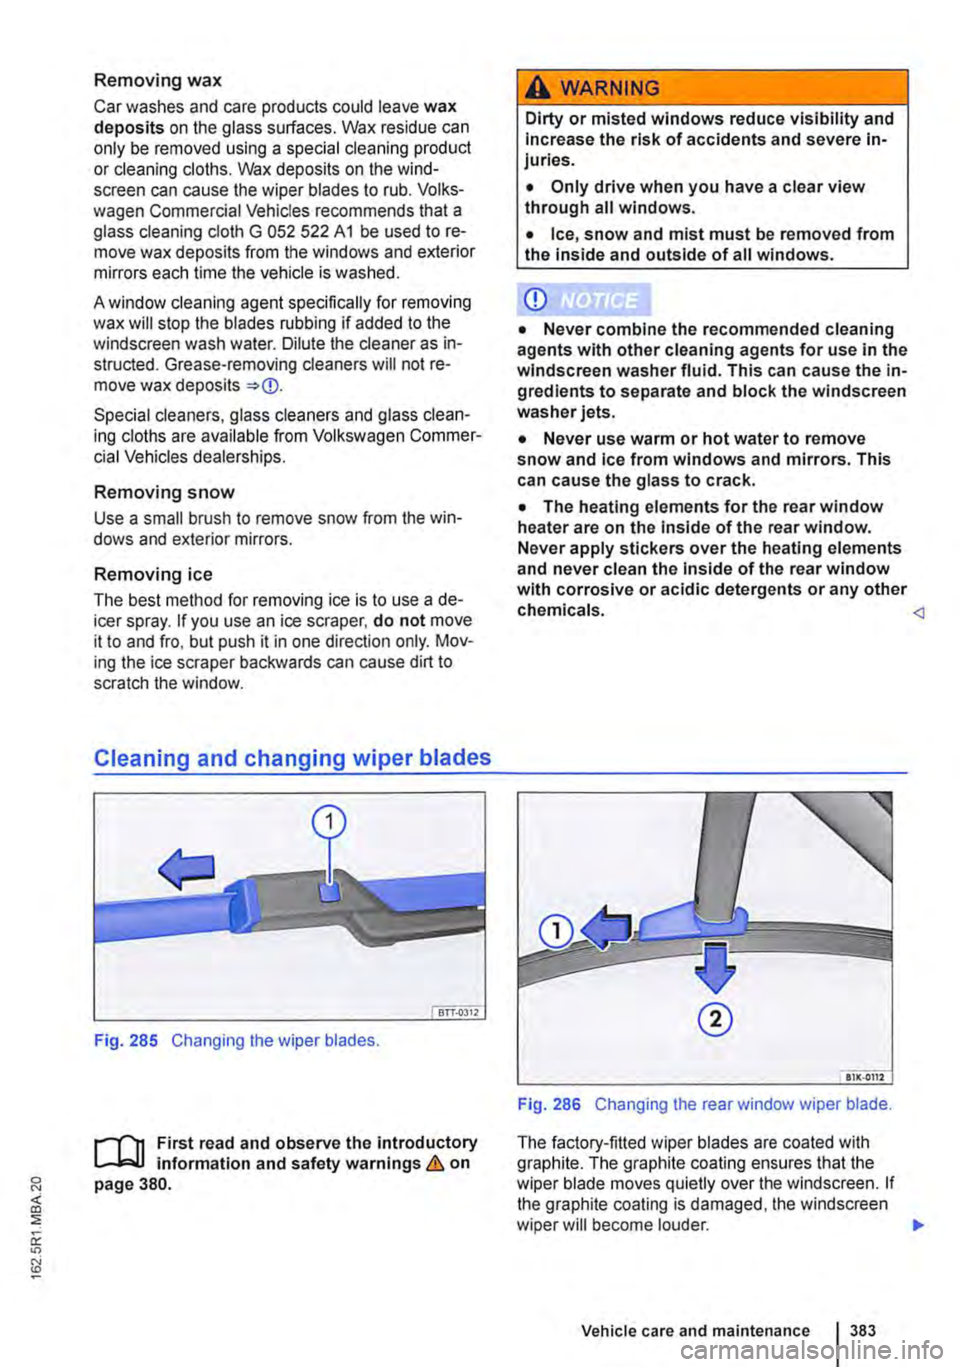
Fig. 285 Changing the wiper blades.
1"'111 First read and observe the introductory l..-J,:.U information and safety warnings & on page 380.
A WARNING
Dirty or misted windows reduce visibility and Increase the risk of accidents and severe in-juries.
• Only drive when you have a clear view through all windows.
• Ice, snow and mist must be removed from the inside and outside of all windows.
CD
• Never combine the recommended cleaning agents with other cleaning agents for use in the windscreen washer fluid. This can cause the in-gredients to separate and block the windscreen washer jets.
• Never use warm or hot water to remove snow and Ice from windows and mirrors. This can cause the glass to crack.
• The heating elements for the rear window heater are on the Inside of the rear window. Never apply stickers over the heating elements and never clean the inside of the rear window with corrosive or acidic detergents or any other chemicals.
The factory-fitted wiper blades are coated with graphite. The graphite coating ensures that the wiper blade moves quietly over the windscreen. If the graphite coating is damaged, the windscreen wiper will become louder. .,..
Vehicle care and maintenance 383