VOLVO C70 CONVERTIBLE 2007 Owner´s Manual
Manufacturer: VOLVO, Model Year: 2007, Model line: C70 CONVERTIBLE, Model: VOLVO C70 CONVERTIBLE 2007Pages: 276, PDF Size: 9.81 MB
Page 181 of 276
2007 Volvo C70
8. Raise the vehicle until the wheel to be changed is lifted off the gro\
und.
9. Unscrew the wheel bolts completely and carefully remove the wheel so \
as not to damage the threads on
the studs.
Installing a wheel
1. Clean the contact surfaces on the wheel and hub.
2. Lift the wheel and place it on the hub.
3. Install the wheel nuts and tighten hand-tight. Using the lug wrench, \
tighten crosswise until all nuts are
snug.
4. Lower the vehicle to the ground and alternately tighten the bolts cro\
sswise to 62 ft. lbs. (85 Nm).
5. Install the wheel cap (where applicable).
170 07 Wheels and tires
Tire sealing system
Tire sealing system
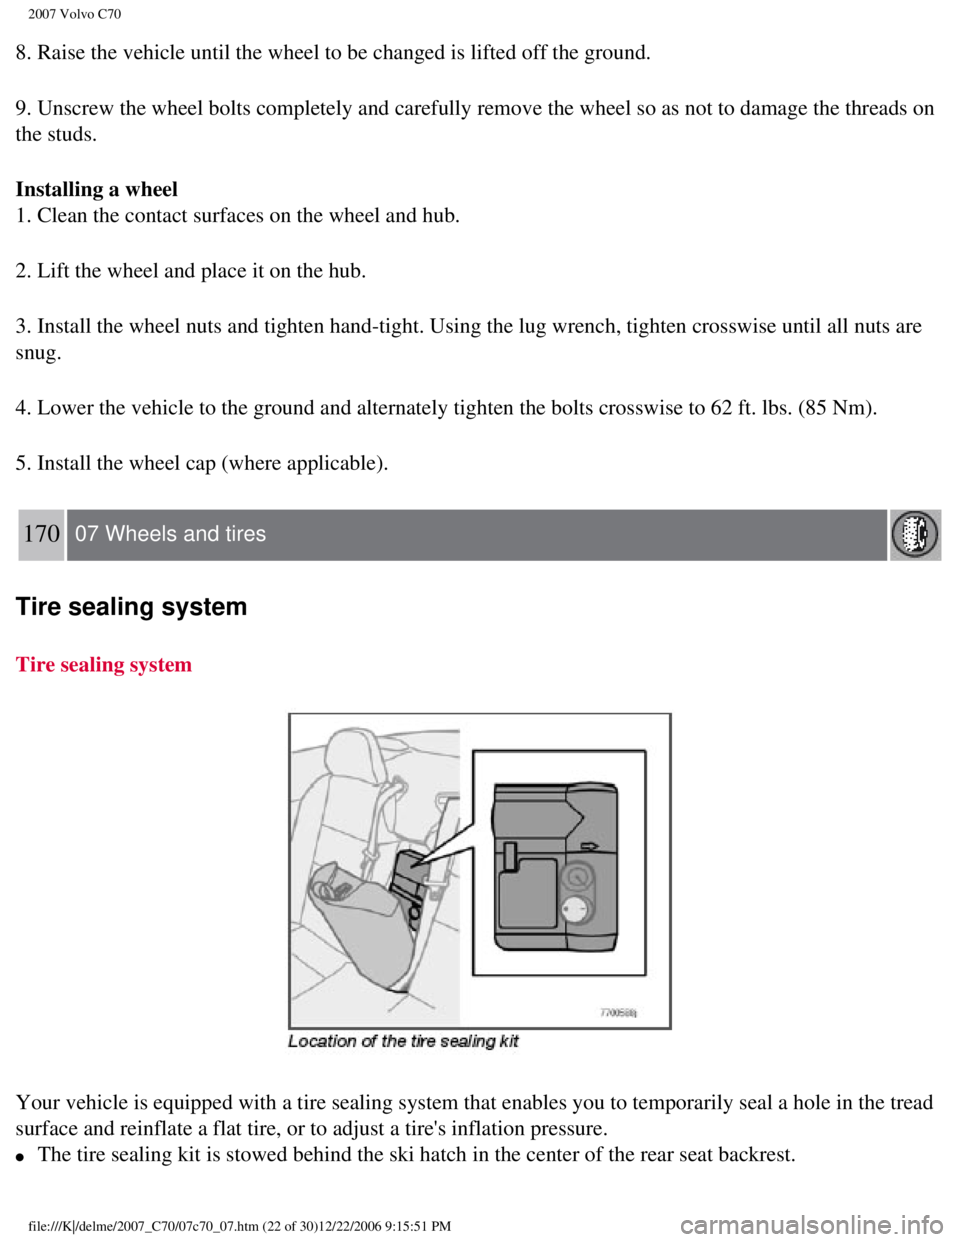
Your vehicle is equipped with a tire sealing system that enables you to \
temporarily seal a hole in the tread
surface and reinflate a flat tire, or to adjust a tire's inflation press\
ure.
l The tire sealing kit is stowed behind the ski hatch in the center of the\
rear seat backrest.
file:///K|/delme/2007_C70/07c70_07.htm (22 of 30)12/22/2006 9:15:51 PM\
Page 182 of 276
2007 Volvo C70
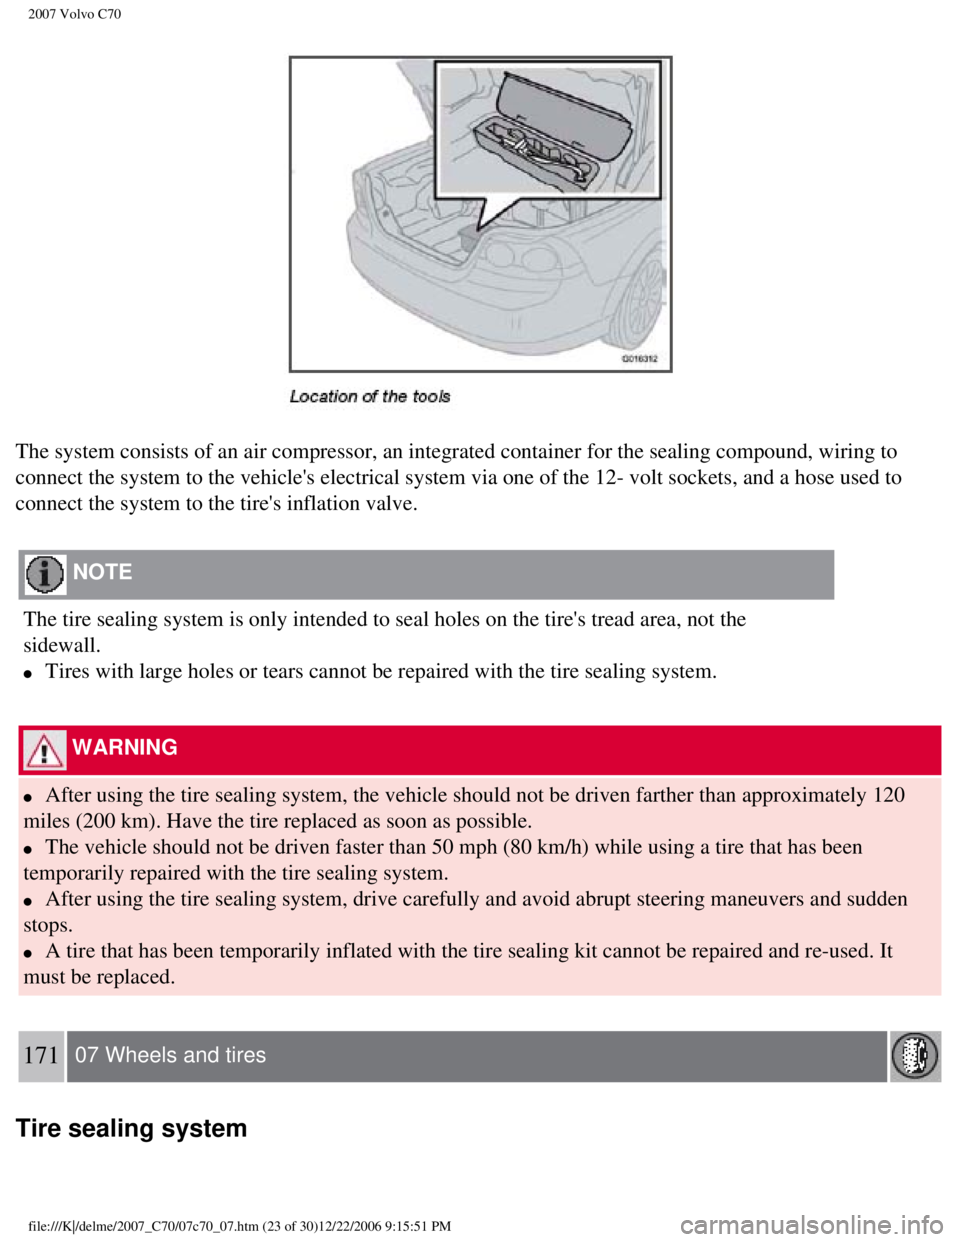
The system consists of an air compressor, an integrated container for th\
e sealing compound, wiring to
connect the system to the vehicle's electrical system via one of the 12-\
volt sockets, and a hose used to
connect the system to the tire's inflation valve.
NOTE
The tire sealing system is only intended to seal holes on the tire's tre\
ad area, not the
sidewall.
l Tires with large holes or tears cannot be repaired with the tire sealing\
system.
WARNING
l After using the tire sealing system, the vehicle should not be driven fa\
rther than approximately 120
miles (200 km). Have the tire replaced as soon as possible.
l The vehicle should not be driven faster than 50 mph (80 km/h) while us\
ing a tire that has been
temporarily repaired with the tire sealing system.
l After using the tire sealing system, drive carefully and avoid abrupt st\
eering maneuvers and sudden
stops.
l A tire that has been temporarily inflated with the tire sealing kit cann\
ot be repaired and re-used. It
must be replaced.
171 07 Wheels and tires
Tire sealing system
file:///K|/delme/2007_C70/07c70_07.htm (23 of 30)12/22/2006 9:15:51 PM\
Page 183 of 276

2007 Volvo C70
Temporarily repairing a flat tire
Before using the tire sealing system, observe the following:
WARNING
l Never leave the tire sealing system unattended when it is operating.
l Keep the tire sealing system kit away from children.
l The vehicle's engine should be running when the tire sealing system is u\
sed to avoid battery drain.
Therefore, be sure the vehicle is parked in a well ventilated place befo\
re using the system.
l Be sure the vehicle is parked safely off the road and away from moving t\
raffic.
l Apply the parking brake.
l Do not remove any foreign objects (nails, etc.) from the tire.
172 07 Wheels and tires
Tire sealing system
Temporarily repairing a flat tire is done in two stages
l In the first stage, the hole is sealed by pumping sealing compound into \
the tire. The car is then driven a
short distance to distribute the sealing compound in the tire.
l In the second stage, the tire's inflation pressure is checked and adjust\
ed if necessary.
Stage 1 - Sealing the hole
Peel off the speed limit sticker (1) and affix it to the steering whee\
l hub where it will be clearly visible to
the driver.
file:///K|/delme/2007_C70/07c70_07.htm (24 of 30)12/22/2006 9:15:51 PM\
Page 184 of 276

2007 Volvo C70
1. Ensure that the orange switch (2) is in position 0 (the 0 side of \
the switch should be pressed down).
2. Pull out the electrical wire (5) and hose (4) from the side compa\
rtment (3).
3. Remove the valve cap from the tire's inflation valve and screw the ho\
se connector onto the valve as
tightly as possible by hand.
4. Connect the electrical wire to the nearest 12-volt socket in the vehi\
cle.
5. Release the safety catch (6) and turn the orange colored section of\
the sealing kit (7), which holds the
sealing compound container, 90 degrees until it clicks into the vertical\
position.
6. Start the vehicle's engine.
7. Start the tire sealing system's compressor by pressing the switch (2\
) to position I.
NOTE
The air pressure gauge (9) will temporarily show an increase in pressu\
re to approximately 88 psi (6 bar)
while the sealing compound is being pumped into the tire. The pressure s\
hould return to a normal level
after approximately one minute.
WARNING
l Contact with the sealing compound may cause skin irritation. If contact \
occurs, wash the affected area
immediately.
l Never stand next to the tire being inflated when the compressor is in op\
eration.
l If cracks, bubbles, etc. form on the tire, switch off the compressor imm\
ediately.
l If there is visible damage to the sidewall or the rim, the tire cannot b\
e repaired. The vehicle should
not be driven if this occurs.
Contact a towing service or Volvo On Call Roadside Assistance if applica\
ble.
8. Within seven minutes, inflate the tire to between 22 - 50 psi (1.8 -\
3.5 bar). Switch off the compressor
briefly to get a clear reading from the pressure gauge (9).
9. Disconnect the electrical wire from the 12-volt socket.
NOTE
file:///K|/delme/2007_C70/07c70_07.htm (25 of 30)12/22/2006 9:15:51 PM\
Page 185 of 276

2007 Volvo C70
If the pressure remains below 22 psi (1.8 bar) after approximately sev\
en minutes, turn off the
compressor. In this case, the hole is too large to be sealed and the veh\
icle should not be driven.
10. Unscrew the hose from the tire's inflation valve and reinstall the v\
alve cap.
11. Fold down the orange section of the tire sealing system to its origi\
nal (horizontal) position and press
the safety catch into place.
12. Safely stow the tire sealing system kit in a convenient place as it \
will soon be used again to check the
tire's inflation pressure.
13. Immediately drive the vehicle for approximately 2 miles (3 km) to \
distribute the sealing compound in
the tire.
173 07 Wheels and tires
Tire sealing system
Stage 2 - Checking inflation pressure
1. Park the car in a safe place.
2. Ensure that the orange switch (2) is in position 0 (the 0 side of \
the switch should be pressed down).
3. Remove the valve cap from the tire's inflation valve and screw the ho\
se connector onto the valve as
tightly as possible by hand.
WARNING
If heavy vibrations, unsteady steering behavior, or noises should occur \
while driving, reduce speed and
park the car in a safe place. Recheck the tire for bumps, cracks, or oth\
er visible damage, and recheck its
inflation pressure. If the pressure is below 16 psi (1.3 bar), do not \
continue driving. Have the vehicle
towed to a workshop or Volvo retailer.
4. Connect the electrical wire to the nearest 12-volt socket in the vehi\
cle.
5. Start the vehicle's engine.
6. Check the tire's inflation pressure on the gauge (9).
file:///K|/delme/2007_C70/07c70_07.htm (26 of 30)12/22/2006 9:15:51 PM\
Page 186 of 276
2007 Volvo C70
NOTE
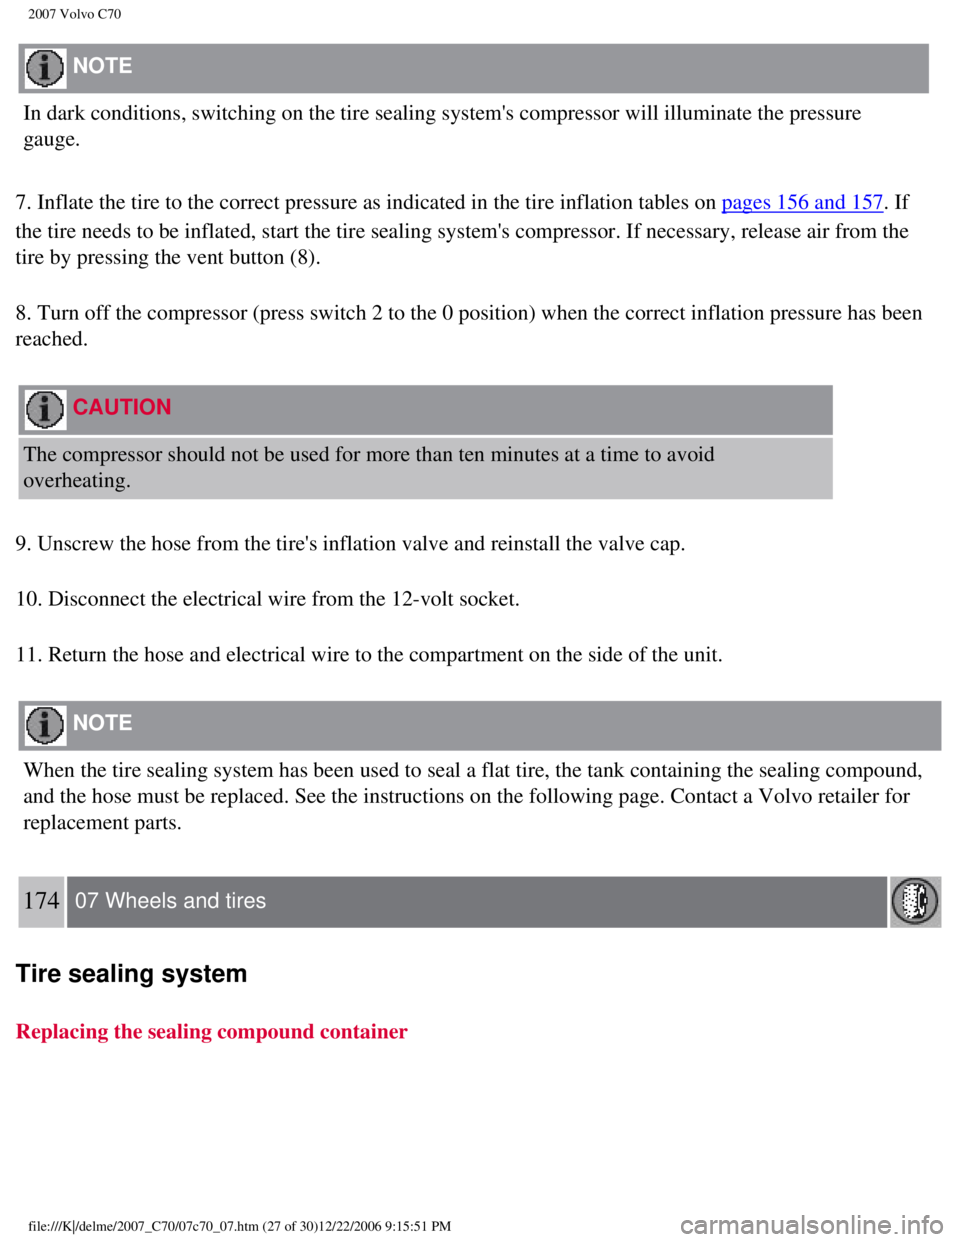
In dark conditions, switching on the tire sealing system's compressor wi\
ll illuminate the pressure
gauge.
7. Inflate the tire to the correct pressure as indicated in the tire inf\
lation tables on
pages 156 and 157. If
the tire needs to be inflated, start the tire sealing system's compresso\
r. If necessary, release air from the
tire by pressing the vent button (8).
8. Turn off the compressor (press switch 2 to the 0 position) when the\
correct inflation pressure has been
reached.
CAUTION
The compressor should not be used for more than ten minutes at a time to\
avoid
overheating.
9. Unscrew the hose from the tire's inflation valve and reinstall the va\
lve cap.
10. Disconnect the electrical wire from the 12-volt socket.
11. Return the hose and electrical wire to the compartment on the side o\
f the unit.
NOTE
When the tire sealing system has been used to seal a flat tire, the tank\
containing the sealing compound,
and the hose must be replaced. See the instructions on the following pag\
e. Contact a Volvo retailer for
replacement parts.
174 07 Wheels and tires
Tire sealing system
Replacing the sealing compound container
file:///K|/delme/2007_C70/07c70_07.htm (27 of 30)12/22/2006 9:15:51 PM\
Page 187 of 276
2007 Volvo C70
After use, return the tire sealing system to its storage compartment beh\
ind the ski hatch in the center of
the rear seat backrest.
WARNING
If you interrupt your trip for more than one hour, check the inflation p\
ressure in the damaged tire again
before continuing. See the section "Stage 2: Checking inflation pressure\
" on
page 154.
Replacing the sealing compound container
The sealing compound container must be replaced if:
l the tire sealing system has been used to repair a tire
l the container's expiration date has passed (see the date on decal 1).
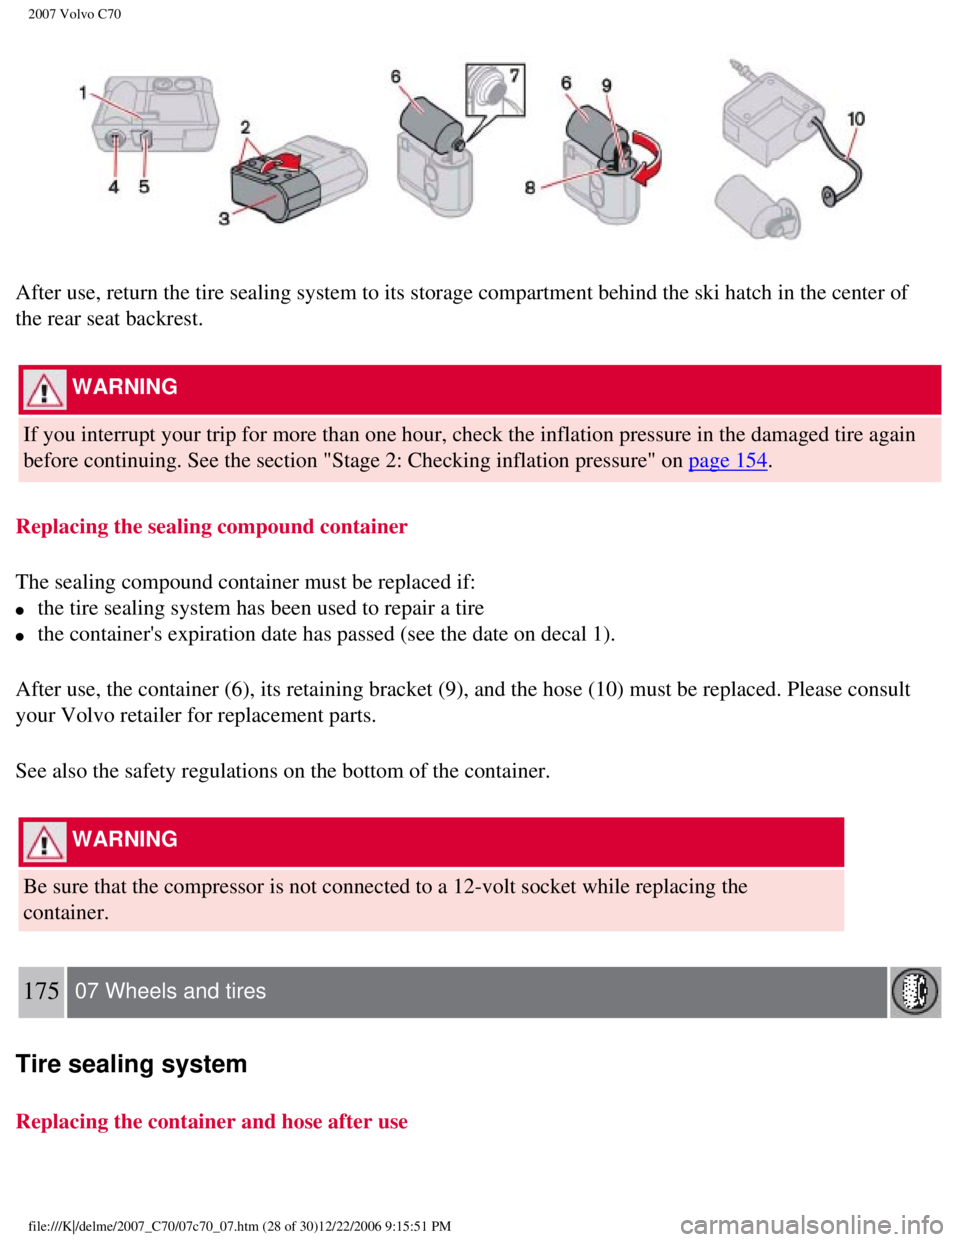
After use, the container (6), its retaining bracket (9), and the hos\
e (10) must be replaced. Please consult
your Volvo retailer for replacement parts.
See also the safety regulations on the bottom of the container.
WARNING
Be sure that the compressor is not connected to a 12-volt socket while r\
eplacing the
container.
175 07 Wheels and tires
Tire sealing system
Replacing the container and hose after use
file:///K|/delme/2007_C70/07c70_07.htm (28 of 30)12/22/2006 9:15:51 PM\
Page 188 of 276

2007 Volvo C70
1. Unscrew the two screws (2) on the orange casing.
2. Remove the speed limit sticker (4) and the expiration date decal (\
1).
3. Release the safety catch (5) and remove the casing (3) from the s\
ealing system unit.
4. Press down the button (8) while twisting the container (6) and re\
taining bracket (9) clockwise
approximately 2/ 3 of a turn and remove them.
5. To remove the hose (10), first press it into housing and then pull \
it out from the opposite side.
6. Wipe away any remaining sealing compound, or scrape it off if it has \
already hardened.
7. Insert a new air hose and check that it is properly seated.
8. Unscrew the cap from the new sealing compound container and check tha\
t the seal (7) is intact and
undamaged.
9. Screw the container (6) firmly into the bracket (9).
10.Mount the bracket on the housing and twist it counterclockwise until \
it clicks into place.
11.Reinsert the casing (3). Check that it is correctly in place and ti\
ghten the screws (2), and press the
safety catch (5) into position.
12.Affix the speed limit decal (4) and a new expiration date decal (1\
).
The empty container and used hose can be discarded as normal refuse, or \
recycled. Consult local
regulations.
Replacing the container after its expiration date has passed
1. Unscrew the two screws (2) on the orange casing.
2. Remove the speed limit sticker (4) and the expiration date decal (\
1).
3. Release the safety catch (5) and remove the casing (3) from the s\
ealing system unit.
4. Unscrew and remove the container.
5. Unscrew the cap from the new sealing compound container and check tha\
t the seal (7) is intact and
file:///K|/delme/2007_C70/07c70_07.htm (29 of 30)12/22/2006 9:15:51 PM\
Page 189 of 276

2007 Volvo C70
undamaged.
6. Screw the container (6) firmly into the bracket (9).
7. Reinsert the casing (3). Check that it is correctly in place and ti\
ghten the screws (2), and press the
safety catch (5) into position.
8. Affix the speed limit decal (4) and a new expiration date decal (1\
).
The empty container can be discarded as normal refuse, or recycled. Cons\
ult local regulations.
Contents | Top of Page
file:///K|/delme/2007_C70/07c70_07.htm (30 of 30)12/22/2006 9:15:51 PM\
Page 190 of 276
2007 Volvo C70
2 0 0 7
VOLVO C70
176 08 Car care
Washing and cleaning the vehicle
178
Paint touch up
182
177 08 Car care
178 08 Car care
Washing and cleaning the vehicle
Washing
The following points should be kept in mind when washing and cleaning th\
e car:
l The car should be washed at regular intervals since dirt, dust, insects \
and tar spots adhere to the paint
and may cause damage. To help prevent corrosion, it is particularly impo\
rtant to wash the car frequently
in the wintertime when salt has been used on the roads.
l Avoid washing your car in direct sunlight. Doing so may cause detergents\
and wax to dry out and
become abrasive. To avoid scratching, use lukewarm water to soften the d\
irt before you wash with a soft
sponge, and plenty of sudsy water.
l Bird droppings: Remove from paintwork as soon as possible. Otherwise the finish may be
file:///K|/delme/2007_C70/07c70_08.htm (1 of 7)12/22/2006 9:15:52 PM