key VOLVO S40 2006 Owner's Guide
[x] Cancel search | Manufacturer: VOLVO, Model Year: 2006, Model line: S40, Model: VOLVO S40 2006Pages: 127, PDF Size: 2.26 MB
Page 102 of 127
2 0 0 6
VOLVO S40
Chapter 11 - Audio
pg. 163 Audio
Audio functions164
Radio functions166
CD player/CD changer (option)170
Compact disc care172
Audio menu settings and selections173
pg. 164 Audio functions
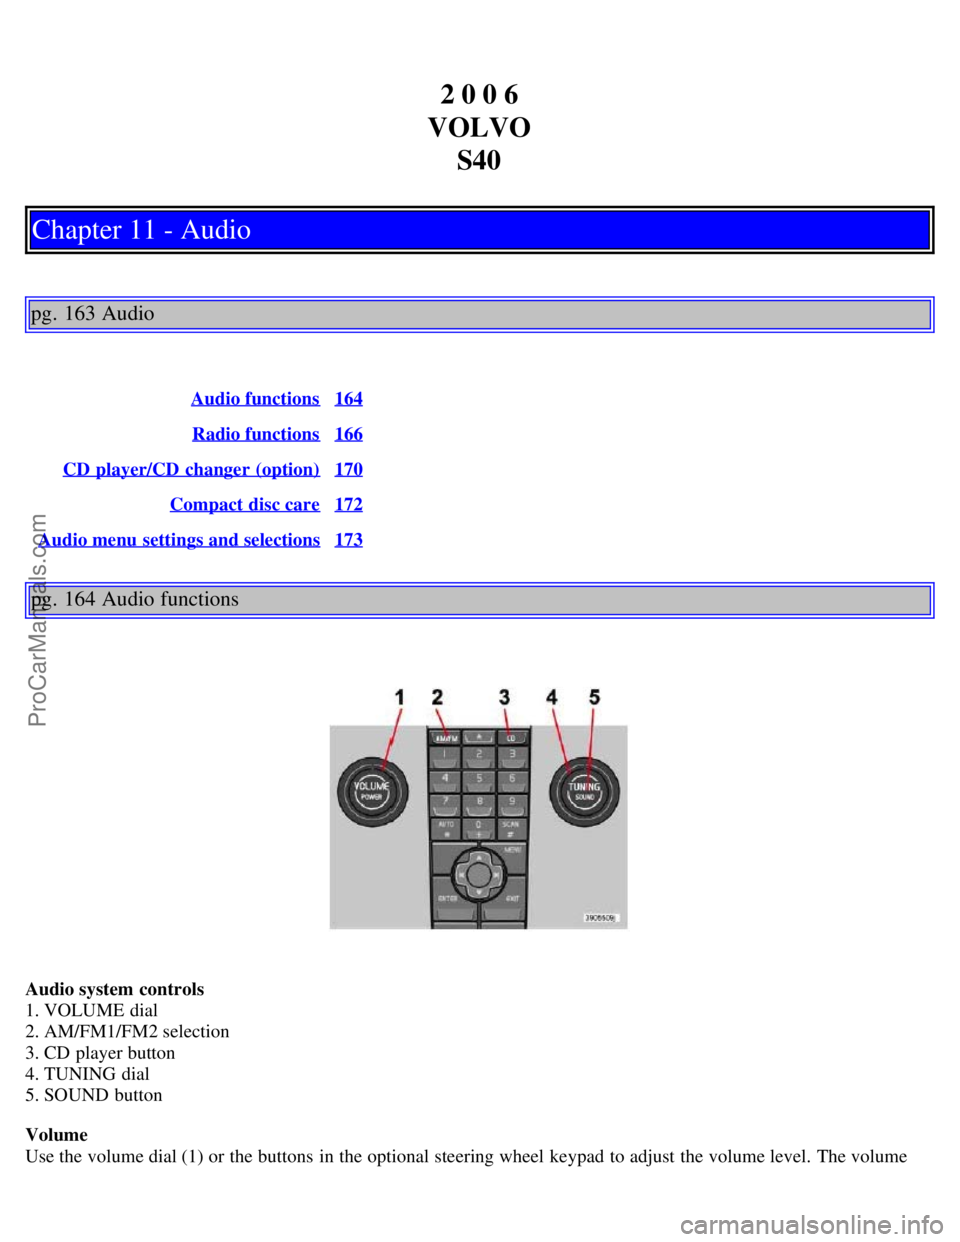
Audio system controls
1. VOLUME dial
2. AM/FM1/FM2 selection
3. CD player button
4. TUNING dial
5. SOUND button
Volume
Use the volume dial (1) or the buttons in the optional steering wheel keypad to adjust the volume level. The volume
ProCarManuals.com
Page 103 of 127
level is also adjusted automatically according to the vehicle's speed, see page 165 for more information on this
function.
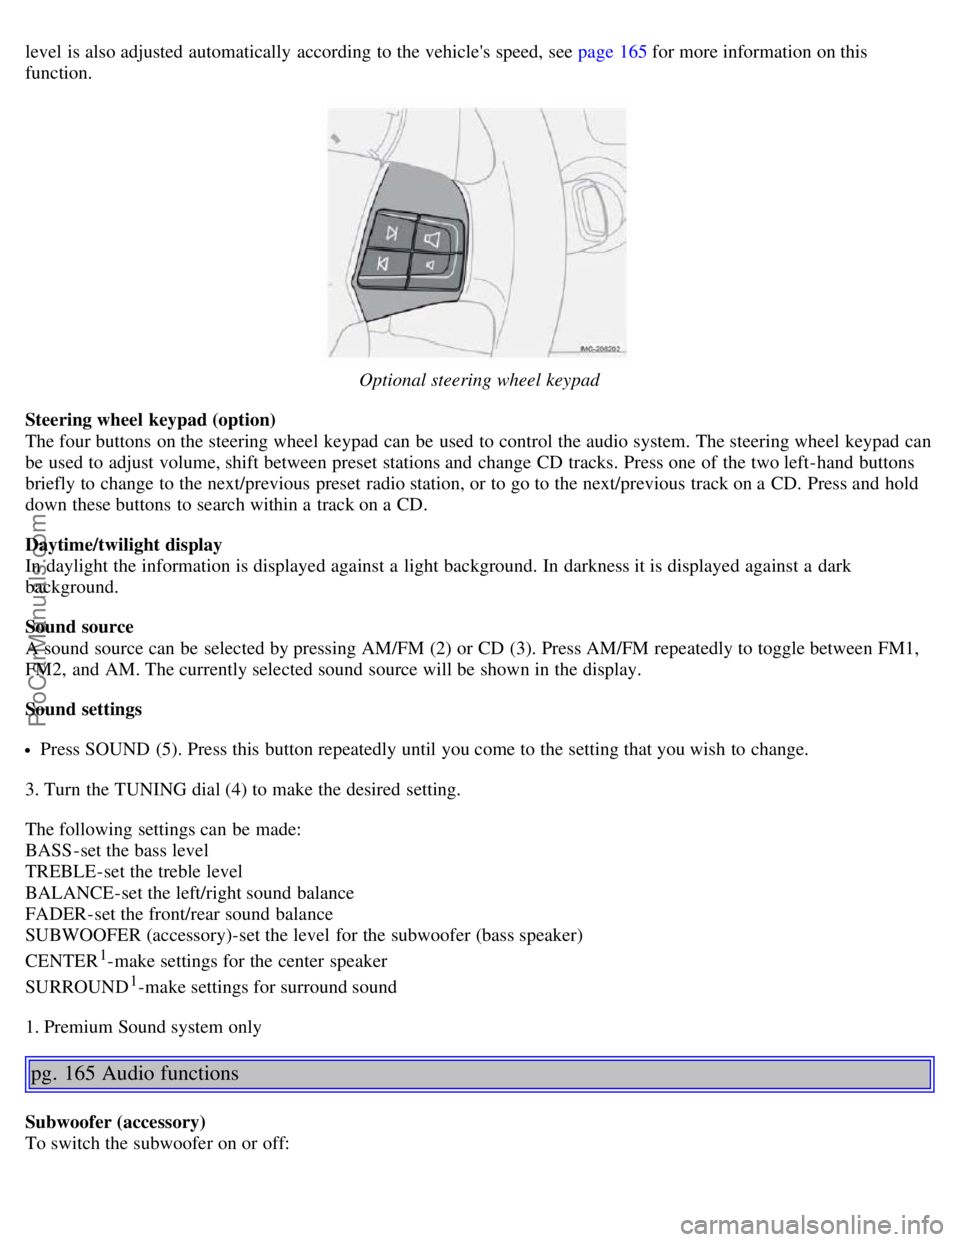
Optional steering wheel keypad
Steering wheel keypad (option)
The four buttons on the steering wheel keypad can be used to control the audio system. The steering wheel keypad can
be used to adjust volume, shift between preset stations and change CD tracks. Press one of the two left-hand buttons
briefly to change to the next/previous preset radio station, or to go to the next/previous track on a CD. Press and hold
down these buttons to search within a track on a CD.
Daytime/twilight display
In daylight the information is displayed against a light background. In darkness it is displayed against a dark
background.
Sound source
A sound source can be selected by pressing AM/FM (2) or CD (3). Press AM/FM repeatedly to toggle between FM1,
FM2, and AM. The currently selected sound source will be shown in the display.
Sound settings
Press SOUND (5). Press this button repeatedly until you come to the setting that you wish to change.
3. Turn the TUNING dial (4) to make the desired setting.
The following settings can be made:
BASS -set the bass level
TREBLE-set the treble level
BALANCE-set the left/right sound balance
FADER-set the front/rear sound balance
SUBWOOFER (accessory)-set the level for the subwoofer (bass speaker)
CENTER
1-make settings for the center speaker
SURROUND
1-make settings for surround sound
1. Premium Sound system only
pg. 165 Audio functions
Subwoofer (accessory)
To switch the subwoofer on or off:
ProCarManuals.com
Page 105 of 127
* Default setting.
To set the level of speed compensation:
Press MENU followed by ENTER.
Select AUDIO SETTINGS in the menu and press ENTER.
Select ASC in the menu and press ENTER.
Select Low, Medium, or High and press ENTER.
pg. 166 Radio functions
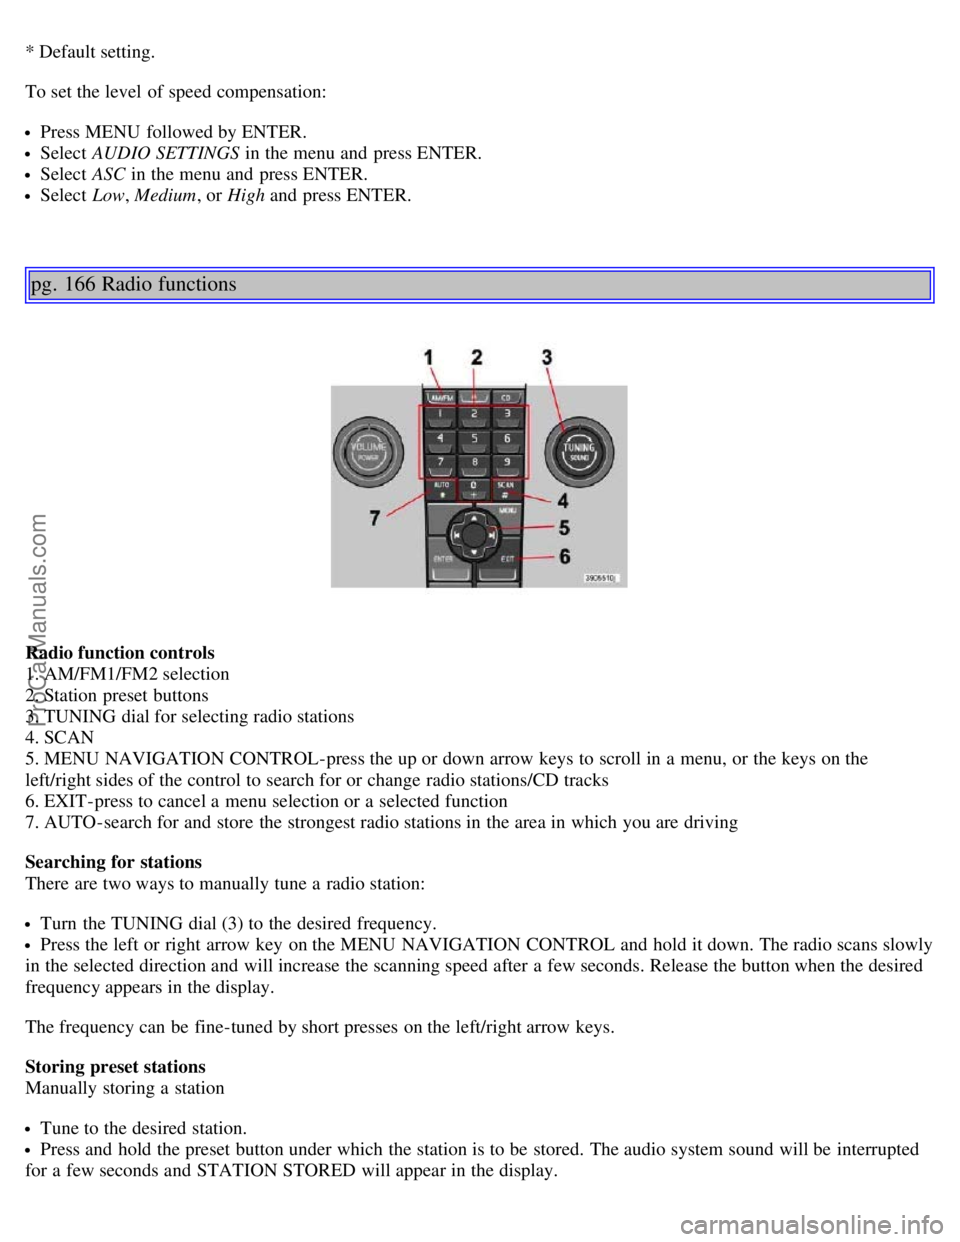
Radio function controls
1. AM/FM1/FM2 selection
2. Station preset buttons
3. TUNING dial for selecting radio stations
4. SCAN
5. MENU NAVIGATION CONTROL-press the up or down arrow keys to scroll in a menu, or the keys on the
left/right sides of the control to search for or change radio stations/CD tracks
6. EXIT-press to cancel a menu selection or a selected function
7. AUTO-search for and store the strongest radio stations in the area in which you are driving
Searching for stations
There are two ways to manually tune a radio station:
Turn the TUNING dial (3) to the desired frequency.
Press the left or right arrow key on the MENU NAVIGATION CONTROL and hold it down. The radio scans slowly
in the selected direction and will increase the scanning speed after a few seconds. Release the button when the desired
frequency appears in the display.
The frequency can be fine-tuned by short presses on the left/right arrow keys.
Storing preset stations
Manually storing a station
Tune to the desired station.
Press and hold the preset button under which the station is to be stored. The audio system sound will be interrupted
for a few seconds and STATION STORED will appear in the display.
ProCarManuals.com
Page 109 of 127
Resetting RBDS functions
This function restores all radio settings to the original factory settings.
Select FM1 or FM2 and press the MENU button.
Press ENTER.
Select ADVANCED RADIO SETTINGS in the menu and press ENTER.
Select RESET ALL in the menu and press ENTER.
Press ENTER again to confirm your selection.
pg. 170 CD player/CD changer (option)
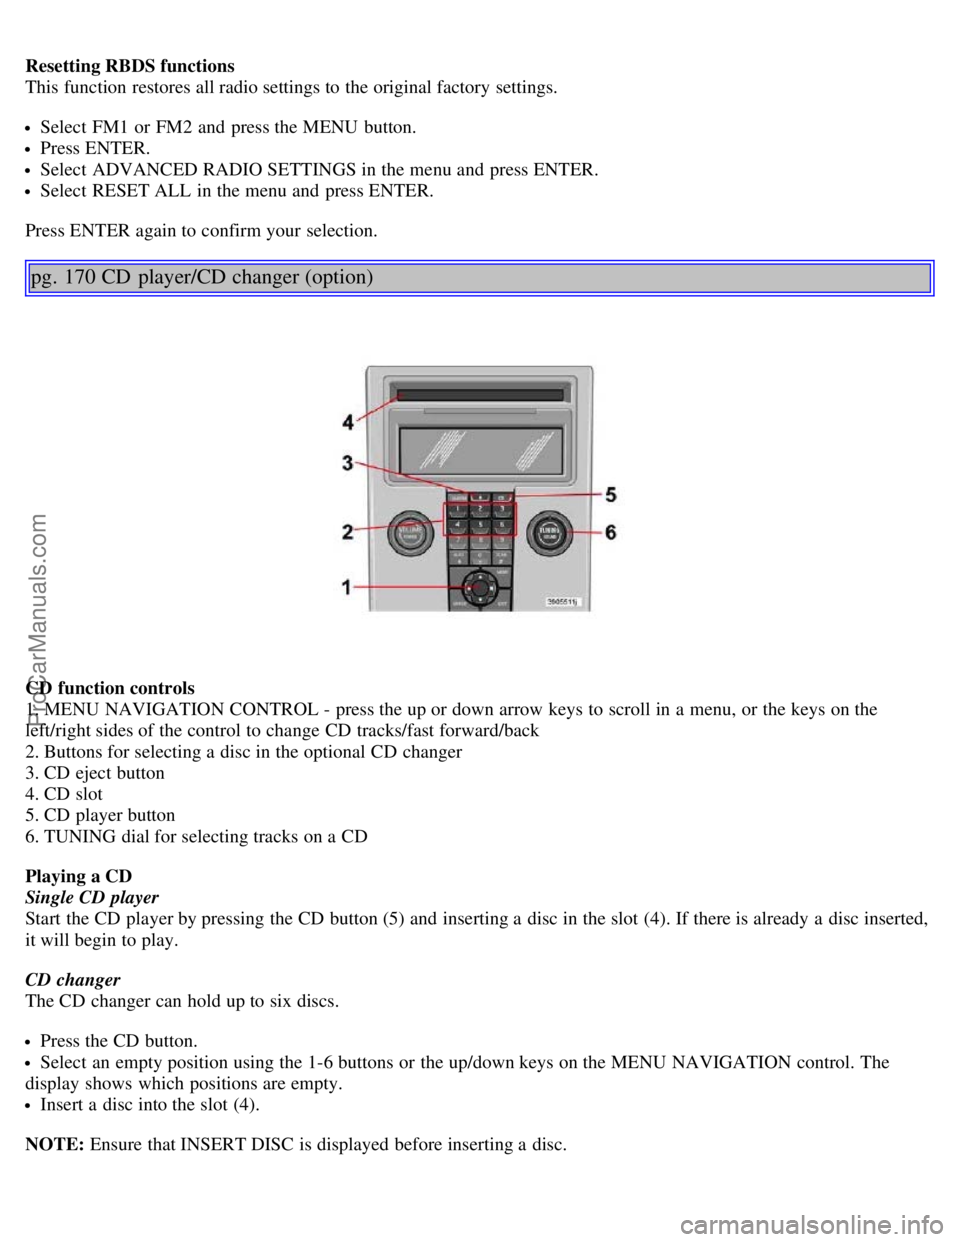
CD function controls
1. MENU NAVIGATION CONTROL - press the up or down arrow keys to scroll in a menu, or the keys on the
left/right sides of the control to change CD tracks/fast forward/back
2. Buttons for selecting a disc in the optional CD changer
3. CD eject button
4. CD slot
5. CD player button
6. TUNING dial for selecting tracks on a CD
Playing a CD
Single CD player
Start the CD player by pressing the CD button (5) and inserting a disc in the slot (4). If there is already a disc inserted,
it will begin to play.
CD changer
The CD changer can hold up to six discs.
Press the CD button.
Select an empty position using the 1-6 buttons or the up/down keys on the MENU NAVIGATION control. The
display shows which positions are empty.
Insert a disc into the slot (4).
NOTE: Ensure that INSERT DISC is displayed before inserting a disc.
ProCarManuals.com
Page 110 of 127
Changing tracks
Press the left or right arrow keys on the MENU NAVIGATION control to skip to the previous or next track.
NOTE: The TUNING dial (6) (turn clockwise to go to the next track, or counterclockwise to go to the previous track)
or the optional steering wheel keypad can also be used for this purpose.
Fast forward/back
Press and hold down the left or right arrows keys in the MENU NAVIGATION control (or the corresponding keys on
the optional steering wheel keypad) to search within a track or the whole disc. The search continues for as long as the
buttons are held down.
Random play
This function plays the tracks on a CD (or on all of the CDs if the vehicle is equipped with the optional CD changer)
in random order (shuffle).
Select CD (5) and press the MENU button.
Press ENTER.
Select RANDOM from the menu and press ENTER.
CD changer only: Select SINGLE DISC or ALL DISCS for the CD changer to randomly choose from one or all
discs.
RND (or RND ALL for the CD changer) is shown in the display for as long as the function is activated. Press the right
arrow key on the MENU NAVIGATION control (1) to select the next random track.
NOTE: CD changer only - you can only select the next random track on the current disc.
pg. 171 CD player/CD changer (option)
Press the EXIT button to stop random play.
Disc text (CD changer only)
Certain CDs contain information about the disc, such as the titles of the tracks, etc. This information can be shown in
the display by activating the DISCTEXT function.
Press MENU. Select the menu for relevant sound source and press ENTER.
Select DISCTEXT in the menu and press ENTER.
If information is stored on the disc, it will now appear in the display. To deactivate this function, select DISCTEXT
in the menu and press ENTER.
Scan
This function plays the first 10 seconds of each track on the CD.
Press SCAN.
Press EXIT to stop the scan function and listen to an entire track.
CD eject
Single CD player
Press the eject button (3) to eject the disc.
CD changer
This function makes it possible to eject a single disc, or to eject all of the discs in the changer.
Press the eject button (3) briefly to eject the disc that is currently playing.
A longer press (more than two seconds) starts the process of ejecting all of the discs in the changer.
ProCarManuals.com
Page 124 of 127
Information display, messages in39
Information symbol34, 35
Inspection readiness144
Instrument overview7
Instrument panel34
Instrument panel lighting41
Interior lighting75
ISOFIX/LATCH anchors28
J
Jack, positioning correctly133
Jump starting114
K
Key blade84
Keylock2, 99
Kickdown104
L
Label information176
LATCH anchors28
License plate lighting, replacing157
Lighting panel41
Loading the vehicle127
Long distance trips94
Low beam bulb, replacing153
Low beam headlights42
M
Maintenance142
Malfunction indicator light36
Manual front seat adjustment72
Manual shifting (Geartronic)103
Manual transmission101
Mirror, rearview52
Mirrors, door-mounted53
Moonroof54
O
OBD II144
Occupant safety10
Occupant Weight Sensor (OWS), disabling front passenger's side airbag18
Octane rating95
Oil pressure warning light37
Oil, changing146
On Call Roadside Assistance183
Onboard Diagnostic System (OBD II)144
Opening the hood145
Opening the trunk from the inside87
ProCarManuals.com