ECO mode VOLVO S60 2007 User Guide
[x] Cancel search | Manufacturer: VOLVO, Model Year: 2007, Model line: S60, Model: VOLVO S60 2007Pages: 200, PDF Size: 4.03 MB
Page 105 of 200
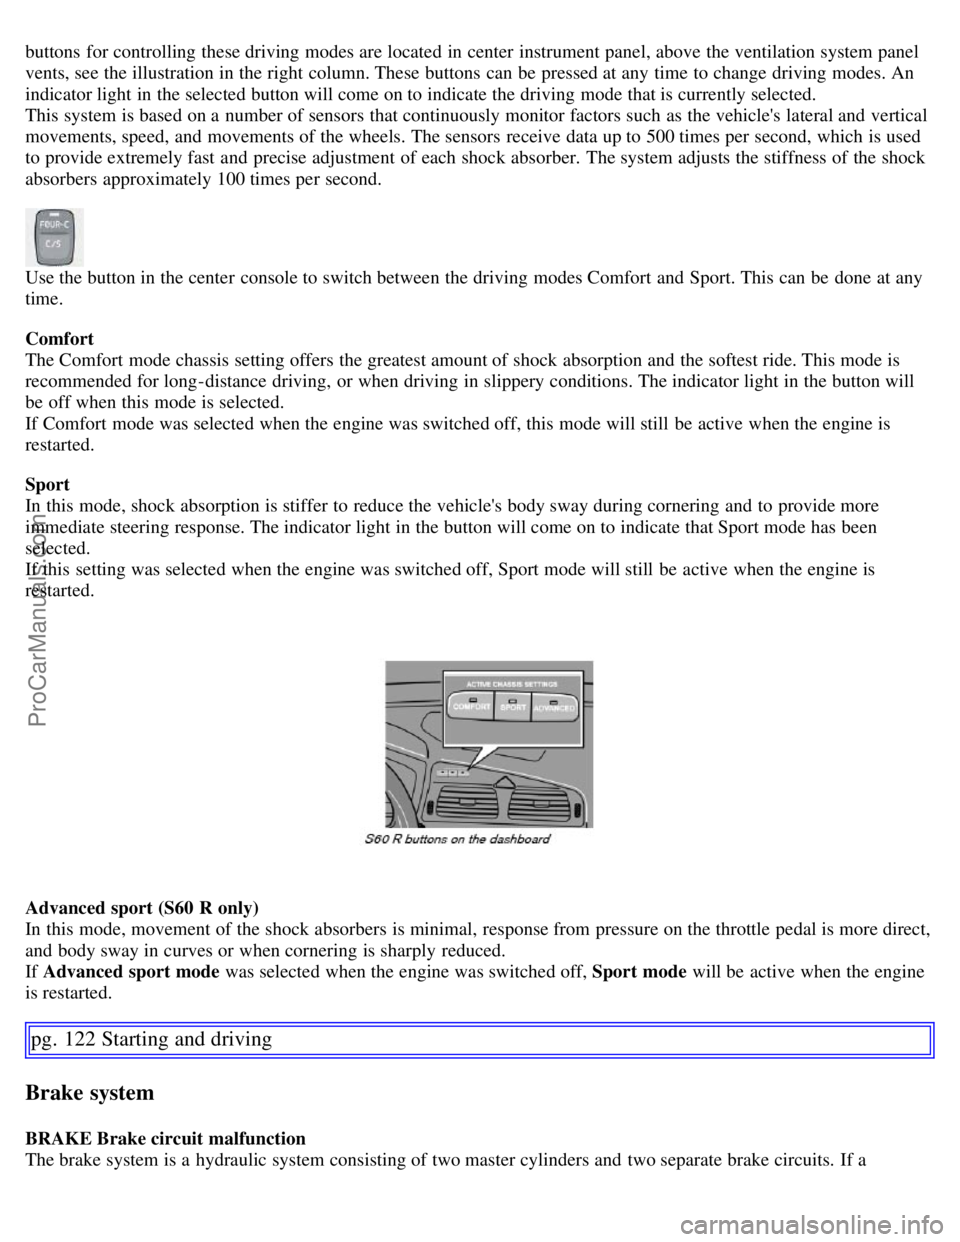
buttons for controlling these driving modes are located in center instrument panel, above the ventilation system panel
vents, see the illustration in the right column. These buttons can be pressed at any time to change driving modes. An
indicator light in the selected button will come on to indicate the driving mode that is currently selected.
This system is based on a number of sensors that continuously monitor factors such as the vehicle's lateral and vertical
movements, speed, and movements of the wheels. The sensors receive data up to 500 times per second, which is used
to provide extremely fast and precise adjustment of each shock absorber. The system adjusts the stiffness of the shock
absorbers approximately 100 times per second.
Use the button in the center console to switch between the driving modes Comfort and Sport. This can be done at any
time.
Comfort
The Comfort mode chassis setting offers the greatest amount of shock absorption and the softest ride. This mode is
recommended for long-distance driving, or when driving in slippery conditions. The indicator light in the button will
be off when this mode is selected.
If Comfort mode was selected when the engine was switched off, this mode will still be active when the engine is
restarted.
Sport
In this mode, shock absorption is stiffer to reduce the vehicle's body sway during cornering and to provide more
immediate steering response. The indicator light in the button will come on to indicate that Sport mode has been
selected.
If this setting was selected when the engine was switched off, Sport mode will still be active when the engine is
restarted.
Advanced sport (S60 R only)
In this mode, movement of the shock absorbers is minimal, response from pressure on the throttle pedal is more direct,
and body sway in curves or when cornering is sharply reduced.
If Advanced sport mode was selected when the engine was switched off, Sport mode will be active when the engine
is restarted.
pg. 122 Starting and driving
Brake system
BRAKE Brake circuit malfunction
The brake system is a hydraulic system consisting of two master cylinders and two separate brake circuits. If a
ProCarManuals.com
Page 108 of 200
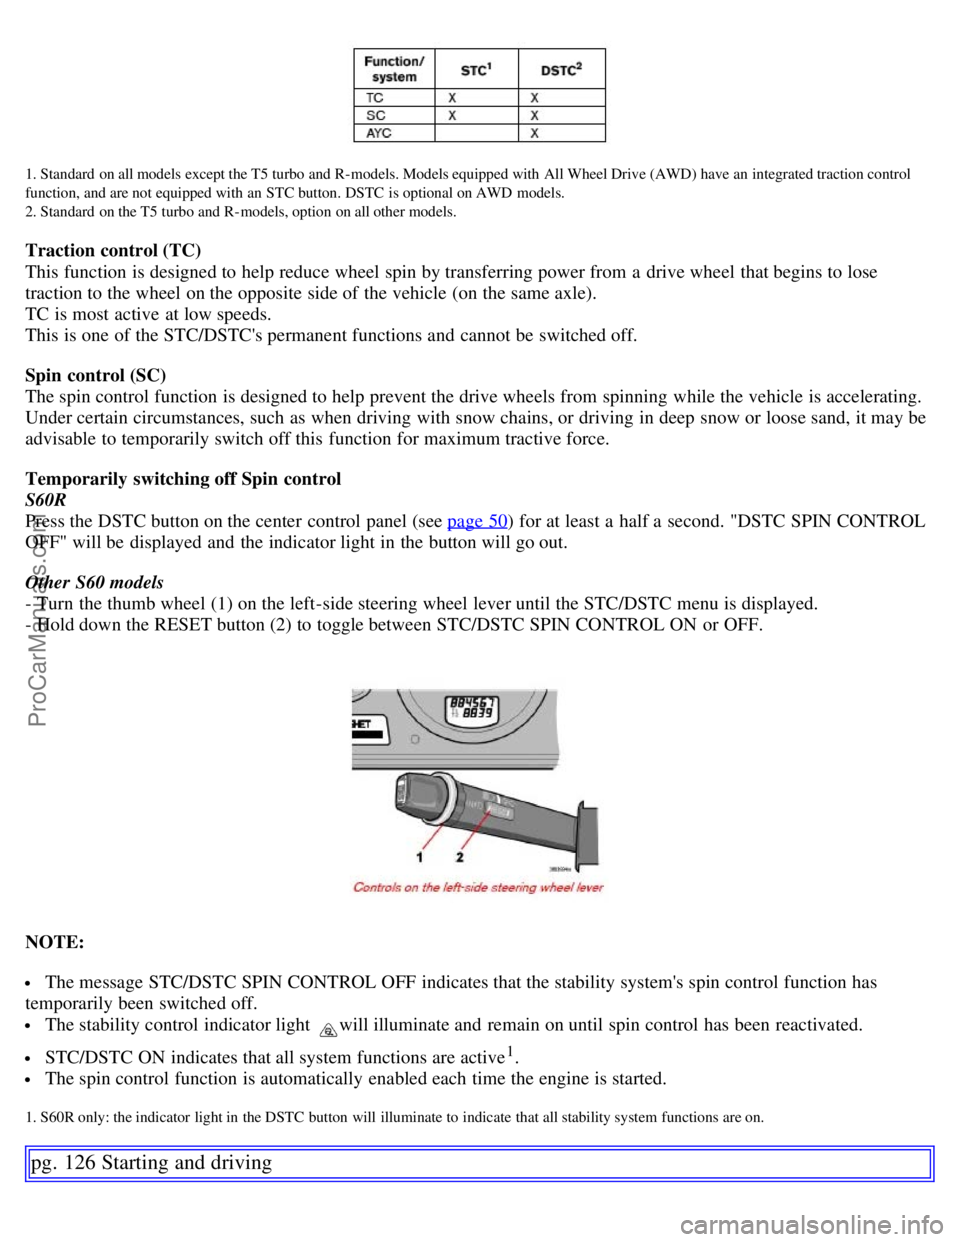
1. Standard on all models except the T5 turbo and R- models. Models equipped with All Wheel Drive (AWD) have an integrated traction control
function, and are not equipped with an STC button. DSTC is optional on AWD models.
2. Standard on the T5 turbo and R- models, option on all other models.
Traction control (TC)
This function is designed to help reduce wheel spin by transferring power from a drive wheel that begins to lose
traction to the wheel on the opposite side of the vehicle (on the same axle).
TC is most active at low speeds.
This is one of the STC/DSTC's permanent functions and cannot be switched off.
Spin control (SC)
The spin control function is designed to help prevent the drive wheels from spinning while the vehicle is accelerating.
Under certain circumstances, such as when driving with snow chains, or driving in deep snow or loose sand, it may be
advisable to temporarily switch off this function for maximum tractive force.
Temporarily switching off Spin control
S60R
Press the DSTC button on the center control panel (see page 50
) for at least a half a second. "DSTC SPIN CONTROL
OFF" will be displayed and the indicator light in the button will go out.
Other S60 models
- Turn the thumb wheel (1) on the left-side steering wheel lever until the STC/DSTC menu is displayed.
- Hold down the RESET button (2) to toggle between STC/DSTC SPIN CONTROL ON or OFF.
NOTE:
The message STC/DSTC SPIN CONTROL OFF indicates that the stability system's spin control function has
temporarily been switched off.
The stability control indicator light will illuminate and remain on until spin control has been reactivated.
STC/DSTC ON indicates that all system functions are active1.
The spin control function is automatically enabled each time the engine is started.
1. S60R only: the indicator light in the DSTC button will illuminate to indicate that all stability system functions are on.
pg. 126 Starting and driving
ProCarManuals.com
Page 109 of 200
Stability system
Active Yaw Control (AYC) - DSTC only
This function helps maintain directional stability, for example when cornering, by braking one or more of the wheels if
the vehicle shows a tendency to skid or slide laterally.
R-models only
The AYC function can be deactivated. This is done by pressing the DSTC button on the center control panel (see the
illustration on page 50) for approximately one second. This procedure must be repeated 5 times, after which "DSTC
REDUCED FUNCTION" will be displayed in the text window. AYC will be automatically reactivated the next time
the ignition is switched on.
The indicator light in the DSTC button will be off.
WARNING!
The car's handling and stability characteristics will be altered if the STC or DSTC system functions have been
disabled.
STC/DSTC-related messages in the text window
"TRACTION CONTROL TEMPORARILY OFF" - The system has been temporarily switched off due to high brake
temperature and will automatically switch on again when the brakes have cooled.
"ANTI SKID SERVICE REQUIRED" - the system has been automatically disengaged due to a fault. An authorized
Volvo retailer should check the system.
Symbols in the instrument panel
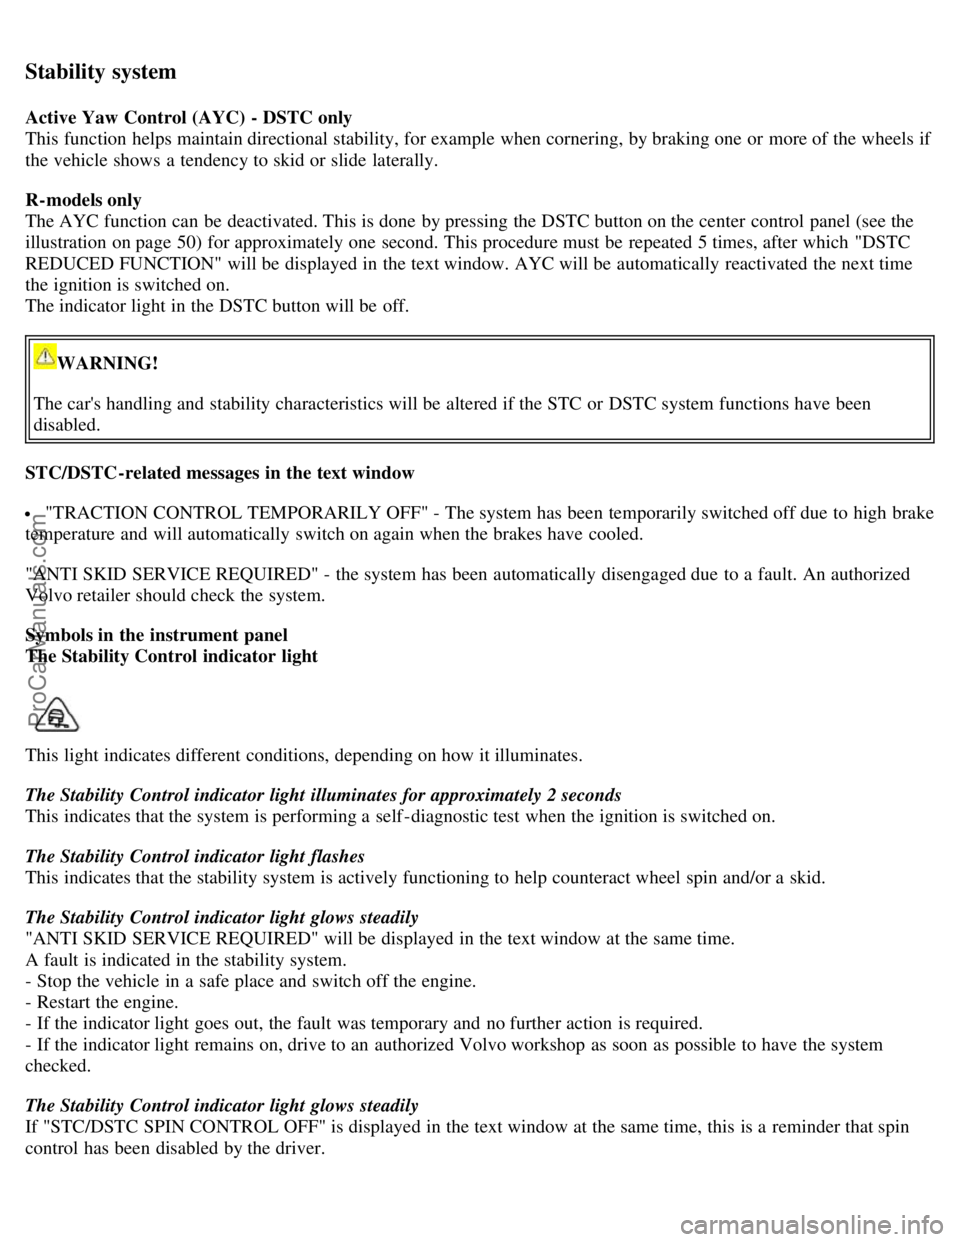
The Stability Control indicator light
This light indicates different conditions, depending on how it illuminates.
The Stability Control indicator light illuminates for approximately 2 seconds
This indicates that the system is performing a self -diagnostic test when the ignition is switched on.
The Stability Control indicator light flashes
This indicates that the stability system is actively functioning to help counteract wheel spin and/or a skid.
The Stability Control indicator light glows steadily
"ANTI SKID SERVICE REQUIRED" will be displayed in the text window at the same time.
A fault is indicated in the stability system.
- Stop the vehicle in a safe place and switch off the engine.
- Restart the engine.
- If the indicator light goes out, the fault was temporary and no further action is required.
- If the indicator light remains on, drive to an authorized Volvo workshop as soon as possible to have the system
checked.
The Stability Control indicator light glows steadily
If "STC/DSTC SPIN CONTROL OFF" is displayed in the text window at the same time, this is a reminder that spin
control has been disabled by the driver.
ProCarManuals.com
Page 113 of 200
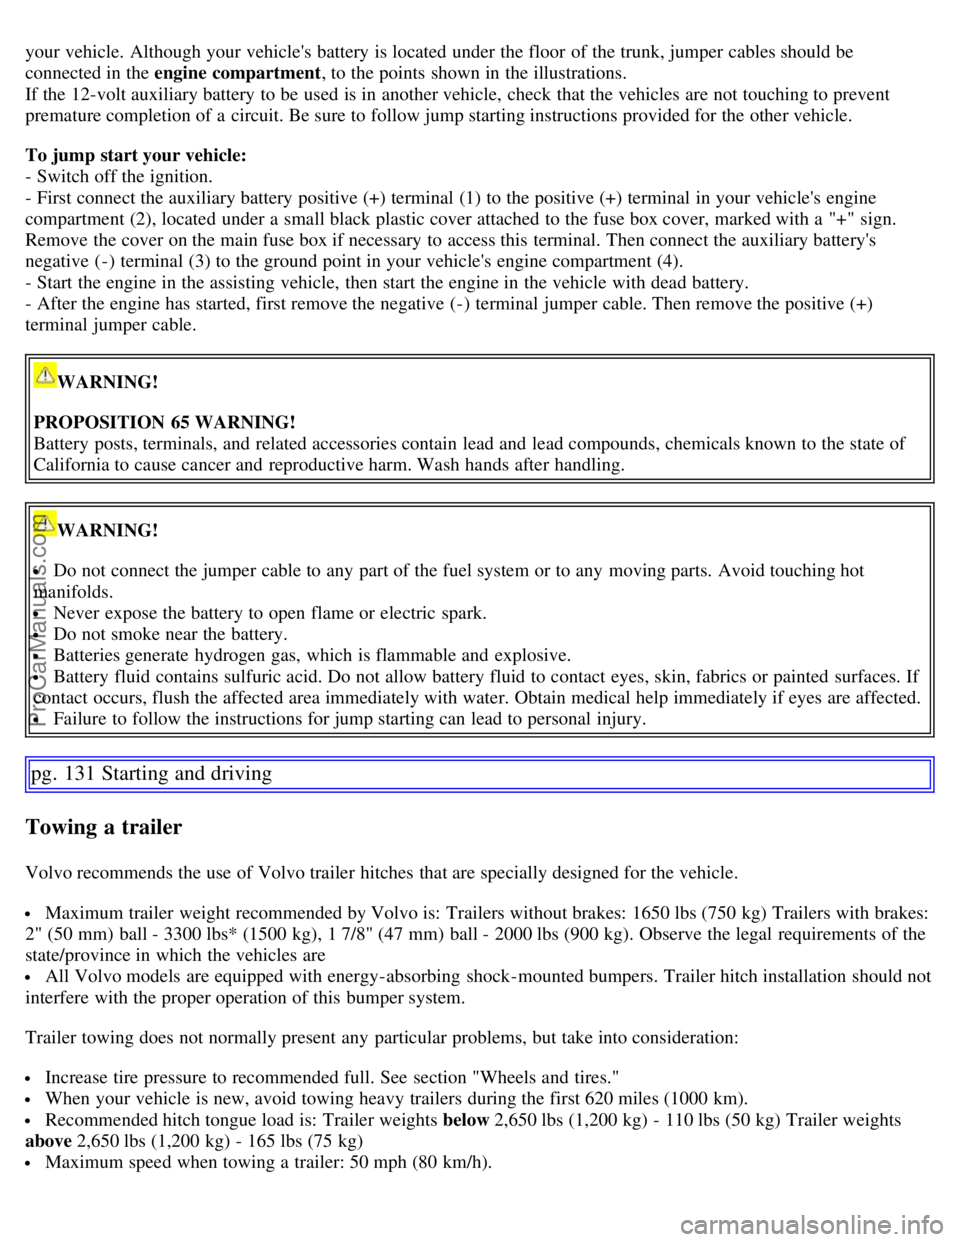
your vehicle. Although your vehicle's battery is located under the floor of the trunk, jumper cables should be
connected in the engine compartment, to the points shown in the illustrations.
If the 12-volt auxiliary battery to be used is in another vehicle, check that the vehicles are not touching to prevent
premature completion of a circuit. Be sure to follow jump starting instructions provided for the other vehicle.
To jump start your vehicle:
- Switch off the ignition.
- First connect the auxiliary battery positive (+) terminal (1) to the positive (+) terminal in your vehicle's engine
compartment (2), located under a small black plastic cover attached to the fuse box cover, marked with a "+" sign.
Remove the cover on the main fuse box if necessary to access this terminal. Then connect the auxiliary battery's
negative (-) terminal (3) to the ground point in your vehicle's engine compartment (4).
- Start the engine in the assisting vehicle, then start the engine in the vehicle with dead battery.
- After the engine has started, first remove the negative (-) terminal jumper cable. Then remove the positive (+)
terminal jumper cable.
WARNING!
PROPOSITION 65 WARNING!
Battery posts, terminals, and related accessories contain lead and lead compounds, chemicals known to the state of
California to cause cancer and reproductive harm. Wash hands after handling.
WARNING!
Do not connect the jumper cable to any part of the fuel system or to any moving parts. Avoid touching hot
manifolds.
Never expose the battery to open flame or electric spark.
Do not smoke near the battery.
Batteries generate hydrogen gas, which is flammable and explosive.
Battery fluid contains sulfuric acid. Do not allow battery fluid to contact eyes, skin, fabrics or painted surfaces. If
contact occurs, flush the affected area immediately with water. Obtain medical help immediately if eyes are affected.
Failure to follow the instructions for jump starting can lead to personal injury.
pg. 131 Starting and driving
Towing a trailer
Volvo recommends the use of Volvo trailer hitches that are specially designed for the vehicle.
Maximum trailer weight recommended by Volvo is: Trailers without brakes: 1650 lbs (750 kg) Trailers with brakes:
2" (50 mm) ball - 3300 lbs* (1500 kg), 1 7/8" (47 mm) ball - 2000 lbs (900 kg). Observe the legal requirements of the
state/province in which the vehicles are
All Volvo models are equipped with energy-absorbing shock-mounted bumpers. Trailer hitch installation should not
interfere with the proper operation of this bumper system.
Trailer towing does not normally present any particular problems, but take into consideration:
Increase tire pressure to recommended full. See section "Wheels and tires."
When your vehicle is new, avoid towing heavy trailers during the first 620 miles (1000 km).
Recommended hitch tongue load is: Trailer weights below 2,650 lbs (1,200 kg) - 110 lbs (50 kg) Trailer weights
above 2,650 lbs (1,200 kg) - 165 lbs (75 kg)
Maximum speed when towing a trailer: 50 mph (80 km/h).
ProCarManuals.com
Page 117 of 200
If you wish to check your vehicle before the approach of cold weather, the following advice is worth noting:
Make sure that the engine coolant contains 50 percent antifreeze. Any other mixture will reduce freeze protection.
This gives protection against freezing down to -31°F (-35°C). See section "Coolant". The use of "recycled"
antifreeze is not approved by Volvo. Different types of antifreeze must not be mixed.
Volvo recommends using only genuine Volvo antifreeze in your vehicle's radiator. Your Volvo retailer stocks plenty
of Volvo engine coolant to protect your vehicle during cold weather.
Try to keep the fuel tank well filled - this prevents the formation of condensation in the tank. In addition, in
extremely cold weather conditions it is worthwhile to add fuel line de -icer before refueling.
The viscosity of the engine oil is important. Oil with low viscosity (thinner oil) improves cold-weather starting as
well as decreasing fuel consumption while the engine is warming up. For winter use, 5W -30 oil, particularly the
synthetic type
1, is recommended. Be sure to use good quality oil but do not use cold-weather oil for hard driving or in
warm weather. See section "Engine oil" for more information.
The load placed on the battery is greater during the winter since the windshield wipers, lighting, etc. are used more
often. Moreover, the capacity of the battery decreases as the temperature drops. In very cold weather, a poorly charged
battery can freeze and be damaged. It is therefore advisable to check the state of charge more frequently and spray an
antirust oil on the battery posts.
Volvo recommends the use of snow tires on all four wheels for winter driving - see section "Wheels and tires."
To prevent the washer fluid reservoir from freezing, add washer solvents containing antifreeze (see page 176 for
the location of the washer fluid reservoir). This is important since dirt is often splashed on the windshield during
winter driving, requiring the frequent use of the washers and wipers. Volvo Washer Solvent should be diluted as
follows:
- Down to 14° F (-10° C) : 1 part washer solvent and 4 parts water
- Down to 5° F (-15° C) : 1 part washer solvent and 3 parts water
- Down to 0° F (-18° C) : 1 part washer solvent and 2 parts water
- Down to -18° F (-28° C) : 1 part washer solvent and 1 part water
Use Volvo Teflon Lock Spray in the locks.
NOTE: Avoid the use of de -icing sprays as they can cause damage to the locks.
W - Winter/Wet driving mode - enhanced vehicle traction (automatic transmission)
Mode W will only function if the gear selector is in the ( D)rive position.
Press the button at the base of the gear selector to engage/disengage this driving mode.
An LED in the button will light up to indicate that W is engaged and this will also be displayed in the instrument
panel (see page 44
).
This mode may be selected for starting/ moving off on slippery roads.
1. Synthetic oil is not used when the oil is changed at the normal maintenance service intervals.
pg. 137 Starting and driving
Before a long distance trip
It is always worthwhile to have your vehicle checked at a Volvo retailer before driving long distances. Your retailer
will also be able to supply you with bulbs, fuses, spark plugs and wiper blades for your use in the event that problems
occur.
As a minimum, the following items should be checked before any long trip:
Check that engine runs smoothly and that fuel consumption is normal.
Check for fuel, oil, and fluid leakage.
Check transmission oil level1.
Check condition of drive belts.
ProCarManuals.com
Page 121 of 200

2 0 0 7
VOLVO S60
Wheels and tires
pg. 141 Wheels and tires
General information 142
Tire inflation pressure table - U.S. models146
Tire inflation pressure table - Canadian models147
Tire Pressure Monitoring System (TPMS) - option on certain U.S. models only148
Self supporting run flat tires (option)150
Tire designations151
Glossary of tire terminology152
Vehicle loading153
Uniform Tire Quality Grading155
Snow chains, snow tires, studded tires156
Temporary spare157
Changing wheels158
pg. 142 Wheels and tires
General information
Your vehicle is equipped with tires according to the vehicle's tire information placard on the B-pillar (the structural
member at the side of the vehicle, at the rear of the driver's door opening), or on the inside of the fuel filler door on
Canadian models.
The tires have good road holding characteristics and offer good handling on dry and wet surfaces. It should be noted
however that the tires have been developed to give these features on snow/ice-free surfaces.
Certain models are equipped with "all-season" tires, which provide a somewhat higher degree of road holding on
slippery surfaces than tires without the "all-season" rating. However, for optimum road holding on icy or snow-
covered roads, we recommend suitable winter tires on all four wheels.
When replacing tires, be sure that the new tires are the same size designation, type (radial) and preferably from the
same manufacturer, on all four wheels. Otherwise there is a risk of altering the vehicle's roadholding and handling
characteristics.
Storing wheels and tires
When storing complete wheels (tires mounted on rims), they should be suspended off the floor or placed on their sides
on the floor.
Tires not mounted on rims should be stored on their sides or standing upright, but should not be suspended.
CAUTION!
ProCarManuals.com
Page 125 of 200

Tire inflation pressure table - U.S. models
The following tire pressures are recommended by Volvo for your vehicle. Refer to the tire inflation placard for
information specific to the tires installed on your vehicle at the factory.Cold tire pressures up to five persons
Tire size Front, psi (kPa)Rear, psi (kPa)
S60
195/65R15
205/55R16
215/55R16
235/45R17
235/45R17 SSRFT
1
35 (240) 35 (240)
235/40R18 39 (270)39 (270)
Temporary spare tire
T125/80R17 61 (420)
61 (420)
S60 R
235/45R17
235/40R18 39 (270)
39 (270)
Temporary spare tire
T115/85R18 61 (420)
61 (420)
1. Self supporting run flat tires. See page 150 for more information.
Load ratings
The load ratings in the tables above translate as follows:
91 = 1365 lbs (615 kg), 93 = 1433 lbs (650 kg), 99 = 1709 lbs (755 kg)
Speed ratings
The speed ratings in the tables translate as follows:
M = 81 mph (130 km/h), V= 149 mph (240 km/h), W= 168 mph (270 km/h)
See also page 151
for an explanation of the designations on the sidewall of the tire.
pg. 147 Wheels and tires
Tire inflation pressure table - Canadian models
The following tire pressures are recommended by Volvo for your vehicle. Refer to the tire inflation placard for
information specific to the tires installed on your vehicle at the factory.
Tire size Cold tire pressures
up to five persons
psi (kPa)Optional pressure
up to three persons
psi (kPa)
FrontRearFront Rear
S60
195/65R15
205/55R16
215/55R16
235/45R17 38 (260)
38 (260)32 (220) 32 (220)
ProCarManuals.com
Page 126 of 200

235/40R1839(270)39(270)35 (240) 35 (240)
Temporary spare tire
T125/80R17 61 (420)
61 (420)61 (420) 61 (420)
S60 R
235/45R17
235/40R18 39(270)
39(270)35 (240) 35 (240)
Temporary spare tire
T115/85R18 61 (420)
61 (420)61 (420) 61 (420)
pg. 148 Wheels and tires
Tire Pressure Monitoring System (TPMS) - option on certain U.S. models only
The tire pressure monitoring system uses sensors mounted in the tire valves to check inflation pressure levels. When
the vehicle is moving at a speed of approximately 20 mph (30 km/h) or faster, these sensors transmit inflation pressure
data to a receiver located in the vehicle.
USA - FCC ID: MRXTG315AM04
This device complies with part 15 of the FCC rules. Operation is subject to the following conditions: (1) This device
may not cause harmful interference, and (2) this device must accept any interference received, including interference
that may cause undesired operation.
When low inflation pressure is detected, TPMS will light up the tire pressure warning light (
) (also referred to as a
telltale) in the instrument panel, and will display a message in the text window. The wording of this message is
determined by the degree of inflation pressure loss.
NOTE: If a fault occurs in TPMS, the tire pressure warning light will flash for approximately 1 minute and TIRE
PRESS SYST SERVICE REQUIRED will be displayed.
Each tire, including the spare (if provided), should be checked monthly when cold and inflated to the inflation pressure
recommended by the vehicle manufacturer on the vehicle placard or tire inflation pressure label. (If your vehicle has
tires of a different size than the size indicated on the vehicle placard or tire inflation pressure label, you should
determine the proper tire inflation pressure for those tires.)
As an added safety feature, your vehicle has been equipped with a tire pressure monitoring system (TPMS) that
illuminates a low tire pressure telltale when one or more of your tires is significantly under-inflated. Accordingly,
when the low tire pressure telltale illuminates, you should stop and check your tires as soon as possible, and inflate
them to the proper pressure. Driving on a significantly under-inflated tire causes the tire to overheat and can lead to
tire failure. Under-inflation also reduces fuel efficiency and tire tread life, and may affect the vehicle's handling and
stopping ability.
Please note that the TPMS is not a substitute for proper tire maintenance, and it is the driver's responsibility to
maintain correct tire pressure, even if under-inflation has not reached the level to trigger illumination of the TPMS low
tire pressure telltale.
Your vehicle has also been equipped with a TPMS malfunction indicator to indicate when the system is not operating
properly. The TPMS malfunction indicator is combined with the low tire pressure telltale. When the system detects a
malfunction, the telltale will flash for approximately one minute and then remain continuously illuminated. This
sequence will continue upon subsequent vehicle start-ups as long as the malfunction exists. When the malfunction
indicator is illuminated, the system may not be able to detect or signal low tire pressure as intended. TPMS
malfunctions may occur for a variety of reasons, including the installation of replacement or alternate tires or wheels
ProCarManuals.com
Page 127 of 200
on the vehicle that prevent the TPMS from functioning properly. Always check the TPMS malfunction telltale after
replacing one or more tires or wheels on your vehicle to ensure that the replacement or alternate tires and wheels allow
the TPMS to continue to function properly.
NOTE:
TPMS indicates low tire pressure but does not replace normal tire maintenance. For information on correct tire
pressure, please refer to the tables on pages 146 and 147
, or consult your Volvo retailer.
Erasing warning messages
When a low tire pressure warning message has been displayed, and the tire pressure warning light has come on:
pg. 149 Wheels and tires
Tire Pressure Monitoring System (TPMS) - option on certain U.S. models only
- Use a tire pressure gauge to check the inflation pressure of all four tires.
- Re-inflate the tire(s) to the correct pressure (consult the tire pressure placard or the tables on pages 146 and 147
).
- Drive the vehicle for several minutes at a speed of 20 mph (30 km/h) or faster.
This will erase the warning text and the warning light will go out.
WARNING!
Incorrect inflation pressure could lead to tire failure, resulting in a loss of control of the vehicle.
Changing wheels with TPMS
Please note the following when changing or replacing the factory installed TPMS wheels/ tires on the vehicle:
Only the factory-mounted wheels are equipped with TPMS sensors in the valves.
If the vehicle is equipped with a temporary spare tire, this tire does not have a TPMS sensor.
If wheels without TPMS sensors are mounted on the vehicle, TIRE PRESS SYST SERVICE REQUIRED will be
displayed each time the vehicle is driven above 25 mph (40 km/h) for 10 minutes or more.
Once TPMS sensors are properly installed, the warning message should not reappear.
Volvo recommends that TPMS sensors be fitted on all wheels used on the vehicle. Volvo does not recommend
moving sensors back and forth between sets of wheels.
CAUTION!
When inflating tires with TPMS valves, press the pump's mouthpiece straight onto the valve to help avoid bending or
otherwise damaging the valve.
pg. 150 Wheels and tires
Self supporting run flat tires (option)
Self supporting run flat tires
Certain models equipped with the Tire Pressure Monitoring System (TPMS) can also be equipped with self supporting
run flat tires.
Tires of this type have specially reinforced sidewalls that make it possible to continue driving in the event of a drop in
inflation pressure. Tires of this type are mounted on special rims.
ProCarManuals.com
Page 129 of 200

6. H: The tire's speed rating, or the maximum speed at which the tire is designed to be driven for extended periods of
time, carrying a permissible load for the vehicle, and with correct inflation pressure. For example, H indicates a speed
rating of 130 mph (210 km/h).
NOTE: This information may not appear on the tire because it is not required by law.
7. M+S or M/S = Mud and Snow, AT = All Terrain, AS = All Season
8. U.S. DOT Tire Identification Number (TIN): This begins with the letters "DOT" and indicates that the tire meets all
federal standards. The next two numbers or letters are the plant code where it was manufactured, the next two are the
tire size code and the last four numbers represent the week and year the tire was built. For example, the numbers 317
mean the 31st week of 1997. After 2000 the numbers go to four digits. For example, 2501 means the 25th week of
2001. The numbers in between are marketing codes used at the manufacturer's discretion. This information helps a tire
manufacturer identify a tire for safety recall purposes.
9. Tire Ply Composition and Material Used: Indicates the number of plies indicates or the number of layers of rubber-
coated fabric in the tire tread and sidewall. Tire manufacturers also must indicate the ply materials in the tire and the
sidewall, which include steel, nylon, polyester, and others.
10. Maximum Load: Indicates the maximum load in pounds and kilograms that can be carried by the tire. Refer to the
vehicle's tire information placard or the safety certification label, located on the B-Pillar or the driver's door or on the
inside of the fuel filler door on Canadian models, for the correct tire pressure for your vehicle.
11. Treadwear, Traction, and Temperature grades: See page 155
for more information.
12. Maximum permissible inflation pressure: the greatest amount of air pressure that should ever be put in the tire. This
limit is set by the tire manufacturer.
pg. 152 Wheels and tires
Glossary of tire terminology
Tire suppliers may have additional markings, notes or warnings such as standard load, radial tubeless, etc.
Tire information placard : A placard showing the OE (Original Equipment) tire sizes, recommended inflation
pressure, and the maximum weight the vehicle can carry.
Tire Identification Number (TIN) : A number on the sidewall of each tire providing information about the tire
brand and manufacturing plant, tire size and date of manufacturer.
Inflation pressure : A measure of the amount of air in a tire.
Standard load: A class of P-metric or Metric tires designed to carry a maximum load at 35 psi [37 psi (2.5 bar) for
Metric tires]. Increasing the inflation pressure beyond this pressure will not increase the tires load carrying capability.
Extra load : A class of P-metric or Metric tires designed to carry a heavier maximum load at 41 psi [43 psi (2.9 bar)
for Metric tires]. Increasing the inflation pressure beyond this pressure will not increase the tires load carrying
capability.
kPa : Kilopascal, a metric unit of air pressure.
PSI: Pounds per square inch, a standard unit of air pressure.
B-pillar : The structural member at the side of the vehicle behind the front door.
Bead area of the tire : Area of the tire next to the rim.
Sidewall of the tire: Area between the bead area and the tread.
Tread area of the tire : Area of the perimeter of the tire that contacts the road when mounted on the vehicle.
Rim: The metal support (wheel) for a tire or a tire and tube assembly upon which the tire beads are seated.
Maximum load rating : a figure indicating the maximum load in pounds and kilograms that can be carried by the
tire. This rating is established by the tire manufacturer.
ProCarManuals.com