wheel VOLVO S60 2008 Owner's Guide
[x] Cancel search | Manufacturer: VOLVO, Model Year: 2008, Model line: S60, Model: VOLVO S60 2008Pages: 230, PDF Size: 5.33 MB
Page 131 of 230
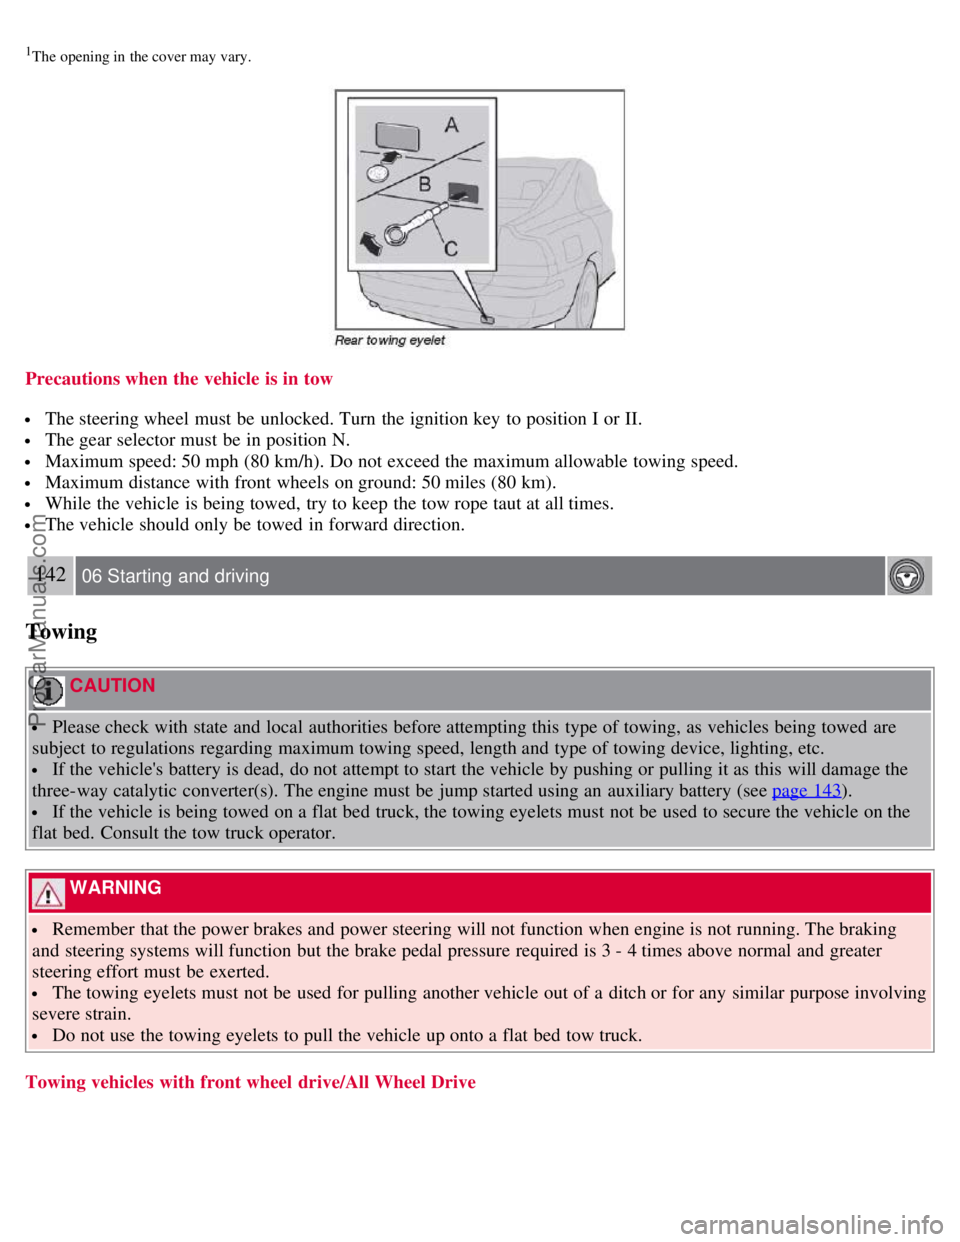
1The opening in the cover may vary.
Precautions when the vehicle is in tow
The steering wheel must be unlocked. Turn the ignition key to position I or II.
The gear selector must be in position N.
Maximum speed: 50 mph (80 km/h). Do not exceed the maximum allowable towing speed.
Maximum distance with front wheels on ground: 50 miles (80 km).
While the vehicle is being towed, try to keep the tow rope taut at all times.
The vehicle should only be towed in forward direction.
142 06 Starting and driving
Towing
CAUTION
Please check with state and local authorities before attempting this type of towing, as vehicles being towed are
subject to regulations regarding maximum towing speed, length and type of towing device, lighting, etc.
If the vehicle's battery is dead, do not attempt to start the vehicle by pushing or pulling it as this will damage the
three-way catalytic converter(s). The engine must be jump started using an auxiliary battery (see page 143
).
If the vehicle is being towed on a flat bed truck, the towing eyelets must not be used to secure the vehicle on the
flat bed. Consult the tow truck operator.
WARNING
Remember that the power brakes and power steering will not function when engine is not running. The braking
and steering systems will function but the brake pedal pressure required is 3 - 4 times above normal and greater
steering effort must be exerted.
The towing eyelets must not be used for pulling another vehicle out of a ditch or for any similar purpose involving
severe strain.
Do not use the towing eyelets to pull the vehicle up onto a flat bed tow truck.
Towing vehicles with front wheel drive/All Wheel Drive
ProCarManuals.com
Page 132 of 230
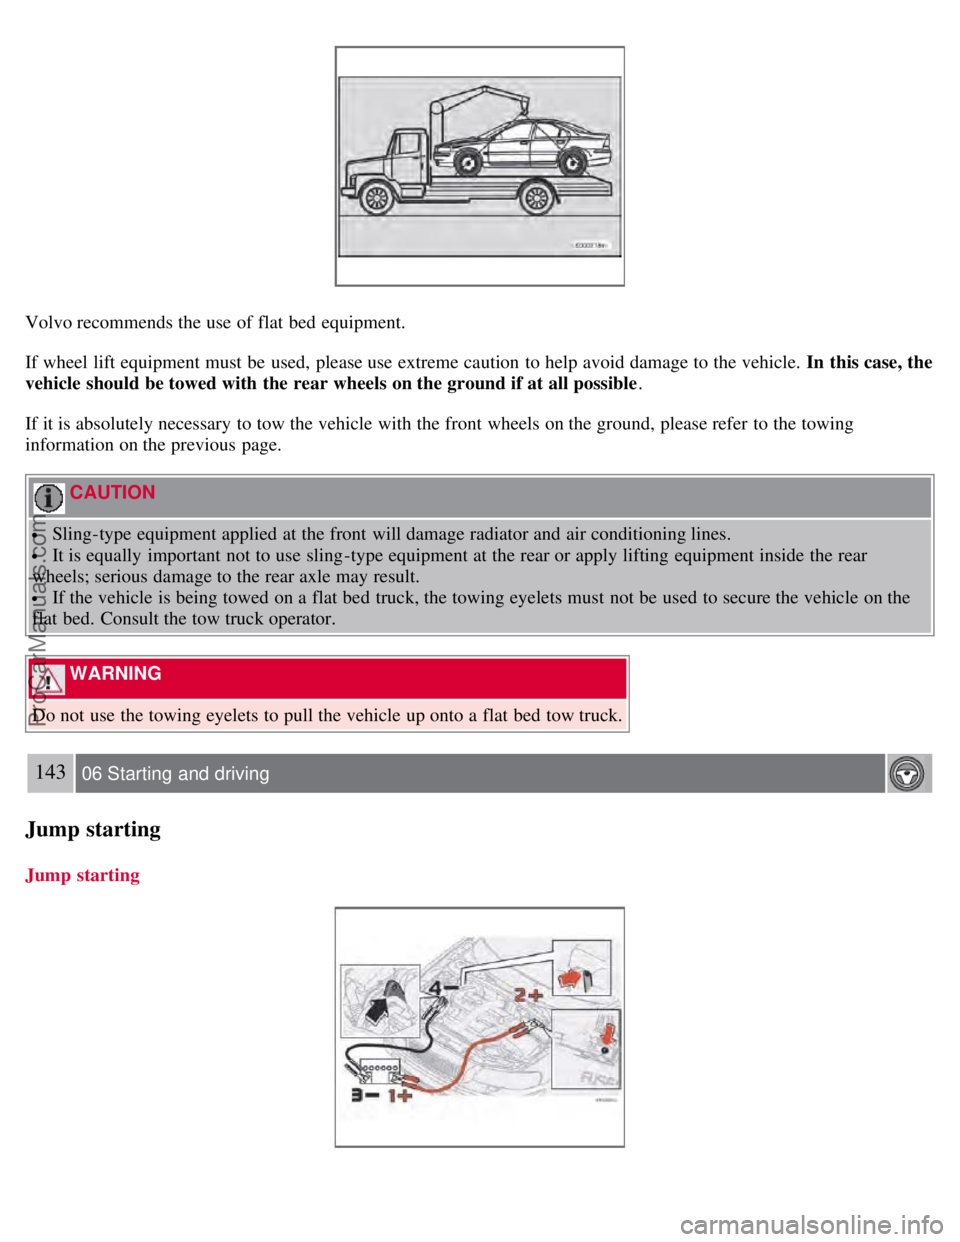
Volvo recommends the use of flat bed equipment.
If wheel lift equipment must be used, please use extreme caution to help avoid damage to the vehicle. In this case, the
vehicle should be towed with the rear wheels on the ground if at all possible.
If it is absolutely necessary to tow the vehicle with the front wheels on the ground, please refer to the towing
information on the previous page.
CAUTION
Sling-type equipment applied at the front will damage radiator and air conditioning lines.
It is equally important not to use sling -type equipment at the rear or apply lifting equipment inside the rear
wheels; serious damage to the rear axle may result.
If the vehicle is being towed on a flat bed truck, the towing eyelets must not be used to secure the vehicle on the
flat bed. Consult the tow truck operator.
WARNING
Do not use the towing eyelets to pull the vehicle up onto a flat bed tow truck.
143 06 Starting and driving
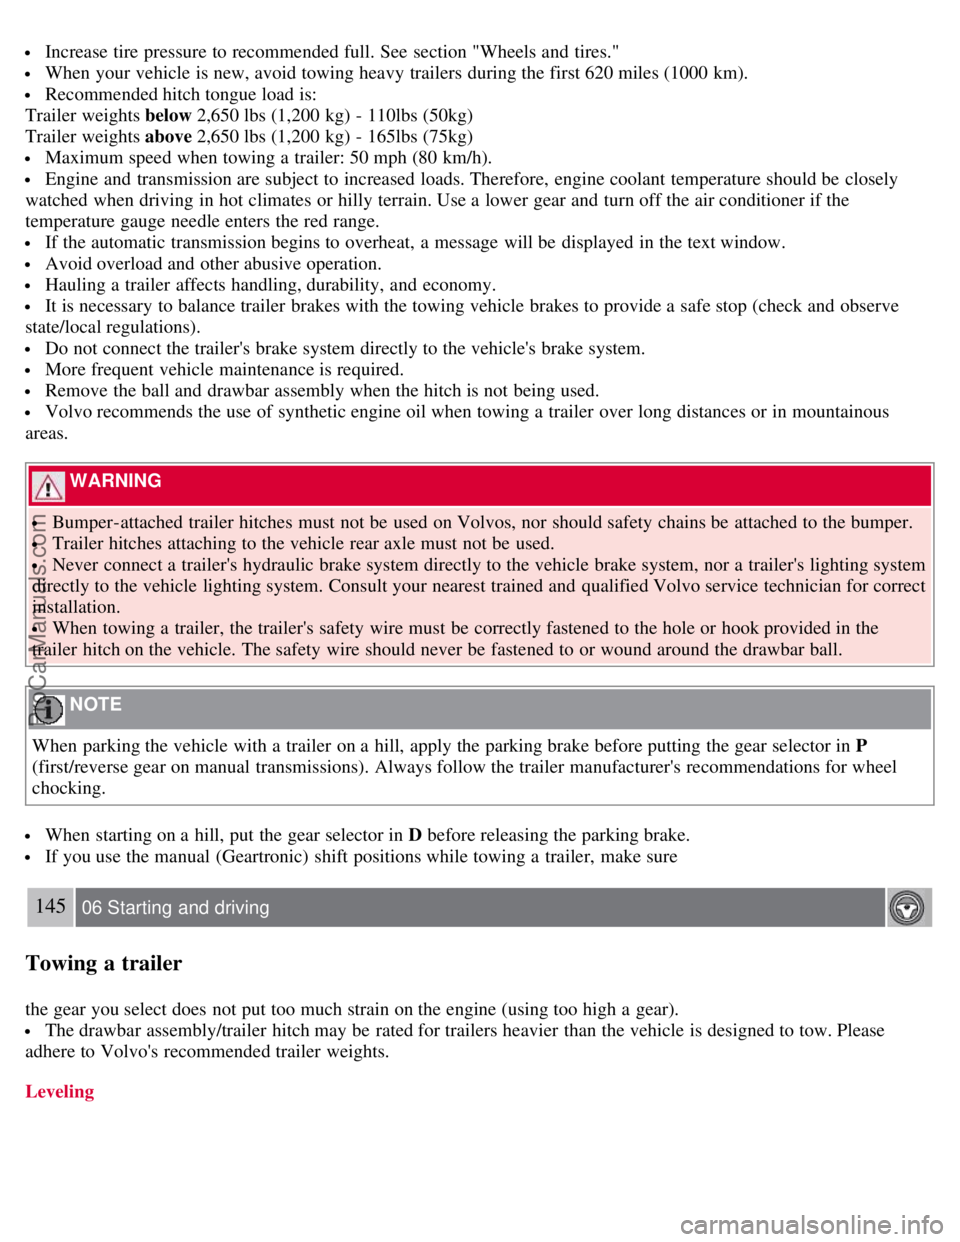
Jump starting
Jump starting
ProCarManuals.com
Page 134 of 230
Increase tire pressure to recommended full. See section "Wheels and tires."
When your vehicle is new, avoid towing heavy trailers during the first 620 miles (1000 km).
Recommended hitch tongue load is:
Trailer weights below 2,650 lbs (1,200 kg) - 110lbs (50kg)
Trailer weights above 2,650 lbs (1,200 kg) - 165lbs (75kg)
Maximum speed when towing a trailer: 50 mph (80 km/h).
Engine and transmission are subject to increased loads. Therefore, engine coolant temperature should be closely
watched when driving in hot climates or hilly terrain. Use a lower gear and turn off the air conditioner if the
temperature gauge needle enters the red range.
If the automatic transmission begins to overheat, a message will be displayed in the text window.
Avoid overload and other abusive operation.
Hauling a trailer affects handling, durability, and economy.
It is necessary to balance trailer brakes with the towing vehicle brakes to provide a safe stop (check and observe
state/local regulations).
Do not connect the trailer's brake system directly to the vehicle's brake system.
More frequent vehicle maintenance is required.
Remove the ball and drawbar assembly when the hitch is not being used.
Volvo recommends the use of synthetic engine oil when towing a trailer over long distances or in mountainous
areas.
WARNING
Bumper-attached trailer hitches must not be used on Volvos, nor should safety chains be attached to the bumper.
Trailer hitches attaching to the vehicle rear axle must not be used.
Never connect a trailer's hydraulic brake system directly to the vehicle brake system, nor a trailer's lighting system
directly to the vehicle lighting system. Consult your nearest trained and qualified Volvo service technician for correct
installation.
When towing a trailer, the trailer's safety wire must be correctly fastened to the hole or hook provided in the
trailer hitch on the vehicle. The safety wire should never be fastened to or wound around the drawbar ball.
NOTE
When parking the vehicle with a trailer on a hill, apply the parking brake before putting the gear selector in P
(first/reverse gear on manual transmissions). Always follow the trailer manufacturer's recommendations for wheel
chocking.
When starting on a hill, put the gear selector in D before releasing the parking brake.
If you use the manual (Geartronic) shift positions while towing a trailer, make sure
145 06 Starting and driving
Towing a trailer
the gear you select does not put too much strain on the engine (using too high a gear).
The drawbar assembly/trailer hitch may be rated for trailers heavier than the vehicle is designed to tow. Please
adhere to Volvo's recommended trailer weights.
Leveling
ProCarManuals.com
Page 137 of 230
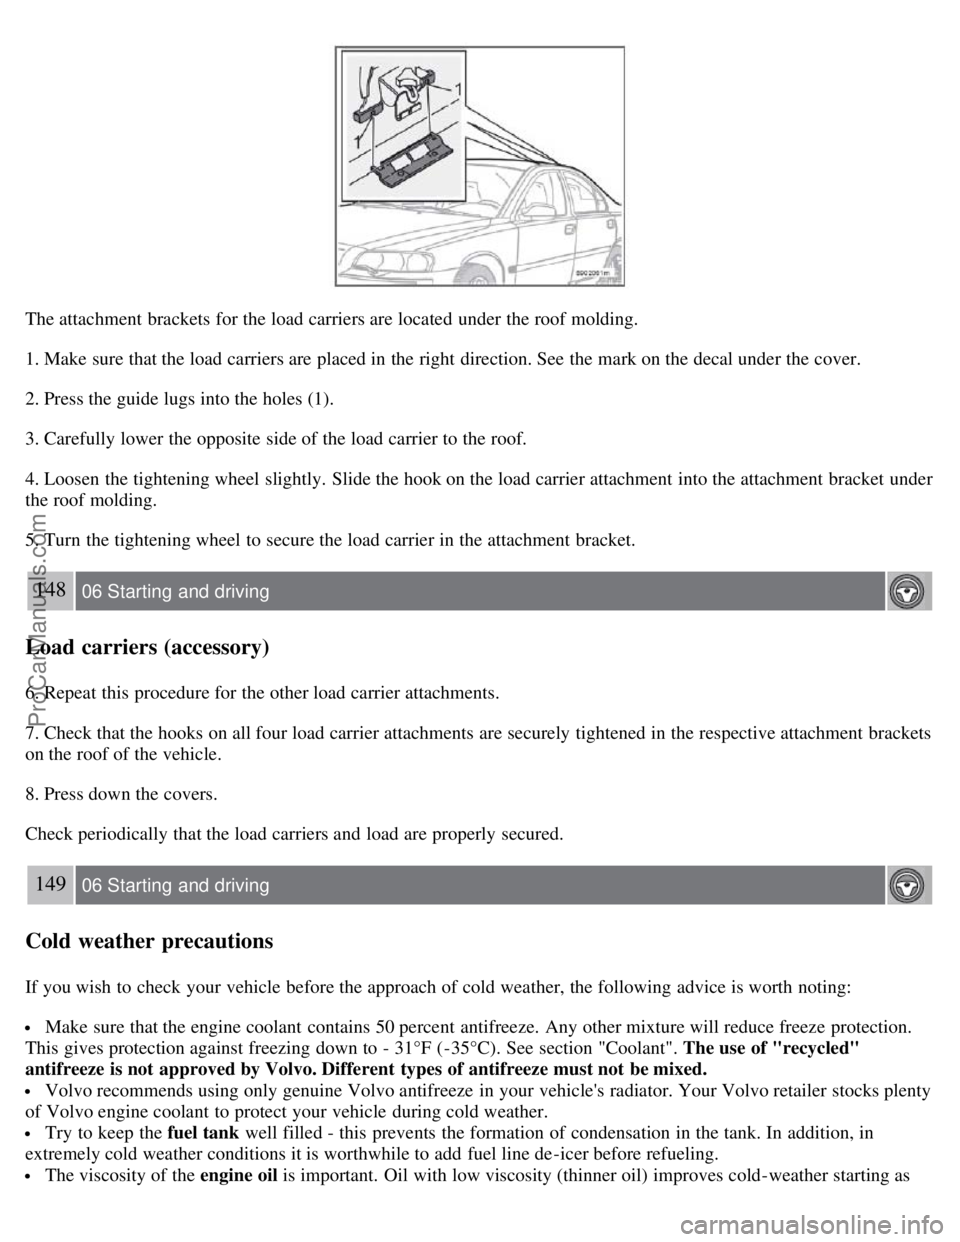
The attachment brackets for the load carriers are located under the roof molding.
1. Make sure that the load carriers are placed in the right direction. See the mark on the decal under the cover.
2. Press the guide lugs into the holes (1).
3. Carefully lower the opposite side of the load carrier to the roof.
4. Loosen the tightening wheel slightly. Slide the hook on the load carrier attachment into the attachment bracket under
the roof molding.
5. Turn the tightening wheel to secure the load carrier in the attachment bracket.
148 06 Starting and driving
Load carriers (accessory)
6. Repeat this procedure for the other load carrier attachments.
7. Check that the hooks on all four load carrier attachments are securely tightened in the respective attachment brackets
on the roof of the vehicle.
8. Press down the covers.
Check periodically that the load carriers and load are properly secured.
149 06 Starting and driving
Cold weather precautions
If you wish to check your vehicle before the approach of cold weather, the following advice is worth noting:
Make sure that the engine coolant contains 50 percent antifreeze. Any other mixture will reduce freeze protection.
This gives protection against freezing down to - 31°F (-35°C). See section "Coolant". The use of "recycled"
antifreeze is not approved by Volvo. Different types of antifreeze must not be mixed.
Volvo recommends using only genuine Volvo antifreeze in your vehicle's radiator. Your Volvo retailer stocks plenty
of Volvo engine coolant to protect your vehicle during cold weather.
Try to keep the fuel tank well filled - this prevents the formation of condensation in the tank. In addition, in
extremely cold weather conditions it is worthwhile to add fuel line de -icer before refueling.
The viscosity of the engine oil is important. Oil with low viscosity (thinner oil) improves cold-weather starting as
ProCarManuals.com
Page 138 of 230
well as decreasing fuel consumption while the engine is warming up. For winter use, 5W - 30 oil, particularly the
synthetic type1, is recommended. Be sure to use good quality oil but do not use cold-weather oil for hard driving or in
warm weather. See section "Engine oil" for more information.
The load placed on the battery is greater during the winter since the windshield wipers, lighting, etc. are used more
often. Moreover, the capacity of the battery decreases as the temperature drops. In very cold weather, a poorly charged
battery can freeze and be damaged. It is therefore advisable to check the state of charge more frequently and spray an
antirust oil on the battery posts.
Volvo recommends the use of snow tires on all four wheels for winter driving - see section "Wheels and tires."
To prevent the washer fluid reservoir from freezing, add washer solvents containing antifreeze (see page 195 for
the location of the washer fluid reservoir). This is important since dirt is often splashed on the windshield during
winter driving, requiring the frequent use of the washers and wipers. Volvo Washer Solvent should be diluted as
follows:
- Down to 14° F (-10° C): 1 part washer solvent and 4 parts water
- Down to 5° F (-15° C): 1 part washer solvent and 3 parts water
- Down to 0° F (-18° C): 1 part washer solvent and 2 parts water
- Down to -18° F (-28° C): 1 part washer solvent and 1 part water
Use Volvo Teflon Lock Spray in the locks.
1Synthetic oil is not used when the oil is changed at the normal maintenance service intervals.
NOTE
Avoid the use of de -icing sprays as they can cause damage to the locks.
W - Winter/Wet driving mode - enhanced vehicle traction (automatic transmission)
Mode W will only function if the gear selector is in the D position.
Press the button at the base of the gear selector to engage/disengage this driving mode.
An LED in the button will light up to indicate that W is engaged and this will also be displayed in the instrument
panel (see page 48
).
This mode may be selected for starting/moving off on slippery roads.
150 06 Starting and driving
Before a long distance trip
It is always worthwhile to have your vehicle checked by a trained and qualified Volvo service technician before
driving long distances. Your retailer or service technician will also be able to supply you with bulbs, fuses, spark plugs
and wiper blades for your use in the event that problems occur.
As a minimum, the following items should be checked before any long trip:
Check that engine runs smoothly and that fuel consumption is normal.
Check for fuel, oil, and fluid leakage.
Check transmission oil level1.
Check condition of drive belts.
Check state of the battery's charge.
Examine tires carefully (the spare tire as well), and replace those that are worn. Check tire pressures.
The brakes, front wheel alignment, and steering gear should be checked by a trained and qualified Volvo service
technician only.
Check all lights, including high beams.
Reflective warning triangles are legal requirement in some countries.
ProCarManuals.com
Page 142 of 230
2 0 0 8
VOLVO S60
154 07 Wheels and tires
General information 156
Tire inflation158
Tire inflation pressure table -U.S. models160
Tire inflation pressure table -Canadian models161
Tire Pressure Monitoring System(TPMS) - U.S. models162
Tire designations164
Glossary of tire terminology165
Vehicle loading166
Uniform Tire Quality Grading168
Snow chains, snow tires, studded tires169
Temporary spare170
Changing wheels171
Tire rotation174
155 07 Wheels and tires
156 07 Wheels and tires
General information
Your vehicle is equipped with tires according to the vehicle's tire information placard on the B-pillar (the structural
member at the side of the vehicle, at the rear of the driver's door opening), or on the inside of the fuel filler door on
Canadian models.
The tires have good road holding characteristics and offer good handling on dry and wet surfaces. It should be noted
however that the tires have been developed to give these features on snow/ice-free surfaces.
Certain models are equipped with "all-season" tires, which provide a somewhat higher degree of road holding on
slippery surfaces than tires without the "all-season" rating. However, for optimum road holding on icy or snow-
ProCarManuals.com
Page 143 of 230
covered roads, we recommend suitable winter tires on all four wheels.
When replacing tires, be sure that the new tires are the same size designation, type (radial) and preferably from the
same manufacturer, on all four wheels. Otherwise there is a risk of altering the vehicle's roadholding and handling
characteristics.
Storing wheels and tires
When storing complete wheels (tires mounted on rims), they should be suspended off the floor or placed on their sides
on the floor.
Tires not mounted on rims should be stored on their sides or standing upright, but should not be suspended.
CAUTION
Tires should preferably be stored in a cool, dry, dark place, and should never be stored in close proximity to
solvents, gasoline, oils, etc.
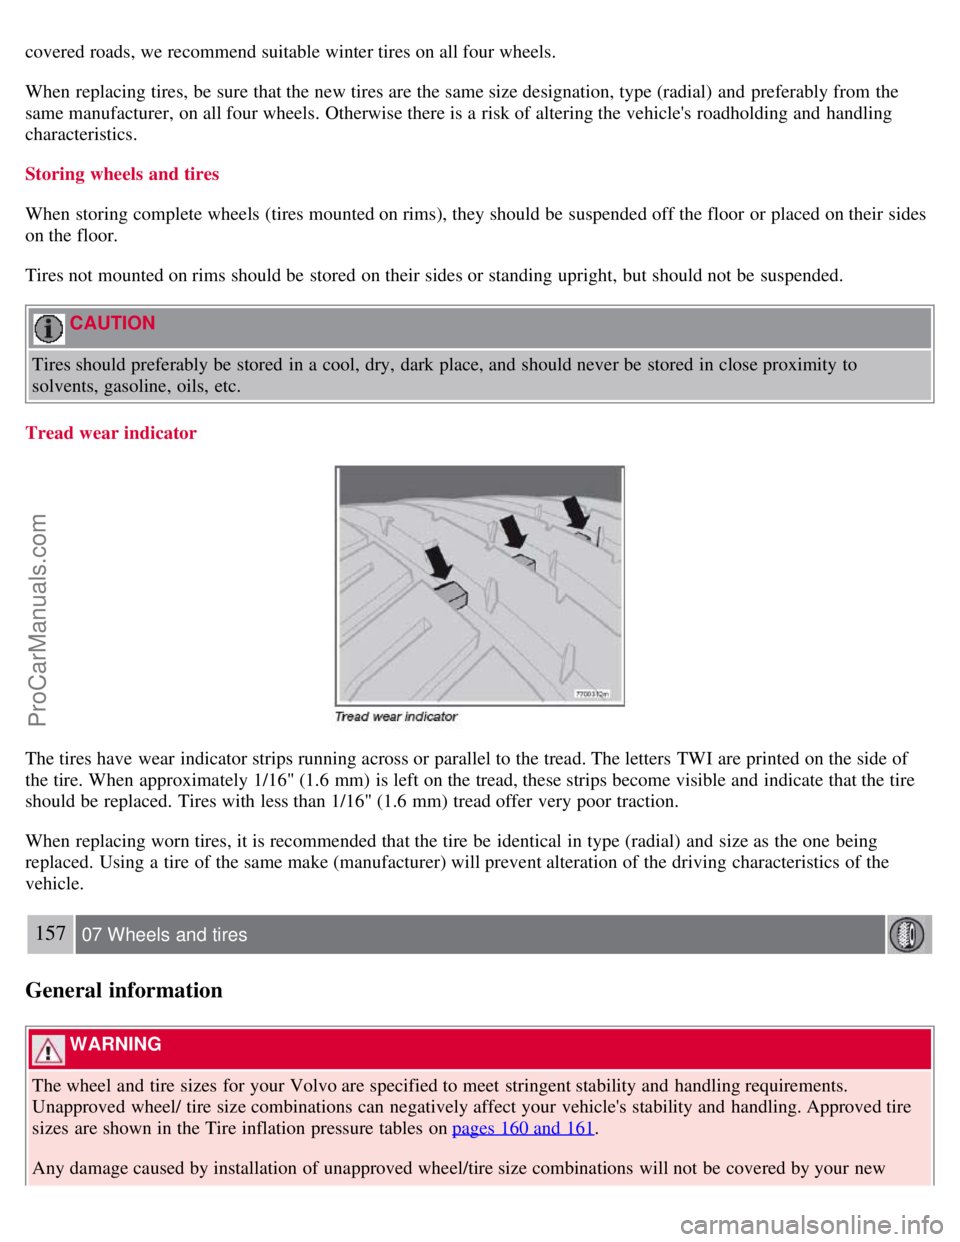
Tread wear indicator
The tires have wear indicator strips running across or parallel to the tread. The letters TWI are printed on the side of
the tire. When approximately 1/16" (1.6 mm) is left on the tread, these strips become visible and indicate that the tire
should be replaced. Tires with less than 1/16" (1.6 mm) tread offer very poor traction.
When replacing worn tires, it is recommended that the tire be identical in type (radial) and size as the one being
replaced. Using a tire of the same make (manufacturer) will prevent alteration of the driving characteristics of the
vehicle.
157 07 Wheels and tires
General information
WARNING
The wheel and tire sizes for your Volvo are specified to meet stringent stability and handling requirements.
Unapproved wheel/ tire size combinations can negatively affect your vehicle's stability and handling. Approved tire
sizes are shown in the Tire inflation pressure tables on pages 160 and 161
.
Any damage caused by installation of unapproved wheel/tire size combinations will not be covered by your new
ProCarManuals.com
Page 144 of 230
vehicle warranty. Volvo assumes no responsibility for death, injury, or expenses that may result from such
installations.
New tires
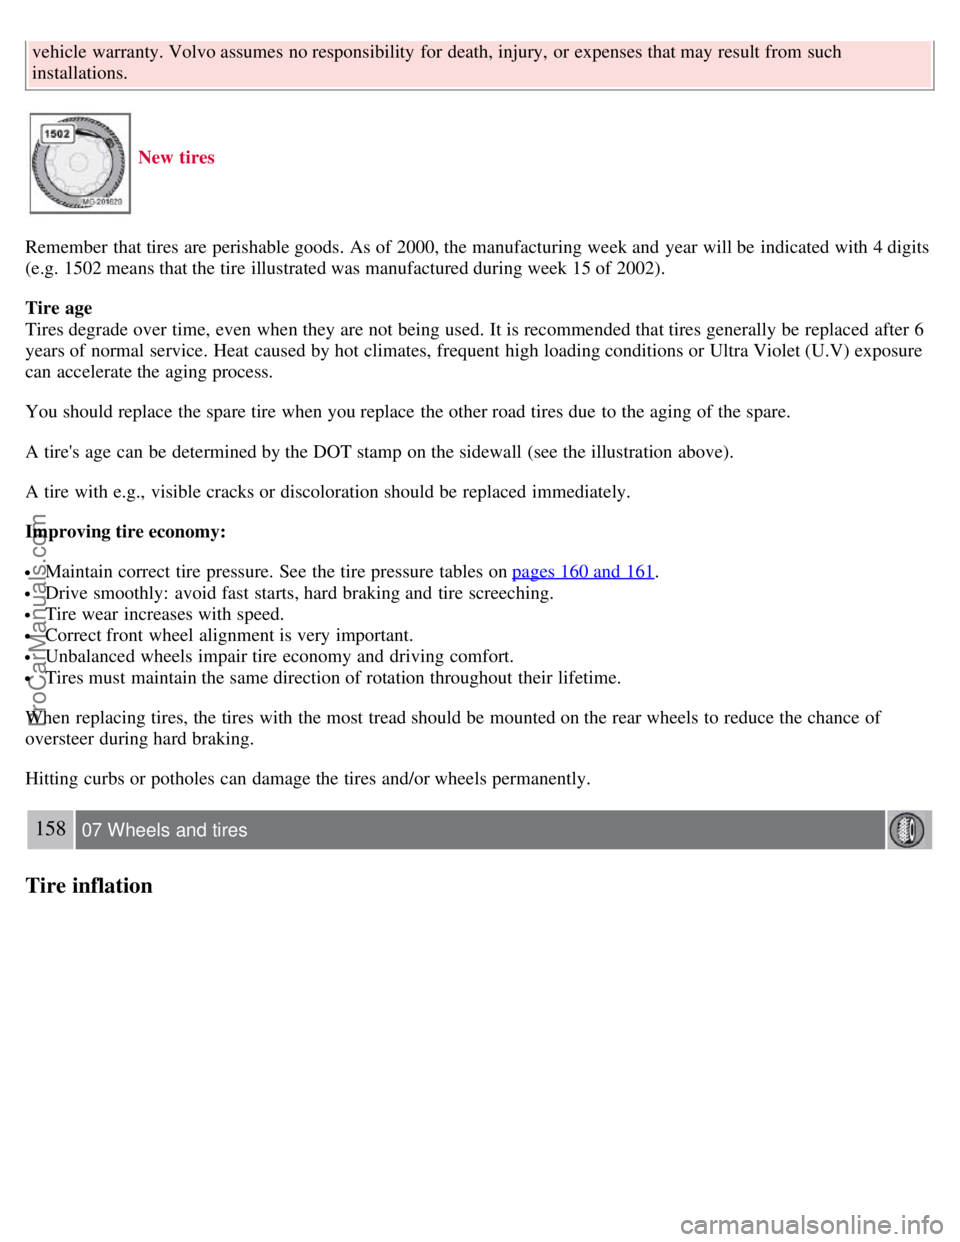
Remember that tires are perishable goods. As of 2000, the manufacturing week and year will be indicated with 4 digits
(e.g. 1502 means that the tire illustrated was manufactured during week 15 of 2002).
Tire age
Tires degrade over time, even when they are not being used. It is recommended that tires generally be replaced after 6
years of normal service. Heat caused by hot climates, frequent high loading conditions or Ultra Violet (U.V) exposure
can accelerate the aging process.
You should replace the spare tire when you replace the other road tires due to the aging of the spare.
A tire's age can be determined by the DOT stamp on the sidewall (see the illustration above).
A tire with e.g., visible cracks or discoloration should be replaced immediately.
Improving tire economy:
Maintain correct tire pressure. See the tire pressure tables on pages 160 and 161.
Drive smoothly: avoid fast starts, hard braking and tire screeching.
Tire wear increases with speed.
Correct front wheel alignment is very important.
Unbalanced wheels impair tire economy and driving comfort.
Tires must maintain the same direction of rotation throughout their lifetime.
When replacing tires, the tires with the most tread should be mounted on the rear wheels to reduce the chance of
oversteer during hard braking.
Hitting curbs or potholes can damage the tires and/or wheels permanently.
158 07 Wheels and tires
Tire inflation
ProCarManuals.com
Page 146 of 230
Checking tire pressure
A certain amount of air seepage from the tires occurs naturally and tire pressure fluctuates with seasonal changes in
temperature. Always check tire pressure regularly.
Cold tires
Inflation pressure should be checked when the tires are cold.
159 07 Wheels and tires
Tire inflation
The tires are considered to be cold when they have the same temperature as the surrounding (ambient) air.
This temperature is normally reached after the vehicle has been parked for at least 3 hours.
After driving a distance of approximately 1 mile (1.6 km), the tires are considered to be hot. If you have to drive
farther than this distance to pump your tire(s), check and record the tire pressure first and add the appropriate air
pressure when you get to the pump.
If checking tire pressure when the tire is hot, never "bleed" or reduce air pressure. The tires are hot from driving and it
is normal for pressures to increase above recommended cold pressures. A hot tire at or below recommended cold
inflation pressure could be significantly under-inflated.
To check inflation pressure:
1. Remove the cap from the valve on one tire, then firmly press the tire gauge onto the valve.
2. Add air to reach the recommended air pressure.
3. Replace the valve cap.
4. Repeat this procedure for each tire, including the spare.
5. Visually inspect the tires to make sure there are no nails or other objects embedded that could puncture the tire and
cause an air leak.
6. Check the sidewalls to make sure there are no gouges, cuts, bulges or other irregularities.
NOTE
If you overfill the tire, release air by pushing on the metal stem in the center of the valve. Then recheck the pressure
with your tire gauge.
Some spare tires require higher inflation pressure than the other tires. Consult the tire inflation tables on pages 160
and 161, or see the inflation pressure placard.
160 07 Wheels and tires
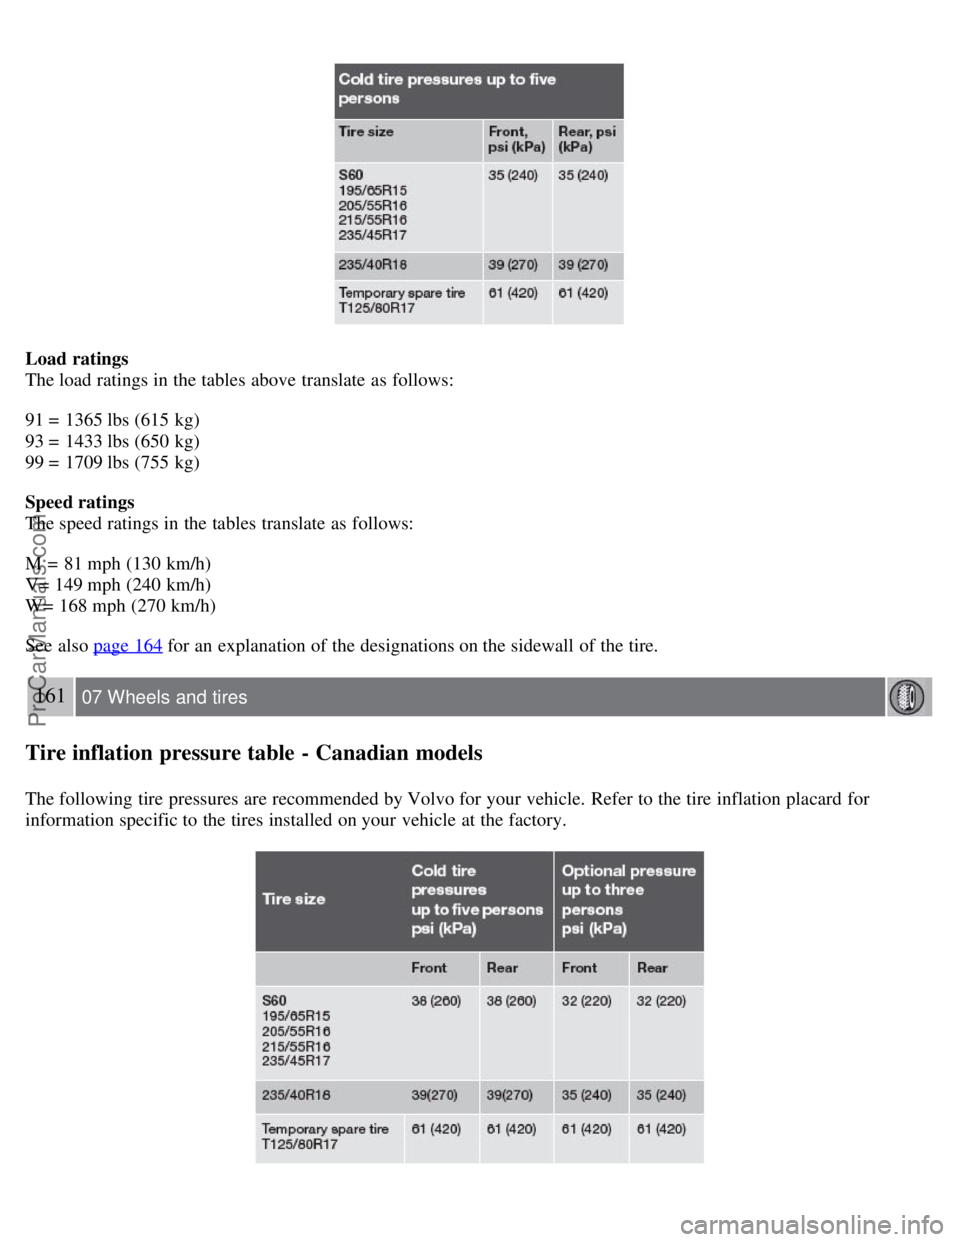
Tire inflation pressure table - U.S. models
The following tire pressures are recommended by Volvo for your vehicle. Refer to the tire inflation placard for
information specific to the tires installed on your vehicle at the factory.
ProCarManuals.com
Page 147 of 230
Load ratings
The load ratings in the tables above translate as follows:
91 = 1365 lbs (615 kg)
93 = 1433 lbs (650 kg)
99 = 1709 lbs (755 kg)
Speed ratings
The speed ratings in the tables translate as follows:
M = 81 mph (130 km/h)
V= 149 mph (240 km/h)
W= 168 mph (270 km/h)
See also page 164
for an explanation of the designations on the sidewall of the tire.
161 07 Wheels and tires
Tire inflation pressure table - Canadian models
The following tire pressures are recommended by Volvo for your vehicle. Refer to the tire inflation placard for
information specific to the tires installed on your vehicle at the factory.
ProCarManuals.com